manuals.online logo
Brands
  1. Home
  2. •
  3. Brands
  4. •
  5. Eaton
  6. •
  7. Industrial Equipment
  8. •
  9. Eaton NZM3-XKCO Series Manual

Eaton NZM3-XKCO Series Manual

This manual suits for next models

7

Other Eaton Industrial Equipment manuals

Eaton NZM2-XAP7 Manual

Eaton

Eaton NZM2-XAP7 Manual

Eaton NZM4-XU Series Manual

Eaton

Eaton NZM4-XU Series Manual

Eaton AT4 Manual

Eaton

Eaton AT4 Manual

Eaton EU1E-SWD Series Manual

Eaton

Eaton EU1E-SWD Series Manual

Eaton COOPER POWER SERIES User manual

Eaton

Eaton COOPER POWER SERIES User manual

Eaton SVC-T3 Manual

Eaton

Eaton SVC-T3 Manual

Eaton NZM3-XDV Series Manual

Eaton

Eaton NZM3-XDV Series Manual

Eaton PXR-RCAM-MRTU-I Manual

Eaton

Eaton PXR-RCAM-MRTU-I Manual

Eaton MTL5500 Series User manual

Eaton

Eaton MTL5500 Series User manual

Eaton DILM XSP/E(RDC48) Series Manual

Eaton

Eaton DILM XSP/E(RDC48) Series Manual

Eaton DMM-125 Series Manual

Eaton

Eaton DMM-125 Series Manual

Eaton Cutler-Hammer ATC-300 User manual

Eaton

Eaton Cutler-Hammer ATC-300 User manual

Eaton Digitrip Retrofit System Manual

Eaton

Eaton Digitrip Retrofit System Manual

Eaton NZM3-4-XKV70-2 Manual

Eaton

Eaton NZM3-4-XKV70-2 Manual

Eaton Airflex HEVC 5005 User manual

Eaton

Eaton Airflex HEVC 5005 User manual

Eaton Airflex WCB2 Series Installation and operating instructions

Eaton

Eaton Airflex WCB2 Series Installation and operating instructions

Eaton EU1H-SWD Series Manual

Eaton

Eaton EU1H-SWD Series Manual

Eaton PKE12/XTU-SOND50 Manual

Eaton

Eaton PKE12/XTU-SOND50 Manual

Eaton MMX-NET-XA Manual

Eaton

Eaton MMX-NET-XA Manual

Eaton KLV-UP-F Series Manual

Eaton

Eaton KLV-UP-F Series Manual

Eaton HP User manual

Eaton

Eaton HP User manual

Eaton Airflex WSB 11210 Installation and operating instructions

Eaton

Eaton Airflex WSB 11210 Installation and operating instructions

Eaton MEMSHIELD 3 Manual

Eaton

Eaton MEMSHIELD 3 Manual

Eaton Char-Lynn HP30 User manual

Eaton

Eaton Char-Lynn HP30 User manual

Popular Industrial Equipment manuals by other brands

ABB +Q957 user manual

ABB

ABB +Q957 user manual

G.B.C BASIC EDGE 50 instruction manual

G.B.C

G.B.C BASIC EDGE 50 instruction manual

Tronair Batpak 11-6602-1000 Operation & service manual

Tronair

Tronair Batpak 11-6602-1000 Operation & service manual

Pilz PNOZ mi2p Operation manual

Pilz

Pilz PNOZ mi2p Operation manual

Clemco Zero BNP 6012 manual

Clemco

Clemco Zero BNP 6012 manual

Erskine Attachments V-Plow Operator's manual

Erskine Attachments

Erskine Attachments V-Plow Operator's manual

ABB HT610965 Operation manual

ABB

ABB HT610965 Operation manual

Morra MH 540 user manual

Morra

Morra MH 540 user manual

GRIGGIO G 240 P4 instructions

GRIGGIO

GRIGGIO G 240 P4 instructions

Nexen AIR CHAMP HT45 user manual

Nexen

Nexen AIR CHAMP HT45 user manual

WTE V5 installation manual

WTE

WTE V5 installation manual

ABB HT845232 Operation manual

ABB

ABB HT845232 Operation manual

SMC Networks CJP Series Operation manual

SMC Networks

SMC Networks CJP Series Operation manual

JohnDow Industries JDI-AFT58 Operator's manual

JohnDow Industries

JohnDow Industries JDI-AFT58 Operator's manual

IMB MB9016A instruction manual

IMB

IMB MB9016A instruction manual

Clarke CUMB1 Assembly & operating instructions

Clarke

Clarke CUMB1 Assembly & operating instructions

amiad Arkal Spin Klin 2 user guide

amiad

amiad Arkal Spin Klin 2 user guide

Maxima GIUNTOMAX Use and maintenance manual

Maxima

Maxima GIUNTOMAX Use and maintenance manual

manuals.online logo
manuals.online logoBrands
  • About & Mission
  • Contact us
  • Privacy Policy
  • Terms and Conditions

Copyright 2025 Manuals.Online. All Rights Reserved.

Emergency On Call Service:Localrepresentative (http://www.eaton.com/moeller/aftersales) or +49 (0)180 5223822 (de, en)1/3
Electric current! Danger to life!
Only skilled or instructed persons may carry out the
following operations.
Lebensgefahr durch elektrischen Strom!
Nur Elektrofachkräfte und elektrotechnisch unterwiesene
Personen dürfendie im Folgenden beschriebenen Arbeiten
ausführen.
Tension électrique dangereuse!
Seules les personnes qualifiées et averties doivent
exécuter les travaux ci-après.
¡Corriente eléctrica! ¡Peligro de muerte!
El trabajo a continuación descritodebe ser realizadopor
personas cualificadas yadvertidas.
Tensione elettrica: Pericolo di morte!
Solo persone abilitate e qualificate possono eseguire le
operazioni di seguito riportate.
触触电危险!电危险!
只允许专业人员和受过专业训练的人员进行
下列工作。
Электрический ток! Опасно для жизни!
Только специалисты или проинструктированные
лица могут выполнять следующие операции.
en
de
fr
es
it
zh
ru
Instruction Leaflet
Montageanweisung
Notice d’installation
Instrucciones de montaje
Istruzioni per il montaggio
安装说明安装说明
Инструкция по монтажу
03/12 IL01208008Z
(AWA1230-1912, AWA1230-2640)
NZM3(-4)-XKC
+NZM3(-4)-XKCO
+NZM3(-4)-XKCU
NZM3(-4)-XKS
...XKC Pressure Clamp Connector Kits for NZM3 Molded Case Circuit Breakers and Switches
-NA
-CNA
(UL/CSA
models)
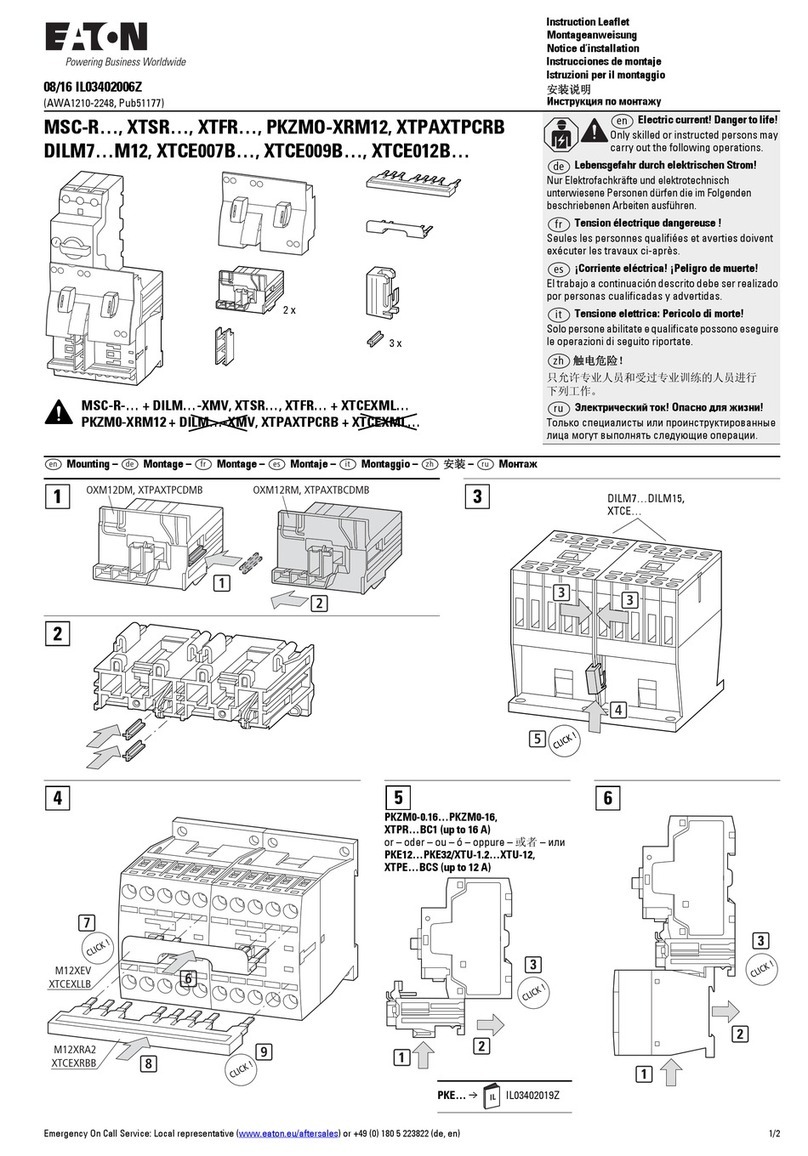
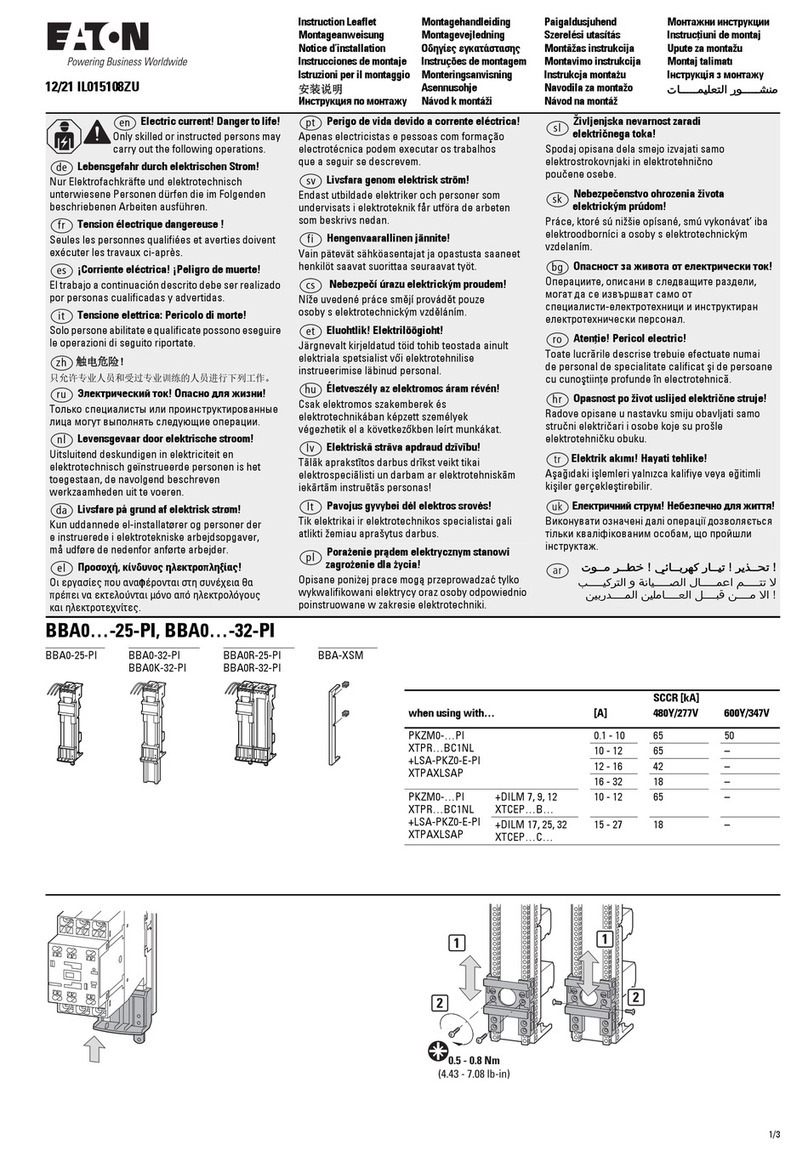
The barrier (shown shaded in the diagrams) is held
tightly into grooves on top and bottom sides of the
breaker or switch and must be removed in order to
mount NZM3-..XKC... pressure clamp connectors and
NZM3-XKSAterminalcover.
To remove:
From the back of the device, use thumb pressure to
push, or an appropriate tool to gently tap each side of
the barrier to help slide it out.
Note:
Do not discard!
It willbe necessary to re-install the barrier once the
XKC connectors are mounted.
Refer to instructions and diagrams which follow.
Caution!
The removal or exchange of parts during mounting may become necessary.
Refer to installation instructions for proper assembly and to maintainelectrical
clearances.
Attenzione!
Per l’esecuzione degli interventi descritti potrebbe essere necessaria la rimozione o
sostituzione di alcuni pezzi. Attenersi alle istruzioni d’installazione per garantire dopo
l’assemblaggio le viedi dispersione necessarie.
Vorsicht!
Für die Durchführung der beschriebenen Arbeiten kann das Entfernen oder
der Austausch von Teilen notwendig sein.
Bitte alle Installations-Anweisungen beachten, um dieerforderlichen Luft- und
Kriechstrecken nach dem Zusammenbauzu gewährleisten.
Attention !
L’enlèvement où l’échange de certaines pièces pendant le montage est parfois
nécessaire. Consultez l’instruction d’assemblagepour assurer une installation
conforme aux normes.
Осторожно!
При проведении описанных процедур может возникнуть необходимость
демонтировать илизаменить детали. Для обеспечения надлежащих зазоров
и вывода тока утечки,соблюдайте все инструкции по монтажу.
¡Atención!
Con el fin de llevar a cabo los trabajos descritos, puede sernecesario eliminar
ocambiar alguna pieza. Le rogamos tenga en cuenta todas las instrucciones de
instalación paraasí garantizar las líneas de fuga y efluvio necesarias tras el montaje.
Removal of XKS Screw termination Connectors
fromNZM3.
Removal of XKSScrew termination Connectors
as shown in the diagrams will enable mounting
of XKC pressure Clamp Connector kits.
push
en it
de zh
fr ru
es
1 2 3
Z 2
8 mm
1
2/3Emergency On Call Service: Local representative (http://www.eaton.com/moeller/aftersales) or +49(0) 180 5223822 (de, en)
03/12 IL01208008Z
4 5 6
12
3
7
8
2 x M6 x 75/25
27 mm
(1.08”)
F25 mm
(F1”)
F16 mm
(F0.64”)
27 mm
(1.08”)
r500 A (400 A UL/CSA models)
f1x35 F1x240 mm2f6x16 x0.8mm
f2x16 F2x120 mm2
f1xAWG 2 F1x500 kcmil
r630 A
10 x24 x1.0 + 5 x24 x1.0
(2 x) 8 x24 x1.0
UL/CSA = Cu only, Ampacity per 75° CTable.
9
27 mm
(1.08”)
9a 9b
21
-XSTK
Emergency On Call Service:Localrepresentative (http://www.eaton.com/moeller/aftersales) or +49 (0)180 5223822 (de, en)3/3
03/12 IL01208008Z
Eaton Industries GmbH, Hein-Moeller-Straße 7-11, 53115 Bonn, Germany
©2000 by Eaton Industries GmbH, www.eaton.com/moeller/support All Rights Reserved
03/12 IL01208008Z 10055608/DE17 DHW/DM
Printed in Germany (04/12)
-NA, -CNA
(UL/CSA models)
NZM3(-4)-XKS
It is necessary to re-install
the barrier to maintain
proper electrical clearances!
XKC aXKS
Removal of XKC Pressure clamp connectors to re-install XKS Screw terminations.
Removal of XKC pressure clamp connector kits will enable re-installation
of XKSscrew termination connectors.
Follow diagramsin this instruction sheet in reverse order to remove the XKC
pressure clamp connectors and proceed as shown above to re-install XKS screw terminations.
-NA, -CNA
(UL/CSA models)
It is necessary to re-install
the barrier to maintain
proper electrical clearances!
10
Z 2
1.2 Nm
(11 lb-in)
11
5 mm
19 Nm
(168 lb-in)
12 13a
push
ON
3
1
8 mm
31 Nm
(275 lb-in)
13b 13c
Z 2
1.2 Nm
(11 lb-in)
push