Sonix Mute Technical Manual
9SONIX MUTE TECHNICAL MANUAL TM376 / A June 2022 www.eaton.com
5 Installation and connectivity
The Sonix Mute unit is intended to be installed on the
100 V line, between the 100 V audio source (amplier)
and a loudspeaker. The two variants of the unit; Sa and
Ex, will have slightly different connection requirements.
ote:N 100 V Line cables should be, where possible, routed within the
PA/GA system in a separate way to avoid contact with signal, audio or
power cables and reduce the possibility of interference.
For the purpose of this manual, an Eaton MEDC
DB4B loudspeaker has been used as an example for
connecting to the Sonix Mute unit, but any 100 V line
loudspeaker can be used. For attenuated output a
loudspeaker with multiple 100 V line transformer tapping
is recommended.
Similarly, Sonix Hmi-26 and Sonix Hmi-Tu units have
been used for illustrative purposes, but any access
panel with mute and/or attenuate output functionality
capable of generating 10 V dc can be used. For details
on functionality and connections please refer to relevant
product manuals.
ote:N Unit must be securely mounted to ensure it does not become
dislodged during operation
5.1 Sonix Mute Sa
5.1.1 Physical installation
The Sonix Mute Sa is a small plastic unit with four ⌀6.0
mm mounting holes. It is designed to mounted in any
orientation, but care should be taken to avoid potential
water traps.
Figure 2 - Sonix Mute SA mounting
Item Purpose
1Mute control connection
2100 V Speaker out
3100 V Line In
4100 V Line Out
5100 V Speaker return (Optional)
Table 2 - Sonix Mute SA ports
ote:N Unit must be securely mounted to ensure it does not become
dislodged during operation.
5.1.2 Glanding
The Sonix Mute SA unit is supplied with 5off M20
glandentries complete with IP65 rated blanking plugs.
Cable glanding should be completed using suitably rated
M20 glands.
Warning: Un-used entries must be blanked off
with IP65 or better rated blanking plugs.
Warning: All glands and blanking plugs
must be tightened fully and installed as per
manufacturer’s recommended procedure.
ote:N Unit does not need to be earthed and does not contain an
earthing point.
5.1.3 Electrical connections (Sonix Mute Sa)
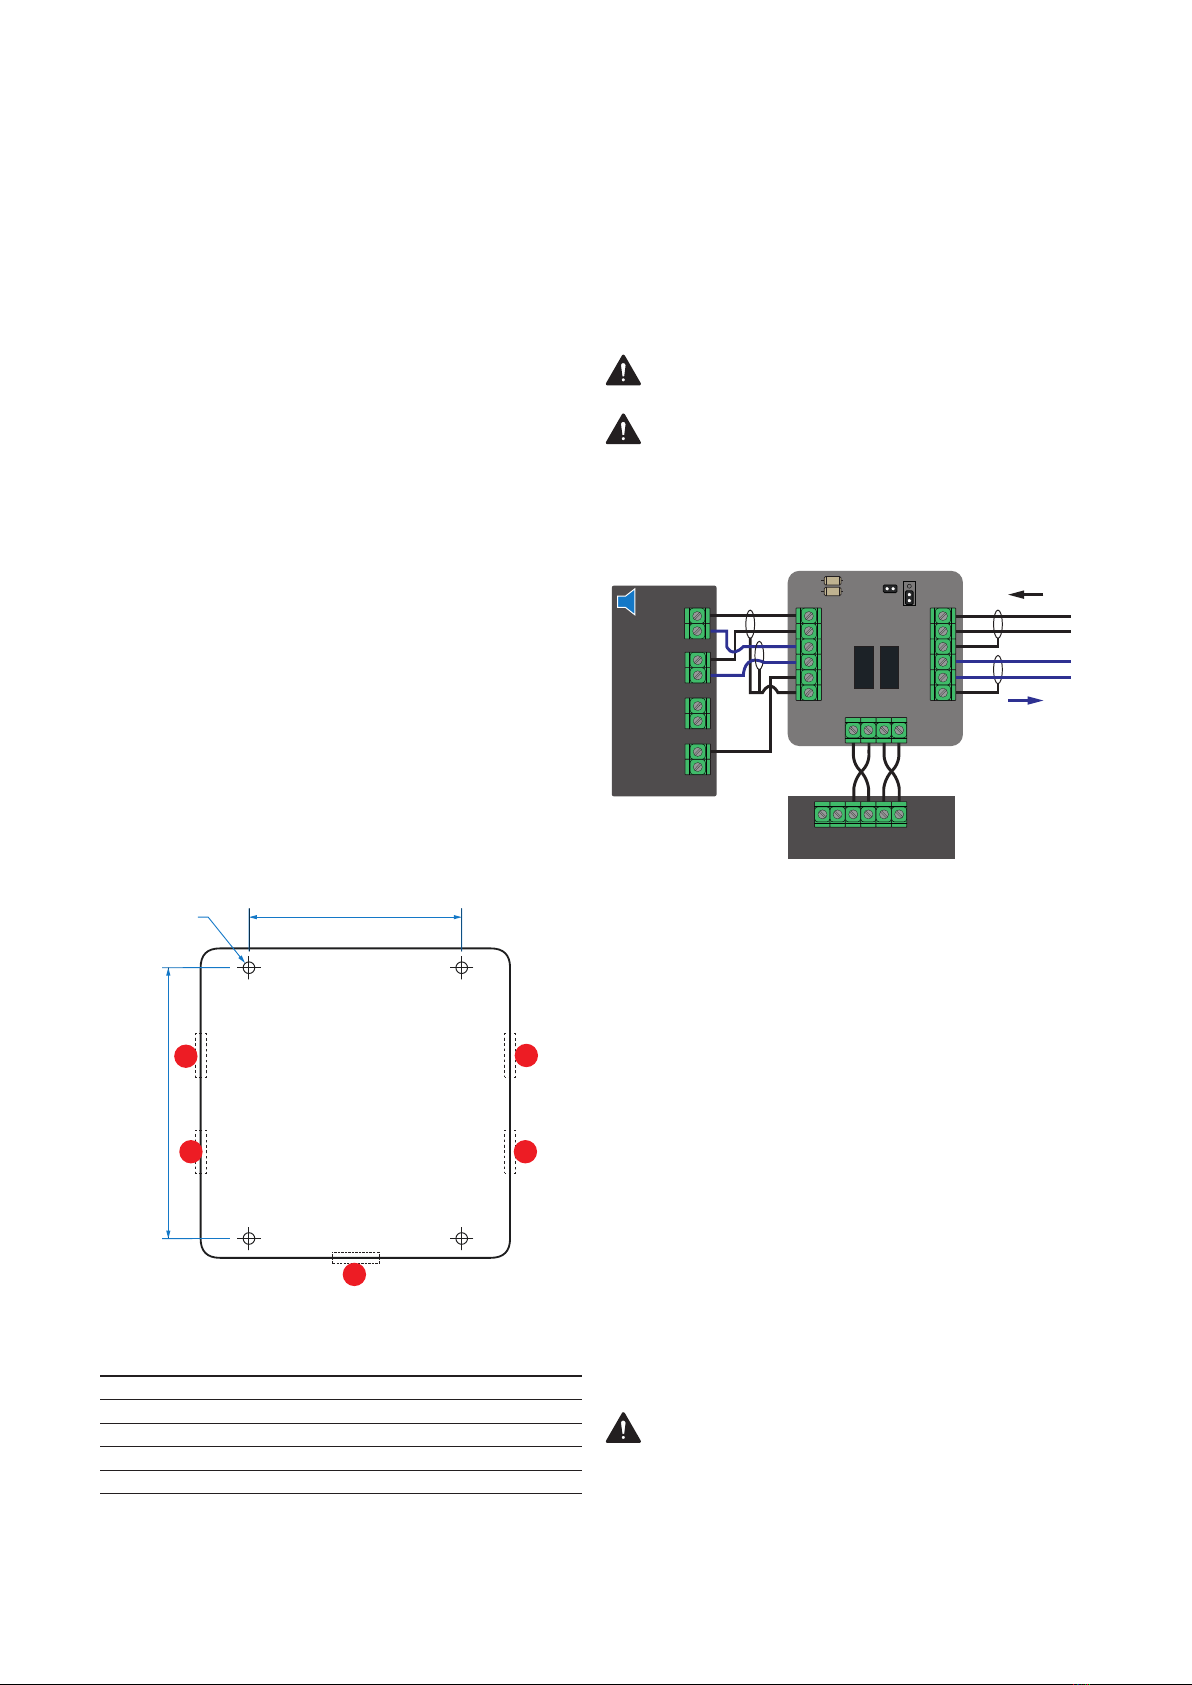
Figure 3 - Connecting Sonix Mute unit in Safe Area
5.1.3.1 100V line connections
The incoming 100 V Line cables are to be terminated
in ‘Speaker Loop In’ terminals: TS3/1 and TS3/2, with
overall screen wired into TS3/3 terminal. Outgoing 100
V line cables should be terminated in the ‘Speaker Loop
Out’ terminals: TS3/4 and TS3/5, with screen connected
to TS3/6 terminal.
ote:N 100 V Line loop output is an optional connection if unit is at the
end of a spur.
On the opposite side of the unit, the speaker is
terminated into the Loudspeaker Out terminals: TS5/1
and TS5/2. These are connected to the intended tapping
of the speaker’s 100 V Line transformer, as used in
normal conditions for full volume. Wires coming back
from the speaker are terminated in the Loudspeaker
In terminals: TS5/3 and TS5/4. This completes the
100 V Line loop, and if the Sonix 350-d is used, both
Loudspeaker In and Speaker Loop Out are a required
connection for passing the loop continuity test (see
“Sense Test” in Sonix 350-d and SAS product manuals
for details).
Warning: When used as part of a 100 V line
loudspeaker loop, there MUST be an effective
loop back on the speaker output terminals TS5/1
to TS5/3 and TS5/2 to TS5/4. This can be either
inside the unit or at the loudspeaker terminals.
TS5/6 screen terminal is shared for both Loudspeaker In
and Loudspeaker Out cables.
1
23
4
5
1
23
C
M
Y
CM
MY
CY
CMY
K
ai165231413011_Sonix Mute Technical Manual Pictograms.pdf 2 12/05/2022 01:08
Mute Attenuate
1 (-) 2 (+) 3 (-) 4 (+)
6
(-5V)
5
(+5V)
4
(-5V)
3
(+5V)
21
J2-J5
HMi-tu /
J9-J10
HMi-26
Mute
Sonix HMi-Tu / HMi-26
Attenuate
MEDC DB4B
100V Line
100V Line
100V Line
Junction
Box
Mute Attenuate
1 (-) 2 (+) 3 (-) 4 (+)
6
(-5V)
5
(+5V)
4
(-5V)
3
(+5V)
21
J2-J5
HMi-tu /
J9-J10
HMi-26
Mute
Attenuate
MEDC DB4B
100V Line
C
M
Y
CM
MY
CY
CMY
K
ai165231413011_Sonix Mute Technical Manual Pictograms.pdf 1 12/05/2022 01:08