EBS EBS 2600 User manual

INDUSTRIAL „INK‑JET” PRINTER
EBS 2600
2020/01/09#1.1EN
USER MANUAL

EBS 2600User ManUal
2020/01/09#1.1EN
2 of 113
1. Preliminary information 7
1.1. resPonsibility 7
1.2. safety rules 8
1.3. incase of accident 9
1.4. fire Protection 9
1.5. Working conditions 9
1.6. aPPlication 9
1.7. comPliance With standards 9
2. comPonents of Printer system 11
3. PreParing the Printer for oPeration and setting basic Parame-
ters 13
3.1. mechanical installation of the Printer in aWorkPlace 13
3.2. first start-uP 14
3.3. controlling abelt conveyor 14
3.4. oPerating the touch screen 15
3.4.1. lcd keyPad 16
3.5. sWitching the Printer onand off 17
3.5.1. sWitching the Printer on17
3.5.2. sWitching the Printer off 18
3.5.3. logging in19
3.6. rePlacing an ink bottle 19
3.6.1. changing the tyPe and/or color of ink 21
3.7. ink level in bottle 21
3.8. general settings 22
3.9. date and time settings 24
3.10. sound settings 25
3.11. disPlay Parameters settings 26
3.12. user manager 26
3.13. Wired communication betWeen the Printer and acomPuter 27
Table of ConTenTs

EBS 2600 User ManUal
2020/01/09#1.1EN 3 of 113
3.13.1. direct connection With acomPuter 28
3.13.2. connection With the ethernet 29
3.14. connecting usb disc to the Printer 30
3.14.1. imPorting Projects 30
3.14.2. exPorting Projects 31
3.14.3. uPdating softWare 31
3.15. messages 33
3.16. statistics 34
4. getting started 34
4.1. oPerating the Printer via Printer touch screen 34
4.1.1. file manager 34
4.1.2. creating aneW Project 36
4.1.3. oPening and editing aProject 36
4.1.4. Project Processor 37
4.1.4.1. Project ProPerties 38
4.1.4.2. List of objects 39
4.1.4.3. cLiPboard 40
4.1.4.4. trash 40
4.1.4.5. objects 41
4.1.4.5.1. rePositioning an object 42
4.1.4.5.2. re-sizing an object 42
4.1.4.5.3. common Parameters of objects 43
4.1.4.5.4. text object – normaL text 45
4.1.4.5.5. text object – date/time 45
4.1.4.5.6. text object – counter 48
4.1.4.5.7. text object – communications Port 50
4.1.4.5.8. text object – text fiLe 54
4.1.4.5.9. shaPe-tyPe object – Line 55
4.1.4.5.10. shaPe-tyPe object – rectangLe 56
4.1.4.5.11. shaPe-tyPe object – eLLiPse 57
4.1.4.5.12. barcode 57
4.1.4.5.13. image 59
4.1.5. Printing Parameters 60
4.1.6. Project recovery 63
4.1.7. service 64
4.1.7.1. Purging 64
4.1.7.2. usb 66
4.1.7.3. unLocking oPtions 66
4.1.7.4. restoring PreLiminary settings 67

EBS 2600User ManUal
2020/01/09#1.1EN
4 of 113
4.1.7.5. information 68
4.2. oPerating the Printer via mozilla firefox Web broWser 68
4.2.1. logging in68
4.2.2. Work screen of ebs Web user interface 68
4.2.3. file manager 69
4.2.4. Projects 69
4.2.4.1. create new Project 69
4.2.4.2. oPen and edit aProject 70
4.2.4.3. imPort Project 71
4.2.4.4. exPort Project 71
4.2.4.5. Project Processor 72
4.2.4.6. Printing Parameters 75
4.2.4.7. objects 78
4.2.4.7.1. common Parameters of objects 78
4.2.4.8. text object – normaL text 79
4.2.4.9. text object – date/time 80
4.2.4.10. text object – counter 83
4.2.4.11. text object – communications Port 84
4.2.4.12. text object – text fiLe 88
4.2.4.13. image 89
4.2.4.14. barcode 90
4.2.4.15. shaPe-tyPe objects 91
4.2.4.15.1. shaPe-tyPe object – Line 91
4.2.4.15.2. shaPe-tyPe object – rectangLe 92
4.2.4.15.3. shaPe-tyPe object – eLLiPse 92
4.2.4.16. objects List 93
4.2.4.17. cLiPboard 93
4.2.4.18. trash 94
4.2.5. tools 94
4.2.5.1. images manager 94
4.2.5.2. fonts manager 95
4.2.5.3. text fiLes manager 95
4.2.5.4. users manager 96
4.2.5.5. Printers network manager 97
4.2.5.6. Language manager 98
4.2.5.7. account management 98
4.2.5.8. worksPace width 98
4.2.5.9. simuLate Printout 99
4.2.5.10. Printout cost 99
4.2.6. settings 99
4.2.6.1. generaL settings 99

EBS 2600 User ManUal
2020/01/09#1.1EN 5 of 113
4.2.6.2. conveyor Parameters 100
4.2.7. service 101
4.2.7.1. uPdate 101
4.2.7.2. Log 101
4.2.7.3. generate service rePort 101
4.2.7.4. instaLL oPtion 102
4.2.7.5. Lcd Preview 102
4.2.8. Printer control 102
4.2.9. info 103
4.2.9.1. about 103
4.2.9.2. oPerating statistics 103
4.2.10. messages 103
5. Printing 104
5.1. oPening Project for Printing 104
5.1.1. oPening aProject for Printing via Printer lcd 104
5.1.2. oPening aProject for Printing via Web broWser 104
5.2. Printing aProject 105
5.2.1. Printing aProject via Printer lcd 105
5.2.2. Printing aProject via Web broWser 105
6. maintenance, storage and transPort 105
6.1. Periodic maintenance 105
6.2. venting the Printhead 107
6.3. storing the Printer 107
6.4. transPorting the Printer 107
7. Problems With functioning and oPeration of the Printer 108
7.1. the Printer does not start 108
7.2. the Printer does not Print in sPite of the start Printing command 108
7.3. a Print is crooked, Wavy or jagged 108
7.4. certain vertical columns are missing in aPrint 109
7.5. a Print is distorted 109
7.6. some of the nozzles do not jet ink 109
7.7. boldfaced or blurred Prints 109
7.8. Questions and Problems 110

EBS 2600 User ManUal
2020/01/09#1.1EN 7 of 113
Dear User,
This Manual contains very useful informaon on how to operate your Print-
er. Please read this Manual carefully.
This manual applies to Oine EBS Web User Interface (Oine WUI) in version 1.6.4 and the
EBS 2600, printers equipped with the control system in version 1.02.45. In order to view the
printer system version go to:
- On the printer LCD: Tools – Service – Informaon – System,
- In EBS Web User Interface (WUI): Info – About – System version.
The product delivered to you corresponds to your specic order, and it may happen that the op-
ons and funconality of your prinng system dier from some descripons or illustraons. As
we need to keep pace with new technological advancement and wish to meet individual require-
ments of our clients, we reserve the right to introduce changes in the design and construcon as
and when necessary. Therefore, claims cannot be made regarding dierences to data, illustraons
or descripons contained in this manual. Should your printer be equipped with opons or so-
ware that are not illustrated or described in this manual or should you have addional queries
aer having read the manual, please contact any EBS Ink Jet Systeme authorized representave
oce for more informaon.
The manufacturer shall not be liable for any damages to the printer resulng from failure to follow
the instrucons or from consequences of editorial or publishing errors contained in this manual.
The applicaon and use of the products are beyond our control and are under full responsibility of
the user.
This document has originally been drawn up in English. Any other language versions are transla-
ons from the original version. Should any discrepancies occur, the English language version shall
prevail.
1. Preliminary information
The following symbols are used in the manual.
Addional informaon on a given subject. a supplement or a reference to the text where more details
can be found.
An important note or p.
It is advisable to strictly follow the ps.
The part numbers quoted in this document are the same for every gure and every descripon given
in this document.
1.1. resPonsibility
EBS Ink Jet Systeme shall not be responsible for damage or personal injuries that might occur

EBS 2600User ManUal
2020/01/09#1.1EN
8 of 113
during installaon, operaon or maintenance of the EBS Ink Jet Systeme printers due to the fail-
ure to follow the safety instrucons and also the good manufacturing pracces and safety stan-
dards generally established in the industry.
Every user who modies or repairs the EBS Ink Jet Systeme printers using consumables, spare
parts or accessories other than those supplied by EBS Ink Jet Systeme or inconsistent with
the EBS Ink Jet Systeme specicaons shall bear exclusive responsibility for such behavior.
EBS Ink Jet Systeme shall not be responsible for any failures or damage caused by modicaons
to the printer or by the applicaon of the printer to other purposes than those the printer is
designed for. The user shall be responsible for ensuring that any required precauons are taken
each me the EBS Ink Jet Systeme printer is used.
The EBS Ink Jet Systeme consumables, spare parts and accessories are designed for use in the
EBS Ink Jet Systeme printers. The applicaon of consumables, spare parts and accessories not
manufactured or recommended by EBS Ink Jet Systeme for use with a parcular printer may
cause printer malfuncon or lead to printer damage, and it always results in loss of the right to
warranty claims.
The EBS Ink Jet Systeme printers are tested together with EBS Ink Jet Systeme consumables
and spare parts according to the relevant safety regulaons and standards, therefore any use of
consumables and spare parts other than those supplied by EBS Ink Jet Systeme may distort the
test condions and aect the conformity of the printer with certain standards. The user shall bear
all risks involved with the use of improper consumables and spare parts.
1.2. safety rules
Before using the EBS 2600 printer read carefully the consumable data sheets.
No eorts have been spared to design the printer diligently so that its operaon is safe and re-
liable. However, the knowledge and observance of a few safety rules and precauons are the pre-
requisite for safe use of the printer.
The printer should be operated by trained personnel. It is recommended that the printer be super-
vised during operaon.
Any service operaons, in parcular:
‑ installaon and removal of the printer,
‑ the operaons that involve opening or removing any of the printer’ protecve covers, must be
performed exclusively by the manufacturer’s authorized service point or by a user trained in such
operaons by the manufacturer’s authorized representaves.
– Do not print on objects whose temperature exceeds 100°C (212°F) at the me of labeling.
– Make any manipulaons in the electrical part of the printer only when the power is turned
o.
– Do not direct the printhead outlet towards persons or animals.
– Wear protecve clothing and goggles while performing any operaons in the ink system and
the printhead.
– Do not use plasc vessels for washing. Drip pans of metal are recommended.
– If you need to disconnect the printer from the electrical mains, take out power plug form the
mains socket 13 (see Fig. 1 (p. 11)).

EBS 2600 User ManUal
2020/01/09#1.1EN 9 of 113
1.3. incase of accident
When ink spills, wipe the spilled liquid with absorbent material and dispose of it following the re
and health and safety at work regulaons.
Take the splashed clothes o as soon as possible.
If eyes or skin get irritated:
–EYES need rinsing with running water over 15 minutes; then contact an ophthalmologist,
–SKIN needs washing with water and soap.
1.4. fire Protection
The instrucons described in the data sheets for every ink or solvent should be followed strictly.
– Place a re exnguisher (designed for exnguishing electrical equipment and ammable sol-
vent res) near the printer.
– Do not print in the areas where an explosion hazard exists.
– Do not use open ames or sparking devices in the printer work area.
– Do not leave ink, solvent or wash-up in open containers.
– Before coming close to ammable liquids touch a grounded metal object (e.g. the grounded
printer housing).
– Ensure good venlaon in the area where the printer is installed (especially near the print-
head) and where consumables are stored.
1.5. Working conditions
– Connect the printer to an electric outlet equipped with protecve grounding.
– Supply voltage: 100 ‑ 240 VAC, 50/60 Hz.
– Working temperature: +5 ‑ +40 ºC (+41 ‑ +104 ºF).
– Relave humidity: up to 80% without condensaon.
1.6. aPPlication
The EBS 2600 printer is designed for marking and labeling arcles moving on the conveyor belt,
for example, and for pung prints and simple graphics on such arcles.
Prints are put on arcles with the applicaon of the INK-JET method.
1.7. comPliance With standards
The manufacturer declares with its full responsibility that when installed and operated in com-
pliance with the manufacturer’s instrucons, the EBS 2600 printer together with its manufac-
turer-supplied accessories meet the essenal requirements and other relevant provisions of the
following European Union Direcves:
– 2014/53/EU,
– 2011/65/EU

EBS 2600User ManUal
2020/01/09#1.1EN
10 of 113
and meet the following harmonized standards:
Standard RED Direcve reference
– EN 60950‑1:2006 + A11:2009 +
A1:2010 + A2:2013,
– EN 50364:2010,
– EN 62369‑1:2009
The protecon of health and safety of persons and
of domesc animals and the protecon of proper-
ty - with reference to Art. 3, par. 1 a)
– ETSI EN 301 489‑1 V2.1.1:2017,
– ETSI EN 301 489‑3 V2.1.1:2017,
– EN IEC 61000‑6‑2:2019
Note: The exposure severity levels
applied during EMC immunity tesng
met the EN 61000-6-2 for industrial
environment)
– EN 61000‑6‑4:2007 + A1:2011,
– EN 55022:2010 + AC:2011,
– EN 61000‑3‑2:2014,
– EN 61000‑3‑3:2013,
– EN 61000‑4‑2:2009,
– EN 61000‑4‑3:2006 + A1:2008 +
A2:2010,
– EN 61000‑4‑4:2012,
– EN 61000‑4‑5:2014 + A1:2017,
– EN 61000‑4‑6:2014,
– EN 61000‑4‑11:2004 + A1:2017,
– EN 61000‑4‑20:2010,
– EN 55016‑2‑1:2014 + A1:2017,
– EN 55016‑2‑3:2010 + A1:2010 +
A1:2014
The protecon requirements with respect to elec-
tromagnec compability - with reference to Art.
3, par. 1 b)
– ETSI EN 300 330 V2.1.1:2017
Eecve use and support the ecient use of
radio spectrum in order to avoid harmful interfer-
ence - with reference to Art. 3, par. 2
Therefore the EBS 2600 printer will bear the mark:
The EBS 2600 printer is class A equipment as dened by EN 55022:2010 + AC:2011 (industrial
environment). In a domesc environment it may cause radio interference in which case the user
may be required to take adequate counter measures.

EBS 2600 User ManUal
2020/01/09#1.1EN 11 of 113
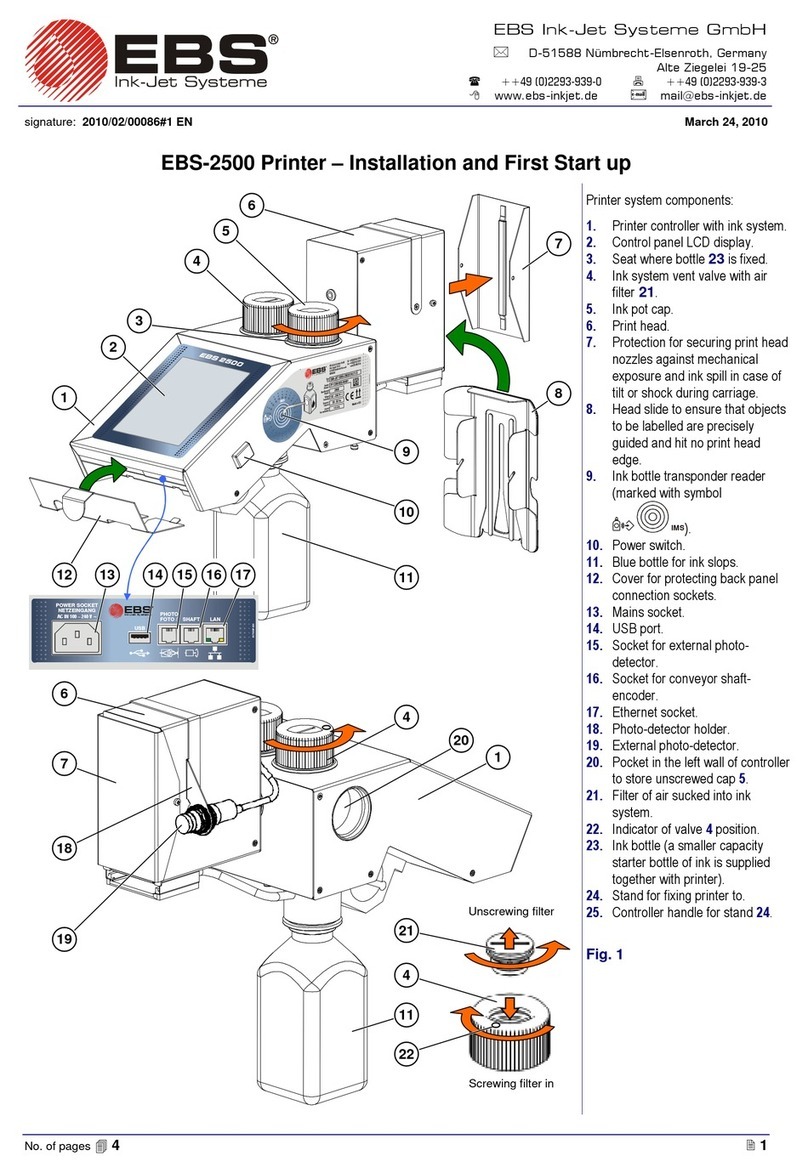
2. comPonents of Printer system
1
2
3
5
7
8a
8b
4
6
9
10
11
12
13 14 15 16 17
18
19
20
6
5
21
22 23
1
24
11
5
28
25
Fig. 1.
4

EBS 2600User ManUal
2020/01/09#1.1EN
12 of 113
1
6
7
11
19
20 21
22 23
26
27
28
VERTICAL
HORIZONTAL
Fig. 2.
1Printer controller with ink system
2Control panel LCD display
3Seat where bole 26 is xed
4Ink pot cap
5Ink system vent valve with air lter 24
6Print head
7Head slide for ensuring that objects to be labeled are precisely guided and hit no printhead
edge
8a Protecon for securing print head nozzles against mechanical exposure and ink spill and
8b guer for draining out ink during purging
9Ink bole transponder reader
10 Power switch
11 Blue bole for ink slops
12 Cover for protecng back panel connecon sockets
13 Mains socket
14 USB port
15 Socket for external photo-detector
16 Socket for conveyor sha-encoder
17 Ethernet socket
18 Nozzle plate – printhead face (ink outlet)
19 Photo-detector holder

EBS 2600 User ManUal
2020/01/09#1.1EN 13 of 113
20 Internal photo-detector
21 RS-232/RS-485 connector
22 Beacon connector
23 Seat for storing unscrewed cap 4
24 Filter of air sucked into ink system
25 Indicator of valve 5 posion
26 Ink bole (a smaller capacity starter bole of ink is supplied together with printer)
27 Stand for xing printer to
28 Controller handle for stand 27
3. PreParing the Printer for oPeration and setting basic Parame-
ters
Posion the printer in a place that is free from vibraon, shocks, excessive dust, smoke and dirt as
well as from aggressive or inammable vapors and gases.
If the printer is to be operated in a heavily dusty or contaminated environment, please consider
whether an addional lter should be used in order to protect vent valve 5 or whether a cover al-
lowing free airow should be installed (ask your dealer for oponal accessories).
The mechanical parameters and ambient condions should meet the requirements given in 8.4.
Working condions (p. 111).
3.1. mechanical installation of the Printer in aWorkPlace
See Fig. 1 (p. 11) and Fig. 2 (p. 12).
To prepare a new printer for operaon, perform the following operaons:
1. Take all system components out of the package.
The printer must not be lted in any direcon by a greater angle than 30° during installaon
and operaon.
2. Install the printer stand in a convenient posion. If the printer stand is screwed to a conveyor
whose oscillaon and vibraon are too strong, fasten the printer to a stable rack or wall that
is not linked to the conveyor.
3. Fasten the printer to the stand. The printer should be installed and operated in the posion
where the top surface of the housing of controller 1 is the horizontal, whereas the printhead
face is the vercal.
The EBS 2600 printer can work in a horizontal posion only.
4. Install internal photo-detector 20 in holder 19 on print head 6 or in any other place that will
allow you to release prinng conveniently within the reach of photo-detector cable. The
holder can be put on the other side of the head, if need be, by unscrewing the holding down
bolts and reversing the holder 19.
5. Fix an external photo-detector (oponally) in a required place and aach it to connecon socket 15.

EBS 2600User ManUal
2020/01/09#1.1EN
14 of 113
6. Install a conveyor speed converter, a so called sha-encoder (oponally) in a convenient
place on the conveyor on which arcles to be labeled will move, so that the converter is driv-
en by the conveyor. Connect the sha-encoder to socket 16.
7. Remove protecon 8a, which secures the printhead nozzles during transport against me-
chanical exposure and ink spillage in case of lt or shock. Screw in head slide 7 in place of the
protecon.
The use of the slide is obligatory and vital for the proper operaon of the printer.
8. Connect the controller feeder cable to socket 13 and to a mains socket.
9. Install cover 12 to secure the back panel connectors.
10. Screw blue bole 11 to the printer boom to collect ink slops.
11. Remove protecve lm from panel LCD 2.
3.2. first start-uP
See Fig. 1 (p. 11).
1. Unscrew air lter 24, which is inside vent valve 5, and check whether it is clean or not. If it is
dirty, clean it (see 6.1. Periodic Maintenance (p. 105)). Re-install the lter.
2. Open valve 5 (marker 25 on valve 5 should be in the PRINTING posion).
3. Unscrew cap 4 out of sea 3 carefully (the direcon of unscrewing is shown in Fig. 1 (p. 11))
and remove it. Put the unscrewed cap 4in seat 23 which is on the le-hand side of the con-
troller.
4. Remove the aluminium foil that protects the cap of starter bole 26.
5. Screw the starter bole into bole seat 3. No turning of the bole upside down makes ink
spill as the bole is equipped with a protecve valve.
6. Screw in blue bole 11 to the printer boom for collecng waste ink.
7. Start up the printer – see 3.5.1. Switching the Printer On (p. 17).
8. Follow the purging procedure to remove air from the printer – see 4.1.7.1. Purging (p. 64).
When the printer is started up for the rst me (e.g. aer the printer has been delivered),
a full, long purging procedure should follow. The amount of ink contained in the starter bole
is sucient enough to do the rst full purging of the printer.
9. Replace the starter bole with a target ink bole – see 3.6. Replacing an Ink Bole (p. 19).
10. Do the short-lasng purging to remove air from the printer – see 4.1.7.1. Purging (p. 64).
11. Set a conveyor-belt travel speed – see 3.8. General Sengs (p. 22).
12. Prepare a project – see 4.1.4. Project Processor (p. 37) and set prinng parameters – see
4.1.5. Prinng Parameters (p. 60).
13. Make a few test prints. If print quality is unsasfactory, repeat the purging procedure.
3.3. controlling abelt conveyor
The EBS 2600 printer can work with an addional, oponal beacon, an alarm signaler, which
works with the ALARM/STOP module to control conveyor operaon. With the module, the
conveyor belt can stop moving as soon as a fatal error occurs and the alarm makes further print-
ing impossible (or as soon as prinng is paused intenonally), and then belt movement can be
restarted manually and prinng can be resumed at the same me.

EBS 2600 User ManUal
2020/01/09#1.1EN 15 of 113
The alarm signaler or ALARM/STOP module shall be connected to socket 22.
For more informaon on the subject see the separate document entled Controlling a Factory
Conveyor.
3.4. oPerating the touch screen
The main screen of the printer consists of the following elements:
G
A B C D E F
H
I
J
K
LM
N O P
status bar
project window
menu bar
status bar
APrinng status – see 5.2.1. Prinng a Project via Printer LCD (p. 105)
BMessages containing the informaon on printer operaon (the icon displayed when
the messages are available) – see 3.15. Messages (p. 33)
CPendrive/USB disc status (the icon is not displayed, when the disc is not connected
to the printer) – see 3.14. Connecng USB Disc to the Printer (p. 30)
DInk container status – see 3.7. Ink Level in Bole (p. 21)
EThe current me of the printer and the date and me sengs – see 3.9. Date and
Time Sengs (p. 24)
FSwitch the printer o and then on again and log out the user – see also 3.5.2. Switch-
ing the Printer O (p. 18)

EBS 2600User ManUal
2020/01/09#1.1EN
16 of 113
project window
GOpen a project to be printed
HEdit a project to be printed and prinng parameters of that project
IProject name (if the name is in green, the project is ready for prinng)
JSelect projects to be printed, from the same folder
KProject number in the folder / the number of projects in the folder
LPreview a project to be printed
M
Save the proj-
ect parameters
modied
If a modicaon is not saved, the project can be printed with
the modied parameter only unl a new project is opened or the
printer is switched o
menu bar
NCreate a new project and edit an exisng project – see 4.1.2. Creang a New Project
(p. 36) and 4.1.3. Opening and Eding a Project (p. 36)
O
Set the language, date and me format (3.8. General Sengs (p. 22)), sound (3.10.
Sound Sengs (p. 25)), display (3.11. Display Parameters Sengs (p. 26)), users
(3.12. User Manager (p. 26)), network (3.13. Wired Communicaon between the
Printer and a Computer (p. 27)), and service opons – see 4.1.7. Service (p. 64)
PEnable and disable prinng – see 5.2.1. Prinng a Project via Printer LCD (p. 105),
rinse the nozzles – see also 4.1.7.1. Purging (p. 64)
Make sure that the edges of the housing are not touched while LCD buons are being touched
on the screen touch – this may disrupt the detecon of a touch.
3.4.1. lcd keyPad
The on-screen keypad can be used for changing the sengs of parameter and inpung text
les from the printer touch screen (LCD) level. It is displayed on the LCD display aer a given
parameter eld has been chosen, while the password is being typed in during logging in opera-
on or while a text is being input to a project.
The keypad contains a full set of Lan leers and a set of digits; moreover it also contains

EBS 2600 User ManUal
2020/01/09#1.1EN 17 of 113
special buons:
to move the cursor ( are available for the keypads that are displayed while
mulple-line text objects are being edited)
to shi between small leers to capital leers and the other way round
to shi between leers and punctuaon marks and the other way round
to convert the Lan leers into Chinese characters (mode of input: pinyin) and the
other way round (the buon is available aer the buon has been touched)
to convert the Lan leers into Cyrillic leers and the other way round (the buon
is available aer the buon has been touched)
to convert leers into special symbols and the other way round
ENTER – to move to the following line
to delete the character that is on the le of the cursor
to delete an enre text (to clear the edit eld)
to undo deleon (the buon is available aer the buon has been touched)
to move back to the previous display
to conrm that you want to input a text you have typed in (the buon is available
aer you have started typing in)
to abandon inpung a text (the buon is available aer you have started typing in)
Moreover, diacrical characters are hidden under certain buons (the are available aer a giv-
en buon has been touched and held on).
3.5. sWitching the Printer onand off
See Fig. 1 (p. 11).
3.5.1. sWitching the Printer on
Press buon 10, which is on the right-hand side of printer controller 1. The printer is ready for
operaon when the main screen is displayed (in about 30 s from the switching on).

EBS 2600User ManUal
2020/01/09#1.1EN
18 of 113
When the printer is switched on, you can move to print a text le from printer memory.
3.5.2. sWitching the Printer off
The printer can be switched o in two ways:
– By means of the (F) buon on the printer touch screen 2.
– Remotely, with EBS Web User Interface available via a Web Browser, by means of the
buon.
When the (F) buon is touched, the window containing the following opons is displayed
on the printer touch screen and also in EBS Web User Interface:
to switch o promptly aer the buon is touched
to switch o and restart the printer
to log out the current user and display the log in display – see 3.5.3. Logging In
(p. 19)
The switching o is done properly, when screen 2 switches o. It can also be signaled with an
audible signal (see 3.10. Sound Sengs (p. 25)).

EBS 2600 User ManUal
2020/01/09#1.1EN 19 of 113
In an emergency situaon, when the above menoned ways of printer switch o turn out inef-
fecve or when the printer needs to be switched o immediately, you can do that by holding
buon 10 over a minimum of 4 second.
Aer emergency switch o the sengs of the printer counters and unsaved projects are lost.
If the emergency switch o occurs too frequently, it may lead to printer damage (e.g. damage
to the le system).
3.5.3. logging in
You can be logged in automacally as Administrator by default (the default password is 1).
You can disable automac logging in or change the default account – see 4.1.1. File Manager
(p. 34).
If the current user is logged out with the Logout buon (see 3.5.2. Switching the Printer O
(p. 18)), a list of user is displayed on the printer screen. Aer a user name has been chosen,
a keypad is displayed (see 3.4.1. LCD Keypad (p. 16)) with which to type in the password.
3.6. rePlacing an ink bottle
Every ink bole is equipped with a transponder that stores the informaon on the type of ink and
its date of manufacture. The printer has a built-in circuit that scans the data from the transponder
and thereby it helps check whether the ink used is of the proper quality. The detailed informaon
on ink (the bole ll-in level, the ink color, the type of solvent, the type of dye, the expiraon
date for the ink, the date when the bole has been accepted) is available aer the drop-shape
icon (D) on the main display top bar has been touched.

EBS 2600User ManUal
2020/01/09#1.1EN
20 of 113
Follow the steps below in order to replace an ink bole:
If possible, replace the container in dust‑free condions so as to minimize the amount of contam-
inants geng in to the printer’s ink system. Do not leave the printer with the ink bole detached
for a longer me than that required to replace the bole.
1. Start up the printer – see 3.5.1. Switching the Printer On (p. 17).
2. Put a new ink bole to transponder reader 9 in the way shown on the reader label, for ink
idencaon and validaon. Aer the informaon about the ink has been read, an ink valida-
on message icon is displayed in the top right corner of LCD panel 2 (press the icon to read
the message – see 3.15. Messages (p. 33)). The new bole is validated and the following
message is displayed: (I99000) New ink container successfully accepted..
An ink bole can be subjected to idencaon and validaon only once.
3. Unscrew and remove the consumed ink bole carefully.
4. Tear o the aluminium foil that secures the cap of the new bole.
5. Screw the new bole into bole seat 3. When the bole is turned upside down, no ink spills
because the bole is equipped with a protecve valve.
6. Start the purging procedure – see 4.1.7.1. Purging (p. 64). When it is nished, make a test
print. Keep repeang the purging procedure, if needed be, unl a correct print is made.
While replacing ink boles, check the level of the waste ink in waste-ink bole 11, empty the
waste-ink bole, if need be. Dispose of waste ink in compliance with the waste ink disposal stan-
dard. Avoid overlling the waste-ink bole, as otherwise the sucon pump may get damaged.
Should problems with the validaon of an appropriate and correct bole occur, the service sta
can make temporary validaon of such a bole possible (for 50 hours) – see 4.1.7.3. Unlocking
Opons (p. 66). The informaon on such a temporarily validated bole appears in the form of
the icon (D) on the status bar.
Other manuals for EBS 2600
1
Table of contents
Other EBS Printer manuals

EBS
EBS EBS-1500 SERIES Installation guide

EBS
EBS EBS-6500 Installation guide

EBS
EBS HANDJET -260 User manual

EBS
EBS EBS 2600 User manual

EBS
EBS EBS-6100 User manual

EBS
EBS HANDJET -260 User manual

EBS
EBS 2500 Instruction sheet

EBS
EBS HandJet 250 User manual

EBS
EBS 6600 Technical specifications

EBS
EBS HandJet 250 User manual