EBS HANDJET -260 User manual

Operating Manual
version: 20140704#1.0
EN
English
HANDJET®EBS-260

2EBS Ink Jet Systeme 20140704#1.0
EN
A
A
19
20
18
21
22
23
24
25
26
13
6
5
11
12
8
7
16
15
4
3
2
1
10
9
14
17
B
B

20140704#1.0 EBS Ink Jet Systeme 3
EN
C
C
30
27
13
31
33
32
Components of Portable
Printer System
See the figures:
A
B
C
.
1. Upper guide roll.
2. Nozzle plate - front part of the
print head (ink outlet).
3. Lower guide roll, to synchronize
printing.
4. Laser pointer (shows the position
of the lowest nozzle during
printing).
5. Openings with plugs for adjusting
electromagnets.
6. Trigger - a print release button,
also used by other functions.
7. Printer base, battery and magnet
compartment.
8. Printer holder.
9. USB port with a cap.
10. Keypad.
11. Name plate.
12. LCD touch screen.
13. Ink container.
14. Ink container labels.
15. Battery charge socket.
16. Charge plug.
17. Guarantee seal.
18. Printer's ON/OFF button.
19. Printer ON LED indicator.
20. Battery charge LED indicator.
21. Radio communication LED
indicator.
22. PRINT ON/OFF LED indicator
(Print on state).
23. Print ON/OFF button.
24. Function key.
25. ”+” key.
26. ”-” key.
27. Printer middle line.
28. Power pack to charge printer
batteries.
29. Plug of power pack 28.
30.
OPEN/CLOSED indicator for
ink container.
31. Container valve.
32. Ink system needle.
33. Ink container gasket.
34. Buzzer - a buzzing signal
generator, located inside element
8of the printer.

4
EN
EBS Ink Jet Systeme 20140704#1.0
EN
Signs
!
Information signs indicating:
that the actions described need to be taken with extra or special care,
the printer’s additional or specific functions or options, which are not
described anywhere else,
untypical behavior of the printer and other hints.
!
A warning not to perform the operation that might be unsafe or
critical for the printer. It requires the user to follow closely the
instructions given therein.
A
B
C
Figure numbering notation
The meaning of LED and other indicators:
The lamp flashes
The lamp glows
Buzzer

20140704#1.0 EBS Ink Jet Systeme
EN
5
EN
T A B L E O F C O N T E NT S
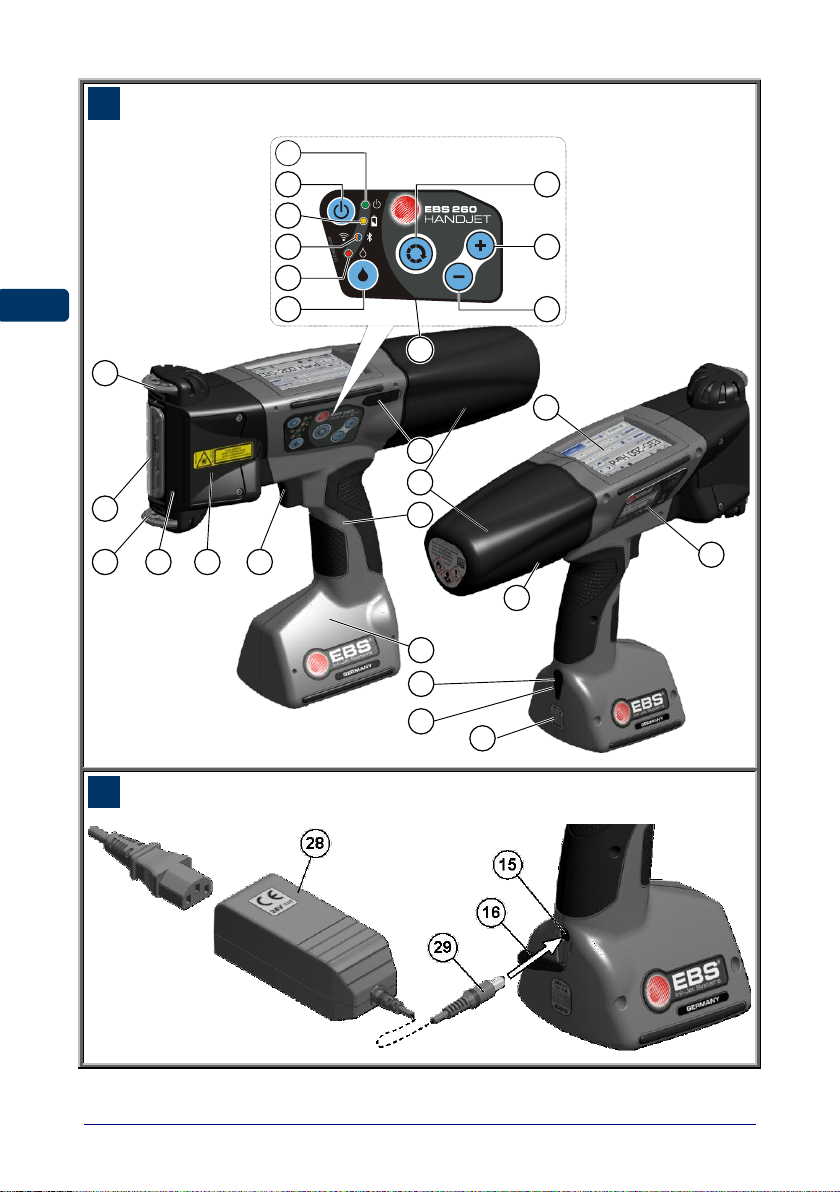
COMPONENTS OF
PORTABLE PRINTER
SYSTEM....................................3
SIGNS .......................................4
APPLICATION ..........................7
OPERATIONAL SAFETY .........7
GENERAL SAFETY INSTRUCTIONS .........7
LASER RADIATION SAFETY...................8
PROTECTING THE BATTERY PACK.........9
WHEN INK OR WASH-UP SPILLS............9
CONTROL OF ELECTROMAGNETIC
INTERFERENCE..................................10
IMPACT ON MEDICAL EQUIPMENT ........10
PACEMAKER AND OTHER MEDICAL
IMPLANTS............................................10
OTHER MEDICAL EQUIPMENT................10
OPERATION IN EXPLOSION HAZARD
AREAS .............................................10
OPERATION IN AREAS OF BLASTING....10
CONFORMITY MARKING......................11
ENVIRONMENTAL PROTECTION ...........11
PREPARING THE PRINTER
FOR OPERATION AND
SETTING BASIC
PARAMETERS........................12
OPERATING TOUCH SCREEN...............12
SIMPLE MENU ......................................14
LCD KEYPAD ......................................14
SWITCHING THE PRINTER ON AND
OFF .................................................16
SWITCHING THE PRINTER ON................16
SWITCHING THE PRINTER OFF ..............16
LOGGING IN.........................................18
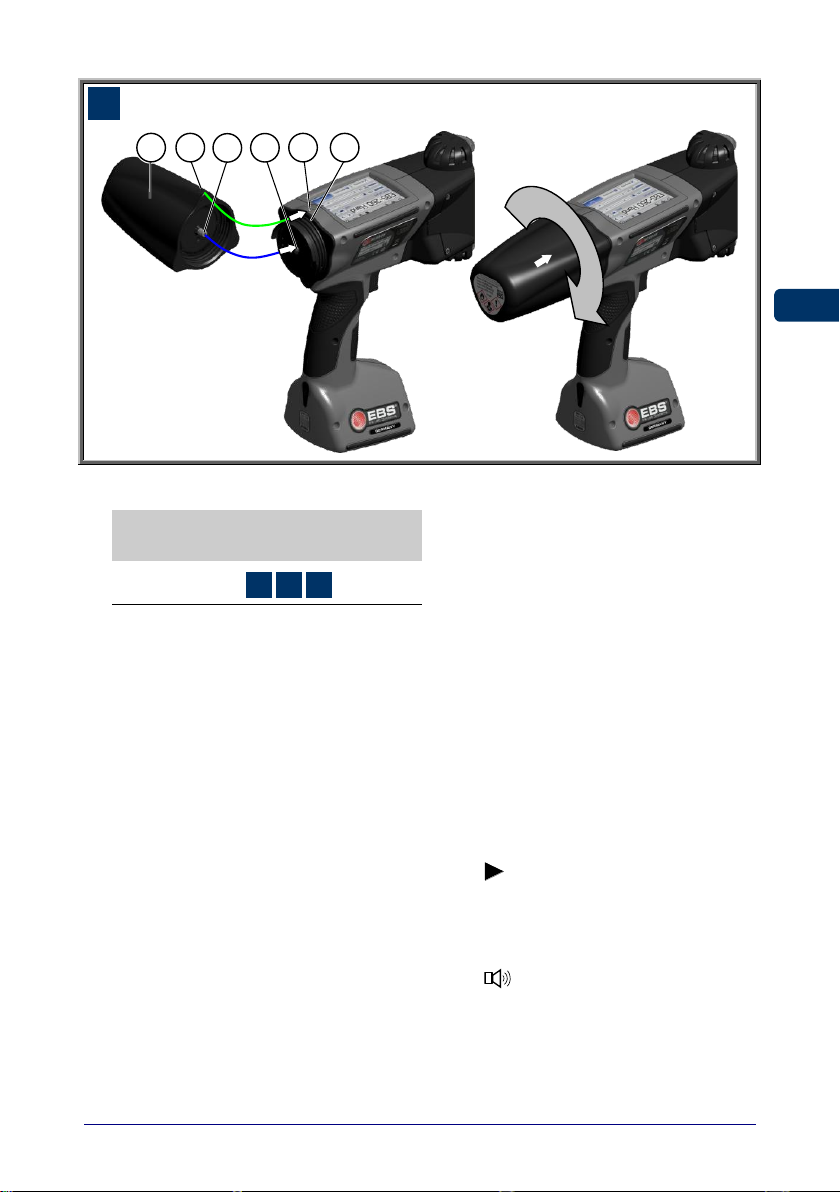
INSTALLING AND REPLACING INK
CONTAINER.......................................19
INSTALLING INK CONTAINER IN THE
PRINTER .............................................19
INK LEVEL IN CONTAINER......................20
REPLACING INK CONTAINER..................20
GENERAL SETTINGS ..........................21
DATE AND TIME SETTINGS.................. 22
SOUND SETTINGS..............................23
ENERGY MANAGEMENT......................25
CHARGING THE BATTERY......................25
LOW-BATTERY INDICATOR ....................26
DISPLAY PARAMETERS SETTINGS .........27
USER MANAGER ............................... 28
RADIO COMMUNICATION AMONG THE
PRINTER,A COMPUTER AND
EXTERNAL DEVICES........................... 29
WIFI WIRELESS CONNECTION...............29
Connecting the Printer to a
New Network via WiFi...................30
BLUETOOTH INTERFACE .......................32
Establishing Connection
between Printer and External
Device............................................32
CONNECTING USB DISC TO THE
PRINTER........................................... 34
IMPORTING PROJECTS .........................35
EXPORTING PROJECTS.........................35
UPDATING SOFTWARE..........................36
MESSAGES ....................................... 37
STATISTICS....................................... 39
GETTING STARTED............... 40
OPERATING THE PRINTER VIA
PRINTER TOUCH SCREEN................... 40
FILE MANAGER ....................................40
CREATING A NEW PROJECT..................41
OPENING AND EDITING A PROJECT........41
PROJECT PROCESSOR.........................42
Project Properties.........................43
List of Objects...............................44
Clipboard.......................................44
Trash..............................................45
Objects ..........................................46
Repositioning an Object ...............47
Re-sizing an Object......................48
Common Parameters of Objects...48
Text Object –Normal text.............51
Text Object –Date/Time...............51
Text Object –Counter ..................53
Text Object –Communications
port...............................................55
Text Object –Text File .................59
Shape-type Object –Line.............60
Shape-type Object –Rectangle....60
Shape-type Object –Ellipse .........61
Barcode........................................62
Image...........................................63
Line Divider..................................64
PRINTING PARAMETERS .......................65
PROJECT RECOVERY ...........................68
SERVICE .............................................69
Purging..........................................70
USB................................................71
Unlocking Options........................71

6
EN
EBS Ink Jet Systeme 20140704#1.0
EN
Restoring Preliminary Settings ....72
Tuning............................................73
Information ....................................73
OPERATING THE PRINTER VIA
MOZILLA FIREFOX WEB BROWSER ..... 74
ESTABLISHING CONNECTION
BETWEEN PRINTER AND COMPUTER ......74
INSTALLING OFFLINE EBSWEB USER
INTERFACE ..........................................74
LOGGING IN.........................................74
WORK SCREEN OF EBSWEB USER
INTERFACE ..........................................74
FILE MANAGER ....................................75
PROJECTS...........................................75
Create a New Project.....................75
Open and Edit a Project................76
Import a Project.............................78
Export Project................................79
Project Processor..........................79
Printing Parameters ......................82
Objects...........................................86
Common Parameters of Objects...86
Text Objects...................................87
Text Object –Normal Text............87
Text Object –Date/Time...............88
Text Object –Counter...................91
Text Object –Communications
port...............................................93
Text Object –Text File..................98
Image..............................................99
Barcode........................................100
Shape-type Objects.....................101
Shape-type Object –Line............101
Shape-type Object –Rectangle ..102
Shape-type Object –Ellipse........103
Line Divider..................................103
List of Objects .............................104
Clipboard .....................................105
Trash............................................105
TOOLS...............................................105
Image Manager............................105
Font Manager...............................106
Text Files Manager......................107
Users Manager.............................108
Printers Network Manager..........109
Language Manager......................110
Account Manager........................111
Workspace width.........................111
Simulate Printout.........................112
SETTINGS..........................................112
General Settings..........................112
SERVICE............................................113
Update..........................................113
Log...............................................114
Generate Service Report.............114
Install Option...............................115
LCD Preview................................115
PRINTER CONTROL ............................115
INFO..................................................116
About ...........................................116
Operating statistics.....................116
MESSAGES........................................116
PRINTING..............................117
OPENING PROJECT FOR PRINTING .....117
OPENING A PROJECT FOR PRINTING
VIA PRINTER LCD ..............................117
OPENING A PROJECT FOR PRINTING
VIA WEB BROWSER............................118
PRINTING A PROJECT .......................118
PRINTING A PROJECT VIA PRINTER
LCD..................................................118
PRINTING A PROJECT VIA WEB
BROWSER .........................................121
MAINTENANCE, STORAGE
AND TRANSPORT ................122
USER SUPPORT...................123
PROBLEMS WITH FUNCTIONING AND
OPERATION OF THE PRINTER.............123
Some of the nozzles do not jet
ink...............................................123
The printer does not print............123
Boldfaced or Blurred Prints.........123
QUESTIONS AND PROBLEMS .............124
TECHNICAL PARAMETERS.124
PRINTER ACCESSORIES ....................127

20140704#1.0 EBS Ink Jet Systeme
EN
7
EN
Dear Users of EBS Ink Jet Systeme equipment,
Please read this manual necessarily in order to get full information about the
operation of your device.
Disclaimer:
We shall bear no responsibility for damage to the device if it is operated
improperly, i.e., inconsistently with this manual.
The application and use of the products are beyond our control and
therefore fall exclusively into your scope of responsibility.
As we wish to keep pace with permanently progressing technological
development and individual requirements of our clients, we need to reserve
the right to change the form, make and technical solutions of our devices.
Therefore no data, illustrations or descriptions of this manual shall form any
grounds for claims.
We spare no effort to ensure that this manual is reliable, includes all
modifications and is free from errors. However, the drawing up and
publication process is complex and an error can occur in spite of our
endeavors and wishes. We shall bear no responsibility for the
consequences of editorial and printing errors in this manual.
If your device contains a particular piece of equipment or needs performing an
operation that have not been illustrated or described in this manual, or if you
have queries on reading this manual, please contact any representative of
EBS Ink Jet Systeme for additional information.
This manual applies to Offline EBS Web User Interface (Offline WUI) in version
1.4 and the EBS-260 printers equipped with the control system in version
1.02.08. In order to view the printer system version go to:
On the printer LCD: Tools –Service –Information –System version,
In EBS Web User Interface (WUI): Information –About the program –
System version.
Application
The HANDJET®EBS-260 printer is designed for marking, labeling, putting prints
and simple graphics wherever the use of a manual labeling device is required or
preferred.
Prints are put on articles with the application of the INK-JET method.
Operational Safety
!
Before you start your printer for the first time read the hints given below
and follow the underlying principles for your own and other persons’
safety.
General Safety Instructions
1. The printer must not be operated in rooms where explosion hazard exists.

8
EN
EBS Ink Jet Systeme 20140704#1.0
EN
2. No prints can be made on objects whose temperature exceeds 100°C at
the time of printing.
3. No open fire or spark producing devices or objects are allowed in the area
where the device operates.
4. During printing ink drops invisible to people’s eye are jetted out of the head
at pressure. Do not aim head outlet 2at any persons, animals or casual
objects because they may get splashed with ink unintentionally.
5. The following requirements need to be met when washing, cleaning and
maintenance operations are performed or ink containers are replaced:
The operations can only be performed in a workplace that is especially
designed for that purpose, when the device is switched off and
protective clothing is worn. A fire extinguisher designed to extinguish
electrical devices and flammable solvent fires must be placed within
easy reach of the device. Air ventilation needs to be ensured at the
workplace.
WARNING: The ink is inflammable!
Be careful not to splash the ink. Especially eyes need protecting. It is
advisable to wear protective glasses.
Protect the ink and the solvent (also waste fluid remaining after the
printer has been washed) against fire, high temperature, sparks,
electric arc and other electric discharge as they may cause ignition of
these inflammable fluids!
Do not use plastic vessels to do the washing. Metal vessels are
recommended.
6. Protect the printer against dirt, heavy dust and excessive moisture.
7. EBS Ink Jet Systeme is able to ensure perfect and safe operation of the
printer only when original, printer-specific accessories and consumables
are used.
Laser Radiation Safety
Laser pointer 4is activated during printing for print positioning. The pointer
emits class 2 laser radiation (according to IEC 60825-1) at the wavelength of
650 nm, with a maximum output power < 1 mW. The leser beam is not
generated in pulses.
1. Do not direct the laser beam of a radiation emitting laser device toward
persons or animals, or stare at the beam. The laser light can damage sight.
2. Do not stare at the beam or look directly through optical instruments
(magnifying glasses, magnifiers, microscopes, binoculars, telescopes). The
looking through certain optical instruments (e.g. loupes, magnifying glasses
and microscopes) at an output laser beam from a distance of up to 100 mm
may generate hazard to the eyes.
3. Avoid directing the beam toward the planes that reflect laser radiation well
(mirrors or other glossy surfaces) so that the reflected beam(s) does not
shine in the eyes.

20140704#1.0 EBS Ink Jet Systeme
EN
9
EN
The printer is marked with the following warning label in English, as standard.
The label is put on the left-hand side of the printer on plug 5covering the hole
through which electromagnets can be adjusted.
K170117-000
IEC/EN 60825-1: 2007
+ AC1 :2008
LASER RADIATION
DO NOT STARE INTO BEAM
CLASS2 LASER PRODUCT
M AX OUT PUT: < 1 m W, WAVE L ENGT H:650 n m
Labels in several languages come together with the printer. If you prefer a
different language than English, replace the label with a more suitable one. If
the label is not available in your language, translate the label contents into your
language and hand it over to the printer users.
Protecting the Battery Pack
The following principles need to be obeyed to protect the batteries that are built
into the printer:
Protect the printer against excessive temperature and fire. Do not expose it
to strong solar radiation for a longer time.
Avoid a sudden change in temperature (cold hot) that might cause vapor
condensation inside the printer and thereby speed up battery discharge
and electronic circuit corrosion. Condition the printer for about 1 hour
before use after it has been moved from a cool place to a warm one.
When Ink or Wash-up Spills
Should the eyes or skin get irritated with ink or wash-up:
!
EYES rinse the eyes with running water for at least 15 minutes, then
see your oculist.
SKIN wash the skin with water and soap.
If the clothing has been splashed, take it off as soon as possible.
When ink or wash-up spill, wipe out the spilled fluid with a piece of
absorbent material, and then remove the material in compliance with fire
and health and safety-at-work regulations.

10
EN
EBS Ink Jet Systeme 20140704#1.0
EN
Control of Electromagnetic Interference
1. Properties of high-frequency devices.
Your Ink-Jet printer contains a high-frequency transmitter and receiver. When it
is in the ON state, the printer receives and transmits high-frequency (HF)
signals.
The controller of the Ink-Jet printer system controls energy emitted during
printer operation on an on-going basis.
The HANDJET®EBS-260 printer complies with all the requirements of the
regulations concerning the impact of the HF energy on humans in your country
–see Conformity Marking (p. 11).
2. Printer accessories.
If you do not use original EBS parts or printer accessories, including batteries or
electronic components, the statutory requirements may not be met and the HF
electromagnetic emission limits may be exceeded.
Impact on Medical Equipment
Pacemaker and Other Medical Implants
The printer contains built-in high-frequency transmitters and receivers. Persons
having medical implants should not approach the printer to a distance smaller
than 20 cm (8 inches) from the implants not to disturb implant operation.
Other Medical Equipment
If you use a piece of medical equipment, please ask the equipment
manufacturer whether the equipment is sufficiently shielded against
electromagnetic radiation. In certain circumstances your doctor may help you
gain the information you require.
Operation in Explosion Hazard Areas
If you work in an explosion hazard area, switch your Ink-Jet printer off, do not
replace the batteries or do not remove them from the printer and follow all
instructions and precautions. Sparking generated by batteries may cause an
explosion and/or fire in this hazardous area and result in personal injuries or
even death.
The regions where a potential explosion hazard exists are usually marked
appropriately. The examples of such regions are: solvent storage areas, fuel
storage areas and petrol stations, below-decks onboard ships, storage areas for
explosive gases, air mixtures, chemicals and metal or flour powders.
Operation in Areas of Blasting
In order to avoid disturbance during blasting operations, the printer should be
switched off in the areas where such operations are performed or where the use
of radio equipment is forbidden.
Follow the operating instructions and information signs.

20140704#1.0 EBS Ink Jet Systeme
EN
11
EN
Conformity Marking
The HANDJET®EBS-260 printer has followed the conformity assessment
procedure which resulted in the issue of Declaration of Conformity. This forms
the basis for the statement that the HANDJET®EBS-260 printer and the
manufacturer’s accessories, to which this Declaration relates, meet the general
requirements and other relevant provisions of the Directive if the printer and the
accessories are installed and used in compliance with the manufacturer's
instructions:
1999/5/EC, 2006/95/EC, 2004/108/EC
and that they meet the following norms that are harmonized with the above
Directives
EN 60950-1:2006 + A11:2009 + A1:2010,
EN 60825-1:2007 + AC1:2008,
ETSI EN 301 489-1 V1.9.2:2011,
ETSI EN 301 489-17 V2.2.1:2012,
EN 55022:2011,
EN 61000-3-2:2006 + A1:2009 + A2:2009,
EN 61000-3-3:2013,
EN 61000-4-2:2009,
EN 61000-4-3:2006 + A1:2008 + IS1:2009 + A2:2010,
EN 300 328 V1.8.1:2012.
The HANDJET®EBS–260 printer will bear the following mark:
Environmental Protection
After the printer has been put out of service, do not take it out together
with other domestic waste.
According to Directive No 2012/19/EUof the European Council on
electrical and electronic equipment waste, the HANDJET®EBS-260
printer and USB-Bluet
ooth modules that have been put out of service must be separated from
domestic waste and processed in an environmentally friendly way.

12
EN
EBS Ink Jet Systeme 20140704#1.0
EN
Preparing the Printer for Operation and Setting Basic
Parameters
Operating Touch Screen
The main screen of the printer consists of the following elements:
status bar
A
Printing status –see Printing a Project via Printer LCD (p. 118),
B
Messages containing the information on printer operation (the icon
displayed when the messages are available) –see Messages (p. 37),
C
Status and the settings of WiFi wireless network –see WiFi Wireless
Connection (p. 29),
D
Bluetooth status and settings –see Bluetooth Interface (p. 32),
E
Pendrive/USB disc status (the icon is not displayed, when the disc is
not connected to the printer) –see Connecting USB Disc to the
Printer (p. 34),
F
Ink container status –see Ink Level in Container (p. 20),
G
Battery status –see Energy Management (p. 25),
H
The current time of the printer and the date and time settings –see
Date and Time Settings (p. 22),
I
Switch the printer off and then on again, log out the user and disable
the screen –see also Switching the Printer Off (p. 16).
status bar
project window
Intensity printing
parameter window
Resolution printing
parameter window
menu bar
S
B
C
D
E
F
G
H
J
K
P
R
I
A
L
M
W
U
T
N
O

20140704#1.0 EBS Ink Jet Systeme
EN
13
EN
project window
J
Preview a project to be printed
K
Select projects to be printed, from the same folder
L
Open a project to be printed
M
Edit a project to be printed and printing parameters of that project
N
Save the
project
parameters
modified
If a modification is not saved, the project can be
printed with the modified parameter only until a new
project is opened or the printer is switched off.
O
Project number in the folder / the number of projects in the folder
P
Project name (if the name is in green, the project is ready for printing)
print intensity
R
Decrease or
increase print
intensity
A change in the intensity setting results in a lower or
higher saturation of a printout with ink of a given
color.
You can change the intensity of a printout of a
chosen project by pressing the -or +button or by
shifting the slider handle. If the parameter setting is
modified, press the Nbutton to save the
modifications to the project.
print resolution
S
Increase or
decrease print
resolution
A change in the width of characters printed and the
length of the entire project are the visual effects of a
modification to the resolution setting.
You can change the resolution of a chosen project
by pressing the –or + button or by shifting the slider
handle. If the parameter setting is modified, press
the Nbutton to save the modifications to the project.
menu bar
T
Create a new project and edit an existing project –see Creating a
New Project (p. 41) and Opening and Editing a Project (p. 41)
U
Set the language, date and time format (General Settings (p. 21)),
sound (Sound Settings (p. 23)), energy (Energy Management (p.
25)), users (User Manager (p. 28)), WiFi (WiFi Wireless Connection
(p. 29)) and Bluetooth (Bluetooth Interface (p. 32)), service options –
see Service (p. 69)
W
Enable and disable printing –see Printing a Project via Printer LCD
(p. 118), rinse the nozzles –see also Purging (p. 70)and Measure
(p. 118)
Make sure that the edges of the housing are not touched while LCD buttons are
being touched on the screen touch –this may disrupt the detection of a touch.
If the touch screen cannot be used (e.g. the operator wears gloves), the keys
available on the keypad 10 can be used instead. With the key 24 you can switch
over between the project window and printing parameter windows. The active
window is framed in black. The keys 25 and 26 are designed for choosing a
project and changing the parameter settings.

14
EN
EBS Ink Jet Systeme 20140704#1.0
EN
Simple menu
You can switch between the main screen and the simplified screen by touching the
selection button that is by the Simple menu option in the General Settings
Commonsheet tab (see General Settings p. 21)).
Use can use the keys 25 and 26 on the keypad 10 to choose a project for
printing (within one folder).
LCD Keypad
The on-screen keypad can be used for changing the settings of parameter and
inputting text files from the printer touch screen (LCD) level. It is displayed on
the LCD display after a given parameter field has been chosen, while the
password is being typed in during logging in operation or while a text is being
input to a project.
status bar
project window
menu bar
B
C
D
E
F
F
G
H
J
P
I
A
M
W
U
T
N
O
L

20140704#1.0 EBS Ink Jet Systeme
EN
15
EN
The keypad contains a full set of Latin letters and a set of digits; moreover it
also contains special buttons:
–to move the cursor ( are available for the keypads
that are displayed while multiple-line text objects are being edited),
–to shift between small letters to capital letters and the other way round,
–to shift between letters and punctuation marks and digits and the other
way round,
–to convert the Latin letters into Chinese characters (mode of input:
pinyin) and the other way round (the button is available after the
button has been touched),
–to convert the Latin letters into Cyrillic letters and the other way round
(the button is available after the button has been touched),
–to convert letters into special symbols and the other way round,
–ENTER –to move to the following line,
–to delete the character that is on the left of the cursor,
–to delete an entire text (to clear the edit field),
–to undo deletion (the button is available after the button has
been touched),
–to move back to the previous display,
–to confirm that you want to input a text you have typed in (the button is
available after you have started typing in),
–to abandon inputting a text (the button is available after you have
started typing in).
Moreover, diacritical characters are hidden under certain buttons (the are available
aftera given button has been touched and held on). These buttons include:
w- ; e- ; r- ;
t- ; y- ; u–;
i- ; o- ;
a- ; s- ; d- ;
g- ; h- ; j- ; k- ;

16
EN
EBS Ink Jet Systeme 20140704#1.0
EN
l- ; z- ; c- ;
n- ;
Switching the Printer On and Off
See figure
A
.
Switching the Printer On
Touch button 18 (and hold it on for about 1s) on the printer keypad 10. The
switching on is done properly when diode 19 emits lights and an audible signal
is heard from buzzer 34 . The printer is ready for operation when the main
screen is displayed (in about 30 s from the switching on).
When the printer is switched on, you can move to print a text file from printer
memory.
Switching the Printer Off
The printer can be switched off in three ways:
by means of button 18 on the printer keypad 10,
by means of the (I) button on the printer touch screen 12,
remotely, with EBS Web User Interface available via a Web Browser, by
means of the button.
When you press button 18, the display shows the message that the printer will
be switched off in 120 seconds. You can speed up this operation by touching
the button or cancel it by touching the button.

20140704#1.0 EBS Ink Jet Systeme
EN
17
EN
When the (I) button is touched, the window containing the following options
is displayed on the printer touch screen and also in EBS Web User Interface:
–to switch off promptly after the button is touched,
–to switch off and restart the printer,
–to log out the current user and display the log in display –
see Logging In (p. 18),
–to enable the screen lock (this option is available only on the
printer screen) –see Display Parameters Settings (p. 27).
The switching off is done properly, when diode 19 goes out and screen 12
switches off. It can also be signaled with an audible signal (see Sound Settings
(p. 23)).
The printer can be switched off automatically after a period of inactivity –see
Display Parameters Settings (p. 27).

18
EN
EBS Ink Jet Systeme 20140704#1.0
EN
In an emergency situation, when the above mentioned ways of printer switch off
turn out ineffective or when the printer needs to be switched off immediately,
you can do that in two ways:
by holding button 18 on keypad 10 over a minimum of 4 second or
by touching button 18 and holding it together with trigger 6at the same
time.
After emergency switch off the settings of the printer counters and unsaved
projects are lost. If the emergency switch off occurs too frequently, it may lead
to printer damage (e.g. damage to the file system).
Logging In
You can be logged in automatically as Administrator by default (the default
password is 1). You can disable automatic logging in or change the default
account - see User Manager (p. 28).
If the current user is logged out with the button (see Switching the
Printer Off (p. 16)), a list of user is displayed on the printer acreen. After a user
name has been chosen, a keypad is displayed (see LCD (p. 14)) with which to
type in the password.

20140704#1.0 EBS Ink Jet Systeme
EN
19
EN
Installing and Replacing Ink Container
See figure
C
.
Installing Ink Container in the Printer
Every ink container is equipped with a transponder that stores the information
on the type of ink and its date of manufacture. The printer has a built-in circuit
that scans the data from the transponder and thereby it helps check whether the
ink used is of the proper quality. The detailed information on ink (the container
fill-in level, the ink color, the type of solvent, the type of dye, the expiration date
for the ink, the date when the container has been accepted) is available after
the drop-shape icon on the main display top bar has been touched.
When the printer is delivered, the ink container is detached. Follow the steps
below in order to install the container:
1. Remove the container from packing 13.
2. Position the container 13 relative to the back part of the printer so that the
triangular mark on the container is directly opposite the printer middle line 27
and that the printer's pin goes into the container's non-return valve opening.
3. Press the container against the printer and turn it clockwise by 270
degrees.
The a new container is accepted, the following message is displayed: New ink
container successfully accepted.
Should problems with the acceptance of an appropriat and correct container occur,
the service staff can make temporary acceptance of such a container possible (for
50 hours) –see Unlocking Options (p. 71).The information on such a temporarily
accepted container appears in the form of the icon (F) on the status bar.

20
EN
EBS Ink Jet Systeme 20140704#1.0
EN
Ink Level in Container
When the printer stops printing, make sure that it is because the ink container
has been emptied. The level of ink in the container is displayed on screen 12
with the icon (F):
0%
1–9%
10–30%
31–60%
61–80%
81–100%
In addition, the and icons displayed alternatively can indicate that:
There is no ink container in the printer,
There is a problem with ink, e.g. the ink is past its use-by date, or the print
limit assigned to the printer has been exceeded. The information about the
problem is displayed after the icon (F) has been touched, and also in
message form after the message icon (B) has been touched.
There is no communication with the container controller –restart the
printer, and when the problem does not subside, contact your service point.
Replacing Ink Container
!
If possible, replace the container in dustfree conditions so as to minimise
the amount of contaminants getting in to the printer’s ink system.
Do not leave the printer with the ink container detached for a longer time
than that required to replace the container. While detaching or installing
the container be careful not to splash anyone or anything with the ink that
may flow out of needle 32.
4
1. Turn the printer off - see
Switching the Printer Off (p.
16).
2. Put the printer in such a way that
the container points downwards,
turn empty container 13 to the
left (a). Wait about 3 seconds
while holding the container to
equalize the pressure.
3. Remove the container carefully
(b).
See figure
C
.
4. If gasket 33 is dirty, remove ink
leftovers from it with wash-up.
5. Install a new container - see
Installing Ink Container in the
Printer (p. 19).
Other manuals for HANDJET -260
1
Table of contents
Other EBS Printer manuals

EBS
EBS 2500 Instruction sheet

EBS
EBS HandJet 250 User manual

EBS
EBS EBS 2600 User manual

EBS
EBS EBS-6500 Installation guide

EBS
EBS EBS-1500 SERIES Installation guide

EBS
EBS HandJet 250 User manual

EBS
EBS EBS-6100 User manual

EBS
EBS EBS 2600 User manual

EBS
EBS EBS-260 User manual

EBS
EBS HANDJET -260 User manual