6EN EBS Ink-Jet Systeme 20111028#4.2
EN
TABLE OF CONTENTS
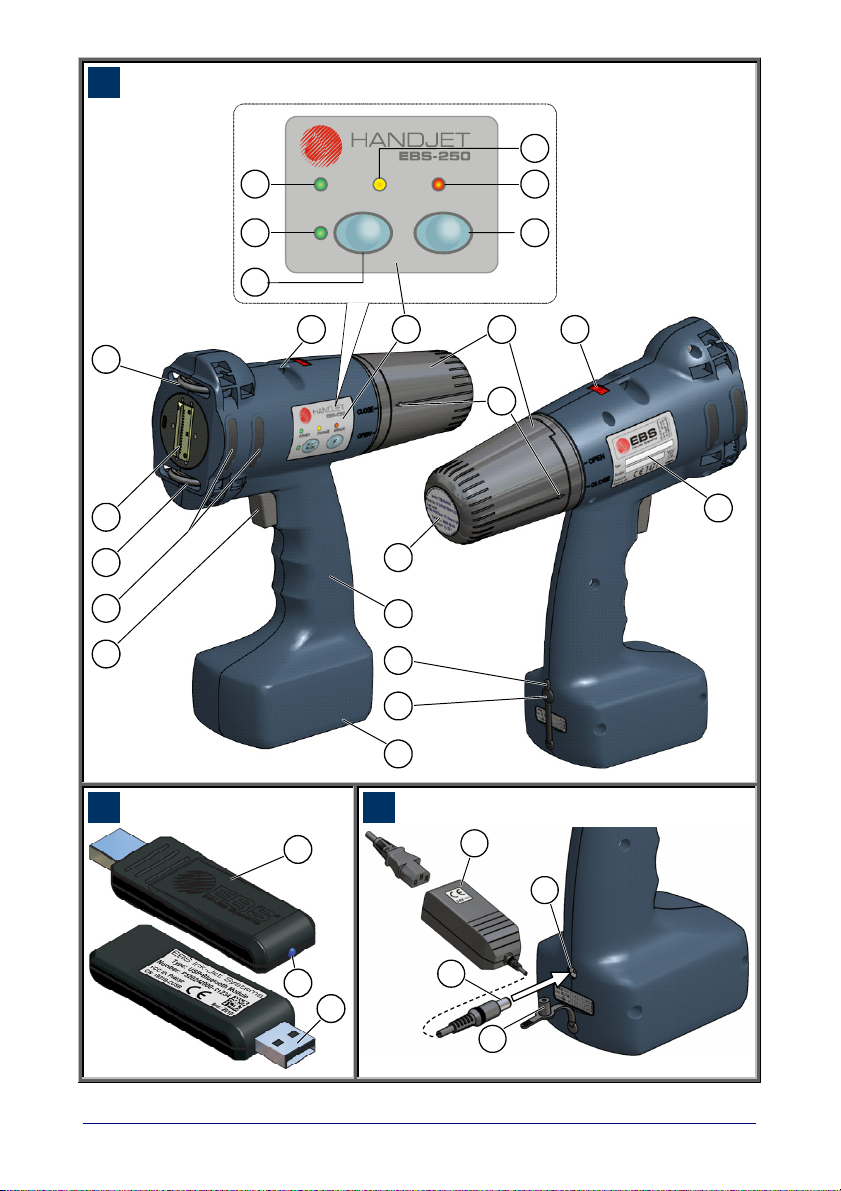
COMPONENTS OF
PORTABLE PRINTER
SYSTEM.................................... 4
SIGNS ....................................... 4
OPERATIONAL SAFETY ......... 7
GENERAL SAFETY INSTRUCTIONS ............7
PROTECTING THE BATTERY PACK............ 8
WHEN INK OR WASH-UP SPILLS...............8
CONTROL OF ELECTROMAGNETIC
INTERFERENCE ....................................... 9
MEDICAL EQUIPMENT..............................9
Pacemaker.......................................... 9
Other Medical Equipment ...................9
OPERATION IN EXPLOSION HAZARD
AREAS....................................................9
OPERATION IN AREAS OF BLASTING.........9
CONFORMITY MARKING........................... 9
ENVIRONMENTAL PROTECTION .............. 10
APPLICATION ........................ 10
INSTALLING AND
STARTING UP ........................ 10
PREPARING THE PRINTER FOR
OPERATION ...................................... 10
CHARGING THE BATTERY ......................10
LOW-BATTERY INDICATOR ..................... 11
INSTALLING AND REPLACING INK
CONTAINER ...................................... 11
INSTALLING INK CONTAINER IN THE
PRINTER............................................... 11
HOW TO CHECK WHETHER THERE IS
ANY INK IN INK CONTAINER? ..................11
REPLACING INK CONTAINER .................. 12
SWITCHING THE PRINTER ON AND
OFF ................................................. 12
SWITCHING THE PRINTER ON................ 12
SWITCHING THE PRINTER OFF ............... 13
INSTALLING AND STARTING THE
PRINTER CONTROL PROGRAM............ 13
INSTALLING CONTROL PROGRAM........... 13
STARTING THE CONTROL PROGRAM ......13
CONNECTING THE PRINTER WITH
COMPUTER ....................................... 13
TEXT FILES AND PRINT
PARAMETERS ....................... 14
HOW TO CREATE A TEXT TO BE
PRINTED? .........................................14
REGULAR TEXT..................................... 14
Changing Proportional Spacing
and Monospacing ............................. 14
Using and Changing Built-in Fonts
of the Printer ..................................... 15
Using and Changing Windows®
Fonts ................................................. 15
VARIABLE FIELDS.................................. 16
Date and Time .................................. 16
Universal Date and Time ..................17
Object Counters ................................ 18
Database Data .................................. 19
PRINT PREVIEW .................................... 21
HOW TO CREATE AND EDIT A
GRAPHICS FILE FOR PRINTING? ............22
HOW TO MODIFY PRINT PARAMETERS..22
Character Resolution ........................ 22
Intensity of Ink Drops ........................ 22
Mode of Timing ................................. 22
Reflecting a text ................................ 23
Rotating a Text ................................. 23
Repeating a Text (Repetition)........... 24
Print Delay ........................................ 24
Distance between Texts ................... 24
Row Repetition ................................. 24
INTELLIGENT CONTROL OF HAND
MOVEMENT........................................25
HOW TO TRANSFER/SAVE TEXT
FILES TO/IN THE PRINTER....................25
HOW TO CHANGE A TEXT FILE
STORED IN THE PRINTER .....................25
PRINTING ................................26
PRINTING A TEXT FILE SAVED IN THE
PRINTER............................................26
LINE PRINTING ...................................26
USING A NUMBER OF TEXTS................27
CREATING A TEXT LIBRARY IN THE
PRINTER............................................... 27
QUICK SAVING/RETRIEVING TEXT
FILES TO/FROM TEXT LIBRARY .............. 28
PRINTING TEXT FILES FROM LIBRARY .... 28
SAVING THE PROJECT LIBRARY ON
COMPUTER DISC .................................. 28
MAINTENANCE, STORAGE
AND TRANSPORT ..................29
USER SUPPORT .....................30