manuals.online logo
Brands
  1. Home
  2. •
  3. Brands
  4. •
  5. Eldat
  6. •
  7. Transmitter
  8. •
  9. Eldat RTS03 Series User manual

Eldat RTS03 Series User manual

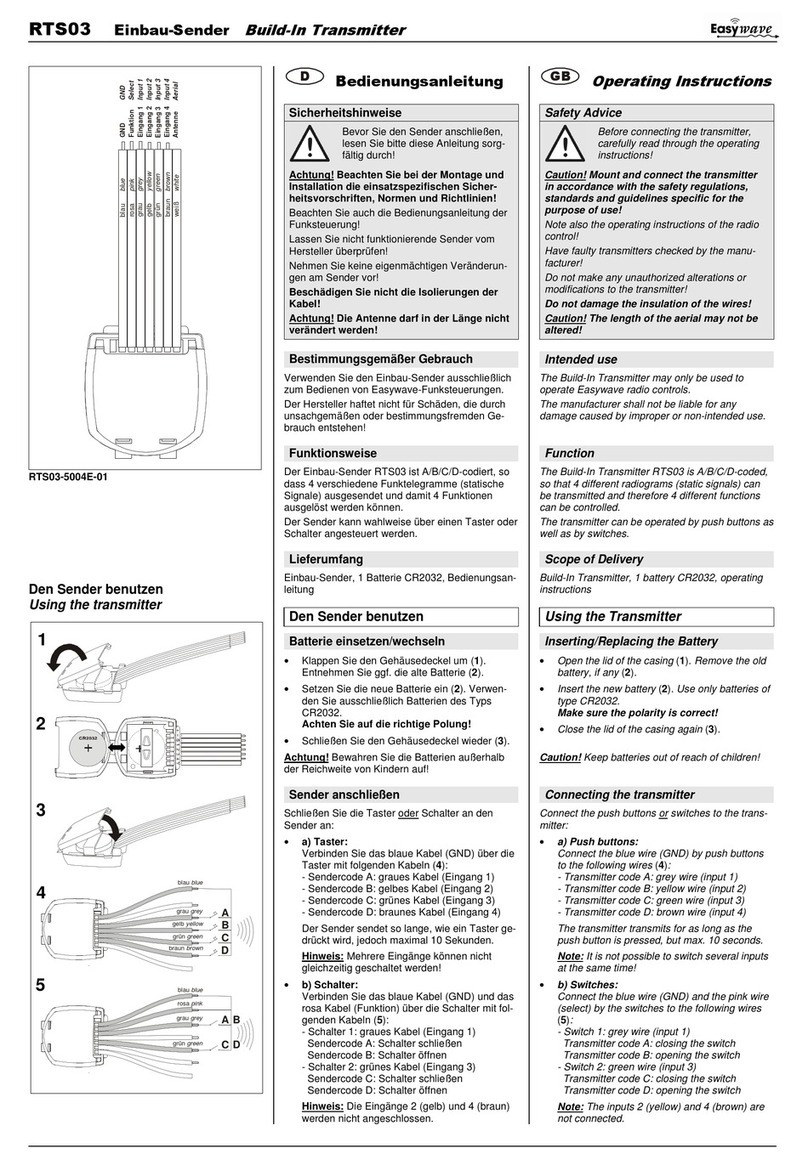
RTS03 Einbau-Sender
Built-In Transmitter
GND GND
Funktion Select
Eingang 1 Input 1
Eingang 2 Input 2
Eingang 3 Input 3
Eingang 4 Input 4
Antenne Aerial
blau blue
rosa pink
grau grey
gelb yellow
grün green
braun brown
white
weiß
Ausführung
RTS03-4104M-01 433,92 MHz
RTS03-5004M-01 868,30 MHz
Den Sender benutzen
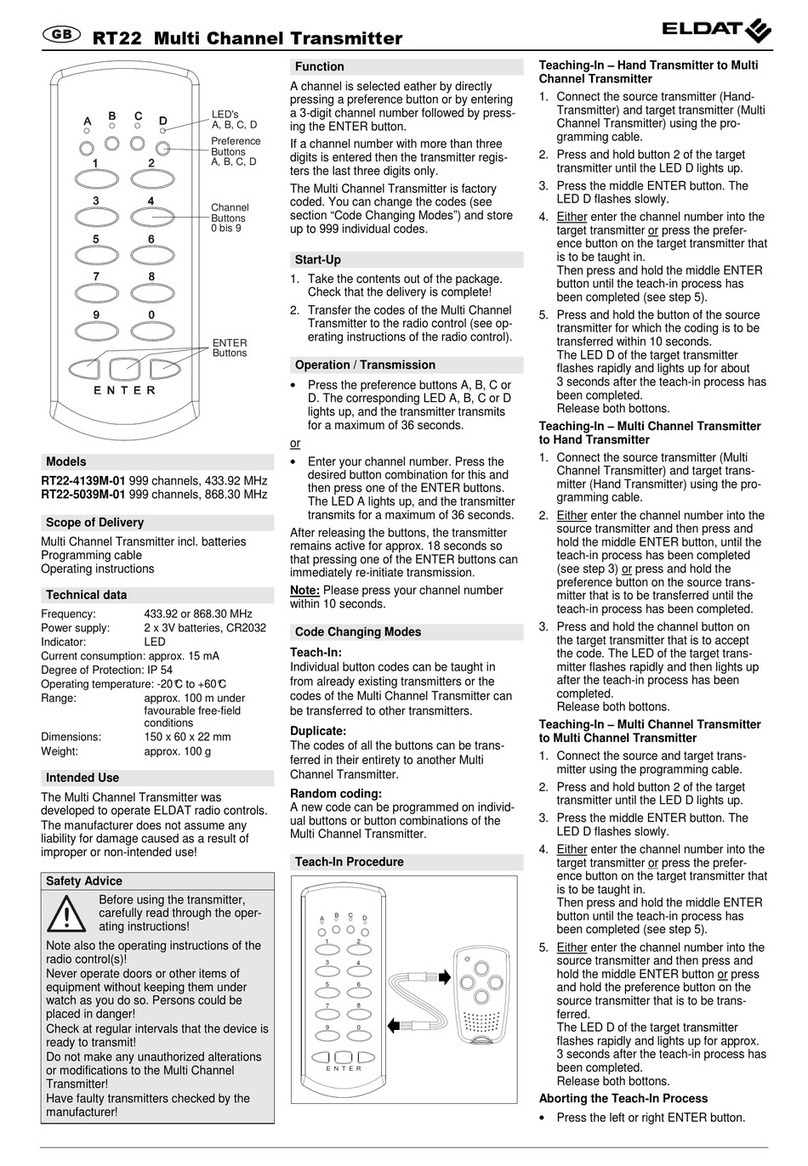
Using the Transmitter
+
A
B
C
D
blau blue
grau grey
gelb yellow
grün green
braun brown
A B
C D
blau blue
grau grey
rosa pink
grün green
D
Bedienungsanleitung
Sicherheitshinweise
Bevor Sie den Sender anschließen,
lesen Sie bitte diese Anleitung sorg-
fältig durch!
Achtung!
Beachten Sie auch die Bedienungsanleitung der
Funksteuerung!
Beachten Sie bei der Montage und
Installation die einsatzspezifischen Sicher-
heitsvorschriften, Normen und Richtlinien!
Lassen Sie nicht funktionierende Sender vom
Hersteller überprüfen!
Nehmen Sie keine eigenmächtigen Veränderun-
gen am Sender vor!
Beschädigen Sie nicht die Isolierungen der
Kabel!
Achtung!
Die Antenne darf in der Länge nicht
verändert werden!
Bestimmungsgemäßer Gebrauch
Verwenden Sie den Einbau-Sender ausschließlich
zum Bedienen von ELDAT-Funksteuerungen.
Der Hersteller haftet nicht für Schäden, die durch
unsachgemäßen oder bestimmungsfremden Ge-
brauch entstehen!
Funktionsweise
Der Einbau-Sender RTS03 kann 4 verschiedene
Funktelegramme (statische Signale) aussenden
und damit 4 Funktionen auslösen.
Der Sender kann wahlweise über einen Taster oder
Schalter angesteuert werden.
Lieferumfang
Sender, 1 Batterie CR2032, Bedienungsanleitung
Den Sender benutzen
Batterie einsetzen/wechseln
•Klappen Sie den Gehäusedeckel um (1).
Entnehmen Sie ggf. die alte Batterie (2).
•Setzen Sie die neue Batterie ein (2). Verwen-
den Sie ausschließlich Batterien des Typs
CR2032. Achten Sie auf die richtige Polung!
•Schließen Sie den Gehäusedeckel wieder (3).
Achtung!
Bewahren Sie die Batterien außerhalb
der Reichweite von Kindern auf!
Sender anschließen
Schließen Sie die Taster oder
•a) Taster: (4) Verbinden Sie das blaue Kabel
(GND) über die Taster mit folgenden Kabeln:
- Sendercode A: graues Kabel (Eingang 1)
- Sendercode B: gelbes Kabel (Eingang 2)
- Sendercode C: grünes Kabel (Eingang 3)
- Sendercode D: braunes Kabel (Eingang 4)
Schalter an den
Sender an:
Der Sender sendet so lange, wie ein Taster ge-
drückt wird, jedoch maximal 36 Sekunden.
Hinweis:
•b) Schalter: (5) Verbinden Sie das blaue Kabel
(GND) und das rosa Kabel (Funktion) über die
Schalter mit folgenden Kabeln:
- Schalter 1: graues Kabel (Eingang 1)
Sendercode A: Schalter schließen
Sendercode B: Schalter öffnen
- Schalter 2: grünes Kabel (Eingang 3)
Sendercode C: Schalter schließen
Sendercode D: Schalter öffnen
Mehrere Eingänge können nicht
gleichzeitig geschaltet werden!
Hinweis: Die Eingänge 2 (gelb) und 4 (braun)
werden nicht angeschlossen.
Montagehinweis:
•in einem Verteilerkasten oder einem Gehäuse
aus Metall
Vermeiden Sie die Montage:
•in der unmittelbaren Nähe von großen Metall-
objekten
•auf dem Boden (oder in dessen Nähe).
Achten Sie darauf, dass die Antenne soweit wie
möglich von den Anschlussleitungen abge-
spreizt wird.
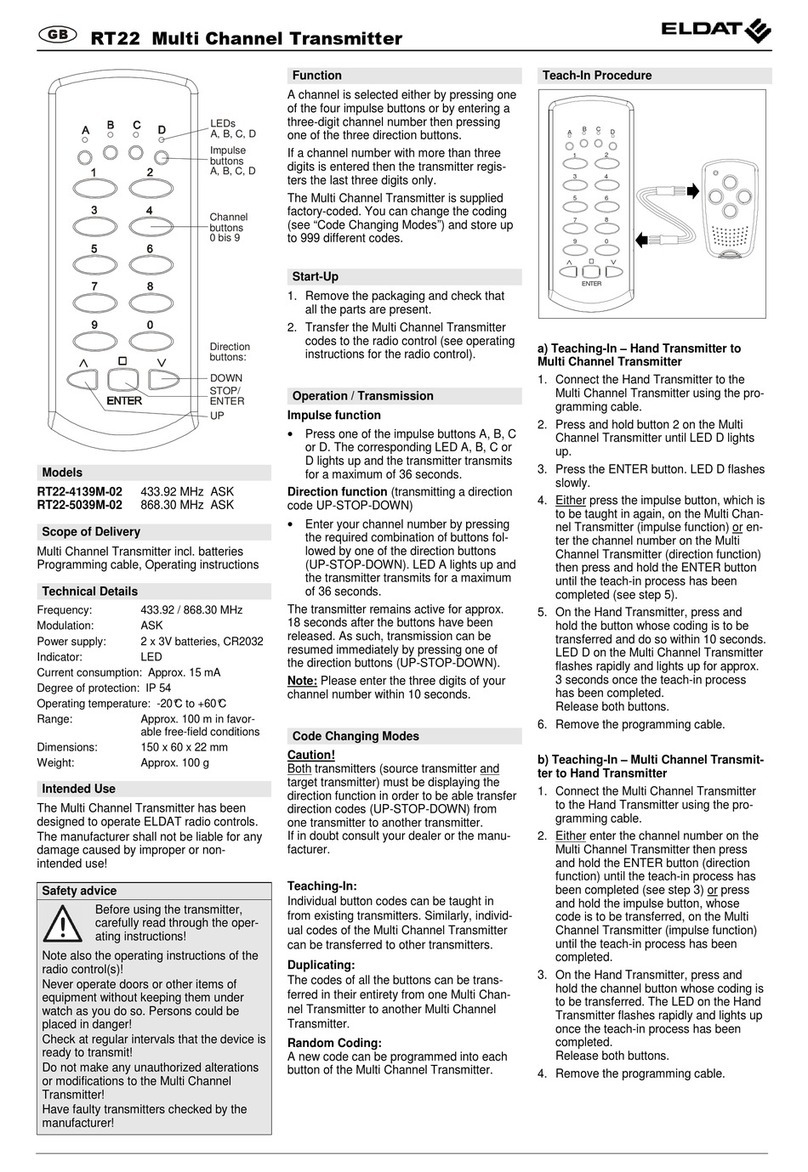
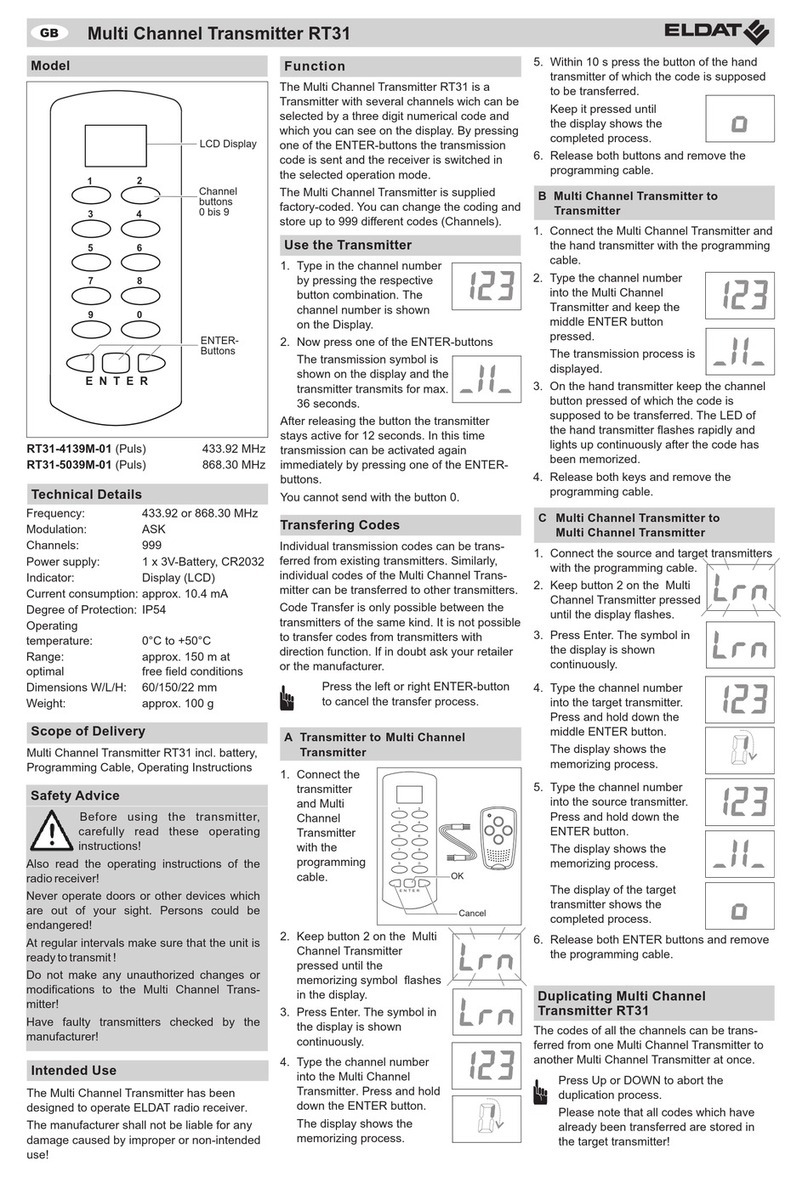
GB
Operating instructions
Safety Advice
Before connecting the transmitter,
carefully read through the operating
instructions!
Caution!
Note also the operating instructions of the radio
control!
Mount and connect the transmitter
in accordance with the safety regulations,
standards and guidelines specific for the
purpose of use!
Have faulty transmitters checked by the manu-
facturer!
Do not make any unauthorized alterations or
modifications to the transmitter!
Do not damage the insulation of the wires!
Caution!
The length of the aerial may not be
altered!
Intended Use
The Built-In Transmitter may only be used to
operate ELDAT radio controls.
The manufacturer shall not be liable for any
damage caused by improper or non-intended use.
Function
The Built-In Transmitter RTS03 can transmit 4
different radiograms (static signals) and therefore
4 different functions can be controlled.
The transmitter can be operated by push buttons as
well as by switches.
Scope of Delivery
Transmitter, 1 battery CR2032, operating instruc-
tions
Using the Transmitter
Inserting/Replacing the Battery
•Open the lid of the casing (1). Remove the old
battery, if any (2).
•Insert the new battery (2). Use only batteries of
type CR2032. Make sure the polarity is cor-
rect!
•Close the lid of the casing again (3).
Caution!
Connecting the Transmitter
Keep batteries out of reach of children!
Connect the push buttons or
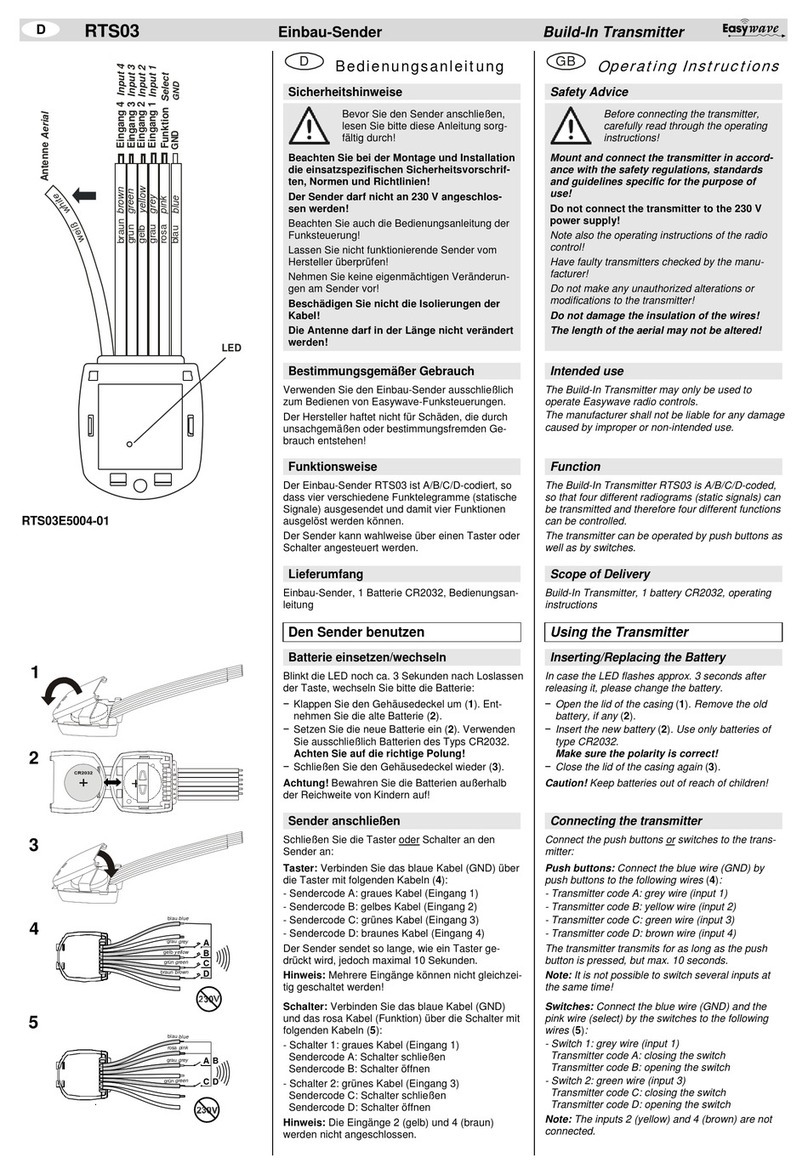
•a) Push buttons: (4) Connect the blue wire
(GND) via the push buttons with the following
wires:
- Transmitter code A: grey wire (input 1)
- Transmitter code B: yellow wire (input 2)
- Transmitter code C: green wire (input 3)
- Transmitter code D: brown wire (input 4)
switches to the trans-
mitter:
The transmitter transmits for as long as the
push button is pressed, but max. 36 seconds.
Note:
•b) Switches: (5) Connect the blue wire (GND)
and the pink wire (select) via the switches with
the following wires:
- Switch 1: grey wire (input 1)
Transmitter code A: closing the switch
Transmitter code B: opening the switch
- Switch 2: green wire (input 3)
Transmitter code C: closing the switch
Transmitter code D: opening the switch
It is not possible to switch several inputs
at the same time!
Note:
Mounting Advice: Avoid mounting
The inputs 2 (yellow) and 4 (brown) are
not connected.
•in a distribution box or housing made of metal
•in the immediate vicinity of large metal objects
•on the ground (or near it).
Make sure that the antenna is stretched as far
away as possible from the connection cables.
1
2
3
4
5
70360 0405 D/GB
++
blau blue
rosa pink
braun brown
blau blue
rosa pink
braun brown
Kundendienst Customer Service
Sollten trotz sachgerechter Handhabung Störun-
gen auftreten oder wurde das Gerät beschädigt,
wenden Sie sich bitte an folgende Adresse:
If, despite correct handling, faults or malfunctions
occur or if the product was damaged, please
contact the company at the address below:
ELDAT GmbH
Im Gewerbepark 14
15711 Königs Wusterhausen
Deutschland Germany
Telefon Phone: + 49 (0) 33 75 / 90 37-0
Telefax Telefax: + 49 (0) 33 75 / 90 37-90
Internet Internet: www.eldat.de
E-Mail E-mail: info@eldat.de
Senden
•Betätigen Sie den gewünschten Taster oder
Schalter.
Hinweis:
Sie müssen die Sendecodes in die Funk-
steuerungen der zu steuernden Geräte einlernen.
Lesen Sie hierzu die Bedienungsanleitungen der
Funksteuerungen.
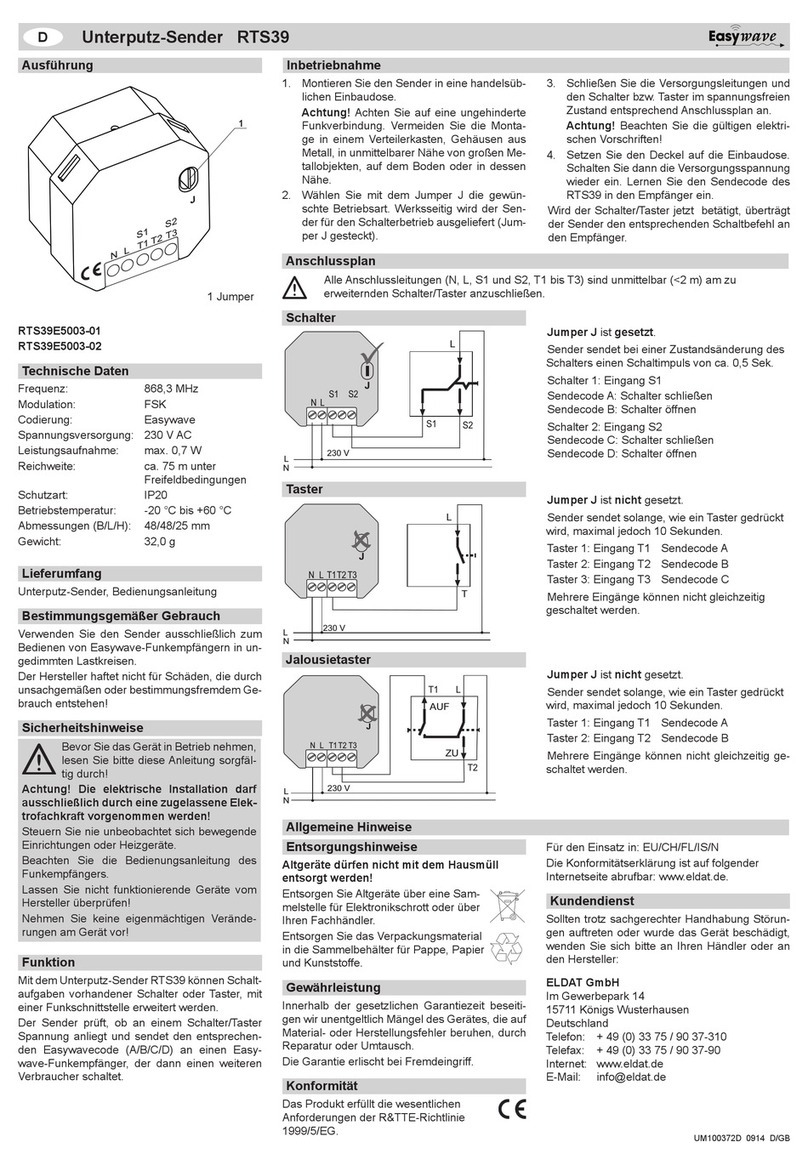
Zufallscodierung erzeugen
Der Sender wird individuell codiert ausgeliefert. Sie
haben die Möglichkeit, die Sendecodes zu ändern,
indem Sie eine neue Zufallscodierung erzeugen.
•Entfernen Sie die Batterie. (6)
•Verbinden Sie das rosa Kabel (Funktion) mit
dem blauen Kabel (GND) und dem braunen
Kabel (Eingang 4). (7)
•Setzen Sie die Batterie wieder ein. (8)
•Trennen Sie nach 1 Sekunde das rosa Kabel
vom braunen Kabel. (9)
•Verbinden Sie innerhalb von 5 Sekunden
wieder das rosa Kabel mit dem braunen Kabel.
•Trennen Sie nach 1 Sekunde das rosa Kabel
vom braunen Kabel.
•Verbinden Sie innerhalb von 5 Sekunden
wieder das rosa Kabel mit dem braunen Kabel.
•Trennen Sie nach 1 Sekunde das rosa Kabel
vom braunen Kabel. Alle 4 neuen Zufallscodes
wurden erzeugt und abgespeichert.
•Entfernen Sie die Batterie. Trennen Sie das
braune Kabel vom blauen Kabel.
•Nehmen Sie den Sender wieder in Betrieb
(siehe „Sender anschließen“).
Allgemeine Informationen
Entsorgungshinweise
Entsorgen Sie das Altgerät über eine Sammelstelle
für Elektronikschrott oder über Ihren Fachhändler.
Entsorgen Sie die Altbatterien in einen Wertstoff-
behälter für Altbatterien oder über den Fachhandel.
Entsorgen Sie das Verpackungsmaterial in die
Sammelbehälter für Kunststoffe.
Altgeräte und Batterien dürfen nicht mit dem
Hausmüll entsorgt werden!
Gewährleistung
Innerhalb der gesetzlichen Garantiezeit beseitigen
wir unentgeltlich Mängel des Gerätes, die auf
Material- oder Herstellungsfehler beruhen, durch
Reparatur oder Umtausch.
Die Garantie erlischt bei Fremdeingriff.
Konformität
Dieses Produkt erfüllt die wesentlichen
Anforderungen der R&TTE-Richtlinie
1999/5/EG.
Für den Einsatz in: EU/CH/FL/IS/N
Die Konformitätserklärung ist auf folgender Inter-
netseite abrufbar: www.eldat.de.
Technische Daten
Frequenz: 868,30 MHz oder
433,92 MHz
Modulation: ASK
Spannungsvers.: 1x 3-V-Batterie, CR 2032
Sendestrom: ca. 10 mA
Ruhestrom:
- Tasterfunktion: ca. 2,5 µA
- Schalterfunktion: ca. 5,0 µA
Schutzart: IP 20
Reichweite: Freifeld: ca. 100 m
Gebäude: ca. 30 m
Betriebstemperatur: -20°C bis +60°C
Abmessungen: 37 x 30 x 10 mm (ohne Kabel)
Gewicht: ca. 14 g (inkl. Batterie)
Transmission
•Press the desired push button or switch.
Note:
The transmission codes have to be trans-
ferred to the radio controls of the devices to be
operated. For this read the operating instructions
supplied with the radio control.
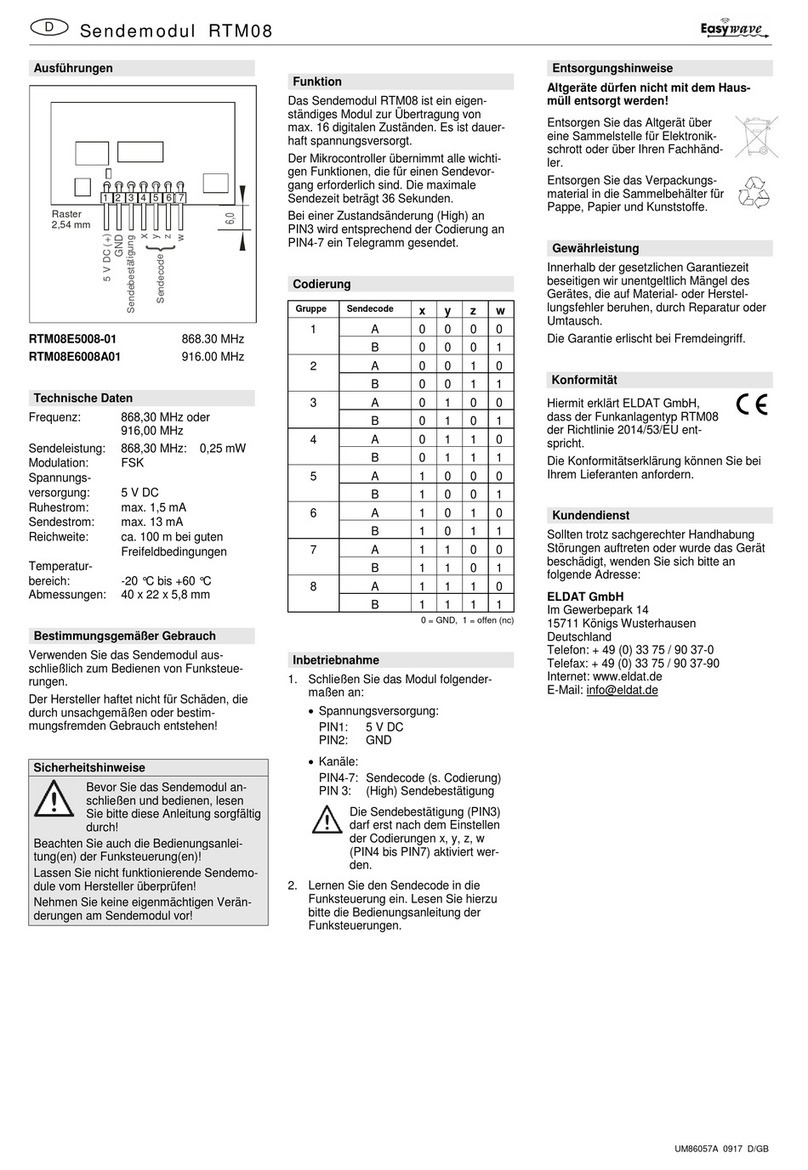
Generating Random Codes
The transmitter is supplied individually coded. You
can change the transmission codes by generating a
new random code.
•Remove the battery. (6)
•Connect the pink wire (select) with the blue wire
(GND) and the brown wire (input 4). (7)
•Insert the battery again. (8)
•Disconnect the pink wire from the brown wire
after 1 second. (9)
•Connect the pink wire with the brown wire
within 5 seconds.
•Disconnect the pink wire from the brown wire
after 1 second.
•Connect the pink wire with the brown wire
within 5 seconds.
•Disconnect the pink wire from the brown wire
after 1 second. 4 new random codes have been
generated and memorized.
•Remove the battery. Disconnect the brown wire
from the blue wire.
•Start up the transmitter again. (see „Connecting
the Transmitter“).
General Information
Disposal
Dispose of the waste product via a collection point
for electronic scrap or via your specialist dealer.
Dispose of used batteries in a recycling bin for
batteries or via the specialist trade.
Put the packaging material into a recycling bin for
plastics.
Waste electrical products and batteries should
not be disposed of with household waste!
Warranty
Within the statutory warranty period we undertake
to rectify free of charge by repair or replacement
any product defects arising from material or produc-
tion faults.
Any unauthorized tampering with, or modifications
to, the product shall render this warranty null and
void.
Conformity
This product conforms to the basic
requirements of the R&TTE Directive
1999/5/EC.
For use in: EU/CH/FL/IS/N
The Declaration of Conformity can be found on the
Internet at: www.eldat.de.
Technical Details
Frequency: 868.30 MHz or
433.92 MHz
Modulation: ASK
Power supply: 1x 3V battery, CR 2032
Transmitting current: approx. 10 mA
Stand-by current:
- button function: approx. 2,5 µA
- switch function: approx. 5,0 µA
Degree of protection: IP 20
Range: free-field: approx. 100 m
buildings: approx. 30 m
Operating temperature: -20°C to +60°C
Dimensions: 37 x 30 x 10 mm
(without wires)
Weight: approx. 14 g (incl. battery)
6
7
8
9

This manual suits for next models

2

Other Eldat Transmitter manuals

Eldat RTS03 Series User manual

Eldat

Eldat RTS03 Series User manual

Eldat Easywave RTS03 Series User manual

Eldat

Eldat Easywave RTS03 Series User manual

Eldat RT31 User manual

Eldat

Eldat RT31 User manual

Eldat Easywave RTM08 Series User manual

Eldat

Eldat Easywave RTM08 Series User manual

Eldat RT39 User manual

Eldat

Eldat RT39 User manual

Eldat RTS01 Series User manual

Eldat

Eldat RTS01 Series User manual

Eldat RT35-4104M-01 User manual

Eldat

Eldat RT35-4104M-01 User manual

Eldat RT22 Series User manual

Eldat

Eldat RT22 Series User manual

Eldat RT37 User manual

Eldat

Eldat RT37 User manual

Eldat RT22-3125M-01 User manual

Eldat

Eldat RT22-3125M-01 User manual

Eldat Easywave RTS39 Series User manual

Eldat

Eldat Easywave RTS39 Series User manual

Eldat RT22-4139M-02 User manual

Eldat

Eldat RT22-4139M-02 User manual

Eldat Easywave RTS43 User manual

Eldat

Eldat Easywave RTS43 User manual

Eldat Easywave RTS03 User manual

Eldat

Eldat Easywave RTS03 User manual

Eldat secwave RT42 User guide

Eldat

Eldat secwave RT42 User guide

Eldat Easywave RT24 Series User manual

Eldat

Eldat Easywave RT24 Series User manual

Eldat RT22-4139M-01 User manual

Eldat

Eldat RT22-4139M-01 User manual

Popular Transmitter manuals by other brands

Mighty Module MM4130 manual

Mighty Module

Mighty Module MM4130 manual

YOKOGAWA DPHarp EJX210B user manual

YOKOGAWA

YOKOGAWA DPHarp EJX210B user manual

Rice Lake SCT-2200 Quick setup guide

Rice Lake

Rice Lake SCT-2200 Quick setup guide

GRAUPNER Kingpad mc-edition mc-28 manual

GRAUPNER

GRAUPNER Kingpad mc-edition mc-28 manual

RS PRO 185-2284 Instruction leaflet

RS PRO

RS PRO 185-2284 Instruction leaflet

Weiking BT06-T user manual

Weiking

Weiking BT06-T user manual

FlowLine EchoPulse LR10 Series manual

FlowLine

FlowLine EchoPulse LR10 Series manual

FlowLine EchoSpan LU80 series manual

FlowLine

FlowLine EchoSpan LU80 series manual

CLA-VAL X117D Installation operation & maintenance

CLA-VAL

CLA-VAL X117D Installation operation & maintenance

Mecon mag-flux M1 manual

Mecon

Mecon mag-flux M1 manual

Crestron DM-TX-200-C-2G quick start

Crestron

Crestron DM-TX-200-C-2G quick start

Honeywell OELD operating instructions

Honeywell

Honeywell OELD operating instructions

MG 10MS instruction manual

MG

MG 10MS instruction manual

Williams Sound WIR TX75 C user manual

Williams Sound

Williams Sound WIR TX75 C user manual

Inovonics EchoStream TapWatch EN1501 Installation and operation manual

Inovonics

Inovonics EchoStream TapWatch EN1501 Installation and operation manual

Trio TX-599 Service manual

Trio

Trio TX-599 Service manual

August MR250 How-to guide

August

August MR250 How-to guide

OJ Electronics PTH Series manual

OJ Electronics

OJ Electronics PTH Series manual

manuals.online logo
manuals.online logoBrands
  • About & Mission
  • Contact us
  • Privacy Policy
  • Terms and Conditions

Copyright 2025 Manuals.Online. All Rights Reserved.