Elgento E26015 User manual

www.elgento.co
SNOW CONE
AND SLUSHY MAKER
MODEL E26015
YOUR SAFETY &
INSTRUCTION MANUAL
PLEASE READ CAREFULLY

2
CUSTOMER SUPPORT TEAM: +44 (0) 333 220 6057
TECHNICAL DATA
Description: Snow Cone and Slushy Maker
Model: E26015
Rated Voltage: 220 - 240V
Frequency: 60Hz
Power consumption: 25W
DOCUMENTATION
We declare that this product conforms to the following product legislation in accordance with the
following directive(s):
2014/30/EU Electromagnetic Compatibility Directive.
2014/35/EU Low Voltage Directive.
2011/65/EU Restriction of Hazardous Substances Directive.
1935/2004/EC Materials & Articles in Contact With Food (LFGB section 30 & 31).
2009/125/EC Eco-Design of Energy Related Products.
2009/48/EC Safety Of Toys.
RKW Quality Assurance, United Kingdom
WARRANTY
This product is guaranteed for 12 months from the date of original purchase. If any defect arises due
to faulty materials of workmanship, the faulty products must be returned to the place of purchase.
Refund or replacement is at the discretion of the retailer.
The following conditions apply:
• The product must be returned to the retailer with proof of purchase.
• The product must be installed and used in accordance with the instructions contained in this
instruction guide.
• It must be used only for domestic purposes.
• It does not cover wear and tear, damage, misuse or consumable parts.
• RKW has limited liability for incidental or consequential loss or damage.
• This guarantee is only Valid in the UK and Eire Only.
An extended warranty is available for this appliance.
See back page for details.

3
www.elgento.co
WIRING SAFETY FOR UK USE ONLY
IMPORTANT
As the colours in the
mains lead of this
appliance may not
correspond with the
coloured markings
identifying the terminals
in your plug, please
proceed as follows:
The wires in the mains lead are coloured in
accordance with the following code:
Blue neutral [N] Brown live [L]
Plug Fitting Details (Where Applicable).
The wire coloured blue is the neutral and must be
connected to the terminal marked [N] or coloured
black.
The wire coloured brown is the live wire and
must be connected to the terminal marked [L] or
coloured red.
On no account must either the brown or the blue
wire be connected to the [EARTH] terminal .
Always ensure that the cord grip is fastened
correctly.
The plug must be tted with a fuse of the same
rating already tted and conforming to BS 1362
and be ASTA approved.
If in doubt consult a qualied electrician who will
be pleased to do this for you.
Non-Rewireable Mains Plug
If your appliance is supplied with a non-rewireable
plug tted to the mains lead and should the fuse
need replacing, you must use an ASTA approved
one (conforming to BS 1362 of the same rating).
If in doubt, consult a qualied electrician who will
be pleased to do this for you.
If you need to remove the plug - disconnect it
from the mains - and then cut o the mains lead
and immediately dispose of it safely.
Never attempt to reuse the plug or insert it into a
socket outlet as there is a danger of an electric
shock.
WARNING:
This appliance is double insulated. Do not connect any wire to the earth terminal.

4
CUSTOMER SUPPORT TEAM: +44 (0) 333 220 6057
PRODUCT SAFETY
When using any electrical appliance, basic safety precautions should
Check that the voltage of the main circuit corresponds with the
rating of the appliance before operating.
• Check that the voltage of the
main circuit corresponds with
the rating of the appliance before
operating.
• Please ensure that the appliance
is used on a stable, level, and
heat resistant surface.
• DO NOT immerse cords, plugs
or any part of the appliance in
water or any other liquid.
• DO NOT leave the appliance
unattended while it is operating.
• Close supervision is necessary
when any appliance is used by
or near children or pets.
• This appliance can be used by
children aged from 8 years and
above and persons with reduced
physical, sensory or mental
capabilities or lack of experience
and knowledge if they have been
given supervision or instruction
concerning use of the appliance
in a safe way and understand
the hazards involved.
• Cleaning and user maintenance
shall not be made by children
without supervision.
• Switch o at the wall socket
then remove the plug from the
socket when not in use or before
cleaning.
• If the supply cord or appliance
is damaged, stop using the
appliance immediately and seek
advice from the manufacturer
or its service agent or a similarly
qualied person.
• DO NOT let the cord hang over
the edge of a table or counter or
let it come into contact with any
hot surfaces.
• The use of accessory
attachments is not
recommended by the appliance
manufacturer, apart from those
supplied with this product.
• DO NOT pull the plug out by the
cord as this may damage the
plug and/or the cable.
• DO NOT use this product for
anything other than its intended
use.
• This appliance is for household
use only.
• DO NOT carry the appliance by
the power cord.

5
www.elgento.co
• CAUTION: Avoid contact with
moving parts. Keep hands
and utensils out of the bowl
while operating to prevent
personal injury or damage to the
appliance.
• CAUTION: Never let the power
unit, cord or plug get wet.
• DO NOT use the appliance
outdoors.
• Avoid contact with moving parts
at all times.
• DO NOT overload the appliance.
• In the unlikely event the
appliance develops a fault,
stop using it immediately and
seek advice from the Customer
Support Team.
HIGH VOLTAGE

6
CUSTOMER SUPPORT TEAM: +44 (0) 333 220 6057
WHAT’S IN THE BOX
Instruction Manual
Mixing Paddle
1. Lid
2. Ice Shaving Chamber
3. Shaft
4. Main Body
5. Mixing Paddle
6. Mixing Bowl
7. Selector Knob
BEFORE YOUR FIRST USE:
• Remove your appliance from the packaging.
• Check that there is no damage to the cord or any visible damage to the body.
• Your appliance is now ready for normal use.
• Dispose of the packaging in a responsible manner.
Dispose of the packaging in a responsible manner.
1 2 3
6
7
4
5

7
www.elgento.co
USING YOUR APPLIANCE
1. Make sure the unit is unplugged. Place unit
on a clean, dry surface.
2. Place ice shaving chamber in main body
and ensure it is seated on the shaft.
3. Twist the shaft in counter-clockwise to lock
into position.
4. Place the mixing paddle in bowl.
5. If mixing shaved ice with other ingredients,
place ingredients in bowl.
Note: Use the serving size markings as a guide
for appropriate ice and liquid levels. For a large
or small serving, ll the ice and liquid to the level
indicated on the bowl.
6. Slide bowl into groove on main body
and turn clockwise until it stops. This will
allow the mixing paddle to mix ice and
ingredients once operation begins.
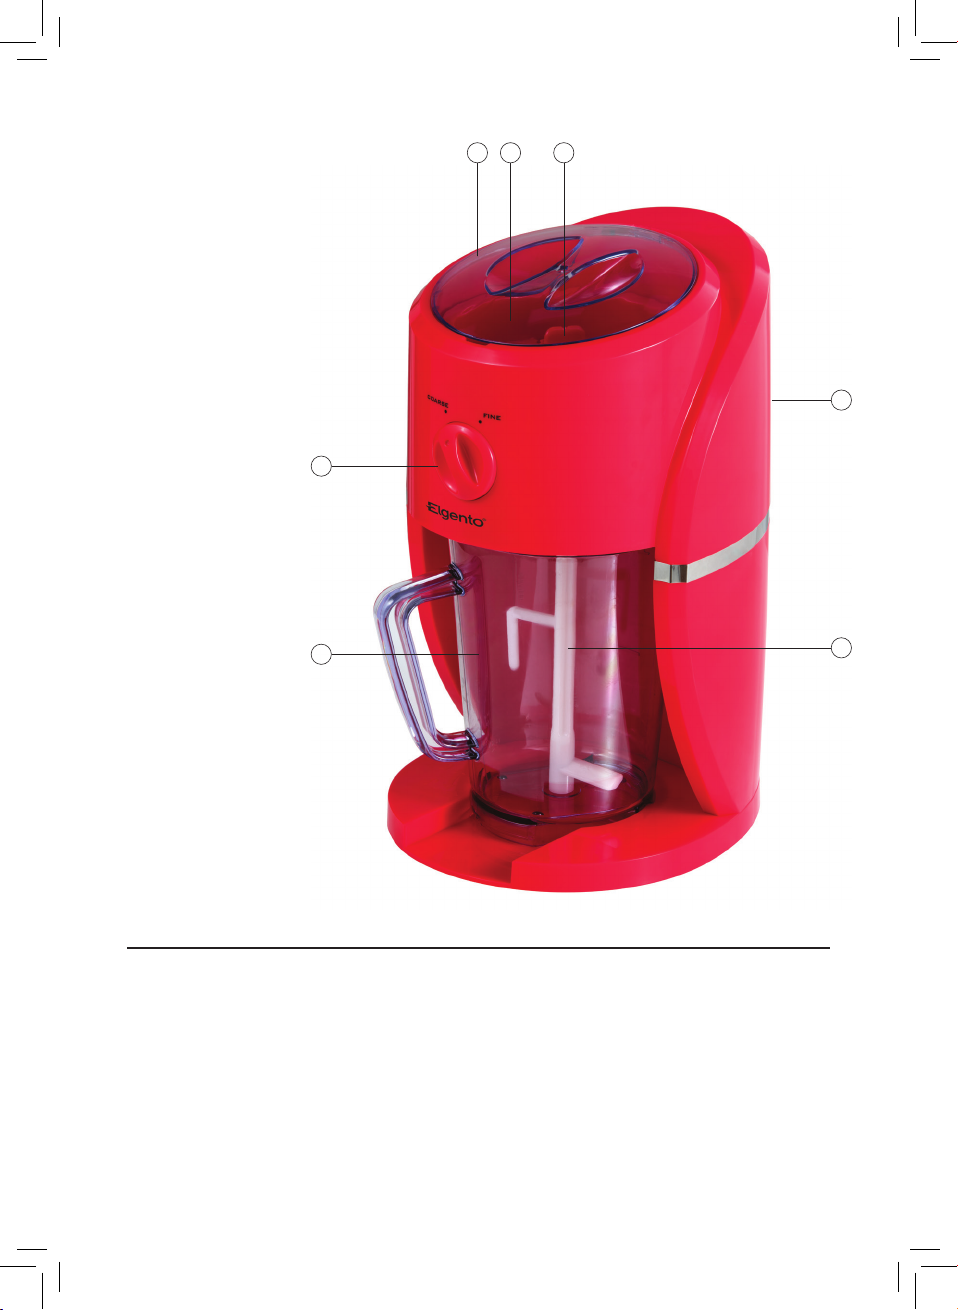
7. Turn selector knob to desired setting. The
ne setting produces ner ice. The coarse
cone setting produces coarser ice.
8. Place ice in the ice shaving chamber. Do
not shave ice above MAX line.
9. Plug cord into outlet.
10. Place lid on main body and turn counter-
clockwise to engage the interlock switch
(power on/o) the unit will start and begin
to shave ice.
11. Turn lid clockwise to stop.
12. To remove bowl , turn counter-clockwise,
slide out and serve
WARNING: Cut Hazard - Avoid contact with the
Shaving Blade. Do not use if the Shaving Blade
is loose, cracked, bent or damaged.
CLEANING AND CARE
IMPORTANT!
• Remove plug from the mains socket, and
allow the appliance to cool down before
cleaning.
• Do not immerse the motor unit of the
appliance in water and make sure no water
enters the appliance.
• Clean the motor unit by wiping it with a
damp cloth. A little detergent can be added
if the appliance is heavily soiled.
• Do not use scouring pads, steel wool or
any form of strong solvents or abrasive
cleaning agents to clean the appliance, as
they may damage the outside surfaces of
the appliance.
• Be careful if you wash the cutter by hand,
as the blades are extremely sharp. If the
cutter is not properly attached, liquid may
seep out into the internal part of the base
unit. This may also be removed using
a slightly dampened cloth and a little
detergent.
IMPORTANT! Allow the unit to dry fully after
cleaning before using again. Do not use the
appliance if damp. Ensure the appliance is
completely clean and dry before storing.

8
CUSTOMER SUPPORT TEAM: +44 (0) 333 220 6057
TO STORE YOUR APPLIANCE:
IMPORTANT!
1. Unplug power cord from the power outlet
and clean as above.
2. Allow the appliance to dry fully.
3. Store on a at, dry level surface out of
reach of children.
WARNING:
DO NOT IMMERSE ANY ELECTRICAL PART
OF THE APPLIANCE IN WATER
DISPOSAL OF THE UNIT
Appliances bearing the symbol shown here
may not be disposed of in domestic rubbish.
You are required to dispose of old electrical
and electronic appliances like this separately.
Please visit www.recycle-more.co.uk or
www.recyclenow.co.uk
for access to information about the recycling
of electrical items.
Please visit www.weeeireland.ie for access to
information about the recycling of electrical
items purchased in Ireland.
The WEEE directive, introduced in August
2006, states that all electrical items must be
recycled, rather than taken to landll.
Please arrange to take this appliance to your
local Civic Amenity site for recycling, once it
has reached the end of its life.

9
www.elgento.co
NOTES

10
CUSTOMER SUPPORT TEAM: +44 (0) 333 220 6057
NOTES

11
www.elgento.co
NOTES

We hope you enjoy your appliance for many years.
As a thank you for purchasing one of our fantastic products,
we are oering you an extra years peace of mind.
To receive your extra years guarantee, register your appliance online by visiting
www.elgento.co
Should you have a problem
with your appliance or need any spare parts please call our
Customer Support Team on:
+44 (0) 333 220 6057
Distributed throughout the UK by RKW LTD
0917.V1
Table of contents
Other Elgento Kitchen Appliance manuals

Elgento
Elgento E21002 Mounting instructions

Elgento
Elgento E14024 User manual

Elgento
Elgento E19022 User manual

Elgento
Elgento E459 User manual

Elgento
Elgento E011/MO User manual

Elgento
Elgento E27009 User manual

Elgento
Elgento E14018 User manual

Elgento
Elgento E26005 Mounting instructions

Elgento
Elgento E27002 User manual

Elgento
Elgento E010 Mounting instructions