RFSOU-1
Wireless twilight switch
EN
02-53/2015 Rev.3
Made in Czech Republic
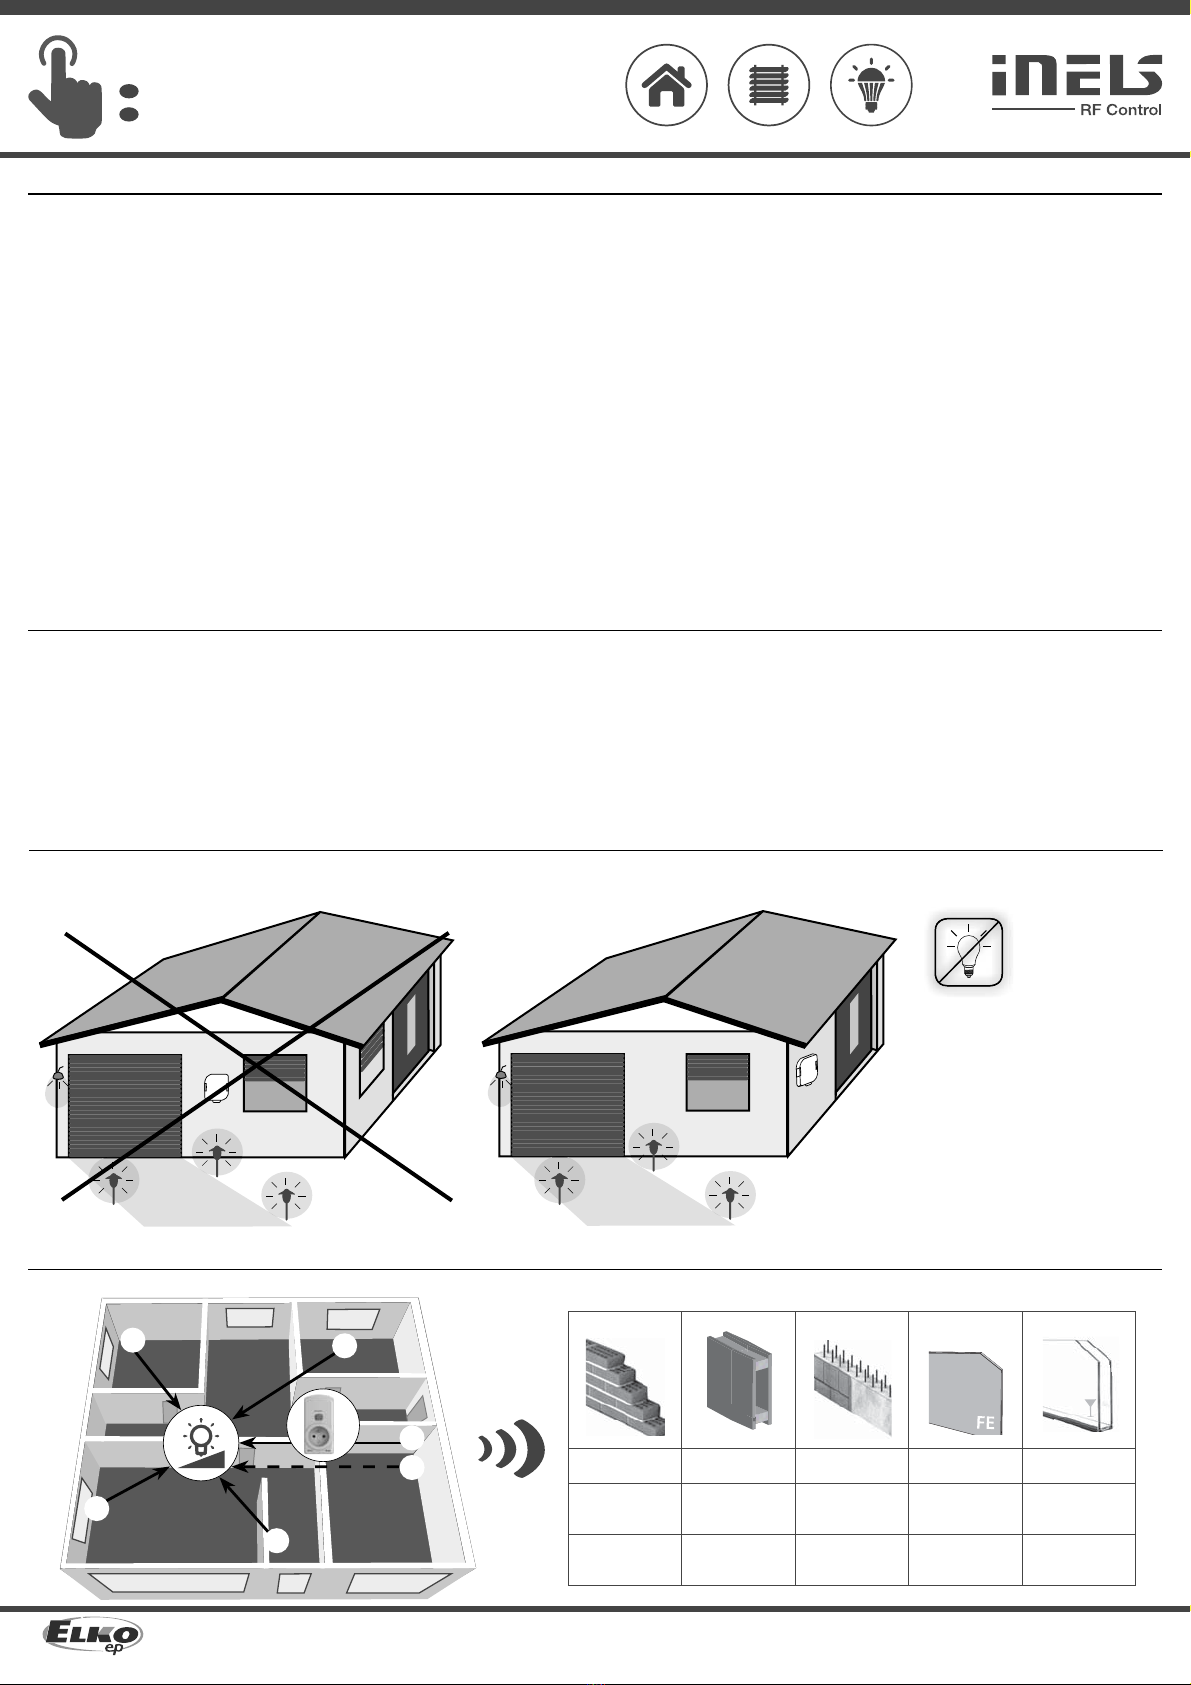
Programming with RF actuators /
On the rotating switch
Function, set the type of unit
that you want to assign (table 1).
While pressing Prog on the
RFSOU-1, insert the batteries.
Observe the polarity. This
activates the programming
mode. Red LED is flashing in
1s interval. After inserting the
batteries, release the button.
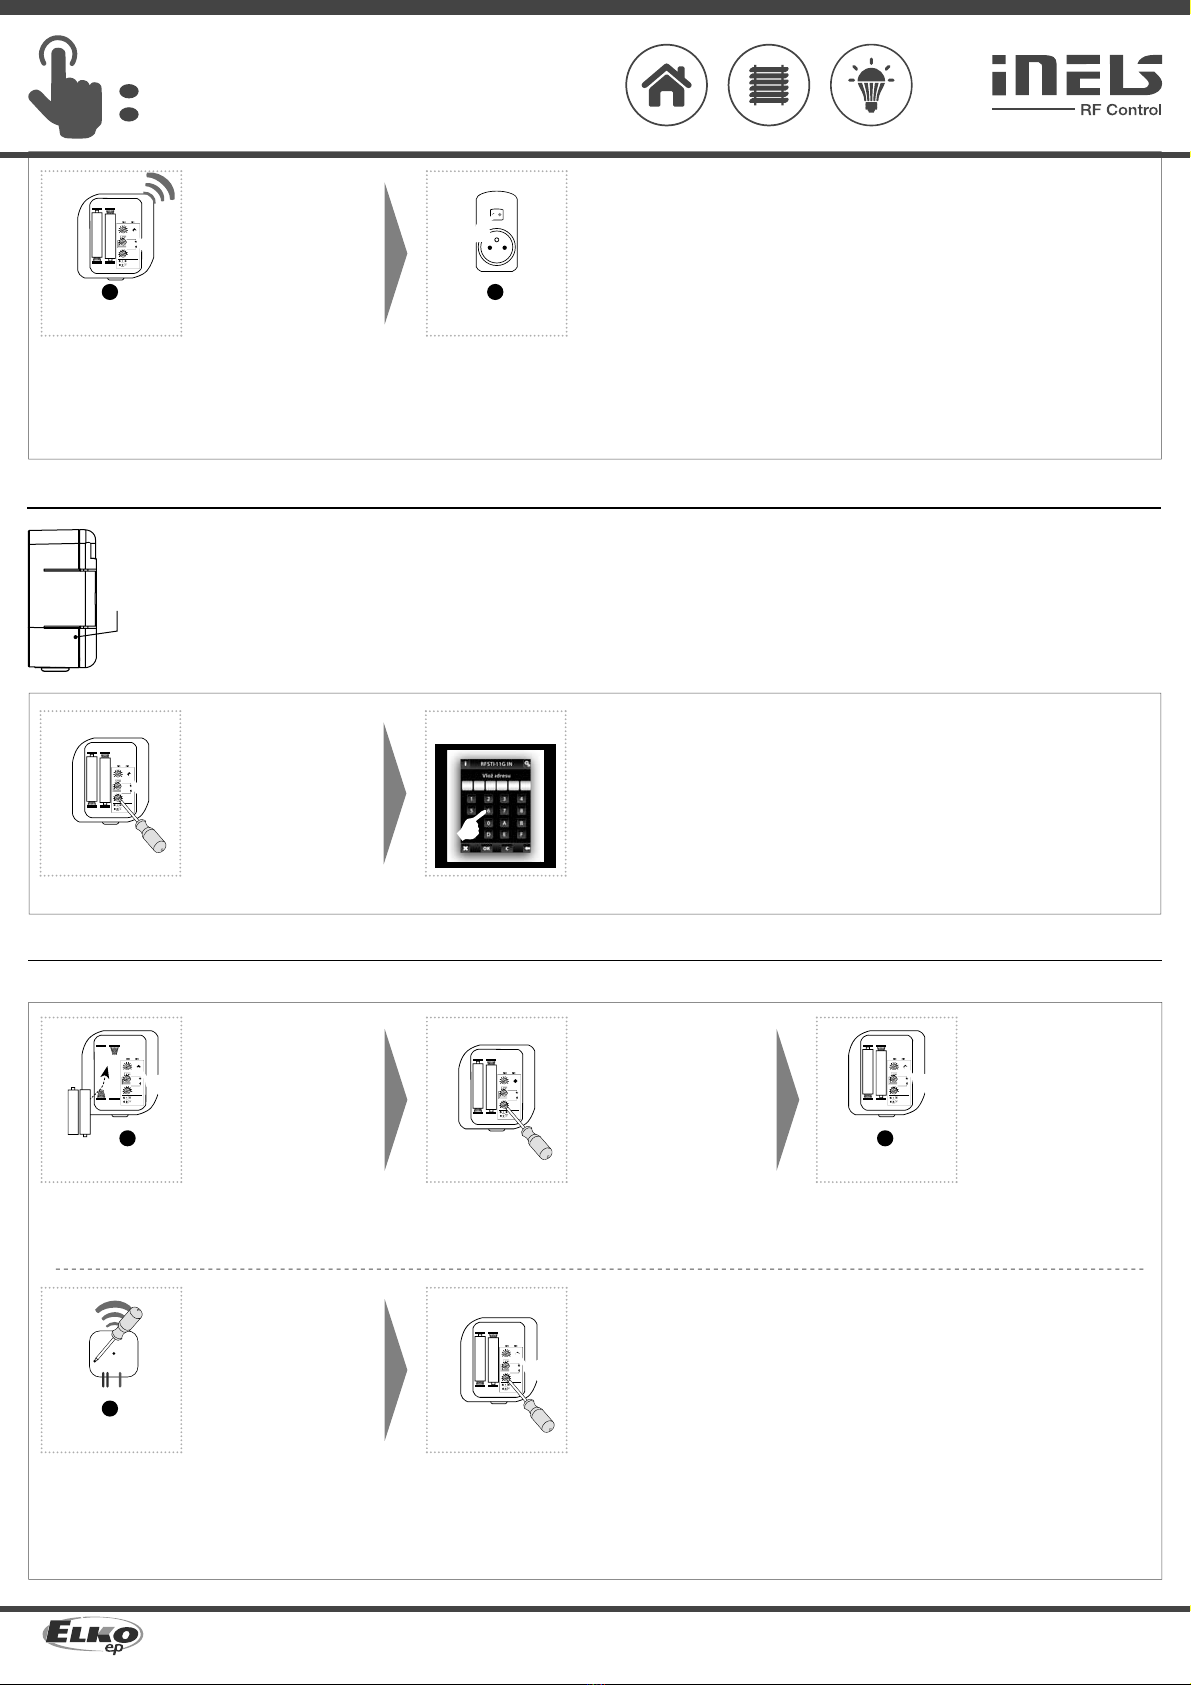
Programming RFSA and RFDA /
Pressing Prog on the assigned
RF unit (must be connected
to the power supply) sends a
signal. The RFSOU-1 indicates
signal receipt by a red LED
that illuminates for 1s.
3
PROG < 1s
1 x
On the rotating switch
Function, set the type
according to the desired delay
(table 2). Confirm the settings
by pressing the Prog button
< 1s.
Press of programming button
on actuator RFSOU-1 shorter
then 1 second will finish
programming mode.
You can program the next RF
unit after a 6-second delay
- the red LED flashes once
again.
LuxFine
MIN MAX PROG
100- 1.000
1.000- 10.000
10.000- 100.000
1- 10
10- 100
100- 1.000
Range
(I x )
Function
lightswitch
twilightswitch
5 6
4 7
3 8
2 9
1
+
-
+
-
4
PROG < 1s
1 x
1
PROG
1 x
LuxFine
MIN MAX PROG
100- 1.000
1.000- 10.000
10.000- 100.000
1- 10
10- 100
100- 1.000
Range
(I x )
Function
lightswitch
twilightswitch
5 6
4 7
3 8
2 9
1
+
-
+
-
2
LuxFine
MIN MAX PROG
100- 1.000
1.000- 10.000
10.000- 100.000
1- 10
10- 100
100- 1.000
Range
(I x )
Function
lightswitch
twilightswitch
5 6
4 7
3 8
2 9
1
+
-
+
-
5
PROG <1s
1 x
LuxFine
MIN MAX PROG
100- 1.000
1.000- 10.000
10.000- 100.000
1- 10
10- 100
100- 1.000
Range
(I x )
Function
lightswitch
twilightswitch
5 6
4 7
3 8
2 9
1
+
-
+
-
6
LuxFine
MIN MAX PROG
100- 1.000
1.000- 10.000
10.000- 100.000
1- 10
10- 100
100- 1.000
Range
(I x )
Function
lightswitch
twilightswitch
5 6
4 7
3 8
2 9
1
+
-
+
-
On the rotating switch
Function, set type 2 (RFJA).
While pressing Prog on the
RFSOU-1, insert the batteries.
Observe the polarity. This
activates the programming
mode. Red LED is flashing in
1s interval. After inserting the
batteries, release the button.
Programming RFJA /
By pressing the button > 3s
on the RF controller (to which
the RFJA is programmed),
start the blinds moving so
they move to one of the
extreme end positions. At
the moment when the relay
opens, the RFJA unit sends a
signal. The RFSOU-1 indicates
signal receipt by a red LED
that illuminates for 1s.
3
>3s1 x
1
PROG
1 x
LuxFine
MIN MAX PROG
100- 1.000
1.000- 10.000
10.000- 100.000
1- 10
10- 100
100- 1.000
Range
(I x )
Function
lightswitch
twilightswitch
5 6
4 7
3 8
2 9
1
+
-
+
-
2
LuxFine
MIN MAX PROG
100- 1.000
1.000- 10.000
10.000- 100.000
1- 10
10- 100
100- 1.000
Range
(I x )
Function
lightswitch
twilightswitch
5 6
4 7
3 8
2 9
1
+
-
+
-
On the rotating switch
Function, set the type
according to the desired delay
(table 2). Confirm the settings
by pressing the Prog button
< 1s.
Press of programming button
on actuator RFSOU-1 shorter
then 1 second will finish
programming mode.
You can program the next RF
unit after a 6-second delay
- the red LED flashes once
again.
5
PROG <1s
1 x
LuxFine
MIN MAX PROG
100- 1.000
1.000- 10.000
10.000- 100.000
1- 10
10- 100
100- 1.000
Range
(I x )
Function
lightswitch
twilightswitch
5 6
4 7
3 8
2 9
1
+
-
+
-
6
LuxFine
MIN MAX PROG
100- 1.000
1.000- 10.000
10.000- 100.000
1- 10
10- 100
100- 1.000
Range
(I x )
Function
lightswitch
twilightswitch
5 6
4 7
3 8
2 9
1
+
-
+
-
LuxFine
MIN MAX PROG
100- 1.000
1.000- 10.000
10.000- 100.000
1- 10
10- 100
100- 1.000
Range
(I x )
Function
lightswitch
twilightswitch
5 6
4 7
3 8
2 9
1
+
-
+
-
4
PROG < 1s
1 x
3/7
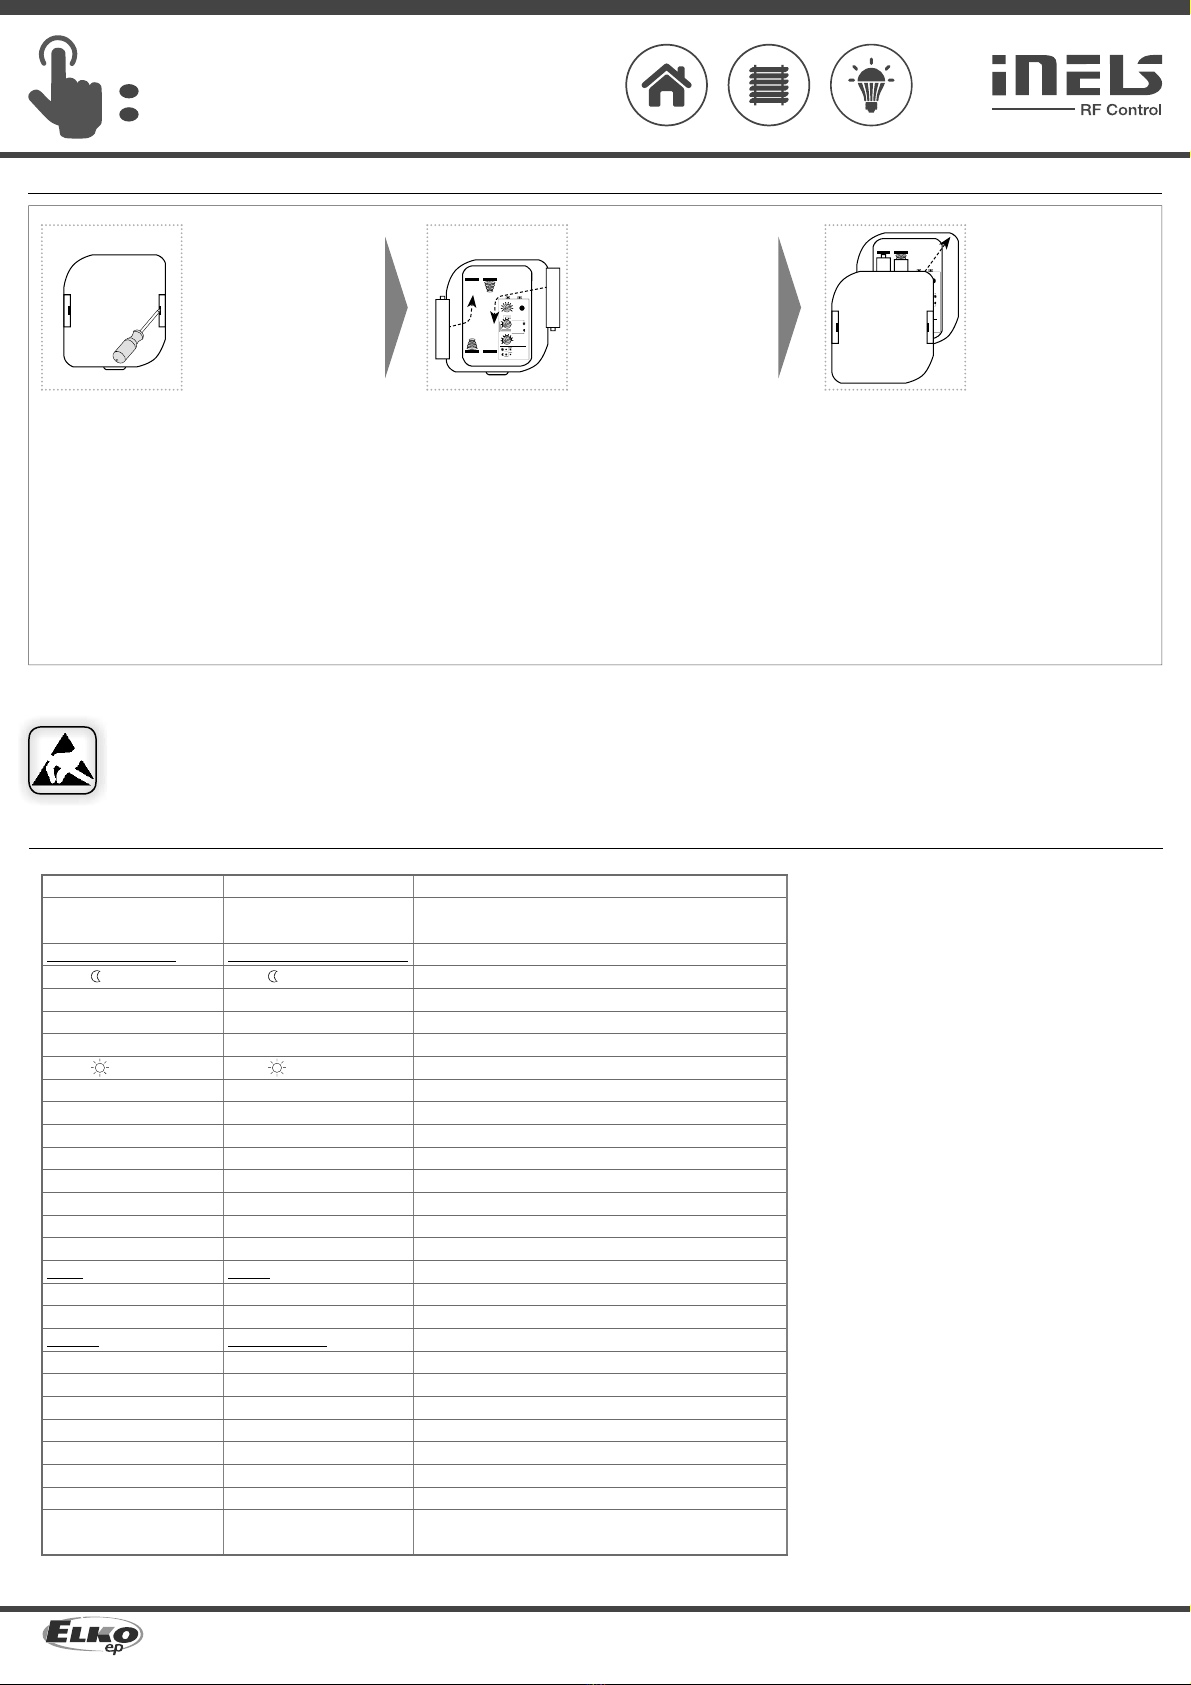
Programming RF units with communication via RFRP-20 /
Steps 1-6 are
the same as
Programming
the RF units (see
above).
178
When inserting the RFRP-20
into an electrical socket (upon
power-up), the programming
button must be pressed.
The green LED flashes. Then
when the red LED button
illuminates, release the button.
By one short press of the
programming button on
the RFRP-20, you move
to the position for input into
the additional learning mode.
The red LED flashes - after
5s the RFRP-20 enters the
additional learning mode.
The LED stops flashing.
PROG < 1s
1 x
23456
LuxFine
MIN MAX PROG
100- 1.000
1.000- 10.000
10.000- 100.000
1- 10
10- 100
100- 1.000
Range
(I x )
Function
lightswitch
twilightswitch
5 6
4 7
3 8
2 9
1
+
-
+
-
Programming /
ELKO
EP
,
s
.r
.o.
|
P
alackého
493
|
769
01
Holešov
,
V
šetuly
|
Czech
Republic
|
e
-mail:
[email protected] |
Support:
+420
778
427
36
6ELKO
EP
Hungary
Kft.
|
Hungária
kr
t.
69
|
1143
Budapest
|
Magyarország
|
e-mail:
[email protected] |
T
echnikai
támogatás:
+36
1
40
30 132 www.elkoep.com / www.elkoep.hu
Vezeték nélküli alkonykapcsoló
HU
Programozás RF egységekkel
RFSA és RFDA programozása
A PROG gomb nyomva
tartása mellett helyezze
be az elemeket. Ügyeljen a
polaritásra. Ezzel aktiválja a
programozási üzemmódot. A
piros LED 1 mp-es ütemben
villog. Az elemek behelyezése
után engedje fel a gombot.
A "Function" forgókapcsolóval
válassza ki a párosítandó
egység típusát (1. táblázat).
Nyomja meg a hozzárendelni
kívánt kapcsolóegység PROG
gombját (előtte csatlakoztatni
kell a tápellátást), az aktor
ekkor jelet küld. Az RFSOU-1
jelzi az üzenet beérkezését,
piros LED-je 1 mp-ig világít.
6 mp várakozás után lehetséges
további RF egységek párosítása
- a piros LED ismét felvillan
egyszer.
A programozás befejezése
után nyomja meg a PROG
gombot röviden (< 1 mp). A "Function"forgókapcsolóval
állítsa be a típusnak megfelelő
késleltetést (2. táblázat).
Megerősítéshez nyomja meg
a PROG gombot röviden
(< 1 mp).
RFJA programozása
A PROG gomb nyomva
tartása mellett helyezze
be az elemeket. Ügyeljen a
polaritásra. Ezzel aktiválja a
programozási üzemmódot. A
piros LED 1 mp-es ütemben
villog. Az elemek behelyezése
után engedje fel a gombot.
A "Function" forgókapcsolóval
válassza ki a 2. típust (RFJA).
Az RFJA-hoz beprogramozott
vezérlőn nyomja 3 mp-nél
hosszabban a gombot, hogy
a redőny elinduljon és a
végállásig mozogjon. A relé
bontásának pillanatában az
RFJA egység jelet küld. Az
RFSOU-1 jelzi a jel beérkezését,
a piros LED 1 mp-ig világít.
6 mp várakozás után lehetséges
további RF egységek párosítása
- a piros LED ismét felvillan
egyszer.
A programozás befejezése
után nyomja meg a PROG
gombot röviden (< 1 mp). A "Function" forgókapcsolóval
állítsa be a típusnak megfelelő
késleltetést (2. táblázat).
Megerősítéshez nyomja meg
a PROG gombot röviden
(< 1 mp).
RF egység beprogramozása RFRP-20 jelismétlőn keresztül történő kommunikációval
Programozás
Az 1 - 6 lépések
megegyeznek
az RF egységek
programozásánál
leírtakkal (lásd
feljebb).
Tartsa nyomva az RFRP-
20 programozó gombját,
miközben a hálózati aljzatba
dugja (tápfeszültség ráadása).
A zöld LED villog. Amikor a
piros LED világít, engedje fel
a gombot.
A programozó gomb egyszeri
megnyomásával lépjen
be az RFRP-20 "tanítási"
üzemmódjába. A piros LED
villog - 5 másodperc múlva az
RFRP-20 "tanítási" módba lép. A
LED kialszik.