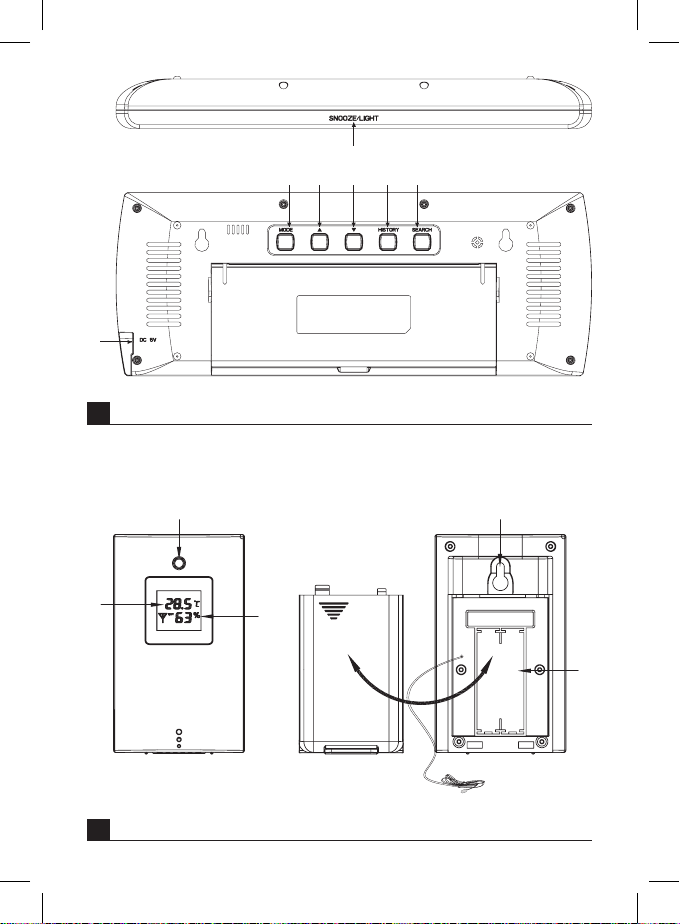
5
Sensor Description
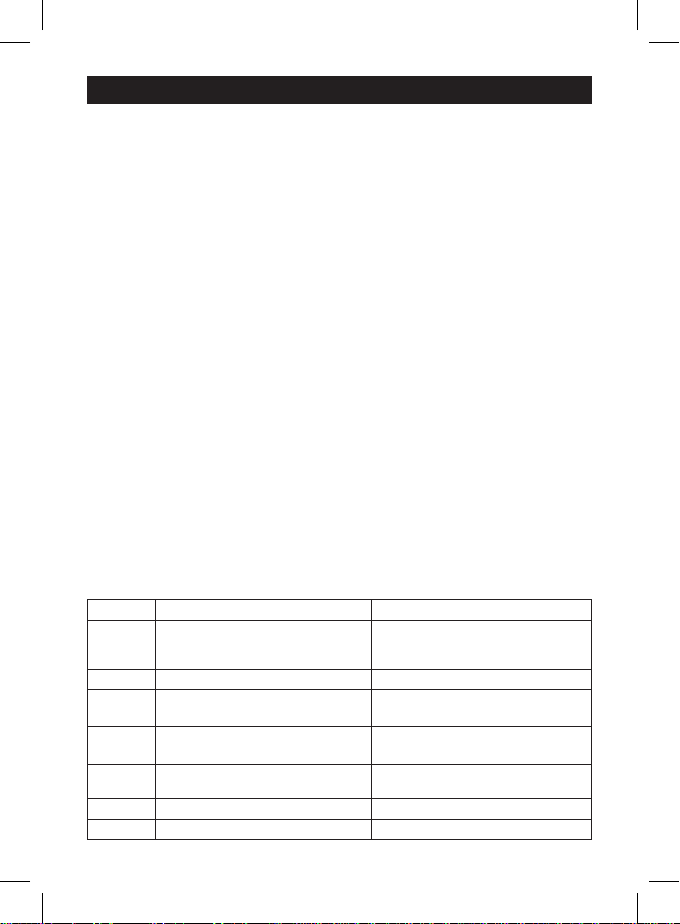
(see Fig. 3)
1. – outdoor temperature; 2. – outdoor humidity; 3. – LED indication of signal transmission to the station;
4. – hole for hanging on a wall; 5. – battery compartment
Attention
Only use 1.5 V alkaline batteries of the same type; do not use rechargeable 1.2 V batteries.
Lower voltage may cause both of the units to not function.
Getting Started
1. First insert batteries into the weather station (3× 1.5V AAA)/ plug the 5V power adapter included
with the device into the station.
2. Then insert batteries into the wireless sensor (2× 1.5 V AAA). When inserting the batteries make
sure the polarity is correct to avoid damaging the weather station or sensor.
3. After inserting batteries into the weather station, the altitude information on the weather station's
screen will begin ashing; use the "", "" (C and D) buttons to input the altitude of your location
and conrm by pressing the History (E) button. The weather forecast icon will start ashing; use the
"", "" (C and D) buttons to select the current weather and conrm by pressing the History button.
4. Then, insert batteries into the wireless sensor (2× 1.5V AAA) and make sure you observe the correct
battery polarity.The red LED indicator will start ashing. The weather station is now trying to connect
to the wireless sensor. This process can take up to 3 minutes. In the event of a connection failure,
press and hold the "SEARCH" button on the station for longer than 3 seconds.
5. We recommend placing the sensor on the north side of the house. The range of the sensor may
decrease substantially in areas with large number of obstacles.The sensor is resistant to dripping
water; however, it should not be exposed to sustained rain. Do not place the sensor on metal objects
as these would reduce transmission range.
6. You can place the sensor vertically or hang it on a wall.
7. If the weather station screen shows the low battery icon in eld no. 17, replace the batteries
in the sensor.
8. If the weather station screen shows the low battery icon in eld no. 26, replace the batteries
in the sensor.
Radio Controlled Clock (DCF77)
• Automatic search for DCF will begin after the 3 minutes spent searching for the outdoor sensor.
The " ”symbol next to the time will be ashing. Once the weather station successfully receives DCF
signal, the screen will show the " ”icon
• Simultaneously press the "" and "" buttons for 3 seconds to manually turn DCF signal search
on or o.
• The clock synchronises daily between 1:00 and 3:00 a.m. If synchronisation is unsuccessful, the
process is repeated between 4:00 and 5:00 a.m.
• In standard conditions (at safe distance from sources of interference, such as TV sets or computer
monitors), the reception of time signal takes several minutes.
• If the weather station does not detect the signal, follow these steps:
• Move the weather station to another location and try to detect DCF signal again.
• Check the distance of the clock from sources of interference (computer monitors or television sets).
The distance should be at least 1.5 to 2 m during signal reception.
• When receiving DCF signal, do not place the weather station in the proximity of metal doors,
window frames and other metal structures or objects (washing machines, dryers, refrigerators etc.).
• In reinforced concrete structures (cellars, high-rise buildings etc.), the DCF signal reception is weaker,
depending on the conditions.
• In extreme cases, place the weather station close to a window toward the transmitter.
Reception of DCF radio signal is aected by the following factors:
• thick walls and insulation, basements and cellars
• inadequate local geographical conditions (these are dicult to assess in advance)