Endo BS3W User manual

INSTRUCTION MANUAL
SQUARE BALANCER
BS3W/BS3N
BS5W/BS5N
BS7W/BS7N
ENDO KOGYO CO., LTD.
BM-10121c
WARNING
・Read this manual before use.
・Keep this manual available.
Issued on April 2016
Copied digital data
from http://www.endo-kogyo.co.jp/

Copyright and liabilities
The copyright for this manual belongs to Endo Kogyo Co., Ltd.
The manual is provided for the limited purpose of supporting the safe and proper use of
the product. It cannot be used for other purposes.
The customer may not use or make copies of this manual, in whole or in part, outside of
this purpose without receiving prior consent from Endo Kogyo Co., Ltd.
The customer is also prohibited from translating or modifying the content of the manual,
in whole or in part.
The content described in the manual is subject to change without advance notice.
Please note this in advance.
November 2019 ENDO KOGYO CO., LTD.
Copied digital data
from http://www.endo-kogyo.co.jp/
SAFETY ALERT SYMBOL AND ALERT SIGNS SIGNS
Please read this manual carefully and follow its instructions.
The SAFETY ALERT SYMBOL ( ), WARNING, CAUTION, and NOTE carry
special messages.
This SAFETY ALERT SYMBOL is used to call your attention to
items or operations that could be dangerous to you or other persons
using this equipment.
Please read these messages and follow these instructions carefully.
:CAUTION indicates a hazardous situation which,
if not avoided, could result in minor or moderate
injury, damage or destruction of the equipment and
others.
:WARNING indicates a hazardous situation which,
if not avoided, could result in death or serious
injury.
NOTE:NOTE indicates a special instruction in operation or maintenance.
Copied digital data
from http://www.endo-kogyo.co.jp/

Scope of warranty and liabilities for the equipment
1. We will repair or replace the product free of charge if a failure due to manufacturing defects
occurs under proper usage during the warranty period.
For details, contact us or your dealer.
2. The warranty will be void in the following cases:
1) Change in ownership.
2) Repair, adjustment, or modification performed by a party other than the manufacturer, agents,
or dealers.
3. Warranty period is 1 year from your purchase.
However, wire rope, wire guide and spring are not covered by warranty.
4. Repairs applicable to any of the following shall be charged even during the warranty period:
1) Failure/damage caused by incorrect use.
2) Failure/damage caused by use of non-genuine parts.
3) Failure/damage caused by fire, earthquake, natural disaster, or other unexpected incident.
4) Incident caused by fall, shock, negligence, or by inadequate storage.
5) Failure/damage caused by use of parts or other equipment that are not included in this product.
6) Replacement of consumables.
7) Usage in violation of dangers or cautions stipulated in this Instruction Manual or the warning
labels.
8) Failure/damage caused by any reason that is not attributable to the manufacturer.
5. Warranty exclusions such as opportunity loss.
Either during or after the warranty period, opporunity loss, damage to anything other than our
product(s), or other duties incurred on you/your customer as a result of the failure of our
product(s) are outside the scope of the warranty.
Copied digital data
from http://www.endo-kogyo.co.jp/

CONTENTS
1. Safety instructions ・・・・・・・・・・・・・・・・・・・・・・・・・・・・・・・・・・・・・・・・・・ 1
2. Specifications ・・・・・・・・・・・・・・・・・・・・・・・・・・・・・・・・・・・・・・・・・・・・・・・・・ 1
3. Drawing ・・・・・・・・・・・・・・・・・・・・・・・・・・・・・・・・・・・・・・・・・・・・・・・・・・・・・・・ 1
4. Spring tension attachment ・・・・・・・・・・・・・・・・・・・・・・・・・・・・・・・・・・・・・・2
5. Safety instructions on use ・・・・・・・・・・・・・・・・・・・・・・・・・・・・・・・・・・・・・・ 2
6. Inspections ・・・・・・・・・・・・・・・・・・・・・・・・・・・・・・・・・・・・・・・・・・・・・・・・・・・・ 4
7. Rope replacement ・・・・・・・・・・・・・・・・・・・・・・・・・・・・・・・・・・・・・・・・・・・・・・・5
8. Spring replacement ・・・・・・・・・・・・・・・・・・・・・・・・・・・・・・・・・・・・・・・・・・・・・5
9. Spring disposal ・・・・・・・・・・・・・・・・・・・・・・・・・・・・・・・・・・・・・・・・・・・・・・・・・6
10. Parts list ・・・・・・・・・・・・・・・・・・・・・・・・・・・・・・・・・・・・・・・・・・・・・・・・・・・・・・7
Copied digital data
from http://www.endo-kogyo.co.jp/

1. Safety Instructions
WARNING
・Incorrect use of the balancer could cause personal injury.
・Observe instructions in the manual and use the spring rod correctly.
・Install the balancer correctly.
・Never use overhead or at the place where may cause an accident in case of suspended load
falling.
・Never place hands, feet, etc., under suspended loads or movable range of rope.
・Never alter the balancer.
・Periodically inspect the balancer.
2. Specifications
Model
Capacity
range(kg)
Stroke(m)
Type of rope
Mass(kg)
BS3W
1.5~3.0
1.3
Wire rope
With thimble
Approx.2.3
BS5W
3.0~5.0
Approx.2.5
BS7W
5.0~7.0
Approx.2.5
BS3N
1.5~3.0
Nylon rope
Without thimble
Approx.2.3
BS5N
3.0~5.0
Approx.2.5
BS7N
5.0~7.0
Approx.2.5
■Working conditions Application area : Indoor and normal atmospheric conditions
Temperature range: -10 ゚C to +50 ゚C
3. Drawing
Copied digital data
from http://www.endo-kogyo.co.jp/
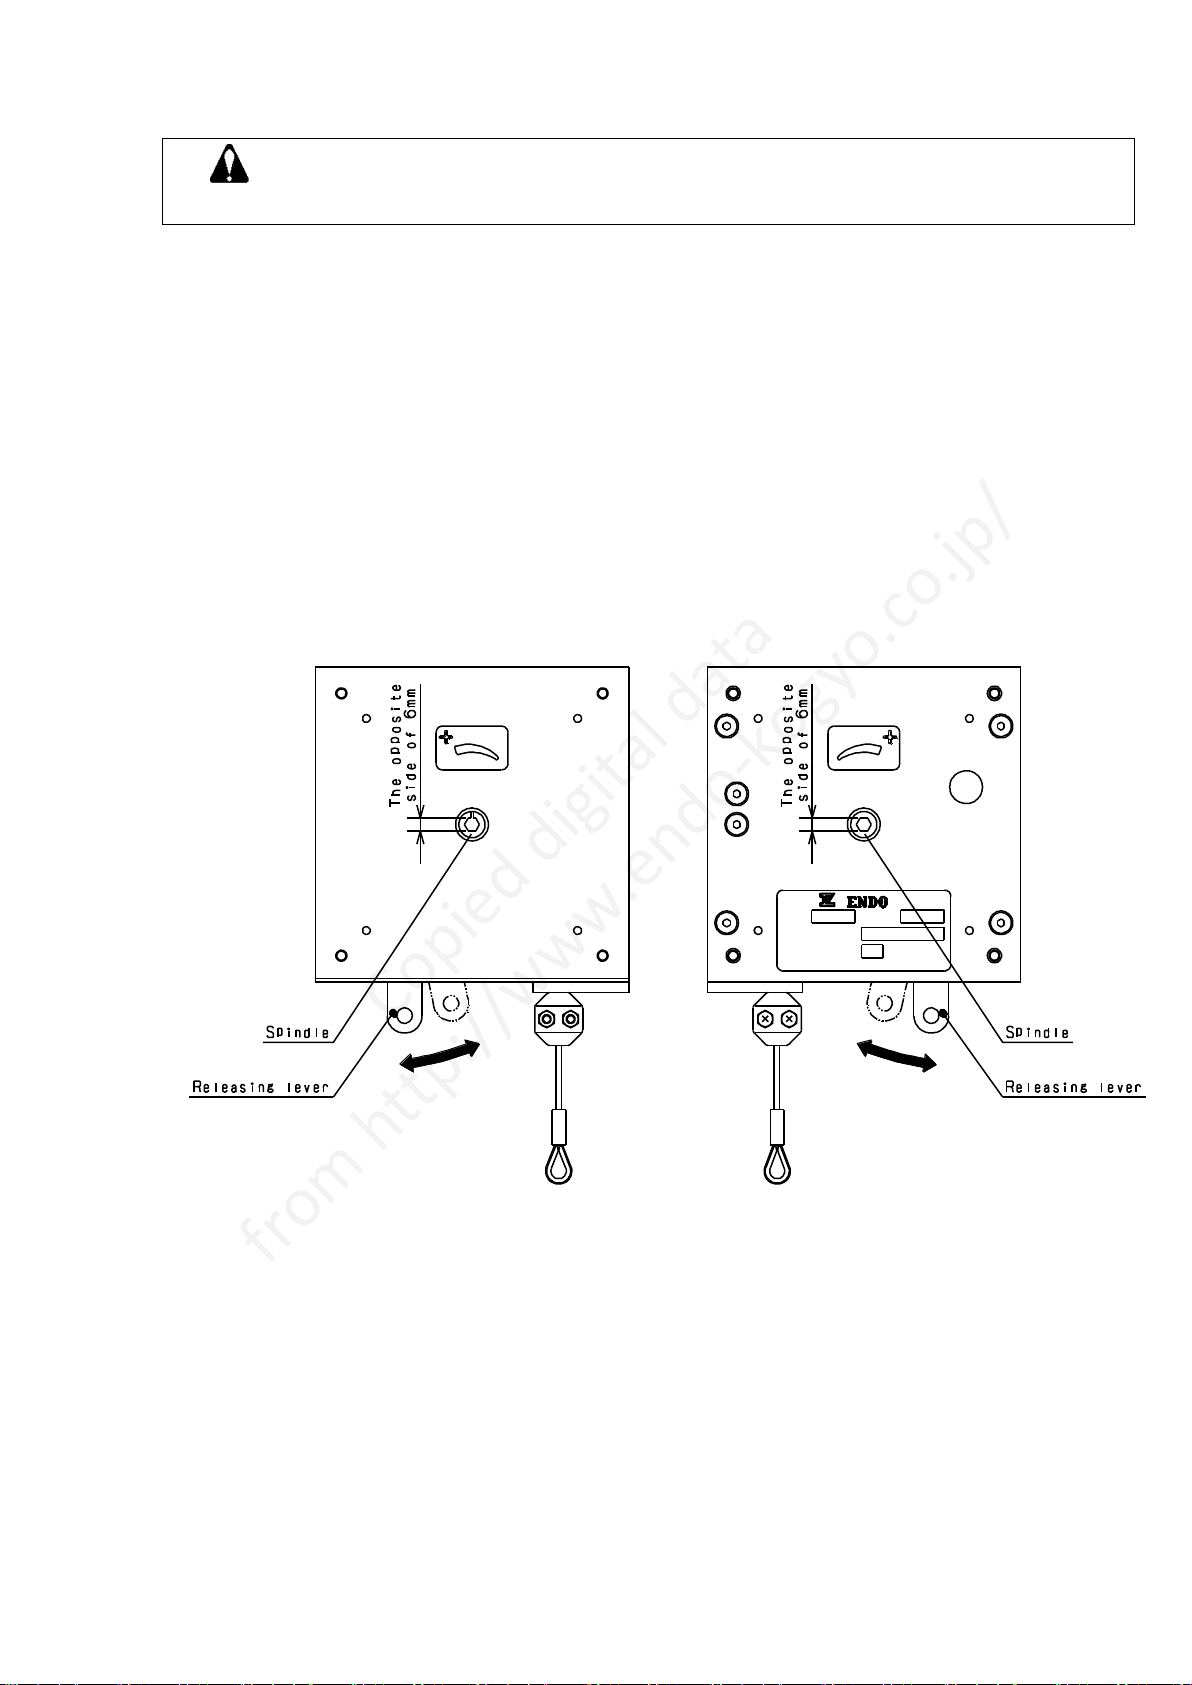
4. Spring tension attachment
CAUTION
・Never move releasing lever with inserting hexagon socket screw key(adjustment tool).
1) Confirm that the weight of suspended load is within the capacity range of the balancer when
you suspend tool/device or when you pull rope sideways.
2) Increase the spring tension by turning the spindle to the + side with a hexagon socket screw
key.(see Fig.1)
CAUTION: turn it to the opposite direction, the spring will break.
Please confirm indication of main body, the direction of two sides is not same.
Decrease the spring tension by moving releasing lever in right and left.
NOTE:Factory setting of spring tension
・BS3W/BS3N.…Approx.2.3kg
・BS5W/BS5N…Approx.4.0kg
・BS7W/BS7N…Approx.6.0kg
Refer to graph and adjust tension that load is balanced. (see Fig.2)
(“0”indicates the condition that wire rope is fully retracted into drum and all
spring tension is released.)
■Back side ■Front side
Fig.1
Copied digital data
from http://www.endo-kogyo.co.jp/

Model BS3W/BS3N Model BS5W/BS5N Model BS7W/BS7N
Fig.2
CAUTION: Initial tension indicates the number of revolutions of the spindle when rope is fully
retracted into drum.
Use in the range of dotted line will lose balance.
E.g. When setting BS5W in 4kgf
Turning the spindle 5 times from the condition that rope is fully retracted into drum and spring
tension is released.
※The graph shows a reference level.
5. Safety instructions on use
WARNING
・Never use overhead or at the place might lead to injury accident when load dropped.
・Never place hands, feet, etc., under suspended loads or movable range of rope.
・Never alter the balancer.
CAUTION
・Always use within maximum spring tension.
・Always adjust the spring tension before use.
・Do not extend the rope past the maximum cable travel.
・Do not pull the rope at an angle. Fix main body so that rope does not touch to plate.
It will cause recovery problem resulting in uneven winding.
・Nylon rope type: attach surely so that wire does not come loose with the tension of the balancer.
・Fix the main body in two M5 bolts or more.
The bolt length
6-10mm: cover and case (front and back side)
8-10mm: side of case (see fig.3)
Clamping torque: 3N・m
Fig.3
Copied digital data
from http://www.endo-kogyo.co.jp/

6. Inspections
WARNING
Periodically inspect the balancer, and replace any worn or damaged parts.
CAUTION
Always use genuine parts for replacement.
■Inspect the balancer at least once a month.
Correct and repair any problems which are detected.
Make the inspection interval shorter when operating frequently or under hostile environments.
■Items to be inspected
●Wire rope type
・Is there any broken wire, deformation or kink in wire?
Allowable number of broken
wires in 1 pitch 13.
・Is there any part of wire rope worn beyond service limit?
・Is there any remarkable wear of thimble?
●Nylon rope type
・Is there any broken fiber or damage (kink, fuzzing)?
・Is there any loosen on the rope attaching device?
・Is there any melting by heat?
●Is there any loosen screws?
Copied digital data
from http://www.endo-kogyo.co.jp/
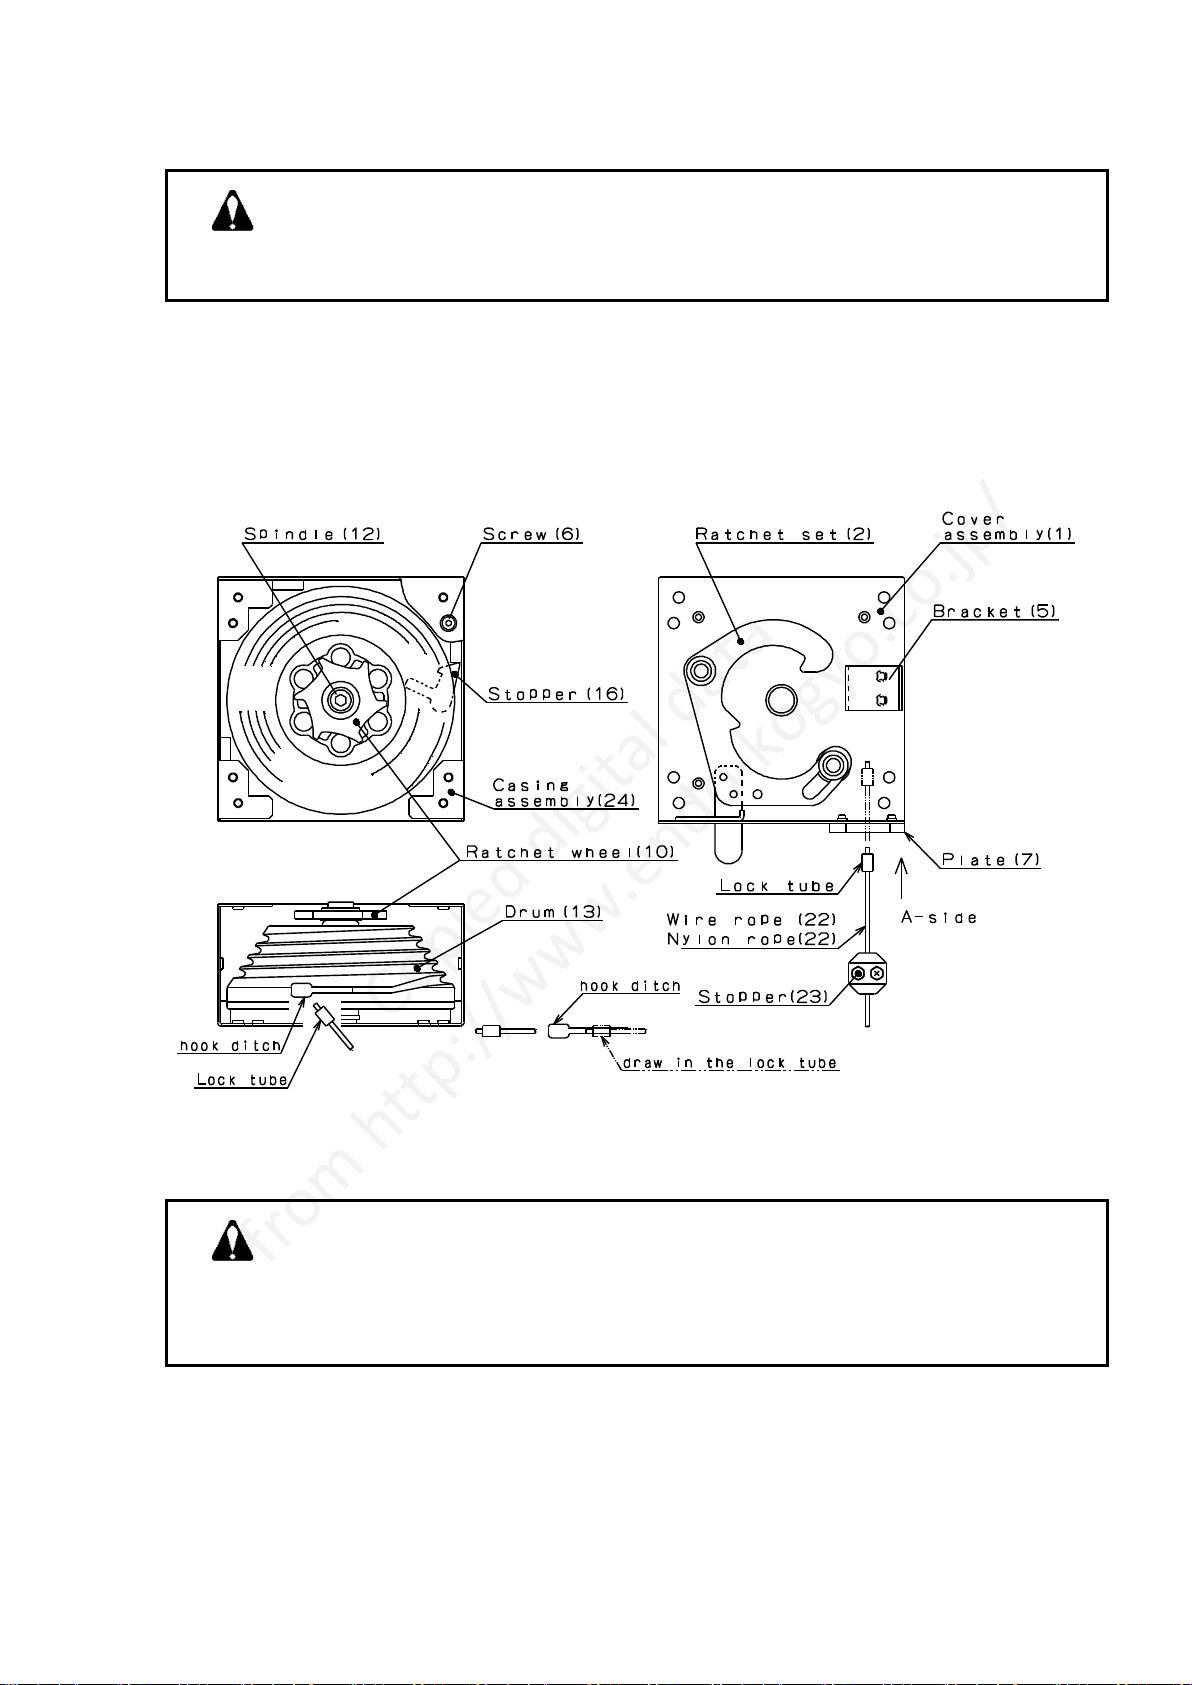
7. Rope replacement
1) Get rid of the spring tension by moving releasing lever in right and left.
See Chapter 4 ‘’Spring tension attachment‘’.
2) Remove Hex. Head screw (6) then remove cover (1).
3) Remove old rope from the drum.
4) Insert the lock tube of the new rope from the A side of the plate (1).
Then install lock tube to the hook ditch of the drum (13).(see Fig.4)
5) Reassemble in reverse order.
6) Turn spindle (13) and wind the rope.
Be careful that a rope does not come off from the ditch of the drum.
Fig.4
8. Spring replacement
Never remove the spring from the drum unless the replacement is required.
Referring to the disassembly drawing (on page 7),
1) Remove the balancer when in the state that rope rolled up.
2) Check the spring tension by pulling rope.
If the tension is left, of the tension by moving ratchet set lever (2) in right and left.
Tension should not be left. See clause 4 ‘’spring tension attachment’’
3) Remove Hex. Head screw (6) then remove cover (1).
WARNING
Do not take the body apart before tensility of the spring disappears.
It take it apart, the rope will snap back and could cause personal injury.
WARNING
・The spring is extremely dangerous. Be careful when handling the spring.
・Never pull the center of the spring when removing the spring from the drum.
If pulled, the spring will expand explosively and cause personal injury.
Copied digital data
from http://www.endo-kogyo.co.jp/

4) Remove the set of drum (15) and plate (15) from casing
assembly (24). Fig.5
5) Remove rope (22) from drum.
6) Loosen Screws (21) and remove Plate (15) from Drum (13).
7) Check spring (14) fracture point and rivet condition.
If fracture caused in the inside, remove spring.
If fracture caused near outer periphery or rivet of
spring is broken. do not remove spring.
Reassemble the plate (15) to drum (13), then contact
to the store.(see Fig.5)
8) Remove spring (14) from drum (13).
9) Reassemble in reverse order.
・After drum (13) assembling, install spring (14). Fig.6
・After assembling new Spring (14), lubricate Spring with grease.
・When installing Plate (15) on Drum (13), place Stopper (16)
in the outer edge Spring (14). (see Fig.6)
Check Stopper can move smoothly after installing Plate.
NOTE:Turn spindle (13) and wind rope (22).
Be careful that a rope does not come off from
the ditch of the drum.
9. Spring disposal
Give a warning to disposal companies that the spring will expand explosively and cause
danger if the spring is treated roughly or the center of the spring is pulled.
WARNING
Never remove Spring (14) from Drum (13) when Spring is broken near the outer
periphery or the rivet of Spring is broken (see Fig.5).
If removed, Spring will expand explosively and cause personal injury.
WARNING
The spring is dangerous due to remaining tension even if it is broken.
Copied digital data
from http://www.endo-kogyo.co.jp/

10. PARTS LIST
Ref.No.
Part No.
Description
Quantity
BS3W
BS3N
BS5W
BS5N
BS7W
BS7N
1
LBP001776
Cover assembly
1
1
1
1
1
1
2
LBP001777
Ratchet set
1
1
1
1
1
1
3
KA30220800
Plain washer
2
2
2
2
2
2
4
KA40310060
Retaining ring
2
2
2
2
2
2
5
P2B301333
Bracket
1
1
1
1
1
1
6
P2B402102
Hex.socket button bolt
6
6
6
6
6
6
7
P2B402092
Plate
1
1
1
1
1
1
8
KA10220410
Screw
2
2
2
2
2
2
9
P2B402093
Bushing
2
2
2
2
2
2
10
P2B301336
Ratchet wheel
1
1
1
1
1
1
11
P2B402034
Washer
1
1
1
1
1
1
12
P2B301337
Spindle
1
1
1
1
1
1
13
P2B100163
Drum
1
1
1
1
1
1
14
P2B300089
Spring
1
1
-
-
-
-
14
P2B300507
Spring
-
-
1
1
-
-
14
P2B300508
Spring
-
-
-
-
1
1
-
LBP000750
Plate assembly
1
1
1
1
1
1
15
-
-Plate
1
1
1
1
1
1
16
-
-Stopper
1
1
1
1
1
1
17
-
-Rivet
1
1
1
1
1
1
Copied digital data
from http://www.endo-kogyo.co.jp/

Ref.No.
Part No.
Description
Quantity
BS3W
BS3N
BS5W
BS5N
BS7W
BS7N
18
-
-Spring
1
1
1
1
1
1
19
-
-Rivet
1
1
1
1
1
1
21
KA10220512
Screw
3
3
3
3
3
3
-
LBP001668
Wire rope assembly
1
-
1
-
1
-
-
LBP001868
Nylon rope assembly
-
1
-
1
-
1
22
-
-Wire rope
1
-
1
-
1
-
22
-
-Nylon rope
-
1
-
1
-
1
23
LBP000924
-Stopper
1
1
1
1
1
1
24
LBP001778
Casing assembly
1
1
1
1
1
1
25
KA31120500
Spring washer
6
6
6
6
6
6
26
P2B301342
Name plate
1
-
-
-
-
-
26
P2B301418
Name plate
-
1
-
-
-
-
26
P2B301343
Name plate
-
-
1
-
-
-
26
P2B301419
Name plate
-
-
-
1
-
-
26
P2B301344
Name plate
-
-
-
-
1
-
26
P2B301420
Name plate
-
-
-
-
-
1
27
P2B301347
Label
1
1
1
1
1
1
28
P2B301348
Label
1
1
1
1
1
1
NOTE) When placing an order, clearly specify the product model, part number and description.
Parts without a part number cannot be supplied individually.
Please purchase a set or complete unit.
Copied digital data
from http://www.endo-kogyo.co.jp/

This manual suits for next models
5
Table of contents
Other Endo Wheel Balancer manuals


