Eonon D5110M User manual

User Manual
Please read this manual before using and
save this manual for future reference.
Model: D5110M


TROUBLE SHOOTING
PROBLEM CAUSE SOLUTION
Can not power on
Check whether power fuse
blew or not.
Some factor cause MPU
wrong operation.
Change fuse same as the old one.
Press RESET button on the panel by pen
point, then, power on.
After ignition
switch off, setting
information all lose
Wrong connection between
ignition line ACC and
Constant 12 Volt wire.
Change the wiring around.
Remote control no
function
Poor performance
of radio station
Can not load disc
Can not play disc
Can not switch
language/subtitle
No image
Change battery in remote control.
No enough power supply
from battery.
Check whether antenna is connected or not,
or poor connection.
Improper length of antenna,
poor connection of antenna
grounding.
There is a disk inside. Eject disk, then, slot in new disk.
Disc is scratched. Change new disc.
Put wrong side of disc into unit. Slot in the disc with sign side up.
There is only one language/
subtitle in disc.
Lens has dirty. Clean lens by lens clean disc.
Video line between unit and
TV is not properly connected.
If disc is not with multi-language/subtitle, it
cannot switch language/subtitle.
Reconnect lines.
CONTENTS
0128
1. BEFORE USE 02
2. Panel function description 03
3. Remote control function 06
4. On/Off the Unit 08
5. Radio Function Operation 09
6. Disc Play 10
7. SD Card/USB Storage Device Playback 15
8. Bluetooth Function Operation 16
9. Multimedia Function Operation 18
10. Navigation Function Operation 20
11. Other Modes 21
12. Setup Function Operation 22
13. Virtual Disc 26
14. IPOD 27
28
TROUBLE SHOOTING

6. Next menu
7. Pause/play
8. Previous song
9. Next song
10. Speed backward
11. Speed forward
14. IPOD
Connect IPOD first, then press in multimedia main interface to access interface as
shown below:
Touch Menu
1. MODE Audio/video file switch
2. Select upward
3. Select downward
4. Confirm
5. Back to file folder menu
Note: the operation is subject to the actual interface.
1 2 345678 9 10 11
1. BEFORE USE
How to Read the Manual
The manual uses photographs to illustrate operational procedures and precautions.
Photographs in the manual are only for reference , please make the object as the
standard.
Warm
To ensure your safety and the safety of your car and others, please make sure you
follow the basic requirements below:
Before using the unit, please read all the relative instructions carefully. Warranty does
not apply to any damage caused by noncompliance with the instruction.
To ensure driving safety and avoid breaking traffic regulation, please do not watch
program or operate the unit while you are driving.
Do not expose the unit to rainwater in case of short circuit.
To avoid short circuit, please do not put or left any metal parts (such as coin or metal
tool) in the unit.
Please use the unit as the manual suggests, do not open the unit or repair by yourself.
If necessary, please go to the professional repair station for help.
When the engine is turned off, do not use the car audio for a long time, otherwise it
will run the battery down.
Do not insert any object into the ventilation slot or other openings.
Do not touch, rub or knock the screen with sharp objects.
Reset Device
If the unit or its connected device does not work normally, use prong tool to press the
reset button, after it restarts, the unit recovers factory default settings.
Directly spray the cleaning fluid onto the device may effect mechanical parts. Use
rough cloth or volatile fluid(such as thinner or alchol) may scratch the surface or
remove the characters.
Lens Mist
In cold weather, mist occurs on the lens of disc player when heat is open. This is called
lens mist which may effect the disc play. In that case, eject the disc and wait until the
condensate fully evaporates, then you can play it again.
27
02

13. Virtual Disc
Through virtual disc, you can copy CD disc to a virtual disc, after copy completed, next
time you just need to open the virtual disc that you can enjoy all songs in the CD disc.
1. Access Virtual Disc
Switch the unit to main interface.
Press VIRTUAL DISC icon in main interface to access virtual disc interface.
2. Button Function Introduction
: Recording On/Off
Click the button to copy songs in CD disc.
: Play
Click to button to play CD disc.
Ten CD disc at most can be copied.
: Stop
Click the button to stop playing.
: Previous/Next Song
Click the button to play previous/next song.
: Random Play
Play songs in the current disc randomly.
: Repeated Play
Play preset file or data repeatedly.
: Delete
Delete all files in the selected disc or one of
them.
11
12
13
14
10
9
8
7
6
5
4
3
2
1
2. Panel function description
1. SRC button
2. RADIO button
3. AUX button
4. SD slot
5. DVD button
6. AUX slot
7. IR
8. USB slot
9. EQ button
10. MAP slot
11. APS button
12. NAVI button
13. SEEK button
14. RESET
15. Eject Disc button
16. Disk load slot
17. MUTE button
18. MIC Window
15161718
03
26

Audio Setup
Touch icon in setup interface to
access sound setup interface as shown
below.
Setup Method
Sound effect-click can switch
among the following sound effects”
Click to adjust favorie sound effect.
Click can resume to initial settings.
Equal Loudness — click icon to turn
on/off equal loudness.
Listening Position-you can select left
/right listening position or turn off the
function.
Listening Position-you can select left
/right listening position or turn off the
function.
Touch can adjust speaker
balance in volume.
Click There are three key tones to
choose from.
Restore Factory Default Settings
Touch icon in setup interface, input
password [888888] and click OK to access
restore factory default settings interface
as shown below:
Setup Method:
Click OK button under “whether to
restore factory default settings”, restore
the unit back to factory default settings.
Version Information
Touch icon in the setup interface and
enter password [888888]. Click OK to enter
into version setup interface as shown in the
picture.
Dual Zone Setup
Click icon to enter into background
setup interface.
You can choose to turn on/off the functions
that are already available in the background
setup interface, and then click [OK] to save
the settings.
Pop country opera
Rock jazz voice
Metal classic custom
Dance blues easy
Electro nostalgia
reset factory
Do you want to reset factory?
Version
Kernel
Application
MPEG
PA01-V1.01.0028.03-3
V11A.BAI06.SL8177_UI20.69.f
0.0
MCU
4.0
Panel Function introduction
1.SRC button
Press this button shortly to power on, press this button longer to power off.
In normal situation, press source button can return to the main menu.
2.RADIO button
In any mode, press the button to access radio mode,
Note: For certain machine model press the button in radio mode to band switch.
3.AUX button
In any mode, press the button to access AUX mode.
4.SD slot
Insert SD card to read video, audio and image files of large volume.
5.DVD button
In any mode, press the button to enter into DVD auto reading mode.
6.AUX slot
To input external audio.
7.IR
It can receive infrared signal of remote control.
8.USB slot
Connect USB mobile device to read video, audio and image files of large volume.
9.EQ button
In a source mode, press the button to enter equalizer setup.
10.MAP slot
The receptacle of map card, inserts the map card to be possible to read the guidance
data.
11.APS button
In radio mode, short press the button to browse memorized station, long press to search
stored stations automatically.
12.NAVI button
Press the button to enter into/exit navigation interface.
13.SEEK button
Radio mode, a short rotation lf the button can be up and down step search for the station,
long rotation of the button can automatically scan for stations.
Playback mode, rotating the knob can be achieved with short upward, and downward
selections; long rotation of the button allows fast forward, rewind playback.
2504

Calibration Method:
Use touch pen to click the center of “+”,
calibrate the screen in sequence by which
the center of “+” moves. After calibration
is completed, the unit will save data and
exit the screen.
Setup Method:
Select your desired background icon via
preview window, then click OK to save
setting.
If you'd like to use your own background
picture in the unit, insert SD card which
stocks background pictures into GPS
card socket. Click Browse SD button in
picture-select interface to set your
favorite background picture.
Note: Please use 288 * 244,
BMP format picture.
BMP options
for the 32-bit,
Method of making the icon:
1. download Adobe Flash CS3 or later.
2. The picture will need to be made into
288 * 244 PNG image, open the image into
Flash Flash tool.
3. The scene is set to 288 * 244 Flash.
4. Click File → Export → Export Image→
Save → color depth set to 32 bit color
Alpha→ OK.
Boot Screen
Touch icon in setup interface to
access boot screen setup interface. Boot
screen is preset when delivery from
factory, please do not access this interface
to change boot screen.
Background Setup
Touch icon in setup interface to access
background setup interface:
14.RESET
Press this button can back to default mode.
15.Eject disc button
Press the button to eject disc.
16. Disk load slot
Enter /exit disc window.
17.MUTE button
Press the button to close volume output, repress it to resume previous volume level.
Long press the button to turn off TFT display screen, then short press it to restart TFT
display.
18.MIC Window
Input socket for microphone.
05
24
Note:
screen, use 800 * 480, BMP image formats.
After pressing the Reset button to change
the boot screen.
If you want to replace the boot
Touch Calibration
Touch icon in setup interface, input
password [888888], click OK to pop up a
dialogue as shown below, click OK to
confirm to access touch calibration
interface:
Calibration
Do you want to calibrate?

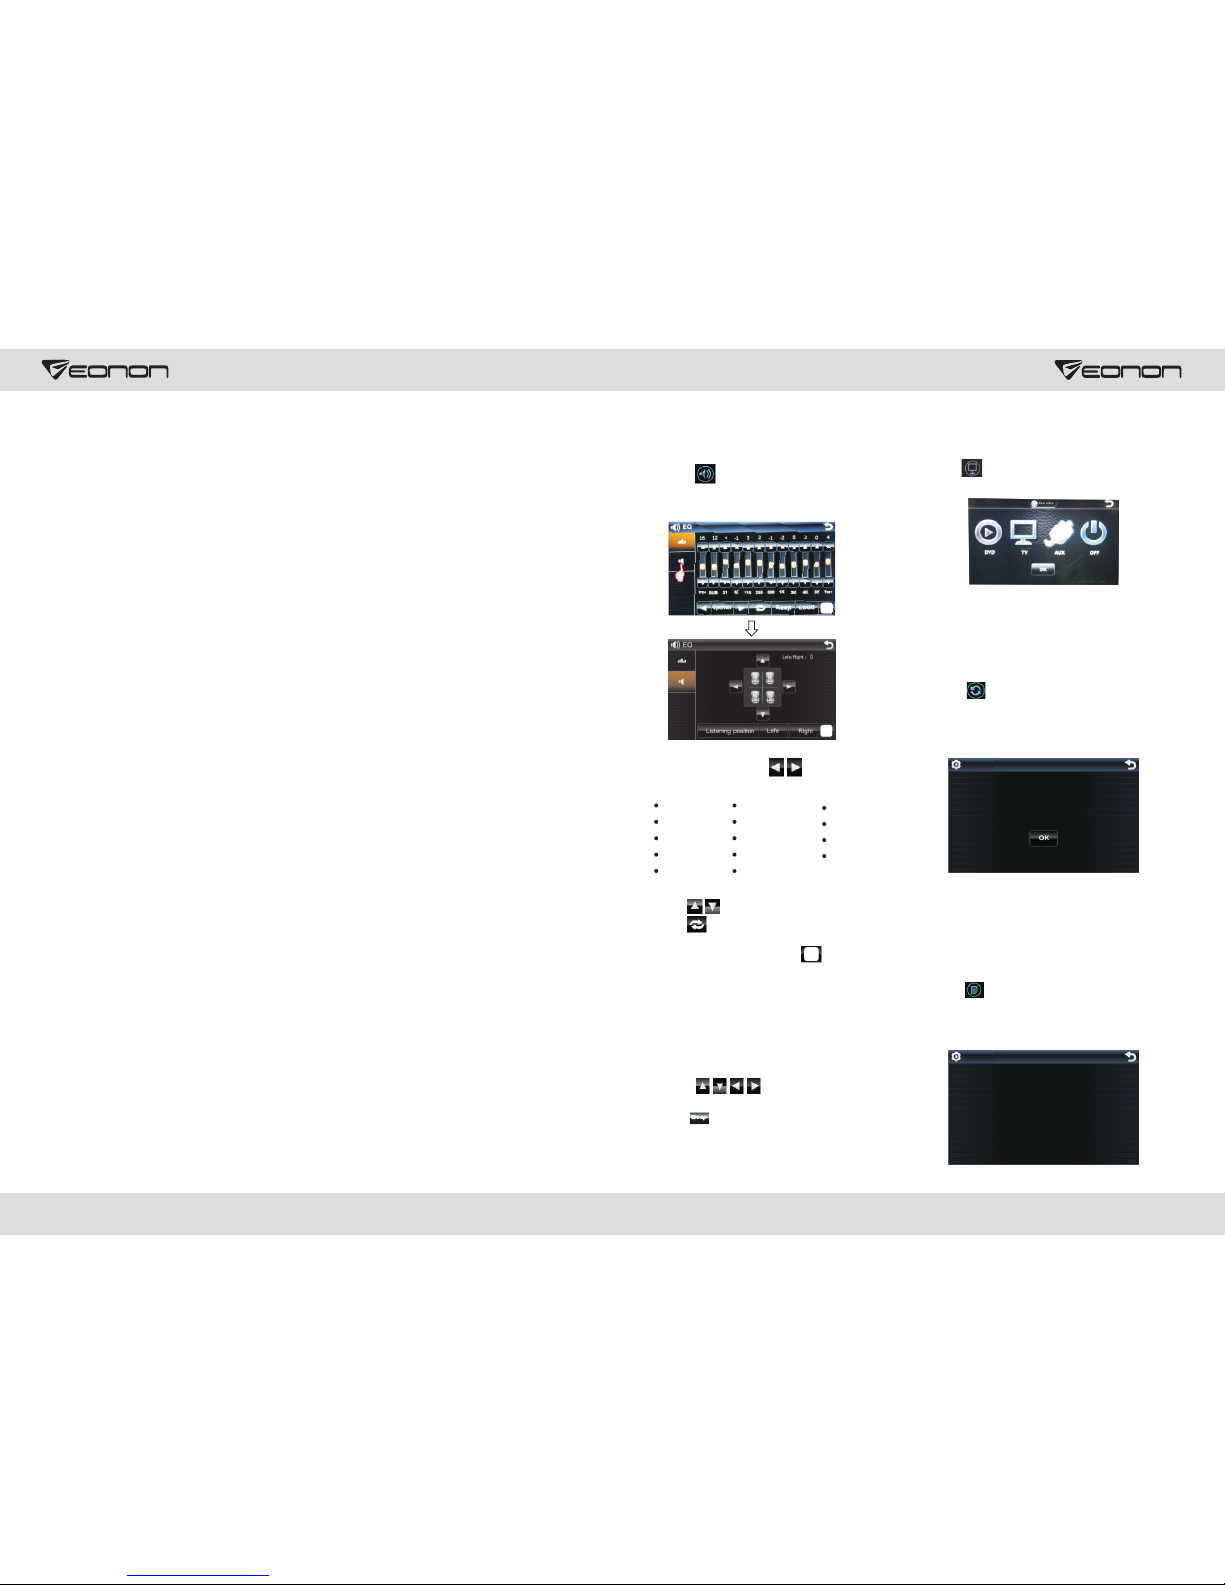
Brightness Adjustment
Touch icon in setup interface to access
brightness setup interface as shown below:
You can click button to adjust screen
brightness. After completion click button
to back to previous interface and save
settings.
Radio Area (optional)
Touch icon in the setup interface and
enter password [888888]. Click OK to enter
into radio setup interface as shown in the
picture.
Select your desired radio setup, click OK
to save settings.
System Setup
Touch icon in setup interface ,input
password [888888], click OK to access
system setup interface as shown below:
You can select to enable or disable existing
functions in system setup interface. After
completion click OK to save settings.
TV Setup
Touch icon in setup interface, input
password [888888], click OK to access TV
setup menu as shown below:
Select your desired TV setup, click OK to
save settings.
Brightness
3. Remote control function
1.POWER
Press once to switch on, press again to
switch off.
2.MUTE button
Press once to turn off audio output,
Press again to resume volume level.
3.NAVI button
Press it to enter to exit the navigation.
4.SOURCE button
Press this button to choose audio sources.
5.EQ button
Press this button to choose POP, ROCK,
CLASS, EQ off.
6.SEEK+ ( )/ SEEK- ( )button
Press this button to manual turning, sped
or quick back, previous song and next song.
7.VOL+ ( )/ VOL- ( )
Press this button to increase or decrease
volume level.
8.SEL button
Press this button to choose sound feature.
9.LOUD button
Press this button to startup LOUD function.
10.BAND -P/N button
In radio mode, press this button to choose
band. In VCD, DVD mode, press this button
to choose AUTO, PAL or NTSC system.
11.LOC/ROM button
In radio mode, press this button to switch
between local and direction, In VCD, CD
mode, press this key to randomly play.
12.STOP button
Press this button to stop playing.
13.PLAY/PAUSE button
Press this button to switch between play
and pause, In stop mode, press this button
to play.
14.ST/PROG button
In radio mode, press this button to choose
stereo or mono station. In audio mode, it
can help stop button to programmed play.
15.0-10+ button
Press this button to choose desired song,
section, preset stations.
※ Decimal numbers, for example the 19th
song, press 1,9 button;
※ Centesimal numbers, for example, the
120th song, press 1,2,0 button.
23
06

12. Setup Function Operation
Access Setup Interface
Touch icon in main interface to access
setup interface, click to turn page as
shown below:
Language Setup
Touch icon in setup interface to
access language setup interface as shown
above: you can select Simple Chinese or
English.
Insert navigation card, touch icon in
setup interface to access navigation setup
interface as shown above.
Click icon can browse upward
/backward, select your desired
navigation start route, click OK to save
setup, retouch button to exit navigation
setup. Then system goes back to main
interface, click in main interface to
access navigation.
Time Setup
Touch icon in setup interface to access
time setup interface, click icon can set
clock, minute respectively, click OK to save
settings.
GPS setup
Navigation Setup
In audio mode, press this button to choose
different set items.
26.OSD display
Press this button to display the title chapter
and the left time.
27.ZOOM button
In DVD/VCD mode, press this button to
ZOOM in.
28.MENU button
Press button to back to the main menu.
BATTERY CHANGE
When control distance of remote control
becomes shorter or no function, please
change battery, please confirm polarity
before change.
One hand press stopper, then pull out
battery.
Put battery into controller.
Insert battery holder into controller.
25.SETUP button
16.AMS/RPT button
In radio mode, press this button to browse
stored stations. In audio mode, press this
button to play repeatedly.
17.TITLE button
In DVD mode, press this button to play
back to the top menu of disc.
18.AUDIO button
In DVD mode, press this button to switch
language of dialogue. In VCD mode, press
this button to choose left track, right track,
and stereo.
19.SET playing time
In DVD mode, press this button, you can
define playing time.
20.SUBTITLE button
In DVD mode, press this button to switch
language of subtitle.
21.PBC button
In VCD mode, press this button to display
all song menus, work with number button
to choose songs.
22.UP, DOWN, LEFT, RIGHT, ENTER
button
In DVD mode, press this button to move
cursor up, down, left, right to choose item
in menu, Press the enter button to confirm
choice.
23.SLOW button
In audio mode, press this button to slow
backward and slow forward.
24.ANGLE button
In DVD mode, press this button to change
play angle.
07
22

Do not rely entirely on CCD, confirm safety of the environment with naked
eyes while you are driving. CCD only assists the drive to park the car. Due to the
limits in CCD range and distance, it may cause traffic accident if the drive
entirely on CCD.
please
release
Field Simulation of Reverse Back Rearview Image
11. Other Modes
Click on the main interface directly into the rear view system.
AUX Input Operation
Put video input plug into AUX video input socket, put audio input plug into AUX audio
input socket.
The unit only provides a video input port and a AUX audio input port group.
CCD System (back rearview mirror)
If your car is equipped with back cameras, please connect “BACK” control cable with
video input port of the camera. When you back your car, the unit shall switch to rearview
mirror mode automatically. (as shown below).
4. On/Off the Unit
On
When the ignition switch is locked in ACC
or ON position, press button on the
panel to turn on the unit.
Off
After starting the unit, hold button for 3
seconds or more to turn off the unit.
Access Main Interface
At power on, press back to main interface
button on the panel to switch to main
interface.
back to
main menu
select day/
night mode
radio mode
GPS mode
disc reading
mode
time display
Volume Adjustment
Press VOL button on the front panel or
remote control to increase/decrease
volume level.
Mute
Press MUTE button on the remote control
or front panel to turn on/off volume output.
On/Off Equal Loudness
Press LOUD button on remote control to
turn on/off equal loudness.
Picture-in-picture Function
Touch PIP icon to enter picture-in-picture
interface. This function means in normal
running status of current mode, you can
start DVD/Bluetooth/Navigation function at
the same time.
Multimedia
mode
bluetooth
mode
function
setup
21
08
Click to exit the rear view system.

10. Navigation Function Operation
Access Navigation
Detailed Procedures
1.Insert map card into GPS/MAP card slot,
touch icon in main interface to access
setup interface.
2.Touch icon in setup interface, system
will enter into navigation setup interface.
3.Click icon in setup interface to
browse upward/backward, select desired
navigation start route, click OK to save
setup, then touch icon to exit
navigation setup.
4.Touch icon in navigation setup
interface to go back to main interface.
5.Touch icon in main interface to
access navigation interface.
Satellite receiver
Navigation system can keep receiving
eight satellite signals. As a general rule, the
navigation system can figure out your
accurate location after received 3-4 satellite
signals. But sometimes, weather and tall
buildings in the city shall affect the signal
receiving effect, as is shown in following
figure:
Receiving signal error
When the satellite signals can be normally
received, the error of standard GPS shall
be about 7 meters. Driving on parallel
sections, there shall be error even the
product has auto-correct function. The
normal receiving of satellite signals shall
be affected and cause error in following
environment.
Angle of
elevation
Angle of
elevation
Scope for receiving satellite signals
In tunnel Among tall buildings
At the boulevard The antenna is sheltered
Underground parking overpass or viaduct
5. Radio Function Operation
Touch icon in main interface to enter
into the interface below:
Auto Search & Store Station
into the interface below:
Touch Radio icon in radio interface to enter
Long touch Scan icon in radio interface to
automatically search and store station.
Manual Search & Store Station
drag frequency spot to fine tune frequency
upward/downward. Long touch icon in
radio interface to automatically search and
store station.
Browse Station
Click in radio interface to browse
each pre stored station for 10 seconds in
order. Repress icon to stop browsing
when you meet your favorite station.
Select & Play Station
Directly touch frequency icon in pre stored
station to select and play desired station.
By pressing number button 1-6 on remote
control can also choose to play pre stored
station directly.
Short touch icon in radio interface or
Band Switch
Touch BAND icon in radio interface
to switch among FM1, FM2, FM3,
AM1 and AM2.
RDS Function
RDS function provides series information
(such as traffic information, name of
station) ,and can automatically switch to
the station with stronger signal and carries
the same program. Touch RDS icon in
radio interface to enter interface below:
AF: touch the button to turn on/off
AF mode.
If the unit does not have RDS function,
it has no AF/TA/PTY function. The
corresponding icon appears grey.
Certain Button Function
: Touch the button to turn on/off mute.
:Touch the button to enter sound
effect setup interface.
: Turn on/off stereo.
: Touch the button to enter picture-in
-picture interface.
REMOTE/LOCAL: Turn on/off remote/local.
TA: touch the button to turn on/off
TA mode.
PTY: touch the button the screen
displays program types, users can
search station according to program
type
0920

Picture-in-Picture Play
Touch PIP button on the display screen will switch video to picture-in-picture status.
In PIP status, hold the top area video screen can move video image at will. You can also
adjust image size according to personal favorite.
External Input
Put video input plug into AUX video input
socket, put audio input plug into AUX audio
input socket.
The unit only provides a video input port
and a AUX audio input port group.
Access Picture-in-picture
Click the button to enter picture in picture status.
Access Sound Setup
Click the button to access sound setup interface.
6. Disc Play
Load/Eject/Play Disc
Enter/Exit
Keep the recording surface up, insert disc into disc slotter. System then detects and
automatically sucks in the disc to read and play. When there is a disc in the device,
click on the panel to eject disc. If disc is not took away 15 seconds after ejecting,
system shall automatically suck in the disc without playing.
Play Disc
After inserting DVD/VCD disc, system
immediately enters into reading status.
When there is disc in the device, click
DISC in main interface to read the disc.
DVD/VCD Disc Play
Button Function Introduction In full
screen play, touch middle area of the
screen to display function menu.
Touch the button once to enter pre stop status, then touch to continue to play; touch
it twice to completely stop, then press button to play from the beginning of disc.
Stop
Previous/Next Chapter/Speed Forward/Backward
During DVD playing, short press the button to access previous chapter/song or next
chapter/song play.Long press the button to access speed forward/backward.
Play/Pause
Touch the button once to pause, retouch it to continue playing.
Picture-in-Picture
Click the button to enter picture-in-picture status.
Enter Sound Setup
Press the button to access sound setup interface
display title, chapter, play time and left time
Press the button to display all information about the current playing disc.
1910

9. Multimedia Function Operation
Access Main Interface
In main interface, click multimedia icon to
access multimedia main interface as shown
below, click corresponding icon to enter
each interface respectively:
Analog TV Function Operation
Touch icon in multimedia main interface
to access analog TV interface.
:Click the button to switch to next
interface (as shown in the figure
below).
:Click the button to enter into
picture-in-picture status. For
detailed function please refer
to Radio“Picture-in-Picture”
section.
:Click the button to browse
station upward/backward.
:Click the button to enter into
sound setup interface. For
detailed function please refer to
“Sound Setup”setion.
:Click the button to appear video
setup interface, click to
adjust appearance effect.
Touch Menu Definition
:Click the button to select station
upward/backward.
:Click the button to switch TV system.
:Click the button to switch TV sound
system.
:Click the button to search station
automatically and store channel.
:Click the button to appear number
button, directly click number button
to select song and play. Appears Up/Down/Left/Right Direction Button
In menu play, work with OK button to select desired chapter.
Press the button to display number button, directly click
number button to select and play song. Click C button to
delete wrong selected number.
Number Button
Repeated Play
In play back mode, touch the button to start repeated function of the following contents:
Chapter Repeat Titel Repeat All Disc Repeat Off.
In VCD play, this function can only be achieved while PBC is turned off.
Enter Video Setup
Click the button to appear video setup
menu, adjust image effect by
using .
Brightness
Contrast
Color
Sharpness
Saturation
Restore to factory
default setting
Click the button the screen shall display system setup menu and submenu, work with
button on remote control to select your favorite item, then confirm with ENTER button.
DVD Setup Menu
Back to Root Menu
In playback mode, touch MENU button: to back to root menu in DVD status; to enter PBC
menu play in VCD status. The interface displays all chapters of disc. You can touch
direction button or 123 to select desired chapter, then press CONFIRM button to play.
Audio (Dialogue) Button
There are various dialogue languages and audio systems in DVD audio play. If the DVD
disc is recorded with multi audio, then you can switch dialogue language and audio
system during play. During play, press button repeatedly to change dialogue
language.
Click the button can go back to the title menu of disc. You can touch direction button
or 123 to select desired chapter, then press OK button to play selected chapter.
Enter Title Menu
11
18

Call Records
Click CALL RECORD to access call record
interface as shown below:
Delete: Touth the button to delete a
selected record.
All Delete: Touch the button to delete all
information in phone book.
Received Call: Touch the button to check
received call.
Missed Call: Touch the button to check
missed call.
Dialed Call: Touch the button to check
dialed call.
Touch the button to dial a selected
number.
Touch the button to turn the
phone book upward/backward.
Call Volume
Click CALL VOLUME to access call
volume interface as shown below:
Click to adjust bluetooth volume.
Device Select
Click DEVICE SELECT to access device
select interface as shown below:
Click CLEAR on the list to delete all paired
cell phone.
Subtitle Language Switch
During playing DVD disc recorded with several subtitle languages, click the button can
switch subtitle languages. Each time the button is pressed, cursor-supported subtitle
language switches and appears on the screen in order.
Zoom Out/In Image
Click the button can zoom in/out image.
Ratio changes as below shows:
DVD Video Angle
During playing multi angle DVD discs recorded for certain special use, press the button
to display the current angle. When the angle number displays on the screen, press the
button repeatedly to switch among recorded angles.
Programmed Play:
In DVD/VCD mode, you can set playing sequence of your favorite songs by programmed
play function. Press button on remote control, the screen displays programm edit
menu as below:
Then, directly use directional button on remote control to move cursor to the song that
needed to be programmed, press ENTER button to confirm. The corresponding song
number shall display on the right.
Start playing ---- move cursor to “PLAY”, press ENTER button on remote control to start
programmed play.
Clear ---- move cursor to “CLEAR”, press ENTER button on remote control to clear a
song in programmed menu.
DVD programmed play menu VCD programmed play menu
PROG
PLAY CLEAR
PROG
PLAY CLEAR
1712

8. Bluetooth Function Operation
Access Bluetooth
Touch icon in main interface to enter
bluetooth mode as below:
Pair/Link
To use bluetooth handsfree function, you
need to establish connection first and pair
the unit with bluetooth cell phone.
Operation:
Set the unit in pair status (as shown above),
then set your cell phone bluetooth in open
status, use cell phone to search equipment.
After bluetooth equipment of the unit is
searched, the cell phone asks you for
bluetooth password. Enter password and
confirm it, the cell phone asks whether you
authorize the connection with the
equipment. Please choose YES. Within 20
seconds the cell phone shall link with the
bluetooth device automatically. In any
working mode, if there is an incoming call,
the unit shall switch from current mode to
bluetooth status. After hanging up the call
the unit resumes to current mode
automatically.
After proper matching between
bluetooth equipment and the unit,
linking status appears “CONNECTED”,
otherwise appears “DISCONNECTED”
Dial
You can directly dial via cellphone or
use number button on the screen to enter
phone number, click button to delete
if wrong number is input.
After entering phone number, click to
dial, touch can hang up the call.
During the call, click to switch call
voice between car speaker and cell phone.
Phone Book
You can select phone number in phone
book and dial, click PHONE BOOK to
access phone book interface as shown
below:
Delete: Touch the button to delete a
selected record.
All Delete: Touch the button to delete all
information in phone book.
Read: Touch the button can read contents
in phone book.
:Touch the button to dial a selected
number.
:Touch the button to turn the phone
book upward/backward.
Disconnect VOL:11
MPEG4 Disc Play
When disc contains readable MP3 files,
click icon to switch to MPEG4 file
play. Touch middle of screen to display
function button as below:
MPEG is the abbreviation of “Moving Pictures Experts Group”. MPEG4 is the 4th
generation of video audio encoder standard released by the experts group. MPEG4 discs
currently available in the market adopt different recording formats, it is a normal
phenomenon if certain discs cannot be played in this device due to format reason.
MP3 Disc Play
When the disc contains readable MP3 files,
click icon to switch to MP3 file play
as below:
You can directly touch song name in
interface to select song.
Touch KEY button in the bottom right
corner to display the following button:
JPEG Disc Play
When disc contains readable JPEG files,
click icon to switch to JPEG file play
as below:
13
16

7. SD Card/USB Storage Device Playback
When there is a USB device/SD card connected, the unit can conduct the playback of
audio/video/image files in the USB device/SD card.
This operation is only effective when the unit has USB/SD card connectors.
Insert/Eject USB storage device
Connect a U disc recorded with media information to the unit by a USB connecting cable.
When there is a need to eject the USB device, exit the USB device playback screen first,
and then take out the device.
Insert/eject SD card
Insert a SD card recorded with media information into the SD card slot in the unit correctly
until it is locked.
When there is a need to eject the SD card, exit the SD card playback status first, then
press the SD card, after the SD card is unlocked, it will automatically pop up.
Enter/exit
Insert a USB storage device or SD card to automatically play data contained in it. If the
unit has connected with a USB device or SD card, touch [USB] icon in the multimedia
interface to enter into the external storage playback interface; Touch [SD] icon to enter
into the SD card playback interface.
Playback
After reading a SD card or USB device, the playback operation is similar to disc playback
operation.
CD Disc Play
After inserting CD disc, system immediately
enters into disc reading status.
when there is a disc in the device, click DISC
in interface to read disc.
After reading disc, system starts playing in
auto sequence.
Button Function Introduction
In full screen play status, touch the
middle area of screen to display below
function menu:
Touch KEY button in the bottom right
corner to display function buttons as below:
Way to Play Image
Play Image in Auto Sequence
Click the button to play image in auto sequence.
Click the button can stop playing image.
Stop
Click the button to go back to previous image or play next image.
Previous/Next Image
Zoom Out/In Image
Click the button can zoom out/in image. Ratio changes as below :
Rotate/Reverse Image
Rotate image
counterclockwise
Roll over image
with horizontal
symmetry
rotate image
clock wise
Roll over image
with vertical
symmetry
15
14
Table of contents
Other Eonon Car Video System manuals

Eonon
Eonon D1303 User manual

Eonon
Eonon E1023 User manual

Eonon
Eonon E0853 User manual

Eonon
Eonon E838 User manual

Eonon
Eonon Headrest with pillow TFT LCD Monitor User manual

Eonon
Eonon L0405M User manual

Eonon
Eonon E1057 User manual

Eonon
Eonon E1102 User manual

Eonon
Eonon M2 User manual

Eonon
Eonon D3108M User manual