Eonon D5109 User manual

Please read this manual before using and
save this manual for future reference
www.eonon.com
Model:D5109
D5109
User Manual

Thanks for purchasing this Digital Screen Software Platform Car A/V product.To
operate the system correctly,please read this User Manual carefully before using
the unit.
Notice:
Kindly note:We keep the final explanation to this user manual and please forgive
if there is any change without additional notices.
unit,make sure your vehicle is connected to DC 12V
1.The unit is designed for 12V DC,negative ground operation system only.
Before installing the
negative ground system.
2.Be sure to connect the speaker (-) leads to speaker (-) terminal.
Never connect the left and right channel speaker cables each other or to
the vehicle body.
3.Do not put remote control under high temperature place,where will lead to
non-work of the
remote control.
4.When replacing the fuse,the replacement must be of the same amperage
as shown on the
fuse holder.
5.Do not block vents or radiator panels.Blocking them will cause heat to build
up inside and
may result in fire.
6.Start the engine of the car prior to powering on the unit.Otherwise,the unit
will take the
battery away.
8.Do not redevelop the unit.
9.The unit is only suitable for 12cm disc(8cm is not suitable).
7.It's better not put Credit Card,Watch,etc magnetic things nearby the unit.
It might lead to the loss of information of these things.
1
Contents
2
Remote Control 3
DISC playing Mode
7
DVD system Menu Setup 8
Radio 15
Navigation 17
Bluetooth(Optional)18
USB SD Playing 19
AUX 19
IPOD(optional) 20
CDC(optional) 20
Reverse Rear View 21
DVB-T(optional) 21
Setting 21
Audio Setting
22
Time Setting
23
Radio Setting 23
Calibration 24
Navigation Path Setting 24
Steering Wheel Key Control
25
System 26
Specification 26
29
Simple Troubleshooting Guide
Main Menu 7
Panel Function 5
Language Setting 24

Remote Control
Under Disc DVD VCD CD and MP3 playing,the operation introduction of
some special buttons of remote control as follows:
Zoom Picture Size
Under Playing status,repeatly press Zoom button on the remote control,
it will appear:
Example: X 2
ZOOM OFF
X 3 X 4 X 1/2
X 1/3
X 4/1
POWER MODEMUTE CLOCK
BAND
P/N
RND
SEL VOL+VOL-
LOUD
MENU
A.PS
010+
456
789
123
GOTO
STOP
REP
SUB-T
ENTER
OSD
ANGLE
TITLE
LOC
PROG
AUDIO
SETUP
PBC
ZOOM
INT
A-B
Power on/off
Main Menu
Clock
Radio Band
Loud
Volume -
Audio Selection
Numeric Key
5
Subtitle
Enter/Confirm
Volume +
Radio Auto Scan,DVD
Programming Play
Stop
Audio/Channel
DVD Zoom in
Disc Angle
Repeat
DVD PBC
Preview
Shortly press for
Mute and Long
press for turning
off screen
Mode Change
Local/Distance Radio
Selection,DVD
Random Play
Dsic Play/Pause
Disc Time Searching Play
3
Selective Play
Under playing status,press GOTO button on the remote control,it will appear the
following menu of selective playing.Input chapter or time in appointed place and
press Confirm .Chapter and Time could not input together.
Example:
Chapter
DVD Subtitle 2/2 Chapter 6/12 00 24 58
Hour: Minute: Second
Multi-Angle Play
Under playing condition,repeatly press ANGLE button on remote control
it will appear pictures with different angles,such as Long,Close,Left and
Right angle.
Example: ANGLE ANGLE 2 ANGLE 3 ANGLE 4
Programming Play
Under playing condition,it can play in sequence by Programming Play function
To set up the order of programmes.Operation method:Press PROG button
on remote Control,the unit will show the programming menu.Input programme
number into the
blue color shadow frame.Press cursor UP,DOWN,LEFT and
RIGHT,move shadow frame in right direction to input another programme number.
Press PLAY button to enter playing status.It is same operation for inputing more
Programme numbers ,Use 0-9 as numbers.
Notice:
.The inputed time and chapter should not exceed the ones of Disc content.
1
.This function is available only under DVD,VCD,MP3,CD,SD,USB playing mode.
2
4

This is for showing DVD picture,TV picture,AUX picture,System Menu
and Radio OSD,etc playing information.
SCREEN WINDOW
NAVI
Under any mode,press this button to switch directly to NAVI interface,
press again to last interface.This button can only switch interface,not
the sound of the last mode,however,it has prioritywhen Navi hasvoice
reminding.
NAVI
This button should be pressed for first use of the unit.Press this button
to resume to default of the factory.When the unit has some abnormity,
this button can also help to resume.
RESET BUTTOM
Under DVD,SD,USB mode,it'sfor selecting previous/nextone;Under
Radio mode,it's for selecting previous/next station
UP/DOWN BUTTON
Insert USB card into thissocket,the unit can switch to USB playing
mode preferentially.
USB PLAYER
USB
Under any mode,press this button can exit or insert a Disc.After
inserting a disc,theunit can automaticallyswitch to Disc Playing
Mode.
EJECT BUTTON
Insert a SD card hereand the unitcan switch toSD playing interface
preferentially
SD CARD PLAYER
For Infrared Remote Control use.
IR REMOTE CONTROL
IR
6
Panel Function
BASIC OPERATION
It's Microphone Head of Bluetooth here.
MIC(Optional Bluetooth Function
MIC
This button canselect radio bandunder radio status;Pressit to switch
to RADIO modeunder other mode(ExceptBluetooth).
BAND BUTTON
BAND
Note:DISC mode canbe available onlyif there isDISC inside theunit.
Press this buttonto switch among:RADIO-DISC-USB-SD-CDC-AUX.
SRC BUTTON
SRC
Shortcut key of Bluetooth function.Press this button to receive acall.
BLUETOOTH BUTTON
If there is DVD Discinside the unit,press this button to DVD Disc
playing mode underany status(Under DVD,SD,USB mode,this button
is to Pause).
PLAY/PAUSE BUTTON
Shortly press thisbutton to mute;Long press it to turn off the screen.
MUTE BUTTON
MUTE
Press this button to power on/off the unit.Turn left or right to control the
volume.
PWR/VOL BUTTON
POW VOL
5

()2 5 .Shortly press to select previous or next programme.Long
press
to fast
reverse( X2-X4-X8-X20 ) or fast forward( X2-X4-X8-X20 ).
()3 .Press to play or pause.
()4 . :Stop playing.
()6 .L/R : Switch between channels.
()7 .OSD :on-screen display.
()8 .Back:press it to show moment playing status.
()9 . :it has the following submenu after pressing this button:
While playing anyDisc or USB,SD,press SETUP button on remote control,the
screen will show system menu setup:
1.If need toselect any setup after entering menu,the operation as follows:First,
use button to
select the setup,then,use button and toselect the detailed function
setup,then, press ENTER to confirm.
2.Tostop setup,press SETUP button again to exit.
DVD System Menu Setup
()1 .Mute:Mute on/off.Long press to turn off the screen.
Menu : Enter playing menu.
RDM : Play at random.
RPT : Repeat play.
Sub-T : The title Disc supports.
Loud : Loud setup.
1
2
3
4
5
6: Select play switch.
7: Direction cursor.
8
Main Menu
DISC PLAY MODE
Press DVD,USB,CD in main menu or SRC on front panel, enter the
following playing interface.Press any area of playing interface,it will appear
the function items.
1
2345679
8
1234567
7

1 Press or() ()2 Press or , or ,then,press ENTER
Default Setup:Procedure asfollows:
There is Restore option in Defaultsetup.This function can restore all setup to
original factory default.
SYSTEM SETUP
VIDEO
TV TYPE
PASSWORD
RATING
DEFAULT
EXIT SETUP
SYSTEM SETUP
TV TYPE
PASSWORD
EXIT SETUP
VIDEO
RATING
DEFAULT RESTORE
Picture Display LanguageSetup:Procedure as follows:
LANGUAGE SETUP
SUBTITLE LANG
MENU LANG
EXIT SETUP
AUDIO LANG
OSD LANGUAGE ENGLISH
CHINESE
GERMAN
SPANISH
FRENCH
PORTUGUESE
LANGUAGE SETUP
AUDIO LANG
SUBTITLE LANG
MENU LANG
OSD LANGUAGE
EXIT SETUP
Audio Language Setup:Procedureas follows:
This function isbased on the support of Disc itself.
LANGUAGE SETUP
AUDIO LANG
SUBTITLE LANG
MENU LANG
OSD LANGUAGE
EXIT SETUP
LANGUAGE SETUP
SUBTITLE LANG
MENU LANG
EXIT SETUP
AUDIO LANG
OSD LANGUAGE
ENGLISH
GERMAN
SPANISH
FRENCH
CHINESE
JAPAN
RUSSIAN
LATIN
()2 Press or , or ,then,press ENTER()1 Press or
10
SYSTEM SETUP
VIDEO
TV TYPE
PASSWORD
RATING
DEFAULT
EXIT SETUP
SYSTEM SETUP
PASSWORD
RATING
DEFAULT
EXIT SETUP
VIDEO
TV TYPE 4:3PS
4:3LB
16:9
()1 Press or ()2 Press or , or ,then,press ENTER
Screen Ratio Setup: The procedure of setting up Screen Ratio as follows:
SYSTEM SETUP
VIDEO
TV TYPE
PASSWORD
RATING
DEFAULT
EXIT SETUP
SYSTEM SETUP
RATING
DEFAULT
EXIT SETUP
VIDEO
TV TYPE
- - - - -
PASSWORD
Password setup is used to control the limit to different age lookers.Enter password,
select age range in class option,then,it can control the programmes limit(This
function is based on the Disc itself .)
SYSTEM SETUP
VIDEO
TV TYPE
PASSWORD
RATING
DEFAULT
EXIT SETUP
SYSTEM SETUP
TV TYPE
PASSWORD
RATING
DEFAULT
EXIT SETUP
VIDEO S-VIDEO
INTERLACE-YUV
Password setup: The procedure of setting up password as follows:
()1 Press or ()2 Press or , or ,then,press ENTER
Video output:The procedure of setting up Video output as follows
()1 Press or ()2 Press or , or ,then,press ENTER
9

VIDEO SETUP
CONTRAST
HUE
SATURATION
SHARPNESS
EXIT SETUP
BRIGHTNESS
-
-
-
-
-
12
10
8
6
4
2
0
VIDEO SETUP
BRIGHTNESS
CONTRAST
HUE
SATURATION
SHARPNESS
EXIT SETUP
Brightness Setup: Procedure as follows:
()1 Press or ()2 Press or , or ,then,press ENTER
AUDIO SETUP
KEY
AUDIO
AUDIO SETUP
EXIT SETUP
AUDIO
KEY
-
-
-
-
-
#
+4
+2
0
-2
-4
L
L
The default of this unit is SPDIF/RAW/.SPDIF/OFF means turn off Digital Output
and turn on Analog Output.SPDIF/RAW means turn on both Digital and Analog
Output.SPDIF/PCM means turn off Analog Audio Output,only Digital Output is
available.
Tone Setup: Procedure as follows:
()1 Press or ()2 Press or , or ,then,press ENTER
12
()1 Press or ()2 Press or , or ,then,press ENTER
Digital Output Setup: Procedure as follows:
AUDIO SETUP
KEY
AUDIO
EXIT SETUP
AUDIO SETUP
KEY
EXIT SETUP
AUDIO SPDIF/OFF
SPDIF/RAW
SPDIF/RCM
This function is based on the support of Disc itself.
LANGUAGE SETUP
AUDIO LANG
SUBTITLE LANG
MENU LANG
OSD LANGUAGE
EXIT SETUP
LANGUAGE SETUP
EXIT SETUP
AUDIO LANG
OSD LANGUAGE
ENGLISH
GERMAN
SPANISH
FRENCH
CHINESE
JAPAN
RUSSIAN
SUBTITLE LANG
LATIN
MENU LANG
Menu Language Setup:Procedure as follows:
()1 Press or ()2 Press or , or ,then,press ENTER
This function is based on the support of Disc itself.
LANGUAGE SETUP
AUDIO LANG
SUBTITLE LANG
MENU LANG
OSD LANGUAGE
EXIT SETUP
LANGUAGE SETUP
MENU LANG
EXIT SETUP
AUDIO LANG
OSD LANGUAGE
ENGLISH
GERMAN
SPANISH
FRENCH
CHINESE
JAPAN
RUSSIAN
SUBTITLE LANG
OFF
Title Language Setup: Procedure as follows:
()1 Press or ()2 Press or , or ,then,press ENTER
11

Dynamic Range Setup: Procedure as follows:
DIGITAL SETUP
OP MODE
DYNAMIC RANGE
DUAL MONO
EXIT SETUP
DIGITAL SETUP
OP MODE
DUAL MONO
EXIT SETUP
-
-
-
FULL
6/8
4/8
2/8
OFF
DYNAMIC RANGE
Sharpness Setup:Procedure as follows:
VIDEO SETUP
BRIGHTNESS
CONTRAST
HUE
SATURATION
SHARPNESS
EXIT SETUP
VIDEO SETUP
EXIT SETUP
BRIGHTNESS
CONTRAST
-
-
-
8
6
4
2
0
HUE
SATURATION
SHARPNESS
()1 Press or ()2 Press or , or ,then,press ENTER
Output Mode Setup: Procedure as follows:
DIGITAL SETUP
OP MODE
DYNAMIC RANGE
DUAL MONO
EXIT SETUP
DIGITAL SETUP
DYNAMIC RANGE
DUAL MONO
EXIT SETUP
LINE OUT
RF REMOD
OP MODE
Output Mode Setup includes:Line out,RF Adjustment Setup.There are Line out
mode and R F adjustment mode to set up in this item.System will default Line Out
()1 Press or ()2 Press or , or ,then,press ENTER
14
Contrast Setup: Procedure as follows:
()1 Press or ()2 Press or , or ,then,press ENTER
VIDEO SETUP
HUE
SATURATION
SHARPNESS
EXIT SETUP
BRIGHTNESS
CONTRAST
-
-
-
-
-
12
10
8
6
4
2
0
VIDEO SETUP
BRIGHTNESS
CONTRAST
HUE
SATURATION
SHARPNESS
EXIT SETUP
VIDEO SETUP
BRIGHTNESS
CONTRAST
HUE
SATURATION
SHARPNESS
EXIT SETUP
VIDEO SETUP
SATURATION
SHARPNESS
EXIT SETUP
BRIGHTNESS
CONTRAST
-
-
-
-
-
+6
+4
+2
0
-2
-4
-6
HUE
VIDEO SETUP
BRIGHTNESS
CONTRAST
HUE
SATURATION
SHARPNESS
EXIT SETUP
VIDEO SETUP
SHARPNESS
EXIT SETUP
BRIGHTNESS
CONTRAST
-
-
-
-
-
12
10
8
6
4
2
0
HUE
SATURATION
Color Setup: Procedure as follows:
()1 Press or ()2 Press or , or ,then,press ENTER
Saturation Setup: Procedure as follows:
()1 Press or ()2 Press or , or ,then,press ENTER
13

(4 5).VOL-,VOL+
Press these buttons to control the volume up or down.
()8 .BAND
Repeatly press this button to select Radio Band orderly.
()9 .AP.S
Browse the stations stored in number 1-6.Each station will be shown for 5
seconds.Long pressing can automatically store station and display relevant
band and frequency.Pressing relevant number 1-6 can select station.
Pressing this button can scan stored station for 5 seconds.
()10 . Return to Main Menu.
[ 7][8 ]
(6 7).
Station Searching.Press to search stations forward/backward
automatically.Aftera station is received,press any number between 1-6,
it will be stored to the selected number when the screen show the number.
[ 7][8 ]
()11 .Next Page:Go to the next page,it will show the following submenu:
.Loud: Loud setup
This button is Local/Distance on/off.Press this button,the screen will
display LOC and it can receive Local signal station.Press LOC again,the
LOC will disappear and it canreceive local or distance stations.
In FM band,press this button:Switch between ST and MONO(Single Channel)
1
.Loc/Distance
2
.ST(Stereo)
3
16
Dual Mono Setup: Procedure as follows:
DIGITAL SETUP
OP MODE
DYNAMIC RANGE
DUAL MONO
EXIT SETUP
DIGITAL SETUP
OP MODE
EXIT SETUP
DYNAMIC RANGE
DUAL MONO
STEREO
MONO L
MONO R
MIX MONO
Dual Mono Setup includes:Stereo,Left Channel,Right Channel,Mixing Channel
Setup.It can set up Audio Signal of Digital Output.System will default Mixing
Channel output.
RADIO
Press Radio mode in main menu or Press SRC to select Radio,it will enter the
following Radio interface:
()1 2 .Numeral button 1-6
Press 1-6 directly to select the stored station.
()3 .Mute:Mute ON/OFF.Long pressing can turn off the screen.
()1 Press or ()2 Press or , or ,then,press ENTER
13
2
345678911
10
21
15

(Optional)
Bluetooth
()2 .Bluetooth connection
Under Standby mode,make your mobile phone with Bluetooth to search for
this unit's Bluetooth code(Car Kit).After getting the code,begin to connect
them.Defaulted connecting password:0000.
()1 .Press Bluetooth in main menu to enter Bluetooth Interface,relevant
operation as follows:
Above functional buttons are only valid until the unit is connected with Bluetooth
mobile phone.
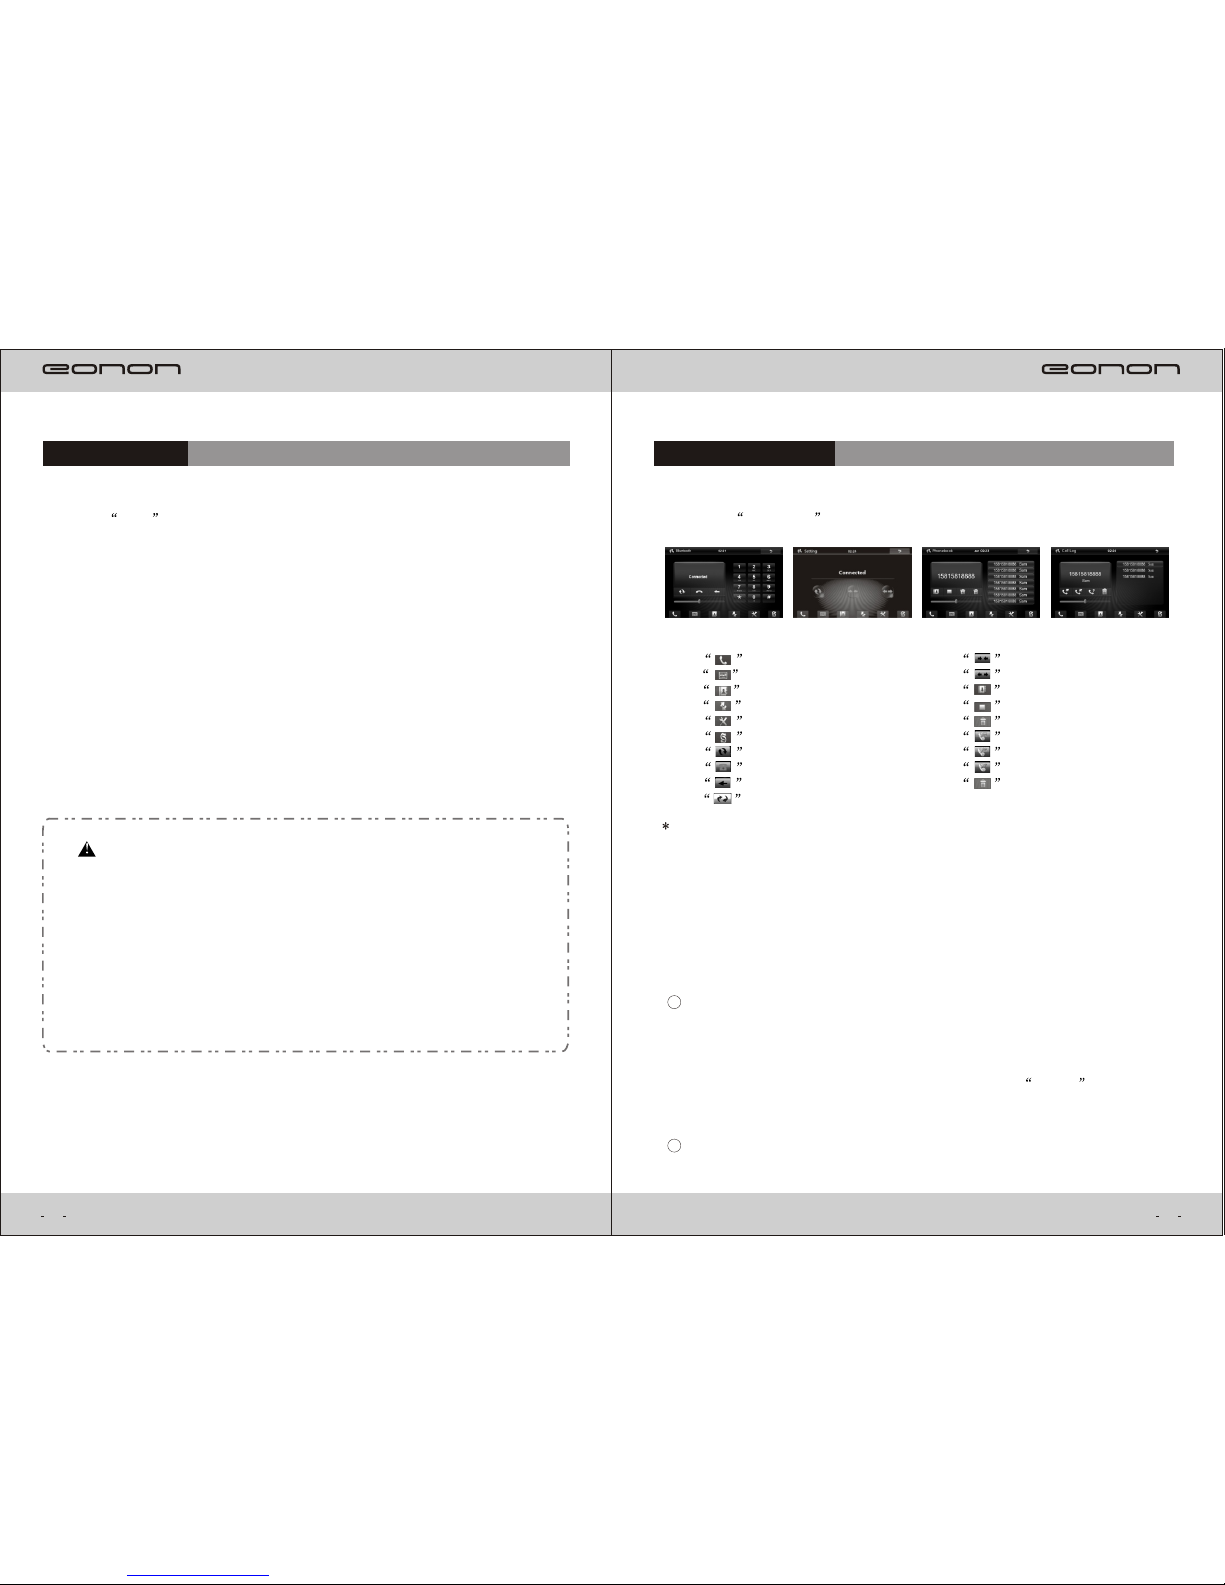
Picture I Picture 2 Picture 3 Picture 4
()3 .Bluetooth Operation
After connecting mobile phone and this unit successfully,you can dial through
this unit. Operation as follows:
Dial the telephone number in Bluetooth interface(As Picture I).When input
wrong number,press backspace to cancel.Press Dial button after input.You
can listen between Mobile and Unit by pressing switch button. After
connecting mobile phone and this unit successfully,you can also search the
number among phone directory and dial it directly(As Picture 3).
.Dial
1
You can see your recent calling record in this menu(As Picture 4).
.Calling record
2
18
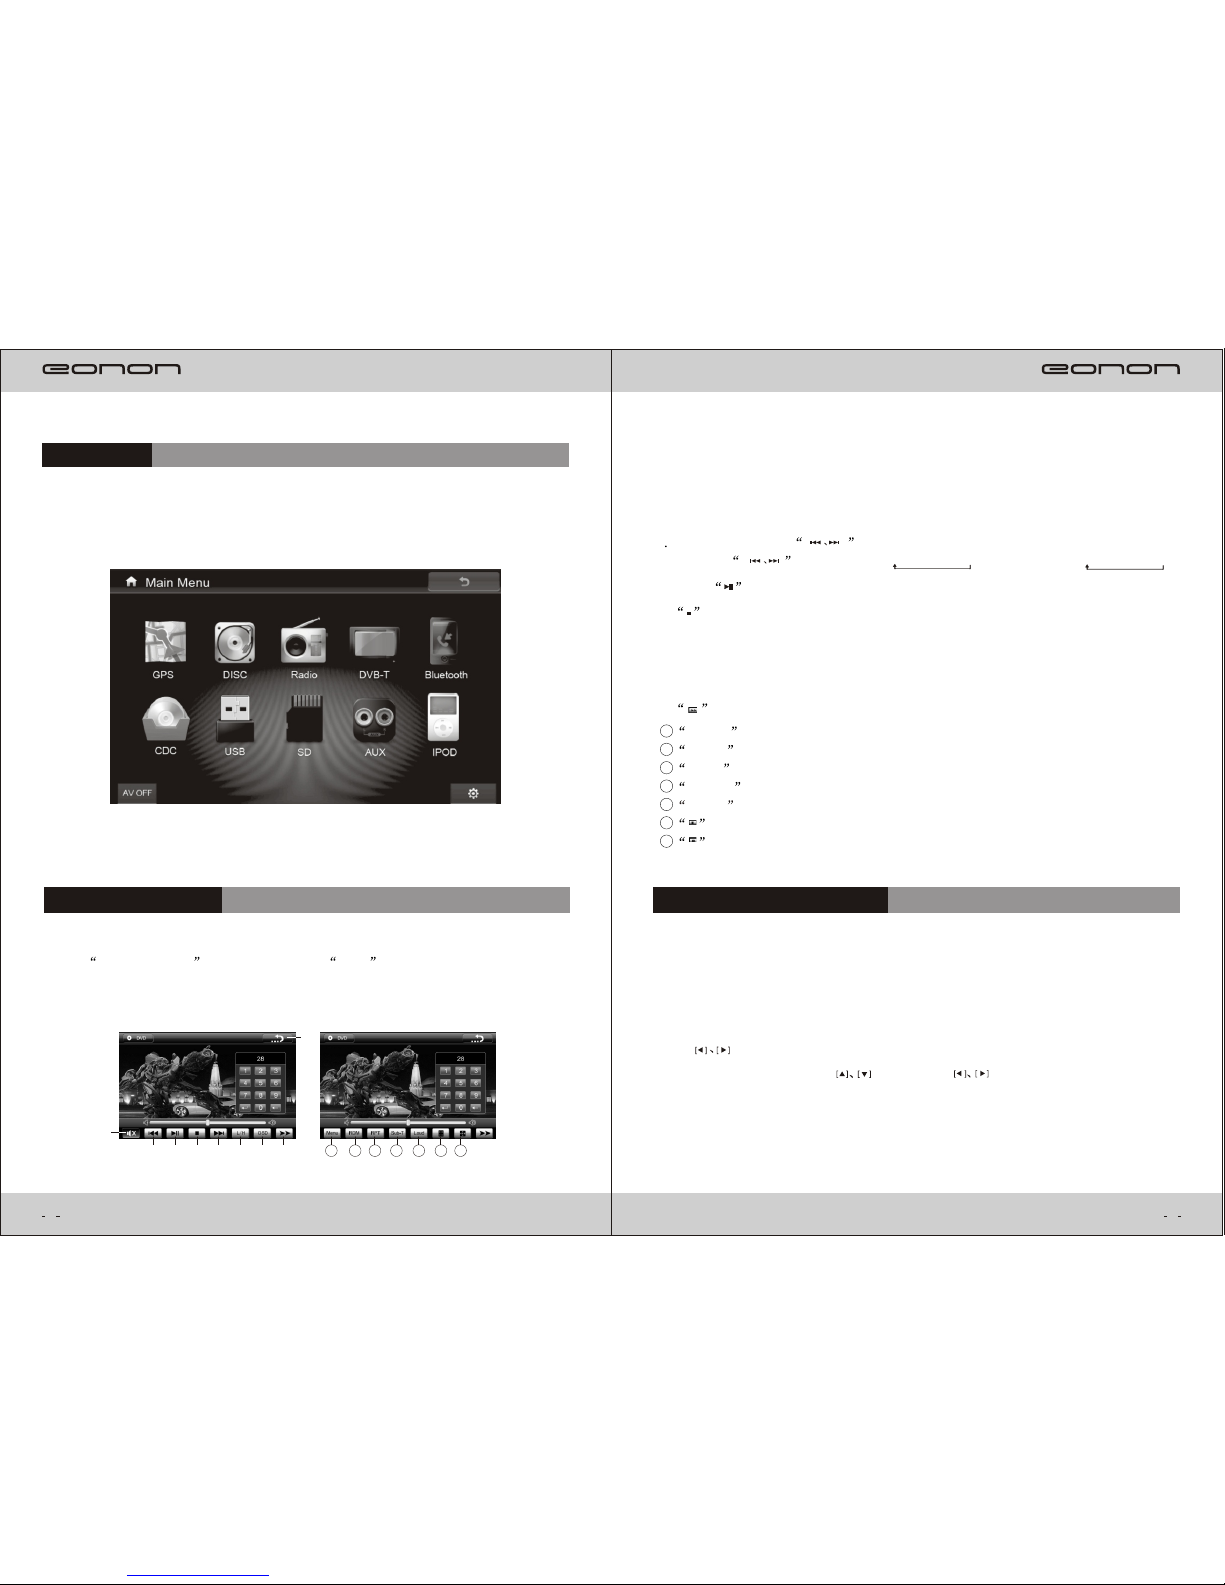
().1 Press NAVI in main menu or on front panel,it will enter Navigation Operation
Interface (It's workable with SD map card ).
().2 Under any working status,press NAVI button in front panel can enter Navigation
Interfacedirectly.It can still keep the previous Audio Signal.When there is
Navigation warning tone,the interface can switch automatically.Press NAVI
againto switch back to previous working status (Bluetooth function is an exception)
().3 For more details,please refer to the Navigation Operation Manual.
Do not take out the map SD card under GPS working status,which can lead to
System fault,GPS invalid,etc.Re-start the function after ACC is closed for
around 30 minutes.Note:MapSD card can taken out only after exiting the
Navigation Operation Interface.To make Navigation operation running smoothly,
please make sure the map is legal.We won't be responsible for the problem
caused by illegal map.
Warning:
NAVIGATION
17
Connected...... 15815818888 Amy
Press to make a calling.
Press to show Keyboard buttons.
Press to browse Phone Directory.
Press to browse recent calling record.
Press for setting up.
Press for switching.
Press to redial.
Press to hang up.
Press to backspace.
Press to initialize Blutooth setup.
Press for Bluetooth connecting.
Press for Bluetooth disconnecting.
Press to download phone directory.
Press to stop downloading.
Press to delete phone directory.
Press to show dialed calling.
Press for received telephone.
Press for missed call.
Press to delete recent call record.

CDC(optional)
The CDC function only can work with Sanyo CD/DVD changer . When our
device has CDC function, you may connect our device with Sanyo
CD/DVD changer, press CDC in main menu or Press “SRC” to select
CDC mode, you can play the songs from your CD/DVD changer.
When our device has iPod function, you may use our iPod cable to connect our
device and your ipod player, press iPod in main menu or Press “SRC”to select
iPod mode, it will display ipod interface and songs list, then it can play the songs
in your iPod.
IPOD(optional)
20
Aux
press Aux in main menu or Press “SRC”to select Aux In mode,can play the audio
or video sources from Audio In or Video In,
All operations will be operated on the
original player of audio or video sources.
Connect USB,SD,press USB,SD in main menu or SRC button to select,it will
enter USB,SD playing.Operation as follows:
Touchscreen operation:Press Touchscreen(show function menu) Press USB,
SD Press Double press the file you want to play.Movie Logo
button
Confirm button
Remote control operation:Right Right Confirm.
Support format:AVI,VOB,DAT,MP3,WMA,JPEG......
USB SD playing
19

Audio Setting
22
Setting
()1 Press in main menu, it will enter setting interface. (As following picture)
()2 “Setting” include “Audio Setting” , “Time Setting”, “Radio Setting”, “other”,
“Calibration”,“Navigation Path”, “Steering Wheel key control”and “upgrade”.
DVB-T(optional)
If you buy our products with digital TV function,connect digital TV box with our
Device press DVB-T In main menu or press “SRC” to select DVB-T mode,you
Can enjoy the program of digital TV,operate by
Touch screen is available.
Reverse Rear View
If you have connected rear view camera to our device, when you put in reverse gear,
the screen of our device will switch to the photo of rearview automatically when you
Put out reverse gear,It will
go back to the original interface automatically.
21
()1 Press in Setting menu,it will enter Audio Setting interface(as following
picture ). Audio Information includes:Bass( ),Treble( ),-7~0~+7 -7~0~+7
EQ(Rock,Pop,Jazz, Classic,Flat).
()3 Press “ ” return to main menu.
()2 Press to return to Setting menu.

Language Setting
(1).Press in Setting menu, you can choose English or traditional chinese
as menu language.
24
Radio Setting
You can set up against the above interface.
Time Setting
23
won't display on the
()1 .Press in Setting menu,itwill enter Time Setting interface.Use forefinger
interface.
Press Done to confirm it.
down,you can adjust time by Year,Month,Day,Hour and Minute.to slide up and
Press show , the time will displayon the interface, press again, thetime
()1 .Press in menu, it will appear the following Radio Area interface:Setting
()1 .Press in Setting menu, it will enter the following interface.
with calibration. Press + in the interface and the process can be ended
when the screen show OK .
Press ,it will apprear the following interface, then, you can go ahead
Calibration
Navigation Path setting
Choose the Navigation Path for your map.
Press in Setting menu, it will enter Navigation Path Setting interface you can
()2 .Press to return to Setting menu.
()2 .Press “ ” return to setting menu.
()2 .Press to return to Setting menu.

System:
System: This function is only for internal use of our factory.
DVD/SVCD/VCD/DVCD/CD/CD-R/CD-RW/MP4/MP3/Mr.OKO
Disc Compatible
Output
Load 4
Voltage DC10V-15V
Max.Output 65Wx4
EQ
+7dB
Bass 100Hz
Treble 10KHz
Audio:4 CH output
4
Collectivity Part
Video:(AV)CVBS AV output
Specification
FM Section
Scan Sensitivity 23dB
Usable Sensitivity 7dB
S/N Ratio 65dB 1KHz 0dB
Crosstalk 32dB
Frequency Response 40Hz-16KHz
Frequency Range 87.5-108MHz
Intermediate Frequency 10.7MHz
26
Steering Wheel Key Control:
(1). look up in the steering wheel control setting interface to check whether
vehicle model if the
corresponding vehicle
Model is stored in the steering wheel control setting;
select the corresponding corresponding vehicle model is
found in the corresponding vehicle model list;
(2). If the corresponding vehicle model is not founded in the steering wheel control
following steps :
others for car brand, set all buttons of steering wheel control bysetting,select
for the setting:
For special models, we have selected the corresponding vehicle model as default for
the car model you bought, you needn't make these setting for steering wheel control.
For universal models:
wheel key control interface (as shown picture), following steps are used
Press the wheel button “ ”in setting menu and input password “ 7758521”to access
into steering
Firstly long press the button of steering wheel control on steering wheel controller,
And the press the button with same function on the left side of steering wheel control
setting interface ( the button change into blue color after pressing). Set other buttons
by the means of one-to-one
correspondence, click button OK to finish setting, then
the steering wheel control can be used.
25

Video System Auto/NTSC/PAL
Channel 2
S/N Ratio 75dB(1KHz 0dB)
Crosstalk 55dB
Frequency
Response 40Hz-16KHz
Dynamic Range 80dB
Distortion 0.4%
DVD section
Auto NTSC/PAL
Video System
2
Channel
75dB(1KHz 0dB)
S/N Ratio
55dB
Frequency
Response
40Hz-16KHz
Crosstalk
70dB
Dynamic Range
0.4%
Distortion
VCD/CD section
28
AM Section
Scan Sensitivity
Usage Sensitivity
S/N Ratio
Intermediate
Frequency
Frequency
Response
Frequency Range
45dB
28dB
45dB(1KHz 0dB)
450KHz
40Hz-16KHz
522-1620KHz
Video Spec
Usage Humidity
Input
Audio:2 CH input
Collectivity Part
Unit Dimension
Installation
Dimension
Unit Weight
-10 +60
DVDC DVDC input
Video:AV CVBS AV input
Video Range:1.0 VP-P(75 )
()Depth*Width*Height
~184x178x100mm
~2.62 Kgs
15 75%
~210x178x100mm
()Depth*Width*Height
Usage
Temperature
Frequency characteristic:
20 20KHZ(+1dB)
27

No work for
Remote
Control
1.There might be some obstacle between unit and remote control;
2.Remote control should aim at the receiver point of the unit;
3.Make sure the correctness of battery installation;
4.Check whether the battery has power or not.
No subtitle 1.Check whether the Subtitle setup of unit is open or not;
2.Check whether the Disc supports Subtitle function.
Staccato Disc dirty or damaged.
Disc cannot be
loaded There is aleady disc inside the unit.
30
Simple Troubleshooting Guide
Problem Cause/Solution
No power
1.Check the connection of the power wire;
2.Check the fuse.Change a new fuse model same as the
replaced one.
Could not read disc
1.Check whether there is Disc in or the Disc is inserted
in right side;
2.Area code of Disc and unit might be different;
3.Disc is damaged or dirty;
4.The format of Disc is wrong;
5.Unit might be affected with damp:Take the disc out first
and make the
unit running for 1-2 hours.
1.Confirm whether the Disc supports Picture or not;
2.Display Chaos:Press RESET to resume;
3.If it's TV which has no picture,please check the
connection of TV antenna.
No Picture
Picture faintness/
distortion
1.TV Picture:Check the place of TV antenna;
2.Reset TV or change the input system of unit.
1.Reset the system of unit or TV. 2.Select screen format from
the disc menu.
Picture not fully
displayed
No sound orAudio
Output not
complete
1.Check the Disc;
2.Check whether the unit is under Mute status or not;Volume
on or off;
3.Check whether the TV system is right or not;
4.Press Channel or Language switch.
29
This manual suits for next models
1
Table of contents
Other Eonon Car Video System manuals

Eonon
Eonon E1063 User manual

Eonon
Eonon E1053 User manual

Eonon
Eonon E1026 User manual

Eonon
Eonon D5102 User manual

Eonon
Eonon Headrest with pillow TFT LCD Monitor User manual

Eonon
Eonon L0101 User manual

Eonon
Eonon D2209 User manual

Eonon
Eonon E1015 User manual

Eonon
Eonon E1023 User manual

Eonon
Eonon E1013 User manual

Eonon
Eonon E1057 User manual

Eonon
Eonon E0837 User manual

Eonon
Eonon D2102 User manual

Eonon
Eonon E1065 User manual

Eonon
Eonon D2208 User manual

Eonon
Eonon 7 Inch Headrest with pillow TFT LCD Monitor... User manual

Eonon
Eonon L0606 User manual

Eonon
Eonon G2103V User manual

Eonon
Eonon L0103 User manual

Eonon
Eonon L0308M User manual