Esco 10107 User manual

EURO BEAD BREAKER
MODEL #10107
Instruction Manual
Parts Breakdown

ESCO EURO BEAD BREAKER Model #10107
Operation
WARNING
The optional air/hydraulic pump is capable of generating uid pressure up to 10,000 PSI.
Keep both hands on the handles and away from the clamping jaw or breaker tongue. Make
certain that the tool is properly aligned on the rim before allowing the bead breaking action.
Do not continue to operate the air/hydraulic pump once the breaker rod is completely
extended. Failure to comply with these instructions could result in personal injury or
equipment damage.
To operate the bead breaker:
1 Make certain the tire is completely deated. Using rubber lubricant, lubricate the area where
you plan to break the bead.
Deatetire. Lubricate with rubber lubricant.
2 Connect the hose of an air/hydraulic pump tothe hydraulic coupling on the bead breaker
tool. Connect the air supply line to the air/hydraulic pump. The air supply should be
between 5 and 10 CFM at 100 PSI to obtain proper operating characteristics. In addition, the
air line should be equipped with an air line lter.
3 Position the bead breaker sothat the jaw makes solid contact with the rim and the teeth are
positioned in the crevice between the bead of the tire and the rim.
NOTE
When a tire has a trash guard, you may have to drive two straight tire irons between the rim
and the tire bead to get a starting point for the teeth.
4 Step on the PUMP end of the pump pedal. The clamping rod will begin to extend and the
jaw will grip the rim.
The Model #10107 includes a clamping jaw pivot pin which can be placed in one of four jaw pivot
positions for use on dierent width anges. The top hole (closest to the handle) is used for
smaller rim anges, and the bottom hole (furthest from the handle) is used for larger rim
anges.

CAUTION
Make certain that the teeth slip in between the rim ange and the bead. If not, depress the
RELEASE end of the pump pedal and realign the tool. If the tool is not positioned correctly,
extending the breaker rod may damage the tire bead or sidewall, the rim ange, or the tool.
If the tool is not pushing parallel to the bead seat area, reposition before continuing.
5 Continue pumping until the tongue of the bead breaker pushes the bead free of the rim.
6 Repeat the process as needed around the diameter of the rim. The tool can be used on the
front and back bead areas.
7 Once the bead is free of the rim, depress the RELEASE end of the pump pedal.
ESCO EURO BEAD BREAKER Model #10107
Service
Most bead breaker malfunctions are a direct result of foreignmatter, such as dirt, dust, water,
etc., entering the tool through the open hydraulic coupler union. Keep the union clean and
capped when the pump is not connected tothe tool toreduce contamination.
Tools whichmay be required for bead breaker service include:
1 Spanner wrench
2 Common screwdriver
3 Needle-nosed pliers
4 Ice pick or sharp awl
5 Allen wrenches (Metric)
6 Open end wrenches
7 Retaining ring pliers
8 Socket wrenches
9 Ratchet
10 Torque wrench

ESCO EURO BEAD BREAKER Model #10107
PurgingAir
These instructions are designed for use with theESCO Air/Hydraulic Pump. If using a dierent
pump, use this information as a guide only. Purge air from the pump and bead breaker as
follows:
1 Remove the snap rings on the rod connectors (items 35 and 38 on the parts drawing).
2 Connect the air/hydraulic pump tothe tool.
3 Connect the pump tothe air supply.
4 Position the pump so that it is higher than the tool and depress the PUMP end of the pedal.
5 After the clamping and breaker rods are fully extended, depress the RELEASE end of the
pedal. Repeat this cycle (PUMP - RELEASE) about ve times.
6 Extend both rods and keep them extended. Check for leaks.Make certain that the rods do
not “creep” back into the cylinders.
Cleaning
Wash the exterior of the bead breaker with warm, soapy water. Rinse with clean water and blow
the tool dry with an air nozzle. Also pay particular attention to the cleanliness of the pump.
CAUTION
Avoid seal damage. Do not use solvent toclean the bead breaker.
Storage
Prior to storing the bead breaker:
1 Completely retract bothrods. An exposed rod may be subject to rusting, pitting and damage
from strikingother tools.
2 If chloride is spilled on the tool, rinse with clean water and blow dry.
3 Dress rod surface nicks and dents with ne grit emery paper. Rod surface nicks and dents,
if left untended, provide a starting point for rust.
NOTE
The chrome plated rod surfaces provide the seal for the tool. Any steps taken to ensure the
continuing quality of the rod surfaces will increase the service life of the tool.

ESCO EURO BEAD BREAKER Model #10107
Hydraulic Flow
Use the hydraulic ow information to help troubleshoot problems with the ESCO Euro Bead Breaker
The bead breaker works via an
air/hydraulic pump which supplies
hydraulic uid pressure to the clamping
cylinder. Fluid pressure is restrictedto
the clamping cylinder byspring pressure
on the sequence ball and by the mated
surfaced of the uid return ball and its
seat. Asthe clamping rod moves out of
the cylinder, the jaw clamps rmly on the
rim.
The internal hydraulic pressure of the
clamping cylinder is sucient to
overcome the spring pressure against
the sequence ball. The ball is forced
away from the seat and pressure
increasesinside the breaker cylinder.

ESCO EURO BEAD BREAKER Model #10107
Hydraulic Flow
The breaker rod has moved out of the
cylinder and the tongue is pressing
against the bead. As pressure
increases,the tongue will break thebead
of the tire from the rim.
Depressingthe RELEASE pedal causes
a decrease in pressure in the clamping
cylinder. With less pressure on the
clamping cylinder side ofthe uid return
ball than on the breaker side, the uid
return ball is lifted o the seat and the
breaker rodretracts. Retraction is due to
an internal spring and pressure of the
bead against the tongue. The breaker
rod retracts rst, followed by the
clamping rod.
NOTE
The clamp can be adjusted for dierent rim widths. Open the clamp wider for larger rim
widths.

ESCO EURO BEAD BREAKER Model #10107
Troubleshooting
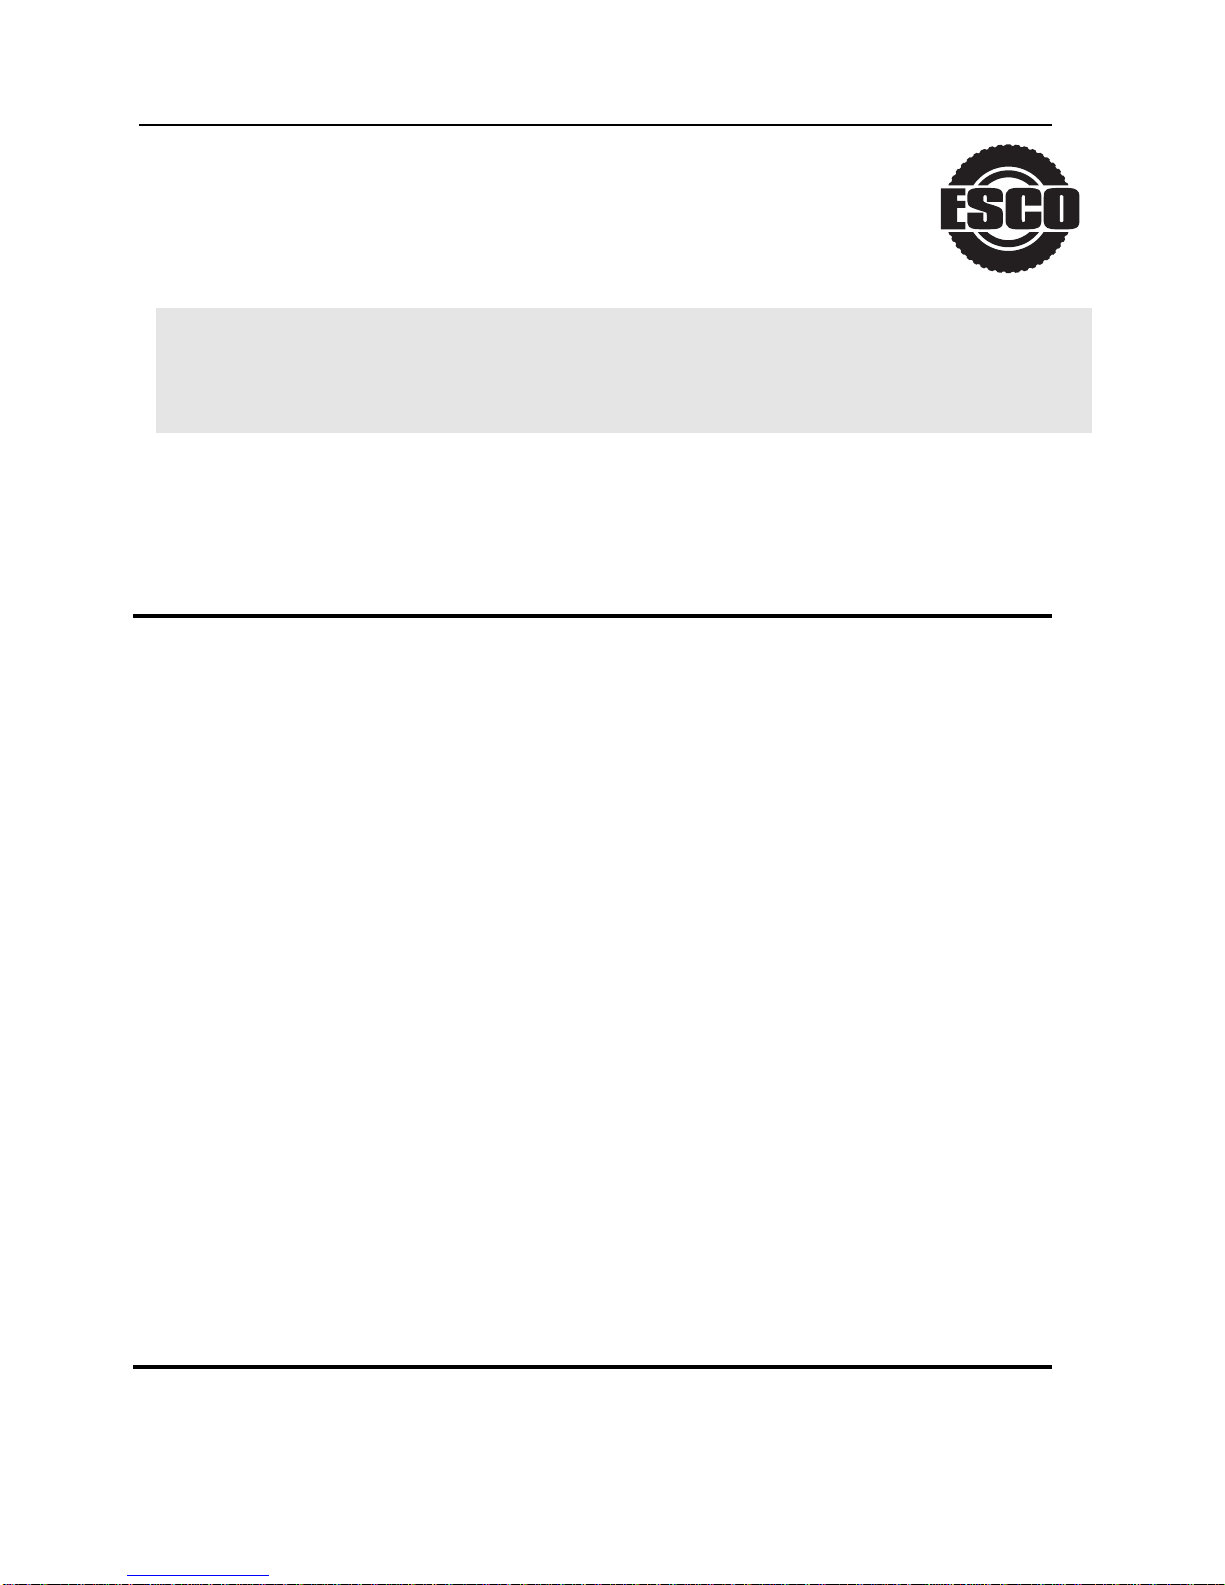
SYMPTOM PROBABLE CAUSE RESOLUTION
Check air supply.Rods extend too slowly. Insucient hydraulic pressure
frompump. Check clearanceofinlet check ball. Ball must
beush with or below end of lter adapter.
Hydraulicpump does not
release. Dirtunder pedal inreleasevalve area. Clean
pedal.
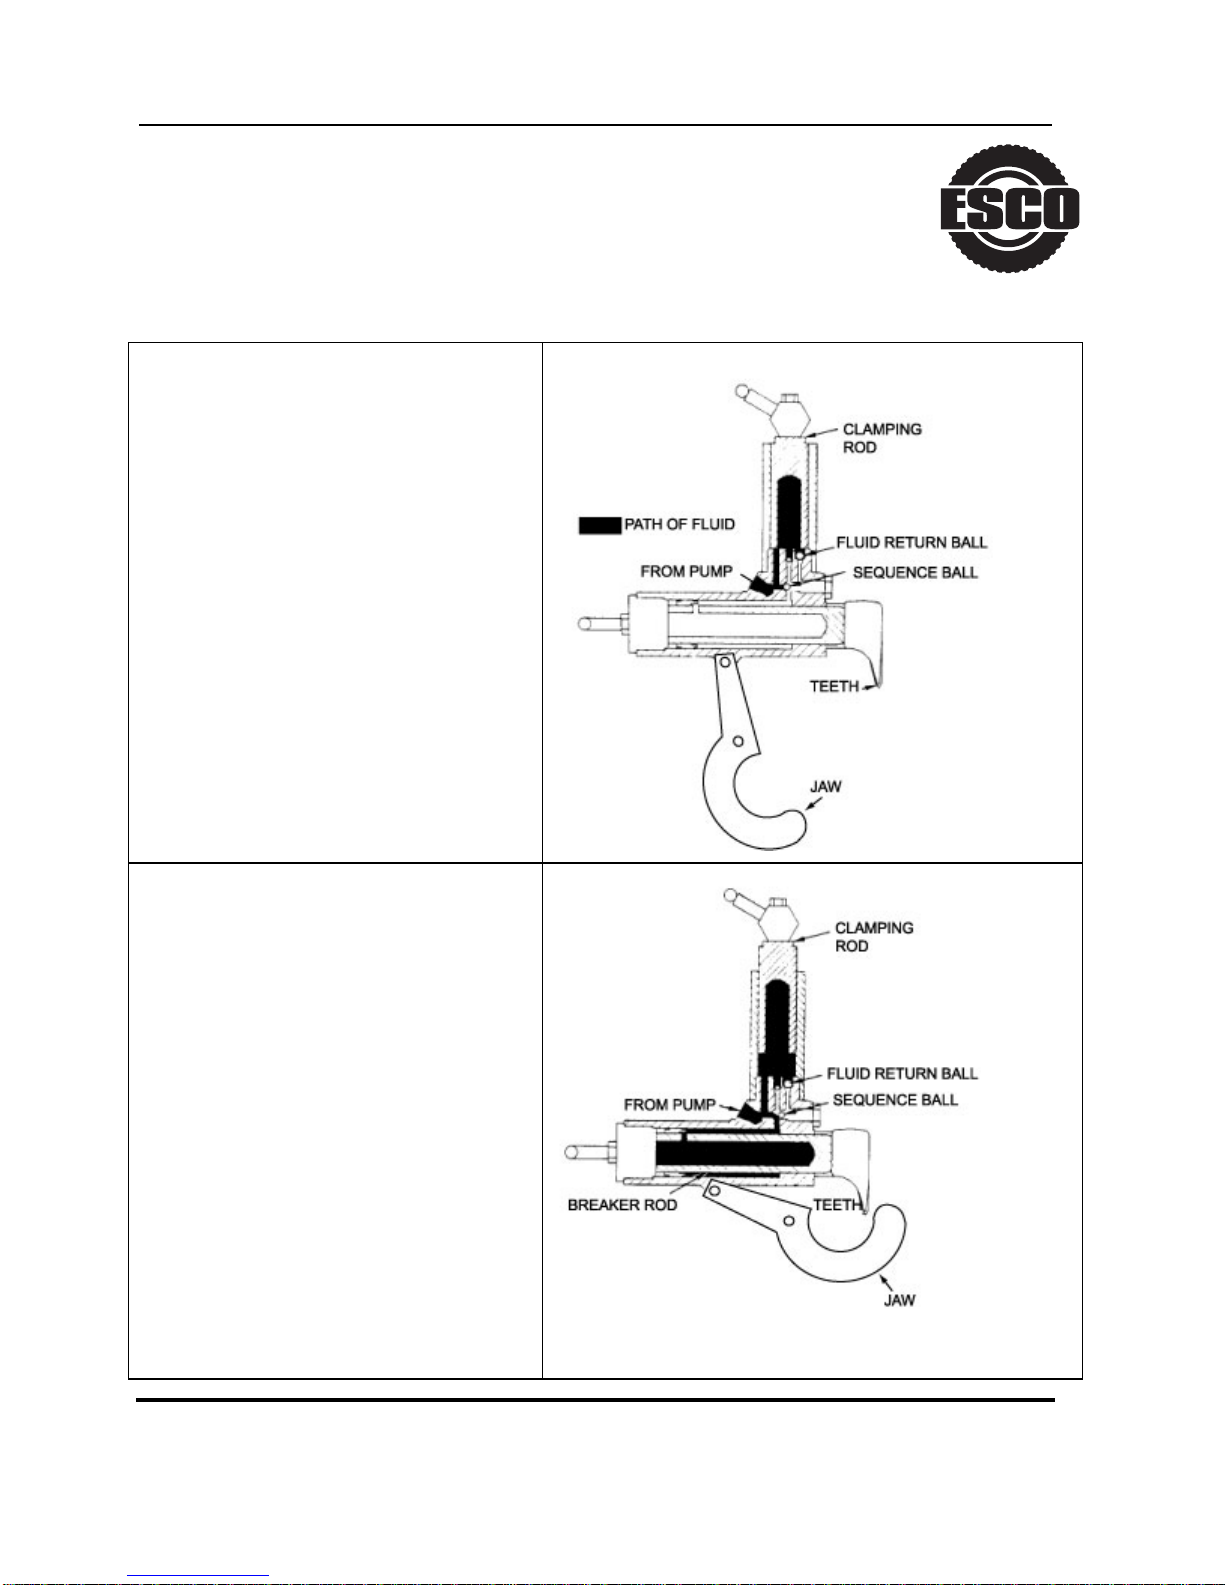
Bearing is misaligned on
breakerrod. Correct or replace.
Rods failto retract.
Broken or weak springs. Replace.
Sequence ball not seated,or
springis broken or weak. Correct or replace.Both rods extend at the
sametime. Hydraulic
pressure in breaker cylinder
isnot being released. Loose screw and ball not
seated. Correct or replace.
Fluid return ball did not restart. Correct or replace.
Dirt plugging return port. Clean port.
Breaker rod retracts after
clampingrod. Hydraulic
pressure in breaker cylinder
isnot being released. Weak or broken spring in
breakercylinder. Replace.
Airpiston stuck. Checkcylinder bore of pump for contamination
or lack of lubrication.
Pump does not reciprocate.
Piston poppet not sealing. Replace.
Pumpreciprocates. Ram
willnot extend.
Check prime. Depress both air valveand hydraulic release
valve at the same time.
Outlet check ball not sealing
properly. Correct or replace.Pump extends ram but will
nothold system pressure. Release valve mechanism not
sealingproperly. Checkpin, ball, release poppet,and poppet
retainer. Correct or replace.
Check air supply. 5 - 10 CFM at 100 PSI
Release valve mechanism.
Low relief valve setting.
Pump extends ram but will
not build to maximum
pressure. Novisible sign of
leakage.
Check for internal leakage.
Inletcheck ball not seatingproperly. Correct or
replace.
Replace copper gasket and assemble in
vertical position.
Pump extends ram but will
not build maximum pressure.
Visiblesign of leakage
through exhaust muer.
Check piston sub-assembly.
Replace piston packing.

EURO BEAD BREAKER
Model #10107

EURO BEAD BREAKER
Model #10107
Part # Description Qty
1 Body 1
2 Cylinder Rod 1
3 Cylinder Head 1
4 Teeth, Clamping 1
5 Foot 1
6 Clamping, Jaw 1
7 Clamping Cylinder Rod 1
8 Clamping Cylinder Housing 1
9 Rod Base 1
10 Side Strap 2
11 Seal Ring 2
12 Seal Ring 2
13 Seal 1
14 O-Ring 1
15 Spring 1
16 Spring 1
17 O-Ring & Thin Ring 1
18 Nut 4
19 Pin 1
20 Spacers 2
21 Clamp Jaw Pin 1
Part # Description Qty
22 Washer 1
23 Screw 1
24 Screw 2
25 Valve Plug 1
26 Washer 2
27 Spring 1
28 Sequencing Ball 1
29 Screw 3
30 Washer 3
31 Screw 1
32 Washer 1
33 Ball 1
34 Bolt 1
35 Snap Ring 4
36 Coupler 1
37 T-Handle 2
38 Set Screw 1
39 Rubber Inserts 6
40 Washer 1
41 Seal Kit 1
Parts List
Table of contents
Other Esco Power Tools manuals