Eskimo WIDE 1 XR User manual

P/N: 40903
ECN: 13497
REV1: 05/02/2022
© Copyright 2022 Ardisam, Inc.
All Rights Reserved.
Operator’s Manual
Original Operating Instructions
WIDE 1™XR
THERMAL
Flip-Style Sled Shelter
Get parts online at
www.GetEskimo.com
GAS/OIL
RATIO
50:1
FRANÇAISFRANÇAIS ENGLISHENGLISH

Check for parts online at www.GetEskimo.com or call 800-345-6007
2
Operator’s Manual
ESKIMO®WIDE 1™ XR Thermal
INTRODUCTION
Eskimo® Ice Shelters are engineered with the ice sherman in mind. We make quality and durability our priority, and we appreciate
your purchase of one of our ice shelters. Follow these simple instructions and your ice shelter will provide you many years of trouble-
free pleasure. Save these instructions for future reference. If for any reason you have a problem with your product, DO NOT return
to the retailer, contact the Eskimo® customer service department at 1-800-345-6007 or by email at info@geteskimo.com for
assistance. Congratulations on your investment in quality. Save these instructions for future reference. Ardisam, Inc reserves the
right to change or alter this manual without notice.
CONTENTS
Introduction .......................................................................................................................................................................................................................................2
Registration ........................................................................................................................................................................................................................................2
Important Safety Precautions......................................................................................................................................................................................................3
Parts...................................................................................................................................................................................................................................................4-5
Bolt Identication Chart.................................................................................................................................................................................................................5
Assembly.......................................................................................................................................................................................................................................6-13
Set-Up and Takedown Instructions..........................................................................................................................................................................................14
Long-Term Storage ........................................................................................................................................................................................................................15
Warranty ............................................................................................................................................................................................................................................16
REGISTRATION AND SERVICE
Record the product model number and serial number in the space provided for easy reference when ordering parts or requesting
technical support. You can register your warranty online by visiting www.GetEskimo.com, or by mailing it to: Ardisam, Inc., P.O. Box
666, Cumberland,WI 54829. For service questions, call our customer service department at (800) 345-6007 Mondays through Fridays.
Warranty is valid only if the completed registration card is received by Ardisam, Inc. within 30 days of purchase.
OWNERSHIP RECORDS
Place of Purchase:
Place of Purchase Address:
City: State/Province: Zip Code/Postal Code:
Model Number: Serial Number (found next to warning tag):
Date of Purchase:
Notes:

3
Check for parts online at www.GetEskimo.com or call 800-345-6007
Operator’s Manual
ESKIMO®WIDE 1™XR Thermal
ENGLISHENGLISH
IMPORTANT SAFETY PRECAUTIONS
This shelter is made with ame resistant fabric which meets
CPAI-84 specications. It is not re proof. The fabric will burn if
left in continuous contact with any ame source.The application
of any foreign substance to the shelter fabric may render the
ame resistant properties ineective.
Fuel-based heat sources burn oxygen and emit carbon monoxide
(an odorless, colorless, poison gas). Breathing carbon monoxide
can cause headaches, drowsiness, nausea, dizziness, confusion
and eventually death. Use caution with heaters. Be sure you
have adequate fresh ventilation, including open windows and
doors. All vents must be opened when using fuel-based heaters
in your shelter.
• Do not use candles, matches or open ames of any kind in
or near an ice shelter.
• Do not cook inside the shelter.
• Exercise extreme caution when using fuel-powered
lanterns or heaters inside a tent. Use battery-operated
lanterns whenever possible.
• Do not refuel lamps, heaters or stoves inside a tent.
• Extinguish or turn o all lanterns and heaters before going
to sleep.
• Do not smoke in shelter.
• Do not store ammable liquids inside of the shelter
.
WARNING
READ, UNDERSTAND AND FOLLOW ALL ASSEMBLY,
SAFETY, SETUP & USE INSTRUCTIONS PROVIDED
BEFORE USE. FAILURE TO FOLLOW ALL WARNINGS
AND INSTRUCTIONS COULD RESULT IN SERIOUS
INJURY OR DEATH.
DO NOT USE OPEN FLAME HEATERS IN YOUR ICE
SHELTER.
WARNING: KEEP ALL FLAME AND HEAT SOURCES AWAY
FROM THIS TENT FABRIC. THIS TENT IS MADE WITH
FABRIC THAT MEETS CPAI84 SPECIFICATIONS FOR
FLAME RESISTANCE. IT IS NOT FIRE PROOF. THE FABRIC
WILL BURN IF LEFT IN CONTINUOUS CONTACT WITH ANY
FLAME SOURCE.
DUE TO TRAFFIC ON LAKES, ICE FISHING CAN BE
HAZARDOUS AT NIGHT. IF YOU CHOOSE TO FISH AT
NIGHT OR IN CONDITIONS WITH POOR VISIBILITY, BE
SURE TO TAKE PRECAUTIONS.
NEVER LEAVE THE ICE SHELTER UNATTENDED.
SECURELY ANCHOR THE ICE SHELTER TO THE ICE IN
HIGH WIND CONDITIONS.

Check for parts online at www.GetEskimo.com or call 800-345-6007
4
Operator’s Manual
ESKIMO®WIDE 1™ XR Thermal
PARTS EXPLOSION
WIDE 1™XR THERMAL
I
A
N
B
K
L
Q
P
T
O
M
S
R
U
H
G
F
E
D
C
J

5
Check for parts online at www.GetEskimo.com or call 800-345-6007
Operator’s Manual
ESKIMO®WIDE 1™XR Thermal
ENGLISHENGLISH
WIDE 1™XR THERMAL PARTS LIST
REF. DESCRIPTION PART Q T Y.
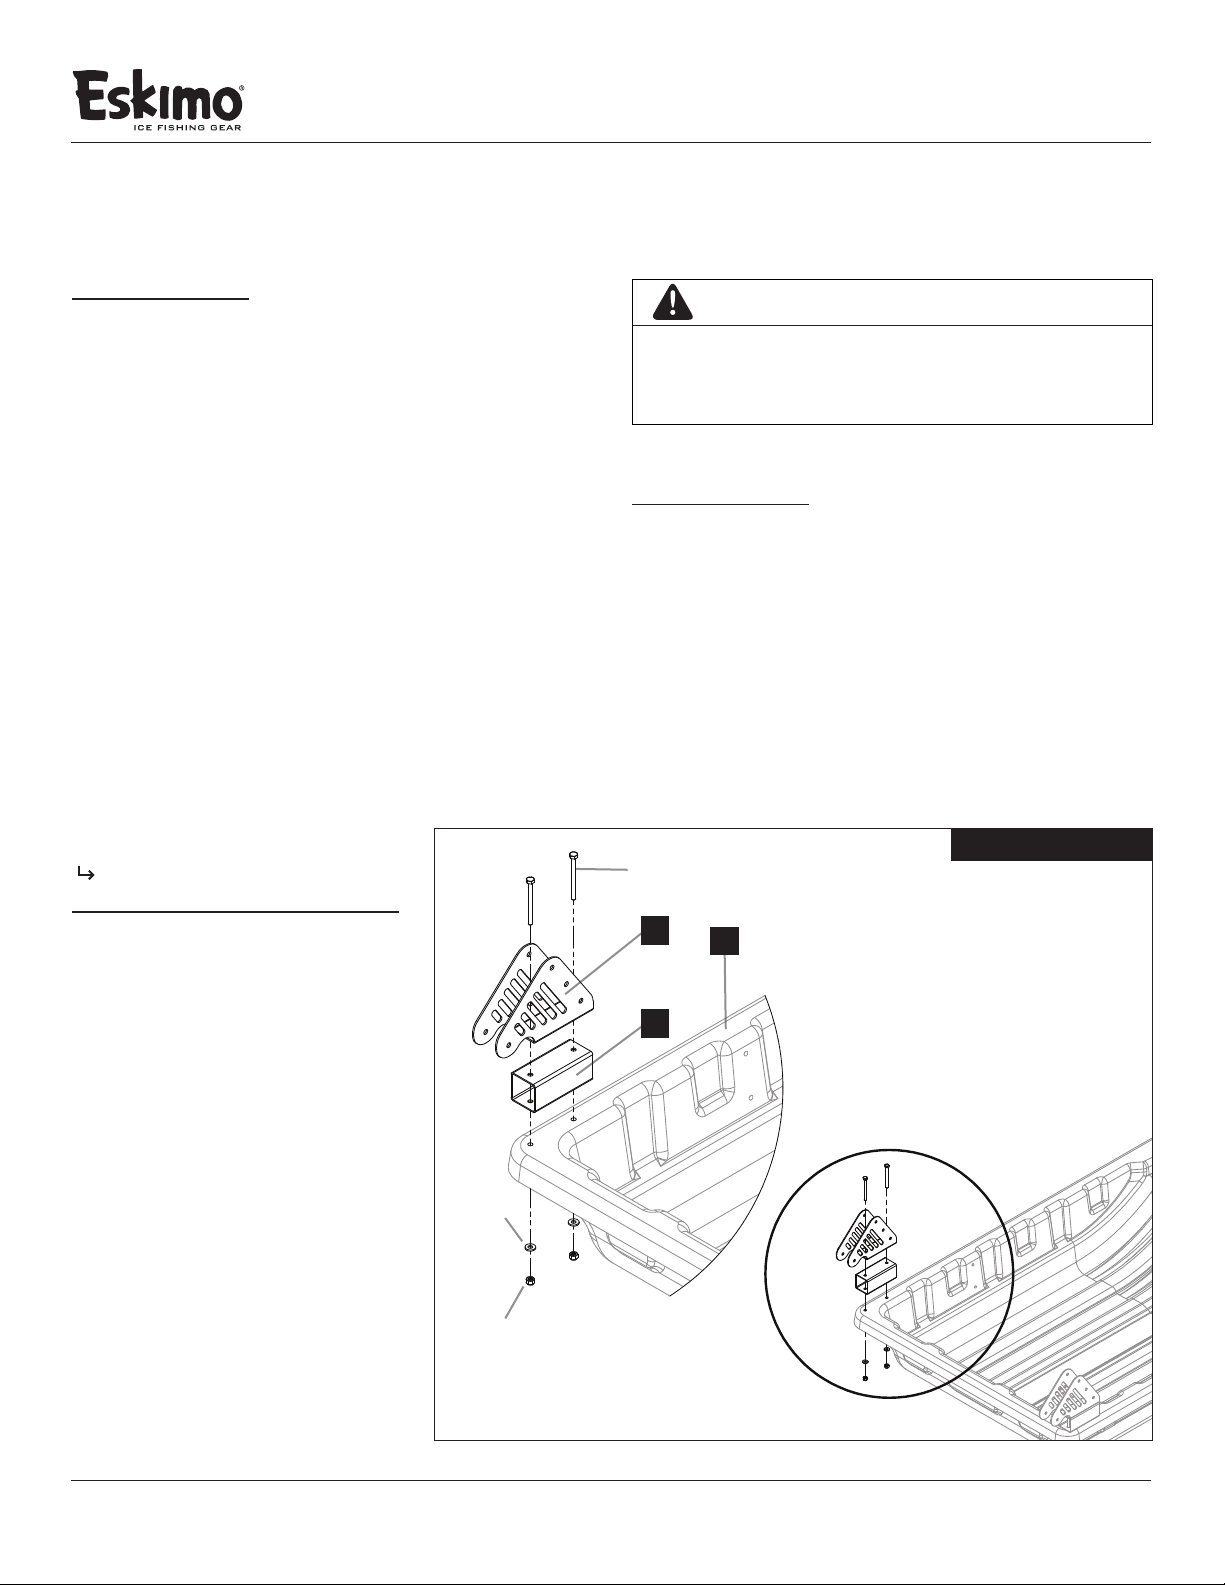
AHINGE DOUBLE SIDED LIGHTWEIGHT 26536 2
BTUBE 50 X 50 X 2MM HINGE RISER 40835 2
CSLED DRILLED 52 X 36 X 9 IN 40905 1
DBRACKET STRAP 28MM SEAT TUBE MOUNT 40839 2
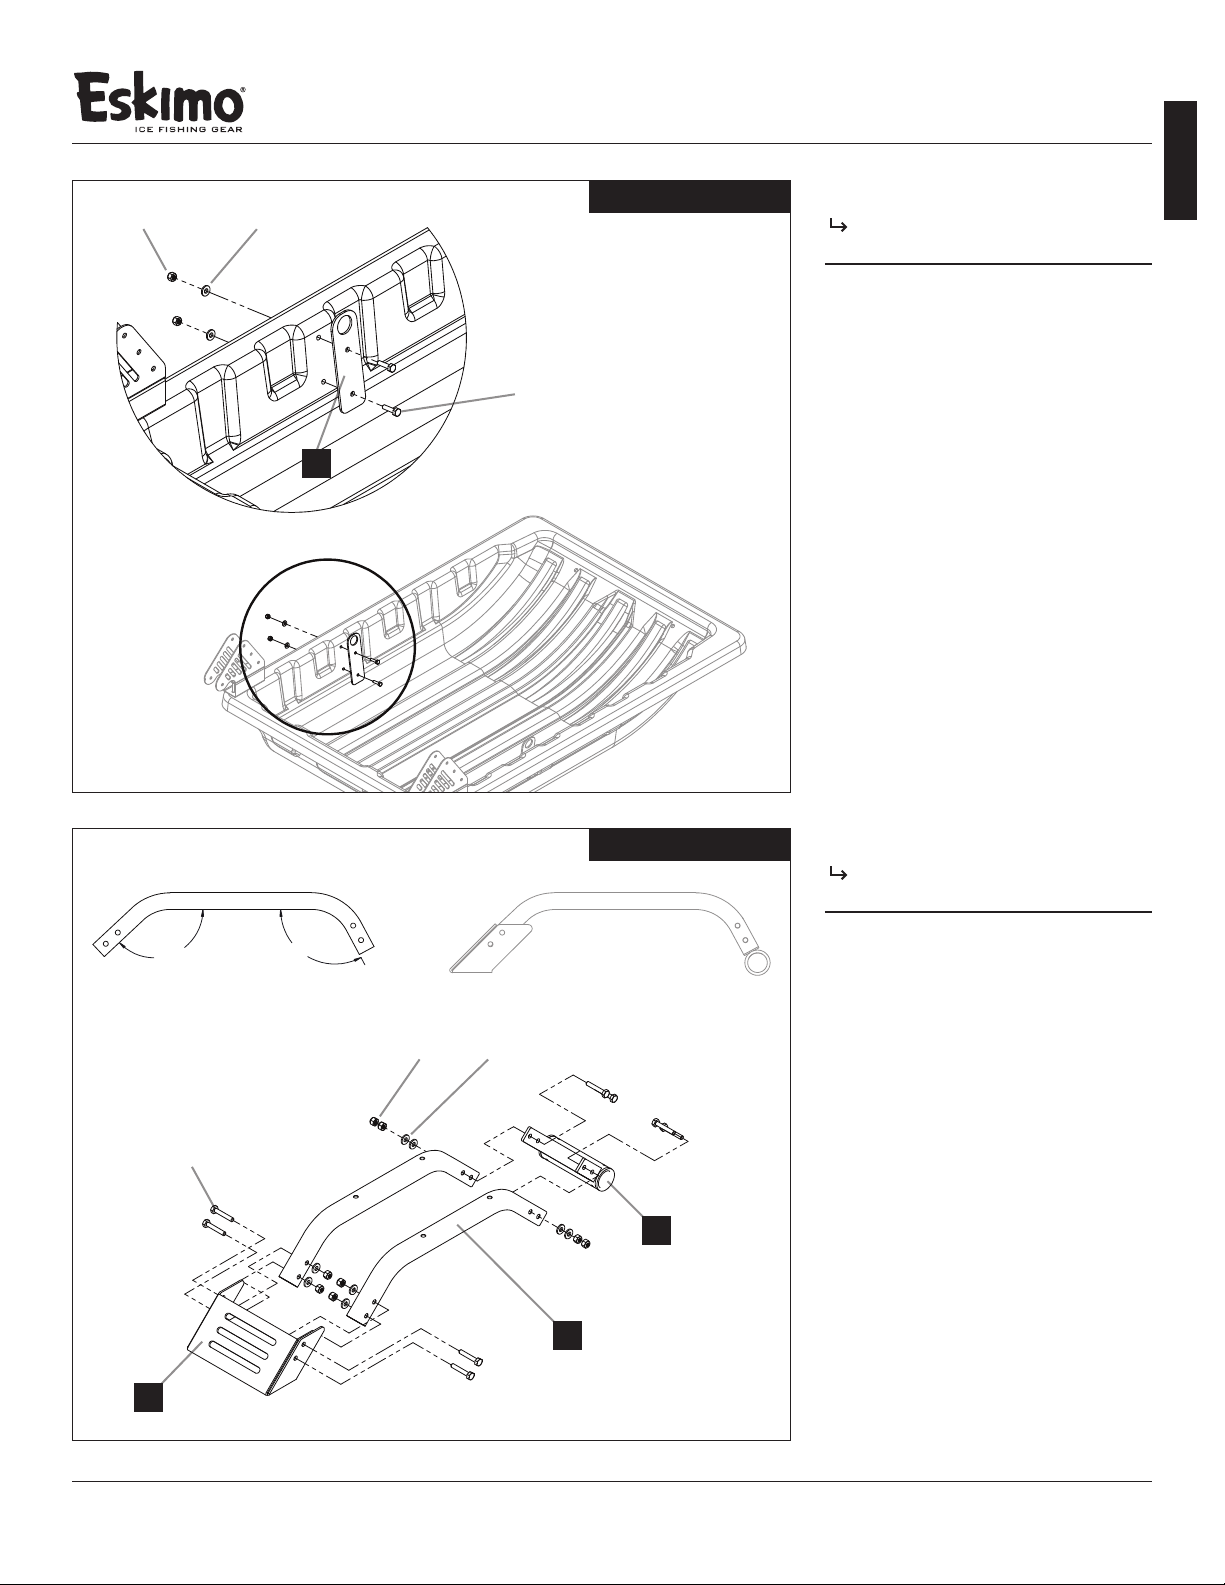
EFTS TUBE 25MM SQUARE SEAT RISER 40836 2
FWELDMENT SEAT CAP FRONT ANGLED 40834 1
GASSEMBLY BRACKET SLIDE 28066 1
HSWIVEL VERSA MOUNT 15016 1
ISEAT VERSA TOP 15004 1
JTUBE ROUND 810MM LONG 28MM X 1.2MM 40840 1
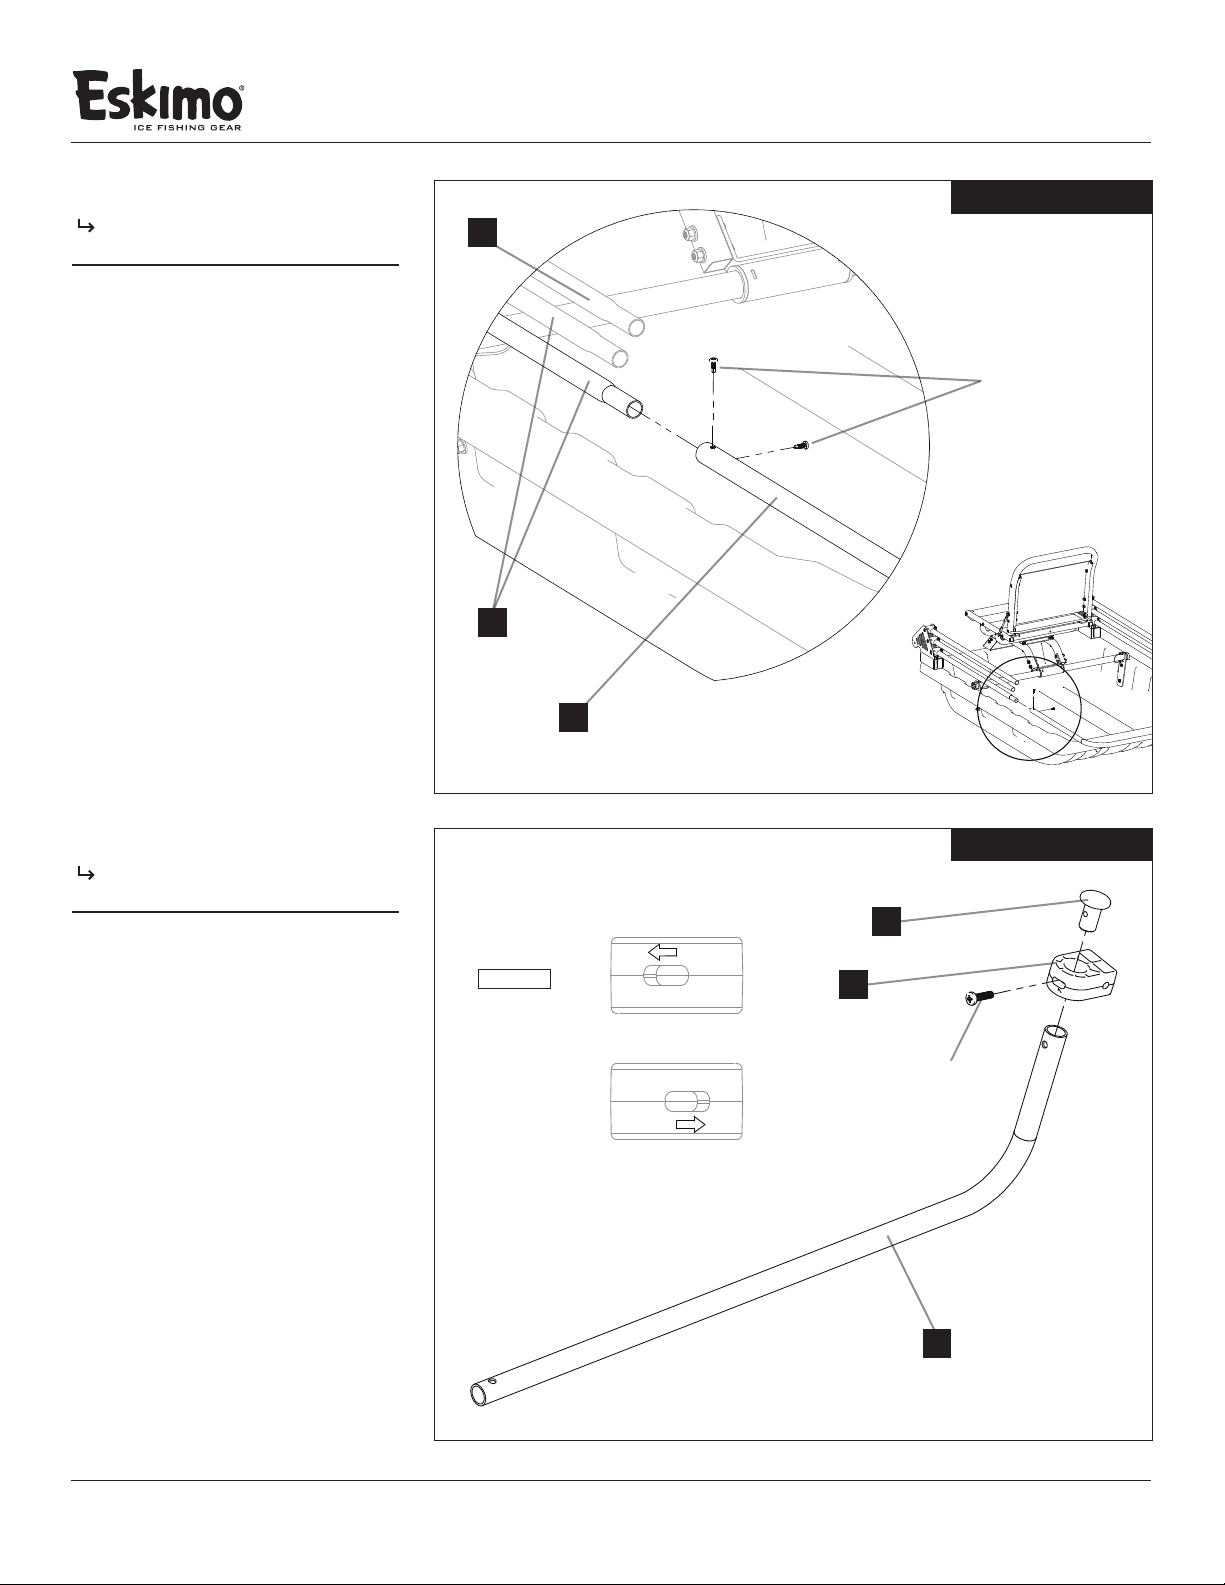
KPLUG SEAT TUBE 25MM DIA 40924 2
LLOCKPIN 1/4 X 13/4 ROUND HANDLE BLK 63281 2
MCAP 22MM ROUND TUBE 40837 6
NTUBE 22MM ROUND UPRIGHT 755MM 27501 4
OTUBE 22MM ROUND UPRIGHT 817MM 40842 2
PTUBE 22MM ROUND U 844 X 581 MM 40841 3
QTUBE 22MM ROUND BENT 28IN LEG 6.75IN DROP 40878 2
RHINGE CAP 22MM ROUND 20 DEG PIVOT 40838 2
SPLUG HINGE PIVOT J POLE 40877 2
TASMBY EXT FNT BTM TUBE 36IN WIDE SLED 40843 1
UASMBY SPREADER POLE ADJ 3/47/8 POLE 3870 IN 41640 1
ITEMS BELOW NOT SHOWN PART Q T Y.
ROPE 1/4 IN X 10 FT TWISTED BLK 27921 1
EDGE TRIM 1/4 IN CUT TO 93.5 IN 69654 1
SKIN SEWN COMPLETE 42350 40742 1
WINDOW PENTAGON 20 X 8 X 5 IN 11953 1
WINDOW HEXAGON TPU 25.5 X 6.5 IN 37546 2
SPLIT RING 60MM ID 30053 5
HARDWARE PART Q T Y.
SCREW #6 1/2 IN PTH BLK ZN 36953 16
SCREW 1/420 X 1.25 IN PPH GR5 BLK ZN FT 41873 2
SCREW #8 1/2 PHILLIPS PAN HEAD 48320 12
BOLT 1/4 X 20 X 11/2 IN HHCS GR5 BLK ZN PT 48240B 16
BOLT 1/420 X 21/2 PTH GR5 BLK ZN 67430 8
BOLT 1/420 X 13/4 PTH 69180 2
BOLT 1/420 X 1 HH GR5 ZN 69345 4
BOLT 1/4 X 20 X 3 IN HHCS GR5 BLK ZN PT 48280B 4
NUT 1/420 HNYLK GR5 BLK ZN 67538B 34
WASHER 1/4 X 5/8 X 0.07 IN GR8 BLK ZN 48261B 42
WASHER 8.1 X 19 X 1.6 MM PLASTIC WN516 4
BOLT IDENTIFICATION CHART
Not all bolt sizes shown are included with all shelters. Bolts shown are for size reference only.
Extra hardware may be included in the parts bag.
48280B BOLT 1/4 X 20 X 3 IN HHCS GR5 BLK ZN P-T
48240B BOLT 1/4 X 20 X 1-1/2 IN HHCS GR5 BLK ZN P-T
69345 BOLT 1/4-20 X 1 HH GR5 ZN
67430 BOLT 1/4-20 X 2-1/2 PTH GR5 BLK ZN
69180 BOLT 1/4-20 X 1-3/4 PTH
41873 SCREW 1/4-20 X 1.25 IN PPH GR5 BLK ZN FT
36953 SCREW #6 1/2 PTH BLK ZN
WN516 48261B 67538B
48320 SCREW #8 1/2 PHILLIPS PAN HEAD

Check for parts online at www.GetEskimo.com or call 800-345-6007
6
Operator’s Manual
ESKIMO®WIDE 1™ XR Thermal
FIGURE 1
TOOLS NEEDED:
• (2) 7/16" wrenches and/or socket driver
• Phillips head screwdriver
• Rubber mallet (optional)
• Cordless drill (optional)
IMPORTANT ASSEMBLY TIP
DO NOT FULLY TIGHTEN ANY NUT AND BOLT COMBINATION
UNTIL INSTRUCTED IN LATER NOTES. THIS WILL HELP WITH HOLE
ALIGNMENT FOR ALL PARTS.
ASSEMBLY TIPS:
• This ice shelter should be assembled in an indoor setting due to the
time and length of assembly. Identify and familiarize yourself with all
parts and hardware before assembly. Allow 1-2 hours for assembly.
• The use of a cordless drill with socket will make assembly of your ice
shelter much quicker. Be sure to set the drill speed on low so you do
not over tighten any nut and bolt combination.
• If a tracking kit or tow hitch is purchased with the shelter, it
should be mounted to the sled before assembly of the ice shelter
for convenience.
ASSEMBLY INSTRUCTIONS
#48280B
#48261B
#67538B
Attach hinges [A] and riser tubes
[B] to sled [C] using two 1/4-20
x 3 inch bolts [#48280B], four
1/4 inch washers [#48261B], and
four 1/4-20 nuts [#67538B].
STEP 1
SEE FIGURE 1
B
AC

7
Check for parts online at www.GetEskimo.com or call 800-345-6007
Operator’s Manual
ESKIMO®WIDE 1™XR Thermal
ENGLISHENGLISH
FIGURE 2
FIGURE 3
Attach brackets [D] to each side
of sled using four 1/4-20 x 1 inch
bolts [#69345], four 1/4 inch
washers [#48261B], and four
1/4 nuts [#67538B].
STEP 2
SEE FIGURE 2
Assemble seat riser frame with
two bent riser tubes [E], front
riser cap [F], and rear sliding
bracket [G]. Use eight 1/4-20
x 1-1/2 inch bolts [#48240B],
eight 1/4 inch washers
[#48261B], and eight 1/4 inch
nuts [#67538B].
NOTE: Ensure riser tubes [E] are
oriented correctly, with the more
open angled end towards the front.
STEP 3
SEE FIGURE 3
ASSEMBLED
LESS
ANGLE
MORE
ANGLE
D
E
G
F
#69345
#48261B#67538B
#48240B
#67538B #48261B
FRONT BACK

Check for parts online at www.GetEskimo.com or call 800-345-6007
8
Operator’s Manual
ESKIMO®WIDE 1™ XR Thermal
FIGURE 4
FIGURE 5
Attach swivel [H] and seat [I] to
seat riser frame [E/F/G] using
eight 1/4-20 x 1-1/2 inch bolts
[#48240B], sixteen 1/4 inch
washers [#48261B], and sixteen
1/4 inch nuts [#67538B].
STEP 4
SEE FIGURE 4
Slide round tube [J] through
brackets [D] assembled to sled
from Step 2.
At the same time, slide round
tube [J] through rear sliding
bracket [G] on assembled
seat riser/swivel/seat (from
Steps 3/4).
Use plastic tube plugs [K] on
each end of round tube [J]
along with two 1/4 inch lock
pins [L] to secure the assembly.
STEP 5
SEE FIGURE 5
H
J
D
G
K
L
I
#48261B
#48240B
#67538B
E/F/G
FIGURE 4A FIGURE 4B

9
Check for parts online at www.GetEskimo.com or call 800-345-6007
Operator’s Manual
ESKIMO®WIDE 1™XR Thermal
ENGLISHENGLISH
FIGURE 6
FIGURE 7
Push pole caps [M] onto each
aluminum upright pole [N]
and [O].
Holes in cap and pole need to
align for proper assembly later.
STEP 6
SEE FIGURE 6
Assemble each aluminum
upright pole [N] to each hinge
[A] as shown using six 1/4-20
x 2-1/2 inch Phillips drive bolts
[#67430], six 1/4 inch washers
[#48261B], and six 1/4 inch
nuts [#67538B].
The longest aluminum upright
pole [O] will be assembled at the
top hole in the hinge [A].
STEP 7
SEE FIGURE 7
M
N & O
N
A
O
#67430
#48261B
#67538B

Check for parts online at www.GetEskimo.com or call 800-345-6007
10
Operator’s Manual
ESKIMO®WIDE 1™ XR Thermal
FIGURE 8
FIGURE 9
Assemble each aluminum loop
pole [P] to the upright poles
[N] and [O] from Step 7, using
the included #8 x 1/2 inch
self-drilling screws [#48320]
to x them to the uprights at
the pre-drilled holes in the
aluminum loop pole [P].
There will be two screws per side
on each aluminum loop pole.
STEP 8
SEE FIGURE 8
Assemble bent aluminum
uprights [Q] with pivoting pole
cap [R] and steel tube plug [S]
using a 1/4-20 x 1-1/4 inch
Phillips drive screw [#41873].
The pivoting pole cap [R] has
an arrow that should point
outwards when assembled.
Make sure you have opposing
assemblies in this step, with
one assembly with an arrow
pointing left, and the other
pointing right. Simply ip the
pole cap when assembling to
achieve this.
NOTE: Ensure 1/4-20 x 1-1/4 inch
screw (#41873) is fully seated. For
extra security, add a small amount of
Loctite® thread locker at end of screw.
STEP 9
SEE FIGURE 9
NOTE
Make sure you
have opposing
assemblies, with
arrows pointing
outwards when
assembled.
#41873
P
O
N
#48320
Q
S
R

11
Check for parts online at www.GetEskimo.com or call 800-345-6007
Operator’s Manual
ESKIMO®WIDE 1™XR Thermal
ENGLISHENGLISH
FIGURE 10
FIGURE 11
Attach bent aluminum upright
assemblies [Q/R/S] to each
hinge [A] using two 1/4-20 x
2-1/2 inch Phillips drive bolts
[#67430], two ¼ inch washers
[#48261B], and two 1/4 inch
nuts [#67538B].
NOTE: Ensure again that the arrow
on the pivot pole cap [R] on each
assembly is pointing outward.
STEP 10
SEE FIGURE 10
The shelter skin [#40742] is
required to be attached to
the bottom extending tube
assembly [T] prior to assembling
to the bent aluminum uprights
[Q/R/S] from Step 10.
Locate the ve split rings at the
front bottom of the shelter,
then thread the bottom
extending tube assembly
through them in sequence.
NOTE: The outer shell of the skin (Red
and Black fabric) should be face down
with the interior (gray fabric) towards
yourself when doing this.
STEP 11
SEE FIGURE 11
NOTE
A
T
Q/R/S
Q/R/S
#67430
#48261B
#67538B
#40742

Check for parts online at www.GetEskimo.com or call 800-345-6007
12
Operator’s Manual
ESKIMO®WIDE 1™ XR Thermal
FIGURE 12
With the skin attached to
the bottom extending tube
assembly [T], align the brackets
on each side with the hole at
the end of each bent aluminum
upright assembly [Q/R/S].
Use one 1/4-20 x 1-3/4 inch
Phillips drive bolt [#69180], two
plastic washers [#WN516], one
1/4 inch washer [#48261B], and
one nut [#67538B] to secure
each side.
The two plastic washers
[#WN516] should be placed
between the tube and the end
brackets to act as a swivel point.
STEP 12
SEE FIGURE 12
Drape the shelter skin over
the top of the frame. Start by
lifting the rear of the shelter skin
over the top of the front frame
support. Make sure that you are
evenly working the shelter skin
over the supports. Continue
working the shelter skin over the
rest of the frame supports until
the shelter skin lies evenly over
the entire shelter.
NOTE: Attaching the skin can be a
dicult task and is easiest with two
people to ensure proper installation
and desired t.
STEP 13
Once the shelter skin is on the
frame, move to the inside of
the shelter and attach the
hook and loop retainers to
the frame supports.
STEP 14
After attaching all of the hook
and loop retainers, extend the
front bottom pole assembly
[T] to the“in use” position
(SEE FIGURE 15). You are now
ready to install the edge trim
to the rear of the shelter.
Move to the outside of the
shelter and start by identifying
the edge trim piece [#69654]
from the parts box.
Locate the center of the edge
trim piece by folding it in half.
Line up the center of the edge
trim to the best of your ability
with the center of the rear of
the shelter.
STEP 15
TQ/R/S
#69180
#WN516
#48261B
#67538B
#WN516

13
Check for parts online at www.GetEskimo.com or call 800-345-6007
Operator’s Manual
ESKIMO®WIDE 1™XR Thermal
ENGLISHENGLISH
SLED
EDGE TRIM
#6 - 1/2”
SCREW
SKIN
FIGURE 14
FIGURE 13
Pull the skin taut and push the
edge trim over lip of the sled
with the shelter skin between
the two. It is important to keep
the skin taut and work the edge
trim evenly around both sides of
the shelter until all edge trim is
in place.
NOTE: When pulling the shelter skin
tight, DO NOT lift the lower frame
support o the ground. Using a
rubber mallet may be helpful while
attaching the edge trim to the sled lip.
STEP 16
SEE FIGURE 13
Secure the edge trim in
place using sixteen #6 x 1/2
inch sheet metal screws
[#36952] provided. A cordless
drill and Phillips head bit is
recommended for this step, but
is not necessary.
NOTE: Screws should be spaced
evenly apart. This step does mean
you will put very small holes in your
shelter skin to keep the edge trim
and skin securely attached to the
sled lip. This will in no way aect the
performance of your shelter.
STEP 17
SEE FIGURE 14
SKIN
EDGE TRIM
SLED

Check for parts online at www.GetEskimo.com or call 800-345-6007
14
Operator’s Manual
ESKIMO®WIDE 1™ XR Thermal
FIGURE 15
TRAVEL POSITION
IN-USE POSITION
QRS DETAIL
Extend the front pole assembly
to the“in use”position before
ipping the shelter over.
To takedown the shelter,
collapse the front pole to the
“travel”position, and ip the
poles over the shelter.
NOTE: Use caution so you don’t rip or
tear the skin, especially around the
hinges or any pinch point areas.
SET-UP / TAKEDOWN
SEE FIGURE 15
On breezy but otherwise nice
days, the included spreader
pole [U] can be extended to the
“in use”position and attached
to the bottom square tube
assembly (small tube side) and
round tube above the door
opening. Flip the shelter over
to create a“windbreak”. There is
not a locked position, and the
intention is to cut light breezes
on nice days. Gusting wind
conditions above a light breeze
could blow the shelter out of
the“windbreak” position and
back into the fully deployed
in-use position.
WINDBREAK
SEE FIGURE 16
FIGURE 16
U

15
Check for parts online at www.GetEskimo.com or call 800-345-6007
Operator’s Manual
ESKIMO®WIDE 1™XR Thermal
ENGLISHENGLISH
TOW ROPE
Locate the included 10 foot tow rope that was in the
hardware bag. To install the tow rope locate the two
holes in the front of the sled and push each end of
the rope through a hole. Tie a knot at each end of the
rope to keep the rope from pulling through the holes.
This tow rope is designed for manual pulling by hand
only. DO NOT tow the shelter behind a motorized
vehicle using the rope.
ADDITIONAL INSTALLATION LONG-TERM STORAGE
• Always make sure your ice shelter is completely
dry before storing for long periods of time.
Storing your ice shelter when damp or wet
may cause mold and mildew damage.
• Remove skin from ice shelter sled and poles.
• Clean all salt, moisture and debris from your
shelter skin, sled and poes. Wipe down poles
with a wet rag.
• Store skin, poles an sled in a cool, dry place
away from rodents.
NOTE: Lubricate the slide poles with a silicon
spray at least seasonally. Do not use oil or
grease as a lubricant.
OPTIONAL ACCESSORIES
• An Eskimo travel cover (#41237) may be
purchased separately to protect your shelter
while towing and traversing the ice, or
during transport to and from the lake.
• For towing behind a motorized vehicle,
you can purchase the EZ-Stow Pivoting Tow
Hitch (#38067) or Eskimo Universal Tow Hitch
(#11608) accessories.
• To help extend the life of the sled, a tracking kit
(#16465) that mounts to the sled bottom can be
purchased, allowing it to slide over rough ice and
terrain easier, with less wear and tear.

Check for parts online at www.GetEskimo.com or call 800-345-6007
All weights, specications and features are approximate and are subject to change
without notice. Due to continuous product improvements, product images may not be
exact. Items used for props not included. Some assembly may be required.
Eskimo®, Division of Ardisam, Inc.
1730 Industrial Avenue, PO Box 666
Cumberland, WI 54829
800-345-6007 | Fax 715-822-2223
Email: info@geteskimo.com
WIDE 1™XR THERMAL
Warranty Terms and Conditions
PRODUCT WARRANTY: 1YEAR LIMITED WARRANTY
Ardisam, Inc., warrants this Eskimo® Wide 1™XR Thermal under a one-year limited warranty to be free from defects in materials or
workmanship or both for a period not exceeding twelve consecutive months from the date of original purchase by the rst retail
consumer or commercial end user. “Consumer use” means personal recreational use by a retail consumer. “Commercial use” or
“commercial application” means all other uses, including use for commercial, income producing or rental purposes. Once a product
has experienced commercial use, it shall thereafter be considered as a commercial use product for purposes of this warranty.
This warranty does not cover cracked windows, tent tears, or bent poles due to use in high wind, inclement weather conditions,
unattended use or uses other than those listed in the owner’s manual. This warranty applies to the original owner that provides a
proof of purchase of the shelter. The warranty is not transferable.The warranty period begins on the date of purchase by the rst retail
consumer or commercial end user, and continues for the twelve month consecutive period thereafter. Any unit used in a commercial
application is covered for a period of 90 days after purchase. For the warranty to be valid, the product must be registered online at
www.GetEskimo.com, or the warranty card must be lled out and received by Ardisam, Inc., within 30 days of purchase. Ardisam, Inc.
shall not be obligated to ship any repair or replacement product to any location outside of the United States of America or Canada.
For replacement parts, phone 800-345-6007 or go online to www.geteskimo.com.
*This warranty applies only to products which have not been subjected to negligent use, misuse, uses other than those indicated in the
product’s owner’s manual, alteration, accident, use of unauthorized parts, failure to perform periodic maintenance as specied in product’s
owner’s manual, normal wear and tear, use of unauthorized parts or repairs performed at non-authorized service centers. There is no other
expressed warranty. Implied warranties, including those of merchantability and tness for a particular purpose, are limited to one year from
purchase, or to the extent permitted by law. All other implied warranties are excluded. Liability for incidental or consequential damages are
excluded to the extent exclusion is permitted by law. Ardisam, Inc. does not assume, and does not authorize any other person to assume
for us, any liability in connection with the sale of our products. To obtain warranty service, you must have prior approval by calling our
customer service department at 1-800-345-6007. If you choose to ship your product to Ardisam for warranty repair, you must rst have
prior approval from Ardisam by calling our customer service department for a return material authorization number (RMA#). Under these
circumstances, all items must be shipped prepaid. Ardisam will at no charge, repair or replace, at their discretion, any defective part which
satises all conditions stated above. Ardisam retains the right to change models, specications and price without notice. Ardisam, Inc. shall
not be obligated to ship any repair or replacement product to any location outside of the United States of America or Canada.

P/N: 40903
ECN: 13497
RÉV5: 05/02/2022
© Copyright 2022 Ardisam, Inc.
Tous droits réservés.
Manuel de l’utilisateur
Instructions d’utilisation
WIDE 1™ XR
THERMAL
Abri à traîneau basculant
Pièces détachées en ligne à
www.GetEskimo.com
GAS/OIL
RATIO
50:1
FRANÇAISFRANÇAIS

Voir les pièces détachées en ligne à www.GetEskimo.com ou composer le 800-345-6007
18
Manuel de l’utilisateur
ESKIMO®WIDE 1™XR Thermal
INTRODUCTION
Les abris Eskimo® sont conçus spéciquement à l’intention du pêcheur sur glace. La qualité et la durabilité sont notre priorité et nous
vous sommes reconnaissants d’avoir acheté l’un de nos abris pour pêche sur glace. Veuillez suivre ces instructions simples et votre
abri pour pêche sur glace vous assurera de nombreuses années de service sans problème. Conserver ces instructions pour toute
référence ultérieure. En cas de quelconques problèmes avec le produit, NE PAS le renvoyer au revendeur, communiquer avec le
service après-vente Eskimo® au 1-800-345-6007 ou par courriel à info@geteskimo.com pour assistance. Nous vous félicitons
pour votre investissement dans la qualité. Conserver ces instructions pour toute référence ultérieure. Ardisam, Inc se réserve le droit
de changer ou de modier ce manuel sans préavis.
SOMMAIRE
Introduction .....................................................................................................................................................................................................................................18
Enregistrement................................................................................................................................................................................................................................18
Mesures de précaution importantes.......................................................................................................................................................................................19
Pièces...........................................................................................................................................................................................................................................20-21
Schéma d’identication des vis.................................................................................................................................................................................................21
Assemblage...............................................................................................................................................................................................................................22-29
Déploiement et repliage de l’abri.............................................................................................................................................................................................30
Entreposage de longue durée...................................................................................................................................................................................................31
Garantie .............................................................................................................................................................................................................................................32
ENREGISTREMENT ET SERVICE APRÈS-VENTE
Consigner le numéro de modèle et le numéro de série du produit dans l’espace prévu pour y accéder facilement lors des commandes
de pièces détachées ou demandes d’assistance technique. L’enregistrement de la garantie peut se faire en ligne à www.GetEskimo.
com ou par courrier à: Ardisam, Inc., P.O. Box 666, Cumberland, WI 54829. Pour toute question, appeler notre service après-vente au
(800) 345-6007 du lundi au vendredi. La garantie est valable uniquement si la carte d’enregistrement dûment remplie est reçue par
Ardisam, Inc. dans les 30 jours après l’achat.
RENSEIGNEMENTS SUR LE PROPRIÉTAIRE
Lieu d’achat:
Adresse du lieu d’achat:
Ville: État/Province: Code postal:
Numéro de modèle: Numéro de série (à côté de l’étiquette de mise en garde):
Date d’achat:
Notes:

19
Voir les pièces détachées en ligne à www.GetEskimo.com ou composer le 800-345-6007
Manuel de l’utilisateur
ESKIMO®WIDE 1™XR Thermal
FRANÇAISFRANÇAIS
MESURES DE PRÉCAUTION IMPORTANTES
Cet abri est fabriqué en toile résistant aux ammes conforme
aux spécications CPAI-84. Il n’est pas incombustible. La toile
nit par brûler en cas de contact continu avec une amme.
L’application de toute substance étrangère sur la toile de l’abri
peut dégrader ses propriétés ignifuges.
Les sources de chaleur à base de combustible brûlent de
l’oxygène et dégagent du monoxyde de carbone (un gaz toxique
inodore et incolore). L’inhalation de monoxyde de carbone
peut provoquer des maux de tête, la somnolence, la nausée,
l’étourdissement, la confusion, voire la mort. User de précautions
avec les appareils de chauage. Veiller à avoir une aération
susante, notamment en ouvrant les portes et les fenêtres.Tous
les évents doivent être ouverts lors de l’utilisation d’appareils de
chauage à combustible dans l’abri.
• Ne pas utiliser de bougies, allumettes ou autres ammes
nues à l’intérieur ou à proximité d’un abri pour pêche sur
glace.
• Ne pas cuisiner à l’intérieur de l’abri.
• Redoubler de précautions lors de l’utilisation de lanternes
ou appareils de chauage à combustible à l’intérieur d’une
tente. Autant que possible, utiliser des lanternes à piles.
• Ne pas remplir les lampes, appareils de chauage ou
réchauds de combustible à l’intérieur d’une tente.
• Éteindre ou couper l’ensemble des lanternes et appareils de
chauage avant de se coucher.
• Ne pas fumer dans l’abri.
• Ne pas entreposer de liquides inammables à l’intérieur de
l’abri
.
AVERTISSEMENT
LIRE, COMPRENDRE ET SUIVRE TOUTES LES
INSTRUCTIONS D’ASSEMBLAGE, DE SÉCURITÉ, DE
MISE EN SERVICE ET D’UTILISATION FOURNIES
AVANT UTILISATION. POUR ÉCARTER LES RISQUES DE
BLESSURE GRAVE OU DE MORT,VEILLER À RESPECTER
TOUTES LES INSTRUCTIONS ET MISES EN GARDE.
NE PAS UTILISER D’APPAREIL DE CHAUFFAGE À FLAMME
NUE DANS L’ABRI.
AVERTISSEMENT : TENIR TOUTES LES FLAMMES ET
SOURCES DE CHALEUR À L’ÉCART DE LA TOILE DE CET
ABRI. CET ABRI EST FABRIQUÉ EN TOILE RÉPONDANT
AUX SPÉCIFICATIONS CPAI84 SUR LA RÉSISTANCE AUX
FLAMMES. IL N’EST PAS INCOMBUSTIBLE. LA TOILE FINIT
PAR BRÛLER EN CAS DE CONTACT CONTINU AVEC UNE
FLAMME.
EN RAISON DE LA CIRCULATION SUR LES LACS, LA
PÊCHE SUR GLACE DE NUIT PEUT ÊTRE DANGEREUSE.
POUR PÊCHER LA NUIT OU PAR FAIBLE VISIBILITÉ,
PRENDRE LES MESURES DE PRÉCAUTION
NÉCESSAIRES.
NE JAMAIS LAISSER L’ABRI POUR PÊCHE SUR GLACE
SANS SURVEILLANCE.
ANCRER SOLIDEMENT L’ABRI À LA GLACE EN CAS DE
GRAND VENT.

Voir les pièces détachées en ligne à www.GetEskimo.com ou composer le 800-345-6007
20
Manuel de l’utilisateur
ESKIMO®WIDE 1™XR Thermal
VUE ÉCLATÉE
WIDE 1™XR THERMAL
I
A
N
B
K
L
Q
P
T
O
M
S
R
U
H
G
F
E
D
C
J
Table of contents
Languages:
Other Eskimo Shelter manuals
Popular Shelter manuals by other brands

IAE
IAE SHELTER Assembly & Maintenance Manual

No Butts Bin
No Butts Bin SR1601 Assembly instructions

TMG
TMG TMG-MSC2030F product manual

Hardlife Utility
Hardlife Utility C2020H Assembly manual

Gazebo penguin
Gazebo penguin SAS11X12FF instruction manual

ABRIS MONDIAL
ABRIS MONDIAL MINI SINGLE SLOPE WALKWAY instructions