Etac Transit User manual

Etac Transit
Manual english
74173I 2015-10-14

1. General – introduction
Intended use.......................................................................3
2. Description
...........................................................................................4
3. The chairs possibilities
....................................................................................... 4-5
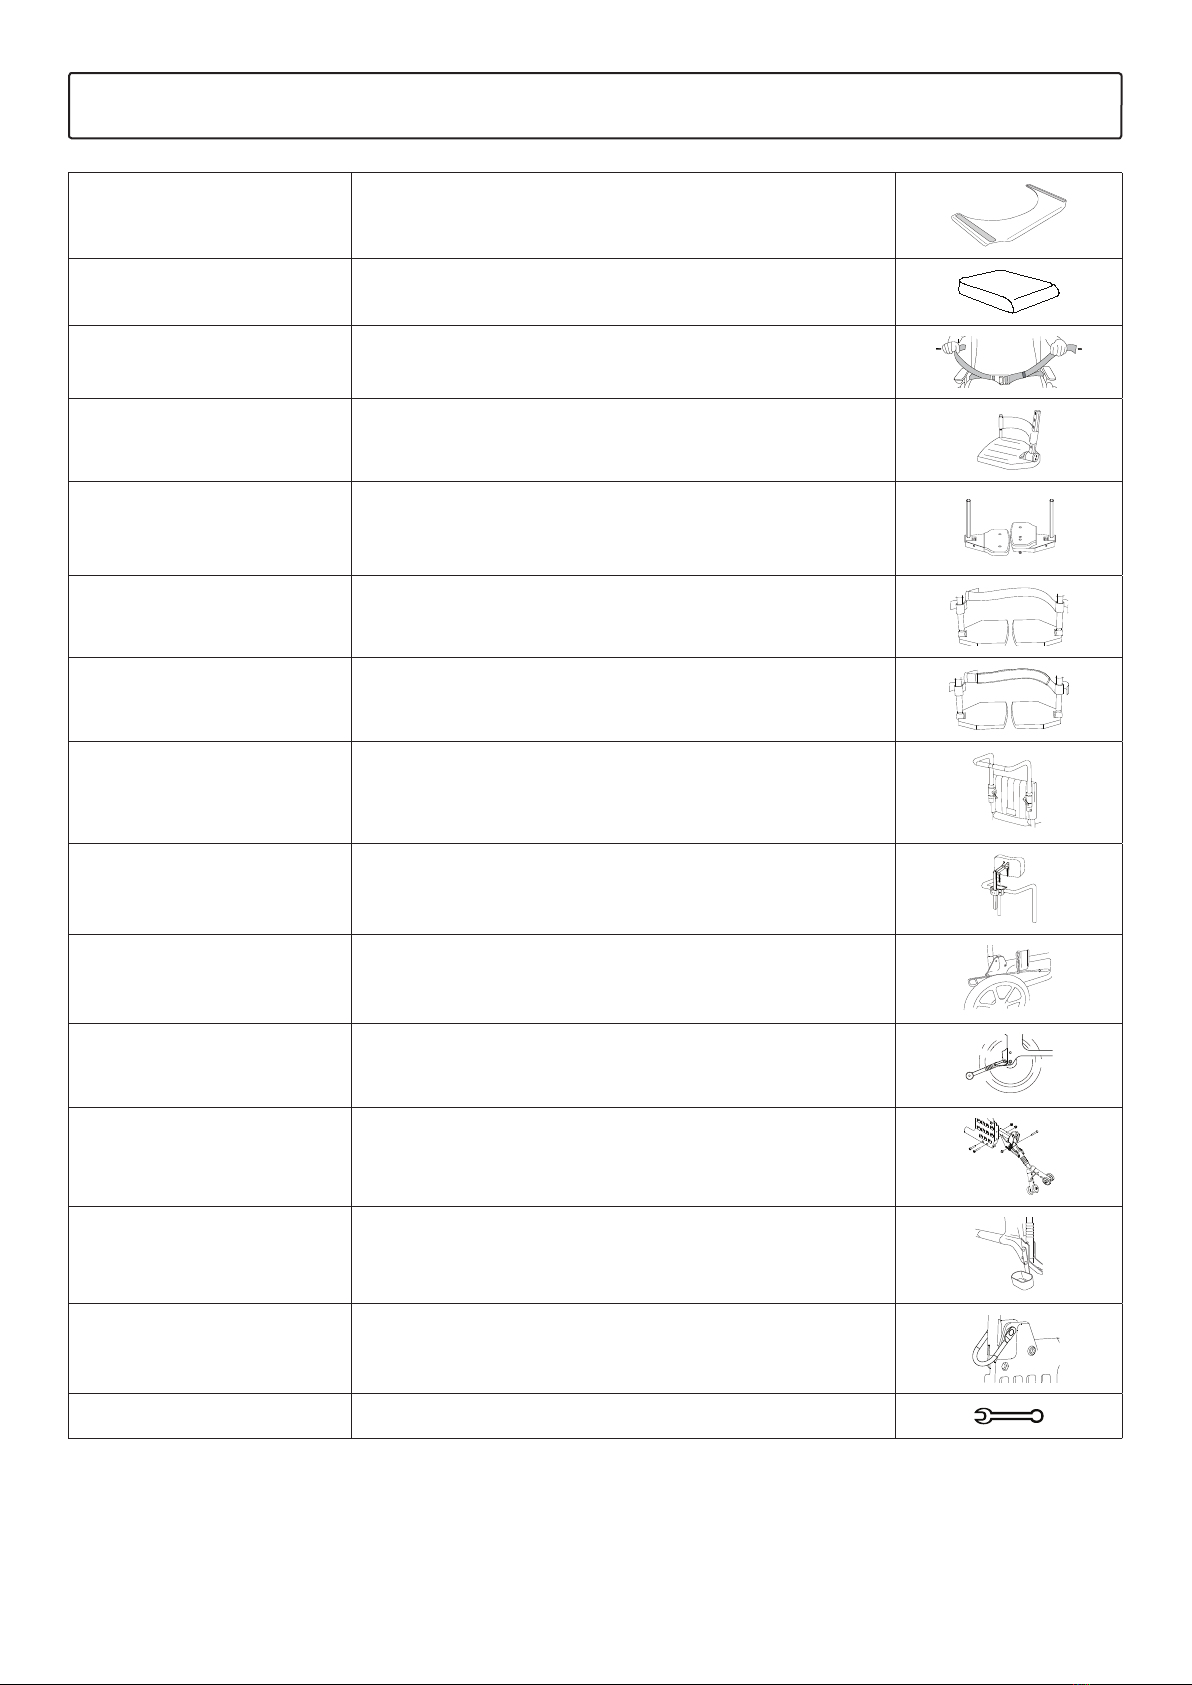
4. Accessories
....................................................................................... 5-6
5. Settings
Front seat height.................................................................7
Adjusting the front seat height by using the front fork
attachment.........................................................................7
Setting the angle of the front fork attachment....................7
Mounting the front fork .....................................................8
User manual
..................................................................................... 9-20
Symbols and warnings ......................................................10
Transportation in vehicles..................................................11
Handling..................................................................... 12-13
Settings seat comfort.................................................. 14-15
Driving technique, maneuvering.................................. 16-18
Maintenance & Fault-finding chart....................................20
5. Settings.
Seat angle.........................................................................21
Seat depth........................................................................21
Seat comfort.....................................................................21
Adjusting back support height .........................................22
Adjusting back support angle ...........................................22
Adjusting back support height (height adjustable push
handle) .............................................................................22
Adjusting back support upholstery ...................................23
8. Readjustments
Attendant brake ...............................................................24
Continuously angle-adjustable legrest (option)..................24
Amputee legrest (option) ..................................................24
9. Accessories - adjusting, handling
Positioning belt.................................................................25
10. Technical data
Etac Transit .......................................................................26
Tests and Guarantees .......................................................26
11. Service and maintenance
Upholstery ........................................................................27
Rear wheel/castor wheel, front fork attachment ...............27
Brakes ..............................................................................27
Washing the frame ...........................................................27
Miscellaneous ...................................................................27
Contents

1. General
Thank you for choosing a wheelchair from Etac. The manual
must be read thoroughly to avoid damage when handling and
using the chair. In this manual the User is the person sitting in the
chair. The Care giver is the person helping the user.
This symbol appears in the manual together with text. It
highlights actions where the wheelchair’s, the user’s or
the care giver’s safety can be put at risk.
This symbol appears in the manual together with text.
Here you will find advice and tips worth considering.
In the centre spread of this manual you will
find a removable section that contains user
information.
Tools
Allen key
3, 4, 5, 6 mm
Socket spanner
8, 10, 13 mm
Socket wrench
24/19 mm
Screw driver
PH1
Explanation for list of points
Applies to model
Standard for this model
Intended use
Transit is a manual cross-folded transportation wheelchair
with variation options that is primarily intended for outdoor use.
The angle of the seat is adjustable. Backrest and footrests are
adjustable in height and angle. In addition there is a range of
options and accessories: Various types of legrests, seat cushions,
height-adjustable push handles, anti-tips etc.
Transit is easy to handle and has excellent seating comfort,
functionality and manoeuvrability.
1 Brake handle attendant brake/parking brake
2 Brake wire
3 Back support tube
4 Back support upholstery
5 Arm support short
6 Side guard
7 Seat upholstery
8 Leg support
9 Foot support
10 Knob foot support
11 Castor wheel
12 Castor fork
13 Cross frame
14 Side frame
15 Rear wheel
2. Description
12
3
6
5
4
8
9
10
12
14
13
15
11
7

3. The chair’s possibilities
In the section ”The chair’s possibilities” you can see all the adaptions possible on the wheelchair. Variations may occur
in different markets, e.g. as regards backrest models. For more information, see www.etac.com or contact our customer
service.
Seat height
Front 51 cm
Rear 49 cm
Castor wheel 8x2” solid
Castor fork
Rear wheel
16x2” rear wheel with attendant brake/parking brake, pneumatic, fixed
axle
16x2” rear wheel with attendant brake/parking brake, solid, fixed axle
Seat
8: 6 Sittsdjup
Fixed
Hard, seat height 2 cm lower than seat upholstery. Easy to remove when
folding
Adjustable
Seat depth 42 cm
Back support
Height 40-47,5 (fixed positions 2,5 cm)
Angle -6° - +6°, fixed positions
With height adjustable push handles
-6 - +6
Back support
upholstery
Fixed
Adjustable
Institution
Back support
cover
Standard
with embroidery
with embroidery and logo
Push handles
Height adjustable
Fixed
Leg support
Lockable
Lockable with narrow angle or short with narrow angle
Lockable institution wide angle

4. Accessories
Arm support cover Detachable, 25 or 38 cm long padded or gel, dark grey plush or
black Dartex. Fits on arm support with solid plate.
Arm support cushion Wide and soft, 8x40 cm, to be mounted on arm support
Widening kit To extend rear wheel, brake and arm support 10 mm on each side
Tray Transparent, to be mounted on long arm supports
In the section ”The chair’s possibilities” you can see all the adaptions possible on the wheelchair. Variations may occur
in different markets, e.g. as regards backrest models. For more information, see www.etac.com or contact our customer
service.
Leg support,
angle adjusta-
ble
Mod 1 with calf support adjustable in height, depth, angle and sideways
Amputee sup-
port
Settable in height, adjustable in length, angle and sideways. Can be
combined with amputee weights.
Foot support
Standard: Max length 51 cm
Min length 33 cm
Shorter attachment tubes to be combined with short, narrow leg sup-
ports
One-piece foot support foldable, adjustable in height and settable in
angle
Arm supports
Length 25 cm, settable in height
Length 38 cm, settable in height
Length 25 cm, settable in height with fingerscrew
Length 38 cm, settable in height with fingerscrew
Locking kit arm
supports Fixed arm support is not removable but can be adjusted in height
Bar Prevents folding
Frame colour Grey blast
3. The chair’s possibilities

4. Accessories
Hemi tray Transparent, width 35-50 cm. Can be fitted onto short or long
armrests.
Seat cushion Dark grey plush and black velour, 56 cm, cut according to seat depth
set, washable
Positioning belt two pieces, with snap-lock, fixing points on the wheelchair frame
Heel straps black nylon, adjustable length
Extended footrest fits onto the existing footrest, from seat width 40-55 cm
Calf strap detachable, black nylon, adjustable in length
Padding for calf strap
Bow handle Height adjustable at intervals of 2 cm. Detachable.
Head support mounted on bow handle, adjustable in height, depth and angle.
User brake
Anti tipper foldable, fixed length
Anti tipper telescopic, foldable, settable height, adjustable length and angle
Cane holder two parts, one of which is an elasticated section that is fastened
around the cane
Securement fittings
Tools

5. Settings
20Nm
The front seat height may be adjusted by:
-Using the front fork attachment, adjustable in height
and angle.
Risk of tipping: Always check the setting of the
the anti-tips.
Loosen the screws (A and B). Adjust according to position
marking (C) to obtain equal height on both sides.
Check and adjust the angle of the attachment and tighten
the screws (see section ”Setting the angle of the front fork
attachment”)
Risk of tipping: Always check the setting of the
the anti-tips.
Adjusting the front seat height by using the front fork attachment
Front seat height
6 mm
The correct angle setting is important
for the wheelchair’s manoeuvrability.
Unscrew the lower attachment screw (A) about 2 turns so
that the shaft (C) moves freely inside the sleeve.
Insert the Allen key in the hole (B) and turn until the at-
tachment is 90° to the floor. Always start from a position
that enables the wheel to move forward in the rotation (D).
Hold the shaft in place while the lower attachment screw is
tightened.
Risk of tipping: Always check the setting of the
the anti-tips.
Keep your eye on something vertical, e.g. a door frame or
table leg, while setting the angle.
Setting the angle of the front fork attachment
A
B
C
A
BCD
20Nm
6 mm

5. Settings
- Pull out the cover plug (A) and unscrew the retaining nut
(B). Pull out the front fork and put the bevelled washer (C)
and the bearing on the new fork.
- Mount the washers and bearings in the front fork at-
tachment as illustrated. Washer (C) is mounted with the
bevelled side towards the front fork. Washer (D) on top
under the retaining nut.
- Tighten the retaining nut until it cannot be turned any
more. Loosen it 1/2-1 turn. The spring washer then has
the correct tension. It reduces the risk of the castor star-
ting to “wobble”.
- Mount the cover plug.
Mounting front fork
19 mm
B
C
A
D

9
Etac / Transit / www.etac.com
User manual
Etac Transit
74173I 2015-10-14
This part of the manual (User manual)
should be torn out and at all times follow
the wheelchair. This as it contains impor-
tant user information.

10
Etac / Transit / www.etac.com
User manual
These symbols appear on labels and in the user manual.
Securing Do not lift the chair
by the armrests
Do not lift the chair
by the legrests
Risk of tipping:
Always have the anti-
tips down when in
motion
Pinch point hazard
After adjusting seat height, centre of balance, backrest
angle or backrest upholstery, the anti-tips function must
always be checked.
General warnings
The following should be taken into account in any use of the product.
Bright sunlight can
heat up parts of the
wheelchair and cause
burns
Do not lift the chair
by the legrests
Risk of tipping:
Always have the anti-
tips down when in
motion
Contents
User manual
Symbols and warnings .....................................................20
Transportation in vehicles.................................................21
Handling.................................................................... 22-23
Settings seat comfort
Backrest cover ..............................................................24
Seat cushion.................................................................24
Backrest upholstery.......................................................24
Backrest angle ..............................................................24
Footrests.......................................................................25
Calf/heel strap ..............................................................25
Armrests.......................................................................25
Driving technique, maneuvering.................................. 26-29
Maintenance & Fault-finding chart....................................30
Symbols and warnings

11
Etac / Transit / www.etac.com
User manual
Etac’s wheelchairs are tested in accordance with ISO
7176-19 (see ”Tests and guarantees” section in the
manual).
Etac recommends in the following order:
1) The user transfers to a seat in the vehicle and uses the
vehicle’s 3-point belt while travelling. The wheelchair
is then placed in the boot or safely in the back seat so
that it cannot overturn or roll.
• If possible, the wheelchair should be placed in the
boot.
• If the wheelchair is placed in the back seat, make
sure it can not overturn or roll. If possible secure the
wheelchair with the car’s safety belt.
2) The wheelchair is secured facing forwards in the vehicle
as per this manual, the user uses a separate 3-point
belt that is secured in the vehicle. This is the way in
which the wheelchair is tested and approved.
Securing
• Securement points rear must be used.
• Restraining device must not be put through the wheels
or around the back tubes.
•The parking brake must be used.
•The anti-tips must be lowered.
•Accessories/parts that can be removed without tools,
shall be removed and secured.
•A correctly adjusted head support shall be used.
•The backrest shall be level with or above the user’s
shoulders.
•Cross brace must be used.
3) According to directive 2001/85/EC, appendix VII, point
3.8.3. there are specially marked wheelchair locations
in vehicles that permit transport with a wheelchair
facing in the opposite direction of travel. If this means
of travel is used, the user/carer must be aware while
travelling, prepared for sudden movements and have
the capacity to maintain a safe sitting position throug-
hout the entire journey. The user’s disabilities must not
be of such an extent that he/she is not able to hold
onto the handles fitted in the vehicle when there are
changes of speed or direction.
•The parking brake must be used.
•The anti-tips must be lowered.
•Accessories/parts that can be removed without tools,
shall be removed and secured.
•A correctly adjusted head support shall be used.
•The backrest shall be level with or above the user’s
shoulders.
•Positioning belt must be used.
Transportation in vehicles

12
Etac / Transit / www.etac.com
Folding
•If a bow handle and/or cross brace is
mounted they should be removed.
•Flip up the footrests.
•Lift up the seat.
User manual
Unfolding
•Push down on one side of the seat frame,
using the whole of the flat of the hand.
•Do not hold the seat frame tube while
unfolding as there is a risk of pinching
your fingers.
•Lower the footrests.
Anti-tippers
•The anti-tippers can be flipped
up.
•Ensure the locking function
works properly when activa-
ting the anti-tip.
•After any adjustments on your wheelchair, always
ensure that you check the function of the anti-tippers.
If necessary to adjust, please contact your dealer or
your Technical Aids Centre.
Handling
Click! Click!
3-7 cm

13
Etac / Transit / www.etac.com
Attendant brake (service brake)
•Brake while in motion by pulling the brake lever
upwards.
Attendant brake (parking brake)
A
•Activate the parking brake by pulling the brake lever
upwards and pressing in button A.
•Release by pressing the lever upwards.
User manual
Push handles/bow handle, height adjustable
Loosen the knobs (A). Set desired height. Ensure that the
push handles are locked in the correct position, tighten
the knobs.
Ensure that the knobs are properly tightened.
This is especially important if the chair is to be
lifted with the user sitting in it.
Make sure the safety button pops out below the
bracket.
The bow handle must be removed before the
chair can be folded.
Legrest
The legrests can be removed/swung to the side if needed.
Lockable legrests by pushing the red button (A).
To fasten the lockable legrests press down on the red button (A),
put the legrest into place and release the button. The legrest is
now locked (B).
Before lifting the wheelchair, check that the
legrests are locked.
AB

14
Etac / Transit / www.etac.com
User manual
Seat comfort
Good seating comfort depends on the needs and possi-
bilities available to each individual. The following general
guidelines here show what to consider when settings are
made.
Select a seat cushion with care. Aside from comfort, it has
an impact on stability and thereby freedom of movement.
Seat cushions also have different pressure distribution
qualities.
The backrest setting is a combination of angles, height
and shape. This is why the angle settings and height for
the backrest may need to be adjusted when the backrest
cover is being adjusted.
Backrest angle
The backrest angle may need to be adjusted when
adjusting the shape of the backrest upholstery.
Contact your dealer or your Technical Aids Centre.
Backrest upholstery
The backrest upholstery is adjusted with the user sitting in
the wheelchair.
•Make sure the user is sitting as far back in the seat as
possible.
•Support the pelvis by tightening the strap found just
below the lumbar region.
•Then adjust the upper strap to provide the user with
upper body support and balance.
•The other straps are adjusted to provide space for the
user’s posterior and follow the back’s natural curvature.
Risk of tipping: Always check the setting of the
the anti-tips.
Do not overtighten the upper straps as this can
prevent the cross-brace from unfolding properly,
i.e. the seat-frame tubes do not sit flush in the
sideframes.
Settings seat comfort
Seat cushion
•Make sure that the correct seat depth is set.
•Position the cushion as far back on the seat so that the
rounded corners end up between the back rails.
•Measure a suitable seat cushion length and cut it accor-
ding to supplied instructions.
•A more contoured seat cushion can be obtained by
using a comfort wedge which is placed in the cushion
cover’s pocket under the seat cushion.
Backrest cover
•Loosen all back straps, but make sure that the Velcro is
still stuck together.
•Place the backrest cover so that it covers the upper edge
of the back rails and forms a crease between the seat
and the backrest allowing the user to properly sit in on
the seat.

15
Etac / Transit / www.etac.com
Foot supports
Adjust the height until you are sure that your feet are
supported and your thighs are resting on the cushion.
For outdoor use the footrests should be raised 4-5 cm
above the ground.
Never stand on the footrests
as there is a risk of tipping!
Adjusting the angle
Adjust the footrest angle, so the ankles are at 90°.
Adjusting the height
Loosen the knob and pull out the screw. Set the height.
Assemble the screw and knob and tighten firmly.
Armrest (adjusting)
•Loosen the screw on the inside of the armrest plate.
•Set the required height and tighten the screw.
•The high position of the armrests supports and relieves
pressure on the back better than a lower position.
Settings seat comfort
User manual
Calf/heel strap
• Adjust the length so that your insteps rest on the
footrests.
Changing the depth of the foot supports
Adjust the depth of the foot supports by switching the
right and left foot support. Do not forget to adjust the
angle.
3 mm
5 mm

16
Etac / Transit / www.etac.com
Parking
Transferring into/out of the wheelchair
Sideways
Remove the armrest on the
side where transfer is to take
place.
From the front
Lifting the wheelchair
•Ensure that the vertically adjustable push handles are
properly tightened.
•Swing non-lockable legrests in
under the seat and lift the
wheelchair by the front
upper part of the frame.
User manual
Driving technique, maneuvering
Never stand on the
footrests as there is a
risk of tipping!
Never park on a slope with a
user in the wheelchair.

17
Etac / Transit / www.etac.com
Activate the anti-tips
afterwards!
Activate the anti-tips
afterwards!
Activate the anti-tips
afterwards!
Care giver, up forwards
– Ensure that the anti-tips are deactivated.
Care giver, up backwards
– Ensure that the anti-tips are deactivated.
Care giver, down forwards
– Ensure that the anti-tips are deactivated.
Care giver, down backwards
– Ensure that the anti-tips are deactivated.
User manual
Activate the anti-tips
afterwards!

18
Etac / Transit / www.etac.com
Activate the anti-tips
afterwards!
Activate the anti-tips
afterwards!
User manual
Stairs, down
– Ensure that the anti-tips are deactivated. Never
use an escalator, even if a care giver is available.
Ensure that height adjustable push handles are
tightened.
We always recommend using two carers for this
transfer. One who walks behind and holds on to
the push handle and one who walks in front and
holds on to the frame (or in the legrests if these
are lockable).
Stairs, up
– Ensure that the anti-tips are deactivated. Never
use an escalator, even if a care giver is available.
Ensure that height adjustable push handles
are tightened.
We always recommend using two carers for this
transfer. One who walks behind and holds on to
the push handle and one who walks in front and
holds on to the frame (or in the legrests if these
are lockable).

19
Etac / Transit / www.etac.com

20
Etac / Transit / www.etac.com
User manual
Castors: Clean castor wheel axles as required.
Chassis: Clean the chassis with non-abrasive detergent, pH value
5-9 or with 70 % disinfectant solution. Rinse and dry.
Upholstery: Wash, see labels on each item.
In the event of problems, contact your dealer or Technical Aids
Centre.
If necessary, lubricate moving parts/joints with cycle oil
or similar.
Fault-finding chart
The wheelchair is pulling
diagonally
•Pump up the tyres (pneumatic tyres)
•Check and adjust the height and angle of the front fork attachments
•The user’s weight is not evenly distributed in the wheelchair
The wheelchair feels “heavy” to
propel
•Pump up the tyres (pneumatic tyres)
•Rear wheel mountings are incorrectly fitted
•Clean the castor axles from hair and dirt
The wheelchair feels “heavy” to
turn
•Pump up the tyres (pneumatic tyres)
•Check that the front fork attachments are not too tight
•Check and adjust the angle of the front fork attachments
•Clean the castor axles from dirt
Brakes not effective •Adjust the wire length
The castor wheels “wobble” •The front forks are not tight enough
•Check and adjust the height and angle of the front fork attachments
The wheelchair is hard to fold/
unfold
•The upholstery is too tight
•Clean and lubricate the cross-brace under the seat
The wheelchair feels “awkward” •Pump up the tyres (pneumatic tyres)
•Check that screws, nuts and bolts are properly tightened
Maintenance
Etac
Box 203, 334 24 Anderstorp, Sweden
Tel +46 371 58 73 00
Fax +46 371 58 73 90
www.etac.com
Table of contents
Other Etac Wheelchair manuals

Etac
Etac R82 Kudu User manual

Etac
Etac Next User manual

Etac
Etac Swift Mobil 24 User manual

Etac
Etac Swift Mobil-2 Series User manual

Etac
Etac Prio User manual

Etac
Etac Ki Mobility AXIOM AS Operator's manual

Etac
Etac Clean Series Instructions for use

Etac
Etac Swift Mobil User manual

Etac
Etac Stapel User manual

Etac
Etac Convaid Safari Tilt Troubleshooting guide

Etac
Etac Crissy Series User manual

Etac
Etac Star StabilAir Series User manual

Etac
Etac Immedia OneWayGlide Non-Slip IM37/8 User manual

Etac
Etac Act User manual

Etac
Etac Act Discontinued User manual

Etac
Etac R82 Turtle User manual

Etac
Etac Prio User manual

Etac
Etac Next Comfort User manual

Etac
Etac Relax User manual

Etac
Etac Cross 6 User manual