Safetymarkings:
Read thisfirst:
> Ifinanydoubt,consultaqualified
electrician.
> Suitable for indoor useonly.
> Suitable for fixing on anormallyflammable
surface.
> When choosing the location foryour new
fitting,ensure thatthe fixingswill be
anchored in asolid surfacee.g.concrete,
brick or ajoist—do notfixdirectlyonto
panelling,cladding,plasterboard
etc.
> WARNING: Thisproduct
becomes hot!
> Thisproductisnotintended to
be used bychildren and persons
withsensory,physical and/or mental
impairments thatwould preventthemfrom
using it safely.
> Before making fixing hole(s),checkthat
there are no obstructionshidden beneath
the mounting surfacesuchaspipesor
cables.
> Ifthe location ofyournew fittingrequiresthe
provision ofanewelectrical supply,the
supplymustconformwiththe requirements
ofthe latestedition ofthe IEE wiring
regulations.
> Donot cover.
> Switchoffthe mainsbefore commencing
installation and removethe appropriate
circuit fuse.
> Makeconnectionstothe electrical supplyin
accordancewiththe following code:
Live-Brownor Red
Neutral -Blue or Black
Earth-Green and Yellow
> If you are connecting tothe mainsusing a
fused spur, a13 Ampfuseshould be fitted.
> This product must be connected toEarth.
> Ensure thattheheater cannotblowhotair
directlyontoanyflammable surfaceorany
surfacewhichmaybe damaged or
discoloured by heat.
> Ifinanydoubt,consultaqualified
electrician.
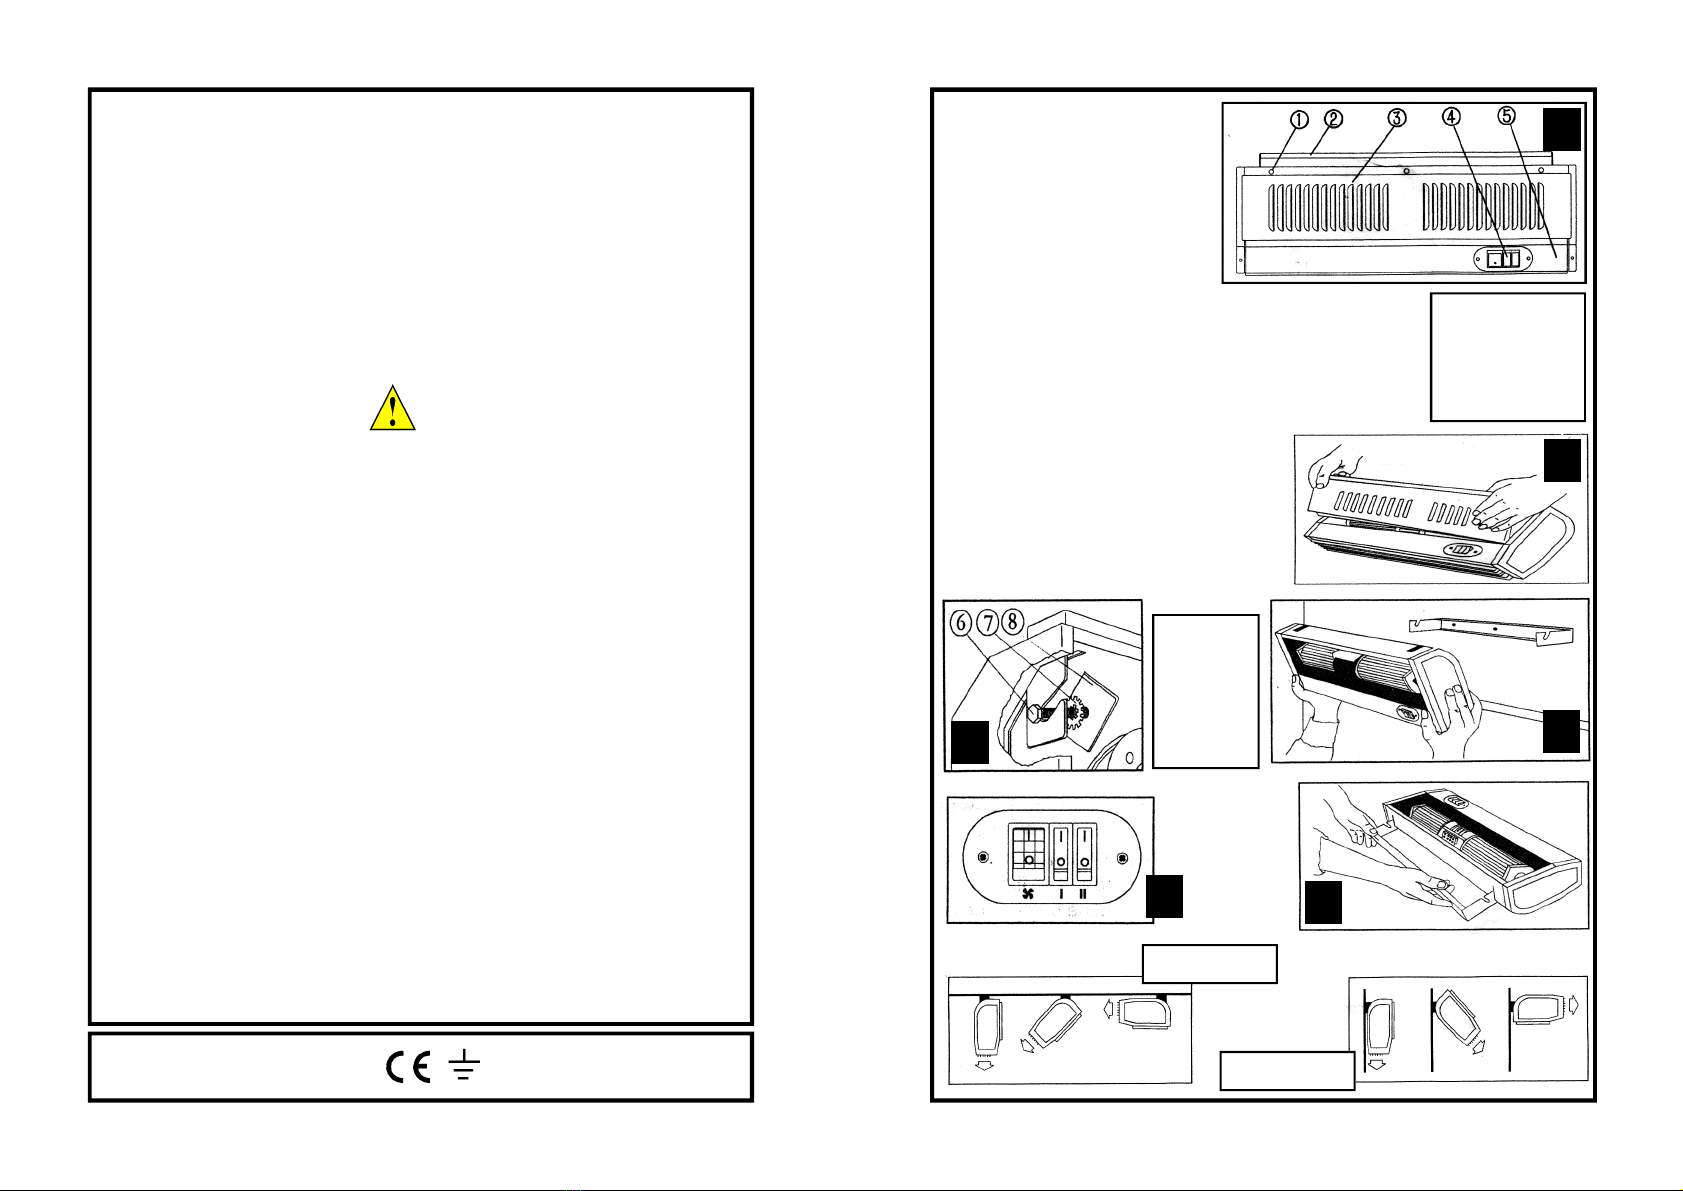
Installation:
1.Removethe three screwsfromthe front
panel and removeit—see diagram [2].
2.Loosen,butdo notremovethe retaining bolt
using aspanner asshownin diagram[3]
and removethe bracket—see diagram [6].
3.Makefixing holesin wall or ceiling using the
wall bracketasatemplateand secure
bracketusing the fixingssupplied.If the
fixingssupplied are notsuitable for your
installation,useappropriatealternative
fixings—see diagram[4]. Note:the bracket
mustbe fixed toasolid pointe.g.brick,
concrete, stud or joist.
4.Hang the heater on the bracket,ensure that
the bracketislocated between the boltand
the serrated washer and that the boltsareat
the end ofthe slotsin the bracket,see
diagram [3].
5.Adjust the heater tothe required angleand
tighten the bolts using aspanner.Takecare
not toover-tighten.
6.Re-fitthe front panel.
7.Connect mainscable (fitted )tothe power
supply according tothe wiring code above.
8.Restore the power and switchon.
Operation:
· The large switchisamaster switch,turning
thisswitchon and off will startand stop the
fan and heaters ifselected.
· The degree ofheatiscontrolled byswitches
I &II—see diagram [5].
Master switchonly—cold fan.
Master +switchIor II—Warmair
(1500W).
Master +switches I&II—Hot air (3000W).
Safetyoverheating protection:
If the unit overheats,thermal switcheswill cut the
power and will restore the power when the unithas
cooled down. However, if the unitoverheats
severely, thermal fuseswill isolatethe cutthe
power: thesefuses will notreset and cannot be
replaced by the user. The unitshould be referred
toaqualified, competentperson for repair
Wall installation
2
5
1
6
34
Components:
(1) Screw
(2) Wall Bracket
(3) Front panel
(4) Switches
(5) Body
(6) Retaining
bolt
(7) Serrated
washer
(8) Mounting
point
Ceilinginstallation
SH3WH Wall Heater 080626PA.pub


