EVS LSM 3 Cameras User manual

LSM 3 Cameras
Rev. 1.09 – Date: June 1999
USER’S MANUAL

LSM 3 CAM
User's Guide
LSM3CAM_1.09_990629.doc
Page: 1/25
Author : Marianne LOTHAIRE rev B.STAS
Software : LSM4CAM.EXE v.1.09 29/06/99
EVS Broadcast Equipment Email : support@evs-broadcast.com Tel: +32-4-361 7000 FAX: +32-4-361 7099
INTRODUCTION
The aim of this manual is to familiarise the operator with the LSM 3CAM and its
REMOTE panel so as to learn as quickly and efficiently as possible the basic
operations.
The next heading, REMOTE PANEL and VIDEO SCREEN LAYOUT, will
provide a diagram of the remote panel layout with a brief description of each
control area.
The main advantage of the LSM3CAM system over current tape-based systems is
the ability to RECORD AND PLAYBACK AT THE SAME TIME. The
LSM3CAM always records the three video inputs on disks. Simultaneously, It
displays on the program output any recorded images. This quadruple access
(three records and one play) allows to make the "Instant Slow Motion". That
means the operator can provide the Slow Motion as soon as the action starts.
With the LSM3CAM, the operator can select at any time the cue in and so he is
ready to start the Slow Motion even if the action is not yet finished. Moreover
the operator does not have to worry about the cue out because the LSM3CAM is
still recording. All of these operations are basic functions of the LSM3CAM.
The CLIP & PLAY LIST MANAGEMENT functions allow the operator to keep
up to 270 clips on disks and of course to replay all or some of them. A PLAY
LIST is constituted of a list of clips (30 PLAY LISTS can be defined).

LSM 3 CAM
User's Guide
LSM3CAM_1.09_990629.doc
Page: 2/25
Author : Marianne LOTHAIRE rev B.STAS
Software : LSM4CAM.EXE v.1.09 29/06/99
EVS Broadcast Equipment Email : support@evs-broadcast.com Tel: +32-4-361 7000 FAX: +32-4-361 7099
REMOTE PANEL AND VIDEO SCREEN LAYOUT
Remote Panel Display
After the boot sequence of the LSM3CAM (a couple of minutes), the remote
panel will display the following messages (Main menu) :
The Functions keys are attached to special functions that need to be validated by
pressing the ENTER key on remote.
F1: Exits the LSM program
F2: Clears all clips saved in all banks
F3: Saves and protect all clips on the disks
F4:
F5: Stops and restarts the recording process of all cameras
F6: Resets the Setup options and restores the factory settings
F7: Displays or hide the incrustations on the monitoring outputs
F8:
F9: Tablet re-initialization
F0: Select Clip Page 1 or Clip Page 2
Press the LSM key to start the LSM 3 CAMERAS editing menu.
Remote LCD display
Menu: F1: Exit LSM F6: Rst Setup
----- F2: Clear Clips F7: Inc. Off
F3: Save Clips F8: .........
Valid : F4: ......... F9: PtDv Tbl
Enter F5: Stop Rec F0: Clip Pg 1
Setup.
LSM.

LSM 3 CAM
User's Guide
LSM3CAM_1.09_990629.doc
Page: 3/25
Author : Marianne LOTHAIRE rev B.STAS
Software : LSM4CAM.EXE v.1.09 29/06/99
EVS Broadcast Equipment Email : support@evs-broadcast.com Tel: +32-4-361 7000 FAX: +32-4-361 7099
REMOTE CONTROL PANEL
The following diagram shows the REMOTE panel along with a brief description
of each area.

LSM 3 CAM
User's Guide
LSM3CAM_1.09_990629.doc
Page: 4/25
Author : Marianne LOTHAIRE rev B.STAS
Software : LSM4CAM.EXE v.1.09 29/06/99
EVS Broadcast Equipment Email : support@evs-broadcast.com Tel: +32-4-361 7000 FAX: +32-4-361 7099
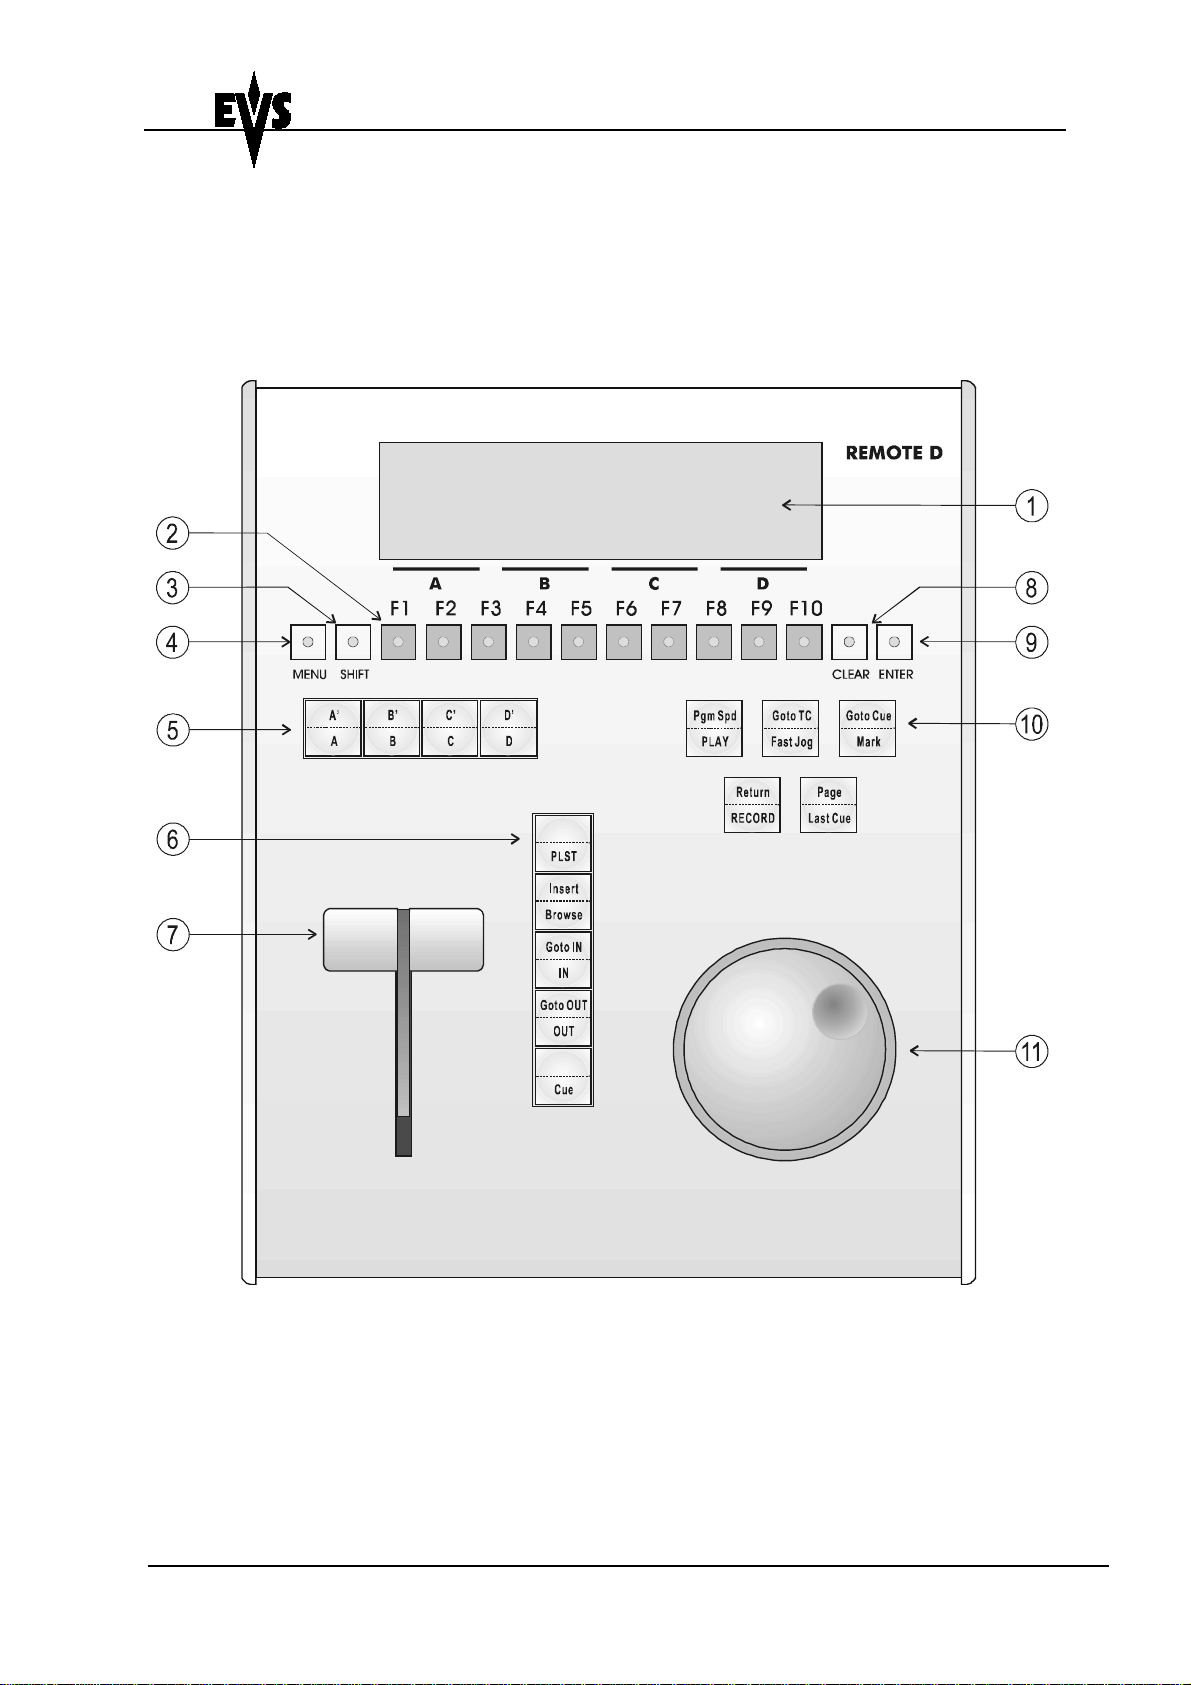
Description of control areas
1. LCD DISPLAY: provides current status of system
2. F1 - F10 buttons: used when modifying user adjustable software
settings, to store / recall
Clips, recall Playlists and enter timecode
information
3. SHIFT key: enables use of secondary key functions
4. MENU key: provides access to the LSM Main Menu - Also
used to escape pop-up windows
5. SOFT keys: with LCD display, enables operator to enter
SLSM MENU system
6. Operational block: PLST - initiates active PLAYLIST
INSERT / BROWSE - used in playlist
management to view / modify playlist
IN / OUT - used to enter in / out points when
storing / modifying clips
CUE - used to jump back from the current
picture, by a duration defined in the Setup.
7. SLOMO LEVER: initiates slow-motion and playlist replay
8. CLEAR button: multi-purpose key used to clear PLAYLISTS and
CUES
9. ENTER button: used to ENTER clips into PLAYLIST and to
validate other options
10. Operational block:
PLAY initiates forward motion
PGM SPD locks the playback speed to the Pgm Speed
defined in Setup.
GOTO TC enables timecode entry, with «F» keys
FAST used with JOG dial for rapid manual recue of
disk recorder
MARK reusable cue entry, 4 cycling cues
GOTO CUE (not implemented)
RECORD initiates «LIVE IN» mode
LAST CUE re-cues disk recorder to last cue entered
(max 4 cues)
11. JOG knob used to accurately cue disk recorder

LSM 3 CAM
User's Guide
LSM3CAM_1.09_990629.doc
Page: 5/25
Author : Marianne LOTHAIRE rev B.STAS
Software : LSM4CAM.EXE v.1.09 29/06/99
EVS Broadcast Equipment Email : support@evs-broadcast.com Tel: +32-4-361 7000 FAX: +32-4-361 7099
Led colours
A selected key lights red.
When a key lights green, it means a value in relation with this key exists.
i.e. F1 to F0 keys > green light means a clip has been stored in relation
with the key.
> red light means the clip associated to the key is playing
or is ready to play.
MENUS
The LSM3CAM menus are displayed on the remote display. Each item can be
selected by pressing the corresponding function key (A, B, C, D). Upper items
can be selected by pressing SHIFT + corresponding function key. MENU key is
used to come back to the main menu. When the program starts, the main menu is
displayed.
LCD Display
LIVE MENU
CLIP MENU
PLAY-LIST MENU
Multicam RECORD
T/C HH:MM:SS:FR. CAM. A CDUR MM:SS:FR
CAP HH:MM:SS:FR PLIST 11 PDUR MM:SS:FR
SPEED 100% PAGE:BANK 1:01
PREF SYNC
CAM.A CAM. B CAM. C
REMOVE INSERT PREF SYNC
CAM.A CAM. B CAM. C
INSERT ED SPD EDIT ALL
Time code of
current picture
Remaining
recording capacity
Playback Speed
Selected playlist
Selected camera / clip Playlist duration
Clip duration / Rec capacity

LSM 3 CAM
User's Guide
LSM3CAM_1.09_990629.doc
Page: 6/25
Author : Marianne LOTHAIRE rev B.STAS
Software : LSM4CAM.EXE v.1.09 29/06/99
EVS Broadcast Equipment Email : support@evs-broadcast.com Tel: +32-4-361 7000 FAX: +32-4-361 7099
INFORMATION DISPLAYS ON VIDEO MONITORING OUTPUT
The monitoring A (PGM) output displays the output signal with some
information regarding the LSM3CAM status :
PGM Normal Display
LIVE (E2E) Mode
NB : When starting the application, the recording capacity will start from 0 and increase, as the LSM3CAM
is progressively scanning the drives while recording. The full capacity will be shown after the first recording
loop.
CLIP Mode
Sync ON
10:00:00:00.
Name of Clip 100
All warning or information messages
will be dis
p
la
y
ed here.
111A
Playback
speed in %
Time code of current picture
Clip duration
Clip number
00:00:00
00:00:00
Option
Remaining time until
the end of clip
Sync ON
10:00:00:00. Record 100
All warning or information messages
will be dis
p
la
y
ed here.
GotoTC : .. : .. : ..
If Goto TC function is
used, Time Code
information appears
here
CAM A
Playback
speed in %
Time code of current picture
Remaining
recording capacity
Selected camer
a
00:00:00 00:00:00
Option
Delay duration

LSM 3 CAM
User's Guide
LSM3CAM_1.09_990629.doc
Page: 7/25
Author : Marianne LOTHAIRE rev B.STAS
Software : LSM4CAM.EXE v.1.09 29/06/99
EVS Broadcast Equipment Email : support@evs-broadcast.com Tel: +32-4-361 7000 FAX: +32-4-361 7099
PLAYLIST Mode
LSM 3 CAMERAS CONTROL MODES
The LSM3CAM can be set in three different basic modes, depending on
commands used.
Live (E2E) Mode
This mode which is selected at start-up can also be selected by pushing the
RECORD key. The LSM3CAM records the input signal and plays it at the same
time on the program output.
Search Mode
This mode is selected by moving the COMMAND KNOB.
In this mode, the operator has the opportunity to search for an image, in order to
define CUE points or clips. Moving the command knob clockwise will force the
LSM3CAM to search forward, moving the command knob counter clockwise will
force it to search backwards. The most important thing to note is that the
LSM3CAM never stops recording while searching.
10:00:00:00.
Name of Clip 100
PL. 11 Left 00:00:00
Spd. 100
111A
Current
playback
speed in %
Time code of current picture
Current Clip duration
Clip number
00:00:00 00:00:00
Time
remaining
in Pla
y
list
Remaining time until
the end of clip
Programmed
playback speed
Playlist number
3/14
Position of the
current clip in
the playlist

LSM 3 CAM
User's Guide
LSM3CAM_1.09_990629.doc
Page: 8/25
Author : Marianne LOTHAIRE rev B.STAS
Software : LSM4CAM.EXE v.1.09 29/06/99
EVS Broadcast Equipment Email : support@evs-broadcast.com Tel: +32-4-361 7000 FAX: +32-4-361 7099
Playback Mode
This last mode is selected by moving the LEVER or pressing the PLAY key.
The LSM3CAM plays in slow motion the incoming signal delayed, a clip or a
play list and of course continues to record the incoming signal on disks.
As soon as the lever is moved, the LSM3CAM starts playing back from current
picture. The playback speed is defined by the lever position. This is used to start
the playback of a normal slow motion, as well as the playback of a clip or a
playlist. During playback, the system never stops recording
Each operation on the REMOTE panel with the command KNOB or LEVER
will be associated to the SEARCH or PLAYBACK mode respectively.
SYNCHRONISATION MODE
This mode will allow to synchronise camera jumps if enabled : a request for
camera change will produce a jump at the same time code on the requested
camera.
If disabled, a request for a camera change (by pressing CAM A, CAM B or CAM
C in the LSM menu) will lead to a jump to a predifined CUE IN point.
SYNCHRO ON SYNCHRO OFF
Cue IN1
Clip A
Cue IN2
Clip B
Cue IN3
Clip C
If a CUE IN point has not been previously defined, the LSM3CAM acts as in
Synchro ON mode (even if Sync OFF is shown) because the system has no
reference to jump to.
PREFERENCE MODE
When this option is on and a clip is recalled, the prefered camera will be
displayed on the PGM output.
The prefered camera is the one which was on PGM output when the clip was first
created. In the Clip Management window, the preferential camera is indicated by
dashes : -B-.
When the preference option is disabled, the PGM output stays on the camera
currently selected when the clip is called.
Cue IN1
Cue IN2
Cue IN3

LSM 3 CAM
User's Guide
LSM3CAM_1.09_990629.doc
Page: 9/25
Author : Marianne LOTHAIRE rev B.STAS
Software : LSM4CAM.EXE v.1.09 29/06/99
EVS Broadcast Equipment Email : support@evs-broadcast.com Tel: +32-4-361 7000 FAX: +32-4-361 7099
DESCRIPTION OF LSM 3 CAM FUNCTIONS
This section will explain the function attached to each key and how to use it.
The operational buttons have PRIMARY and SECONDARY functions. Each
button is divided into upper and lower sections. The PRIMARY function is
represented by the LOWER label, and the SECONDARY by the UPPER. The
SECONDARY function is enabled by first pressing the SHIFT button. Refer to
Remote panel layout section for a complete overview of all functions.
SECTION A : REMOTE CONTROL KEYS
RECORD
This RECORD key selects the LIVE (E2E) mode. It is also used to restart the
record if it was stopped. The LSM3CAM records and plays the input signal at the
same time at 100% speed.
When the RECORD key does not light, it means the LSM 3CAM does not record.
PGM SPEED (SHIFT PLAY)
This option allows to set the slow motion of all clips on a default speed defined in
the SETUP menu.
PLAY
This function allows the operator to start playing at a predefined speed (defined
in the SETUP) from the field on air.
MARK
Marks up to 4 CUE points. The CUE point are always marked on the live picture.
None of them are protected and will be erased when the recording process reaches
that particular CUE point. When marking more than 4 CUE points, the new CUE
points will overwrite the oldest one.
The MARK key lights green if a CUE point has been defined. It lights red if the
current picture is actually a CUE point.

LSM 3 CAM
User's Guide
LSM3CAM_1.09_990629.doc
Page: 10/25
Author : Marianne LOTHAIRE rev B.STAS
Software : LSM4CAM.EXE v.1.09 29/06/99
EVS Broadcast Equipment Email : support@evs-broadcast.com Tel: +32-4-361 7000 FAX: +32-4-361 7099
LAST CUE
This LAST CUE key allows the operator to visualise one of the pre-defined CUE
points. Press the LAST CUE key several times in order to visualise all CUE
points. After the last CUE point is reached, pressing LAST CUE once more will
recall the 1st CUE point.
PAGE (SHIFT LAST CUE)
Use this key to select clip page 1 or clip page 2.
FAST
When selected enables FAST pictures search. The actual speed of this fast jog is
adjustable in the SETUP.
RESET
A full reset of the LSM can be done from the remote panel. Press successively
:PLAY - FAST JOG - MARK keys , then confirm the reset by pressing the
with LAST CUE key or cancel by pressing the RECORD key. After confirmation,
the system is reset and restart automatically (restart time might take a couple of
minutes) .
GOTO TC (SHIFT FAST JOG)
This function is used to jump to a particular time code. Press this key, the
following message appears on the program output (PGM) above the current time
code :
« GotoTC : .. : .. : .. ». Use the function keys F1 to F10 to ener the desired time
code (6 digits : hh:mm:ss). After the 6th digit is entered, the LSM3CAM will
automatically reach that time code. If the last digits are 0 (zeros), you don't need
to enter them. Just press ENTER on the remote to validate the entry and reach
the desired picture.
RETURN (SHIFT RECORD)
This function allows the operator to come back to the position where he was
before recalling a clip. This little trick permits to come back to a previous
position, without using the RECORD key and the COMMAND KNOB.

LSM 3 CAM
User's Guide
LSM3CAM_1.09_990629.doc
Page: 11/25
Author : Marianne LOTHAIRE rev B.STAS
Software : LSM4CAM.EXE v.1.09 29/06/99
EVS Broadcast Equipment Email : support@evs-broadcast.com Tel: +32-4-361 7000 FAX: +32-4-361 7099
SECTION B : CLIP AND PLAY-LIST MANAGEMENT
IN
This key is used to define a SHORT IN point. A SHORT IN point is the first
image of a clip. The key lights red if the on-air image is the SHORT IN point. It
lights green if a SHORT IN point has been defined but the on-air image does not
correspond. This IN point can be erased by pressing CLEAR and then IN, or by
pressing the RECORD key (going back to E2E mode)
If the SHORT IN is marked with the LSM3CAM in Live (E2E) mode, it is
automatically marked on all 3 cameras. If a SHORT IN point has already been
marked and the system is in Search or Playback mode, marking a second SHORT
IN point will only affect the current camera; the SHORT IN for the other 2
cameras is not changed. This allows the operator to define different SHORT IN
points for the different cameras.
Refer to CLIP & PLAY LIST MANAGEMENT section for more information.
OUT
This key is used to define a SHORT OUT point. An SHORT OUT point is the
last image of a clip. The key lights red if the on-air image is the SHORT OUT
point. It lights green if a SHORT OUT point has been defined but the on-air
image does not correspond. This OUT point can be erased by pressing CLEAR
and then OUT.
The same remark apply for SHORT OUT as for SHORT IN points, depending
whether the system is in Live (E2E) or Search/Playback mode.
GOTO IN (SHIFT IN)
This function jumps to the SHORT IN point of the selected clip.
GOTO OUT (SHIFT OUT)
This function jumps to the SHORT OUT point of the selected clip.
CUE
This function is used to jump back a few seconds from the current position. The
duration of the jump can be adjusted in the SETUP menu.

LSM 3 CAM
User's Guide
LSM3CAM_1.09_990629.doc
Page: 12/25
Author : Marianne LOTHAIRE rev B.STAS
Software : LSM4CAM.EXE v.1.09 29/06/99
EVS Broadcast Equipment Email : support@evs-broadcast.com Tel: +32-4-361 7000 FAX: +32-4-361 7099
PLST
PLST key is used to enter the playlist mode and call the selected playlist. This
function is available if the current playlist is not empty. If this key is pressed
while the system is already in playlist mode, it forces the playlist to jump back at
the very beginning of the play list.
Refer to CLIP & PLAY LIST MANAGEMENT section for more information.
BROWSE
This function is only valid if the current playlist is not empty and enters the
BROWSE mode.
It allows to browse quickly from clip to clip within the play-list. Each time the
COMMAND KNOB is turned, the first image (SHORT IN) of the corresponding
clip is displayed on the screen.
INSERT (SHIFT BROWSE)
This function inserts a clip after the current clip of the selected play list.
ENTER
This key is used as a confirmation to all messages. It is already used to validate
jumps to particular T/C. If a clip is selected, pressing ENTER on the remote
pushes it into the current play list
CLEAR
Clear is used to cancel functions like Goto Tc, Goto Cue, ...
Clear function allows the operator to clear a clip, a SHORT IN/OUT point or a
playlist.
How to clear ?
1. Press the CLEAR key. It blinks red meaning you are in clear mode.
2. Press IN key to clear the IN point or
Press OUT key to clear the OUT point
To delete a clip, a SHORT IN/OUT point or a playlist refer to CLIP & PLAY
LIST MANAGEMENT section.

LSM 3 CAM
User's Guide
LSM3CAM_1.09_990629.doc
Page: 13/25
Author : Marianne LOTHAIRE rev B.STAS
Software : LSM4CAM.EXE v.1.09 29/06/99
EVS Broadcast Equipment Email : support@evs-broadcast.com Tel: +32-4-361 7000 FAX: +32-4-361 7099
SECTION C : COMMAND KNOB OR JOG.
Allows the operator to enter the SEARCH mode and thus to choose exactly the
CUE OUT or CUE IN image. Move the command knob clock-wise to search
forward and move it counter clock-wise to search backwards. A complete
revolution of the jog will produce a jump of approximately 1 to 2 seconds.
The operator must use this command knob to set parameters in the SETUP menu.
Refer to the SETUP menu section for more information.
SECTION D : LEVER.
The LEVER is used to start a play or to modify slow motion speed. The LEVER
run goes from 0 up to 100%.
A constant speed play can be obtained by pressing PGM SPD (Shift + PLAY) key
(refer to section A function for more details on this function).
Examples Of Use
INSTANT REWIND SLOW MOTION
1. Press the RECORD key in order to be in LIVE mode.
2. Use the command KNOB to go in SEARCH mode and to define your IN
point, even if the action is not finished.
3. Move the LEVER to the required speed and the Slow Motion will start
automatically.
4. When the Slow Motion is finished, move the LEVER to 0% speed position
and the image will be frozen.
5. When the Slow Motion is no longer needed, move the LEVER to 100%
speed position or press the RECORD key to return to the LIVE (E2E)
mode.

LSM 3 CAM
User's Guide
LSM3CAM_1.09_990629.doc
Page: 14/25
Author : Marianne LOTHAIRE rev B.STAS
Software : LSM4CAM.EXE v.1.09 29/06/99
EVS Broadcast Equipment Email : support@evs-broadcast.com Tel: +32-4-361 7000 FAX: +32-4-361 7099
CUE IN POINTS
It is possible to define seperate CUE IN points for each channel in the field train
and in clips.
How to define such points ?
1. Define CUE IN point for a selected camera (let's say CAM B). Press IN key.
2. Use the command knob to search for the accurate picture for the camera change,
select the camera you want to jump to (CAM A) and press IN again. A CUE IN is
set on CAM A.
3. You can repeat this operation to define a CUE IN on CAM C.
How to manage this ?
If SYNCHRONISATION mode is disabled (SYNC OFF), a camera selection will
automatically jumps on the CUE IN point. A play can be started immediately.
From now on, the discussion was valid in the field train. It is possible to define a
CUE OUT point and store a clip. All defined CUES IN are automatically stored
into the clip. If user wants to modify those CUES IN, he can do it but only if he
recalls the clip. The effective clip protection zone will be set from the minimum
CUE IN up to the MAXIMUM CUE OUT. Guardbands (handles) are still
available and start from these points.
CUE IN points defined in the field train cannot be modified in Search/Playback.
The only way to modify them is to clear them and to define them once again.
In Live (E2E) mode, marking a new CUE IN point will overwrite the previous
one on all 3 cameras.
Pressing the RECORD key returns the system to Live (E2E) mode and erase all
CUE IN points.
Let’s consider the following case :
1. User search for an accurate image on CAM A and define a CUE IN point.
2. User defines a CUE OUT point and defines a clip.
In that case, no CUE IN was defined on CAM B and CAM C by the user so they
will be automatically set equals to CAM A CUE IN.

LSM 3 CAM
User's Guide
LSM3CAM_1.09_990629.doc
Page: 15/25
Author : Marianne LOTHAIRE rev B.STAS
Software : LSM4CAM.EXE v.1.09 29/06/99
EVS Broadcast Equipment Email : support@evs-broadcast.com Tel: +32-4-361 7000 FAX: +32-4-361 7099
CLIP AND PLAY LIST MANAGEMENT
A clip is defined by a SHORT IN and a SHORT OUT
point. When SHORT IN and SHORT OUT points are set,
the system automatically write protects a user definable
length of material before and after the SHORT IN/OUT
points respectively, these are referred to as the GUARD-
BANDS.
Each clip, which is stored on disks will receive an identification number. This
number is in fact a combination of 3 digits: the first one is a page, the second one
a bank and the third one is the position number in this bank.
i.e. clip n°121 is stored in page #1, bank #2, position #1.
clip n°257 is stored in page #2, bank #5, position #7.
It is possible to store 10 clips in each bank. Nine banks are available by page,
which means the operator can create 180 clips.
It is possible to trim a clip by redefining SHORT IN and SHORT OUT points.
Remarks.
1. IN & OUT points of a clip cannot be replaced by new ones.
2. SHORT IN & SHORT OUT points of a clip can be replaced by new ones.
Finally, a play list contains a list of clips and has also an identification number of
two digits (a page and a position within the bank #10). Bank #10 is the play-list
reserved bank. 10 play-list can be created in each bank #10, so 20 playlists can
be defined.
Menu Shift EnterClea
r
F1 F2 F3 F4 F5 F6 F7 F8 F9 F0
IN SHORT IN SHORT OUT OUT
If SHORT IN and SHORT OUT
points are defined, only the fields
between those two points will be
played if the sequence is recalled
(the same applies when the
sequence is included in a play-
list).
Fields between IN and
SHORT IN and fields between
OUT and SHORT OUT
(GUARD BANDS) can be
reached with the command
knob. So the SHORT IN and
SHORT OUT points can be
redefined.

LSM 3 CAM
User's Guide
LSM3CAM_1.09_990629.doc
Page: 16/25
Author : Marianne LOTHAIRE rev B.STAS
Software : LSM4CAM.EXE v.1.09 29/06/99
EVS Broadcast Equipment Email : support@evs-broadcast.com Tel: +32-4-361 7000 FAX: +32-4-361 7099
CLIP MANAGEMENT
How to define a clip ?
1. Select the LIVE mode.
2. Use the command KNOB to go in SEARCH mode and define your SHORT
IN or SHORT OUT point.
3. Press the IN key to mark your SHORT IN point of the clip.
4. Research the SHORT OUT point and then press the OUT key to mark it
also.
The clip is now defined and take note that IN and OUT keys light; red colour
means the defined point is on-air, green colour means the field played is between
SHORT IN and SHORT OUT, no colour means it is in the GUARD BANDS
(between IN and SHORT IN or between SHORT OUT and OUT). The remote
display gives all needed information regarding this clip.
How to store a clip ?
1. Define a clip.
2. Select the clip page (PAGE1 contains clips 110 to 199 and PAGE2
contains clip 210 to 299) with the PAGE key or F10 from the main menu.
3. Select the bank (a) where the clip will be stored by pressing SHIFT + F(a)
keys.
i.e. bank n°3 SHIFT + F3
bank n°7 SHIFT + F7
4. Now select the location (b) of the clip to store and press the corresponding
F(b) key.
i.e. clip n°112 SHIFT + F1 (to select bank n°1) then F2 (to
select location nr 2).
clip n°135 SHIFT + F3 (to select bank n°3) then F5 (to
select position number 5).
How to play a clip ?
1. Store a clip.
2. Recall the defined clip which will be played, the corresponding F key
lights red.
If PREF is OFF :
The user recalls a clip : the image displayed is the first CUE IN point defined
(jump is done on the first CUE IN entered).

LSM 3 CAM
User's Guide
LSM3CAM_1.09_990629.doc
Page: 17/25
Author : Marianne LOTHAIRE rev B.STAS
Software : LSM4CAM.EXE v.1.09 29/06/99
EVS Broadcast Equipment Email : support@evs-broadcast.com Tel: +32-4-361 7000 FAX: +32-4-361 7099
If PREF is ON :
The user recalls a clip : the image displayed is the CUE IN of the active camera.
If CAM C is selected before user recalls the clip, the clip image displayed will be
the SHORT IN point of CAM C. When clips are recalled, the image displayed
will always be the CUE IN of the selected camera.
3. Move the lever to start the Slow Motion of this clip.
4. Press again the corresponding F key to re-start the Slow Motion.
How to delete a clip ?
Press the CLEAR key and then the F key corresponding to the clip. A clip can
not be deleted while it is on air. When a clip is deleted, all playlists are scanned
and that clip is removed from all of them.
How to shorten a clip ?
1. Store a clip.
2. Recall the defined clip by pressing the corresponding F key.
3. Move the COMMAND KNOB in order to go into SEARCH mode and
define your SHORT IN point.
4. Press the IN key to mark the SHORT IN point.
5. Move the COMMAND KNOB to define your SHORT OUT point.
6. Press the OUT key to mark the SHORT OUT point.
7. Recall the defined clip by pressing the corresponding F key. The clip
jumps on the new SHORT IN point.
9. Move the LEVER to go into SLOW mode and play the clip. The SLOW
MOTION will stop at the new SHORT OUT point.
GOTO In and GOTO Out
You can use Goto In and Goto Out function to jump immediately onto SHORT IN
or SHORT OUT cue respectively.

LSM 3 CAM
User's Guide
LSM3CAM_1.09_990629.doc
Page: 18/25
Author : Marianne LOTHAIRE rev B.STAS
Software : LSM4CAM.EXE v.1.09 29/06/99
EVS Broadcast Equipment Email : support@evs-broadcast.com Tel: +32-4-361 7000 FAX: +32-4-361 7099
How to Use the VGA Display screen?
NB : The VGA output of the LSM3CAM can emulate B&W video mode using
the VGABNC adaptor provided with the system. To switch between VGA and
video mode, press simultaneously [ALT]+[Backspace] on the keyboard. If the
VGA/Video monitor is blank or blurred, try to switch to the other mode.
When the LSM3CAM application starts, the default VGA screen is the Clip
Screen below. The other screen available is the Playlist Screen. Press F9 on the
keybaord to call the Playlist Screen, and F10 to call the Clip Screen.
Clip Screen Layout
The screen is set up with 4 columns, displaying 4 Clip Banks (1-4) at a time.Clips
created on camera A, B or C are highlighted and the prefered camera is indicated
by dashes: -B-.
Useful Keys
[ENTER] : call the selected clip. Also used to validate particular actions.
←↑↓→: moves cursor and select a clip inside the clip library. When the
cursor encloses the NAME area, calling the clip will show the
prefered camera on air. When the cursor encloses a particular
camera of the clip, calling the clip will show this camera on air.
[DEL] : delete the selected clip. Must be confirmed with [ENTER] key.
If the cursor on the VGA screen encloses the NAME area of the
clip, this clip is deleted on all cameras. If the cursor encloses a
particular camera of the clip, this clip is deleted for this camera
only.
[PgUp] [PgDn] : Select Clip Page 1 or Clip Page 2
[Ctrl] + ←↑↓→ : Select a the group of banks to display (1-4, 2-5, … 6-9)
Tablet & Stylus
Clip management is in the Clip Screen can also be done using the optional tablet
and stylus. Clips can be selected and deleted the same way as
with the keyboard.

LSM 3 CAM
User's Guide
LSM3CAM_1.09_990629.doc
Page: 19/25
Author : Marianne LOTHAIRE rev B.STAS
Software : LSM4CAM.EXE v.1.09 29/06/99
EVS Broadcast Equipment Email : support@evs-broadcast.com Tel: +32-4-361 7000 FAX: +32-4-361 7099
NB : When clip banks or clips are selected using the remote, the VGA Clip
Screen is automatically updated.
How to name a clip?
Within the clip screen, select the clip to name by using the arrow keys with the
keyboard. Simply type the name on the keyboards (to clear the whole string press
ESC) and then press <F1> on the keyboard to validate.
How to erase a clip on all cameras?
Within the clip screen, select the clip to erase by using the arrow keys with the
keyboard. Make sure the cursor encloses the NAME area of the clip. Press the
DEL key on keyboard, the CLEAR on the VGA screen is highlighted and
blinking, then press ENTER to validate. The selected clip is erased on all
cameras. A clip can not be deleted while it is on air. When a clip is deleted, all
playlists are scanned and that clip is removed from all of them.
How to erase a clip on one camera?
Within the clip screen, select the clip to erase on camera A, B, or C by using the
arrow keys with the keyboard. Press the DEL key on keyboard, the CLEAR on the
VGA screen is highlighted and blinking, then press ENTER to validate. The
selected clip is erased on the selected camera only. A clip can not be deleted
while it is on air. When a clip is deleted, all playlists are scanned and that clip is
removed from all of them.
CLEAR AND SAVE ALL CLIPS.
How to clear all clips ?
- go into the main menu (MENU)
- press the function key [F2] on the remote. User is asked to press [ENTER] or
[CLEAR] on the remote panel to confirm or cancel the operation. A message
appears on the composite monitor which give the result of the clearing.
How to save all clips ?
- go into the main menu (MENU)
- press the function key [F3] on the remote to save clips. A message appears on
the composite monitor and gives the result of the saving.
In case the application is not exited properly (power loss, system hangs, …), clips
created after the last "Save Clips" command will be lost. Clips created before the
"Save Clips" command will be retrieved.
IT IS RECOMMENDED TO SAVE CLIPS REGULARLY.
Table of contents
Other EVS Recording Equipment manuals

EVS
EVS Synapse 2GX100/110 Instruction sheet

EVS
EVS Synapse GED100 User manual

EVS
EVS LSM-VIA Manual

EVS
EVS Synapse 2GF100 User manual

EVS
EVS Synapse GMD100 User manual

EVS
EVS Multicam LSM User manual

EVS
EVS Synapse 2GF100/110 Instruction sheet

EVS
EVS Synapse 2XG100 User manual

EVS
EVS LSM-VIA Manual

EVS
EVS EPSIO LIVE User manual
Popular Recording Equipment manuals by other brands

Klark Teknik
Klark Teknik DN 726 Operating and service information

Dolby Laboratories
Dolby Laboratories DA20 user manual

Argiriadis Analogue Electronics
Argiriadis Analogue Electronics DU EQ 2022 user guide

Zoom
Zoom R20 Supplementary manual

JK Audio
JK Audio BlueDriver-M3 Connect applications

Cytech
Cytech Comfort DM02 manual