Exo Terra PT2464 User manual

Operating Instructions
Mode d’emploi
Gebrauchsanleitung
Manual de Instrucciones
Modalità d’uso
Gebruiksaanwijzing
Thermostat
& Hygrostat
600W Thermostat
& 100W Hygrostat
with Day/Night Timer
PT2464

2
Thank you for purchasing the Exo Terra®600W Thermostat &
Hygrostat with Day/Night timer. Please read this operation manual
carefully before use and operate according to the instructions
provided for maximum safety and performance. We recommend that
you keep this manual handy for future reference.
• Dimming function controls terrarium temperatures very
accurately
• 100W Hygrostat to control optimum humidity levels
• Controls heating devices up to 600W
• Daytime and night-time temperature and humidity can be set
individually
• From 10°C up to 60°C (50°F – 140°F) and up to 99% RH
• Easy-to-read LCD screen shows actual temperature and
humidity
• Red LED will indicate when heating device is powered
• Blue LED will indicate when humidifying device is powered
• Push button/dial system to avoid accidental setting or
tampering
• Remote temperature and humidity probe
• Extra long 6.2 feet / 190cm power-cord
Can be used with the following Exo Terra®heating/humidifying
sources:
Day & Night Heating:
• Heat Mat (PT2015/16/17/18)
• Heat Cable (PT2011/12/13)
• Ceramic Heater (PT2044/45/46/47/48)
• Infrared Basking Spot (PT2141/42/44/46)
• Night Heat Lamp (PT2120/22/24/26/30 & PT2058/59)
Day Time Heating:
• Daytime Heat Lamp (PT2100/02/04/10/11/12/14)
• Daylight Basking Spot (PT2195/31/32/33/34)
• Intense Basking Spot (PT2196/35/36/38/40)
Humidity
• Fogger (PT2080)
• Humidifier (PT2081)
Reptiles are ectotherm, and use heat from an external source to
thermoregulate their optimal body temperature. Most reptiles use
direct radiant heat from the sun in combination with conductive heat
from sun-heated surfaces such as branches, rocks or other heat
accumulating structures. Next to heat, overall humidity is a very
important factor for the health and wellbeing of reptiles, amphibians
and invertebrates. Providing such a species related temperature
gradient, in combination with appropriate humidity levels, in the
terrarium is an important factor in successful reptile and amphibian
THERMOSTAT & HYGROSTAT
Operating
Instructions
ENGLISHFRANÇAISDEUTSCHESPAÑOLITALIANONEDERLANDS
INDEX
ENGLISH 3
FRANÇAIS 11
DEUTSCH 20
ESPAÑOL 29
ITALIANO 38
NEDERLANDS 47
Thermostat (600W)
& Hygrostat (100W)
PT2464

4
INSTRUCTIONS PERTAINING TO A RISK OF FIRE, ELECTRIC SHOCK,
OR INJURY TO PERSONS
IMPORTANT SAFETY INSTRUCTIONS
WARNING: To guard against injury, basic precautions should be
observed when handling the appliance, including the following:
1. READ AND FOLLOW ALL SAFETY INSTRUCTIONS and all
important notices on the appliance before using. Failure to do
so may result in in personal injury or damage to the unit.
2. DANGER – For each of the following situations, do not attempt
repairs yourself; return the product to an authorized service
facility for service if it is still under warranty or discard the
appliance. Do not operate the appliance if it has a damaged
electrical cord or if it is malfunctioning or if it is dropped or
damaged in any manner. Never use with an extension cord
unless plug can be fully inserted. Do not attempt to defeat this
safety feature.
A. For INDOOR HOUSEHOLD USE ONLY, NOT for commercial use.
B. Carefully examine the appliance after installation. It should not
be plugged in if there is water on parts not intended to be wet.
C. Do not operate any appliance if it has a damaged cord or
plug, or if it is malfunctioning or if it is dropped or damaged
in any manner. The power cord of this appliance is a Z type
attachment and cannot be replaced; if the cord is damaged,
the appliance should be discarded. Never cut the cord.
D. To avoid the possibility of the appliance plug or electrical
socket getting wet, position the unit to one
side of a wall-mounted socket to prevent
water from dripping onto the socket or plug. A
“drip-loop” should be arranged.The “drip loop”
is that part of the cord below the level of the
socket, or the connector if an extension cord is
used, to prevent water from traveling along the
cord and coming into contact with the socket.
If the plug or socket does get wet, DO NOT unplug the cord.
Disconnect the fuse or circuit breaker that supplies power to
the appliance. Then unplug and examine for the presence of
water in the socket.
3. Read and observe all the important notices on the appliance.
4. This appliance can be used by children aged from 8 years
and above and persons with reduced physical, sensory or
mental capabilities or lack of experience and knowledge if
they have been given supervision or instruction concerning
use of the appliance in a safe way and understand the hazards
involved. Children shall not play with the appliance. Cleaning
and user maintenance shall not be made by children without
supervision.
5. To avoid injury, do not contact hot surfaces.
6. Always unplug an appliance from an outlet when not in use,
before putting on or taking off parts, and before cleaning.
Never yank cord to pull the plug from the outlet. Grasp the plug
and pull to disconnect.
7. Do not use the appliance for other than intended use. The use
of attachments not recommended or sold by the appliance
manufacturer may cause an unsafe condition.
8. Do not install or store the appliance where it will be exposed to
weather or to temperatures below freezing. Do not expose the
unit to direct sunlight.
9. If an extension cord is necessary, ensure the connection
keeping. With the Exo Terra Thermostat & Hygrostat with Day/Night
timer you can create a well-controlled heating/humidifying system
that allows you to maintain the required temperature and humidity
conditions similar to those found in desert and tropical environments.
The day- and night temperature and humidity can be set individually.
For instance; the temperature can be set lower for the night, while
the humidity can be set higher, just as it would occur in nature. The
Thermostat & Hygrostat will also help to prevent overheating and
undercooling during hot summer days or cold winter nights, while
keeping the humidity at the desired level. The Dimming function
keeps the temperature at the desired set-point with a much higher
accuracy than conventional thermostats and virtually eliminates
temperature swings in the terrarium. The easy-to-read LCD screen
shows heating mode, day or night mode and actual temperature and
humidity. A Blue LED will indicate when the humidifying device is
powered and once the set humidity level is reached, the Blue LED
will no longer show.
Simply connect your Heat Mat, Heat Cable or Ceramic Heater and
a Fogger or Humidifier to the Exo Terra Thermostat & Hygrostat,
set the preferred temperature & humidity and place the heat and
humidity sensor in the desired spot. The push button/dial system of
the Thermostat & Hygrostat will prevent accidental changes of the
set temperature and humidity level if the device is being handled.
The Thermostat comes with a power cord with grounded plug &
receptacle for increased safety and to allow the use of a power
outlet strip. The remote sensor can be safely used in highly moist
terrariums.
The Exo Terra®Thermostat & Hygrostat should be set according
to the needs of the animals. Thoroughly research the preferred
optimum temperature (POTR) and humidity range for your specific
reptile, so you can create the correct temperature gradients
and humidity inside the terrarium to allow your reptiles to
thermoregulate and maintain their moisture levels.
Always use a Thermometer & Hygrometer to monitor the
temperature and humidity inside your terrarium. Adjust the
Exo Terra®Thermostat & Hygrostat according to the required
temperature and humidity range for your pet’s environment.
NOTE: In combination with a non-visible light emitting heat source
(like Exo Terra’s Heat Mat, Heat Cable, Ceramic Heater, Infrared
Basking Spot or Night Heat Lamp), the Exo Terra Thermostat &
Hygrostat allows you to create a well-controlled 24-hour heating
system that will not interrupt your animal’s normal activity cycle,
while maintaining the required temperature and humidity conditions
similar to those found in their natural environment.
NOTE:When using the Exo Terra Thermostat & Hygrostat in
combination with a visible-light emitting bulb (like Exo Terra’s
Intense Basking Spot, Daylight Basking Spot or Daytime Heat Lamp)
to create a daytime basking area or for ambient daytime heating
purposes, you need to set the night-time temperature at its lowest
point (10°C or 50°F) in order to avoid the bulb to emit light at night
disturbing your animal’s normal activity cycle.
READ INSTRUCTIONS THOROUGHLY PRIOR TO INSTALLATION AND
OPERATION.
ENGLISHFRANÇAISDEUTSCHESPAÑOLITALIANONEDERLANDS

6
is watertight and dust proof. A cord with a proper rating
should be used. A cord rated for less amperes or watts than
the appliance rating may overheat. Care should be taken to
arrange the cord so that it will not be tripped over or pulled.
The connection should be carried out by a qualified electrical
installer.
10. Ensure that the appliance is placed on a flat, even surface.
SAVE THESE INSTRUCTIONS FOR FUTURE REFERENCE
Only close adherence of these installation, electrical and
maintenance guidelines will ensure the safe and efficient use of
this appliance.
EEXO TERRA®600W DIMMING THERMOSTAT & 100W HYGROSTAT
with DAY/NIGHT TIMER – INSTALLATION INSTRUCTIONS
INSTALLATION in Exo Terra®Natural Terrariums
Follow this installation procedure to install the Exo Terra®Thermostat
& Hygrostat on any size of Exo Terra®Natural Terrarium:
1. Unlock the top screen cover and lift it off the terrarium.
2. Slide one of the inlet holes (located on the back of the screen top
on either side) to the open position, so the wiring will fit through.
3. Feed the wire with sensor through the first available inlet hole on
the preferred side on the back of the screen cover.
4. Position the sensor inside your terrarium, in the location where
you want to reach the temperature & humidity setting. This can
be on top of the substrate if you are using a Heat Mat or Heat
Cable, but this can also be on a branch, cave or pile of stones
if you are using a Ceramic Heater or Infrared bulb to heat up a
certain basking area. NOTE: If using with a substrate heating
device, please follow manufacturer’s instructions for safe use of
the heating device.
5. Place the top screen cover back on the terrarium and lock it
into position.
6. Close the remaining inlets by sliding the slider against the tubing
or wires to prevent escape from feeding insects and smaller
animals.
7. Place the Exo Terra®Thermostat & Hygrostat on a solid, level
surface.
8. Connect your Heat Mat, Heat Cable or Ceramic Heater and
a Fogger or Humidifier to the respective receptacle of the
thermostat / Hygrostat. Controls heating devices up to 600W and
humidifying devices up to 100W.
INSTALLATION in other Terrarium Models
1. Refer to your terrarium’s instruction manual for instructions on
how to install equipment, wiring and sensor cables inside the
terrarium.
2. Position the sensor inside your terrarium, in the location where
you want to reach the temperature set on the dial. This can be
on top of the substrate if you are using a Heat Mat or Heat Cable,
but this can also be on a branch, cave or pile of stones if you
are using a Ceramic Heater or Heat Bulb to heat up a certain
basking area. NOTE: If using with a substrate heating device,
please follow manufacturer’s instructions for safe use of the
heating device.
3. Place the Exo Terra®Thermostat on a solid, level surface.
4. Connect your heating device (Heat Mat, Heat Cable, Ceramic
Heater, Incandescent Heat Bulbs, etc.) to the receptacle of the
thermostat. Controls heating devices up to 300W per socket.
WARNING: Do not overload the Exo Terra®Thermostat & Hygrostat
by connecting heat devices with outputs greater than 600W to the
HEATING receptacle. Do not overload the Exo Terra®Thermostat &
Hygrostat by connecting humidifying devices with outputs greater
than 100W to the HUMIDITY receptacle. Damage from overloading
is considered misuse and is exempt from the guarantee.
OPERATING INSTRUCTIONS
The Exo Terra®Thermostat & Hygrostat should be set according
to the needs of the animals. Thoroughly research the preferred
optimum temperature (POTR) and humidity range for your specific
reptile, so you can create the correct temperature gradients
and humidity inside the terrarium to allow your reptiles to
thermoregulate and maintain their moisture levels.
Always use a Thermometer & Hygrometer to monitor the
temperature and humidity inside your terrarium. Adjust the
Exo Terra®Thermostat & Hygrostat according to the required
temperature and humidity range for your pet’s environment.
NOTE: In combination with a non-visible light emitting heat source
(like Exo Terra’s Heat Mat, Heat Cable, Ceramic Heater, Infrared
Basking Spot or Night Heat Lamp), the Exo Terra Thermostat &
Hygrostat allows you to create a well-controlled 24-hour heating
system that will not interrupt your animal’s normal activity cycle,
while maintaining the required temperature and humidity conditions
similar to those found in their natural environment.
NOTE: When using the Exo Terra Thermostat & Hygrostat in
combination with a visible-light emitting bulb (like Exo Terra’s
Intense Basking Spot, Daylight Basking Spot or Daytime Heat Lamp)
to create a daytime basking area or for ambient daytime heating
purposes, you need to set the night-time temperature at its lowest
point (10°C or 50°F) in order to avoid the bulb to emit light at night
disturbing your animal’s normal activity cycle.
INITIAL SETTING in °F or °C:
• Simply plug-in the Thermostat to go with the initial setting
(for EU): Dimming mode – 30°C Daytime and 25°C Night-time
temperature – Humidity setting 60% – time setting 0:00 (sunrise
9:00 – Sunset 21:00)
• If you want to switch to °F, please press and hold the “T” button
on the back while plugging-in the device. The Thermostat will be
set to 86°F daytime, 77°F night-time and humidity of 60%.The
display will show the actual temperature and humidity
SET CLOCK and TIMER:
1. Press and hold the “T” button at the back of the thermostat
during 4 seconds to start setting the clock and timer. The time
that is currently set will appear and start blinking.
2. The clock hours will start blinking; turn the knob at the back to
adjust the hours;
3. Press the “T” button once again and the clock minutes will start
blinking, turn the knob at the back to adjust the minutes;
4. Press the “T” button once again and the clock time setting is
finalised. Now the “SUN” symbol appears and the “daytime”
hours will start blinking; turn the knob at the back to adjust the
“daytime” hours;
5. Press the “T” button once again and the “daytime” minutes will
start blinking, turn the knob at the back to adjust the “daytime”
ENGLISHFRANÇAISDEUTSCHESPAÑOLITALIANONEDERLANDS

8
ENGLISHFRANÇAISDEUTSCHESPAÑOLITALIANONEDERLANDS
minutes;
6. Press the “T” button once again and the “daytime” setting is
finalised. The “MOON” symbol appears and the “night-time”
hours will start blinking; turn the knob at the back to adjust the
“night-time” hours;
7. Press the “T” button once again and the “night-time” minutes
will start blinking, turn the knob at the back to adjust the “night-
time” minutes;
8. Press the “T” button once again and the “night-time” setting
is finalised.
SET TEMPERATURE and HEATING MODE:
Daytime:
1. To set the “daytime” heating mode, temperature and humidity
press and hold the “SUN” button at the back of the thermostat
during 4 seconds.
2. The heating mode will start blinking; turn the knob at the back to
select the desired heating mode (ON/OFF or Dimming);
3. Press the “SUN” button once again and the temperature that
is currently set will start blinking; turn the knob at the back to
adjust the temperature;
4. Press the “SUN” button once again and the humidity level that
is currently set will start blinking; turn the knob at the back to
adjust the humidity level;
5. Press the “SUN” button once again and the desired “daytime”
heating mode, temperature and humidity setting is finalised.
Night-time:
1. To set the “night-time” heating mode, temperature and humidity
press and hold the “MOON” button at the back of the thermostat
during 4 seconds.
2. The heating mode will start blinking; turn the knob at the back to
select the desired heating mode (ON/OFF or Dimming);
3. Press the “MOON” button once again and the temperature that
is currently set will start blinking; turn the knob at the back to
adjust the temperature;
4. Press the “MOON” button once again and the humidity level that
is currently set will start blinking; turn the knob at the back to
adjust the humidity level;
5. Press the “MOON” button once again and the desired “night-
time” heating mode, temperature and humidity setting is
finalised.
• To check the “daytime” heating mode, temperature and
humidity, simply press the “SUN” button
• To check the “night-time” heating mode, temperature and
humidity, simply press the “MOON” button.
• To check the current time settings, simply press the “T” button
for current time, press “T” button again for “daytime setting”,
press “T” again for “night-time setting”.
• After setting the temperature, you can always switch between
°C and °F by unplugging the device, then press and hold the “T”
button while plugging-in the device. This will switch between °C
and °F, without changing your settings.
1. A Red LED will indicate when the heating device is powered
and once the set temperature is reached, the Red LED will no
longer show.
2. A Blue LED will indicate when the humidifying device is powered
and once the set humidity level is reached, the Blue LED will no
longer show.
“Please note that the Red or Blue LED indicates power to the
attached heating or humidifying device and not mains power to the
Exo Terra®Thermostat/Hygrostat.”
GUARANTEE
This product is guaranteed for defective parts and workmanship
for a period of 2 years from the date of purchase. This guarantee is
valid with proof of purchase only. The guarantee is limited to repair
or replacement only and does not cover consequential loss, loss or
damage to livestock and personal property or damage to animate or
inanimate objects, irrespective of the cause thereof.This guarantee
is valid only under normal operating conditions for which the unit
is intended. It excludes any damage caused by unreasonable use,
negligence, improper installation, tampering, abuse or commercial
use. The warranty does not cover wear and tear, breakage of glass or
parts which have not been adequately or correctly maintained. THIS
DOES NOT AFFECT YOUR STATUTORY RIGHTS.
Your Exo Terra Thermostat includes a 2 year standard warranty. To
extended the warranty by a further 3 years, simply register your
product online. It’s fast, easy and completely free! Complete
the online form at: www.exo-terra.com The extended warranty
is subject to the provisions outlined within the standard 2 year
warranty.
RECYCLING
This item bears the selective sorting symbol for waste
electronic and electrical equipment (WEEE). This
means that the product must be handled pursuant to
European Directive 2012/19/EU in order to be recycled or
dismantled to minimize its impact on the environment. For
further information please contact your local or regional authorities.
Electronic products not included in the selective sorting process are
potentially dangerous for the environment and human health due to
the presence of hazardous substances.
SERVICE
If you have any problem or question about the operation of this
product, please consult your Exo Terra®specialist retailer in the first
instance. Most problems can be resolved in store, but in the unlikely
event it cannot, please return the unit with a valid proof of purchase
to the retailer for a replacement under the two-year warranty. When
you call (e-mail or write) our Customer Service Department, please
have all relevant information such as model number and/or part
numbers available, as well as the nature of the problem:
Distribution and Customer Service:
U.K.:
Rolf C. Hagen (UK) Ltd.
California Dr. Whitwood Industrial Estate
Castleford, West Yorkshire WF10 5QH
mail to: http://faq.hagencrm.com/?uk
Helpline Number 01977 521015 (Between 9:00 AM and 5:00 PM,
Monday to Thursday and 9:00 AM and 4:00 PM on Friday – excluding
Bank Holidays)

10
Germany:
HAGEN Deutschland GmbH & Co. KG, Lehmweg 99-105, 25488 Holm
Service-Hotline: +49 (0) 4103 / 960-2000 (Montag – Freitag von
9:00 – 16:00 Uhr)
Spain:
Rolf C Hagen España, S.A.,Avda de Beniparrell 11 y 13, P.I. L’Alteró,
46460 Silla (Valencia)
mail to: info@hagen.es
Malaysia:
Rolf C.Hagen (Sea) Sdn.Bhd.
Lot 14A, Jalan 3A, Kawasan Perusahaan
Cheras Jaya, Balakong 43200 Cheras,
Selangor Darul Ehsan, Malaysia.
Tel: 603-9074 2388
Fax: 603-9074 2389
For general information on our whole product range, explore our
websites at: www.exo-terra.com or www.hagen.com.
Distributed by:
Canada: Rolf C. Hagen Inc., Montreal, QC H9X 0A2
U.K.: Rolf C. Hagen (U.K.), W.Yorkshire WF10 5QH
Germany: HAGEN Deutschland GmbH & Co. KG, 25488 Holm
Spain: Rolf C Hagen España, S.A. P.I. L’Alteró, 46460 Silla (Valencia)
Malaysia: Rolf C. Hagen (SEA) SDN, 43200 Cheras, Selangor D.E.
Merci d’avoir acheté le thermostat et hygrostat Exo TerraMD avec
minuteur à fonction diurne et nocturne. Veuillez lire le présent
mode d’emploi attentivement avant d’utiliser l’appareil et suivre
les instructions fournies pour éviter tout danger et assurer un
fonctionnement optimal. Nous vous recommandons de conserver ce
mode d’emploi pour consultation ultérieure.
• Variateur qui contrôle la température du terrarium avec une
grande précision
• Hygrostat de 100 W qui régule l’humidité pour la maintenir à
un niveau optimal
• Thermostat qui permet de contrôler des appareils de chauffage
jusqu’à 600 W
• Réglage individuel des températures et du taux d’humidité de
jour et de nuit
• Températures de 10 à 60 °C (50 - 140 °F), et jusqu’à une
humidité relative de l’air de 99 %
• Écran à cristaux liquides facile à lire affichant la température
réelle et le taux d’humidité actuel
• Voyant à DEL rouge qui indiquent quand l’appareil de chauffage
est en marche
• Voyant à DEL bleu qui s’allume lorsque le système
d’humidification est alimenté
• Système de boutons et de cadrans prévenant les changements
accidentels de température lorsque l’appareil est manipulé
• Capteur de température et d’humidité à distance
• Cordon d’alimentation très long de 190 cm (6,2 pi)
Le thermostat peut être utilisé avec les appareils de chauffage et
les humidificateurs Exo TerraMD suivants :
Chauffage diurne et nocturne :
• Heat Mat – Pellicule chauffante (PT2015/16/17/18)
• Heat Cable – Câble chauffant (PT2011/12/13)
• Ceramic Heater – Émetteur de chaleur en céramique
(PT2044/45/46/47/48)
• Infrared Basking Spot – Ampoule infrarouge pour lézarder
(PT2141/42/44/46)
• Night Heat Lamp – Ampoule clair de lune (PT2120/22/24/26/30
& PT2058/59)
Chauffage diurne :
• Daytime Heat Lamp – Ampoule infrarouge à lumière du jour
(PT2100/02/04/10/11/12/14)
• Daylight Basking Spot – Ampoule à lumière du jour pour lézarder
(PT2195/31/32/33/34)
• Intense Basking Spot – Ampoule intense pour lézarder
(PT2196/35/36/38/40)
THERMOSTAT & HYGROSTAT
Mode d’emploi
ENGLISHFRANÇAISDEUTSCHESPAÑOLITALIANONEDERLANDS

12
Humidité
• Fogger – Générateur de brouillard (PT2080)
• Humidifier – Humidificateur (PT2081)
Les reptiles sont des animaux ectothermes, c’est-à-dire qu’ils
régulent leur température corporelle optimale à l’aide de sources de
chaleur externes. Pour la plupart des reptiles, cette source constitue
la chaleur rayonnante directe du soleil en combinaison avec la
chaleur conduite par les surfaces chauffées par le soleil, telles que
les branches, les pierres ou toute autre structure qui emmagasine la
chaleur. Pour garder des reptiles, des amphibiens et des invertébrés
et pour assurer leur santé et leur bien-être, il est primordial de
maintenir un gradient de température et un taux d’humidité
adéquats dans le terrarium selon l’espèce de reptile gardée. Le
thermostat et hygrostat Exo TerraMD à minuteur avec fonction
diurne et nocturne permet de créer un système de chauffage et
d’humidité contrôlés afin d’offrir les conditions stables idéales aux
reptiles, comme celles d’un environnement désertique ou tropical.
Les températures de jour et de nuit et le taux d’humidité peuvent
être réglés individuellement. Par exemple, la température peut être
diminuée et le taux d’humidité augmenté pour le cycle nocturne,
comme dans la nature. Le thermostat et hygrostat contribue aussi
à prévenir la surchauffe pendant les chaudes journées d’été ou le
froid extrême pendant les froides soirées d’hiver tout en maintenant
le taux d’humidité désiré. Le mode Dimming (variable) maintient
la température désirée de façon beaucoup plus précise que les
thermostats standards en plus de réduire considérablement les
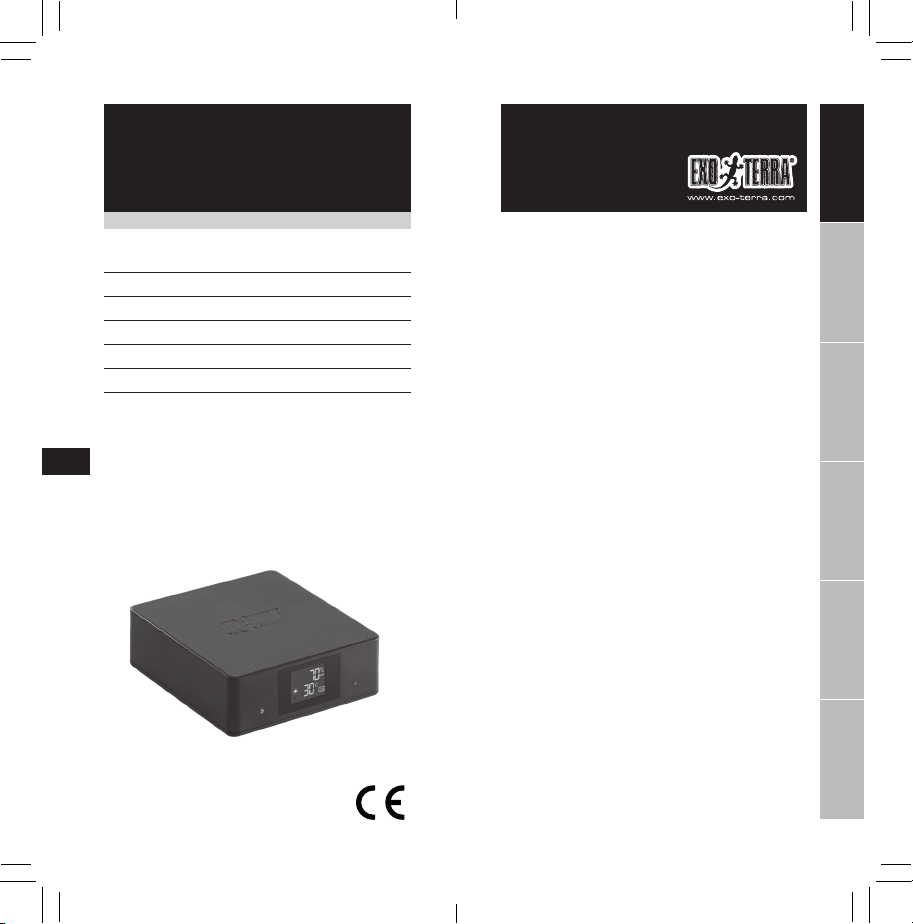
variations de température dans le terrarium. L’écran à cristaux
liquides facile à lire affiche le mode de chauffage, le cycle actuel
(diurne ou nocturne), la température réelle et le taux d’humidité
actuel. Un voyant à DEL rouge s’allument lorsque l’appareil de
chauffage est alimenté et s’éteignent une fois la température réglée
atteinte. Un voyant à DEL bleu s’allume lorsque l’humidificateur est
alimenté et s’éteint une fois le taux d’humidité réglé atteint.
Il suffit de brancher le thermostat et hygrostat Exo TerraMD à
la pellicule chauffante, au câble chauffant ou à l’émetteur de
chaleur en céramique ainsi qu’au générateur de brouillard ou à
l’humidificateur, de régler la température et le taux d’humidité
souhaités, puis de placer le capteur de température et d’humidité
à l’endroit désiré. Le système de boutons et de cadrans prévient
les changements accidentels de température et de taux d’humidité
lorsque l’appareil est manipulé. Grâce à son cordon d’alimentation
avec fiche pour prise de terre très sûre, le thermostat peut
également être branché sur une barre d’alimentation. Finalement, le
capteur à distance peut être utilisé sans danger dans les terrariums
à haut taux d’humidité.
*Le thermostat et hygrostat Exo TerraMD doit être réglé en fonction
des besoins des reptiles gardés. Il importe donc de faire des
recherches précises sur les espèces gardées afin de connaître
leur plage de températures optimales préférentielles (PTOP) ainsi
que leur taux d’humidité optimal, et ainsi d’offrir les gradients de
température et les taux d’humidité adéquats à la thermorégulation et
à la bonne hydratation des espèces dans le terrarium.
Toujours utiliser un thermomètre et hygrostat pour surveiller
la température et le taux d’humidité à l’intérieur du terrarium.
Régler le thermostat et hygrostat Exo TerraMD selon la plage de
températures et le taux d’humidité requis dans l’environnement
du reptile.
NOTE : En combinaison avec une source de chaleur à lumière
invisible (comme la pellicule chauffante, le câble chauffant,
l’émetteur de chaleur en céramique, l’ampoule infrarouge pour
lézarder ou l’ampoule nocturne à infrarouge Exo Terra), le thermostat
et hygrostat Exo TerraMD permet de créer un cycle de chauffage
précis de 24 heures qui ne perturbera pas les activités normales de
l’animal et maintient les conditions de température et d’humidité
requises et fidèles à celles retrouvées dans l’environnement naturel
de ce dernier.
NOTE : Lorsque le thermostat et hygrostat Exo TerraMD est utilisé
en combinaison avec une ampoule émettant de la lumière visible
(comme l’ampoule intense pour lézarder, l’ampoule à lumière du jour
pour lézarder, ou l’ampoule infrarouge à lumière du jour) pour créer
un endroit diurne où lézarder ou une chaleur ambiante diurne, régler
la température du cycle nocturne au minimum (10 °C, ou 50 °F) pour
éviter que l’ampoule ne perturbe les activités normales du reptile.
BIEN LIRE LE MODE D’EMPLOI AVANT D’INSTALLER ET DE FAIRE
FONCTIONNER L’APPAREIL.
INSTRUCTIONS SE RAPPORTANT À UN RISQUE D’INCENDIE, DE
DÉCHARGE ÉLECTRIQUE OU DE BLESSURES AUX PERSONNES
MESURES DE SÉCURITÉ IMPORTANTES
AVERTISSEMENT: Pour éviter toute blessure en manipulant le
thermostat, il faut observer certaines précautions de sécurité de
base, notamment celles qui suivent :
1. LIRE ET RESPECTER TOUTES LES CONSIGNES DE SÉCURITÉ
et tous les avis importants concernant l’appareil avant de
l’utiliser. Tout manquement à ces précautions peut entraîner des
blessures aux personnes ou des dommages à l’appareil.
2. DANGER – Dans chacune des situations suivantes, ne pas
essayer de réparer l’appareil soi-même; le retourner plutôt à
un service de réparations autorisé s’il est encore sous garantie
ou le jeter. Ne pas utiliser un appareil dont la fiche ou le cordon
est endommagé, qui ne fonctionne pas correctement ou qui est
tombé ou a été endommagé de quelque manière que ce soit. Ne
jamais utiliser l’appareil avec une rallonge électrique à moins
que la fiche puisse être entièrement insérée. Ne pas essayer
d’aller à l’encontre de cette mesure de sécurité.
A. POUR USAGE DOMESTIQUE ET À L’INTÉRIEUR SEULEMENT, ET
NON pour usage commercial.
B. Examiner l’appareil avec soin après l’installation. Ne pas le
brancher s’il y a de l’eau sur des pièces qui ne doivent pas être
mouillées.
C. Ne pas utiliser un appareil dont la fiche ou le cordon est
endommagé, qui ne fonctionne pas correctement ou qui est
tombé ou a été endommagé de quelque manière que ce soit.
Le cordon d’alimentation de cet appareil est de type Z et ne
peut donc pas être remplacé; si le cordon est endommagé, jeter
l’appareil. Ne jamais couper le cordon.
D. Afin d’éviter que la fiche ou la prise de courant
entre en contact avec de l’eau, installer
l’appareil à côté d’une prise de courant murale
pour empêcher l’eau de s’égoutter sur la
prise ou sur la fiche. Former une « boucle
d’égouttement », c’est-à-dire une courbure dans
ENGLISHFRANÇAISDEUTSCHESPAÑOLITALIANONEDERLANDS

14
la partie du cordon se trouvant sous la prise de courant ou sous
le connecteur de la rallonge afin d’empêcher l’eau de s’écouler
le long du cordon et de s’infiltrer dans la prise de courant. Si la
fiche ou la prise de courant est mouillée, NE PAS débrancher
l’appareil. Mettre d’abord hors circuit le fusible ou le disjoncteur
qui alimente l’appareil et débrancher celui-ci ensuite. Vérifier
qu’il n’y a pas d’eau dans la prise.
3. Lire et suivre tous les avis importants apparaissant sur l’appareil.
4. Cet appareil peut être utilisé par des enfants âgés d’au moins 8
ans et par des personnes aux capacités physiques, sensorielles
ou mentales réduites, ou qui manquent d’expérience et de
connaissance, s’ils utilisent l’appareil sous surveillance ou s’ils
ont reçu les directives nécessaires à l’utilisation sécuritaire
de l’appareil et comprennent bien les dangers possibles. Les
enfants ne doivent pas jouer avec cet appareil. Le nettoyage
et l’entretien de l’appareil ne doivent pas être effectués par un
enfant sans surveillance.
5. Pour éviter toute blessure, ne toucher aucune pièce chaude.
6. Toujours débrancher l’appareil lorsqu’il n’est pas utilisé, avant
d’insérer ou de retirer des pièces ou d’en effectuer le nettoyage.
Ne jamais tirer sur le cordon d’alimentation pour débrancher
l’appareil. Prendre plutôt la fiche entre les doigts, puis la tirer.
7. Ne pas se servir de l’appareil pour un usage autre que celui pour
lequel il a été conçu. L’emploi d’accessoires ni recommandés
ni vendus par le fabricant de l’appareil peut être source de
situations dangereuses.
8. Ne pas installer ni ranger l’appareil où il risque d’être exposé aux
intempéries ou à des températures sous le point de congélation.
Protéger l’appareil de la lumière directe du soleil.
9. Si une rallonge électrique est nécessaire, vérifier que le
raccordement est étanche à l’eau et à la poussière. Utiliser une
rallonge d’un calibre suffisant. Un cordon électrique de moins
d’ampères ou de watts que l’appareil peut surchauffer. Prendre
les précautions nécessaires pour éviter que l’on tire la rallonge
ou que l’on trébuche sur celle-ci. Le raccordement doit être
effectué par un électricien qualifié.
10. S’assurer que l’appareil est placé sur une surface plane et de
niveau.
CONSERVER CES INSTRUCTIONS POUR CONSULTATION
ULTÉRIEURE
Seule l’observation rigoureuse des présentes directives concernant
l’installation, l’électricité et l’entretien assurera un emploi sûr et
efficace de l’appareil.
INSTRUCTIONS D’INSTALLATION DU THERMOSTAT DE 600 W ET
HYGROSTAT DE 100 W EXO TERRAMD
INSTALLATION dans les terrariums naturels Exo TerraMD
Suivre les étapes d’installation du thermostat et hygrostat Exo
TerraMD pour les terrariums naturels Exo TerraMD de n’importe quel
format.
1. Déverrouiller le couvercle grillagé et le soulever du terrarium.
2. Dégager l’une des ouvertures (situées à l’arrière du couvercle
grillagé de chaque côté) afin d’y passer le fil de l’appareil.
3. Passer le fil doté du capteur dans la première ouverture du côté
désiré à l’arrière du terrarium.
4. Placer le capteur à l’intérieur du terrarium, à un endroit devant
atteindre la température et le taux d’humidité réglés. Le capteur
peut être placé au-dessus du substrat si une pellicule ou un
câble chauffant sont utilisés, ou encore sur une branche, une
cachette ou un amas de pierres si un émetteur de chaleur en
céramique ou une ampoule chauffante sont utilisés pour chauffer
un endroit où lézarder en particulier. REMARQUE : Suivre les
directives du fabricant pour un usage sécuritaire du thermostat
s’il est utilisé avec un appareil de chauffage du substrat.
5. Replacer le couvercle grillagé et le verrouiller en place.
6. Bloquer les ouvertures en glissant le curseur sur les fils pour
empêcher les insectes servant au nourrissage ou les petits
animaux de s’enfuir.
7. Installer le thermostat et hygrostat Exo TerraMD sur une surface
solide et plane.
8. Brancher le tapis chauffant, le câble chauffant ou l’émetteur
de chaleur en céramique ainsi que le générateur de brouillard
et l’humidificateur à la prise correspondante du thermostat et
hygrostat. Contrôle les appareils de chauffage d’au plus 600 W
et les humidificateurs d’au plus 100 W.
INSTALLATION dans les autres modèles de terrariums
1. Consulter le mode d’emploi du terrarium pour les étapes
d’installation de l’équipement, des fils et des câbles capteurs à
l’intérieur du terrarium.
2. Placer le capteur à l’intérieur du terrarium, à un endroit devant
atteindre la température et le taux d’humidité réglés. Le capteur
peut être placé au-dessus du substrat si une pellicule ou un
câble chauffant sont utilisés, ou encore sur une branche, une
cachette ou un amas de pierres si un émetteur de chaleur en
céramique ou une ampoule chauffante sont utilisés pour chauffer
un endroit où lézarder en particulier. REMARQUE : Suivre les
directives du fabricant pour un usage sécuritaire du thermostat
s’il est utilisé avec un appareil de chauffage du substrat.
3. Installer le thermostat et hygrostat Exo TerraMD sur une surface
solide et plane.
4. Brancher le tapis chauffant, le câble chauffant ou l’émetteur de
chaleur en céramique ainsi que le générateur de brouillard et
l’humidificateur à la prise respective du thermostat et hygrostat.
Contrôle les appareils de chauffage d’au plus 600 W et les
humidificateurs d’au plus 100 W.
AVERTISSEMENT : Pour éviter une surcharge, ne pas brancher le
thermostat et hygrostat Exo TerraMD à des appareils de chauffage
de plus de 600 W à la prise de chauffage. Ne pas brancher le
thermostat et hygrostat Exo TerraMD à des humidificateurs de plus
de 100 W à la prise d’humidité. Les dommages causés par une
surcharge sont considérés comme étant le résultat d’une mauvaise
utilisation de l’appareil et ne sont donc pas couverts par la garantie.
INSTRUCTIONS D’UTILISATION
*Le thermostat et hygrostat Exo TerraMD doit être réglé en fonction
des besoins des reptiles gardés. Il importe donc de faire des
recherches précises sur les espèces gardées afin de connaître
leur plage de températures optimales préférentielles (PTOP) ainsi
que leur taux d’humidité optimal, et ainsi d’offrir les gradients de
température et les taux d’humidité adéquats à la thermorégulation et
à la bonne hydratation des espèces dans le terrarium.
Toujours utiliser un thermomètre et hygrostat pour surveiller
la température et le taux d’humidité à l’intérieur du terrarium.
Régler le thermostat et hygrostat Exo TerraMD selon la plage de
températures et le taux d’humidité requis dans l’environnement
ENGLISHFRANÇAISDEUTSCHESPAÑOLITALIANONEDERLANDS

16
du reptile.
NOTE : En combinaison avec une source de chaleur à lumière
invisible (comme la pellicule chauffante, le câble chauffant,
l’émetteur de chaleur en céramique, l’ampoule infrarouge pour
lézarder ou l’ampoule nocturne à infrarouge Exo Terra), le thermostat
et hygrostat Exo TerraMD permet de créer un cycle de chauffage
précis de 24 heures qui ne perturbera pas les activités normales de
l’animal et maintient les conditions de température et d’humidité
requises et fidèles à celles retrouvées dans l’environnement naturel
de ce dernier.
NOTE : Lorsque le thermostat et hygrostat Exo TerraMD est utilisé
en combinaison avec une ampoule émettant de la lumière visible
(comme l’ampoule intense pour lézarder, l’ampoule à lumière du jour
pour lézarder, ou l’ampoule infrarouge à lumière du jour) pour créer
un endroit diurne où lézarder ou une chaleur ambiante diurne, régler
la température du cycle nocturne au minimum (10 °C, ou 50 °F) pour
éviter que l’ampoule ne perturbe les activités normales du reptile.
AFFICHAGE ET RÉGLAGES PAR DÉFAUT
• Pour l’affichage et les réglages par défaut, simplement brancher
le thermostat : (for EU) Mode Dimming (variable) – Affichage
de la température en degrés Celsius (°C) (température de jour
de 30 °C et température de nuit de 25 °C) – Réglage du taux
d’humidité (60 %) – Affichage de l’heure sur 24 heures (début du
cycle diurne à 9:00 et début du cycle nocturne à 21:00).
• Pour passer à l’affichage en degrés Fahrenheit (°F), enfoncer le
bouton “T” situé à l’arrière de l’appareil au moment de brancher
ce dernier. La température sera alors réglée à 86 °F le jour et
77 °C la nuit, et le taux d’humidité à 60 %. L’écran affichera la
température et l’humidité réelles.
RÉGLAGE de L’HORLOGE et du MINUTEUR :
1. Pour régler l’heure et le minuteur, appuyer sur le bouton T situé à
l’arrière du thermostat et le garder enfoncé pendant 4 secondes,
ou jusqu’à ce que l’heure actuelle clignote à l’écran.
2. Lorsque les chiffres des heures clignotent, tourner le bouton de
réglage à l’arrière de l’appareil pour régler les heures.
3. 3. Appuyer sur le bouton T de nouveau. Lorsque les chiffres des
minutes clignotent, tourner le bouton de réglage pour régler les
minutes.
4. Appuyer sur le bouton T une dernière fois pour terminer le
réglage de l’horloge. Une icône de soleil et l’heure programmée
pour le début du cycle diurne s’affichent ensuite à l’écran.
Lorsque les chiffres des heures clignotent, tourner le bouton de
réglage pour régler les heures.
5. Appuyer sur le bouton T de nouveau. Lorsque les chiffres des
minutes clignotent, tourner le bouton de réglage pour régler les
minutes.
6. Appuyer sur le bouton T une dernière fois pour terminer le
réglage du minuteur du cycle diurne. Une icône de lune et l’heure
programmée pour le début du cycle nocturne s’affichent ensuite
à l’écran. Lorsque les chiffres des heures clignotent, tourner le
bouton de réglage pour régler les heures.
7. Appuyer sur le bouton T de nouveau. Lorsque les chiffres des
minutes clignotent, tourner le bouton de réglage pour régler les
minutes.
8. Appuyer sur le bouton T une dernière fois pour terminer le
réglage de la minuterie du cycle nocturne.
RÉGLAGE DU MODE DE CHAUFFAGE, DE LA TEMPÉRATURE ET DU
TAUX D’HUMIDITÉ
Jour :
1. Pour programmer la température, le taux d’humidité et le mode
de chauffage désirés pour le cycle diurne, appuyer sur le bouton
SOLEIL à l’arrière du thermostat et le garder enfoncé pendant
4 secondes.
2. Lorsque le mode de chauffage clignote à l’écran, tourner le
bouton de réglage pour sélectionner le mode de chauffage
désiré, soit ON/OFF (marche/arrêt) ou Dimming (variable).
3. Appuyer sur le bouton SOLEIL de nouveau. Lorsque la
température programmée clignote à l’écran, tourner le bouton de
réglage à l’arrière de l’appareil pour régler la température.
4. Appuyer sur le bouton SOLEIL de nouveau. Lorsque le taux
d’humidité programmé clignote à l’écran, tourner le bouton de
réglage à l’arrière de l’appareil pour régler le taux d’humidité.
5. Appuyer sur le bouton SOLEIL une dernière fois pour terminer
le réglage de la température, du taux d’humidité et du mode de
chauffage pour le cycle diurne.
Nuit :
1. Pour programmer la température, le taux d’humidité et le mode
de chauffage désirés pour le cycle nocturne, appuyer sur le
bouton LUNE à l’arrière du thermostat et le garder enfoncé
pendant 4 secondes.
2. Lorsque le mode de chauffage clignote à l’écran, tourner le
bouton de réglage pour sélectionner le mode de chauffage
désiré, soit ON/OFF (marche/arrêt) ou Dimming (variable).
3. Appuyer sur le bouton LUNE de nouveau. Lorsque la température
programmée clignote à l’écran, tourner le bouton de réglage à
l’arrière de l’appareil pour régler la température.
4. Appuyer sur le bouton LUNE de nouveau. Lorsque le taux
d’humidité programmé clignote à l’écran, tourner le bouton de
réglage à l’arrière de l’appareil pour régler le taux d’humidité.
5. Appuyer sur le bouton LUNE une dernière fois pour terminer le
réglage de la température, du taux d’humidité et du mode de
chauffage pour le cycle nocturne.
• Pour faire s’afficher la température, le taux d’humidité et le
mode de chauffage programmés pour le cycle diurne, appuyer
sur le bouton SOLEIL.
• Pour faire s’afficher la température, le taux d’humidité et le
mode de chauffage programmés pour le cycle nocturne, appuyer
sur le bouton LUNE.
• Appuyer sur le bouton T pour faire s’afficher l’heure actuelle.
Appuyer sur le bouton T de nouveau pour faire s’afficher le
réglage du minuteur du cycle diurne, et appuyer dessus une
deuxième fois pour le réglage du minuteur du cycle nocturne.
• Une fois la température programmée, il est possible de
réinitialiser le format d’affichage de la température (°C ou °F) en
débranchant l’appareil et en le rebranchant tout en maintenant
le bouton T enfoncé. Les préférences d’affichage seront ainsi
modifiées sans incidence sur les réglages.
1. Un voyant à DEL rouge s’allument lorsque l’appareil de
chauffage est alimenté et s’éteignent une fois la température
réglée atteinte.
2. Un voyant à DEL bleu s’allume lorsque l’humidificateur est
alimenté et s’éteint une fois le taux d’humidité réglé atteint.
ENGLISHFRANÇAISDEUTSCHESPAÑOLITALIANONEDERLANDS

18
“Bien noter que les voyants à DEL rouge et bleu indiquent l’état de
marche de l’appareil de chauffage et de l’humidificateur branchés,
et non du thermostat et hygrostat Exo TerraMD.”
GARANTIE
Ce produit est garanti contre tout défaut de matériaux et de
fabrication pour une période de deux (2) ans à partir de la date
d’achat. La présente garantie est valide accompagnée d’une
preuve d’achat seulement. La garantie se limite à la réparation ou
au remplacement des appareils seulement et ne s’applique ni aux
pertes ni aux dommages directs ou indirects occasionnés aux objets
animés ou inanimés, peu importe la cause. La garantie est valide
seulement dans les conditions normales d’utilisation pour lesquelles
l’appareil a été conçu. La garantie exclut tout dommage causé par
un usage inapproprié, la négligence, une installation incorrecte,
une modification, un usage abusif ou un usage commercial. Elle ne
couvre pas l’usure normale, ni le bris de verre, ni les pièces n’ayant
pas été entretenues de manière adéquate. LA PRÉSENTE GARANTIE
NE PORTE PAS ATTEINTE À VOS DROITS PRÉVUS PAR LA LOI.
Votre thermostat Exo Terra est offert avec une garantie standard
de deux (2) ans. Pour une garantie prolongée de trois (3) ans
supplémentaires, enregistrez simplement le produit en ligne. C’est
rapide, facile et complètement gratuit! Complétez le formulaire en
ligne à : www.exo-terra.com La garantie prolongée est soumise
aux mêmes dispositions énoncées dans la garantie standard de
deux (2) ans.
RECYCLAGE
Ce produit porte le symbole de la collecte sélective des
déchets d’équipements électriques et électroniques
(DEEE), ce qui signifie qu’on doit éliminer ce produit
conformément à la directive européenne 2012/19/EU
afin de le recycler ou de le désassembler pour minimiser
ses répercussions sur l’environnement. Vérifier auprès d’agences
locales ou régionales pour en apprendre davantage. Les produits
électroniques non compris dans le processus de collecte sélective
sont potentiellement dangereux pour l’environnement et la santé
humaine en raison de la présence de substances dangereuses.
SERVICE
Si vous avez des problèmes ou des questions par rapport à
l’utilisation de cet appareil, veuillez d’abord vous adresser à votre
détaillant de produits Exo TerraMD spécialisé. Si le problème ne peut
pas être résolu en magasin, veuillez retourner l’article accompagné
de la preuve d’achat à votre détaillant afin de remplacer le produit,
dans le délai de deux (2) ans prévu dans la garantie. Lorsque
vous communiquez avec nous, veuillez avoir en main ou indiquer
dans votre message tous les renseignements pertinents, tels que
le numéro de modèle ou le numéro des pièces, ainsi que des
précisions sur le problème.
Service à la clientèle et Service de réparations autorisé sous
garantie :
R.-U. :
Rolf C. Hagen (UK) Ltd.
California Dr.Whitwood Industrial Estate
Castleford, West Yorkshire WF10 5QH
Adresse courriel : http://faq.hagencrm.com/?uk
Entre 9 h et 17 h du lundi au jeudi, et entre 9 h et 16 h le vendredi
(à l’exception des jours fériés)
Allemagne :
HAGEN Deutschland GmbH & Co. KG Lehmweg 99-105, 25488 Holm
Service à la clientèle : +49 (0) 4103 / 960-2000
Du lundi au vendredi, de 9 h à 16 h
Espagne :
Rolf C. Hagen España S.A.,Av. de Beniparrell n.11 y 13, P.I. L’Alteró,
46460 Silla (Valencia)
Malaisie :
Rolf C. Hagen (Sea) Sdn.Bhd.
Lot 14A, Jalan 3A, Kawasan Perusahaan
Cheras Jaya, Balakong 43200 Cheras,
Selangor Darul Ehsan, Malaysia.
Assistance téléphonique : 603-9074 2388
Télécopieur : 603-9074 2389
Adresse courriel : customer.service-sea@rchagen.com
Pour de l’information générale sur l’ensemble de nos
produits, visiter nos sites Web au www.exo-terra.com/fr
et au www.hagen.com.
Distribué par :
Canada : Rolf C. Hagen inc., Montréal (Québec) H9X 0A2
R.-U. : Rolf C. Hagen (U.K.), W. Yorkshire WF10 5QH
Allemagne : HAGEN Deutschland GmbH & Co. KG, 25488 Holm
Espagne : Rolf C Hagen España, S.A. P.I. L’Alteró, 46460 Silla (Valencia)
Malaisie : Rolf C. Hagen (SEA) SDN, 43200 Cheras, Selangor D.E.
ENGLISHFRANÇAISDEUTSCHESPAÑOLITALIANONEDERLANDS

20
Vielen Dank für den Kauf des Exo Terra®600-Watt-Thermostaten
& Hygrostaten mit Tag-/Nacht-Zeitschaltuhr. Bitte lesen Sie diese
Gebrauchsanleitung sorgfältig durch, bevor Sie diesen Thermostat in
Betrieb nehmen. Für die maximale Sicherheit und Leistung müssen
Sie diesen Thermostat gemäß diesen Anleitungen betreiben. Wir
empfehlen Ihnen, diese Gebrauchsanleitung aufzubewahren.
• Die Dimm-Funktion steuert die Terrarientemperaturen äußerst
präzise
• Der 100-Watt-Hygrostat kontrolliert die optimale
Luftfeuchtigkeit
• Steuert Heizgeräte bis zu 600 W
• Die Tages- und Nachttemperaturen und die Feuchtigkeit können
separat voneinander eingestellt werden
• Zwischen 10°C und 60°C und bis zu 99% Luftfeuchtigkeit
• Gut leserliches LCD-Display zeigt die derzeitige Temperatur und
Luftfeuchtigkeit an
• Die rote LED zeigt an, wenn das Heizgerät mit Strom versorgt
wird
• Die blaue LED zeigt an, wenn das Befeuchtungsgerät mit Strom
versorgt wird
• Mit Schaltknopf zur Verhinderung von versehentlichen
Veränderungen der Einstellungen
• Fernsensor für Temperatur und Feuchtigkeit
• Extralanges Netzkabel: 190 cm
Kann zusammen mit den folgenden Exo Terra®Wärme-/
Feuchtigkeitsquellen verwendet werden:
Tag- & Nacht-Beheizung:
• Heat Mat – Substratheizer (PT2015/16/17/18)
• Heat Cable – Wärmekabel (PT2011/12/13)
• Ceramic Heater – Keramischer Heizstrahler
(PT2044/45/46/47/48)
• Infrared Basking Spot – Infrarot-Wärmelampe (PT2141/42/44/46)
• Night Heat Lamp – Nacht-Wärmelampe (PT2120/22/24/26/30
& PT2058/59)
Tag-Beheizung:
• Daytime Heat Lamp – Tag-Wärmelampe
(PT2100/02/04/10/11/12/14)
• Daylight Basking Spot – Tageslicht-Wärmelampe
(PT2195/31/32/33/34)
• Intense Basking Spot – Intensiv-Wärmelampe
(PT2196/35/36/38/40)
Feuchtigkeit
• Fogger – Nebelerzeuger (PT2080)
• Humidifier – Beregnungsanlage (PT2081)
THERMOSTAT & HYGROSTAT
Gebrauchsanleitung
Reptilien sind ektotherm und brauchen die Wärme von einer
externen Quelle, um ihre Körpertemperatur optimal regulieren zu
können. Die meisten Reptilien verwenden sowohl die direkte von der
Sonne ausgestrahlte Wärme als auch die übertragene Wärme von
Oberflächen, die von der Sonne erwärmt wurden, wie beispielsweise
Äste, Felsen oder andere wärmespeichernde Strukturen. Neben der
Wärme ist auch die Luftfeuchtigkeit sehr wichtig für die Gesundheit
und das Wohlergehen der Reptilien, Amphibien und Wirbellosen.
Solch ein artgerechtes Temperaturgefälle und solch eine geeignete
Luftfeuchtigkeit in einem Terrarium herzustellen, ist ein wichtiger
Faktor für die erfolgreiche Reptilien- und Amphibienhaltung. Mit dem
Exo Terra®Thermostat & Hygrostat mit Tag-/Nacht-Zeitschaltuhr
können Sie ein gutgesteuertes Wärme-/Feuchtigkeitssystem
erzeugen. Es ermöglicht Ihnen, die benötigten Temperatur- und
Luftfeuchtigkeitsbedingungen beizubehalten, die denen in einer
Wüsten- oder tropischen Umgebung ähneln. Die Tages- und
Nachttemperaturen und die Luftfeuchtigkeit können separat
voneinander eingestellt werden. Zum Beispiel: die Temperatur kann
für die Nacht niedriger eingestellt werden und die Luftfeuchtigkeit
höher – genau so wie es auch in der freien Natur vorkommen
würde. Der Thermostat & der Hygrostat tragen ebenfalls dazu bei,
eine Überhitzung an heißen Sommertagen oder eine Unterkühlung
in kalten Winternächten zu vermeiden und die gewünschte
Luftfeuchtigkeit gleichzeitig beizubehalten. Die Dimm-Funktion
kann die Temperatur sehr genau auf dem gewünschten Einstellwert
halten. Damit werden Temperaturschwankungen in dem Terrarium
nahezu vollständig verhindert. Das gut leserliche LCD-Display zeigt
den Heizmodus, den Tag- oder Nachtmodus und die derzeitige
Temperatur und Luftfeuchtigkeit an. Eine rote LED-Lampe zeigt an,
wenn das Heizgerät mit Strom versorgt wird. Sobald die eingestellte
Temperatur erreicht ist, erlöschen die rote LED und das Heizsymbol.
Eine blaue LED-Lampe zeigt an, wenn das Befeuchtungsgerät mit
Strom versorgt wird. Sobald die gewünschte Luftfeuchtigkeit erreicht
ist, erlischt die blaue LED.
Verbinden Sie einfach Ihren Substratheizer, Ihr Wärmekabel oder
Ihren keramischen Heinzstrahler und Ihren Nebelerzeuger oder Ihre
Beregnungsanlage dem Exo Terra®Thermostat & Hygrostat, stellen
Sie die gewünschte Temperatur & Luftfeuchtigkeit ein und platzieren
Sie den Wärme- und den Feuchtigkeitssensor an der gewünschten
Stelle. Der Schaltknopf des Thermostaten & Hygrostaten verhindert
versehentliche Änderungen der eingestellten Temperatur und
Luftfeuchtigkeit, wenn das Gerät angefasst wird. Der Thermostat
ist mit einem Netzkabel ausgerüstet und der Fernsensor kann
problemlos in sehr feuchten Terrarien verwendet werden.
Der Exo Terra®Thermostat & Hygrostat sollte den Bedürfnissen
der Tiere gemäß eingestellt werden. Recherchieren Sie den
optimalen Temperaturbereich (POTR – preferred optimum
temperature range) und Luftfeuchtigkeitsbereich, so dass Sie das
richtige Temperaturgefälle für die Thermoregulierung und den
optimalen Luftfeuchtigkeitsbereich für den Feuchtigkeitshaushalt
Ihrer speziellen Reptilien in Ihrem Terrarium schaffen können.
Verwenden Sie immer ein Thermometer & Hygrometer, um die
Temperatur und die Luftfeuchtigkeit im Inneren Ihres Terrariums
zu beobachten. Stellen Sie den Exo Terra®Thermostat & Hygrostat
dem Temperatur- und Feuchtigkeitsbereich gemäß ein, den Ihre
Tiere benötigen.
ENGLISHFRANÇAISDEUTSCHESPAÑOLITALIANONEDERLANDS

22
HINWEIS: In Kombination mit einer Wärmequelle, die nicht-
sichtbares Licht ausstrahlt (wie beispielsweise der Exo Terra®
Substratheizer, das Wärmekabel, der keramische Heizstrahler,
die Infrared Basking Spot oder Night Heat Lamp), ermöglicht
es Ihnen der Exo Terra®Thermostat & Hygrostat, ein gut
gesteuertes 24-Stunden-Wärmesystem zu schaffen, um den
normalen Aktivitätszyklus Ihres Tieres nicht zu unterbrechen und
um die benötigten Temperatur- und Feuchtigkeitsbedingungen
nachzuahmen, wie sie in der freien Natur vorkommen.
HINWEIS: Wenn Sie den Exo Terra®Thermostat & Hygrostat in
Kombination mit einer Lampe verwenden, die sichtbares Licht
ausstrahlt (wie beispielsweise die Exo Terra®Intense Basking Spot,
Daylight Basking Spot oder Daytime Heat Lamp), um am Tag einen
Sonnenplatz zu schaffen oder um die Umgebungslufttemperatur
zu erwärmen, dann müssen Sie die Nachttemperatur auf den
niedrigsten Punkt (10°C) einstellen, damit die Lampe in der Nacht
kein Licht ausstrahlt, da sonst der normale Aktivitätszyklus Ihres
Tieres gestört werden könnte.
LESEN SIE DIE GEBRAUCHSANLEITUNG GRÜNDLICH, BEVOR SIE DIE
EINHEIT INSTALLIEREN UND IN GEBRAUCH NEHMEN
HINWEISE ZU GEFAHREN DURCH BRÄNDE, ELEKTRISCHE SCHOCKS
ODER VERLETZUNGEN.
WICHTIGE SICHERHEITSHINWEISE
ACHTUNG: Zum Schutz vor Verletzungen sind beim Umgang
mit diesem Gerät grundlegende Sicherheitsvorkehrungen zu
beachten, einschließlich der folgenden Hinweise:
1. LESEN UND BEFOLGEN SIE ALLE SICHERHEITSHINWEISE sowie
alle wichtigen Hinweise auf dem Gerät vor Gebrauch. Eine
Nichteinhaltung kann Verletzungen und Geräteschäden nach sich
ziehen.
2. VORSICHT – In allen nachfolgend aufgeführten Fällen ist
keine Reparatur in Eigenregie zu versuchen. Das Gerät ist zur
Reparatur an einen autorisierten Kundendienst zurückzugeben
oder zu entsorgen. Das Gerät darf nicht verwendet werden,
wenn das Netzkabel oder der Netzstecker beschädigt ist, eine
Betriebsstörung aufgetreten ist oder das Gerät heruntergefallen
oder auf irgendeine Weise beschädigt wurde. Niemals mit
einem Verlängerungskabel verwenden, wenn der Stecker nicht
vollständig eingesteckt werden kann. Versuchen Sie nicht, diese
Sicherheitsvorrichtungen zu umgehen.
A. Das Gerät ist NUR FÜR DIE VERWENDUNG IN PRIVATHAUSHALTEN
vorgesehen und darf nicht im Freien verwendet werden. Es ist
nicht für den kommerziellen Gebrauch vorgesehen.
B. Gerät nach der Installation sorgfältig überprüfen. Es darf nicht
an das Stromnetz angeschlossen werden, wenn Teile nass
geworden sind, die nicht nass werden dürfen.
C. Kein Gerät mit beschädigtem Kabel oder beschädigtem
Stecker benutzen oder wenn es nicht richtig funktioniert,
heruntergefallen ist oder anderweitig beschädigt wurde. Das
Netzkabel dieses Geräts kann nicht ausgewechselt werden.
Wenn das Kabel beschädigt ist, sollte das Gerät entsorgt werden.
Niemals das Kabel abschneiden.
D. Um die Möglichkeit zu vermeiden, dass der Gerätestecker
oder die Steckdose nass werden, sollte das Gerät neben einer
Wandsteckdose so abgestellt werden, dass kein Wasser auf
Steckdose oder Stecker tropfen kann. Eine
„Tropfschleife“ sollte gebildet werden. Sie
ist der Teil des Netzkabels, der unterhalb
der Steckdose oder des Anschlusses bei
Verwendung eines Verlängerungskabels liegt.
Damit wird verhindert, dass Wasser am Kabel
entlangwandert und mit der Steckdose in
Berührung kommt. Wenn der Stecker oder die
Steckdose nass werden, ziehen Sie NICHT den
Stecker. Sicherung oder Stromkreisunterbrecher für das Gerät
ausschalten. Erst danach das Netzkabel herausziehen und die
Steckdose auf Wasser überprüfen.
3. Lesen und befolgen Sie alle wichtigen auf dem Gerät
vorhandenen Hinweise.
4. Dieses Gerät kann von Kindern ab einem Alter von acht (8)
Jahren und von Personen mit eingeschränkten physischen,
sensorischen oder geistigen Fähigkeiten oder einem Mangel
an Erfahrung und/oder Wissen verwendet werden, wenn sie
beaufsichtigt werden oder bezüglich des sicheren Gebrauchs
des Geräts unterwiesen wurden und die daraus resultierenden
Gefahren verstanden haben. Kinder dürfen nicht mit dem Gerät
spielen. Reinigung und Benutzerwartung dürfen nicht durch
Kinder ohne Beaufsichtigung durchgeführt werden.
5. Um Verletzungen zu vermeiden, berühren Sie keine heißen Teile.
6. Trennen Sie grundsätzlich das Gerät vom Stromnetz, wenn es
nicht verwendet wird, bevor Teile ein- bzw. abgebaut werden
oder vor der Reinigung. Nie am Netzkabel ziehen, um den
Stecker aus der Steckdose zu ziehen. Immer den Stecker
anfassen und ziehen.
7. Verwenden Sie das Gerät nur für den vorgesehenen Zweck.
Die Verwendung von Zubehörteilen, die nicht vom Hersteller
des Gerätes empfohlen oder verkauft werden, kann zu einem
unsicheren Betriebszustand des Gerätes führen.
8. Installieren oder lagern Sie das Gerät nicht dort, wo es der
Witterung oder Temperaturen unter dem Gefrierpunkt ausgesetzt
ist. Das Gerät keiner direkten Sonneneinstrahlung aussetzen.
9. Ist ein Verlängerungskabel erforderlich, sicherstellen, dass
die Verbindung wasser- und staubdicht ist. Nur Kabel mit
der geeigneten Auslegung verwenden. Ist das Kabel auf eine
geringere Stromstärke oder Leistungsaufnahme ausgelegt als
das Gerät, kann dies zu einer Überhitzung des Geräts führen. Das
Kabel so verlegen, dass es keine Stolpergefahr bildet und nicht
versehentlich herausgezogen werden kann.
10. Das Gerät auf einer flachen, ebenen Fläche aufstellen.
BEWAHREN SIE DIESE ANLEITUNG AUF
Zur sicheren und effizienten Nutzung dieses Gerätes wird empfohlen,
diese Anleitung für Installation,Wartung und Elektrik gründlich zu
lesen und zu befolgen.
DIMMBARER EXO TERRA®600-WATT-THERMOSTAT &
100-WATT-HYGROSTAT MIT TAG-/NACHT-ZEITSCHALTUHR –
INSTALLATIONSANLEITUNGEN
INSTALLATION in Exo Terra®Terrarien
Befolgen Sie die Installationsanleitungen, um den Exo Terra®
Thermostat & Hygrostat in jedem beliebigen Exo Terra®Terrarium
zu installieren:
1. Lösen Sie die Netzgitterabdeckung von dem Terrarium und
nehmen Sie sie ab.
ENGLISHFRANÇAISDEUTSCHESPAÑOLITALIANONEDERLANDS

24
2. Öffnen Sie eine der Kabelöffnungen (die Öffnungen befinden sich
an den Seiten im hinteren Bereich der Netzgitterabdeckung), so
dass das Kabel hindurch passt.
3. Stecken Sie das Kabel mit dem Sensor durch die erste mögliche
Kabelöffnung auf der gewünschten Seite im hinteren Bereich der
Netzgitterabdeckung.
4. Positionieren Sie den Sensor im Inneren des Terrariums an der
Stelle, an der Sie die eingestellte Temperatur & Luftfeuchtigkeit
erreichen wollen. Dies kann eine Stelle auf dem Substrat
sein, wenn Sie einen Substratheizer oder ein Wärmekabel
verwenden. Dies kann aber auch auf einem Ast, einer Höhle
oder einem Steinhaufen sein, wenn Sie einen keramischen
Heizstrahler oder eine Infrarotlampe verwenden, um einen
bestimmten Sonnenplatz aufzuheizen. HINWEIS:Wenn Sie einen
Substratheizer verwenden möchten, befolgen Sie bitte für einen
sicheren Gebrauch die Anleitungen des Herstellers.
5. Setzen Sie die Netzgitterabdeckung wieder auf das Terrarium
und befestigen Sie sie.
6. Schließen Sie die anderen Öffnungen, indem Sie den Schieber
an das Kabel heranschieben, damit Futterinsekten und kleinere
Tiere nicht entweichen können.
7. Platzieren Sie den Exo Terra®Thermostat & Hygrostat auf einem
festen, geraden Untergrund.
8. Verbinden Sie Ihren Substratheizer, Ihr Wärmekabel oder Ihren
keramischen Heizstrahler und Ihren Nebelerzeuger oder Ihre
Beregnungsanlage mit der entsprechenden Anschlussdose des
Thermostaten & Hygrostaten. Steuert Heizgeräte bis zu 600 W
und Befeuchtungsgeräte bis zu 100 W.
INSTALLATION in anderen Terrarienmodellen
1. Bitte beziehen Sie sich auf die Bedienungsanleitung Ihres
Terrariums, um Geräte, Netz- und Sensorkabel ordnungsgemäß
in Ihrem Terrarium zu installieren.
2. Positionieren Sie den Sensor im Inneren des Terrariums an der
Stelle, an der Sie die eingestellte Temperatur & Feuchtigkeit
erreichen wollen. Dies kann eine Stelle auf dem Substrat
sein, wenn Sie einen Substratheizer oder ein Wärmekabel
verwenden. Dies kann aber auch auf einem Ast, einer Höhle
oder einem Steinhaufen sein, wenn Sie einen keramischen
Heizstrahler oder eine Infrarotlampe verwenden, um einen
bestimmten Sonnenplatz aufzuheizen. HINWEIS:Wenn Sie einen
Substratheizer verwenden möchten, befolgen Sie bitte für einen
sicheren Gebrauch die Anleitungen des Herstellers.
3. Platzieren Sie den Exo Terra®Thermostat & Hygrostat auf einem
festen, geraden Untergrund.
4. Verbinden Sie Ihren Substratheizer, Ihr Wärmekabel oder Ihren
keramischen Heizstrahler und Ihren Nebelerzeuger oder Ihre
Beregnungsanlage mit der entsprechenden Anschlussdose des
Thermostaten & Hygrostaten. Steuert Heizgeräte bis zu 600 W
und Befeuchtungsgeräte bis zu 100 W.
WARNUNG: Überladen Sie den Exo Terra®Thermostat & Hygrostat
nicht durch die Verbindung der HEIZ-Anschlussdose mit Heizgeräten
mit einer Leistung von mehr als 600 Watt. Überladen Sie den Exo
Terra®Thermostat & Hygrostat nicht durch die Verbindung der
FEUCHTIGKEIT-Anschlussdose mit Befeuchtungsgeräten mit einer
Leistung von mehr als 100 Watt. Schäden durch eine Überladung
werden als unsachgemäßer Gebrauch eingestuft und sind daher von
der Gewährleistung ausgeschlossen.
BEDIENUNGSANLEITUNGEN
Der Exo Terra®Thermostat & Hygrostat sollte den Bedürfnissen
der Tiere gemäß eingestellt werden. Recherchieren Sie den
optimalen Temperaturbereich (POTR – preferred optimum
temperature range) und Luftfeuchtigkeitsbereich, so dass Sie das
richtige Temperaturgefälle für die Thermoregulierung und den
optimalen Luftfeuchtigkeitsbereich für den Feuchtigkeitshaushalt
Ihrer speziellen Reptilien in Ihrem Terrarium schaffen können.
Verwenden Sie immer ein Thermometer & Hygrometer, um die
Temperatur und die Luftfeuchtigkeit im Inneren Ihres Terrariums
zu beobachten. Stellen Sie den Exo Terra®Thermostat & Hygrostat
dem Temperatur- und Feuchtigkeitsbereich gemäß ein, den Ihre
Tiere benötigen.
HINWEIS: In Kombination mit einer Wärmequelle, die nicht-
sichtbares Licht ausstrahlt (wie beispielsweise der Exo Terra®
Substratheizer, das Wärmekabel, der keramische Heizstrahler,
die Infrared Basking Spot oder Night Heat Lamp), ermöglicht
es Ihnen der Exo Terra®Thermostat & Hygrostat, ein gut
gesteuertes 24-Stunden-Wärmesystem zu schaffen, um den
normalen Aktivitätszyklus Ihres Tieres nicht zu unterbrechen und
um die benötigten Temperatur- und Feuchtigkeitsbedingungen
nachzuahmen, wie sie in der freien Natur vorkommen.
HINWEIS: Wenn Sie den Exo Terra®Thermostat & Hygrostat in
Kombination mit einer Lampe verwenden, die sichtbares Licht
ausstrahlt (wie beispielsweise die Exo Terra®Intense Basking Spot,
Daylight Basking Spot oder Daytime Heat Lamp), um am Tag einen
Sonnenplatz zu schaffen oder um die Umgebungslufttemperatur
zu erwärmen, dann müssen Sie die Nachttemperatur auf den
niedrigsten Punkt (10°C) einstellen, damit die Lampe in der Nacht
kein Licht ausstrahlt, da sonst der normale Aktivitätszyklus Ihres
Tieres gestört werden könnte.
GRUNDEINSTELLUNG in °C oder °F:
• Verbinden Sie den Thermostat für die Grundeinstellung einfach
mit dem Stromnetz: Dimmmodus – 30°C am Tag und 25°C in der
Nacht – Feuchtigkeitseinstellung 60% – Zeiteinstellung 0:00 Uhr
(Sonnenaufgang 9:00 Uhr – Sonnenuntergang 21:00 Uhr)
• Wenn Sie die Anzeige auf °F umschalten möchten, halten Sie den
„T“-Knopf auf der Rückseite gedrückt, während Sie das Gerät
mit dem Stromnetz verbinden. Der Thermostat ist auf 86°F am
Tag und 77°F in der Nacht und 60% Feuchtigkeit eingestellt. Das
Display zeigt die derzeitige Temperatur und die Luftfeuchtigkeit.
EINSTELLUNG der UHR und der ZEITSCHALTUHR:
1. Halten Sie den „T“-Knopf auf der Rückseite des Thermostaten
4 Sekunden lang gedrückt, um mit der Einstellung der Uhr und
der Zeitschaltuhr zu beginnen. Die Zeit, die derzeit eingestellt
ist, blinkt auf.
2. Die Stundenangabe beginnt zu blinken. Drehen Sie den Knopf
auf der Rückseite, um die Stundenangabe einzustellen.
3. Drücken Sie den „T“-Knopf erneut und die Minutenangabe
beginnt zu blinken. Drehen Sie den Knopf auf der Rückseite, um
die Minutenangabe einzustellen.
4. Drücken Sie den „T“-Knopf erneut und die Einstellung der
Uhrzeit ist abgeschlossen. Jetzt erscheint das „SONNEN“-Sym-
bol und die Stundenangabe für den „Tag“ beginnt zu blinken.
Drehen Sie den Knopf auf der Rückseite, um die Stundenangabe
ENGLISHFRANÇAISDEUTSCHESPAÑOLITALIANONEDERLANDS

26
für den „Tag“ einzustellen.
5. Drücken Sie den „T“-Knopf erneut und die Minutenangabe für
den „Tag“ beginnt zu blinken. Drehen Sie den Knopf auf der
Rückseite, um die Minutenangabe für den „Tag“ einzustellen.
6. Drücken Sie den „T“-Knopf erneut und die Einstellung für den
„Tag“ ist abgeschlossen. Jetzt erscheint das „MOND“-Symbol
und die Stundenangabe für die „Nacht“ beginnt zu blinken.
Drehen Sie den Knopf auf der Rückseite, um die Stundenangabe
für die „Nacht“ einzustellen.
7. Drücken Sie den „T“-Knopf erneut und die Minutenangabe für
die „Nacht“ beginnt zu blinken. Drehen Sie den Knopf auf der
Rückseite, um die Minutenangabe für die „Nacht“ einzustellen.
8. Drücken Sie den „T“-Knopf erneut und die Einstellung für die
„Nacht“ ist abgeschlossen.
EINSTELLUNG des HEIZMODUS, der TEMPERATUR und der
FEUCHTIGKEIT
Tag:
1. Um den Heizmodus, die Temperatur und die Feuchtigkeit für
den „Tag“ einzustellen, halten Sie den „SONNEN“-Knopf auf der
Rückseite des Thermostaten 4 Sekunden lang gedrückt.
2. Der Heizmodus beginnt zu blinken. Drehen Sie den Knopf auf
der Rückseite, um den gewünschten Heizmodus (AN/AUS oder
dimmen) einzustellen.
3. Drücken Sie erneut auf den „SONNEN“-Knopf und die derzeit
eingestellte Temperatur beginnt zu blinken. Drehen Sie den
Knopf auf der Rückseite, um die Temperatur einzustellen.
4. Drücken Sie erneut auf den „SONNEN“-Knopf und die derzeit
eingestellte Feuchtigkeit beginnt zu blinken. Drehen Sie den
Knopf auf der Rückseite, um die Feuchtigkeit einzustellen.
5. Drücken Sie erneut auf den „SONNEN“-Knopf und die Einstellung
des Heizmodus, der Temperatur und Feuchtigkeit für den „Tag“
ist wie gewünscht abgeschlossen.
Nacht:
1. Um den Heizmodus, die Temperatur und die Feuchtigkeit für
die „Nacht“ einzustellen, halten Sie den „MOND“-Knopf auf der
Rückseite des Thermostaten 4 Sekunden lang gedrückt.
2. Der Heizmodus beginnt zu blinken. Drehen Sie den Knopf auf
der Rückseite, um den gewünschten Heizmodus (AN/AUS oder
dimmen) einzustellen.
3. Drücken Sie erneut auf den „MOND“-Knopf und die derzeit ein-
gestellte Temperatur beginnt zu blinken. Drehen Sie den Knopf
auf der Rückseite, um die Temperatur einzustellen.
4. Drücken Sie erneut auf den „MOND“-Knopf und die derzeit ein-
gestellte Feuchtigkeit beginnt zu blinken. Drehen Sie den Knopf
auf der Rückseite, um die Feuchtigkeit einzustellen.
5. Drücken Sie erneut auf den „MOND“-Knopf und die Einstellung
des Heizmodus, der Temperatur und Feuchtigkeit für die „Nacht“
ist wie gewünscht abgeschlossen.
• Um den Heizmodus, die Temperatur und die Feuchtigkeit für den
„Tag“ zu überprüfen, drücken Sie einfach auf den „SONNEN“-
Knopf.
• Um den Heizmodus, die Temperatur und die Feuchtigkeit für die
„Nacht“ zu überprüfen, drücken Sie einfach auf den „MOND“-
Knopf.
• Um die derzeitigen Zeiteinstellungen zu überprüfen, drücken
Sie einfach auf den „T“-Knopf, um die derzeitige Zeit zu sehen.
Drücken Sie erneut auf den „T“-Knopf, um die Tagzeiteinstellung
zu sehen und drücken Sie erneut auf den „T“-Knopf, um die
Nachtzeiteinstellung zu sehen.
• Nachdem Sie die Temperatur eingestellt haben, können Sie
jederzeit zwischen der Anzeige der Temperatur in °C oder in °F
wählen, indem Sie das Gerät vom Stromnetz trennen und dann
den „T“-Knopf gedrückt halten, während Sie das Gerät wieder
mit dem Stromnetz verbinden. So können Sie die Anzeige der
Temperatur von °C in °F ändern, ohne dass Ihre Einstellungen
verändert werden.
1. Eine rote LED zeigt an, wenn das Heizgerät mit Strom versorgt
wird. Sobald die eingestellte Temperatur erreicht ist, erlischt
die rote LED.
2. Eine blaue LED zeigt an, wenn das Befeuchtungsgerät mit Strom
versorgt wird. Sobald die eingestellte Feuchtigkeit erreicht ist,
erlischt die blaue LED.
“Bitte beachten Sie, dass die rote bzw. blaue LED anzeigen, ob das
mit dem Exo Terra®Thermostat / Hygrostat verbundene Heizgerät
bzw. Befeuchtungsgerät mit Strom versorgt wird und nicht, dass der
Exo Terra®Thermostat / Hygrostat mit Strom versorgt wird.”
GEWÄHRLEISTUNG
Dieses Produkt hat eine Gewährleistung auf fehlerhafte Teile und
Verarbeitung für einen Zeitraum von 2 Jahren ab Kaufdatum. Diese
Gewährleistung gilt nur mit dem Kaufnachweis. Die Gewährleistung
beschränkt sich auf die Reparatur oder den Austausch und
umfasst keine Folgeschäden, Verluste oder Schäden an Tieren und
persönlichem Eigentum unabhängig von deren Ursache. Diese
Gewährleistung gilt nur unter normalen Betriebsbedingungen, für
die das Produkt bestimmt ist. Ausgeschlossen sind Schäden, die
durch unangemessene Verwendung, Fahrlässigkeit, unsachgemäße
Installation, Manipulation, Missbrauch oder kommerzielle Nutzung
verursacht wurden. Die Gewährleistung erstreckt sich nicht auf
den Verschleiß, Glasbruch oder auf Teile, die nicht ordnungsgemäß
gewartet wurden. DIES HAT KEINEN EINFLUSS AUF IHRE
GESETZLICHEN RECHTE.
Für Ihr Exo Terra Thermostat gilt eine 2-jährige
Standardgewährleistung. Um die Gewährleistung um weitere
3 Jahre zu verlängern, registrieren Sie Ihr Produkt einfach
online. Die Registrierung ist schnell, einfach und kostenlos!
Füllen Sie das Online-Formular auf www.exo-terra.com aus. Die
Gewährleistungsverlängerung unterliegt den Bestimmungen, die im
Rahmen der 2-jährigen Standardgewährleistung festgelegt sind.
RECYCLING
Dieses Produkt trägt die WEEE-Kennzeichnung
für die getrennte Entsorgung von Elektro- und
Elektronikaltgeräten und muss daher gemäß der
Europäischen Richtlinie 2012/19/EU so entsorgt
werden, dass es dem Recycling oder einer anderen
umweltschonenden Form der Verwertung zugeführt wird.Wenden
Sie sich für weitere Informationen an die zuständigen Behörden.
Elektronikgeräte, die nicht ordnungsgemäß entsorgt werden, stellen
eine potentielle Gefahr für unsere Umwelt und die menschliche
Gesundheit dar, da sie gefährliche Stoffe enthalten.
ENGLISHFRANÇAISDEUTSCHESPAÑOLITALIANONEDERLANDS

28
KUNDENDIENST
Sollten Sie im Hinblick auf den Gebrauch des Produktes Probleme
oder Fragen haben, wenden Sie sich bitte zuerst an Ihren Exo
Terra®Fachhändler. Häufig können Probleme und Fragen vom
Fachhändler geklärt werden; falls dies jedoch einmal nicht der Fall
sein sollte, geben Sie das Gerät mit dem Kaufbeleg im Rahmen der
Gewährleistung an den Vertreiber in Ihrem Land zurück. Wenn Sie
unseren Kundendienst kontaktieren (telefonisch oder schriftlich),
halten Sie bitte alle relevanten Informationen, z.B. Modell-Nummer
und/oder Teile-Nummer sowie Angaben zum Problem, bereit:
Deutschland:
HAGEN Deutschland GmbH & Co. KG, Lehmweg 99-105, 25488 Holm
Service-Hotline: +49 4103 960-2000 (Montag – Freitag von 9:00 –
16:00 Uhr)
Weitere Informationen über unser gesamtes Produktsortiment
finden Sie auf: www.exo-terra.com und www.hagen.com
Vertrieb durch:
Kanada: Rolf C. Hagen Inc., Montreal, QC H9X 0A2
Großbritannien: Rolf C. Hagen (U.K.),W.Yorkshire WF10 5QH
Deutschland: HAGEN Deutschland GmbH & Co. KG, 25488 Holm
Spain: Rolf C Hagen España, S.A. P.I. L’Alteró, 46460 Silla (Valencia)
Malaysia: Rolf C. Hagen (SEA) SDN, 43200 Cheras, Selangor D.E.
Gracias por comprar el Termostato e Higrostato con Temporizador
Día/Noche de 600W Exo Terra®. Lee atentamente este manual de
funcionamiento antes de usar y usa el producto de acuerdo con las
instrucciones proporcionadas para máxima seguridad y rendimiento.
Te recomendamos que tengas este manual a mano para futuras
consultas.
• La función de atenuación controla la temperatura del terrario
con mucha precisión
• Higrostato de 100W para controlar los niveles óptimos de
humedad
• Controla dispositivos de calefacción de hasta 600W
• La temperatura y humedad diurna y nocturna se pueden
configurar individualmente
• Desde 10°C hasta 60°C (50°F-140°F) y hasta 99% de humedad
relativa
• La pantalla LCD de fácil lectura muestra la temperatura y
humedad reales
• El LED rojo indicarán cuando el dispositivo de calefacción está
en funcionamiento
• El LED azul indicará cuando el dispositivo de humedad está en
funcionamiento
• Sistema de botón/dial para evitar modificaciones o alteraciones
accidentales
• Sonda remota de temperatura y humedad
• Cable de alimentación extra-largo de 190 cm / 6,2 pies
Se puede utilizar con las siguientes fuentes de calor/humedad
Exo Terra®:
Calefacción de Día y Noche:
• Heat Mat – Manta térmica (PT2015/16/17/18)
• Heat Cable – Cable calefactor (PT2011/12/13)
• Ceramic Heater – Calentador cerámico (PT2044/45/46/47/48)
• Infrared Basking Spot – Bombilla Incandescente
(PT2141/42/44/46)
• Night Heat Lamp – Bombilla Incandescente
(PT2120/22/24/26/30 & PT2058/59)
Calefacción de Día:
• Daytime Heat Lamp – Bombilla Incandescente
(PT2100/02/04/10/11/12/14)
• Daylight Basking Spot – Bombilla Incandescente
(PT2195/31/32/33/34)
• Intense Basking Spot – Bombilla Incandescente
(PT2196/35/36/38/40)
THERMOSTAT & HYGROSTAT
Instrucciones
de Operación
ENGLISHFRANÇAISDEUTSCHESPAÑOLITALIANONEDERLANDS

30
Humedad
• Fogger – Generador de niebla (PT2080)
• Humidifier – Humidificador (PT2081)
Los reptiles son ectotermos y usan el calor de una fuente externa
para termo-regular su temperatura corporal óptima. La mayoría de
los reptiles usan el calor radiante directo del sol en combinación
con el calor conductivo de las superficies calentadas por el sol,
como ramas, rocas u otras estructuras que acumulan calor. Además
del calor, la humedad general es un factor muy importante para
la salud y el bienestar de los reptiles, anfibios e invertebrados.
Proporcionar un gradiente de temperatura relacionado con la
especie en combinación con niveles de humedad apropiados en el
terrario es un factor importante para el mantenimiento exitoso de
reptiles y anfibios. Con el Termostato e Higrostato con Temporizador
Día/Noche Exo Terra se puede crear un sistema bien controlado
de calefacción/humedad que te permita mantener las condiciones
de temperatura y humedad requeridas, similares a las que se
encuentran en un ambiente desértico o tropical. La temperatura
y la humedad diurna y nocturna se pueden ajustar y controlar
individualmente. Por ejemplo, la temperatura se puede establecer
más baja para la noche, mientras que la humedad se puede ajustar
más alta, tal como ocurriría en la naturaleza. El Termostato e
Higrostato también ayudará a prevenir el sobrecalentamiento y el
enfriamiento insuficiente durante los calurosos días de verano o las
frías noches de invierno, mientras mantiene la humedad al nivel
deseado. La función de Atenuación mantiene la temperatura en el
punto configurado deseado con una precisión mucho mayor que los
termostatos convencionales y prácticamente elimina los cambios de
temperatura en el terrario. La pantalla LCD de fácil lectura muestra
el modo de calefacción, el modo día o noche y la temperatura
y la humedad actuales. Un LED rojo y un indicarán cuando el
dispositivo de calefacción está encendido y una vez que se alcance
la temperatura establecida se apagará el LED rojo. Un LED azul
indicará cuando el dispositivo humidificador está encendido y una
vez que se alcance la humedad establecida se apagará el LED azul.
Simplemente conecta la manta térmica, el cable térmico o el
calentador de cerámica y un nebulizador o humidificador al
Termostato e Higrostato Exo Terra, configura la temperatura y la
humedad deseadas y coloca el sensor de calor y humedad en el
lugar deseado. El sistema de botón/dial del Termostato e Higrostato
evitará los cambios accidentales de la temperatura y el nivel de
humedad establecidos si se está manipulando el dispositivo. El
termostato viene con un cable de alimentación con enchufe y toma a
tierra para mayor seguridad y para permitir el uso de una regleta de
varios enchufes. El sensor remoto se puede utilizar de forma segura
en terrarios muy húmedos.
El Termostato e Higrostato Exo Terra®debe ajustarse de acuerdo
con las necesidades de los animales. Debes investigar a fondo
el rango preferido de temperatura óptimo y el rango de humedad
para tu reptil en específico, para que puedas crear los gradientes
de temperatura y la humedad correctos dentro del terrario para
permitir que tus reptiles se termo-regulen y mantengan su nivel
de humedad.
Usa siempre un termómetro y un higrómetro para monitorear
la temperatura y la humedad dentro de tu terrario. Ajusta el
Termostato e Higrostato Exo Terra®de acuerdo con el rango
de temperatura y humedad requeridos para el entorno de tu
mascota.
NOTA: En combinación con una fuente de calor emisora de luz no
visible (como el Heat Mat, Heat Cable, Ceramic Heater, Infrared
Basking Spot o Night Heat Lamp de Exo Terra), el Termostato e
Higrostato Exo Terra te permite crear un sistema de calefacción
controlado las 24 horas que no interrumpirá el ciclo de actividad
normal de tu animal, mientras mantienes las condiciones de
temperatura y humedad similares a las que se encuentran en su
entorno natural.
NOTA: Cuando uses el Termostato e Higrostato Exo Terra en
combinación con una bombilla emisora de luz visible (como el
Intense Basking Spot, Daylight Basking Spot o Daytime Heat Lamp
de Exo Terra) para crear un área de calentamiento diurno o para
fines de calefacción diurna , debes ajustar la temperatura nocturna
en su punto más bajo (10 ° C o 50 ° F) para evitar que la bombilla
emita luz y perturbe el ciclo de actividad normal de tu animal.
LEE LAS INSTRUCCIONES CUIDADOSAMENTE ANTES DE INSTALAR
O USAR.
INSTRUCCIONES RELATIVAS A LOS RIESGOS DE INCENDIOS,
DESCARGAS ELÉCTRICAS O DAÑOS A PERSONAS
INSTRUCCIONES IMPORTANTES DE SEGURIDAD
ADVERTENCIA: para prevenir cualquier daño o herida, se deben
tomar precauciones básicas cuando se maneja el aparato,
incluyendo las siguientes:
1. LEE Y SIGUE TODAS LAS INTRUCCIONES DE SEGURIDAD y
todos los avisos importantes en el equipo antes de usarlo. El no
hacerlo puede resultar en daños al equipo.
2. PELIGRO – Para cada una de las siguientes situaciones,
no intentes repararlo tú mismo, devuelve el producto a un
distribuidor autorizado para el servicio si aún está bajo garantía
o desecha el producto. No utilices el aparato si tiene dañado
el cable o el enchufe, o si no funciona correctamente o si se
cayó o está dañado de alguna manera. Nunca usar con un
cable de extensión a menos que el enchufe pueda insertarse
completamente. No intentes eliminar esta característica de
seguridad.
A. SÓLO PARA USO DOMÉSTICO EN INTERIORES. NO ES PARA USO
COMERCIAL.
B. Examina cuidadosamente el aparato después de la instalación.
No debe ser conectado si hay agua en piezas que no deben
mojarse.
C. No hagas funcionar ningún aparato si tiene el cable o el enchufe
dañado, si no funciona correctamente o si se ha caído o dañado
de alguna manera. El cable eléctrico de este aparato es un
accesorio de tipo Z y no puede ser reemplazado, si el cable está
dañado, el aparato debe ser desechado. Nunca se debe cortar el
cable.
D. Para evitar la posibilidad de que el enchufe o el tomacorriente se
mojen, coloca la unidad a un lado del enchufe de
la pared. Para evitar que el agua gotee sobre el
tomacorriente o el enchufe, deja caer una curva
con el cable. Esta curva consiste en dejar parte
del cable por debajo del nivel de la unidad y del
enchufe, o del conector del cable de extensión
ENGLISHFRANÇAISDEUTSCHESPAÑOLITALIANONEDERLANDS

32
si se utiliza, para evitar que el agua gotee a lo largo del cable y
entre en contacto con el enchufe. Si el enchufe o tomacorriente se
mojan, NO desenchufes el cable. Desconecta el fusible o el circuito
que suministra energía al aparato. A continuación, desenchufa y
examina si hay agua en el enchufe.
3. Lee y sigue todos los avisos importantes sobre el aparato.
4. Este aparato puede ser utilizado por niños de 8 años o mayores,
así como personas con capacidades físicas, sensoriales o
mentales reducidas o falta de experiencia y conocimiento, si se les
ha dado la supervisión o instrucciones relativas al uso del aparato
de una manera segura y comprenden los riesgos involucrados.
Los niños no deben jugar con el aparato. La limpieza y el
mantenimiento no deben ser realizados por niños sin supervisión.
5. Para evitar lesiones no toques las partes calientes.
6. Desconecta siempre el enchufe de cualquier aparato eléctrico de
la toma de corriente cuando no esté siendo utilizado, antes de
poner o quitar partes, y antes de limpiar. Nunca tires del cable
para desenchufar un aparato. Desenchúfalo tirando del enchufe.
7. No utilices el aparato para otro uso distinto al previsto. El uso
de accesorios no recomendados o no vendidos por el fabricante
puede ser inseguro.
8. No instales ni guardes el aparato donde pueda estar expuesto
a temperaturas bajo cero. No expongas la unidad a la luz solar
directa.
9. Si se necesita un cable de extensión, asegúrate que la conexión
es impermeable y a prueba de polvo. Se debe utilizar un
cable con una clasificación adecuada. Un cable clasificado
para menos amperios o vatios que el aparato puede causar
sobrecalentamiento. Se debe tener cuidado de colocar el cable
para que no se tropiece ni se tire de él. La conexión debe ser
realizada por un instalador electricista cualificado.
10. Asegúrate de que el aparato se coloca sobre una superficie plana
y uniforme.
GUARDA ESTAS INSTRUCCIONES PARA REFERENCIA FUTURA
Sólo el cumplimiento de estas instrucciones de instalación, eléctricas
y mantenimiento garantizará el uso seguro y eficiente de este aparato.
TERMOSTATO E HIGROSTATO DE 600W EXO TERRA®CON
TEMPORIZADOR DE DÍA / NOCHE – INSTRUCCIONES DE INSTALACIÓN
INSTALACIÓN EN LOS TERRARIOS NATURALES EXO TERRA
Sigue este procedimiento de instalación para instalar el Termostato e
Higrostato Exo Terra®en cualquier tamaño de los Terrarios Naturales
Exo Terra®
1. Abre la cubierta de malla superior y sepárala un momento del
terrario.
2. Desliza uno de los orificios de entrada (que se encuentra en la
parte posterior de la malla a cada lado) a la posición abierta, para
que puedas pasar el cableado.
3. Pasa el cable con el sensor a través del primer orificio de entrada
disponible en el lado que quieras en la parte posterior de la
cubierta de malla del terrario.
4. Coloca el sensor dentro del terrario, en la ubicación donde deseas
que alcance la temperatura y humedad configuradas en el dial.
Esta ubicación puede ser sobre el sustrato si estás utilizando una
manta calefactora o cable calefactor, pero también se puede poner
en una rama, cueva o piedras si se está utilizando un calentador
cerámico o bombilla calefactora para calentar una determinada
área para asolearse o punto caliente. NOTA: si lo utilizas con un
dispositivo de calefacción para sustrato, sigue las instrucciones
del fabricante para el uso seguro del dispositivo de calefacción.
5. Coloca la cubierta de malla superior de nuevo en el terrario y que
asegúrala en su posición.
6. Cierra las entradas restantes deslizando la tapa corredera
hasta las mangueras o cables para evitar que los insectos de
alimentación y animales pequeños se escapen.
7. Coloca el Termostato e Higrostato Exo Terra®sobre una
superficie sólida y nivelada.
8. Conecta tu manta térmica, cable calefactor o calentador
cerámico y un nebulizador o humidificador en su respectivo
enchufe del termostato e higrostato. Controla dispositivos de
calefacción de hasta 600W y dispositivos de humedad de hasta
100W.
INSTALACIÓN EN OTROS MODELOS DE TERRARIO
1. Consulta el manual de instrucciones de tu terrario para saber
cómo instalar el equipo, el cableado y el sensor dentro del
terrario.
2. Coloca el sensor dentro del terrario, en la ubicación donde
deseas que alcance la temperatura y la humedad configuradas
en el dial. Esta ubicación puede ser sobre el sustrato si estás
utilizando una manta calefactora o cable calefactor, pero
también se puede poner en una rama, cueva o piedras si se
está utilizando un calentador cerámico o bombilla calefactora
para calentar una determinada área para asolearse o punto
caliente. NOTA: si lo utilizas con un dispositivo de calefacción
para sustrato, sigue las instrucciones del fabricante para el uso
seguro del dispositivo de calefacción.
3. Coloca el Termostato Exo Terra®sobre una superficie sólida y
nivelada.
4. Conecta tu manta térmica, cable calefactor o calentador
cerámico y un nebulizador o humidificador en su respectivo
enchufe del termostato e higrostato. Controla dispositivos de
calefacción de hasta 600W y dispositivos de humedad de hasta
100W.
ADVERTENCIA: No sobrecargues el Termostato e Higrostato Exo
Terra®conectando dispositivos de calor con potencias superiores
a 600W en el enchufe de CALEFACCIÓN. No sobrecargues el
Termostato e Higrostato Exo Terra®conectando dispositivos
de humedad con potencias superiores a 100W en el enchufe
de HUMEDAD. Los daños por sobrecarga se consideran un uso
indebido y están exentos de la garantía.
INSTRUCCIONES DE FUNCIONAMIENTO
El Termostato e Higrostato Exo Terra ®debe ajustarse de acuerdo
con las necesidades de los animales. Investiga a fondo el rango
óptimo de temperatura y humedad preferidos para tu reptil en
específico, para que puedas crear los gradientes de temperatura
y humedad correctos dentro del terrario para permitir que tus
reptiles se termo-regulen y mantengan sus niveles de humedad.
Siempre utiliza un termómetro e higrómetro para controlar la
temperatura en el interior de tu terrario. Configura el Termostato
e Higrostato Exo Terra®de acuerdo con el rango de temperatura y
humedad requeridos para el entorno de tu mascota.
ENGLISHFRANÇAISDEUTSCHESPAÑOLITALIANONEDERLANDS

34
NOTA: En combinación con fuentes de calor que no emitan luz
visible (como la manta térmica, cable calefactor, calentador
cerámico, Infrared Basking Spot o Night Heat Lamp de Exo Terra) el
Termostato e Higrostato Exo Terra te permite crear un sistema de
calefacción de 24 horas bien controlado que no interrumpirá el ciclo
de actividad normal de tu animal, mientras mantiene las condiciones
de temperatura y humedad requeridas similares a las que se
encuentran en su entorno natural.
NOTA: Cuando uses el Termostato e Higrostato Exo Terra en
combinación con fuentes de calor emisoras de luz visible (como el
Intense Basking Spot, Daylight Basking Spot o Daytime Heat Lamp
de Exo Terra) para crear un área para calentarse durante el día o
aumentar la temperatura ambiental diurna, debes configurar la
temperatura nocturna en el punto más bajo (10°C o 50°F) para que
la bombilla no emita luz durante la noche lo que interrumpiría el
ciclo normal de actividad de tu animal.
CONFIGURACIÓN INICIAL en °F o °C:
• Simplemente enchufa el termostato para usar con la
configuración inicial (para UE): Modo de atenuación – 30°C
durante el día y 25°C durante la noche – Configuración de
humedad 60% – Configuración de la hora en 0:00 (salida del sol
9:00 – Atardecer 21:00)
• Si deseas cambiar a °F, mantén presionado el botón “T” en la
parte posterior mientras enchufas el dispositivo. El termostato
se ajustará a 86°F durante el día, 77°F durante la noche y
una humedad del 60%. La pantalla mostrará la temperatura y
humedad reales.
CONFIGURAR EL RELOJ Y EL TEMPORIZADOR:
1. Mantén presionado el botón “T” en la parte posterior del
termostato durante 4 segundos para comenzar a configurar
el reloj y el temporizador. La hora que está configurada
actualmente aparecerá y comenzará a parpadear.
2. Presiona el botón “T” una vez más y las horas del reloj
comenzarán a parpadear, gira la perilla en la parte posterior para
ajustar a la hora actual.
3. Presiona el botón “T” una vez más y los minutos del reloj
comenzarán a parpadear, gira la perilla en la parte posterior para
ajustar a los minutos actuales.
4. Presiona el botón “T” una vez más y se finalizará la
configuración de la hora del reloj. Ahora aparecerá el símbolo
“SOL” y las horas de “día” comenzarán a parpadear, gira la
perilla en la parte posterior para configurar las horas de “día”.
5. Presiona el botón “T” una vez más y los minutos de “día”
comenzarán a parpadear, gira la perilla en la parte posterior para
ajustar los minutos de “día”.
6. Presiona el botón “T” una vez más y finalizará la configuración
de “día”.Aparecerá el símbolo “LUNA” y las horas de “noche”
comenzarán a parpadear, gira la perilla en la parte posterior para
ajustar las horas de “noche”.
7. Presiona el botón “T” una vez más y los minutos de “noche”
comenzarán a parpadear, gira la perilla en la parte posterior para
ajustar los minutos de “noche”.
8. Presiona el botón “T” una vez más y se finalizará la
configuración de horas de “noche”.
9. Press the “T” button once again and the “night-time” setting
is finalised.
CONFIGURAR LA TEMPERATURA, EL MODO DE CALEFACCIÓN Y LA
HUMEDAD:
Día:
1. Para configurar la temperatura, el modo de calefacción y la
humedad de “día”, mantén presionado el botón “SOL” en la parte
posterior del termostato durante 4 segundos.
2. El modo de calefacción comenzará a parpadear, gira la perilla en
la parte posterior para ajustar el modo de calefacción al deseado:
ON / OFF (encendido/apagado) o Dimming (atenuación).
3. Presiona el botón “SOL” una vez más y la temperatura que está
configurada actualmente comenzará a parpadear, gira la perilla en
la parte posterior para configurar la temperatura.
4. Presiona el botón “SOL” una vez más y la humedad que está
configurada actualmente comenzará a parpadear, gira la perilla en
la parte posterior para configurar la humedad.
5. Presiona el botón “SOL” una vez más y la configuración del modo
de calefacción, la temperatura y la humedad de “día” deseadas
habrá finalizado.
Noche:
1. Para configurar la temperatura, el modo de calefacción y la
humedad de “noche” mantén presionado el botón “LUNA” en la
parte posterior del termostato durante 4 segundos.
2. El modo de calefacción comenzará a parpadear, gira la perilla en
la parte posterior para ajustar el modo de calefacción al deseado:
ON / OFF (encendido/apagado) o Dimming (atenuación).
3. Presiona el botón “LUNA” una vez más y la temperatura que está
configurada actualmente comenzará a parpadear, gira la perilla en
la parte posterior para configurar la temperatura.
4. Presiona el botón “LUNA” una vez más y la humedad que está
configurada actualmente comenzará a parpadear, gira la perilla en
la parte posterior para configurar la humedad.
5. Presiona el botón “LUNA” una vez más y la configuración del
modo de calefacción, la temperatura y la humedad de “noche”
deseadas habrá finalizado.
• Para comprobar la temperatura, el modo de calefacción y la
humedad de “día”, simplemente presiona el botón “SOL”
• Para comprobar la temperatura, el modo de calefacción y la
humedad de “noche”, simplemente presiona el botón “LUNA”
• Para comprobar la configuración de hora actual simplemente
presiona el botón “T”, presiona el botón “T” de nuevo para ver la
configuración de “día”, presiona el botón “T” de nuevo para ver la
configuración de “noche”.
• Después de configurar la temperatura, siempre puedes cambiar
entre °C y °F de la siguiente manera: desenchufa el dispositivo,
luego presiona y mantén presionado el botón “T” mientras
enchufas el dispositivo. Esto cambiará entre °C y °F, sin cambiar
tu configuración.
1. Un LED rojo indicarán cuando el dispositivo de calentamiento está
funcionando y una vez se llegue a la temperatura configurada el
LED rojo no aparecerán.
2. Un LED azul indicará cuando el dispositivo de humedad está
funcionando y una vez se llegue a la humedad configurada el LED
azul ya no aparecerá.
“Ten en cuenta que el LED rojo o azul indican la alimentación a
los dispositivos de calefacción o humedad conectados y no la
alimentación de la red al Termostato e Higrostato Exo Terra®.”
ENGLISHFRANÇAISDEUTSCHESPAÑOLITALIANONEDERLANDS

36
GARANTÍA
Este producto está garantizado por piezas defectuosas y mano de
obra por un período de 2 años a partir de la fecha de compra. Esta
garantía es válida solo con la prueba de compra. La garantía se
limita únicamente a la reparación o el reemplazo y no cubre pérdidas
consecuentes, pérdidas o daños a animales y propiedad personal o
daños a objetos animados o inanimados, independientemente de la
causa de los mismos. Esta garantía solo es válida en las condiciones
de funcionamiento normales a las que está destinada la unidad. Se
excluye cualquier daño causado por uso irrazonable, negligencia,
instalación incorrecta, alteración, abuso o uso comercial. La garantía
no cubre el desgaste, la rotura de cristal y las partes que no se han
mantenido de manera adecuada o correcta. ESTO NO AFECTA SUS
DERECHOS LEGALES.
Tu Termostato Exo Terra incluye 2 años de garantía estándar. Para
alargar esta garantía hasta un total de 3 años solo tienes que
registrar online tu producto. Es rápido, fácil y ¡completamente
gratis! Rellena el formulario online en www.exo-terra.com. La
extensión de la garantía está sujeta a las condiciones especificadas
para los 2 años de garantía estándar.
RECICLAJE
Este artículo lleva el símbolo de clasificación selectiva
para el desecho de equipos electrónicos y eléctricos
(RAEE). Esto significa que el producto debe manipularse
de conformidad con la Directiva Europea 2012/19 / UE
para ser reciclado o desmantelado a fin de minimizar su
impacto sobre el medio ambiente. Para obtener más información,
contacta con las autoridades locales o regionales. Los productos
electrónicos no incluidos en el proceso de clasificación selectiva
son potencialmente peligrosos para el medio ambiente y la salud
humana debido a la presencia de sustancias peligrosas.
SERVICIO
Si tienes algún problema o pregunta sobre el funcionamiento de
este producto, por favor contacta a tu distribuidor especializado Exo
Terra®en primera instancia. La mayoría de los problemas pueden ser
resueltos fácilmente en la tienda. En el improbable caso de que no se
pueda, por favor devolver la unidad a la tienda con un comprobante
de compra válido para su remplazo bajo la garantía de dos años.
Cuando llames (escribas o envíes correos electrónicos) a nuestro
Departamento de Atención al Cliente, por favor ten a mano toda la
información relevante como el número del modelo y/o números de
partes disponibles, así como la naturaleza del problema:
Distribución y Servicio al cliente:
Reino Unido:
Rolf C. Hagen (UK) Ltd.
California Dr.Whitwood Industrial Estate
Castleford, West Yorkshire WF10 5QH
mail to: http://faq.hagencrm.com/?uk
Helpline Number 01977 521015 (Between 9:00 AM and 5:00 PM,
Monday to Thursday and 9:00 AM and 4:00 PM on Friday – excluding
Bank Holidays)
Alemania:
HAGEN Deutschland GmbH & Co. KG, Lehmweg 99-105, 25488 Holm
Service-Hotline: +49 (0) 4103 / 960-2000 (Montag – Freitag von
9:00 – 16:00 Uhr)
España:
Rolf C Hagen España, S.A.,Avda de Beniparrell 11 y 13, P.I. L’Alteró,
46460 Silla (Valencia)
e-mail a: info@hagen.es
Malasia:
Rolf C.Hagen (Sea) Sdn.Bhd.
Lot 14A, Jalan 3A, Kawasan Perusahaan
Cheras Jaya, Balakong 43200 Cheras,
Selangor Darul Ehsan, Malaysia.
Tel: 603-9074 2388
Fax: 603-9074 2389
Para obtener información general sobre toda nuestra gama de
productos, visita nuestras webs: www.exo-terra.com o www.
hagen.com.
Distributed by:
Canada: Rolf C. Hagen Inc., Montreal, QC H9X 0A2
U.K.: Rolf C. Hagen (U.K.), W. Yorkshire WF10 5QH
Germany: HAGEN Deutschland GmbH & Co. KG, 25488 Holm
Spain: Rolf C Hagen España, S.A. P.I. L’Alteró, 46460 Silla (Valencia)
Malaysia: Rolf C. Hagen (SEA) SDN, 43200 Cheras, Selangor D.E.
ENGLISHFRANÇAISDEUTSCHESPAÑOLITALIANONEDERLANDS

38
Grazie per aver acquistato il termostato e l’igrostato Exo Terra®da
600 W con timer Day / Night. Leggere attentamente questo manuale
di istruzioni prima dell’uso e operare secondo le istruzioni fornite
per garantire la massima sicurezza e prestazioni. Ti consigliamo di
tenere questo manuale a portata di mano per riferimenti futuri.
• La funzione di dimming controlla le temperature del terrario in
modo molto accurato
• Igrostato da 100 W per il controllo dei livelli di umidità ottimale
• Controlla i dispositivi di riscaldamento fino a 600W
• La temperatura e l’umidità diurna e notturna possono essere
impostate singolarmente
• Da 10°C fino a 60°C e fino a 99% RLH
• Lo schermo LCD di facile lettura mostra la temperatura e
l’umidità effettive
• Il LED rosso indicheranno quando il dispositivo di riscaldamento
è alimentato
• Il LED blu indicherà quando il dispositivo di umidificazione è
alimentato
• Premere il tasto / comporre il sistema per evitare impostazioni
accidentali o manomissioni
• Sonda di temperatura e umidità remota
• Cavo di alimentazione extra lungo da 190 cm
Può essere utilizzato con le seguenti fonti di riscaldamento /
umidificazione Exo Terra®:
Riscaldamento diurno e notturno:
• Heat Mat – Tappeto termico (PT2015/16/17/18)
• Heat Cable – Cavo di calore (PT2011/12/13)
• Ceramic Heater- Riscaldatore in ceramica (PT2044/45/46/47/48)
• Infrared Basking Spot – Spot basking infrarosso
(PT2141/42/44/46)
• Night Heat Lamp – Lampada di calore notturna
(PT2120/22/24/26/30 & PT2058/59)
Riscaldamento diurno:
• Daytime Heat Lamp – Lampada di calore diurna
(PT2100/02/04/10/11/12/14)
• Daylight Basking Spot – Spot di luce del giorno
(PT2195/31/32/33/34)
• Intense Basking Spot – Intenso crogiolarsi al sole
(PT2196/35/36/38/40)
Umidità:
• Fogger (PT2080)
• Humidifier – Umidificatore (PT2081)
I rettili sono ectotermi e utilizzano il calore di una fonte esterna per
termoregolare la temperatura corporea ottimale. La maggior parte
THERMOSTAT & HYGROSTAT
Modalità d’uso
ENGLISHFRANÇAISDEUTSCHESPAÑOLITALIANONEDERLANDS
dei rettili utilizza il calore radiante diretto del sole in combinazione
con il calore conduttivo proveniente da superfici riscaldate dal sole
come rami, rocce o altre strutture che accumulano calore. Oltre
al calore, l’umidità generale è un fattore molto importante per
la salute e il benessere di rettili, anfibi e invertebrati. Fornire un
gradiente di temperatura relativo a una specie, in combinazione con
un’umidità appropriate livelli, nel terrario è un fattore importante
nel mantenimento di rettili e anfibi di successo. Con il termostato
Exo Terra e l’igrostato con timer Day / Night è possibile creare
un sistema di riscaldamento / umidificazione ben controllato che
consente di mantenere le condizioni di temperatura e umidità
richieste simili a quelle che si trovano negli ambienti desertici e
tropicali. La temperatura e l’umidità diurne e notturne possono
essere impostate singolarmente. Per esempio; la temperatura
può essere impostata più bassa per la notte, mentre l’umidità può
essere impostata più in alto, proprio come avverrebbe in natura.
Il termostato e l’igrostato contribuiscono inoltre a prevenire il
surriscaldamento e il sottoraffreddamento durante le calde giornate
estive o le fredde notti invernali, mantenendo l’umidità al livello
desiderato. La funzione Dimming mantiene la temperatura al
setpoint desiderato con una precisione molto più elevata rispetto
ai termostati convenzionali ed elimina virtualmente le oscillazioni
di temperatura nel terrario. Lo schermo LCD di facile lettura
mostra la modalità di riscaldamento, la modalità giorno o notte e la
temperatura e l’umidità effettive. Un LED rosso indicheranno quando
il dispositivo di riscaldamento è alimentato e una volta raggiunta la
temperatura impostata, il LED rosso non verranno più visualizzati.
Un LED blu indicherà quando il dispositivo umidificatore è alimentato
e una volta raggiunto il livello di umidità impostato, il LED blu non
verrà più visualizzato.
Collega semplicemente il tappetino termico, il cavo riscaldante
o il riscaldatore ceramico e un nebulizzatore o umidificatore al
termostato e all’igrostato Exo Terra, imposta la temperatura e
l’umidità preferite e posiziona il sensore di calore e umidità nel punto
desiderato. Il pulsante / sistema di composizione del termostato
e dell’igrostato previene modifiche accidentali della temperatura
impostata e del livello di umidità se il dispositivo viene maneggiato.
Il termostato è dotato di un cavo di alimentazione con spina e presa
con messa a terra per una maggiore sicurezza e per consentire
l’uso di una presa di corrente. Il sensore remoto può essere
tranquillamente utilizzato in terrari molto umidi.
Il termostato e l’igrostato Exo Terra®devono essere impostati
in base alle esigenze degli animali. Cerca accuratamente la
temperatura ottimale preferita (POTR) e l’intervallo di umidità
per il tuo specifico rettile, in modo da poter creare i gradienti
di temperatura e umidità corretti all’interno del terrario per
consentire ai tuoi rettili di termoregolare e mantenere i loro livelli
di umidità.
Utilizzare sempre un termometro e igrometro per monitorare
la temperatura e l’umidità all’interno del terrario. Regola il
termostato e l’igrostato Exo Terra®in base alla temperatura e
all’umidità richieste per l’ambiente del tuo animale domestico.
NOTA: In combinazione con una fonte di calore che emette luce
non visibile (come tappetino riscaldante Exo Terra, cavo riscaldante,
riscaldatore ceramico, spot radiante a infrarossi o lampada di calore
notturna), il termostato e l’igrostato Exo Terra consente di creare un
Table of contents
Languages:
Other Exo Terra Pet Care Product manuals

Exo Terra
Exo Terra PT3590 User manual

Exo Terra
Exo Terra Monsoon MULTI PT2493 User manual

Exo Terra
Exo Terra PT2240 User manual

Exo Terra
Exo Terra PT2234 User manual

Exo Terra
Exo Terra Turtle Clif PT3649 User manual

Exo Terra
Exo Terra PT2490 User manual

Exo Terra
Exo Terra PT-2241 User manual

Exo Terra
Exo Terra PT-2230 User manual

Exo Terra
Exo Terra PT2011 User manual

Exo Terra
Exo Terra Monsoon RS400 User manual