Fein 60250 User manual

9" (230mm) SLUGGER METAL CUTTING SAW
INSTRUCTION MANUAL
Double Insulation Slugger order number: 69908120001
Original instruction

2
TABLE OF CONTENTS
Additional safety rules for metal cutting saw 2
Assembly and adjustment instruction 3
Installing a new saw blade 4
Laser 6
Cutting depth adjustment 8
Operation 8
Guide ruler 9
Chip removal 10
Replacing carbon brushes 11
Maintenance and servicing 11
Trouble shooting 12
Specifications 12
Parts diagram 13
Replacement parts 14
Manufacturer 18
Intended use
The metal cutting saw is powerful enough to cut steel sheet metal as thick as ¼” (6mm). Metal cutting
saws are designed to rapidly cut lengths or pieces of zinc coated, steel sheet metal and various
metals without heating up either the blade or the material.
WARNING: To reduce the risk of injury, read the instruction manual.
WARNING! Read all safety warnings and all instructions. Failure to follow the warnings and
instructions may result in electric shock, fire and/or serious injury.
ADDITIONAL SAFETY RULES OF
METAL CUTTING SAW
CAREFULLY READ THE FOLLOWING SAFETY WARNINGS PRIOR TO CONNECTING THE
METAL CUTTING SAW TO POWER.
1. Must keep the safety device in the fixed position, and work according to the order. Never wedging
or binding the safety device below and must use the safety device. Before using the metal cutting
saw every time, must ascertain the safety device.
Caution: It probably bends the safety device below when the circular saw fall to the ground, and it
should not be used again til check result is OK after repairing.
2. The blade should be kept clean and sharp. Breakdown and rebound can be lowered to the
minimum limitation with the proper maintenance.
Danger: The hand must depart from the sawing area when operating. Do not touch blade when blade

3
is rotating, don’t put the work-piece in either. Do not take the process-work-piece sawed by hand when
blade is still rotating. Caution: The blade will slide a period of time after turning off the Switch.
3. Adjustment. Before sawing, ascertain the adjustment of saw depth is right.
4. Must select the right blade. Use the suitable saw blade within the range shown on nameplate.
5. Guide cord should be apart from sawing place and be fixed when sawing, and ensure it can't be
twined by work-piece when sawing. The tool must be held steadily when sawing, and use the
appropriate work-piece to support, and put the guide cord far away from the work-piece.
6. Do not use cutting oil while cutting.
7. Do not use blades which are deformed or cracked.
8. Always use safety glasses. Everyday eyeglasses only have impact resistant lenses; they are not
safety glasses.
9. To avoid possible hearing damage, wear ear plugs when using power tool.
Motor Specifications and Electrical Requirements
Power Supply and Motor Specifications
The AC motor used in this saw is a universal. Nonreversible type having the following specifications:
Model No. 60250
Maximum
Developed H.P 2.4
Voltage 120
Amperes 15
Hertz (Cycles) 60
Phase Single
RPM 2300
Rotation of Shaft Counter-clockwise
Power Connections
A separate electrical circuit should be used for your tools. This circuit should not be less #12 wire and
should be protected with a 20 Amp fuse. Have a certified electrician replace or repair a worn cord
immediately and connect the motor as nameplate mentions. Running low voltage will damage the
motor.
WARNING: DO NOT EXPOSE THE TOOL TO RAIN OR OPERATE THE TOOL IN DAMP AREAS.
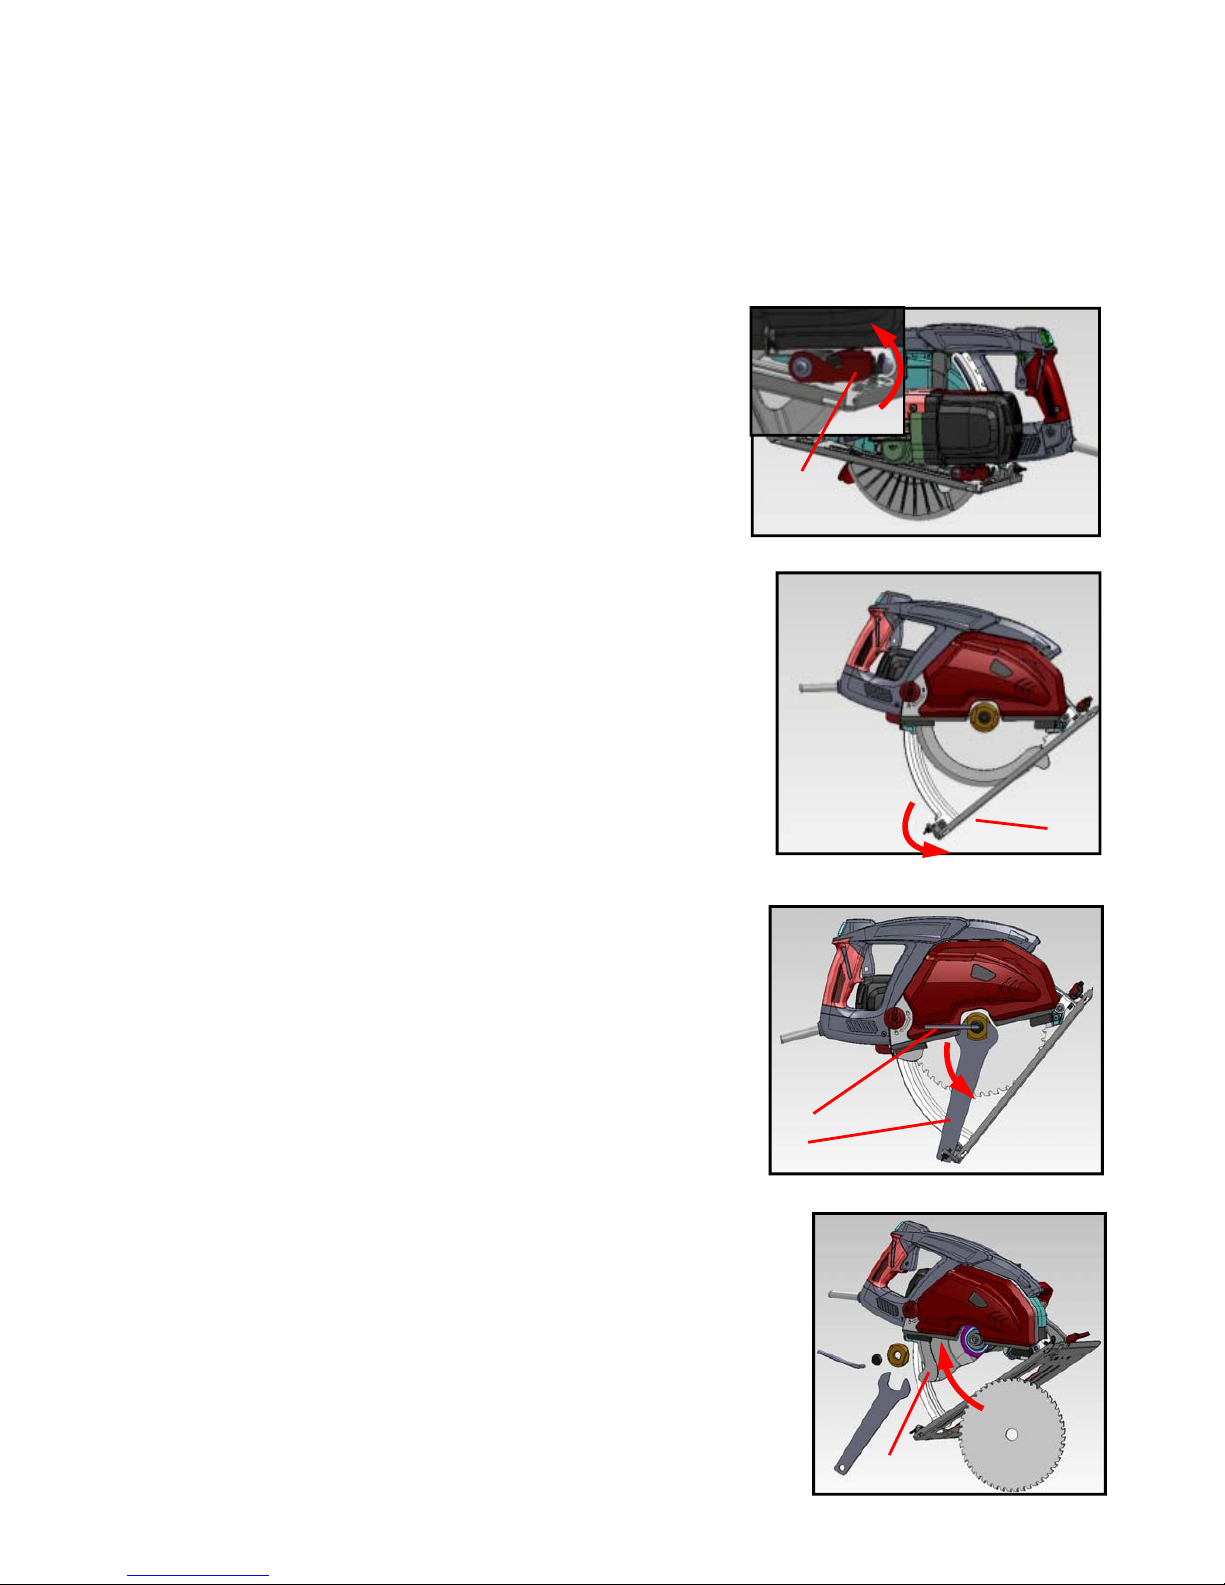
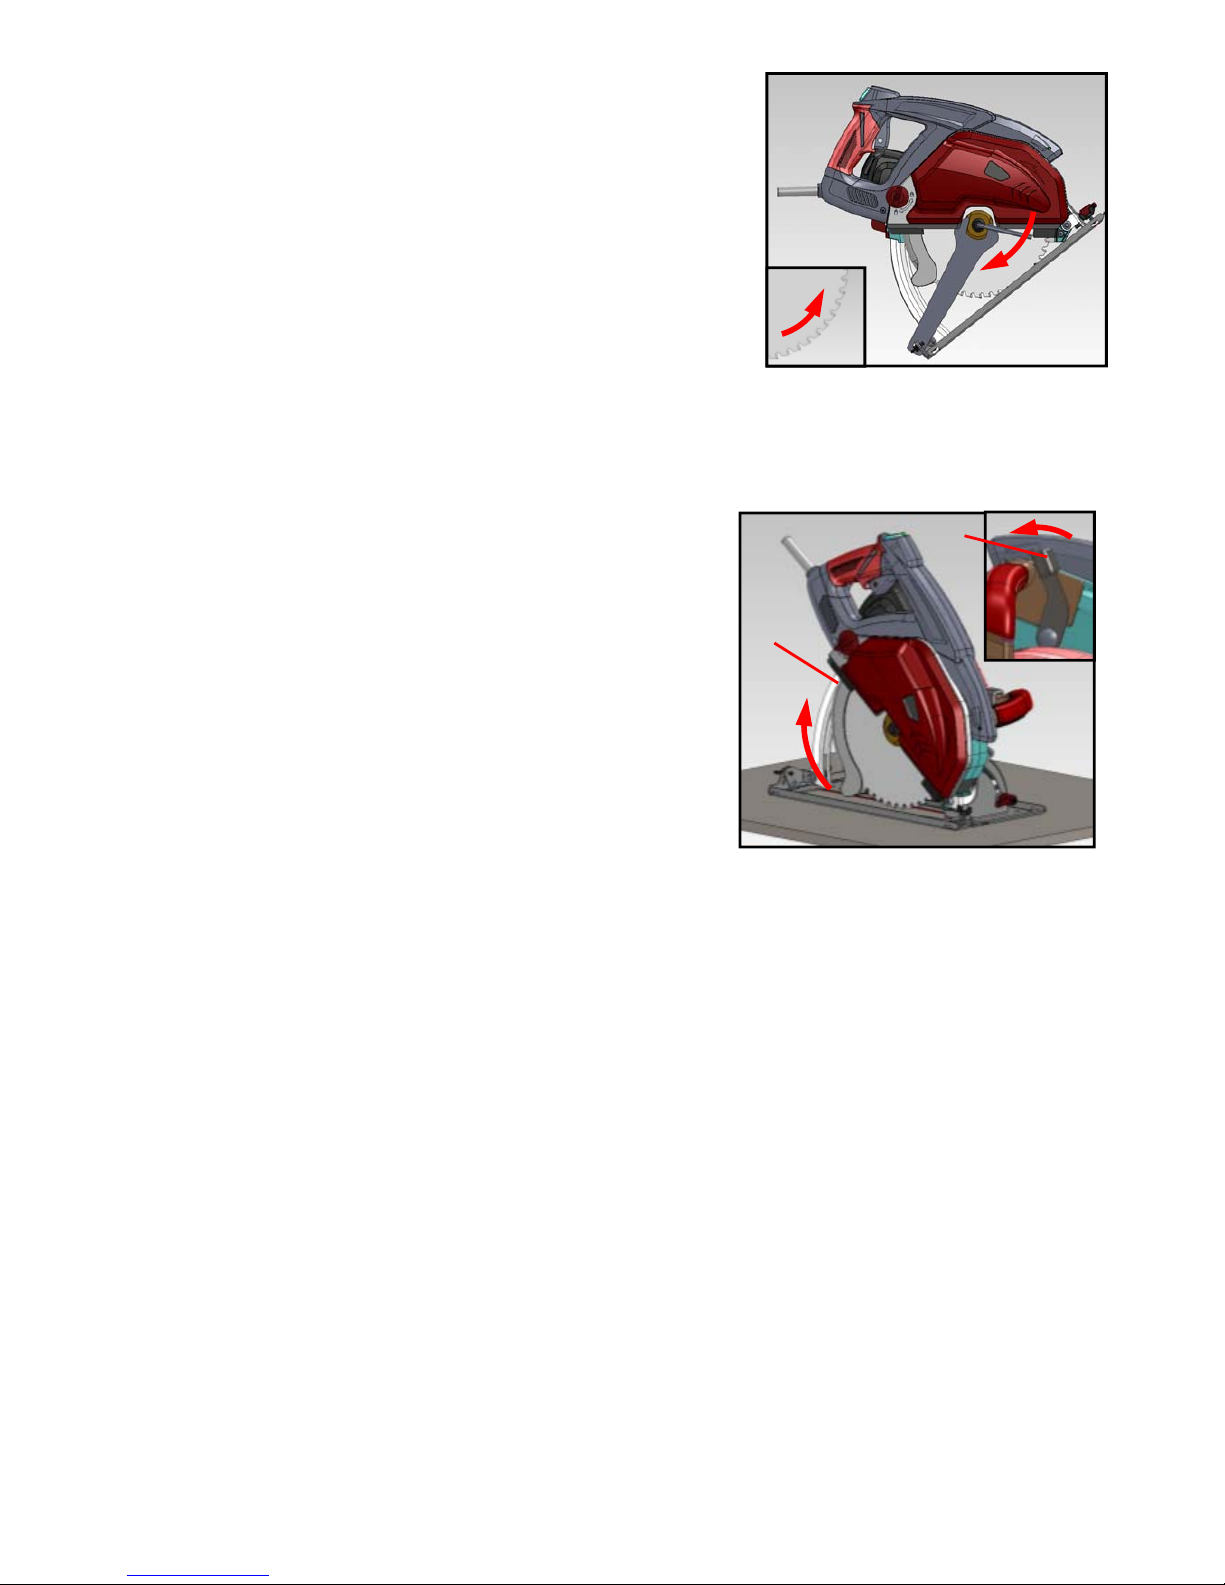
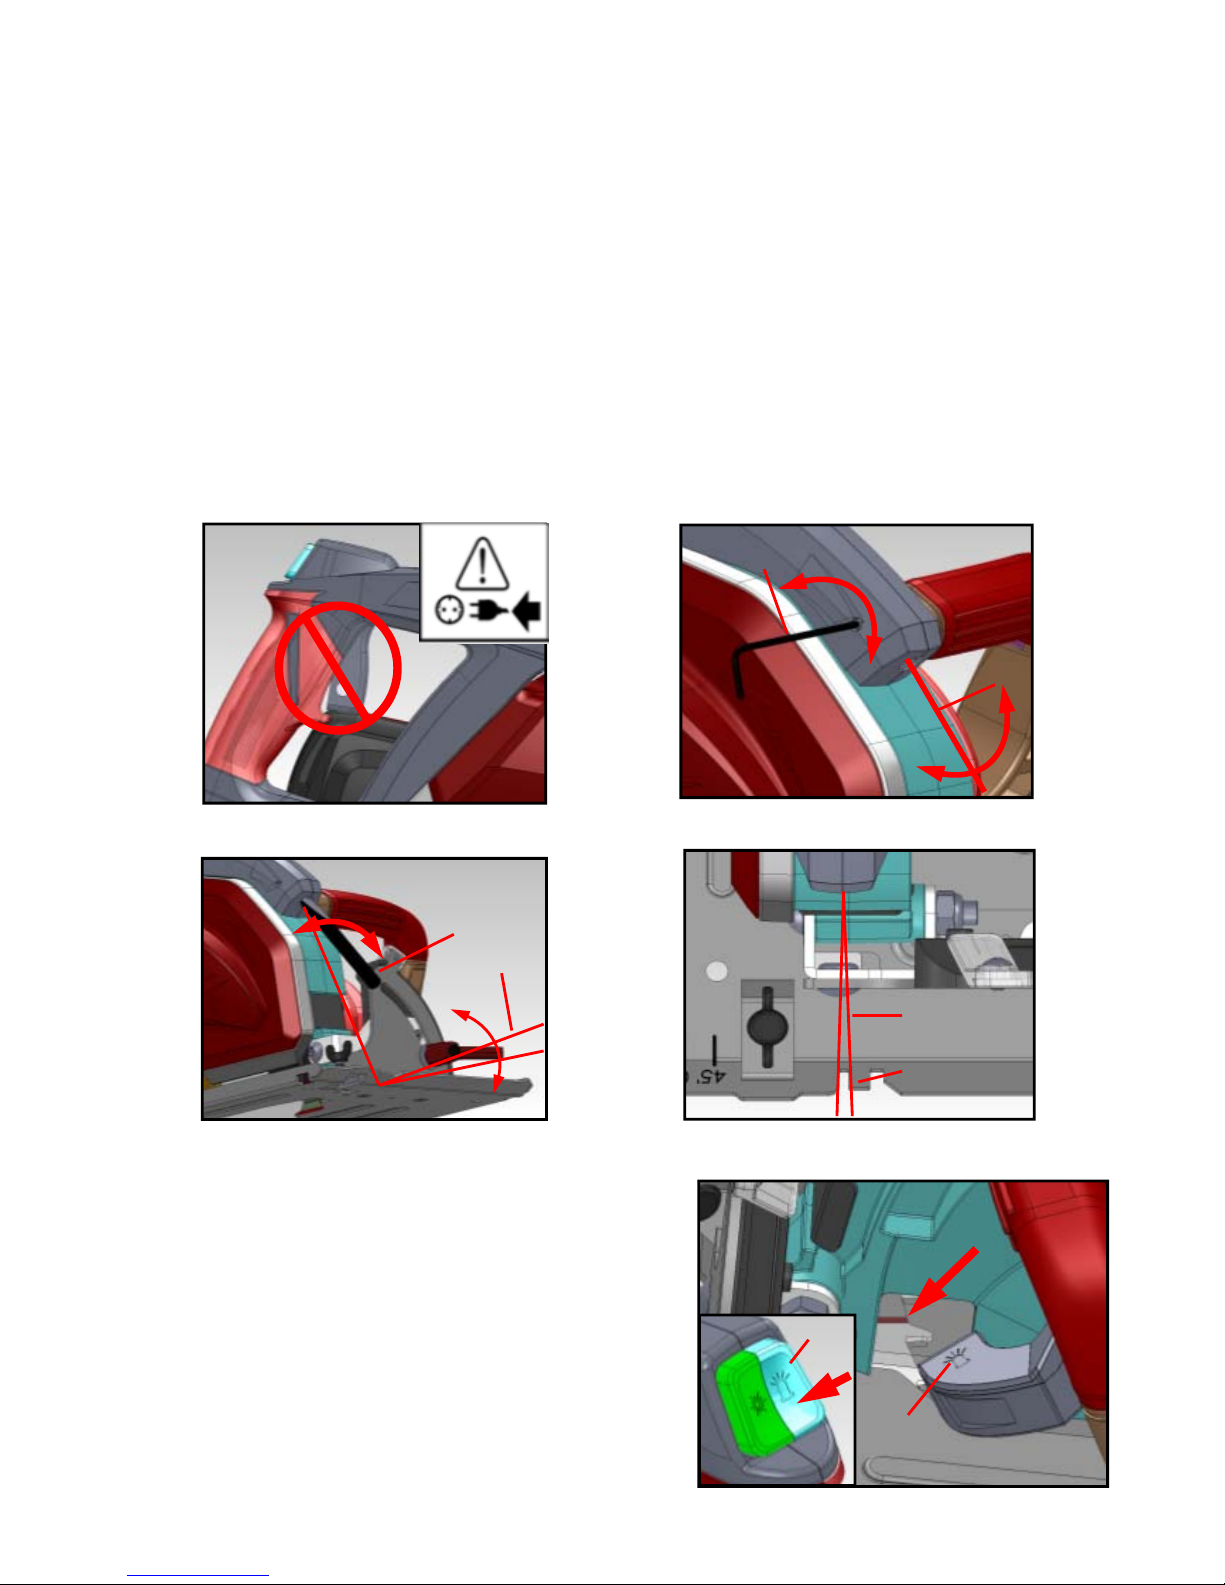
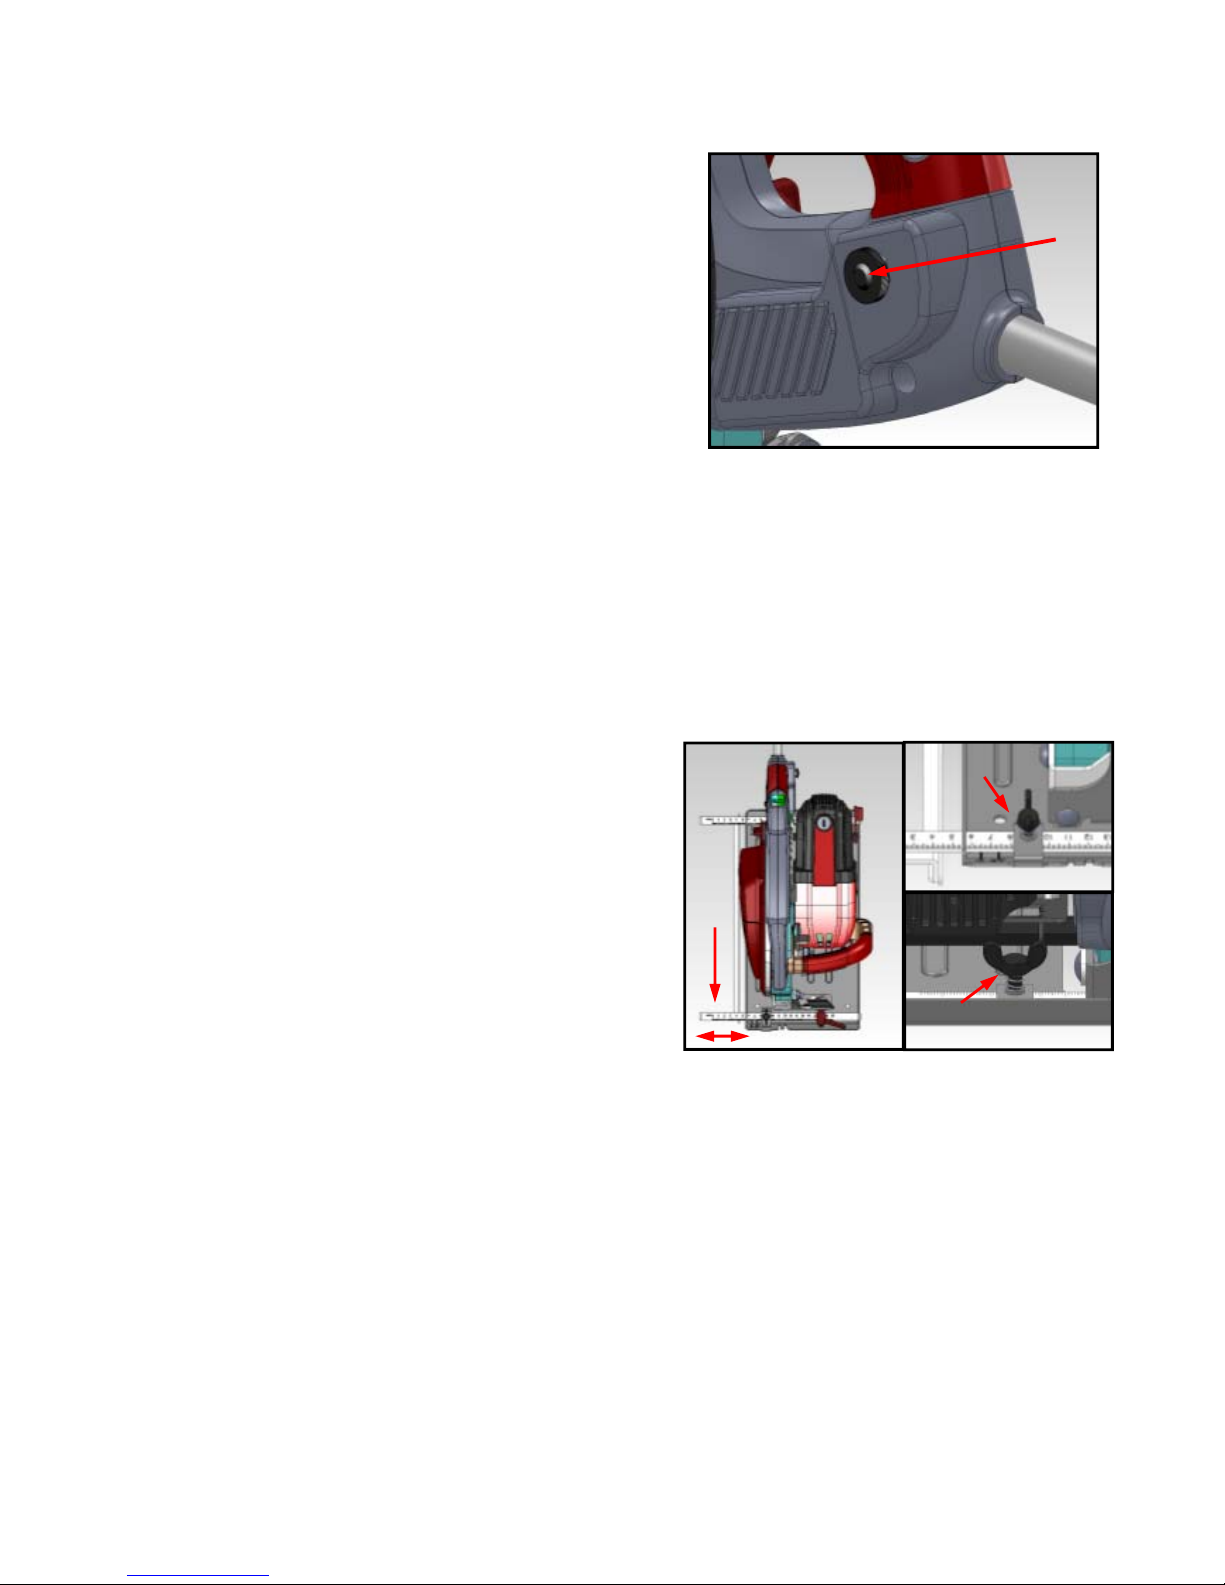
ASSEMBLY AND ADJUSTMENT INSTRUCTIONS
WARNING:
For your own safety, never connect the plug to a power source outlet until all assembly steps are
complete and you have read and understood the safety and operating instructions. The safety cover is
attached to the saw for your protection. Should the safety cover become damaged, do not use the saw
until damaged cover has been replaced. If the safety cover becomes dirty, or chip adheres to it. Clean
the safety cover carefully with a damp cloth.

4
Installing a New Saw Blade
WARNING: To prevent an accident or personal injury, always turn off the trigger switch and disconnect
the power plugfrom the receptacle before removing or installing a blade. Only use blades designed for
metal cutting saws. The use of any abrasive wheels, alternative purpose wheels, or differentsize
blades could void warranty. Check regularly that the blade is flat, sharp and free of any defects or
damage. Ensure the saw is disconnected from Power.
1. Push the lower guard lever (A) Refer to Fig.1
2. Open the plate to the maximum (B) Refer to Fig.2
3. Use the open-end wrench “D” to hold the flange, use
6mm HEX wrench ”C” to loosen the arbor screw in
counterclockwise direction.
Refer to Fig.3
4. Remove the HEX wrench, open-end wrench and arbor screw,
slide open lower blade guard, and then remove blade.
Refer to Fig.4
Fig.2
B
Fig.1
A
Fig.3
C
D
Fig.4
E

5
5. Insert new blade, flange and arbor screw in proper order.
Use the open end wrench to hold the flange and use the
HEX wrench to tighten the arbor screw in clockwise direction.
Refer to Fig.5
Note: Put the blade on in right direction.
The arrow on blade must be same direction as arbor turn.
Note: Blade must be secure between inner and outer flanges.
Pocket Cutting
WARNING:
To reduce the risk of electric shock, check work area for hidden pipes and wires before
making pocket cuts.
Pocket cuts are made in the middle of the work piece when
it can't be cut from an edge. If you must use a circular saw
to make a pocket cut, USE EXTREME CAUTION. To maintain
control of the saw during pocket cutting, keep both hands on
the saw. Refer to Fig.6
1. Beginning at a corner, line up the sight line with your
cutting line. Tilt the saw forward, firmly fixing the front of
the shoe on the work piece. The blade should be just above
cutting line, but not touching it. Raise the (B) lower guard
using the lower guard lever (A).
2. Pull the trigger and allow the motor to reach full speed before beginning cut. Using the front of the
shoe as a hinge point, gradually lower the back end of the saw into the work piece. Release the lower
guard lever (A).
3. When the shoe rests flat against work piece, advance the saw to the far corner. Release the trigger
and allow the blade to come to a complete stop before removing it from work piece. Repeat the above
steps for each side of the opening.
Use a small hand saw to finish the corners if they are not completely cut through.
We recommend using a jig saw or a similar tool to cut this type of pocket cut.
Fig.6
A
B
Fig.5

Rele
a
the l
o
WA
R
The
i
1.
P
2. T
a
t
R
a
se the lo
c
o
ck lever "
A
R
NING: B
e
i
nstruction
s
P
ush the le
f
he laser
w
t
(A) 0∘t
h
R
efer to Fi
g
c
k lever "A
A
" and wi
n
e
sure to di
s
for laser
f
t button "
A
w
ill change
h
e laser is
g
.9 (other
a
", and the
w
n
g nut "B".
sconnect
t
usage.
A
" to turn
o
according
at the no
t
a
ngles are
A
Fig.8
Usa
g
w
ing nut "
B
Refer to
F
t
he power
LA
S
o
n the lase
to the an
g
t
ch (B), if
t
without re
f
B
6
g
e for
b
B
", then c
h
F
ig.7
plug.
S
ER
r
(B), pus
h
g
le plate f
o
t
he bevel
i
f
erence).
B
Fig.7
A
b
evel
h
ange the
b
h
again to
t
o
r guiding
t
i
ndicator
a
C
C
b
evel plat
e
t
urn off. R
e
t
he cut. Ex
a
t 45∘the
n
C
C
e
angle fro
m
e
fer to Fig.
ample: th
e
n
laser is
a
Fig.9
B
A
m
0∘to 4
5
8
e
bevel ind
a
t the not
c
5
∘Fix
icator
c
h (C)
A

7
ALIGNING THE LASER GUIDE LINE
DANGER:
Laser radiation. Avoid direct eye contact with light source
WARNING:
Use of controls or adjustments or performance of procedures other than those specified herein
may result in hazardous radiation exposures. When you adjust the laser please don’t tune on
switch. Fig.10. Otherwise starting the blade can be dangerous.
1. Adjusting the laser: Tighten or loosen the (A), for adjusting the laser indication direction.
Adjusting tooling: M2 HEX wrench (A) as Fig.11
2. Adjusting the laser indication direction to be same line as cutting line. Adjusting tooling: parallel
screw driver (A) Fig.12
3. Adjust the laser line (B) on the notch (C) then set up the bevel scale at the 0∘position. Fig.13
How to use LED light
LED is used when the condition is dark and user
can see the work piece and blade from the window.
‧Push the LED button(A) to start the LED light,
push again to turn off, as Fig.14
Fig.11
A
B
Fi
g
.12
A
B
Fig.13
B
C
Fig.10
Fig.14
A
B

8
CUTTING DEPTH ADJUSTMENT
1. Pull up & loosen the Lock Lever (A) first Fig.15
2. Lift the back of the saw away from the base plate until the approximate depth is achieved.
3. Ensure the Lock Lever (A) Fig.16 is tightened securely after the depth adjustment is made.
To adjust the lock made.To adjust the lock and unlock positions (if necessary) simply pull the
lever towards the hand-grip of the saw, rotate it slightly as required.
Warning: 1. Make sure the motor is stopped before changing the cutting height.
2. Cutting with a loose Lock Lever invites injury.
OPERATION
Operation of Switch
Press the stop button (A) first and pull the trigger
(B) at the same time to start rotating. To stop
rotating, release trigger. Fig.17
Operation
Please use right hand (A) to hold the rear handle,
and left hand (B) to hold the tool after the blade
reaches the maximum speed rate and push
forward along the surface of work piece.
Keep moving smoothly until the cut is finished.
Fig.18
Fig.15
A
Fig.16
A
Fig.17
A
B
Fig.18
B
A

9
DIRECTION OF SAWING
Align saw blade to the right of the operator.
OVERLOAD PROTECTION
Under extreme overload, the current consumption
may considerably exceed the permissible nominal
value. In this case, overload protection prevents
the motor from burning out. The saw has a reset
button (A) that will restart the motor after it shuts
off due to extreme overload, if the motor stops during operation, turn the ON/OFF switch to the
OFF position. Unplug the saw from its power source. Wait about three minutes for the motor
to cool down. Push in on the reset button and turn the switch to the on position. Refer to Fig.19
THE GUIDE RULER
The guide ruler can be used to cut a straight sawing
line along the workpiece and can be affixed at the
front of base with the wing nut. The guide ruler (C)
can be used on the right side of the blade only,
shown in Fig.20. Using the guide provides accurate
cuts compared to free-hand cutting. Locate the guide
into the mounting slots (A) at the front of the baseplate
and tighten the wing screw (B) to lock it at the desired
cut width. Refer to Fig.20
C
A
B
Fig.20
Fig.19
A

10
SIGHTING NOTCH FOR FREE-HAND CUTTING
Sighting notches (A) near the front of the baseplate provides guidance. When performing
free-hand cutting (at 90 degrees) the cutting line for the saw blade can be observed through a
u-shaped sighted notch at the front of the base plate.
Align the cutting line on the workpiece with the v-
shaped sighting notch at the front of the base plate
when cutting at 45 degree angle. (This is due to the
placement of the pivot point).
Turn saw on before contacting workpiece, wait until
the blade reaches full RPM before proceeding with cut. Apply
Apply even pressure all of the way through cut to
ensure proper blade operation and to obtain smoother
cutting.
Beware:Beware of the kickback at the instant the running blade touches the workpiece.
CHIP REMOVAL
GLASS WINDOW
The chips can be observed through a glass window. When the chip shield area is half full, remove
the cover by loosening the two bolts and empty the contents. Make sure the chips have been
removed completely.
Way to clean the cutting chips
1. Unscrew the knob bolts (A) on the blade housing.
Refer to Fig.22
2. Remove chip shield (B). (keeping the bolts
screwed on guard). Refer to Fig.23
3. Remove the chips.
Beware: Always keep the saw away from your body
when removing the chip shield, the chips will fall out.
The chips could be very hot, be careful not to touch them
when you remove the chip shield.
Fi
g
.21
A
Fig.22
A
Fig.23

11
LUBRICATION
See Fig. 24
This tool has been properly lubricated and is ready to use.
The recommended grease: Mobil HD 85W/140 Oil.
Add the oil
Check oil level of the gear case once a year. Follow the
procedure below to check and fill the oil. Unplug the
the tool. Place the saw on a horizontal position.
Use the 5mm HEX wrench to loosen the screw and
removing the oil plug, using a small funnel [spout size is
less than 3/16” (5mm).] Fill oil approximately 1.3 oz. (40cc),
avoid spilling by visual check. Please use the “Mobil HD 85W/140” oil,
Once filled, replace the oil plug with the 5mm HEX wrench, do not over tighten. The O-ring under
the head should be compressed slightly, over tightening will cause the O-ring to unseat and not
seal properly.
REPLACING CARBON BRUSHES
►Caution: Turn off the switch and disconnect plug from power supply before checking.
REPLACE CARBON BRUSHES
Check brushes regularly, if worn down to 1/4” (6mm),
Replace brushes. Carbon brushes should be clean and
slide freely in holder. Carbon brushes should be replaced
in pairs. Use a flat blade screwdriver to remove the brush
cap (A), take out the worn carbon brush (B) insert new
carbon brush and secure the brush holder cap. Refer to
Fig.25
MAINTENANCE AND SERVICING
Disconnect tool from power supply before carrying out any
servicing and maintenance. Keep the machine clean. Never use a saw blade that is damaged or
distorted. Replace the saw blade when it becomes dull. For service and replacement pieces see the
replacement parts list and manufacturer website. Inspect the safety cover to assure that it is in good
condition and moves smoothly. Never use the tool unless the safety cover operates properly and it is
in good operating condition. After operation of the tool has been completed, make sure power plug
has been disconnected from the receptacle and store it in a secure place out of the reach of children.
Periodically remove chips in the chip cover and dust from the surface of the power tool with a damp
cloth. Keep the tool away from contact with water or oil.
Fig.25
Fig.24

12
TROUBLESHOOTING
SYMPTOM POSSIBLE CAUSE CORRECTIVE ACTION
• Saw won’t start • Loss of power supply • Check power source
• Brushes worn or sticking • Check brushes
• Switch is faulty • Contact repair center
• Possible short circuit • Contact repair center
• Cord damaged • Contact repair center
• Unsatisfactory cuts • Dull, damaged or incorrect blade • Sharpen or replace blade
• Motor is overloaded. • Reduce pushing force
• Unusual sound • Mechanical obstruction. • Contact repair center
• Possible short circuit • Contact repair center
• Blade out of balance • Replace blade
• Heavy sparking inside
motor housing • Brush not moving freely • Disconnect power, remove
brushes and clean or replace
• Possible short circuit/dirty
commutator • Contact repair center
SPECIFICATONS:
Rated voltage 110-120V~ 50/60Hz 220-240V~ 50/60Hz
Rated input 1800W
No load speed 2300min-1(RPM)
Arbor 15.9mm
Saw blade diameter 230mm(9")
Arm-held vibration 6.75m/s2 k=1.5
Weight 9.5kg
Max. cutting depth at 90 ゚83mm
Max. cutting depth at 45 ゚56.5mm
Max. cutting thickness 13mm
Sound power level 95.5 dB(A)
Sound pressure level 93.8 dB(A)

PART
S
13
S
DIA
G
G
RA
M
M

14
REPLACEMENT PARTS
REF NO. SLUGGER ORDER NUMBER DESCRIPTION
169908120002SETFLUTECOVER
269908120003PIVOT
369908120004GLASS
469908120005DUSTCOVERSET
569908120006DUSTCOVERHOOKPLATE
669908120007LOCKWASHER
769908120008BOLT,M4X0.7,10MM,PANHEAD,PHILLIPS
869908120009FLATHDSCREW
969908120010DUSTCOVERPLATE
1069908120009FLATHDSCREW
1169908120012ARBORBOLT(BLADEBOLT)
1269908120013FLANGE
1469908120015O‐TYPERING
1569908120016WASHER
1669908120017BLADEWASHER
1769908120018SPACERRING
1869908120019EXTLRETAININGRING
1969908120020WASHER
2069908120021GUARDLOWER
2169908120008BOLT,M4X0.7,10MM,PANHEAD,PHILLIPS
2269908120007LOCKWASHER
2369908120024INNERBLADEGUARD
2469908120025SCREW(SELF‐TAPPING,CLAMP)
2569908120026SCREW
2669908120027SPRING
2769908120028BOLT,FLATHD
2869908120025SCREW(SELF‐TAPPING,CLAMP)
2969908120025SCREW(SELF‐TAPPING,CLAMP)
3069908120031UPPERGUARD
30.169908120032WARNINGLABEL
3169908120033SCREW
3269908120034TORSIONSPRING
3369908120035BLADEGUARDFLITER
3469908120036FLATWASHER
3569908120068LOCKWASHER
3669908120038CROSSRECESSEDTRUSSHEADSCREW
3769908120038CROSSRECESSEDTRUSSHEADSCREW
3869908120040BLADEGUARDLIFTINGBLOCK

15
3969908120041LENSHOLDINGPLATE
4069908120004GLASS
4169908120038CROSSRECESSEDTRUSSHEADSCREW
4269908120036FLATWASHER
4369908120045CUSHION
4469908120046WIRECAP
4569908120047BLADEGUARDPUSHLEVER
4669908120048AIRBAFFLECOVER
46.169908120049WARNINGLABEL
46.269908120050WARNINGLABEL
4769908120038CROSSRECESSEDTRUSSHEADSCREW
4869908120052GUARDPIVOTSCREW
4969908120053GRASPHANDLE
5069908120054HEXSOCHDSCREW
5169908120055WASHER
*A169908120056GEARBOXASS’Y
6269908120066BOLT,M4X8MM,PANHEAD,PHILLIPS
6469908120069OILSEAL
6569908120070OILSEALBOX
6669908120071SCREW/M6X1MM
6769908120072WASHER/D5XD13X2T
6869908120073LEDLIGHTCAP
6969908120074LEDCOVER
7069908120075LEDLIGHT
7169908120076LEDSEAT
7269908120077SCREW,M3X1.06,8MM,PANHEAD,PHILLIPS,
PLASTITE
7369908120078PANHEADSCREW
7469908120079NYLONSCREWCAPS
7569908120080O‐TYPERING
7669908120081NYLONNUT
7769908120082BALLBEARING
7869908120083WORMGEAR
8169908120085OILSEALPLATE
8269908120086BALLBEARING
8369908120087ARMATUREASS’YWITHBEARINGSET
8469908120088BALLBEARING
8569908120089PANHDSELF‐TAPSCREW/WASHER
8669908120090FIELDASS’Y
8769908120091BRUSHHOLDER
8869908120092BRUSH

16
8969908120093BRUSHCAP
9069908120094REINFORCEPLATE
9169908120095SCREWPANHEADM5+WASHER
9269908120096MOTORHOUSING
9369908120097GUIDERULER
9469908120098RIVET
9569908120099WINGSCREW
9669908120100WASHER
9769908120101BEVELPLATE
9869908120102CUTTINGDEPTHSCALEPLATE
9969908120103WASHERFENCECIRCLE
10069908120104HEXBAR
10169908120105E‐RING(ETW)
10269908120106SECURELEVER
10369908120107FLATWASHER
10469908120108LOCKINGWASHERM5
10569908120109SOCKETSCREW
10669908120099WINGSCREW
10769908120111SPRINGSHAFTLOCKBUTTON
10869908120112SCREW
10969908120113BASEPLATE
11069908120114LOCKLEVER
11169908120115FLATWASHER
11269908120116BEVELLOCKINGPLATE
11369908120117MITERINDICATOR
11469908120118CROSSRECESSEDTRUSSHEADSCREW
11569908120119SETSCREW
11669908120120NUTLOCKING
11769908120121CARRIAGESCREW
11869908120122RACKET
118.169908120123BEVELSCALE
11969908120009FLATHDSCREW
12069908120125BRACKET
12169908120126SOCKETSCREW
12269908120025SCREW(SELF‐TAPPING,CLAMP)
123+13569908120275COMPLETEHANDLE
12469908120129POWERCORD
12569908120130CORDGUARD
12669908120025SCREW(SELF‐TAPPING,CLAMP)
12769908120132SWITCH
12869908120133OVERLOAD

17
12969908120134LOCKBUTTON
13069908120135SPRING
13169908120136LEDBUTTON
13269908120137LASERBUTTON
13369908130138BUTTONSWIRCHASS’Y
13469908120025SCREW(SELF‐TAPPING,CLAMP)
13669908130141SPRING
13769908120142LASERASS’Y
13869908120143LASERFIXEDRING
13969908120144O‐TYPERING
14069908120145TERMINALBLOCK
14169908120146ACTODCTRANSFORMERMODULES
14469908120148TRANSFORMER
14569908120149EXTRUDEDTUBING
14669908120150WIRINGCONNECTOR
14769908120151WIRINGCONNECTOR
14869908120152WIRINGCONNECTOR
14969908120153CORDCLAMP
15069908120025SCREW(SELF‐TAPPING,CLAMP)
15169908120155SETSCREW
15269908120156SELFTAPPINGSCREW
15369908120157SELFTAPPINGSCREW
15469908120158SETSCREW
16169908120160WRENCH
162699081201616MMHEXWRENCH
16469908120163LEDFIXEDPLATE
16569908120108LOCKWASHERM5
16669908120165NUTHEXM5X0.8
90169908120273AIRBLOWINGCASE

Pleas
e
Wear
e
A
lway
s
A
lway
s
A
lway
s
Never
Laser
Do no
t
Cauti
o
Cauti
o
e
read the
e
ar p
r
otec
t
s
wear saf
e
s
keep ha
n
s
disconn
e
expose to
radiation.
A
t
dispose
o
o
n:When
c
o
n
F
E
T
instructio
n
t
ion!
e
ty glasse
s
n
ds away
f
e
ct the plu
g
ol to rain.
A
void dire
c
o
f electric
t
c
utting don
E
IN Power T
o
T
el. 412-922
-
n
s carefull
y
s
when us
f
rom the p
a
g
from the
c
t eye con
t
t
ools toget
h
’t touch th
e
Cauti
o
o
ols, Inc., 1
0
-
8886, Toll F
18
y
before st
a
ing the m
a
a
th of the
s
socket be
f
t
act with li
g
h
er with h
o
e
metalpa
o
n: Lase
r
r
a
0
30 Alcon St
r
ree: 1-800-4
a
rting the
m
a
chine.
s
aw blade.
f
ore carryi
n
g
ht source
o
usehold
w
rts to avoi
d
a
diation d
o
r
eet, Pittsbu
r
41-9878, w
w
m
achine.
n
g out any
.
w
aste mat
e
d
burn.
o
not stare
r
ggh, PA 15
2
w
w.feinus.co
m
work on t
h
e
rial!
into bea
m
2
20
m
h
e machin
m
e.


Table of contents
Other Fein Saw manuals
Popular Saw manuals by other brands

Axminster
Axminster AC1950B Original instructions

Bosch
Bosch GCM 10 SD Professional operating instructions

Baileigh
Baileigh STS-14120 Operator's manual

MK Diamond Products
MK Diamond Products MK 770 Alignment procedure

Edco
Edco SS-26 Series Operator's instruction manual

GÜDE
GÜDE GBS 250 Original instructions