Felix Storch Food 1.5 User manual
www.FELIXfood.nl
support@felixprinters.com
Zeemanlaan 15
3401MV IJsselstein
The Netherlands
Quick Start Guide
FELIX Food 1.5
Page 1Guide FELIX Food V1.5
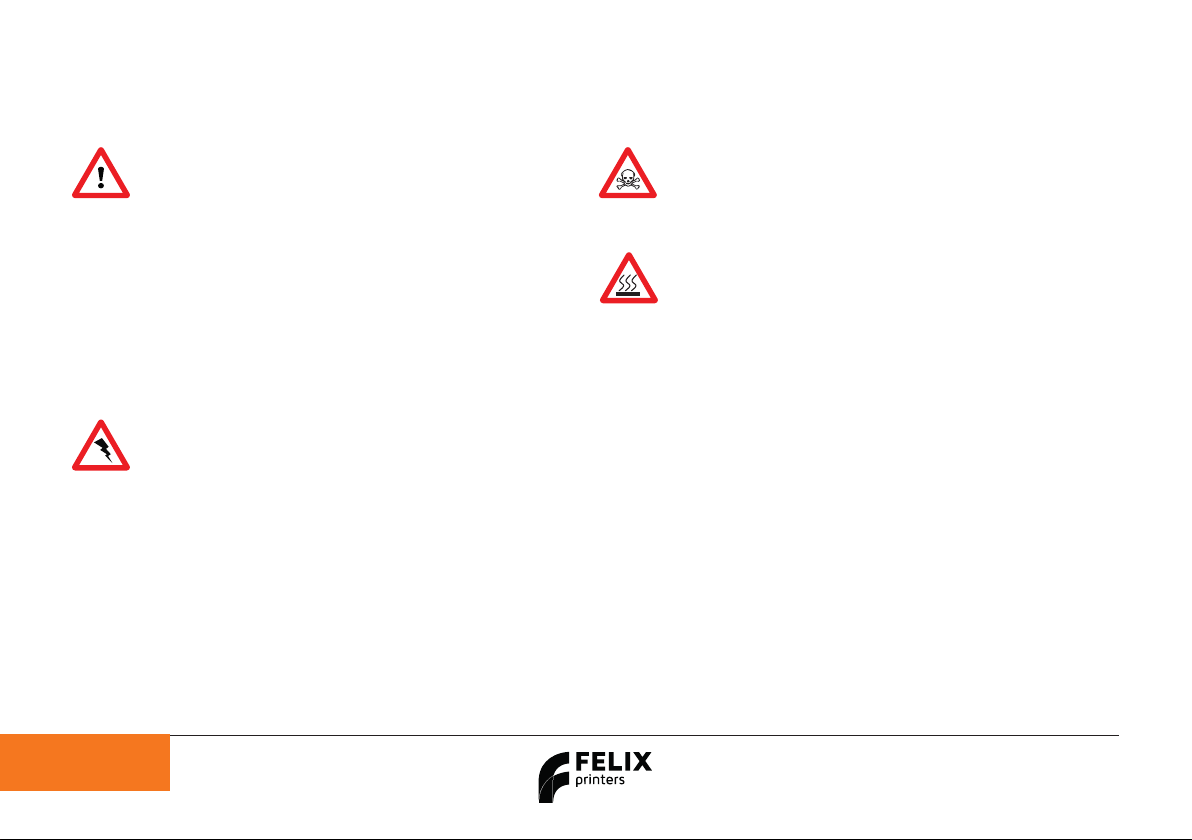
1 Safety
General safety
- Keep children under the age of 14 out of reach of the printer.
- FELIXprinters are only suitable for professional use.
Considerations when in operation.
- Don’t leave the printer unattended, before making sure the
first layer is printed properly.
- Don’t lean on the printer.
- Be careful with long hair and wide clothes.
- Don’t transport the printer while printing.
- Make sure all moving parts can move without any obstructions.
- Don’t remove any objects from the hot plate while printing.
- Caution with any moving parts that move in the X, Y and Z
direction. Moving parts can have a pinching hazard.
Electronic safety
- Only use the power supplies and cables supplied by
FELIXprinters. Always turn off and unplug the printer before
performing maintenance or modifications.
- The power supply meets all CE mark regulations and is
protected against short-circuit, overload, over voltage and
over temperature.
Printer placement
- Place the FELIXprinter on a stable table/desk or something with
a similar height.
- Place the printer on a height where children cannot
reach it.
- Use the FELIXprinter in a clean environment at room
temperature.
Caution with harmful print media
- Some media can be toxic or harmful when consumed. FELIXprinters
is in no way responsible for harm by poisoning when printing
objects with poisonous media. The responsibility for
consuming printed media rests entirely with the end-user/consumer.
Caution with heater elements
- There is a potential risk of burning, as the print head and bed add-on
module can reach temperatures of up to 80°C and the standard
heated bed up to 90°C.
- Always let the printer cool down for at least 5 minutes before
doing maintenance or modifications.

Page 2
Guide FELIX Food V1.5
2 Introduction
3 Contents
Thank you for choosing FELIXprinters!
IMPORTANT: READ THIS MANUAL AND SAVE COUNTLESS HOURS OF YOUR TIME.
We know you can’t wait to start using the product and not many people like to read. For most household appliances
this might work but taking this strategy will most likely set you up for failure and frustration.
So please follow this manual, we made it as short and understandable as possible to enjoy your FOODprinter.
Kind regards,
FELIXprinters
1 SAFETY ............................................................................................................................ 1
2 INTRODUCTION .......................................................................................................... 2
3 CONTENTS ................................................................................................................... 2
4 PRINTER SPECIFICATIONS .................................................................................... 3
5 FELIX FOOD AT A GLANCE .................................................................................. 4
6 UNBOXING .................................................................................................................... 5
6.1 WHAT’S IN THE BOX? ............................................................................................................................ 5
7 INSTALLATION ............................................................................................................. 6
7.1 INSTALL FOOT BRACKET ................................................................................................................... 6
7.2 PREPARE THE PRINTBED ................................................................................................................ 8
8 DISPLAY AND POWER ......................................................................................... 12
8.1 DISPLAY OVERVIEW ........................................................................................................................... 12
8.2 INSTALLING THE DISPLAY UNIT ................................................................................................. 13
8.3 INSTALLING THE POWER CABLE .............................................................................................. 14
8.4 DISPLAY MENU OVERVIEW .......................................................................................................... 15
9 CONNECTING TO THE INTERNET ..................................................................... 16
9.1 CONNECT PRINTER THROUGH WIFIWLAN ....................................................................... 16
9.2 CONNECT VIA LAN .............................................................................................................................. 16
9.3 CONNECT THROUGH WEB UI ..................................................................................................... 17
10 CALIBRATION ......................................................................................................... 21
10.1 LEVEL THE PRINT SURFACE ........................................................................................................ 21
10.2 CALIBRATE THE BED DISTANCE Z=0 ................................................................................ 25
10.3 CALIBRATE THE EXTRUDER XYZ OFFSET SWITCH ONLY .................................... 31
11 PREPARATION FOR PRINTING ......................................................................... 36
11.1 UPLOAD GCODE USING A USB STICK .................................................................................. 36
11.2 UPLOAD GCODE USING THE WEB INTERFACE ........................................................... 38
11.3 PREPARING THE SYRINGE ........................................................................................................... 40
11.4 MOVE THE PLUNGER PUSHER BY HAND ...................................................................... 41
11.5 MOVE THE PLUNGER PUSHER TROUGH MENU ........................................................ 42
11.6 LOADING A SYRINGE ........................................................................................................................ 44
12 STARTING A PRINT ............................................................................................... 45
12.1 START A PRINT VIA THE DISPLAY MENU ............................................................................ 45
12.2 START PRINT VIA THE WEBUI ................................................................................................. 46
13 PCB OVERVIEW .................................................................................................... 47
14 FREQUENTLY ASKED QUESTIONS ................................................................ 48

Page 3Guide FELIX Food V1.5
Page 3
4 Printer specifications
Guide FELIX Food V1.5
SYSTEM SPECIFICATIONS
- Printer dimensions (L, W, H) 430 x 500 x 700 mm
- Weight 14,0 kg
- Power requirements: 110 - 220 V
CAPABILITIES
- Layer height range 0.25 – 2,0 mm
- Flex plate (301 Stainless Steel)
- Automatic motorized bed levelling
EXTRUDERS
- Dual motorized piston extruder (switch & twin)
- Suitable for 100 mL standard luer lock type
- Standard nozzle diameter from 1.6, 2.5 and 3.5 mm (8G, 11G & 14G)
- (optional) Heated syringe temperature range 20°C up to 80°C
STANDARD PRINT BED
- Bed temperature up to 90 °C
INTERFACE
- 5” Capacitive Touchscreen with embedded octa-core
processor
- Print server (Repetier-Server)
- Webcam monitoring
- Print file management
- 16GB memory
PRINT MATERIALS
- All viscous materials up to viscosity of 1000PaS
CONNECTIVITY
- USB flash drive
- WIFI
- Wired Ethernet
SOFTWARE
- Simplify3D
Page 4
Guide FELIX Food V1.5
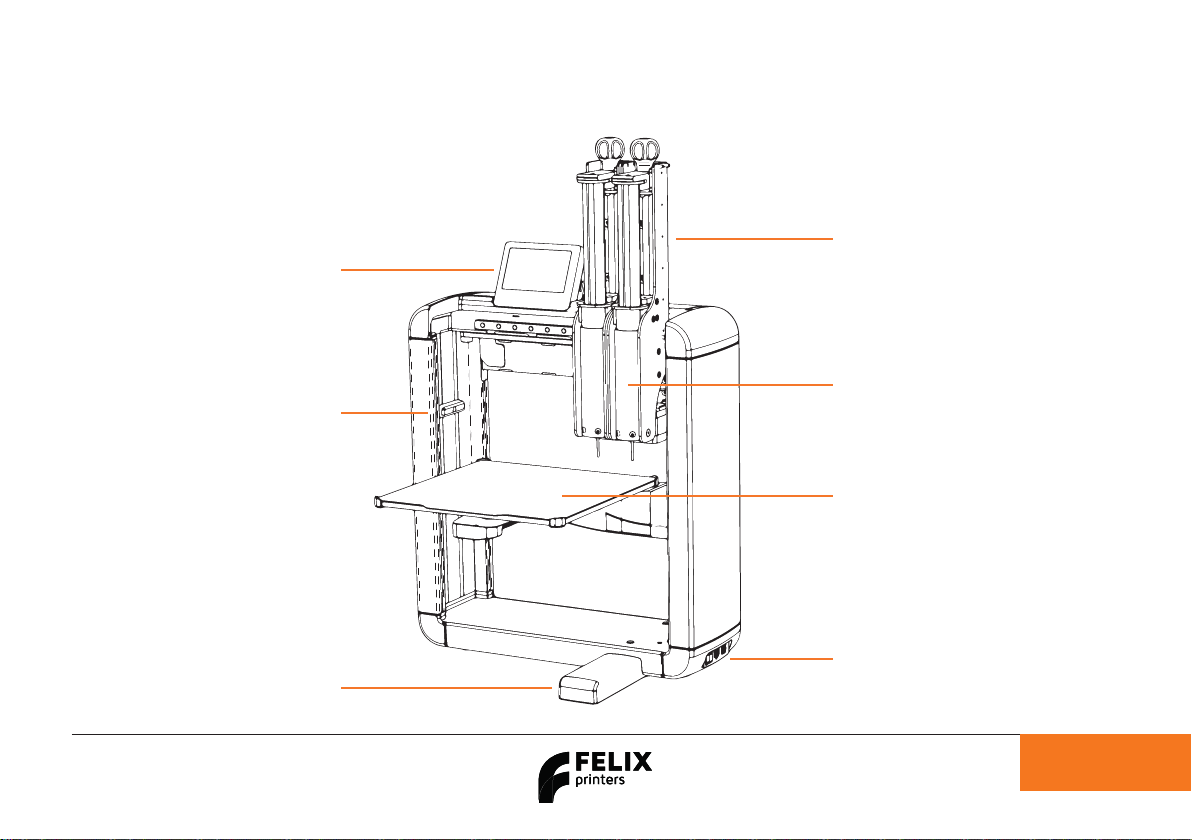
5 FELIX Food at a glance
Page 4
Guide FELIX Food V1.5
Display
Camera
Foot Bracket
Power Plug
Power Switch
Heated Bed
Syringe Holder
(optional: heated)
Dual Extruder Assembly
Guide FELIX Food V1.5
Page 5
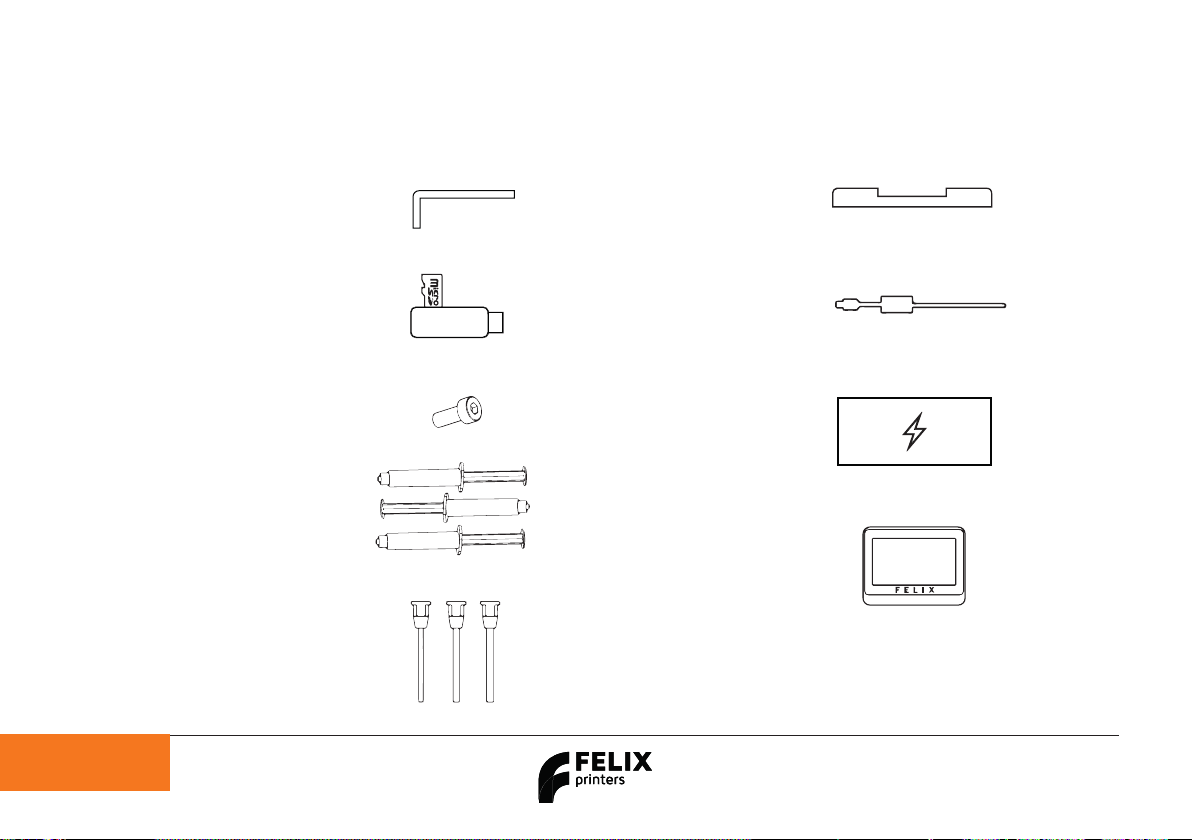
6.1 What’s in the box?
Page 5
6 Unboxing
Guide FELIX Food V1.5
A 1x Allen key
B 1x MicroSD card +
USB Stick
C 2x M4x12 bolts
D 3x 100ML Luer
lock Syringes
E Stainless
steel nozzle pack (6 needles)
F 1x Foot bracket
G 1x Power cable
H 1xPower unit
I 1x Display unit
NB: The box could contain extra materials you have ordered.

Page 6
7 Installation
Guide FELIX Food V1.5 Page 6
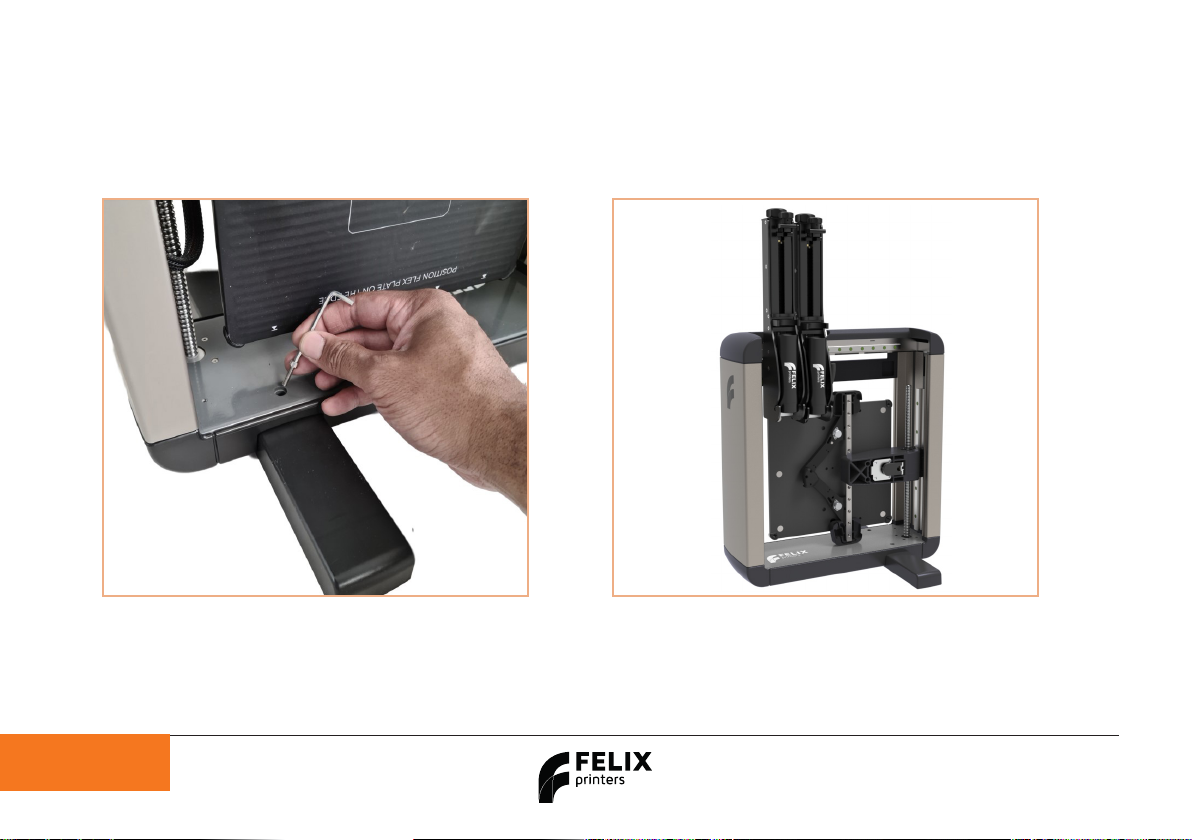
7.1 Install Foot bracket
1. Take the printer out of the box and remove
the foam blocks.
2. Place the foot bracket on a sturdy flat
surface and place the printer onto the foot
bracket.
Fix the foot with 2x supplied M4x12 bolts and allen
key.
Guide FELIX Food V1.5
Page 7
Repeat at the back of the printer. Finished!
Guide FELIX Food V1.5

Page 8
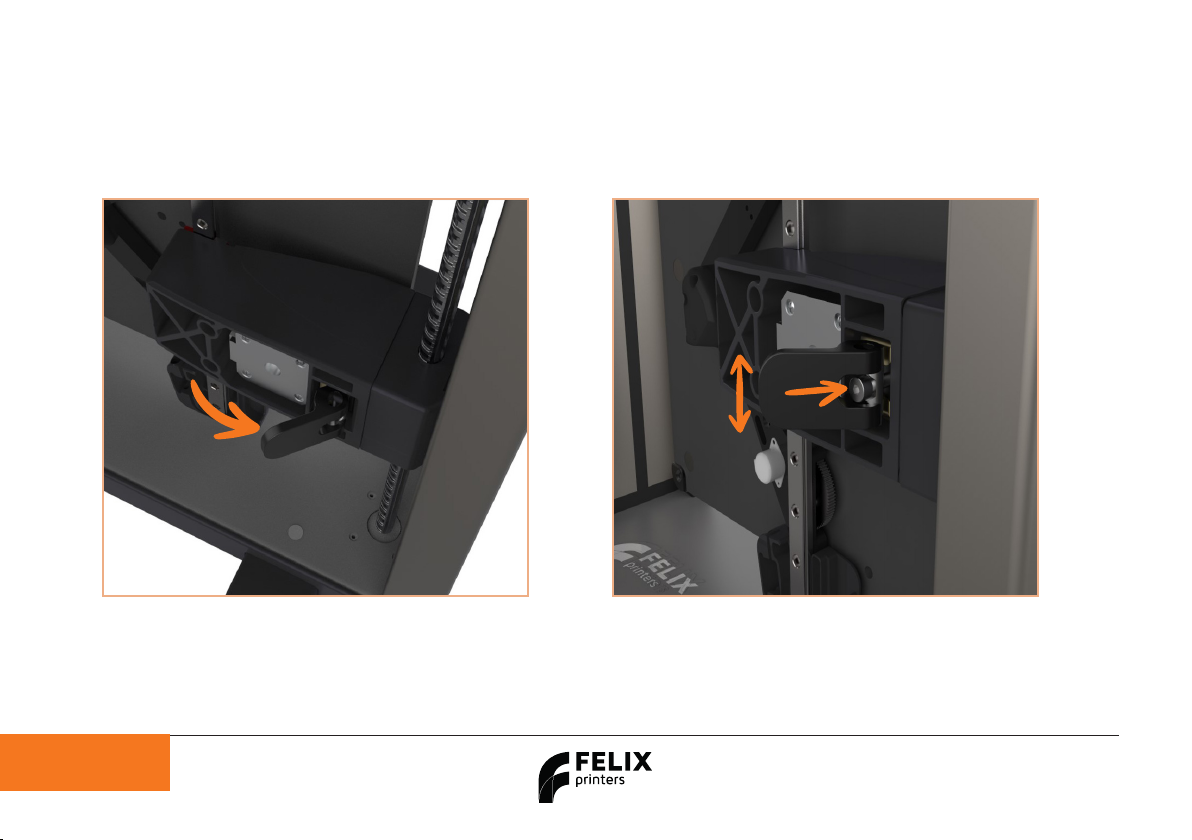
7.2 Prepare the printbed
Place the printer on a stable surface and locate the
Z-stage (bed bracket arm).
Push the Z-stage to the top position of the spindle
while rotating the spindle clockwise (by hand).
Guide FELIX Food V1.5 Page 8
Guide FELIX Food V1.5
DO NOT SURPASS THE SPINDLE END
Page 9
Flip out the lever at the bottom of the buildplate. Shake the lever and firmly push on the bolt head to
loosen the mechanism. This may take some force,
but if you listen closely you can hear it pop loose.
Guide FELIX Food V1.5
Page 10
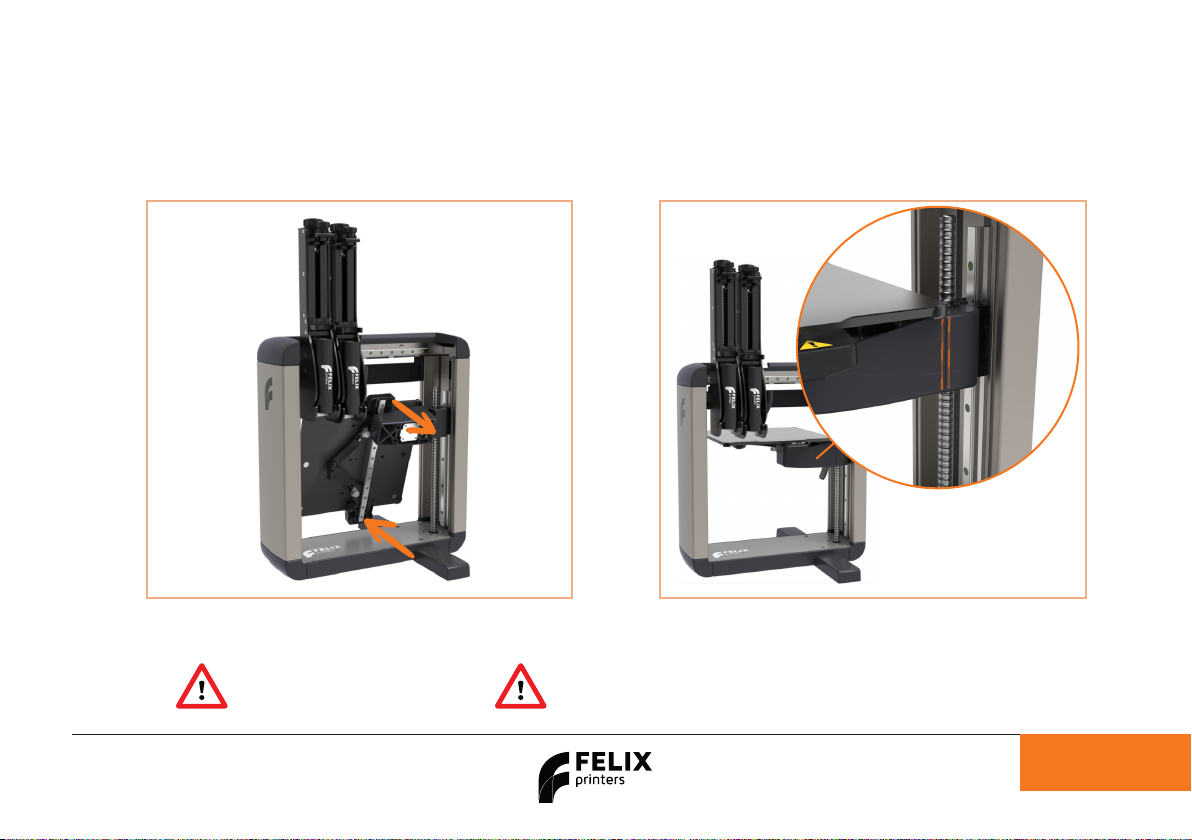
Grab the buildplate by the two black end blocks and
rotate the bed assembly 90 degrees.
Rotate the buildplate until the edges of the bed
bracket arm are parallel.
Guide FELIX Food V1.5
AVOID COLLISION WITH THE
EXTRUDER MOTORS!
Page 11
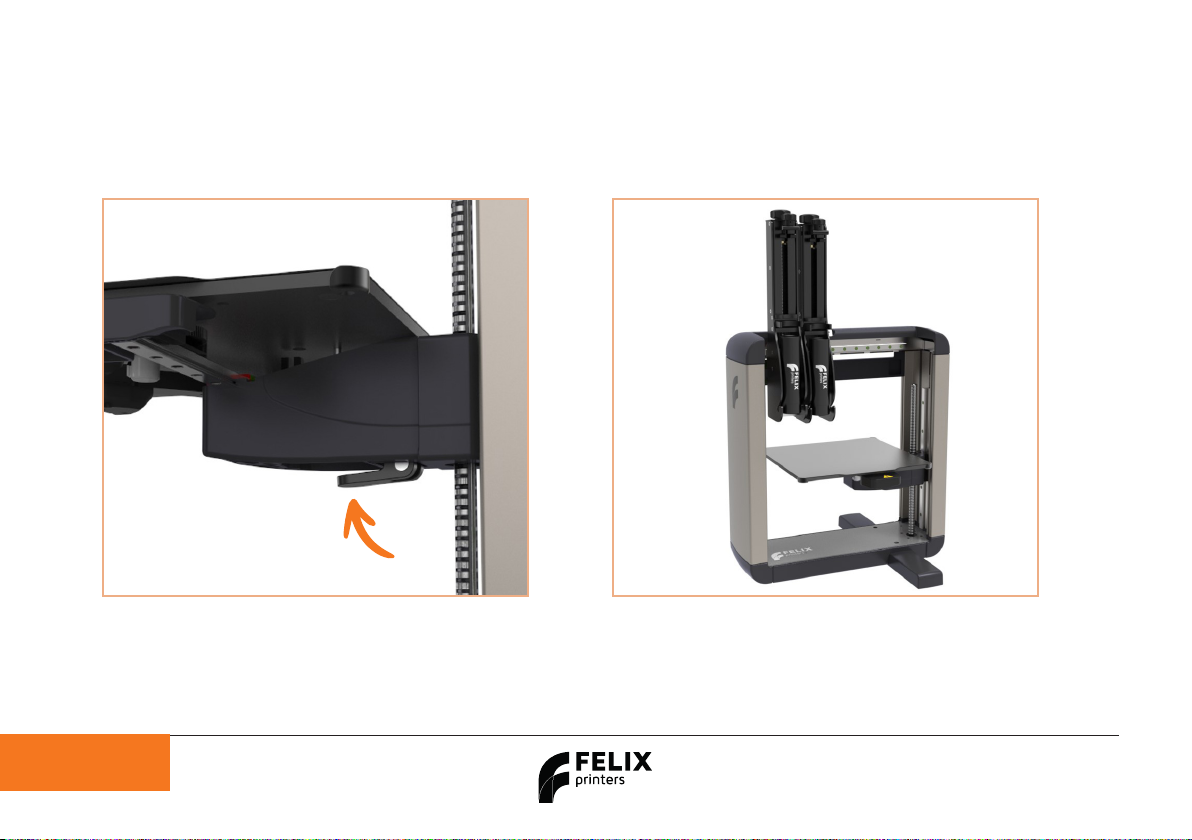
Flip the lever back, to lock the buildplate into its
position.
Finished!
Guide FELIX Food V1.5

Page 12
8 Display and Power
Guide FELIX Food V1.5 Page 12
Guide FELIX Food V1.5 Page 12
Guide FELIX Food V1.5
123
45
Ethernet
LAN
USB
External
(USB stick
or other
printers)
Ribbon cable USB
internal
Webcam
8.1 Display Overview
IMPORTANT
Make sure the power is turned off when connecting the display.
Failing to do so could cause serious damage to the screen.

Page 13
8.2 Installing the display unit
Guide FELIX Food V1.5
1. Connect cables on designated positions.
2. Slide the screen onto the metal pins.
NOTE: Watch out that the cables are not
pinched when installing the display into place.
1 2 3
1 2
Page 14
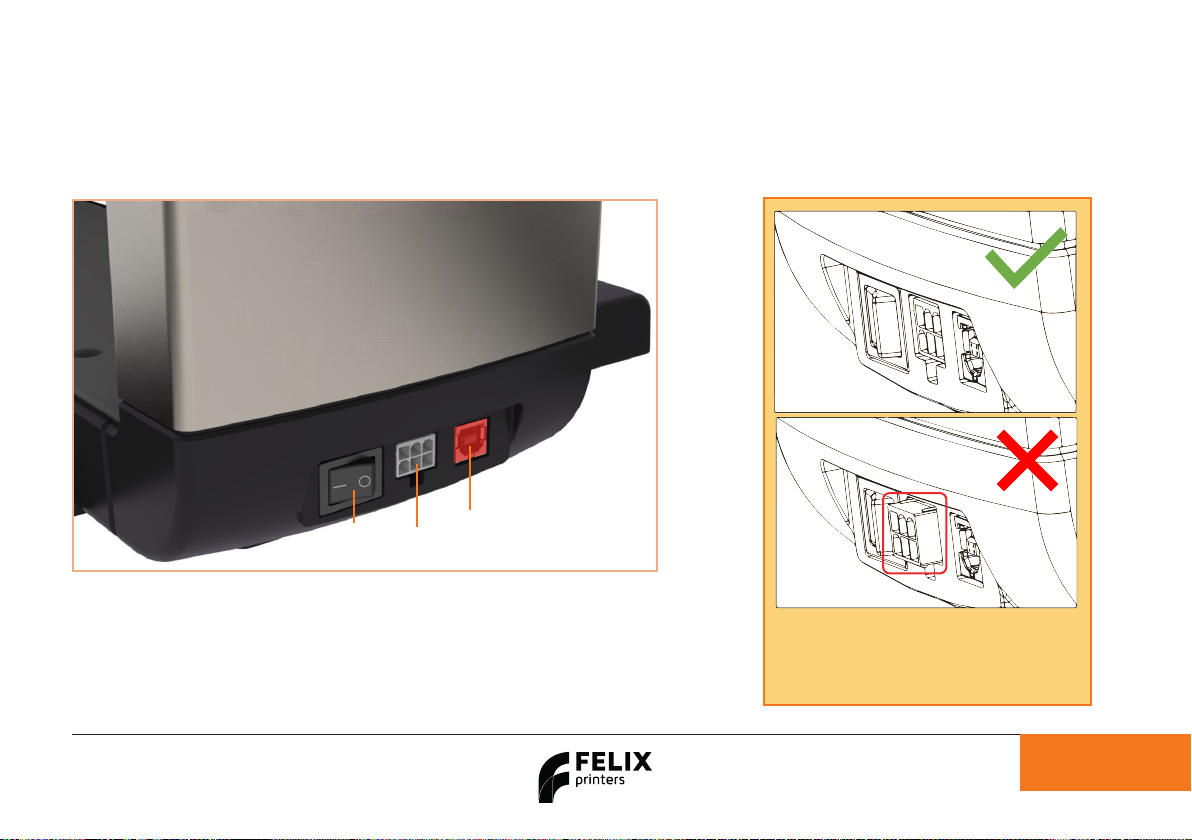
8.3 Installing the power cable
Guide FELIX Food V1.5
Power
Switch
Power
Cable
USB
Cable (not in use when
printer uses touchscreen)
NOTE:
In some instances if there is a firm pull
exerted onto the power cable, the white
housing of the connector could come out of
the printer. If that occurs, push it back in place.
1. Insert the power cable into the printer and the power socket.
2. Flip the power switch of the printer.
3. The display should light up immediatly after turning on the
machine and after a while the FELIX boot screen should be dislayed.
4. Bootup time takes approx 40 seconds.
Page 15
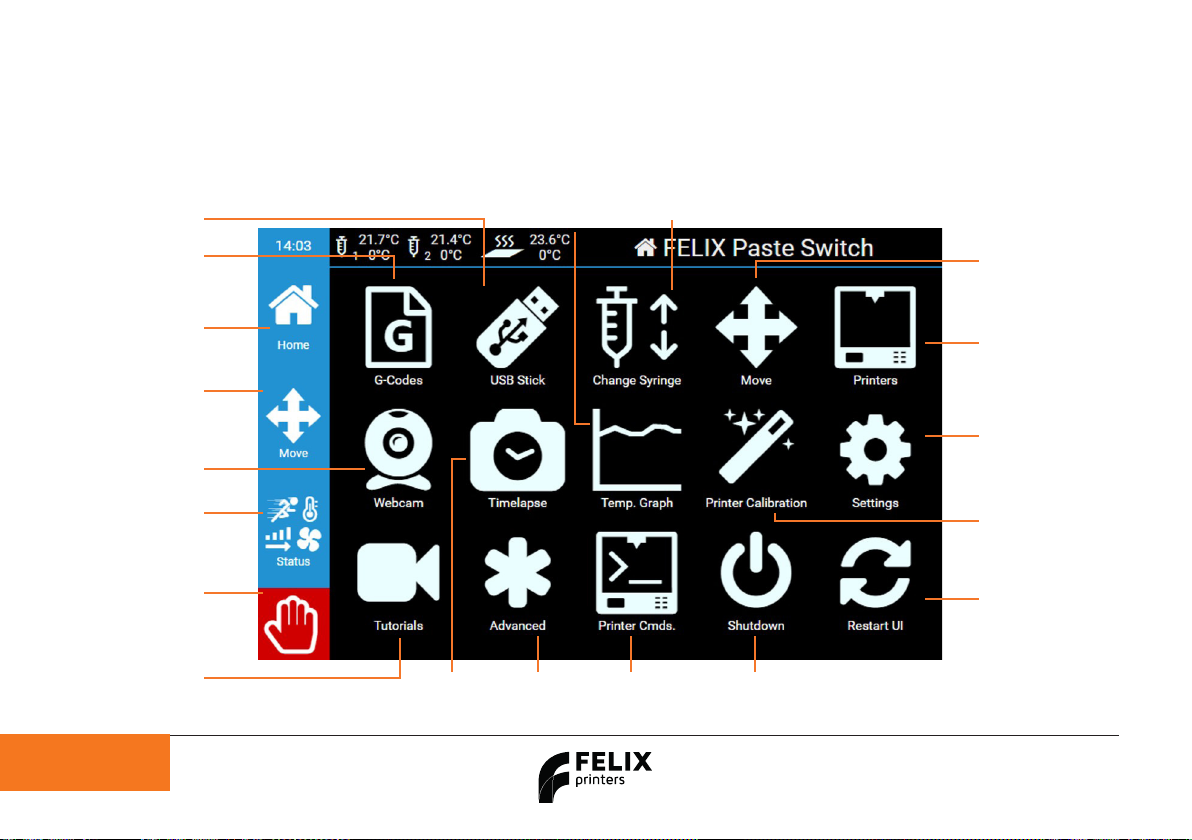
8.4 Display menu overview
Guide FELIX Food V1.5
USB stick
G-codes on the USB
Gcode menu
Gcodes sent via wifi
or internal memory
Move
Move menu for
the printhead,
extruder and bed.
Tutorials
Tutorials and
quick tips
Home
Returns to
Home menu
Webcam
Opens the webcam
Status menu
General printer
settings
Emergency stop
Stops everything,
only use when
necessary.
Timelapse
Timelapse menu
Advanced
Eeprom &
console
Printer commands
Useful
command presets
Shutdown
Shuts down
server
Restart UI
Restarts the
touchscreen interface
Printer Calibration
Wizards for the
calibration of the machine
Settings
General server settings
Printers Menu
Currently connected
printers and additional
connected printers.
Move
Move the printhead
and print bed
Temp Graph
Shows a temperature graph
of the extruders and bed
Change Syringe
Load and unload syringes
Page 16
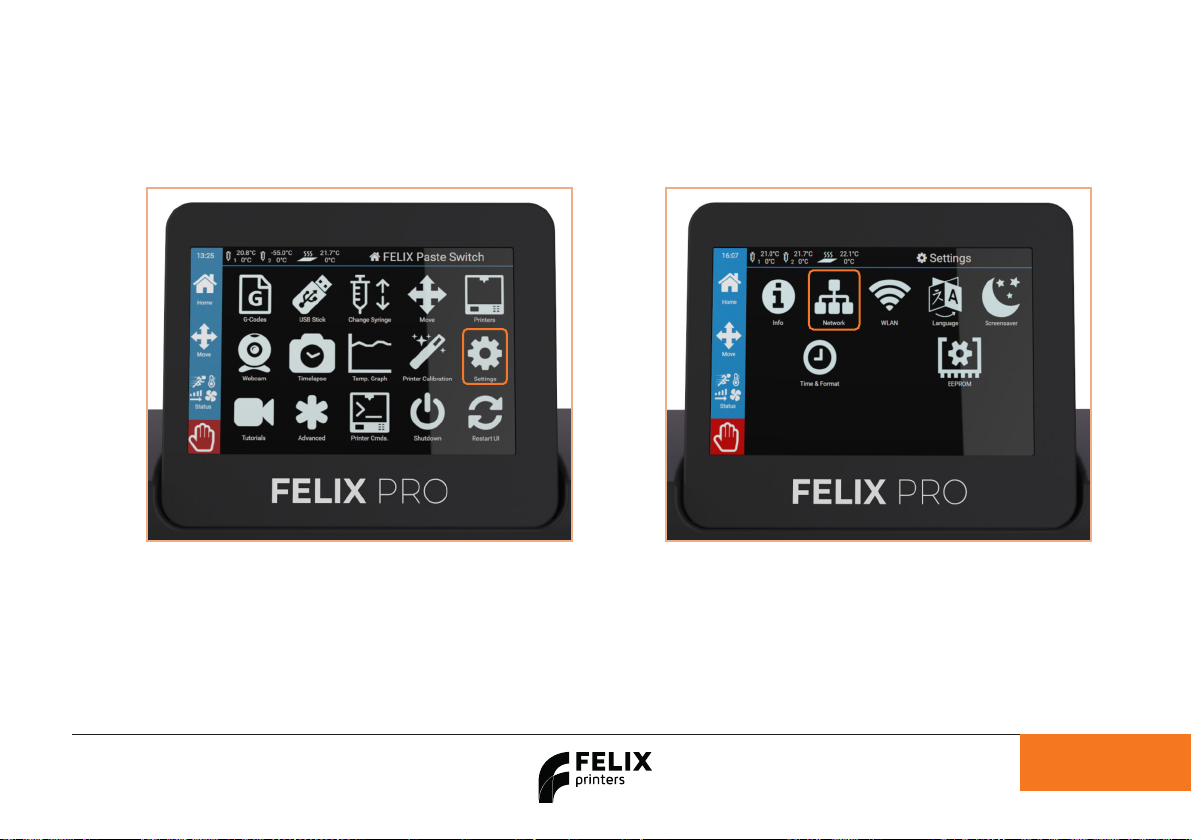
9.1 Connect printer through WIFI/WLAN
Tap the “Settings” button. Tap the “Network” button. A list of available networks
appears, select your network and insert credentials.
The printer is now connected to the WLAN/Wi-Fi.
9 Connecting to the internet
Guide FELIX Food V1.5
9.2 Connect via LAN
Plug in the cable on the left side of the touchscreen, and the printer should automatically obtain an IP address in the network.
Page 17
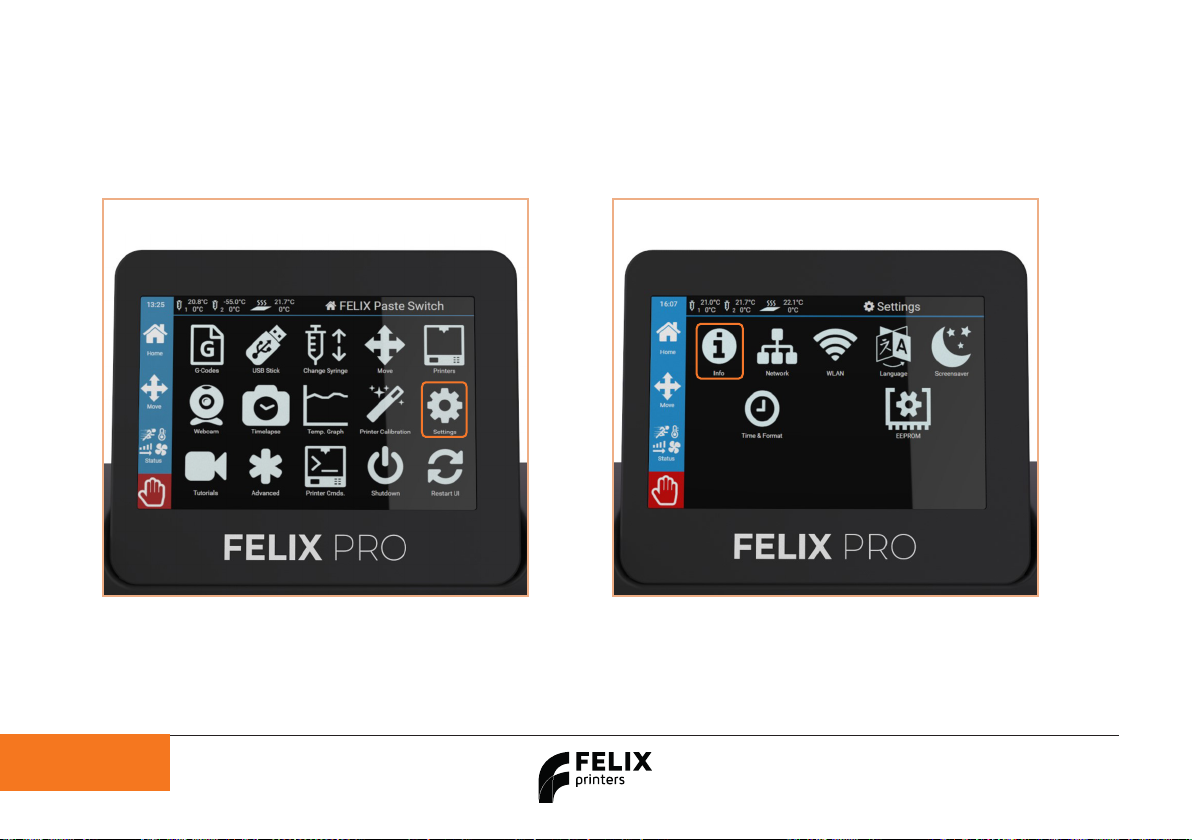
9.3 Connect through web UI
Once the printer is connected to the internet you
can setup the printer on the web UI (remote control).
To use remote control, tap the “Settings” button.
Tap the “Info” button.
Guide FELIX Food V1.5

Page 18
Write down the shown IP http-address or scan the
QR code on the device which is connected to the
same network.
NOTE: No IP adress shown? Check your printer’s
internet connection!
Enter the IP-adress in the URL bar of the
internet browser of your choice.
Guide FELIX Food V1.5

Page 19 Guide FELIX Food V1.5
Page 19 Guide FELIX Food V1.5
Page 19 Guide FELIX Food V1.5
In your webbrowser, tap the “go to printer” button.
Table of contents
Other Felix Storch 3D Printer manuals

Felix Storch
Felix Storch 2.0 User manual

Felix Storch
Felix Storch Pro 3 User manual

Felix Storch
Felix Storch Pro BIOprinter User manual

Felix Storch
Felix Storch 3.1 Single User manual

Felix Storch
Felix Storch 3.2 User manual

Felix Storch
Felix Storch Pro L Series User manual

Felix Storch
Felix Storch Pro L Series User manual

Felix Storch
Felix Storch Pro L User manual

Felix Storch
Felix Storch Pro 3 User manual

Felix Storch
Felix Storch Tec 4.0 to Tec 4.1 Upgrade Kit Quick start guide


