Felix Storch Pro 3 L User manual

Quick Start Guide
www.FELIXprinters.comwww.FELIXprinters.com
support@felixprinters.comsupport@felixprinters.com
Zeemanlaan 15Zeemanlaan 15
3401MV IJsselstein3401MV IJsselstein
The NetherlandsThe Netherlands
FELIX Pro 3 L / XL

Page 1
1 Safety
General safety
- Keep children under the age of 14 out of reach of the printer.
- FELIXprinters are only suitable for professional use.
Considerations when in operation.
- Don’t leave the printer unattended, before making sure the
first layer is printed properly.
- Don’t lean on the printer.
- Be careful with long hair and wide clothes.
- Don’t transport the printer while printing.
- Make sure all moving parts can move without any obstructions.
- Don’t remove any objects from the hot plate while printing.
- Caution with any moving parts that move in the X, Y and Z
direction. Moving parts can have a pinching hazard.
Electronic safety
- Only use the power supplies and cables supplied by
FELIXprinters. Always turn off and unplug the printer before
performing maintenance or modifications.
- The power supply meets all CE mark regulations and is
protected against short-circuit, overload, over voltage and
over temperature.
Printer placement
- Place the FELIXprinter on a stable table/desk or something with
a similar height.
- Place the printer on a height where children cannot
reach it.
- Use the FELIXprinter in a clean environment at room
temperature.
Ventilate
- Good ventilation while printing is advised. When printing ABS, small
concentrations of styrene vapor can be released. This can (in some cases)
cause headaches, fatigue, dizziness, confusion, drowsiness, malaise,
difficulty in concentrating, and a feeling of intoxication.
- We recommend using filament types shown on the FELIXprinters
website. Examples PLA, PETG, ABS-X, Glassbend etc. Other types may be
toxic; please follow instructions from the filament supplier.
Caution with heater elements
- There is a potential risk of burn, as the print head can reach temperatures
of up to 275°C and the heated bed of up to 120°C.
- Don’t place objects on the heated bed, not even when the printer is
turned off.
- Always let the printer cool down for at least 5 minutes before doing
maintenance or modifications.
- Never try to print without a buildplate in the machine, this can cause
damage to the machine and heated bed.

Page 2
2 Introduction
Thank you for choosing FELIXprinters!
It is highly recommended to at least read this manual. It explains in short how to make your first print and contains
important information to operate the printer properly.
Kind regards,
FELIXprinters
3 Contents
1 Safety 1
2 Introduction 2
3 Contents 2
4 Printer specifications 3
5 FELIX Pro 3 L at a glance 4
6 What
´
s in the box? 5
7 Display 9
8 Print proces simplified 10
9 Preparation for printing 11
10 Start a print 16
11 Power loss recovery 21
12 Printer calibration 22
13 Tips and Tricks 28
14 Maintanence 29
15 Display Messages 32

Page 3
4 Printer specifications
System specifications
- Printer dimensions (L, W, H) 600 x 666 x 776 mm (XL)
- Printer dimensions (L, W, H) 906 x 666 x 966 mm (L)
- Weight 65 kg (L), 80 kg (XL)
- Power requirements: 110 - 220 V
Capabilities
- Build volume (L, W, H) 300 x 400 x 400 mm (L)
- Build volume (L, W, H) 600 x 400 x 600 mm (XL)
- Layer height range 0.05 - 0.4
- Bed temperature: max. 120 °C
- Flex plate
- Software bed leveling
- Automatic nozzle calibrations
- Power loss recovery
Extruders
- Diameter nozzle: 0.5 mm (optional 0.35 and 0.7mm)
- Nozzle temperature: max. 275 °C
- Full metal hot-ends
- Filament flow detection
Interface
- Capacitive Touchscreen, with embedded 1.2 Ghz
quad core processor.
- Print server (Repetier-Server)
- Webcam
- Print file management
- 16GB memory
Print materials
- Open source 1.75 mm filaments
- Tolerance: ± 0.15 mm
- PLA, PET(G), Flex, ABS-X, PVA, Wood, Glass
Connectivity
- USB flash drive
- WIFI
- Wired Ethernet
Software
- Simplify3D
- Open source Repetier-Host for FELIXprinters.

Page 4
5 FELIX Pro 3 L at a glance
Lid
Display
USB port
Front door
Enclosure Fan
Ethernet
Power plug
Power switch
Emergency
stop
Side door

Page 5
6 What
´
s in the box?
A 1x Tweezers
B 1x Power cable
C 1x MicroSD card + USB reader
D 2x Teflon tubes
E 1x Wrench 14mm
Recommended tools:
F 1x Spatula
G 1x Allen key set
H 1x 1kg Premium PLA
NB: The box could contain extra materials like filament you have ordered.

Page 6
6.1 First Checks
Check if teflon tubes are pushed in correctly Remove belt clips for x and y axis, to ensure proper
motion is possible
Place the printer on a sturdy surface and ensure the printer is “level”. Open the front door and place a bubble level on the
center bottom or on the print-bed. Then level the printer, by adjusting the feet with the 14mm wrench.
Open the top cover.

Page 7
The airvents on top of the printer are important:
OPEN slots when using PLA, PETG, or TPU.
CLOSE slots when using ABS, PC or Nylon
Closing the slots retains more heat in the printer, which is beneficial
for higher temperature materials as it reduces warping. However
closing the slots when using PLA will most likely cause filament jams
because the extruder can overheat.
6.2 Opening/Closing the air vents

Page 8
1. Insert the power cable in the power socket
2. Flip the power switch to the ON position
3. Wait for the printer to turn on. The light of the print-head should light up immediately, the screen
boots up in approximately 40 seconds.
6.4 Power on
Ethernet port
Power socket
Power switch
Page 9
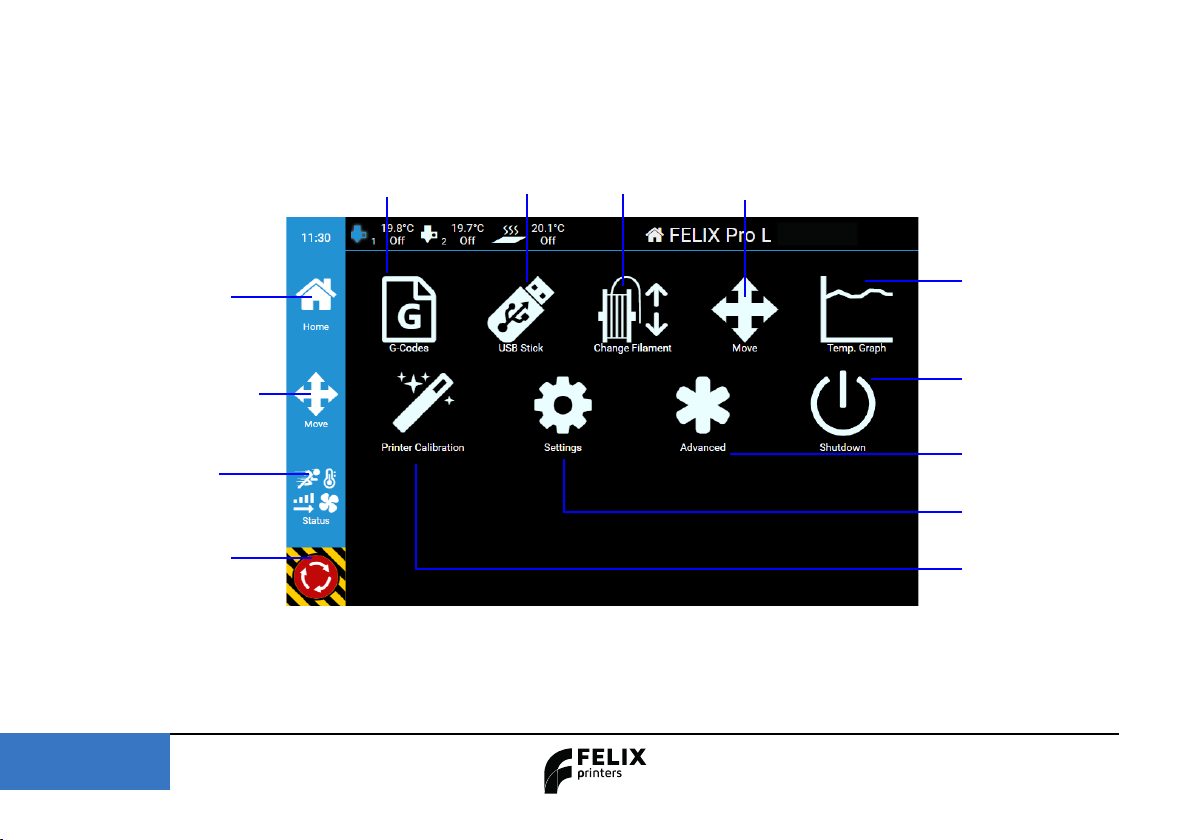
7 Display
Shutdown procedure: To shut down the printer correctly, press the shutdown button first and then proceed to turn
off the power switch. This ensures the proper shutdown of the operating system on the display unit.
Home
Returns to home
menu.
Move menu
Move the head or bed
of the machine.
Status menu
General printer
settings
Emergency button
Stops everything
immediately
USB Stick
import gcodes
from usb stick.
Change filament
Load & Unload
filament.
Print files (G-codes )
G-codes saved on the
machine.
Move menu
Move the head or bed
of the machine.
Temperture
Temperature graph of the
nozzle and buildplate
Shutdown
Shuts down the printer
server / display.
Advanced
EEPROM, console and
server commands.
Settings
Settings regarding wi-fi,
ethernet and other settings.
Calibration
Printer calibration
menu

Page 10
8 Print proces simplified
3D MODEL SLICE PRINT READY
Follow the construction
rules of 3D printing (see
appendix)
Choose correct settings accor-
ding to type of print object and
chosen material type.
Make certain that the print surface is
completely free from grease and ensu-
re that the nozzles of the print head are
clean.
Allow the printer to per-
form its tasks and enjoy
the printing process!
IMPORTANT!
First Layer: Never leave printer unattended if you are not sure if first layer is printed correctly!

Page 11
9.1 Level the Buildplate
Page 11
9 Preparation for printing
IMPORTANT! At this stage, ONLY perform bed leveling as the printer is already factory calibrated.
During this routine, the printer measures the build plate’s top surface to compensate for any irregularities, ensuring an optimal first
layer. A well-printed first layer is crucial for a successful print, and following this procedure with a clean bed will minimize the chan-
ces of failure.
In general calibration is only required when there has something physically changed on the machine.
- Replacing/changing a hot-end
- After transport
- New buildplate
- When you can see the printer is not printing properly

IMPORTANT: Detach the flexplate from the printer bed before cleaning the surface
The first layer is vital as it sets the foundation for the entire print. Follow these steps for a successful first layer:
1. Remove any leftover filament from the print bed using a spatula or tweezers, being cautious not to damage the Kapton sticker.
2. Clean the Kapton layer on the flex plate with a detergent like methylated spirit or 100% alcohol to ensure it’s grease-free, as grease
can hinder bed adhesion.
3. Apply an adhesive like 3DLac, Magigoo, Pritt Powerstick, especially for larger prints.
Note: If using spray adhesive, remove the flex plate from the printer to avoid
damaging the machine’s linear motion components and fans.
Page 12
9.2 Clean the buildplate
Foto buildplate met
flexplate Foto loshalen flexplate
Page 13
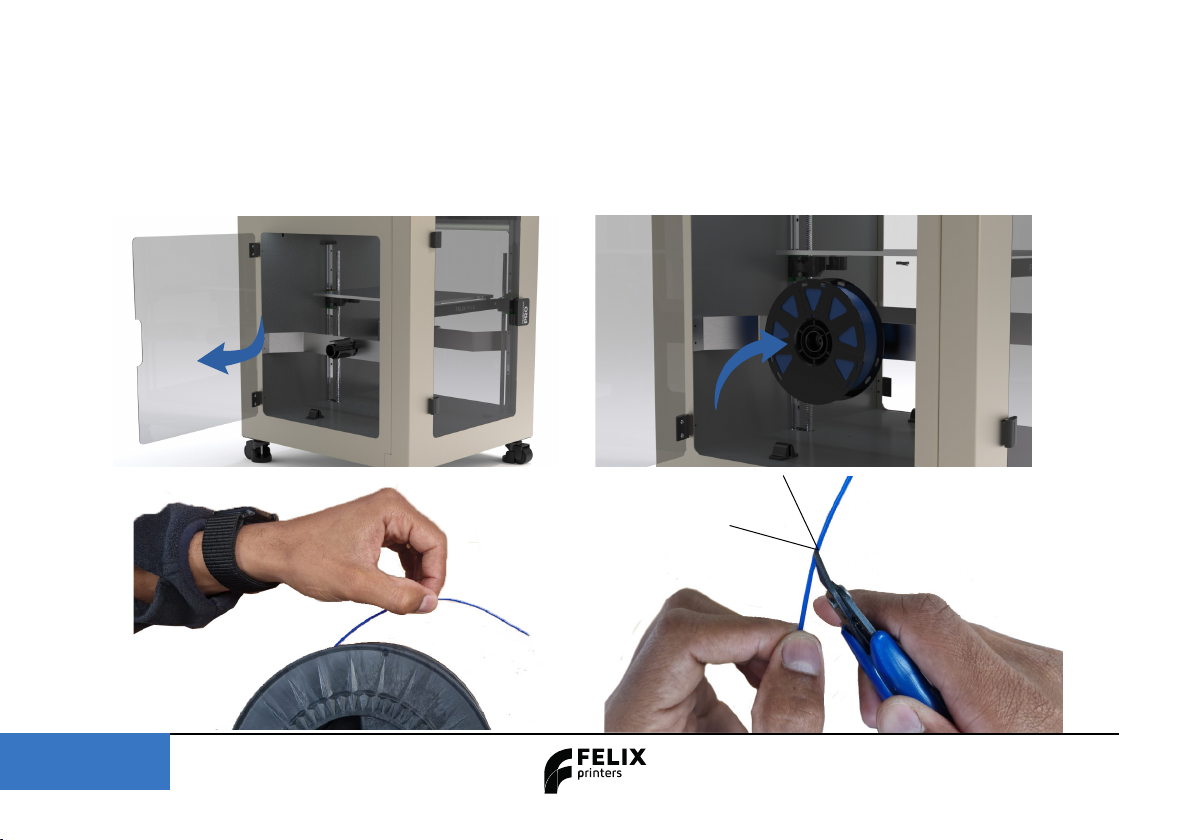
9.3 Load Filament
1.1. Open doorOpen door on either the left or right side door of the machine.on either the left or right side door of the machine.
2.2. Place the filament spoolPlace the filament spool on the spool holders found inside.on the spool holders found inside.
3.3. Trim the filament tip at a 45° angleTrim the filament tip at a 45° angle using a flush cutter for easier insertion through the bowden tube. Insert the cut endusing a flush cutter for easier insertion through the bowden tube. Insert the cut end
into the dust cleaner and slide it through the bowden tube entirely.into the dust cleaner and slide it through the bowden tube entirely.
45°

Page 14
Foto insert filament in de
printkop
When the filament exits the other end of the Bowden tube, guide it towards the printhead. Gently press on the hotend’s
extruder to ease the pressure, facilitating smooth insertion. Slide the filament into the hotend until it reaches a stop.
Foto indrukken hotend
release pressure

In the printer’s main menu, tap the “change filament” icon. In the subsequent menu, select either the left
(extruder 1) or right (extruder 2) nozzle by tapping the blue top bar.
Page 15Page 15
9.4 Change filament
After the nozzle heats up, the printer proceeds to the
next menu where you can start by pressing “insert
filament”. Once assured of correct filament loading,
click “start.”
The machine will auto-feed 20mm of filament. Suc-
cessful loading is confirmed when filament extrudes
from the nozzle.
Upon completion, use the provided tweezers to re-
move the extruded filament piece from the nozzle.

Page 16
10.1 Start a print using a USB stick
Page 16
10 Start a print
Prepare and save a desired G-code which is generated with Simplify3D on a USB stick. Then plug the USB stick into the front USB
port of the machine. Next, go to the printer’s main menu. In the main menu, tap the “USB Stick” button.
If your Gcode file does not show up, tap the “Refresh” button at the left blue bar. Select to import or directly print your model.

Page 17
10.2 Make connection through WI-FI
You can link up to the printer either through Wireless LAN or a wired LAN connection. To get details about the connection, you'll
need to navigate to the settings menu. In the settings menu, press the “Network” icon.
A list of available networks will pop up. Here you can pick your WiFi, enter the password, and then tap the green “Connect” button.

Page 18
10.3 Make connection through LAN
Insert an Ethernet cable at the back of the printer. Make sure you're connected to the same network; if not, you won't be
able to access the printer. Go to the settings menu and press the Network button to find the IP address.
10.4 Remotely control the printer via WI-FI or LAN
Once you've set up a WiFi or wired connection with the printer, go to Settings -> Network. Then, enter the displayed HTTP-address
in your web browser or scan the QR code on a device that's connected to the same network.

Page 19
10.5 Print via web interface.
Overview of the dashboard.
Press the “Go to Printer” button.
This manual suits for next models
1
Table of contents
Other Felix Storch 3D Printer manuals

Felix Storch
Felix Storch Pro L Series User manual

Felix Storch
Felix Storch Pro L User manual

Felix Storch
Felix Storch Pro L Series User manual

Felix Storch
Felix Storch Pro 3 User manual

Felix Storch
Felix Storch FELIXFOOD 3D User manual

Felix Storch
Felix Storch 3.2 User manual

Felix Storch
Felix Storch Food 1.5 User manual

Felix Storch
Felix Storch 2.0 User manual

Felix Storch
Felix Storch Tec 4.0 to Tec 4.1 Upgrade Kit Quick start guide

Felix Storch
Felix Storch Pro BIOprinter User manual


