manuals.online logo
Brands
  1. Home
  2. •
  3. Brands
  4. •
  5. Ferno
  6. •
  7. Medical Equipment
  8. •
  9. Ferno 082-1997 User manual

Ferno 082-1997 User manual

1
© Ferno-Washington, Inc. 234-3328-00 June 2005
Sidearm - Left
Lock Pin
Description
This kit includes two sidearms and mounting hardware
for the Ferno®24-MAXX™mortuary cot.
Parts Supplied
1 ea .................................................... Sidearm (Right)
1 ea ....................................................... Sidearm (Left)
4 ea .. Mounting Block (2 Lock Pin End, 2 Non-Pin End)
1 ea ..............................Lock Casting (1 Right, 1 Left)
4 ea ......................................................... Split Bearing
2 ea ...................................................... 1-3/8" Roll Pin
4 ea ............................ 1/4-20 x 1-3/8" Sidearm Screw
2 ea .................... 1/4-20 x 1-1/8" Lock Casting Screw
6 ea ......... 1/4-20 x 3/4" Sidearm/Lock Casting Screw
12 ea ........................................................ Lock washer
1 ea .................... Loctite®242 Threadlocker Capsule*
1 ea .......................................................... #25 Drill Bit
* Read cautionary information on Loctite®packaging
Tools Required
1 ea ......................................................... Electric Drill
1 ea .................................................................Hammer
1 ea .............................................. Phillips screwdriver
1 ea ........................................................ Sander or File
Read Before Beginning the Installation
• Disinfect and clean the cot before installing the
sidearms. See the disinfecting and cleaning
instructions in the 24-MAXX Users’ Manual.
• Separate the kit components by removing the lock
washers and screws from the mounting blocks and
lock castings.
• This kit includes left and right sidearms. Install the
sidearms with the lock pin and lock casting toward
the operator end of the cot (Figure 1). The sidearms
attach to the slots shown in Figure 1.
AA
AA
Accessory Kit 082-1997ccessory Kit 082-1997
ccessory Kit 082-1997ccessory Kit 082-1997
ccessory Kit 082-1997
24-MAXX24-MAXX
24-MAXX24-MAXX
24-MAXX™™
™™
™SidearmsSidearms
SidearmsSidearms
Sidearms
Loctite®
KIT COMPONENTS (NOTTO SCALE)
Mounting Block (4 total)
Split Bearing (4)
Lock Washer (12)
#25 Drill Bit
Roll Pin (2)
Phillips Screws
3/4" (6)
1-3/8" (4)
1-1/8" (2)
Figure 1 - 24-MAXX Sidearm Slots
Loading End Operator End
Slots for Sidearm
Lock at
this End
Sidearm - Right
Lock Pin
Lock Castings -
Right and Left
Cavity
2© Ferno-Washington, Inc. 234-3328-00 June 2005
Installing the Sidearm
1. Place a split bearing around the cot main frame
(Figure 2) at the two sidearm slots on one side of
the cot.
Figure 2 - Placing a Split Bearing
2. Position a sidearm with the mounts in the slots on
the bed frame and with the mounts behind the split
bearings (Figure 3). Center the sidearm mounts on
the bearings, and lay the sidearm toward the cot
bed surface as you continue the installation.
3. Place a lock washer on a 3/4" screw and a 1-3/8"
screw. Apply a few drops of Loctite®to the threads
of both screws (Figure 4).
4. Attach the mating half of the sidearm mount. Using
a Phillips screwdriver, thread the long (1-3/8")
screw through the upper part of the mounting block,
and thread the short (3/4") screw through the lower
part of the mounting block (Figure 5 and Figure 6).
Do not finish tightening the screws.
Figure 6 - Attaching the Mounting Block
Figure 4 - Apply Loctite®to Screw Threads
Figure 5 - Preparing to Attach the Mounting Block
Long Screw
(1-3/8")
Short Screw
(3/4")
Figure 3 - Set the Sidearm in Place
Sidearm
Mount
Split
Bearing
3
© Ferno-Washington, Inc. 234-3328-00 June 2005
5. Repeat Steps 3 and 4 to attach the second mounting
block to the other end of the sidearm (Figure 7).
Figure 8 - Sidearm Upright
6. Slide the assembled sidearm as far toward the
loading end of the cot as possible (Figure 7). Push
the loading-end mounting block and bearing against
the casting for the bumper glide. This will eliminate
the sidearm from being able to slide end-to-end after
the installation is complete.
7. Rotate the sidearm up and down and check for
excessive looseness or dragging. Finish tightening
the sidearm screws by equally tightening or
loosening the screws at each end so the sidearm
rotates smoothly.
8. Position the sidearm upright (directly over the cot
main frame tubing, Figure 8).
9. Place lock washers on a 1-1/8" screw and a 3/4"
screw for the lock casting, and apply a few drops
of Loctite®to the screw threads.
10. Place the inside half of the lock casting inside the
slot and against the sidearm mount, with the cavity
toward the lock pin (Figure 9).
11. Use the Phillips screwdriver to join the halves of
the casting with the screws and lock washers you
prepared in Step 9 (Figure 10). Do not finish
tightening the screws.
12. Rotate the lock casting so that when the sidearm is
upright, the lock pin touches the inside of the lock
casting (Figure 11). This will prevent the sidearm
from leaning inward toward the body. Tighten the
lock casting screws until the lock washers are flat.
Figure 11 - Lock Pin Viewed from Overhead
Lock pin against
inside of casting
Figure 10 - Attaching the Lock Casting
Figure 9 - Positioning Half of the Lock Casting
Cavity
Figure 7 - Attaching the Second Mounting Block
Slide Sidearm
Toward Loading End
As Far As Possible
(Step 6)
Attach Mounting
Block (Step 5)
4© Ferno-Washington, Inc. 234-3328-00 June 2005
13. Confirm that the mounting block at the loading end
is as far to the loading end as possible (against the
bumper glide casting).
14. Permanently secure the lock casting to the cot with
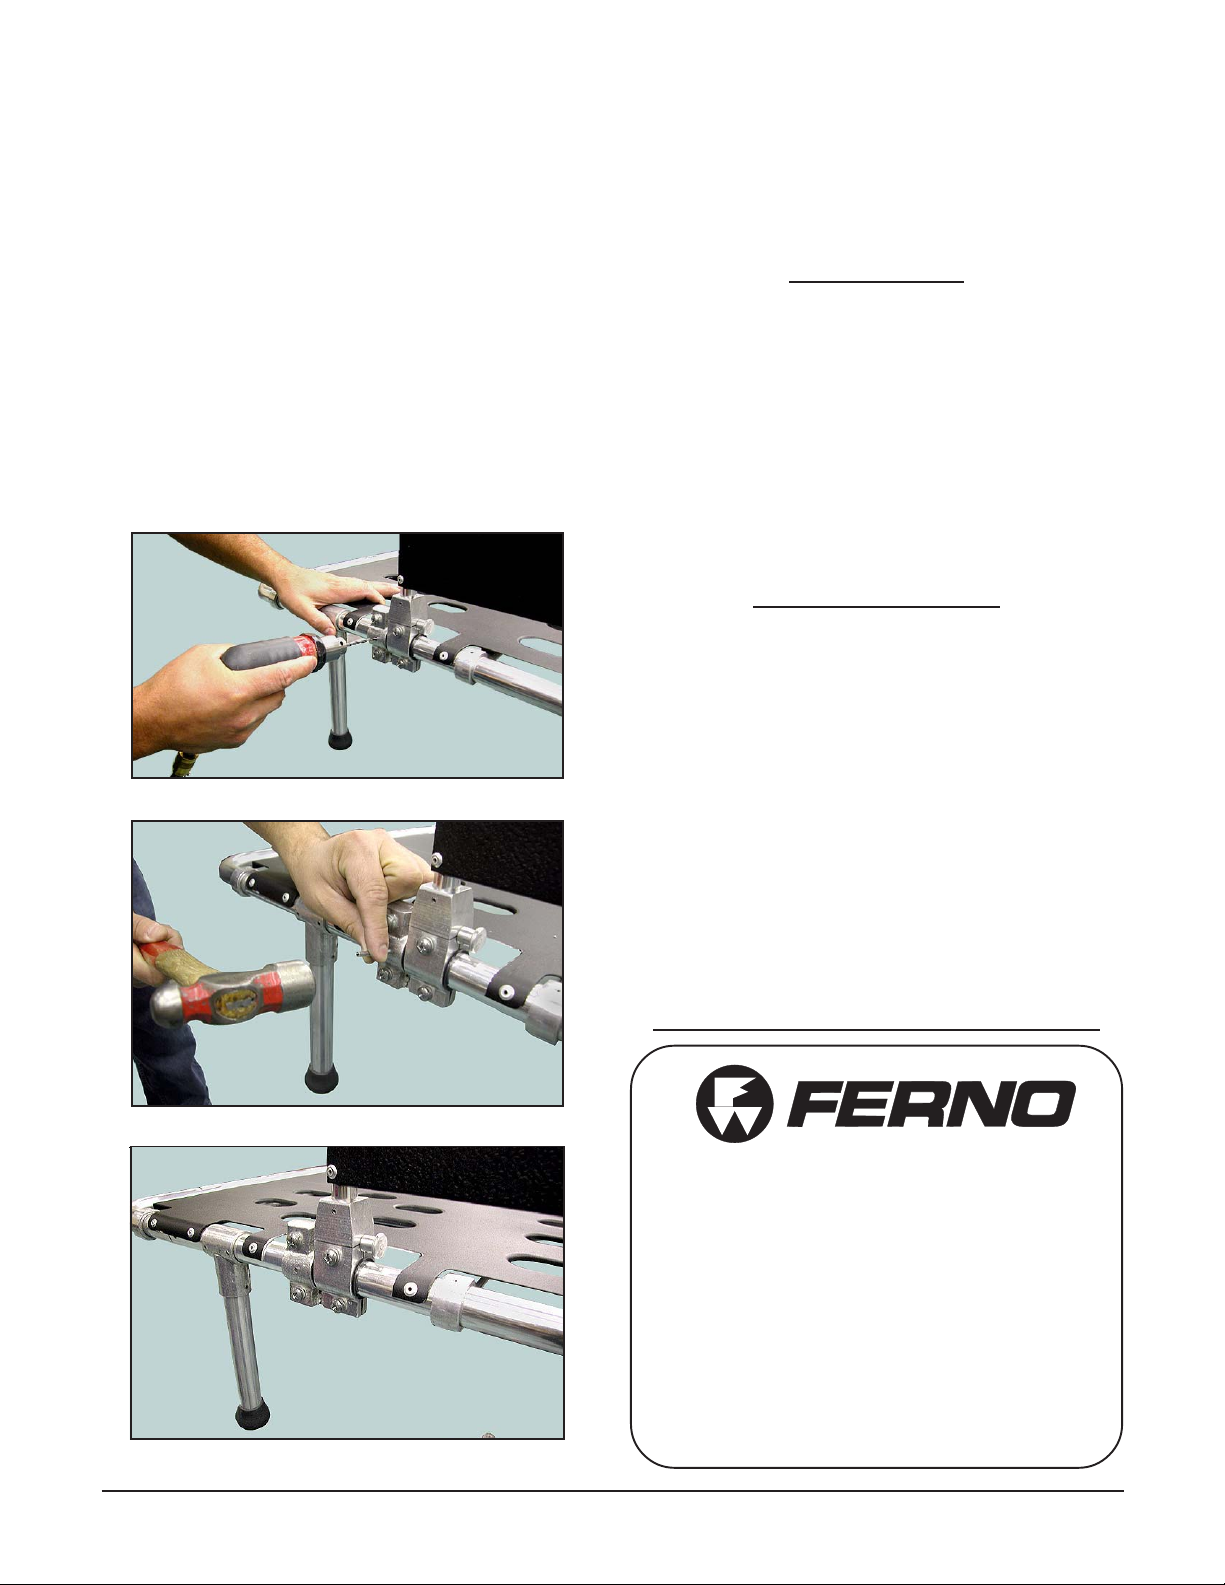
the roll pin. To do this:
• Tighten the lock casting completely to prevent
movement.
• Use a drill and the #25 bit to drill a hole straight
through the lock casting and cot tubing (Figure 12).
• Use a hammer to insert the roll pin and drive it
through the casting and tubing (Figure 13). Drive
the roll pin until it is flat against the casting, with
no excess visible (Figure 14). Use a sander or file
to remove burrs and rough edges.
15. Repeat Steps 1-13 to install the second sidearm.
16. Test the function of the sidearms before placing the
cot in service.
Figure 14 - Completed Installation
Figure 13 - Driving the Roll Pin
Figure 12 - Drilling for the Roll Pin
Maintaining the Sidearms
Disinfecting and cleaning: Follow the disinfecting and
cleaning instructions in the 24-MAXX users’ manual.
Inspecting: Inspect the sidearms regularly, at the same
time as you inspect the cot. Look for excessive wear or
damage. Verify that the sidearms rotate properly and the
lock pin functions properly.
Lubricating: Lubricate the lock pin with a small amount
of WRL-191-S synthetic lubricant when needed. Do not
lubricate the sidearm bearings - they are nylon and should
not be lubricated.
Using the Sidearm
To lower the sidearm, pull the lock pin and swing the
sidearm down.
To raise a sidearm, swing it up. When fully raised, the
sidearm automatically locks into position.
Keep the sidearms raised except for when you transfer a
body onto or off of the cot. Do not fold the cot with the
sidearms lowered.
To OrderAccessories or for More Information:
Telephone (U.S.A., Canada) .............. 1.877.733.0911
Fax (U.S.A. toll-free) ......................... 1.888.388.1349
Fax (U.S.A.) ....................................... 1.937.382.1191
Telephone (International) ................ +1.937.382.1451
Fax (International) ........................... +1.937.382.6569
Internet ............................................... www.ferno.com
Ferno-Washington, Inc.
70 Weil Way
Wilmington, OH 45177-9371 U.S.A.

Other Ferno Medical Equipment manuals

Ferno Germa Rescue Lite Full Body Splint Manual

Ferno

Ferno Germa Rescue Lite Full Body Splint Manual

Ferno PEZO2 User manual

Ferno

Ferno PEZO2 User manual

Ferno 103 User manual

Ferno

Ferno 103 User manual

Ferno Compact 2 Track Chair User manual

Ferno

Ferno Compact 2 Track Chair User manual

Ferno B-lock head immobiliser Operating instructions

Ferno

Ferno B-lock head immobiliser Operating instructions

Ferno 101-H User manual

Ferno

Ferno 101-H User manual

Ferno CCT Six-P User manual

Ferno

Ferno CCT Six-P User manual

Ferno Kit 069-5796 User manual

Ferno

Ferno Kit 069-5796 User manual

Ferno FL1 User manual

Ferno

Ferno FL1 User manual

Ferno 11-T Stretcher User manual

Ferno

Ferno 11-T Stretcher User manual

Ferno Mobile Transporter 35A Series User manual

Ferno

Ferno Mobile Transporter 35A Series User manual

Ferno 35A-NM User manual

Ferno

Ferno 35A-NM User manual

Ferno 24 MAXX User manual

Ferno

Ferno 24 MAXX User manual

Ferno 26-S User manual

Ferno

Ferno 26-S User manual

Ferno Megasus User manual

Ferno

Ferno Megasus User manual

Ferno PRO F1 User manual

Ferno

Ferno PRO F1 User manual

Ferno 24 MAXX User manual

Ferno

Ferno 24 MAXX User manual

Ferno Child EasyFix Manual

Ferno

Ferno Child EasyFix Manual

Ferno Pegasus User manual

Ferno

Ferno Pegasus User manual

Ferno RS5 User manual

Ferno

Ferno RS5 User manual

Ferno Pedi-Mate 678 User manual

Ferno

Ferno Pedi-Mate 678 User manual

Ferno ScoopEXL Operating instructions

Ferno

Ferno ScoopEXL Operating instructions

Ferno 50-E User manual

Ferno

Ferno 50-E User manual

Ferno Tirol Kit Operating instructions

Ferno

Ferno Tirol Kit Operating instructions

Popular Medical Equipment manuals by other brands

NRS Healthcare M54234 User instructions

NRS Healthcare

NRS Healthcare M54234 User instructions

Mobidiag Novodiag NVD-INST-B user manual

Mobidiag

Mobidiag Novodiag NVD-INST-B user manual

Schrack Seconet BT-IP user manual

Schrack Seconet

Schrack Seconet BT-IP user manual

Acteon Piezotome Cube user manual

Acteon

Acteon Piezotome Cube user manual

Tivic Health ClearUP user guide

Tivic Health

Tivic Health ClearUP user guide

Albrecht CDS MANUSAN User instructions

Albrecht

Albrecht CDS MANUSAN User instructions

Breathe NIOV Instructions for use

Breathe

Breathe NIOV Instructions for use

STARmed VIVA combo RF Generator user guide

STARmed

STARmed VIVA combo RF Generator user guide

gbo NEOSERV 114 user manual

gbo

gbo NEOSERV 114 user manual

Arjo Stretcher Slings Instructions for use

Arjo

Arjo Stretcher Slings Instructions for use

Otto Bock 743L30-230 LaserLine Instructions for use

Otto Bock

Otto Bock 743L30-230 LaserLine Instructions for use

Roche ACCU-CHEK TenderLink Instructions for use

Roche

Roche ACCU-CHEK TenderLink Instructions for use

OxySmart PC-60F user manual

OxySmart

OxySmart PC-60F user manual

Rhythm Healthcare LM5BA manual

Rhythm Healthcare

Rhythm Healthcare LM5BA manual

SOMNOmedics NIBP PLM instruction manual

SOMNOmedics

SOMNOmedics NIBP PLM instruction manual

MedSource MS-74002 user manual

MedSource

MedSource MS-74002 user manual

Care of Sweden CuroCell AREA Zone Instructions for use

Care of Sweden

Care of Sweden CuroCell AREA Zone Instructions for use

Human Tecar HCR 1002 user manual

Human Tecar

Human Tecar HCR 1002 user manual

manuals.online logo
manuals.online logoBrands
  • About & Mission
  • Contact us
  • Privacy Policy
  • Terms and Conditions

Copyright 2025 Manuals.Online. All Rights Reserved.