FlyTek ECO-ZIP User manual
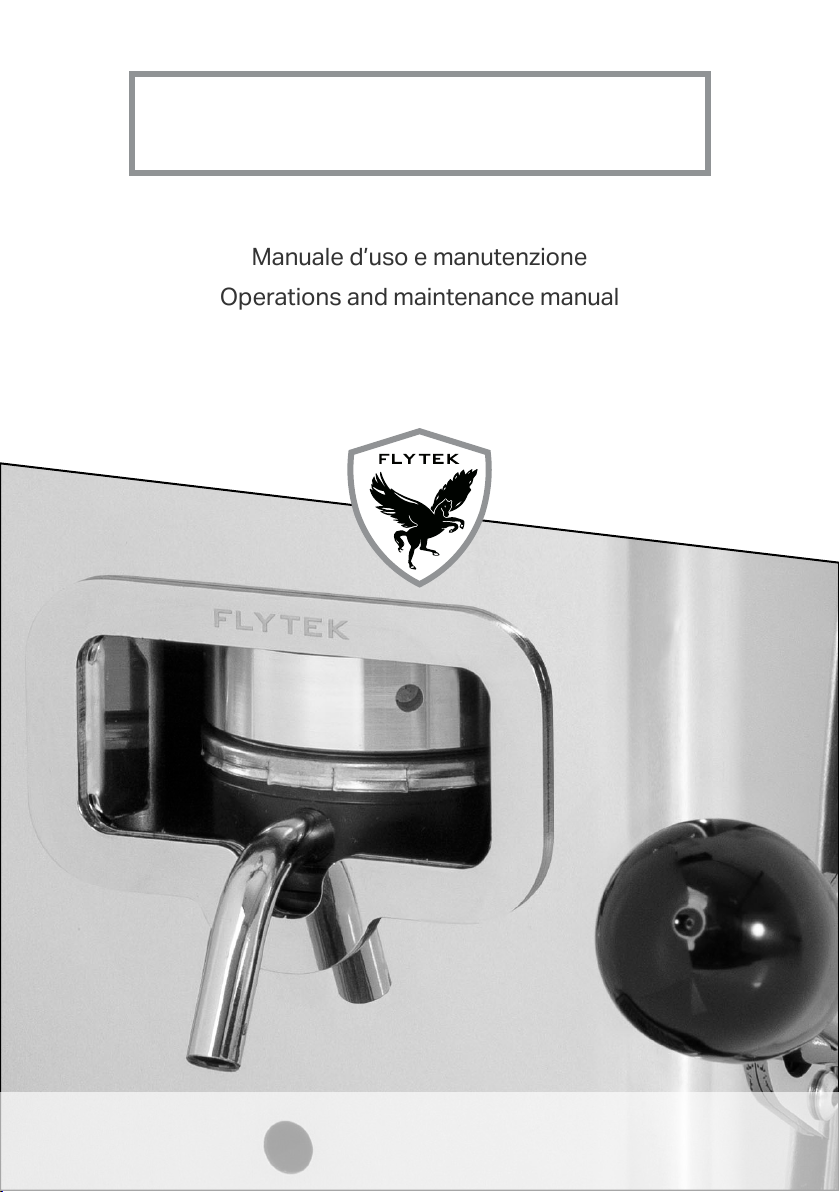
ECO-ZIP
Manuale d’uso e manutenzione
Operations and maintenance manual
100% MADE IN ITALY

Italiano................................................................................. pag 4
English................................................................................ pag 14
INDICE DELLE LINGUE - LANGUAGE INDEX
2

3

A. Vaschetta raccogli acqua;
B. Beccuccio erogazione caè;
C. Spia di riscaltamento;
D. Interruttore erogazione caè;
E. Interruttore accensione macchina;
F. Manopola;
G. Serbatoio acqua;
H. Sede inserimento cialda;
I. Spia stand-by;
J. Spia accensione macchina;
Tecno Meccanica S.r.l.
Tutti i diritti sono riservati
Nessuna parte di questo manuale può essere riprodotta, copiata o divulgata con qualsiasi mezzo senza
l’autorizzazione scritta della Tecno Meccanica S.r.l.
Indicazioni generali di sicurezza ............ pag 5
Smaltimento .................................................. pag 5
Caratteristiche tecniche ........................... pag 5
Installazione .................................................. pag 6
Riempimento serbatoio ............................ pag 6
Collegamento alla rete elettrica ............ pag 6
Beccuccio erogazione caè ................... pag 6
Accensione .................................................... pag 7
Come fare il caè ........................................ pag 7
Funzionamento dello stand-by ...............pag 8
Pulizia del gruppo erogatore.....................pag 8
Pulizia del beccuccio...................................pag 8
Pulizia della macchina ............................... pag 9
Anomalie e possibili soluzioni ................. pag 9
Condizioni di garanzia ............................ pag 12
INDICE DEGLI ARGOMENTI
Vi ringraziamo per aver scelto la macchina da caè eco-ZiP, un prodotto di alta qualità progettato,
sviluppato, fabbricato e collaudato totalmente in Italia. Questo prodotto è una macchina da caè a
cialde ad utilizzo prevalentemente domestico.
La macchina è adatta a tutte le cialde diametro 44 (cosiddetto standard ESE).
H
J
D
C
IE
A
F
G

Di seguito sono riassunte alcune indicazioni generali di sicurezza:
• Leggere attentamente le istruzioni d’uso prima di procedere alla messa in funzione della macchina;
• Non eettuare mai alcuna operazione con le mani umide o bagnate;
• Non coprire mai la macchina, neppure parzialmente, con stronacci o con teli di protezione;
• Non mettere le mani in prossimità del beccuccio erogazione caè (rif. B) durante il funzionamento;
• Non immergere la macchina in acqua per la pulizia;
• Questo apparecchio può essere utilizzato da bambini di età non inferiore a 8 anni soltanto se vengono
adeguatamente sorvegliati, se sono istruiti all’utilizzo sicuro dell’apparecchio, e se ne capiscono i
rischi connessi. Operazioni di pulizia e/o manutenzione non devono essere eettuate da parte di
bambini, a meno che essi non abbiano età superiore a 8 anni, e soltanto se sono adeguatamente
sorvegliati. Mantenere l’apparecchio ed il cavo fuori dalla portata di bambini di età inferiore a 8 anni;
• Questo apparecchio può essere utilizzato da persone con capacità siche, sensoriali o mentali
ridotte, oppure con mancanza di esperienza e conoscenza, soltanto se vengono adeguatamente
sorvegliati ed istruiti all’utilizzo sicuro dell’apparecchio, e se ne capiscono i rischi connessi. I bambini
non devono giocare con l’apparecchio;
• Questo apparecchio è destinato ad essere utilizzato in applicazioni domestiche e similari, quali: aree
di cottura all’interno di negozi, uci e altri ambienti lavorativi, case coloniche, da parte dei clienti in
alberghi e altre strutture di tipo residenziale, bed & breakfast e simili.
Questo prodotto è conforme al DL 151/2005 e alla Direttiva europea 2002/96/
EC. Al termine della propria vita utile, l’apparecchio NON deve essere smaltito
come riuto generico domestico. Deve invece essere portato in uno dei centri
di raccolta dierenziata per riuti elettrici ed elettronici approntati dalla Pubblica
Amministrazione. Un’appropriata raccolta dierenziata contribuisce ad evitare
possibili eetti negativi sulla salute e sull’ambiente!
Il danneggiamento, la rimozione o l’alterazione della targa identicativa deve
essere immediatamente segnalata al Rivenditore. Non saranno possibili interventi
in garanzia se la targa identicativa risulta danneggiata, rimossa o alterata.
Sul retro della macchina, accanto alla spina di rete, è apposta la targa identicativa con riportati i dati tecnici
da comunicare al Rivenditore in caso di richiesta di informazioni o di assistenza tecnica.
INDICAZIONI GENERALI DI SICUREZZA
SMALTIMENTO
CARATTERISTICHE TECNICHE
ALIMENTAZIONE: 220-230 V DIMENS. LxHxP: 150x293x280 mm
FREQUENZA: 50/60 Hz CAPACITÀ SERBATOIO: 1 l
POTENZA MAX: 700 W CAPACITÀ VASCHETTA: 335 cm3
PRESSIONE: 8 bar MATERIALE PRINCIPALE: acciaio
PESO: 7 Kg ca.
5
Estrarre la macchina dall’imballo e collocarla su un piano stabile, adatto a sostenerne il peso, in prossimità di
una presa di corrente idonea. Conservare l’imballo in tutte le sue parti per eventuali futuri trasporti.
INSTALLAZIONE
Togliere il coperchio di acciaio per accedere al serbatoio acqua (rif. G). RACCOMANDIAMO L’UTILIZZO
DI UN FILTRO ADDOLCITORE O DI UN SACCHETTO ANTICALCARE che deve essere periodicamente
sostituito. Se ciò non viene fatto, all’interno della macchina si possono formare incrostazioni calcaree tali
da pregiudicarne il buon funzionamento, oltre che la validità della garanzia. Dopo aver quindi introdotto il
ltro addolcitore all’interno del serbatoio, riempire quest’ultimo con acqua potabile, possibilmente a basso
contenuto di calcio. Si può eseguire il riempimento del serbatoio utilizzando un imbuto e una bottiglia.
RIEMPIMENTO DEL SERBATOIO
6
La tensione di alimentazione della macchina non è modicabile dall’utente.
Prima del collegamento alla rete elettrica, vericare che la tensione della rete
corrisponda alla tensione di alimentazione della macchina indicata nella targhetta
di identicazione.
Durante l’erogazione non toccare il beccuccio e non esporsi con il viso alle parti
calde dell’apparecchio (pericolo di ustioni). Le superci riscaldanti della macchina
sono soggette a calore residuo anche dopo l’uso!
Il beccuccio erogazione è situato nella parte anteriore della macchina.
COLLEGAMENTO ALLA RETE ELETTRICA
BECCUCCIO EROGATORI CAFFÈ (rif. B)

7
ACCENSIONE
COME FARE IL CAFFÈ
Accendere la macchina premendo l’interruttore (rif. E) posto sul pannello frontale dei comandi; la relativa
spia (rif. J) si accenderà. Appena accesa la macchina, inizia il rapido processo di riscaldamento della caldaia.
Attendere l’accensione della spia di riscaldamento (rif. C): quando ciò si verica vuol dire che l’acqua è in
temperatura ottimale di esercizio e che la macchina è pronta all’uso.
Alzare la leva della macchina (rif. F) verso l’alto come indicato nella gura sottostante.
PER LA PRIMA EROGAZIONE: inserire una cialda nell’apposita sede (rif. H) e abbassare delicatamente la leva
no a scatto ne corsa. Porre un bicchierino sotto al beccuccio e premere l’interruttore di erogazione
(rif. D); dopo circa 5 secondi inizierà l’erogazione del caè. Raggiunto il livello desiderato nel bicchierino
premere nuovamente l’interruttore di erogazione per fermare l’uscita del caè. Se durante l’erogazione
la spia di riscaldamento (rif. C) si spegne, signica semplicemente che la macchina si sta riscaldando per
portare l’acqua in temperatura ottimale; l’erogazione può quindi tranquillamente continuare. Una volta che
il caè è stato erogato si consiglia di rimuovere la cialda per evitare che asciugandosi rimanga attaccata. E’
consigliabile invece attendere l’accensione della suddetta spia (rif. C) prima di erogare il caè successivo.
PER TUTTE LE EROGAZIONI SUCCESSIVE: si procede esattamente come sopra.
8
FUNZIONAMENTO DELLO STAND-BY
La macchina è dotata di dispositivo Stand-by allo scopo di favorire il risparmio energetico e, di
conseguenza, un minore impatto ambientale. Il dispositivo si attiva dopo 30 minuti dall’ultima erogazione di
caè, illuminando la relativa spia (rif. I). Per poter utilizzare nuovamente la macchina, è necessario spegnerla
e riaccenderla agendo sull’interruttore di accensione (rif. E): lo spegnimento della spia (rif. I) indica che
l’apparecchio è di nuovo utilizzabile.
E’ importante svuotare la vaschetta raccogli acqua (rif. A) dopo l’erogazione di non più di 20 caè.
Non introdurre le dita all’interno della sede inserimento cialda (rif. H): pericolo di
schiacciamento e/o ustioni!
Se la vaschetta non viene svuotata, l’acqua può fuoriuscire.
PULIZIA DEL GRUPPO EROGATORE E DEL BECCUCCIO
PULIZIA DELLA MACCHINA
Il gruppo erogatore ed il beccuccio vanno puliti settimanalmente. Per fare ciò bisogna procedere ad
eettuare una erogazione senza cialda. Porre un bicchiere abbastanza capiente sotto al beccuccio e
premere l’interruttore di erogazione (rif. D); dopo circa 5 secondi inizierà l’erogazione di acqua calda. Dopo
circa due minuti premere nuovamente l’interruttore di erogazione per fermare l’uscita dell’acqua.
Qualsiasi tipo di pulizia, eccezion fatta quella del gruppo erogatore, deve essere eseguita a macchina
spenta e dopo che la macchina si è rareddata. Per pulire la supercie esterna della macchina usare
solamente un panno morbido inumidito con acqua. La vaschetta raccogli acqua (rif. A) va estratta e lavata
con acqua calda e sapone utilizzando una spugna non abrasiva e deve essere accuratamente asciugata
prima del suo reinserimento. Se si rendesse necessaria la pulizia del serbatoio dell’acqua, utilizzare acqua
calda.
Non utilizzare la lavastoviglie per pulire la macchina o suoi componenti.
Si danneggiano irrimediabilmente! Non usare altresì solventi e prodotti o
materiali abrasivi.
Se si utilizzano detergenti per la pulizia del serbatoio, assicurarsi di
risciacquarlo scrupolosamente, poiché eventuali residui chimici all’interno del
serbatoio possono provocare pericolo di intossicazione alimentare.

9
Le riparazioni devono essere eseguite esclusivamente da personale autorizzato e competente. Se non si è
in grado di risolvere i problemi con l’aiuto della presente tabella, rivolgersi al proprio Rivenditore Autorizzato.
ANOMALIE E POSSIBILI SOLUZIONI
Eventuali riparazioni eseguite non rispettando i capitolati di produzione della
Casa costruttrice e/o utilizzando pezzi di ricambio non originali, possono
essere fonte di pericolo per l’utente. Se l’acqua nel serbatoio viene a mancare
si può bruciare la pompa e mandare la macchina in cortocircuito.

PROBLEMA POSSIBILE CAUSA SOLUZIONE
Erogazione del caè
insuciente o impossibile
Serbatoio dell’acqua vuoto Riempire il serbatoio (pag. 6).
Macinatura troppo ne Utilizzare una cialda-carta
nuova. Rivolgersi al Fornitore
delle cialde.
Le bevande erogate sono
fredde anche se la spia (rif.
C) è accesa
Tazze ceramiche fredde Preriscaldare le tazze con
acqua calda, o utilizzare
bicchierini monouso.
Erogazione troppo lenta L’acqua nel serbatoio sta per
nire, riempire il serbatoio
(pag. 6).
Sistema di riscaldamento
difettoso
Rivolgersi al Rivenditore
La pompa fa troppo rumore Serbatoio dell’acqua vuoto Riempire il serbatoio (pag.
6) e premere a ripetizione il
tasto (rif. D).
La “crema” è troppo poca o
manca del tutto
Macinatura troppo grossa Utilizzare una cialda nuova.
Rivolgersi al Fornitore delle
cialde.
Caè non fresco Utilizzare una cialda nuova.
Rivolgersi al Fornitore delle
cialde.
Acqua nel serbatoio
presente da molti giorni
Sostituire l’acqua del
serbatoio (pag. 6)
10

La Società costruttrice Tecno Meccanica S.r.l. con sede amministrativa sita in Via Marlianese
43, 51034 Serravalle Pistoiese (PT) ITALY
Dichiara sotto la propria responsabilità che la macchina per il caè espresso descritta in questo
manuale:
Modello: eco-ZiP Alimentazione: 220v 50/60hz Anno di costruzione: vedi targa CE
È conforme alle Direttive:
2006/42/CE relativa al ravvicinamento delle legislazioni degli Stati membri relative alle
macchine, che sostituisce la Direttiva 98/37/CE;
2014/35/UE relativa al materiale elettrico destinato ad essere adoperato entro taluni limiti
di tensione;
2014/30/UE relativa alla compatibilità elettromagnetica (EMC), che sostituisce la Direttiva
2004/108/CEE;
2009/125/CE (ErP – Ecodesign) relativa al regolamento standby 1275/2008 con modica
801/2013/UE.
L’Amministratore
DICHIARAZIONE DI CONFORMITÀ
11

L’apparecchio è garantito per 1 anno dalla data di acquisto, salvo i termini di legge.
La garanzia è limitata a difetti di fabbricazione o di materiali, non è estesa ai pezzi soggetti ad usura o a
danneggiamenti alle parti delicate (interruttori, cavo di alimentazione, ecc....), e NON è altresì estesa a
danni conseguenti incuria od uso errato dell’apparecchio medesimo (ad esempio utilizzo di acqua con
durezza superiore a 8°F e/o mancato utilizzo o sostituzione di idoneo sacchetto addolcitore, che possono
causare incrostazioni di calcare). In caso di guasto coperto da garanzia, riportare l’apparecchio presso
il Rivenditore dove lo stesso è stato acquistato, muniti di scontrino o fattura sulla quale deve essere
riportato il numero di matricola, che deve corrispondere a quello posto sull’etichetta presente nel retro
dell’apparecchio, accanto alla spina di rete. Solo in questo modo è garantito il ripristino gratuito delle
funzionalità dell’apparecchio, mentre le spese di trasporto rimangono ad esclusivo carico del Cliente. La
garanzia decade in caso di impiego improprio o manomissione, uso della forza e interventi non eseguiti
da nostro personale specializzato. La nostra garanzia non limita comunque i diritti legali del Cliente.
GARANZIA
12
ETICHETTA COLLAUDO - NUMERO DI MATRICOLA

13

Tecno Meccanica S.r.l.
All rights reserved
No part of this manual may be reproduced, copied or divulged by any means without the prior written
authorization of Tecno Meccanica S.r.l.
General safety instructions .................. pag 15
Disposal ...................................................... pag 15
Technical features .................................... pag 15
Installation .................................................. pag 16
Tank lling ................................................... pag 16
Power grid connection ........................... pag 16
Coee spout .............................................. pag 16
Power on ...................................................... pag 17
How to make coee ................................ pag 17
Programmable elecronic dosing ........ pag 18
Steam System ........................................... pag 18
Coee group cleaning ............................ pag 19
Steam wand cleaning .............................. pag 19
Machine cleaning....................................... pag 19
Common problems and possible
solutions....................................................... pag 19
Warranty conditions ................................ pag 22
TABLE OF CONTENTS
Thank you for choosing the CLICK PRO 2 coee machine, a top-quality product entirely
designed, developed, manufactured and tested in Italy. This pod coee machine is primarily
designed for professional use.
Please remember to use only pods provided by your Supplier; the use of dierent pods from
those for which the coee machine was designed may lead to poor coee quality.
A. Drip trays;
B. Coee spouts;
C. Steam boiler pressure switch;
D. Coee group ignition switches;
F. Pod-press levers;
G. Cup warmer;
I. Steam knob;
K. General power switch;
M. Steam wand;
O. Steam boiler pressure gauge.
DD
C
I
O
BB
M
AA
K
F
G
Some general safety instructions are summarized below:
• Read the operating instructions carefully before turning on the coee machine;
• Never perform any operation with wet or damp hands;
• Never cover the machine, not even partially, with cloths or protective covers;
• Do not put your hands near the coee spouts (ref. B), the steam wand (ref. M) and the cup warmer (ref.
G) while the machine is working;
• Do not immerse the machine in water nor use water jets for cleaning;
• This device may only be used by children of at least 8 years of age if adequately supervised, instructed
in the safe use of the device, and aware of the risks involved. Cleaning and/or maintenance operations
should never be carried out by children, unless they are over 8 years of age, and only if adequately
supervised. Keep the coee machine and the cable out of the reach of children under 8 years of age;
• This device can be used by persons with reduced physical, sensory or mental capabilities, or lack of
experience and knowledge, if they are adequately supervised and instructed in the safe use of the
machine and understand the risks involved. Children should never play with the coee machine;
• This device is intended for use in professional and similar applications, such as bars, restaurants,
holiday farms, hotels and other accommodation facilities, guest houses and similar structures.
This product is in compliance with Legislative Decree 151/2005 and European
Directive 2002/96/EC.
At the end of its lifetime, the device must NOT be disposed of with general
household waste. Instead, it must be taken to one of the separate waste collection
centres for electrical and electronic waste set up by the Public Administration.
Proper separate waste collection helps to prevent possible negative eects on
health and environment!
Damage, removal or alteration of the identication plate must be immediately
reported to the Retailer. Warranty claims will not be possible if the identication
plate is damaged, removed or altered.
On the back side of the machine you can nd the identication plate reporting the technical data to be
communicated to the Retailer in case of request for information or technical assistance.
GENERAL SAFETY INSTRUCTIONS
DISPOSAL
TECHNICAL FEATURES
15
POWER SUPPLY: 220-230 V BOILER CAPACITY: 1,1 l
FREQUENCY: 50/60 Hz MAIN MATERIAL: steel
MAX POWER: 2.500 W SIZE LxHxP: 465x365x410 mm
MAX PRESS. COFEE GROUPS: 20 bars WEIGHT: 18 Kg ca.
AVERAGE PRESS. COFFEE GROUPS: 8
bars
TANK CAPACITY: 5,0 l

Remove the machine from the packaging and place it on a stable, horizontal surface, suitable to support its
weight, near a suitable power socket. The coee machine must be installed in an environment with a
minimum temperature of 15°C and a maximum temperature of 25°C. Keep the original packaging in all its
parts for possible future transport.
INSTALLATION
Remove the cup warmer (ref. G) to access the water tank. WE RECOMMEND USING A SOFTENER AND
ANTI-SCALE FILTER that needs to be periodically replaced. Should this not be done, scale deposits may
form inside the machine that could jeopardize its proper functioning and the validity of the warranty. After
having inserted the softener lter inside the tank, ll it with drinking water with low calcium content. We
recommend lling the tank using a funnel and a bottle. To perform all these operations, remove only the
round cap on the right side (the one with the ller pipes) of the tank. Don’t touch the round cap on the
left side (the one with only one tube inserted).
The machine is equipped with a water tank level sensor. If the water in the tank reaches a too low level,
any dispensing in progress is interrupted and the three LED lights on the RIGHT-hand control panel (ref. D)
will start to ash at the same time, indicating that the tank needs to be lled as explained above. To avoid
reaching this point, we recommend you to periodically check the water level.
If water freezes inside the machine system, disconnect the power plug, switch o the machine and place it
in a heated room with a temperature of at least 15°C. Wait about 30 minutes before switching the machine
on and using it again. To prevent the machine from freezing and for an optimal general performance, we
recommend using it in an environment with a temperature not below 15°C.
TANK FILLING
16
The supply voltage of the machine cannot be modied by the user. Before
connecting the device to the power grid, check that the mains voltage
corresponds to the machine’s supply voltage indicated on the identication plate.
While the machine is dispensing coee, do not touch the spouts and do not
expose your face to the hot parts of the machine (danger of burns). The heating
surfaces of the machine are subject to residual heat even after use!
If the external power cable of this device is damaged, it must be replaced by a special cable provided by
theManufacturer or by the Customer Service.
The coee spouts are located on the front side of the machine.
POWER GRID CONNECTION
COFFEE SPOUTS (ref. B)
After switching on the device using the main switch (ref. K), wait about two minutes until the coee
groups reach the ideal operating temperature and are ready for use.
Once this time has elapsed, operate one or both of the pod-press levers (ref. F), lifting them upwards.
Insert a pod in one of the appropriate seats and gently lower the lever until it clicks into place.
Place a cup under the corresponding coee spout (ref. B) and press one of the three keys (short coee,
long coee or manual start/stop) on the corresponding control panel located at the top of the machine
(ref. D). For example, if you want to make a short coee using spout B1, you will have to press key 0 on the
left-hand switch panel:
If instead you want to make a long coee using spout B2, you will have to press key 4 on the right-hand
control panel. Once you have pressed one of the coee dispensing keys, you have to wait about three
seconds for the coee to ow out. Once the programmed dose has been reached, the coee dispensing
stops automatically (except when pressing keys 2 or 5). If you want to stop the dispensing earlier, simply
press the same key again. Once the coee has been dispensed, we recommend removing the pod to
prevent it from sticking as it dries.
It is important to empty the drip trays (ref. A) after dispensing not more than 30 cups of coee.
HOW TO MAKE COFFEE
17
Turn on the machine by pressing the general power switch (ref. K) located on the lower right-hand side of
the machine. This switch only activates the coee brewing units and the additional electric cup warmer
(optional); to also use the steam boiler, it is necessary to use the dedicated switch (ref. C).
POWER ON
B1 B2
03
14
25
Please remember to use only pods provided by your Supplier. The use of dierent
pods from those for which the coee machine was designed may not guarantee
the same dispensing quality.
Your Click Pro 2 coee machine is equipped with an ecient steam system. To use it, you have to operate
the boiler switch (ref. C), which will allow the boiler to heat up. Wait approximately two mintes for the
boiler to reach the ideal operating pressure. Check on the pressure gauge (ref. O) that the pressure is
approximately 2.1 bar: when this occurs, it means that the boiler is ready to generate steam.
To generate steam: insert the steam wand (ref. M) into a cup or any other recipients containing the liquid
to be heated or emulsied (e.g. milk) and turn the steam knob (ref. I) anticlockwise until the correct steam
intensity is reached. Once you have obtained the desired result, turn the same knob (ref. I) clockwise until
the steam output is completely stopped.
STEAM SYSTEM
While the machine is dispensing coee, do not touch the steam wand and/or
the hot water dispenser and do not expose your face to the hot parts of the
machine (danger of burns). The heating surfaces of the machine are subject to
residual heat even after use!
18
The machine has been preset at the factory with a suitable programmed electronic dosing, which takes
into account the specic pressing and grinding of the pods provided by your Supplier. However, you can
customise and modify all pre-set coee doses in the manner specied below. Since the programming of
each of the two panels is independent of the other, you will have to use dierent keys depending on
whether you wish to program the left-hand or the right-hand control panel:
Keep key 2 (left-hand control panel) or key 5 (right-hand control panel) pressed until the corresponding
LED light starts ashing (programming must now be carried out within 15 seconds). To programme a
“short coee” delivered from the coee spout below, rst insert a pod, press key 0 (left-hand control
panel) or key 3 (right-hand control panel) to start the coee dispensing and press it again when the
desired dose has been reached. To programme a “long coee” delivered from the coee spout below,
rst insert a pod, press key (left-hand control panel) or key 4 (right-hand control panel) to start the coee
dispensing and press it again when the desired dose has been reached.
PROGRAMMABLE ELECTRONIC DOSING
If the trays are not emptied, water may leak out.
Any type of cleaning, except that of the brewing unit and the steam wand, must be carried out when the
machine is turned o (general power switch on zero) and after it has cooled down. To clean the external
surface of the machine, use a soft wet cloth. The drip trays (ref. A) must be removed and washed with hot
water and soap using a non-abrasive sponge and must be thoroughly dried before being reinserted.
MACHINE CLEANING
The coee groups must be cleaned weekly. To clean them, you have to make a coee without a pod.
Lower the pod-press lever (ref. F), place suciently large cups under the two coee spouts (ref. B) and
press the respective long coee keys (1 and 4); after about three seconds, hot water will start to ow out.
Once the programmed dose has been reached, the water dispensing will stop automatically.
The steam wand must be cleaned daily if used. To do this, place the steam wand (ref. M) inside a cup or
other recipient containing only clean water and turn the steam knob (ref. I) anticlockwise until the
maximum steam output is reached. After one minute, turn the same knob clockwise again until the steam
output completely stops. Wait until the steam wand has cooled suciently, then clean its outer surface
with a soft cloth dampened with hot water and remove all deposits (e.g. milk) to prevent obstruction of the
steam outlet holes.
COFFEE GROUP AND STEAM WAND CLEANING
COMMON PROBLEMS AND POSSIBLE SOLUTIONS
Do not use the dishwasher to clean the machine or its components. They
would be irreparably damaged! Do not use solvents and abrasive products or
materials.
If you clean the tank with detergents, be sure to rinse it thoroughly, as any
chemical residues inside the tank may cause food poisoning.
Any repairs executed without observing the manufacturing specications
and/or using non-original spare parts may be a source of danger to the user.
If the water in the tank runs out the pumps may burn and consequently the
machine may short-circuit.
19
PROBLEM POSSIBLE CAUSE SOLUTION
Insucient or impossible
coee brewing
Empty water tank Fill the tank (page 16).
Grinding too ne Use a new pod. Contact
coee pod Supplier.
Brewed coees are cold Cold ceramic cups Preheat the cups with hot
water or use disposable
cups.
Faulty heating system Contact the Supplier.
Pump makes too much
noise and does not allow
coee brewing
The pump sucked in air Fill the tank (page 16) and
repeatedly press the manual
coee dispensing switch
(switch 2 of the panel ref. D)
until the pump is correctly
triggered.
The “cream” is not enough
or missing at all
Grinding too coarse Use a new pod. Contact
coee pod Supplier.
Coee not fresh Use a new pod. Contact
coee pod Supplier.
Water has been in the tank
for many days
Replace the water in the
tank paying attention to its
correct re-insertion.
20
Table of contents
Languages:
Other FlyTek Coffee Maker manuals

FlyTek
FlyTek STEEL PRO User manual

FlyTek
FlyTek Zip User manual

FlyTek
FlyTek EXTRA User manual

FlyTek
FlyTek EXCELSA User manual

FlyTek
FlyTek ZIP PRO 4 User manual

FlyTek
FlyTek ZiP Professional User manual

FlyTek
FlyTek MAXIMA User manual

FlyTek
FlyTek ZIP PRO 2 User manual

FlyTek
FlyTek MAXIBAR User manual

FlyTek
FlyTek Zip User manual


Popular Coffee Maker manuals by other brands

Chef-Master
Chef-Master HEB085 instruction manual

essentiel b
essentiel b ECF6 user guide

La Spaziale
La Spaziale S1 Vivaldi Instruction manual for the installer

Mr. Coffee
Mr. Coffee UTC 403 Series Installation and operating instructions

Mr. Coffee
Mr. Coffee BVMC-ECMP1000 quick start guide

Mr. Coffee
Mr. Coffee BVMC-LMX43 user manual


