manuals.online logo
Brands
  1. Home
  2. •
  3. Brands
  4. •
  5. FMS
  6. •
  7. Motorized Toy Car
  8. •
  9. FMS FMS11221RTRGN User manual

FMS FMS11221RTRGN User manual

Length:291mm
Width: 135mm Height:158mm
Wheel base: 187mm Ground clearance: 16mm
Approach angle: 61° Departure angle: 60°
SPECIFICATION
1:12 jimny
Manuel d’utilisation
Instruction Manual
Bedienungsanleitung
操作手册
TABLE OF CONTENTS
02
...................................................................
.............................................................
................................................................
..........................................................................
...........................................................................
.....................................................................
......................................................................
......................................................................
...........................................................................
..................................................................
....................................................................
...................................................
...............................................................
...............................................................
.............................................................
............................................................
EN
SAFETY PRECAUTIONS
RADIO SYSTEM
THROTTLE STICK POSITION
VEHICLE SETUP
OPERATING THE VEHICLE
CAR BODY ASSEMBLY
CHASSIS ASSEMBLY
COCKPIT ASSEMBLY
FRONT AXLE ASSEMBLY
MAIN GEAR BOX ASSEMBLY
REAR AXLE ASSEMBLY
SPRING SHOCK ASSEMBLY
TRANSMISSION GEAR BOX ASSEMBLY
STEERING GEAR
General list of accessories (I)
General list of accessories (II)
03
05
15
15
16
30
31
32
33
34
35
36
36
37
38
39
Introduction
Safety, precautions and warnings
SAFETY PRECAUTIONS
03
EN
This manual is written to assist you in properly operating, maintaining and repairing the vehicle. As many of the
components used are unique to this truck, please retain this manual as a future reference.
Composed of precision-made components, the FMS 1:12 Suzuki Jimny is not a toy, thus it is not suited for
children under 14 years of age. Minors should be accompanied by an adult when operating. Failure to operate or
maintain this vehicle in a safe manner can result in bodily harm.
It is the owner responsibility to operate this product in a safe manner. FMS and its distributors are not responsible
in any way for any and all bodily harm and/ or property damage that may result from the use of this product.
Replace damaged components with original factory-parts. Pay special attention to the polarity of all vehicle
wiring.
• Replace damaged components with original factory-parts. Pay special attention to the polarity of all vehicle wiring.
• Use common sense when selecting the environment to operate your vehicle. Do not operate near power cables,
cellular/radio towers, deep water or unstable terrain. The operator is solely responsible for their actions.
• The product is composed of precision electrical components. It is critical to keep the product away from moisture
and other contaminants.
• Always check the radio range of the vehicle prior to operation in order to prevent radio loss or interference.
• Operate this product within your ability. If the vehicle is dangerous to retrieve, it never worth the risk.
• Always turn on the transmitter before connecting the battery on the model. When turning off the model, always
disconnect the battery first, and then turn off the model, always disconnect the battery first, and then turn off the
transmitter. If this order is reversed, the model may become uncontrollable and cause serious damage.
• Never allow transmitter batteries to run low as it may cause loss of vehicle control.
• Plastics on the vehicle are susceptible to damage or deformation due to extreme heat and cold climate. Do not
store the model near any source of heat such as oven or heater. Store the model indoors, in a climate-controlled,
room temperature environment.
CE compliance information for the european union
The associated regulatory agencies of the following countries recognize the noted certifications for this product as
authorized for sale and use.
Declaration of Conformity
Products: 2.4GHz Controller
Equipment Class: 2
The objects of declaration described above are in
conformity with the requirements of the specifications
listed below.
Item Name : 2.4GHz Controller
The RED Directive 2014/53/EU
EN 60950-1:2006 + A11:2009 + A1:2010 + A12:2011 + A2:2013
EN 300 328 V2.1.1:2016
EN 301 489-1 V2.1.1:2017
EN 301 489-17 V3.1.1:2017
UK DE DK BG SE GZ ES NL SK HU RO FR PT
FI EE LV LT PL AT CY SI GR MT IT IE LU
04
EN
This product is not a toy! (14+) Recommended for ages 14 and up. Adult supervision
required for ages under 14 years old. Contains small parts, keep out of reach of children
3 years of age and younger.
Please read this manual carefully prior to using.We are not responsible for any intention-
al damage or improper use.lf you require any additional information or have any
quesions adout he product or its use,please contact us via(www.fmsmodel.com).
MADE IN CHINA
RF Exposure Compliance
This equipment complies with FCC radiation exposure limits set forth for an uncontrolled environment. This
equipment should be installed and operated with minimum distance 20cm between the radiator and your body.
This transmitter must not be co-located or operating in conjunction with any other antenna or transmitter.
Environmentally friendly disposal
Old electrical appliances must not be disposed of together with the residual waste, but have to be disposed of
separately. The disposal at the communal collecting point via private persons is for free. The owner of old appli-
ances is responsible to bring the appliances to these collecting points or to similar collection points. With this
little personal effort, you contribute to recycle valuable raw materials and the treatment of toxic substances.
Certification
FCC Compliance Statement
This device complies with Part 15 of the FCC Rules. Operation is subject to the following two conditions:
(1) this device may not cause harmful interference, and (2) this device must accept any interference received,
including interference that may cause undesired operation.
Warning: changes or modifications not expressly approved by the party responsible for compliance could void
the user's authority to operate the equipment.
This equipment has been tested and found to comply with the limits for a Class B digital device, pursuant to
Part 15 of the FCC Rules. These limits are designed to provide reasonable protection against harmful interfer-
ence in a residential installation. This equipment generates, uses and can radiate radio frequency energy and,
if not installed and used in accordance with the instructions, may cause harmful interference to radio communi-
cations. However, there is no guarantee that interference will not occur in a particular installation.
If this equipment does cause harmful interference to radio or television reception, which can be determined by
turning the equipment off and on, the user is encouraged to try to correct the interference by one or more of the
following measures:
1.Reorient or relocate the receiving antenna.
2.Increase the separation between the equipment and receiver.
3.Connect the equipment into an outlet on a circuit different from that to which the receiver is connected.
4.Consult the dealer or an experienced radio/TV technician for help.
FCC ID: N4ZR4A10
RADIO SYSTEM
Safety symbols
Pay close attention to the following symbols and their meanings. Failure to follow these warnings could cause damage,
injury or death.
Danger Not following these instructions may lead to serious injuries or death.
Warning Not following these instructions may lead to major injuries.
Attention Not following these instructions may lead to minor injuries.
05
EN
Prohibited Mandatory
Do not use the product at night or in bad weather like rain or thunderstorm. It can cause
erratic operation or loss of control.
●
Do not use the product when visibility is limited.
●
Do not use the product on rain or snow days. Any exposure to moisture (water or snow)
may cause erratic operation or loss of control.
●
Interference may cause loss of control. To ensure the safety of you and others, do not
operate in the following places:
1、Near any site where other radio control activity may occur
2、Near power lines or communication broadcasting antennas
3、Near people or roads
4、On any body of water when passenger boats are present
●
Do not use this product when you are tired, uncomfortable, or under the influence of
alcohol or drugs. Doing so may cause serious injury to yourself or others.
●
The 2.4GHz radio band is limited to line of sight. Always keep your model in sight as a
large object can block the RF signal and lead to loss of control.
●
Do not touch any part of the model that may generate heat during operation, or imme-
diately after use. The engine, motor or speed control, may be very hot and can ause se-
rious burns.
●
Misuse of this product may lead to serious injury or death. To ensure the safety of you
and your equipment, read this manual and follow the instructions.
●
Make sure the product is properly installed in your model. Failure to do so may result
in serious injury.
●
Make sure to disconnect the receiver battery before turning off the transmitter. Failure
to do so may lead to unintended operation and cause an accident.
●
Ensure that all motors operate in the correct direction. If not, adjust the direction first.
●
Make sure the model stays within the systems maximum range to prevent loss of control.
●
Safety guide
06
EN
Introduction
From the amazingly detailed interior, outer body, chassis and suspension, this is an RC model that replicates its
full-size counterpart in virtually every area. The 1:12 Suzuki Jimny is ready to conquer the wilderness.
• Officially licensed product of the Suzuki Motor Corporation.
• Ready-to-Run 4WD.
• Painted body in the original coating, with stainless marks using the photo-etching technique.
• Electroplating Suzuki logo and light cups.
• Photo-etching honeycomb grille and authentic movable rear-view mirror.
• Fine wheel artwork mounted with natural rubber tires.
• Bumpers, wheel fenders and roof can be disassembled for personal modification.
• Outstanding car light system with up to 15 LEDs.
Headlights: Full Beam / Dipped
Turn signals: Activated when turning / Dual flash switch
Fog lights: Front & rear fog lights can be activated remotely
Brake lights: Activated when parking
Reverse lights: Activated when reversing
Realistic Body Details
• Lift the hood for a featured lifelike scale engine with delicate detailing.
• Side doors open similar to the real Jimny.
• The steering wheel is driven by an independent servo andinked to the front wheel steering.
• Adjustable front seats, a perfect match for 1:12 figures.
• Open the backdoor, flatten the rear seats and enjoy some spacious storage!
• The trunk features a hidden storage area.
• Super detailed interior and dashboard.
Chic Interior
• Solid frame-full chassis structure.
• Metal frame rails.
• Front & rear 3-link rigid axle suspension with coil spring.
• The scale engine houses a 180 motor with a two-speed transmission.
• Metal gears.Metal gears.
• 25 stainless steel ball bearings.
• Super detailed interior and dashboard.
• Battery, servo, receiver, ESC, light control — all under the hood.
Robust Chassis
07
Introduction
FS-R4A1 based on ANT protocol is a three-in-one receiver with ESC and LED light group control board. It has
an external single antenna, can output PWM signal and light control signal, can implement two-way transmis-
sion, adopts automatic binding, and has a compact design, which can be adapted to various model cars.
Transmitter intruction
Transmitter Overview
[1]
[2]
[3]
[4]
[5]
[6]
[7] [13]
[12]
[14]
[16]
[15]
[17]
[18]
[8]
[9]
[11]
[10]
[1] Traversing handwheel, 35 degrees on
each side (CH1) [10] ST.D/R
[2] Throttle button, 25 degrees in front and
12.5 degrees at rear (CH2) [11] TH.D/R
[3] Push button switch (CH4) [Push button
function is flip type] [12] Switch to the electric adjustment mode
[4] Three-position toggle switch (CH3) [13] TH.REV
[5] Lanyard hole [14] G.LED
[6] Handle, 4*AAA battery compartment [15] BIND
[7] ST.REV [16] ST.TRIM
[8] R.LED [17] TH.TRIM
[9] RX.BATT [18] Power Switch
EN
EN
[1] CH1
[2] CH3
[3] CH4
[4] Left-turn light port
[5] Head light port
[6] Right-turn light port
[7] Head light port
[8] Fog light port
[9] Fog light port
[10] Antenna
[11] Power switch
[12] Battery line "+"
[13] Battery line "-"
[14] Motor port "+"
[15] Motor port "-"
[16] Stickers
[17] LED
[18] Left-turn light port
[19] Right-turn light port
[20] Reversing light port
[21] Brake light port
[22] Taillight port
[23] Signal pin
[24] Power "+"
[25] Power "-"
• Product Name: FS-R4A1
• Adaptive transmitter: FS-MG41
• Model Type: Car
• Channels: 4
• Numbers of Light Interfaces: 7
• RF: 2.4GHz ISM
• 2.4G Protocol: ANT
• Antenna: Single antenna
• Input Power: Lipo (2S)/NiMH (5~7Cell)
• BEC Output: 6V/1A
• Continuous/Peak Current: 10A/50A
• Data Output: PWM
• Temperature Range: -10℃—+60℃
• Humidity Limit: 20%~95%
• WaterProof: PPX4
• Online Update: No
• Dimensions: 33mm*30mm*12mm
• Weight: About 11g
• Certification: CE, FCC ID: N4ZR4A10
08
Overview
Specifications
Binding
The receiver automatically enters the binding state once it is powered on.
Press the BIND Key to turn on the transmitter and allow it to enter its binding state. Here, G.LED flashes
quickly, and operator releases the BIND Key.
1. When the receiver is powered on and waits for 1 second, it will automatically enter the binding state if it is
not connected;
2. After the binding is successful, the LED indicator of the receiver is always on.
Notes: (1) Set the transmitter to its binding state first, and then set the receiver to its binding state. If the
binding is not completed within 10s, the indicator light of the receiver will enter its slow flashing state.
(2) If re-binding is successful, all the settings of the car lights will be restored to their default values.
[12]
[11]
[13]
[14]
[15]
[6][7][8][9]
[10]
[19] [20][17] [18]
[16]
[3]
[4]
[5]
[2]
[1]
[22][21]
[23]
[24]
[25]
EN
ESC protection
This receiver has multiple prompt functions such as power-on self-check display, overheating alarm prompt,
and low/high voltage alarm prompt.
• Self-check display: all car lights will be on for 1S when the receiver is powered on;
• Overheating alarm: When the internal temperature of the ESC is detected to exceed 110℃,motor has no
output, all car lights flash promptly, and the normal output will be restored when the temperature is lower than
70℃;
• Low/high voltage alarm: When the receiver enters the low voltage protection, motor has no output, and all the
lights flash slowly; when the receiver enters the high voltage protection, all channels have no output. All car
lights flash promptly.
Headlight control
The lights control works mainly through the setting of transmitter to achieve the conversion between
lighting state and lighting mode.
This receiver presets five light control modes and each mode shares the same light state of reversing lights,
that is, when the model car is reversed, the reversing lights stay on with high brightness, and vice versa off.
While its turn signals, headlights, brake lights, taillights and fog lights vary from one another as described
below:
• Default mode: Default mode: In this mode, whether the model car turns or not, the turn signal stays off;
when the brake is applied, the brake light is on with high brightness and vice versa off; all the headlights, tail-
lights and fog light stay off.
• Mode A: In this mode, when the model car turns, turn signals shows slow flashing and when brake is applied,
the brake light is on with high brightness, vice versa low light; The headlights are in a low light state; the tail
lights and fog lights are always off.
• Mode B: In this mode, when the model car turns, turn signals shows slow flashing; when brake is applied, the
brake light is on with high brightness, vice versa low light; the headlights are on with high brightness; the tail-
lights and fog light are always off.
• Mode C: In this mode, whether the model car turns or not, the turn signal keeps slow flashing; when brake is
applied, the brake light is on with high brightness, vice versa low light; the headlights are on with high bright-
ness, the taillights and fog light are on.
• Mode D: In this mode, when the model car turns, the turn signal shows slow flashing; when brake is applied,
the brake light is on with high brightness, vice versa off; the headlights are in constant off state; the tail lights
and fog light are in constant on state.
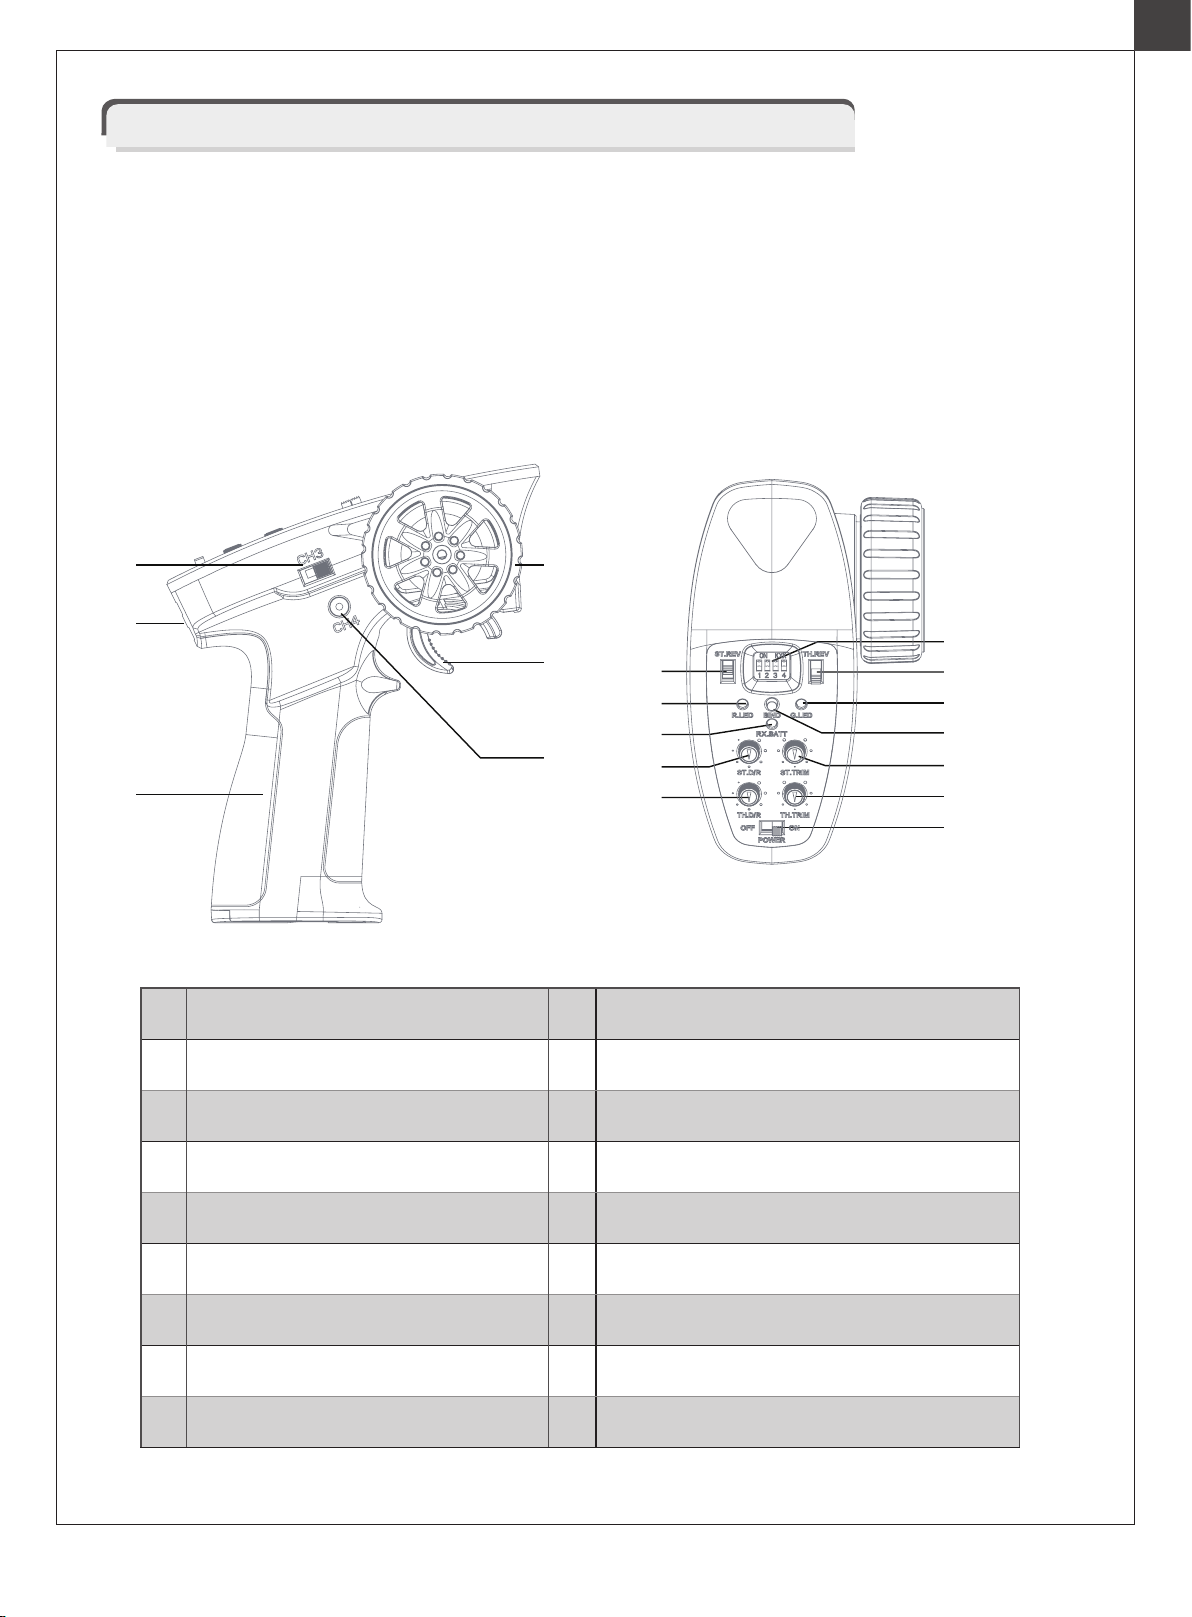
Note: (1) Press button CH4 on the remote control to switch the working mode in turn, from default mode, mode
A, mode B, mode C to mode D. Each press comes with a switch in mode.
(2) Default mode is on every time when you turn on the system.
(3) Mode C represents the emergency light working state,with both the left and right turn signal lights
working together as emergency lights by synchronously slow flash.
09
ESC function instructions
1.Connect related equipment:
Make sure the ESC is off before connection.
Connect the motor with M+ and M- of ESC. Con-
nect the steering servo to the 3Pin interface
marked with "ST" of ESC (- + S connected corre-
spondingly). Connect the battery with the positive
and negative poles of ESC correspondingly.
Battery
Motor
ESC&RX
LED
Servo
10
Failsafe
This function is used to protect the safety of the model and the operator when the receiver cannot normally
receive the signal from the transmitter and is out of control. The receiver defaults that the throttle channel is
fixed to be out of control and enters the brake state. After other channels are out of control, the receiver has no
signal output. If you set it on the transmitter, it will output according to the set value.
Attention:
• Make sure the product is installed and calibrated correctly, failure to do so may result in serious injury.
• Please carefully check each power device and car frame instructions to ensure the power matching is reason-
able before use. Avoid damaging power system due to incorrect matching.
• Do not let the external temperature of the system exceed 90℃/194 ℉, because high temperature will
damage the power system.
• Make sure the receiver's battery is disconnected before turning off the transmitter, failure to do so may lead to
unintended operation or loss of control.
• After use, remember to disconnect the battery and the ESC. If the battery isn't disconnected, the ESC will
consume electric energy all the time even if it is off. It will discharge completely if connect the battery for a long
time, thus resulting in the failure of the battery or the ESC. We are not responsible for any damage caused by
this!
• Make sure the receiver is mounted away from motors or any device that emits excessive electrical noise.
• Keep the antenna of the receiver at least 1cm away from conductive materials such as carbon or metal.
• Do not power on the receiver during the setup process to prevent loss of control.
2. Normal boot, identification throttle midpoint:
After connecting related equipment as step 1, turn on the radio first, move the throttle trigger to the neutral posi-
tion. Turn on the switch of ESC at last. The receiver will automatically recognize the battery type when it is pow-
ered on again. Then it can run it.
Notes:
a. The ESC can be run after completing self-inspection (about 3 seconds) if power on, otherwise it cannot be
operated normally.
b. If there is no power output and the red light of ESC flashes quickly after power on, please check whether the
throttle trim of the transmitter is set to the "0" position, the receiver will automatically recognize the midpoint of
the trim throttle after restarting;
c. If the rotation direction is not correct during running, exchange the two wires connecting motor and ESC.
d. To make sure everything is ok, please turn on the transmitter first and finally turn on the ESC, turn off the
ESC first and finally turn off the transmitter.
Notes: Please refer to the relevant sections for details about the battery type, drag brake force and running
mode of the ESC.
ENEN
Dial Switch sign
ESC Parameter Setting
The Dial Switch on the transmitter is used to set ESC parameters, that is, the Dial Switch is located at different posi-
tions and the corresponding parameter values are different.
Setting Method:
There are three parameters can be set for the ESC, which are "Running mode", "Battery type", "Drag brake", There
are slide switches numbered 1 2 3 4 on the radio panel . The above parameters can be set by dialing down and up.
The specific operation is as follows:
When No. 1 slide switch is on the down, it indicates that the operation mode is set to FWD / REV / BRK.
When No. 1 slide switch is on the up, it indicates that the operation mode is set to FWD/REV.
When No. 2 slide switch is on the down, it indicates that the battery type is set to Lipo.
When No. 2 slide switch is on the up, it indicates that the battery type is set to NiMH.
When No. 3 and No.4 slide switch are on the down, it indicates that the drag brake force is set to 0%.
When No. 3 slide switch is on the down and No.4 slide switch is on the up, it indicates that the drag brake force is set
to 50%.
When No. 3 slide switch is on the up and No.4 slide switch is on the down, it indicates that the drag brake force is set
to 75%.
When No. 3 and No.4 slide switch are on the up, it indicates that the drag brake force is set to 100%.
Parameter Explanation:
1. Running Mode
FWD/REV/BRK: This mode adopts "double click” reverse mode, that is, when the throttle trigger is pushed from
netural range to the reverse area for the first time, the motor is only braking and will not reverse; when the throttle
trigger is moved back to the netural range and pushed to the reverse area for the second time, it will reverse. This
mode is applicable to general models.
FWD/REV: This mode adopts "one click" reverse mode, that is, when the throttle trigger is pushed from netural range
to the reverse area, the motor immediately generates reverse action, which is generally applied to rock crawler.
Parameter setting method:
When No. 1 slide switch is on the down, it indicates that the operation mode is set to FWD / REV / BRK.
When No. 1 slide switch is on the up, it indicates that the operation mode is set to FWD/REV.
2. Battery Type
There are LiPo and NiMH cells. The low-pressure protection value is different under different types. It can be set
according to the actual use.
Parameter setting method:
When No. 2 slide switch is on the down, it indicates that the battery type is set to Lipo.
When No. 2 slide switch is on the up, it indicates that the battery type is set to NiMH.
3. Drag Brake Force
The drag brake means that when the throttle trigger moves from the forward or reverse area to netural range, it will
produce certain braking force to the motor, the larger the value is, the greater the drag brake force is. Select proper
braking force according to the actual situation.
Parameter setting method:
When No. 3 and No.4 slide switch are on the down, it indicates that the drag brake force is set to 0%.
When No. 3 slide switch is on the down and No.4 slide switch is on the up, it indicates that the drag brake force is set
to 50%.
When No. 3 slide switch is on the up and No.4 slide switch is on the down, it indicates that the drag brake force is set
to 75%.
When No. 3 and No.4 slide switch are on the up, it indicates that the drag brake force is set to 100%.
11
EN
12
EN
Times for Pressing
Button
CH4
Light
Position
Headlight
White
headlights
keep on
Taillights
keep on
Reversing
white lights
Left turn
yellow light
Right turn
yellow light
The brake
lights show
double
flash in the
left and
right turn.
The yellow
headlights
keep on
The red
taillights
keep on
White
headlights
keep on
with high
brightness
Taillights
turn red
with high
brightness
amid brake
operation
OFF OFF OFF
OFF
OFF
Throttle linkage
control
Brake lights are on
with high brightness
amid brake operation
Reverse lights are on
amid reverse opera-
tion
Throttle linkage
control
•
Fog lamp
Taillights
Function Power on
is off by
default I II Control Mod Remarks
•
OFF
OFF
OFF
OFF
OFF
OFF OFF
OFFOFF
OFF
III IV V
• •
• •
• •
• •
Turn
Signal
Direction linkage
controL
Direction linkage
controL
3 left turn signals
automatically blink in
the left turn with a
1-sec flashing
frequency, namely on
0.5 sec and off 0.5 sec.
3 right turn signals
automatically blink in
the right turn with a
1-sec flashing
frequency, namely on
0.5 sec and off 0.5 sec.
A total of 6 left and right
turn signals flash
automatically regard-
less of direction with a
1-sec flashing
frequency, namely on
0.5 sec and off 0.5 sec.
•
OFF
OFF
OFFOFFOFF OFF
Lighting function
13
EN
Getting started
Before operation, install the battery and connect the system as instructed below.
Danger Do not expose to excessive heat or liquids.
Danger Do not open, disassemble, or attempt to repair the battery.
Danger Do not crush/puncture the battery, or short the external contacts.
Danger Do not use the battery if damaged.
Danger Do not drop the battery or expose to strong shocks or vibrations.
Danger Always store the battery in a cool, dry place.
Danger Only use specified battery (X4 AA batteries).
Transmitter Battery Installation
1.Open the battery compartment cover.
2.Insert 4 fully-charged AAA batteries into the compartment. Make sure that the battery makes good contact with the
battery compartment's contacts.
3. Replace battery compartment cover.
Battery Type: AAA
Battery Installation:
Low battery alarm: When the battery is lower than 4.2V, the LED on the panel will flash slowly.
Instructions
After setting up, follow the instructions below to operate the system.
1. Automatic code matching (the transmitter and receiver have been successfully coded before leaving the
factory.)
1. When the transmitter power is on and the code matching mode is on, the light keeps flashing;
2. The power supply of the receiving board is turned on, and the front lights keep flashing to enter the code matching
mode;
3. When the code matching is successful, all the transmitter lights are on and all the lights on the car are off;
If you need to replace another transmitter or receiver, please follow the following steps to code:
Note: when code matching, please operate the transmitter to enter the code matching state first, and then operate the
receiver to enter the code matching state.
14
EN
2、POWER OFF
Instructions
1.Transmitter specification
1.Disconnect the receiver power.
2.Toggle the transmitter's power switch to the off position.
Follow the steps below to turn off the system:
Danger Make sure to disconnect the receiver power before turning off the transmitter. Failure
to do so may lead to damage or serious injury.
Product Model
Channels
Model Type
RF
RF Power
2.4GHz Protocol
Distance
Channel Resolution
Battery
Charging Interface
Life time
Low Voltage Warning
Antenna Type
Data Interface
Temperature Range
Humidity Range
Online Update
Color
size
weight
Certification
FS-MG41
4
Car, Boat
2.4GHz ISM
<20dBm
ANT
>150m(ground)
1024
6V DC 1.5AAA*4
NO
According to battery type
<4.2V
Built-in single antenna
No
-10°C— +60°C
20—95%
No
Black
118mm x 73mm x 145mm
130g
CE,FCC ID:N4ZMG400
THROTTLE STICK POSITION
Throttle stick position
Top point of backward directionTop point of forward directionNeutral point
15
EN
Connecting the battery
VEHICLE SETUP
Step 1: open the hood.
Step 2: place the battery in the battery box and connect the battery plug.
EN
16
OPERATING THE VEHICLE
Step 1: turn on the transmitter, the headlamp of the transmitter will flash and enter the frequency matching mode.
Step 2: turn on the receiver switch, the headlight will flash and enter the frequency matching mode.
Step 3: when the transmitter and receiver are successful in frequency up, the front lights of the transmitter will be on for a
long time, and the front lights of the vehicle will be off.
目录
17
.............................................................................
..............................................................................
..................................................................................
.................................................................................
................................................................................
......................................................................................
......................................................................................
..................................................................................
...............................................................................
......................................................................................
..................................................................................
...............................................................................
...............................................................................
.............................................................................
.............................................................................
..................................................................................
CN
安全保障措施
无线电系统
油门扳机位置
车辆设置
车辆操作
车壳
车底
座舱
前桥组件
驱动牙箱组
后桥组件
避震组件
分动牙箱组
转向舵机组
配件表明细一
配件表明细二
18
18
28
29
29
30
31
32
33
34
35
36
36
37
40
41
指引
安全、预防措施及警告
安全保障措施
18
无线电系统
安全符号
仔细阅读以下符号及其相关说明,如不按照以下指引进行操作,可能会导致设备损坏或人员伤亡。
CN
危险
警告 如果不按照说明方法操作,可能导致操作者或他人遭受较大伤害。
注意 如果使用者不按照说明方法操作,有可能导致操作者或他人受到轻微伤害。
如果不按照说明方法操作,可能导致操作者或他人严重受伤,甚至遭受生命危险。
本手册可以有效帮助您正确操作、维护和修理本品。由于本品所涉多数部件为特有部件,请保留本手册作为未来
参考之用。
这款产品由精密制造的组件组成,非玩具级别,不适合14岁以下的儿童操作使用。
未成年人应在有经验的成年人陪同下操作使用。不当操作或维护会造成车辆损坏,甚至可能导致人身及财产损
失。
本品操作者需以安全的方式操作本品。FMS及其分销商不以任何方式对不当使用本产品所可能造成的任何人身伤
害或财产损害负责。
• 请使用原厂部件更换损坏的部件。特别注意所有车辆接线的正负极。
• 务必选择合适的环境操作遥控模型,所选环境需远离电缆、无线电塔、深水及不稳定地形。本品操作者对其行为全权负责。
• 本品由精密电子部件构成。请勿将本品暴露于潮湿的环境或者其他污染物中,以免造成损坏。
• 确保每次操作前检查车辆的无线接收范围,以防止无线信号丢失或受干扰。
• 在您的能力范围内操作此产品。在任何时候,如果车辆操作有危险,则绝对不值得冒险。
• 通电方式:务必先开遥控器再将车子通电。断电方式: 务必先将车子断电再关遥控器。以上顺序如逆转,则可能引起遥控模型失
控,导致人身伤害或财产损失。
• 遥控器电池低电时,不要操作模型车,以免造成失控。
• 模型产品上的塑胶件容易因极冷或极热气候出现变形或损坏的状况。所以请将模型产品存放于常温环境中。
使用前请仔细阅读本手册。 我们不对任何故意损坏或不当使用负责。 这个产品不是玩
具! 建议 14 岁及以上者使用。 14 岁以下的用户 , 需要在成年人监督下使用。 本产品部
分包含小零件,请务必保证 3 岁及以下儿童不能接触本产品。
MADE IN CHINA
19
禁止 强制
请不要在夜晚或雷雨天气使用本产品,恶劣的天气环境有可能导致遥控设备失灵。
●
请不要在能见度有限的情况下使用本产品。
●
请不要在雨雪或有水的地方使用本产品。 如果有液体进入到系统内部,可能会导致运行不
稳定或失灵。
●
信号干扰可能导致设备失控。为保证您和他人的安全,请不要在以下地点使用本产品:
1、通信基站附近或其他无线电活跃的地方
2、人多的地方或道路附近
3、水域附近
4、高压电线或通信广播天线附近
●
当您感到疲倦、不舒服,或在摄入酒精或服食导致麻醉或兴奋的药物后,不要操作本产品。 否则
可能对自己或他人造成严重的伤害。
●
2.4GHz无线电波段完全不同于之前所使用的低频无线电波段。 使用时请确保模型产品在您的
视线范围内,大的障碍物将会阻断无线电频率信号从而导致遥控失灵模型失控。
●
在操作或使用模型后,请勿触摸任何可能发热的部位, 如电池、电机等。这些部件可能非常热,
容易造成严重的烧伤。
●
遥控设备使用不恰当可能导致操作者或他人严重受伤,甚至死亡。为保证您和设备的安全,请
仔细阅读使用说明书并按照要求进行操作。
●
使用前必须确保本产品与模型安装正确,否则可能导致模型发生严重损坏。
●
关闭时,请务必先关闭接收机电源,然后关闭发射机。 如果关闭发射机电源时接收机仍然在工
作, 将有可能导致遥控设备失控或者引擎继续工作而引发事故。
●
操控时,请先确认模型所有舵机的动作方向与操控方向一致。 如果不一致,请调整好正确的方向。
●
当遥控距离较远时,有发生失控的可能,请适当缩短遥控距离。
●
安全信息
CN
20
产品介绍
1:12 吉姆尼 Jimny
世界上第一台同时具备外观仿真、精细内饰、底盘结构也完全还原实车的仿真遥控模型;
外观:
• 获得铃木公司官方授权,细节一丝不苟的高度仿真
• 产品以涂装完成品的形态发售
• 完全还原的轮毂和轮胎
• 全尺寸备胎可以取下使用
• 大灯可以点亮,有远近光切换功能
• 前、中、后转向灯有转向联动和双闪切换功能
• 前后雾灯可遥控点亮
• 尾灯、高位刹车灯均可点亮并有刹车联动功能
• 倒车灯在倒车时自动点亮
内饰:
• 引擎盖可以打开,且有仿真的发动机造型和管线排布
• 两侧车门可以打开,开启角度亦和实车相仿
• 方向盘由独立舵机驱动与前轮联动转向
• 前排座椅可前后调节,方便容纳 1/12 可动人偶
• 后排座椅可以安全放平,呈现和实车一样的强大的收纳
• 后排杂物箱可以打开,以容纳各类工具配件
• 后备箱可以打开
底盘:
• 扫描实车,完美呈现 JIMNY 非承载式底盘,前后标配金属止推杆螺旋弹簧的结构特点
• 180 电机包裹在仿真的发动机外壳内
• 两档机械变速箱包裹在仿真的变速箱内
• 电池、舵机、接收机、电调、灯控全部整合在引擎盖下
• 全车金属齿轮
• 金属万向节传动轴
• 滚珠轴承
CN

Other FMS Motorized Toy Car manuals

FMS 11802 ROC004RTR User manual

FMS

FMS 11802 ROC004RTR User manual

FMS 1:24 FCX24 MAX SMASHER User manual

FMS

FMS 1:24 FCX24 MAX SMASHER User manual

FMS HUMMER H1 User manual

FMS

FMS HUMMER H1 User manual

FMS 1/24 FMT24 CHEVROLET COLORADO User manual

FMS

FMS 1/24 FMT24 CHEVROLET COLORADO User manual

FMS FMM054P User manual

FMS

FMS FMM054P User manual

FMS 1/12 Land Rover II Series User manual

FMS

FMS 1/12 Land Rover II Series User manual

FMS 11035 User manual

FMS

FMS 11035 User manual

FMS TOYOTA LC80 Land Cruiser User manual

FMS

FMS TOYOTA LC80 Land Cruiser User manual

FMS 1:12 TOYOTA FJ45 Pick-up User manual

FMS

FMS 1:12 TOYOTA FJ45 Pick-up User manual

FMS HT-TX02 User manual

FMS

FMS HT-TX02 User manual

FMS 1:24 FCX24 MAX SMASHER User manual

FMS

FMS 1:24 FCX24 MAX SMASHER User manual

FMS DPFMS10602RTR User manual

FMS

FMS DPFMS10602RTR User manual

FMS 1:24 FCX24 UNIMOG User manual

FMS

FMS 1:24 FCX24 UNIMOG User manual

Popular Motorized Toy Car manuals by other brands

Horizon Hobby Axial SCX10 II UMG10 Kit instruction manual

Horizon Hobby

Horizon Hobby Axial SCX10 II UMG10 Kit instruction manual

Fisher-Price POWER WHEELS CDD22 owner's manual

Fisher-Price

Fisher-Price POWER WHEELS CDD22 owner's manual

FRP Electric Kids manual

FRP

FRP Electric Kids manual

Avson 370-237V80 owner's manual

Avson

Avson 370-237V80 owner's manual

LaTrax Valentino Rossi THE DOCTOR RALLY VR46... owner's manual

LaTrax

LaTrax Valentino Rossi THE DOCTOR RALLY VR46... owner's manual

Amewi FR16 manual

Amewi

Amewi FR16 manual

Jamara 405053 instructions

Jamara

Jamara 405053 instructions

REVELL Out Speeder instructions

REVELL

REVELL Out Speeder instructions

Mini Pro Chassis Dyno V1 instruction manual

Mini Pro

Mini Pro Chassis Dyno V1 instruction manual

Kyosho MINI-Z Racer AWD MA-10 Type instruction sheet

Kyosho

Kyosho MINI-Z Racer AWD MA-10 Type instruction sheet

Jamara 405148 Instruction

Jamara

Jamara 405148 Instruction

Fisher-Price Power Wheels X6645 owner's manual

Fisher-Price

Fisher-Price Power Wheels X6645 owner's manual

Ofna Racing titan twin instruction manual

Ofna Racing

Ofna Racing titan twin instruction manual

Carisma Racing 4XS instruction manual

Carisma Racing

Carisma Racing 4XS instruction manual

Avigo BMW X5 Owner's manual and assembly instructions

Avigo

Avigo BMW X5 Owner's manual and assembly instructions

Caretero Toyz Sport Car user manual

Caretero

Caretero Toyz Sport Car user manual

Aosom 370-235V80 manual

Aosom

Aosom 370-235V80 manual

Kyosho MINI-Z Racer MR-02 RM Type instruction sheet

Kyosho

Kyosho MINI-Z Racer MR-02 RM Type instruction sheet

manuals.online logo
manuals.online logoBrands
  • About & Mission
  • Contact us
  • Privacy Policy
  • Terms and Conditions

Copyright 2025 Manuals.Online. All Rights Reserved.