FONESTAR SCI-750 User manual

SCI-750, SCI-760P,
SCI-770D
WIRELESS UHF
CONFERENCE SYSTEM
INSTRUCTION MANUAL

- 2-
We take this opportunity to thank you for buying this product.
We recommend you read the instruction manual before switching on the machine and follow the instructions
that are given. Keep the manual for future reference.
ECURITY AND THE ENVIRONMENT
ELECTRICAL SECURITY
Check that the current in the mains connection where the machine is to be installed corresponds to the
power supply of the machine.
To avoid damaging the equipment, electrical shocks, fire or physical injury when you connect or disconnect
the equipment from the power supply, pull the plug firmly out of the mains socket holding the plug, never the
cable.
Always do this with dry hands.
Keep the power supply cable far from sources of heat. Do not put heavy objects on top of it or change it.
Clean dust and dirt off the power supply cable regularly.
Do not open the machine; you could get an electric shock.
CAUTION
While installing the machine, make sure it is switched off and unplugged.
Do not open the machine. Touching the internal parts is dangerous and you could receive an electric shock.
The machine must not be splashed or dripped on. Never place recipients with liquid inside on the machine.
Do not place anything inside the machine.
LOCATION
Place the equipment on a horizontal surface with enough space around it to allow ventilation.
Avoid direct sunlight, heat sources and excessive dust.
Do not place the machine near magnetic fields or static electricity.
Do not use surfaces which vibrate or receive impact.
Do not pile machines on top of one another.
VENTILATION
Never block or cover the ventilation slits on the machine.
Do not expose it to direct sunlight or place it near sources of heat.
PERIODS OF INACTIVITY
When the machine is not going to be used for a long period of time, disconnect it from the mains.
If you are using an adapter, take into account that it will continue using electricity even if the machine is
switched off. If it is not going to be used for a long period of time, disconnect it from the mains.
THE ENVIRONMENT
To save energy, switch the machine off when you are not going to use it for a long time. The machine could
contain substances that are harmful to the environment or human health. To minimize the effect of these
substances the machine must be correctly managed and recycled when you decide to dispose of it.
When you dispose of it remember: it cannot be thrown into a conventional rubbish bin.
If it contains or uses batteries, these must be disposed of separately.
The machine (without batteries) must be disposed of correctly. Put it in a container specially intended for the
collection of electronic and electrical appliances, at the dump or hand it over to the dealer when you purchase
similar equipment, so that the dealer can dispose of it correctly (at no added cost).
EN

- 3-
IGNIFICANCE OF THE YMBOL ON THE MACHINE*
The symbol formed by the expression “Class 1 laser product” written in a rectangle
indicates that visible or invisible laser radiation could be produced. Avoid direct exposure
to the laser.
The symbol formed by a ray of lightening inside a triangle shows that the machine has
connection terminals or a circuit with areas with a current which could cause an electric
shock, even in normal working conditions.
The symbol formed by an exclamation mark in a triangle shows that the instruction manual
must be referred to for information on how the machine works and its use.
The symbol formed by one square inside another square shows that the machine has
double electrical insulation.
The European Community symbol shows that the machine complies with the current
European Union legislation, as well as its transposition to local legislation.
The symbol of a rubbish bin crossed out and over a horizontal line shows that when the
product is disposed of it must be done properly, placing it in a special selective electronic
and electrical equipment container or through a dealer when purchasing a similar product,
at no additional cost. It also shows that the machine was put on the market after 13th
August 2005 (European Community Directive 2012/19/EU of Electrical and Electronic
recycling, and its Spanish equivalent R.D.219/2013).
In accordance with what is set out in the aforementioned decree, FONESTAR is registered
in the RAEE (Registro de Aparatos Eléctricos y Electrónicos) in a special section REI
(Registro de establecimientos Industriales), with the entry number 001851.
*It is possible that some of these symbols do not appear on the machine.
EXEMPTION OF LIABILITY
The characteristics of the equipment and the content of the manual can change without forewarning.
FONE TAR, .A. does not assume responsibilities regarding the inappropriate use of the equipment or the
information supplied in this instruction manual, and specifically disclaims any implied liability for marketability
or fitness for any other use.
All rights reserved by FONE TAR, .A.
EN

DE CRIPTION
Wireless conference system, which combines the characteristics of a conference system (priority and
selection of maximum number of open microphones) with those of a wireless microphone system (mobility
and ease of installation).
The control unit CI-750 has different microphone operating modes: limit, FIFO or Chairman Only. It is
possible to use one president microphone CI-760P and up to 255 delegate microphones CI-770D. The
microphones are switch activated and the president microphone can have priority over the delegate
microphones.
The most important characteristics of the wireless system are described below:
CI-750 Control unit
- Microprocessor-based control unit.
- Priority control with delegate cut-off while the president has priority.
- Maximum number of microphones in use selector.
- Audio and control signal transition between the switchboard and the microphones.
CI-760P Wireless desktop president microphone
CI-770D Wireless desktop delegate microphone
- Wireless desktop microphone UHF 610-665 MHz.
- President microphone with priority and control over delegate microphones.
- Information display.
- Gooseneck microphone.
- LED operating ring.
- Automatic channel selection.
- 60 m range in favourable conditions and without obstacles.
CONTROL AND FUNCTION
CI-750 CONTROL UNIT
FRONT PANEL
1.- USB/MP3 player/recorder information display.
2.- USB storage device connection port.
3.- Conference system configuration information display.
4.- w/s: allow the menu options for the configuration of the wireless desktop microphone.
5.- ET: menu options selection button.
6.- RF: FR radio frequency level indicator of the active president and delegate microphones.
7.- AF: AF audio signal level indicator of the active president and delegate microphones.
8.- P: president microphone controls.
9.- D1 D2 D3 D4: active delegate microphone controls.
10.- 12: a short press of this button allows playback to be started/paused. A long press of this button takes
you to the main menu of the player.
- 4-
EN

EN
- 5-
11.- {KIP }: a short press of these buttons allows you to skip to the previous/next track. A long press of
these buttons allows the playback volume to be reduced/increased.
12.- MENU: player/recorder menu access button.
13.- VOL: president and active delegate microphone volume control.
14.- LED power indicator.
15.- POWER: on/off switch.
REAR PANEL
1.- ANT DATA: data antenna connector.
2.- DATA: camera system connection, R -45 connector.
3.- Power supply input for mains adapter provided.
4.- UNBAL OUTPUT: unbalanced audio signal output, female 6.3 mm jack connector.
5.- BAL OUTPUT: balanced audio signal output, male XLR connector.
6, 7.- ANT A: antenna connector for microphone audio signal reception.
8.- ANT B: antenna connectors for microphone audio signal reception.
CI-760P and CI-770D WIRELE DE KTOP MICROPHONE , PRE IDENT AND DELEGATE
1.- LED operating ring.
2.- Information display.
3.- VOL-: reduces the microphone volume.
4.- VOL+: increases the microphone volume.
5.- ON/OFF: speech request button.
6.- PRIORITY: president microphone speech priority control. By pressing this button the rest of the delegate
microphones are deactivated and only the president microphone can be used.
7.- MUTE: silences the audio from the microphone.
8.- On/off button.
9.- Battery compartment.

CONNECTION
IN TRUCTION FOR U E
OPERATING MODE
This device allows 2 president operating modes to be selected: CONLY and CFREE.
-CONLY: this mode deactivates all the delegate microphones when the president PRIORITY button has
been pressed.
-CFREE: this mode allows 5 seconds of president microphone priority starting when the PRIORITY button
is pressed. The delegate microphones can be activated after 5 seconds have passed providing that its
configuration allows it.
And 2 delegate operating modes: FIFO and LIMIT.
-FIFO: this mode deactivates the first delegate microphone to have been activated when an input request
is received from another delegate microphone providing that the number of active microphones is the
maximum permitted by the mode. This mode has 4 submodes to indicate the maximum number of
delegate microphones that can be active at the same time: 1MAX-FIFO, 2MAX-FIFO, 3MAX-FIFO and
4MAX-FIFO.
If the selected mode is the 2MAX-FIFO, when there are 2 active delegate microphones and a third wishes
to speak, the one which was activated first will automatically be deactivated.
-LIMIT: this mode will not let any other delegate microphone be activated when the maximum number
permitted by the mode has been reached until one of the active microphones has been deactivated. This
mode has 4 submodes to indicate the maximum number of delegate microphones that can be active at
the same time: 1MAX-LIMIT, 2MAX-LIMIT, 3MAX-LIMIT and 4MAX-LIMIT.
If the selected mode is the 2MAX-LIMIT, when there are 2 active delegate microphones and a third one
wishes to speak, this cannot do so until one of the previous ones has been deactivated.
Note: the active mode by default is CFREE-4MAX-FIFO.
CONFIGURATION OF THE MAIN UNIT
Once this unit has been switched on, the conference system configuration information display shows the
selected operating mode and the microphone transmission channels.
It is possible to modify these values by pressing the SET button to select the value you wish to modify, and
pressing the w/sbuttons to modify the value of each setting.
The microphone signal transmission channel can be selected manually, as described in the previous
paragraph, or automatically. For automatic selection you must press the SET button until the channel you
wish to configure flashes on the screen. Then, press and hold the SET button until the current value
disappears and shows two dots“ ·· ” in its place. Wait a few seconds while the system scans all the channels
in order to choose the most appropriate.
- 6-
EN

EN
- 7-
Advanced configuration
With the device switched off, press and hold the SET and POWER buttons simultaneously to enter the
advanced configuration mode. This mode allows modification of the values: ROOM, TEST, D1, D2 and D3.
When you have finished the configuration, press the POWER button.
-ROOM: this setting can have 16 different values (0, 1, 2, 3, 4, 5, 6, 7, 8, 9, A, B, C, D, E or F). This value
must coincide in the main unit and in the microphones for its correct data communication. It is
recommended that this value is only modified when there are several systems in the same building
operating at the same time; thereby avoiding interference in the communication between the main unit and
the microphones.
-TE T: it is recommended not to modify this value.
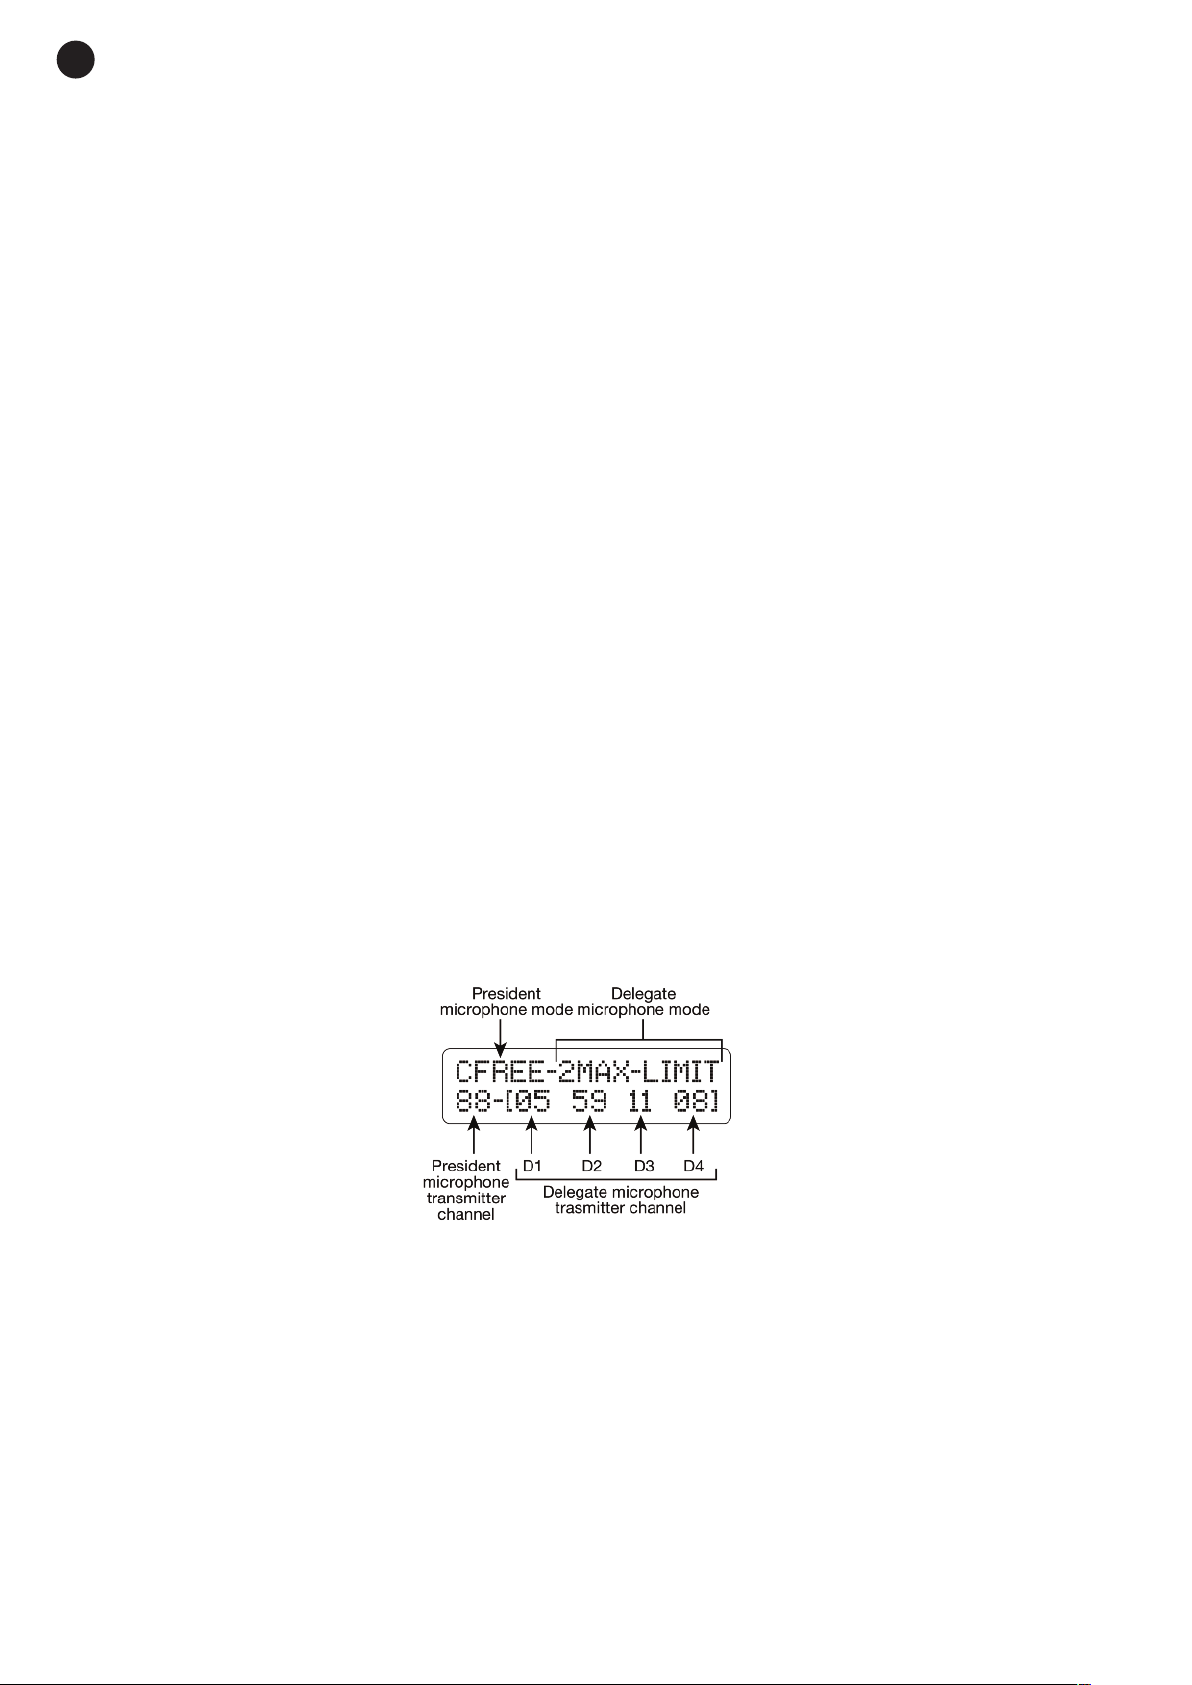
-D1, D2 and D3: these settings allow the receiver delegate channels 1, 2 and 3 to be modified. This device
assigns the channels to the delegates depending on the last one active, which means, to activate a second
microphone revise the status of channel D1; by activating another microphone the D2 status will be
revised, etc. If the channel is damaged the system will block the channels after the damaged channel. In
order that the device ignores the damaged channel and uses the subsequent ones, this channel must be
deactivated using the D1, D2 and D3 settings. Use the 0 value to deactivate the channel and 1 to activate it.
Locking the configuration buttons
The configuration button can be locked by pressing SET and the w b���o�. To unlock these buttons, press
SET and the s button.
Player/recorder
This conference device player allows you to play any audio file whether it is from a mobile device via its
bluetooth receiver, a USB memory or from other devices connected by USB cable such as computers. it also
records on a USB memory stick the audio received from active microphones during a conference.
To navigate through the menus, use the buttons {y }and press button 12 to select the required option. A
long press of button 12 will return to the main menu and a long press of the MENU button will take you to
the recording mode.
The main menu of this player/recorder has 5 options:
- MUSIC: to play audio files contained in a USB memory stick.
- REC: to record a conference in a USB memory stick.
- BLUETOOTH: activates the bluetooth receiver to connect a mobile device and send audio wirelessly.
- USB AUDIO: to play audio files from a computer connected by USB cable.
- SYSTEM SETTINGS: allows adjustment of the backlighting and contrast of the information display,
change the language, display the version of firmware installed and reset the factory settings.
During playback of the audio tracks, by pressing the MENU button, we are able to configure the options
relative to the player. The options are as follows:
- REPEAT: allows different repeat modes: repeat all, repeat folder, repeat one or random.
- EQUALIZER: offers different equalizations: natural, pop, rock, jazz, classic, soft or DBB.
- FILE BROWSER: allows selection of folders or files contained in the USB memory.
- ENTER MAIN: to return to the main menu.
To record the audio from the active microphones, you only have to insert a USB memory stick and select the
REC option from the main menu. Then, press button 12 to start/pause recording.

COMMI IONING THE MICROPHONE
Insert the batteries in the wireless desktop microphones and switch them on by pressing and holding the red
button which is on the right side of the microphone base.
The display will show information such as: the battery status, the wireless connection status, the microphone
volume, the microphone status, the signal transmission channel, the ROOM to which it is connected and the
microphone identifier.
Both the ROOM as well as the identifier can be modified. The model CI-760P also allows the chimes
connected to priority to be activated/deactivated. To do so, with the microphone completely switched off,
you must press and hold the red power button and the MUTE button simultaneously. Then, you can press
the VOL-/VOL+ buttons to modify the value and MUTE to save it and move on to the next setting.
The LED microphone ring will remain lit while the microphone is activated.
TIP FOR OBTAINING BETTER RE ULT
- Use the batteries provided or replace them with similar ones.
- Remove obstacles between the receiver and the transmitter.
- The distance between the receiver and the transmitter must not be greater nor less than 3 m.
- The receiver antenna must not be near to metal surfaces.
- The microphone capsule must be positioned about 10 or 15 cm away from the mouth of the person who
is speaking.
- The output signal level must not be very high, otherwise it will distort the signal. However, on the other
hand, if the output signal is very low, the s/n ratio will be decreased and the noise will be increased. To
adjust the output level to a correct value, we must adjust the mixer level to a standard level, for example,
0 dB gain and adjust the conference system output so that when we speak through the microphone in
a loud voice, it does not produce distortion.
- Switch off the microphone after use and if it is not going to be used for a long period of time remove the
battery.
INTEGRATION WITH OTHER Y TEM
This device allows integration with video systems. To communicate between the two devices it is necessary
to connect them with an ethernet cable, R 45 DATA connector.
- 8-
EN

TECHNICAL PECIFICATION
CI-750
CHARACTERI TIC Control unit.
LCD information display.
USB/MP3 recorder/player.
Integrated bluetooth receiver, plays music received from a mobile telephone.
Priority control with delegate microphone cut-off while the president has priority.
Maximum number of microphones in use selector.
Up to 256 microphones in total, 5 active at the same time.
Audio and control signal transition between the switchboard and the microphones.
RE PON E 50-15,000 Hz
OUTPUT 1 balanced line, XLR 12,000 Ω 200 mV
1 unbalanced line, 6.3 mm jack 12,000 Ω 200 mV
POWER UPPLY 12-15 V DC, 7 W
DIMEN ION 483 x 89 x 355 mm depth. 2 U 19" rack
ACCE ORIE 4 antennas
OPTIONAL CI-760P: wireless president desktop microphone
CI-770D: wireless delegate desktop microphone
CI-780C: battery charger
CI-760P CI-770D
CHARACTERI TIC Wireless president microphone.
Priority and control over delegate
microphones.
Information display.
Gooseneck microphone.
Automatic channel selection.
Data and audio transmission.
60 m range in favourable conditions.
Wireless delegate microphone.
Information display.
Gooseneck microphone.
Automatic channel selection.
Data and audio transmission.
60 m range in favourable conditions.
CAP ULE Unidirectional electret condenser
POWER 10 mW maximum
POWER UPPLY Rechargeable battery 3.7 V, 1,950 mAh included or 3 x 1.5 V LR6-AA batteries
DIMEN ION Gooseneck microphone: 43 mm
Base: 170 x 58 x 120 mm depth
ACCE ORIE Foam windshield
- 9-
EN

FONE TAR I TEMA .A. hereby declares that the CI-750 type of radio equipment complies with the Directive 2014/53/EU.
The complete text of the EU Declaration of Conformity is available at the following internet address:
fonestarpro.com/E / CI-750
FONE TAR I TEMA .A. hereby declares that the CI-760P type of radio equipment complies with the Directive 2014/53/EU.
The complete text of the EU Declaration of Conformity is available at the following internet address:
fonestarpro.com/E / CI-760P
FONE TAR I TEMA .A. hereby declares that the CI-770D type of radio equipment complies with the Directive 2014/53/EU.
The complete text of the EU Declaration of Conformity is available at the following internet address:
fonestarpro.com/E / CI-770D
EN
- 10 -

WARRANTY
This product has been tested and has passed the corresponding quality control prior to being put on the market.
FONE TAR guarantees the suitability of the product for its specified use during a period of 2 years from the delivery date and
commits itself to repair or substitute the goods as expressed in the Spanish law ‘La Ley General para la Defensa de los
Consumidores y Usuarios, Real Decreto Legislativo 1/2007 16 Noviembre.
The lack of conformity in the first six months after purchase, due to a manufacturing defect, will be rectified with no more than
showing the proof of purchase. After six months FONE TAR reserves the right to demand proof of the product being sold with
that problem.
This warranty does not include damage produced by: inappropriate use or negligence, accidents, worn out parts due to use,
breakages, burns, spilt liquids or other substances, excessive humidity, battery deterioration and internal manipulation of the
device, the software or its components by unauthorized persons, and in general any use that is unrelated to the nature and
purpose of the product.
If any service is needed during the warranty period because of lack of conformity, please contact the business or distributor
where the product was purchased in no more than 2 months after being conscious of the problem. It is only necessary to
contact FONE TAR if it is impossible or imposes an undue burden for them to solve it.
To benefit from this warranty it is necessary to show the proof of purchase with the date clearly visible, with no corrections or
crossing out.
This document adds information, and never decreases the consumers’ rights, which in all cases are protected by the Spanish
law ‘La Ley General para la Defensa de los Consumidores y Usuarios, Real Decreto Legislativo 1/2007 16 Noviembre.
FONE TAR is a member of ECOEMBALA ES ESPAÑA, S.A. “ECOEMBES”, with number 03497 and all our products carry the symbol,
backed by our membership and subscription to the above mentioned organization with the recycling and subsequent management of
our packaging.
FONESTAR, S.A. - NIF: A28780443 - Poligono Trascueto - 39600 Revilla de Camargo, Cantabria (Spain)
www.fonestar.com
- 11 -
EN

www.fonestar.com
Other manuals for SCI-750
1
This manual suits for next models
2
Table of contents
Other FONESTAR Conference System manuals

FONESTAR
FONESTAR SCF-550 User manual

FONESTAR
FONESTAR SCD-600 User manual

FONESTAR
FONESTAR SCI-705R User manual

FONESTAR
FONESTAR SCI-700 User manual

FONESTAR
FONESTAR SCD-600 User manual

FONESTAR
FONESTAR SCF-500 User manual

FONESTAR
FONESTAR SCF-250 User manual

FONESTAR
FONESTAR SCD-600 Quick start guide

FONESTAR
FONESTAR SCD-600 User manual

FONESTAR
FONESTAR SCF-550 User manual