Francotyp-Postalia optimail 30 User manual

19
Francotyp Postalia Ltd
74 Questor
Powdermill Lane
Dartford
Kent
DA1 1EF
www.fpmailing.co.uk
Customer Support
Did you know our website now has the facility to book service requests online as
well as checking your TELESET credit balance andmuch more........
www.fpmailing.co.uk
Did you know our website now has the facility to book service requests online as
well as checking your TELESET credit balance and much more........
www.fpmailing.co.uk

Step 11 Your First Frank...
18
2
Crown DieTown Circle

Step 10 Loading your Adverts and Town Circle
The Optimail 30 can store up to 6 adverts. You can easily load adverts from chip
card yourself. Order new adverts from Francotyp-Postalia.
Press the key.
Select in the menu:
LOAD FROM CHIP CARD.
Remove the Master card and insert the card
with your adverts printed on it.
The optimail shows all adverts stored on the
card.
You can LOAD ALL or SELECT individual
adverts.
Please save your adverts when prompted.
Once the card has been loaded and saved
successfully remove the Advert / Logo card
and re-insert your Master card.
Now we have to load the Town circle onto the Franking machine. This is done in the
exact same way as an Advert card is loaded.
Press the key.
Select in the menu:
LOAD FROM CHIP CARD.
Remove the Master card and insert the
card with your Town circle printed on it.
Now select LOAD ALL.
Once the town circle has been loaded please re-insert the Master Card
then press and hold the back key to return to the home screen.
17
Table of Contents
Check the contents of the box Page 3
Positioning your Optimail 30 Page 4
Installing the ribbon cassette Page 5
Mounting the scale platform Page 6
Installing the catcher tray Page 7
Connecting your Optimail 30 Page 8
Switching On Page 9
Authorisation Page 10
Loading Postage / Teleset Page 14
Loading Adverts and Town Circle Page 17
Your first frank Page 18
Insert card with Town circle

Step 1 Check the contents of the box
DO NOT TURN MACHINE ON YET….
3
Loading Postage / Teleset (Cont…)
• Select CONTINUE to end
the Teleset process.
The optimail 30 displays the home
menu.
16

Loading Postage / Teleset (Cont…)
15
Caution! When you move the optimail 30
from a cold environment (i.e. below 10°C /
50°F): Wait at least 24 hours before connecting the
optimail 30. The optimail 30 requires
this period to adapt to the ambient conditions.
• Choose an installation site with the following
ambient conditions:
– Room temperature: 10°C / 50°F to
40°C / 104°F.
– No direct sunlight.
– Power socket and BT jack for connecting
the modem in the immediate vicinity.
• Place the optimail 30 on a firm, level, low
vibration and horizontal base.
Step 2 Positioning your optimail 30
4
Cont.....

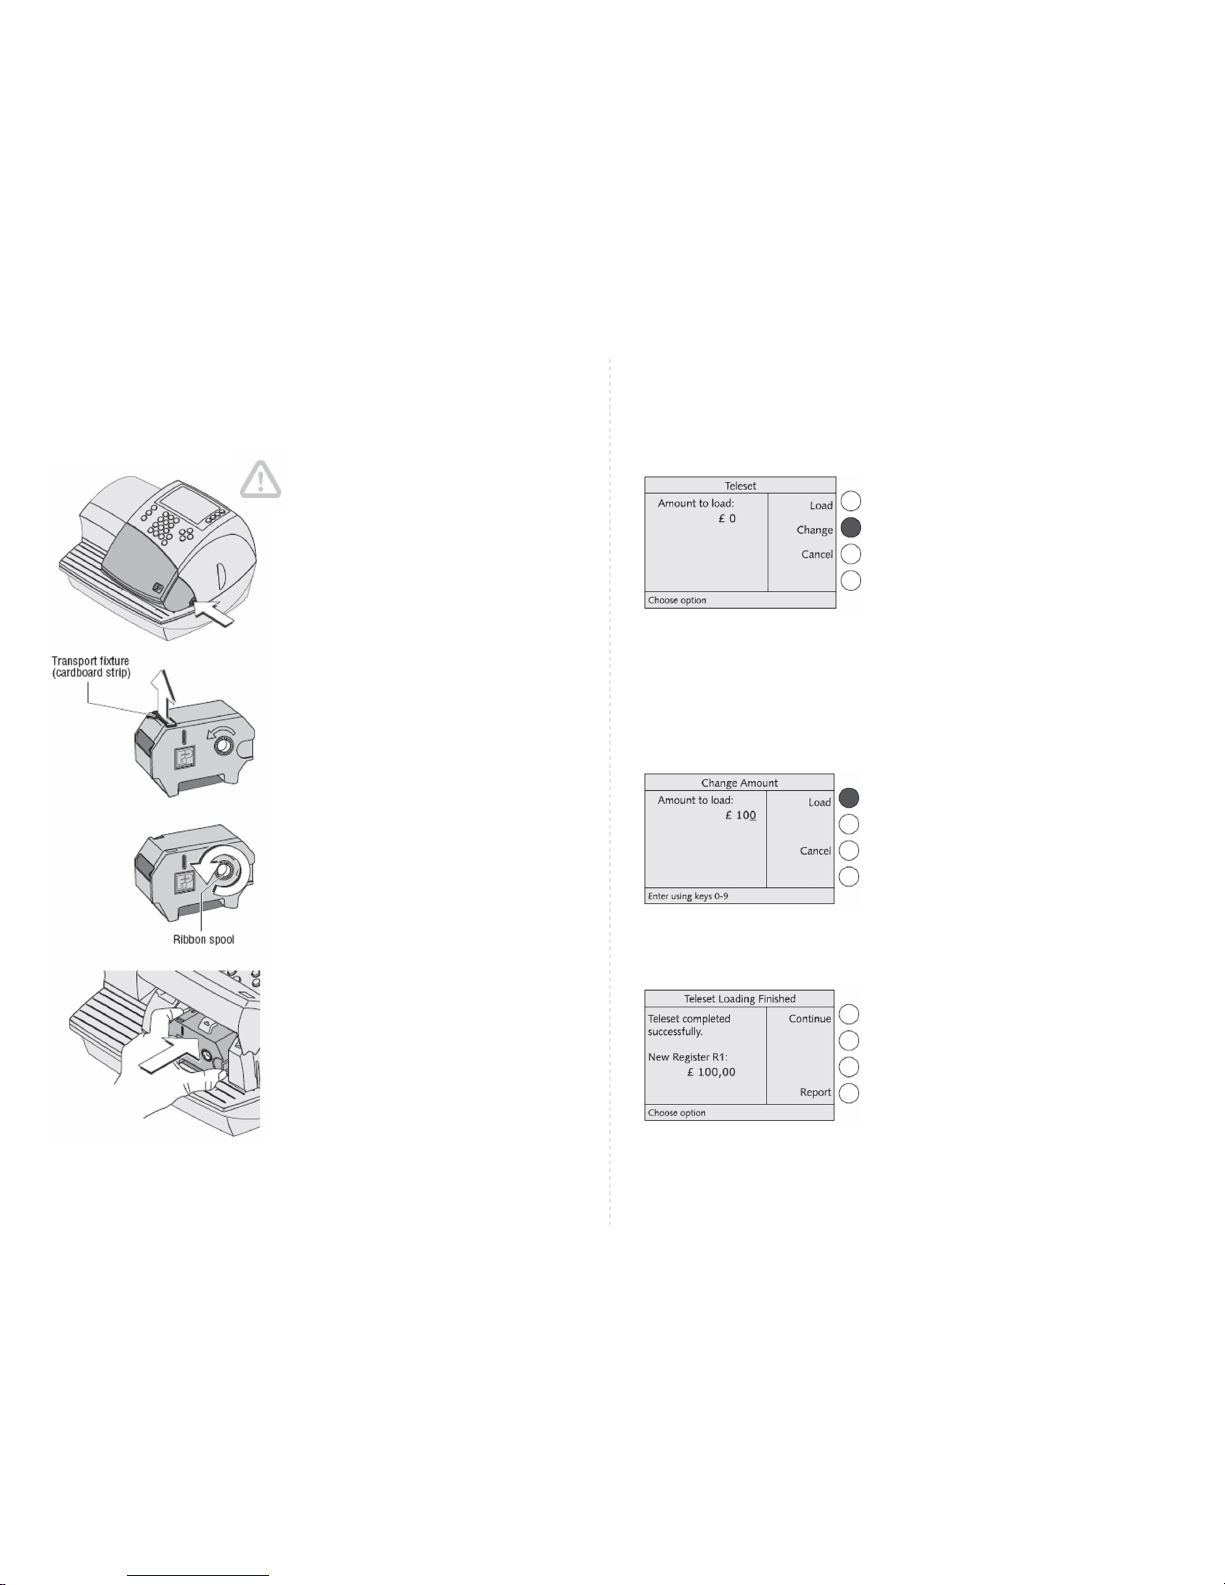
Take the supplied ribbon cassette from the packing.
A cardboard strip may be present in the ribbon cas-
sette as transport fixture (see the
illustration).
• If present: Remove the cardboard strip.
• Tension the ribbon. Turn the white ribbon
spool in the direction of the arrow until the
ribbon is taut.
• Place the ribbon cassette on the letter receiv-
ing tray with the ribbon facing downwards.
• Hold the ribbon cassette as shown in the
illustration and carefully insert it in the cas-
sette slot. The cassette must easily slide into
the cassette slot.
• Insert the cassette until the latch clips over
and holds it in position.
• Close the cartridge flap.
5
• Type the desired sum.
• Continue by pressing LOAD.
For verification the optimail 30 indicates the
set sum to be loaded.
To load this sum:
• Use LOAD to establish the connection
to the Teleset Data Centre.
Loading continues automatically. You can
monitor the progress in the display. Please
stand by. Data exchange takes some time.
The residual sum is indicated when loading
ends. This represents the available postage
credit of your optimail 30.
14
You now load the first postageinto your
franking machine. The sum you enter is
loaded into your optimail 30 as postage
credit. Theamount is defined by the amount
you have set up / available on your Teleset
account.
You can find out how much postage you
have available by visiting our website
www.fpmailing.co.uk and selecting Teleset
Account Balance which will take you to our
secure customer area when you type in your
8 digit PIN number
• Use the CHANGE option to change
the “Amount to load”.
Step 9 Loading Postage / Teleset
Cont.....
Caution! Make sure not to crease or tear the
ribbon when inserting it. Otherwise the ribbon
might break.
Also make sure the edges of the ribbon do
not fold over.
• Open the flap of the ribbon cassette compartment
by lightly pressing the release catch.
The flap swings up automatically.
Step 3 Installing the ribbon cassette

Authorisation (Cont…)
Authorisation
It takes some time to establish the connection
and to authorise your optimail 30. Please
stand by.
The optimail 30 displays a message when
the authorisation was successful and
prompts you to load postage.
• Select CONTINUE to start the Teleset
Process. (i.e. Download funds onto
your franking machine).
13
If you ordered an optimail 30 with integrated
scale, the scale comes mounted to the
franking machine on delivery. You need only
attach the scale platform.
• Hold the scale platform so that the long slot
in the scale platform foot points to the right
(towards the display).
• Place the scale platform onto the scale
receptacle from above. The long slot of the
scale platform must slide in the counterpart
on the scale receptacle.
• Press down slightly on the scale platform
with your flat hand.
Step 4 Mounting the scale platform
6
Check your Modem Settings
The illustration is an example of a Modem
Parameter overview.
The Phone Type is set to EXTENSION.
The Access Method is set to EXCHANGE
DIGIT.
The Exchange Digit is set to dial a ‘0’ and
the comma denotes a 2 second wait.
i.e. the franking machine will dial a ‘0’ and
then wait for 2 seconds before dialling the
Teleset modem number which is
programmedinto the machine at the factory.
To go back and change these settings
again, press the CANCEL Soft Key 3.
Once you are happy that your settings
match the requirements of your telephone
line, and will allow the machine to access an
outside line, then press SAVE Soft Key 4.
Once the SAVE option is pressed the frankingmachine will attempt to
establish a connection to the Teleset data system which will register
your machine’s warranty and authorise your account.

Step 5 Installing the catcher tray
• Attach the letter stop to the catch
tray:
Slide the stop into the guides on
the catch tray bottom.
• Place the catch tray to the right of
the franking machine.
• Slightly lift the franking machine
on the right. The right side of the
housing features two slots where
the catch tray is fastened.
• Push the catch tray underneath
the franking machine so that the
catches on the catch tray engage
in the slots.
• Put the franking machine carefully
down.
7
Authorisation (Cont…)
12
Exchange Digit
(extension only)
As above this option is only available if you selected
EXTENSION as your method of dialling out.
Please insert using the numeric keys, the number that has to be dialled to access an
outside line. Normally a “9” is used.
• A W indicates waiting for the dialling tone.
Use WAIT to define waiting for the dialling
Tone after the exchange digit was dialled.
• A comma (,) indicates a dialling pause.
Use PAUSE to insert a dialling delay of
2 seconds.
Press CONTINUE once you have selected the correct Exchange Digit.
Cont.....

Access method
(extension only)
If you selected EXTENSION as your method of dialling
out (above) then pleaseselect
EXCHANGE DIGIT as your current setting.
The other option to toggle between is HOOK FLASH
but this is not used in the UK.
These options can betoggled between by pressing
Soft key 2 as above.
When EXTENSION is set as your current setting
please press CONTINUE.
Authorisation (Cont…)
11
Warning! Use only the power and modem
cables provided with the optimail 30 or
approved by Francotyp-Postalia.
Make sure that cables are not damaged.
Make sure the socket for connecting the
optimail 30 is close by and easily accessible
at all times.
Step 6 Connecting your optimail 30
Modem cable
Plug the modem cable into the modem
socket on the franking machine. The
modem socket is at the rear of the franking
machine. The spring on the plug must face
downwards.
Connect the modem cable to the BT jack
telephone socket (analogue). Digital telephone
systems will have to have an analogue line
patched over for the franking machine to use.
Power cable
Connect the power cable securely to the franking
machine. The power connection is at the
rear of the optimail 30.
Plug the power cable into a regular 240V socket.
8
Setting up your modem to dial out
You are now required to set up the modem
so that it can dial out of your building and
establish a connection to the Teleset
server where you download your postage
from.
• If you are required to dial a number
to access an out side line please
ensure you have EXTENSION as
your current setting.
• If you are NOT required to dial a
number to access an outside line,
please ensure you have DIRECT
LINE as your current setting.
You can toggle between these two set-
tings by pressing soft key 2, as shown
in the illustration.
• Press CONTINUE when you are
happy.
Cont.....
Current Setting

Switch on your franking machine using the
toggle switch on the left hand side of the
franking machine.
The display lights up and the authorisation
procedure starts.
Step 7 Switching on Step 8 Authorisation
When the machine has run through
its start-up tests the “Welcome”
screen is displayed
9
Inserting the MASTER card
• Insert the supplied card labelled MASTER
Into the card reader on the right side of the
franking machine. The chip on the card
must face the rear.
• Push in the card against a slight resistance
all the way to the stop (The “Continue”
option will appear on screen if the card is
being read).
• Press the CONTINUE multifunction key.
10
Cont.....
Other manuals for optimail 30
1
Table of contents
Other Francotyp-Postalia Postal Equipment manuals

Francotyp-Postalia
Francotyp-Postalia FlexiScale User manual

Francotyp-Postalia
Francotyp-Postalia T 1000 Trend User manual

Francotyp-Postalia
Francotyp-Postalia FPi 1030 User manual

Francotyp-Postalia
Francotyp-Postalia FPi 500 User manual

Francotyp-Postalia
Francotyp-Postalia PostBase Mini User manual

Francotyp-Postalia
Francotyp-Postalia ultimail User manual