Gasmate PH600 Series User manual

Patio Heater – PH600 Series
FOR YOUR SAFETY
If you smell gas:
1. Shut off the gas to the
appliance.
2. Extinguish any open flame.
3. If odour continues,
immediately call your gas
supplier.
Do not store or use gasoline
or other flammable vapour and
liquids in the vicinity of this or any
other appliance.
WARNING:
Improper installation, adjustment,
alteration, service or maintenance
can cause injury or property
damage.
Read the instructions thoroughly
before installing or servicing this
equipment.
Important: The installer or seller must leave these instructions with the consumer.
FEATURES:
• New and innovative design
• The ideal solution for extending the
season for outdoor entertaining
• Creates a stylish and attractive ambience
• Casts an approximate 3 to 6 metre
circle of radiant sun-like warmth
• Electronic ignition
• Adjustable heat output
• Includes a safety ‘tip-over’ switch that
halts supply of gas to the unit should it
be accidentally knocked over
• Flame safeguard system for enhanced
safety
• Stainless steel burner for extra long-term
reliability
• Durable and weather resistant
• Complete with hose and POL regulator
• Sectional reflector
• Efficient & powerful output
• Operates for approximately
9 hours on a properly filled
9Kg Propane cylinder
• AGA approved
Retain these instructions for future use.
02108 09/06
FOR OUTDOOR USE
ONLY
PROPANE GAS
(NZ-LPG)

Installation, Operation and Maintenance Instructions
Prior to assembling your appliance, the following must be
reviewed. Compliance with the following should result in
satisfactory heater operation. This instruction manual should
be retained for future reference. The installation must
conform with local codes or authority having jurisdiction.
1. The patio heater is intended for heating residential and
non-residential outdoor spaces. The installation must
conform with local codes or, in the absence of local
codes, with the Australian Standard AS 5601.
2. Adequate clearance around air openings into the
combustion chamber, clearances from combustible
materials, provisions for accessibility and for
combustion and ventilating air supply must be
maintained at all times when the appliance is operating.
INSTALLATION
3. Proper clearance from combustible materials must be
maintained at all times. The minimum clearances are
as follows:
Minimum Clearance from Combustibles:
Side 500 mm Rear 500 mm
Ceiling 500 mm Below 1900 mm
Combustible materials are considered to be wood,
compressed paper, plant fibres, plastic, plexiglas or
other materials capable of being ignited and burned.
Such materials shall be considered combustible even
though flame proofed, fire-retardant treated or plastered.
Additional clearance may be required for glass, painted
surfaces and other materials which may be damaged by
radiant or convection heat.
4. Heaters must be placed on a level and adequate footing
and be readily accessible.
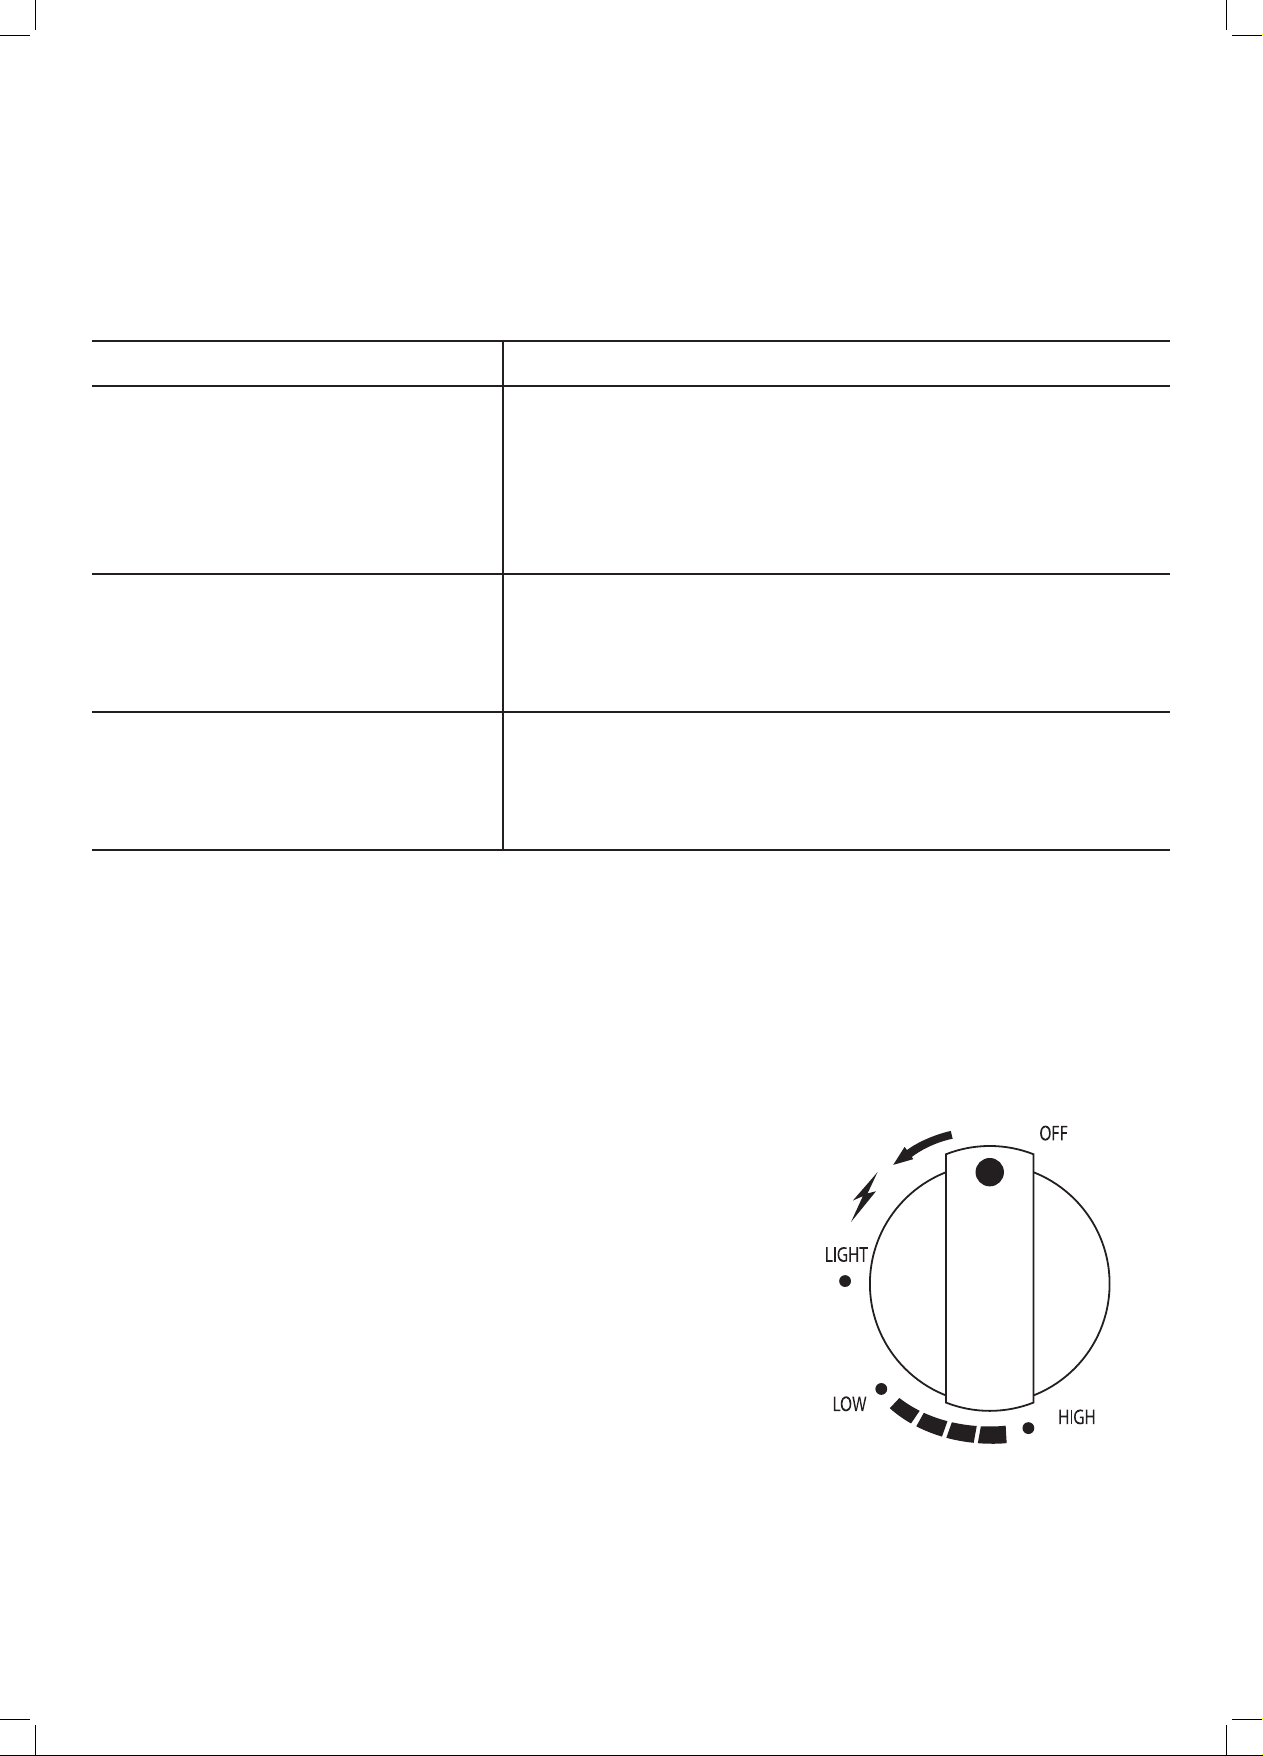
5. The gas manifold supply pressure must be regulated
at 2.75 kPa utilising an AGA approved regulator
(supplied with heater).
6. The appliance must be inspected before each use, and
at least annually by a qualified service person.
a. The appliance area must be kept clear and free of
combustible materials, gasoline and other flammable
vapours and liquids.
b. Gas orifices and burner must be kept clear of dirt
and cobwebs. Flow of combustion and ventilation air
through the perforated portions of the heater must
not be obstructed. Cleaning with a soft brush before
use and at least every six months is recommended.
c. All gas connections should be checked for leaks
utilising a soap solution. Never use a flame for this
purpose.
d. The flame pattern at the emitter grid should be
visually checked whenever heater is operated.
If flames extend beyond surface of the emitter grid
or black spot is accumulating on the emitter grid
or reflector, the heater should be turned off
immediately. The heater should not be operated again
until the unit is serviced and or repaired.
e. Any cleaning agent used on the heater should be of a
non-combustible and non-corrosive nature.
f. The stainless steel emitter grid normally does not
require cleaning and should NEVER be painted.
The reflector may be cleaned, but never painted.
Important Safety Rules:
This appliance must only be used in a well ventilated
area.
1. This appliance shall not be installed or used indoors, in
buildings, garages or any other enclosed area.
2. DO NOT place articles on or against this appliance.
3. DO NOT use or store flammable materials near
this appliance.
4. Children and adults should be alerted to the hazards of
high surface temperatures, burns and clothing ignition.
5. Children should be carefully supervised when they
are in the area of the appliance.
6. NEVER hang anything including clothes or other
flammable items on the appliance.
7. DO NOT operate this appliance unless it is fully
assembled with reflector in place.
8. DO NOT SPRAY AEROSOLS IN THE VICINITY
OF THIS APPLIANCE WHILE IT IS IN
OPERATION.
9. Installation and repair should be done by a qualified
service person. The appliance must be inspected
before use and at least annually by a qualified service
person. More frequent cleaning may be required as
necessary. It is imperative that control compartment,
burners and circulating air passages of the heater and
light be kept clean.

7. The hose assembly should be properly located out of
pathways where people may trip over it. The hose
must be protected from contact with hot or sharp
surfaces both during use and while in storage. The
hose assembly should be visually inspected prior to
each use of the heater. If excessive abrasion or wear is
evident, or the hose is cut, it must be replaced prior to
operating the heater. The replacement hose assembly
may be obtained from the manufacturer.
8.
DO NOT use any pressure regulator or hose
assembly other than those supplied with the appliance.
Replacement pressure regulator and hose assembly
must be those specified. Replacement parts may
be obtained from the manufacturer or your local sales
representative.
9. Installation and use of this heater must conform with
local codes or, in the absence of local codes, with the
Standards of Storage and Handling of Liquefied
Petroleum Gases.
10. This heater is designed to operate with a standard 9Kg
propane cylinder with Approved Cylinder Connection.
11. The valve outlet must be maintained in good condition.
When the cylinder is not in use, be sure to cover it with
a dust cap. A leak test should be performed with soapy
water whenever connecting a new cylinder. NEVER use
a match to test for leaks.
12. The propane cylinder must be turned off whenever the
heater is not in use. When the heater is to be stored
indoors, the propane cylinder and the heater must be
disconnected and the cylinder stored in accordance
with the Standard for Storage and Handling of Liquefied
Gases. (ie: Not indoors, but in a dry and well ventilated
area.)
13. The patio heater has been designed with several safety
features which include a tip over switch.
Screw the coupling nut of regulator into the cylinder valve outlet.
(Cylinder not included)
POL CYLINDER CONNECTION DEVICE
Type of Gas Propane (NZ-LPG)
Consumption 45 MJ/h
Operating Pressure 2.75 kPa
Injector Size 2.0 mm
Any modification to the heater not described in the
installation instructions may compromise the safety of this
appliance. Special concern is as follows:
(1) DO NOT shorten post length;
(2) DO NOT bypass thermocouple safety;
(3) DO NOT operate heater without a reflector;
Clothing or other flammable materials should not be hung
from the heater, or placed on or near the heater. The area
above the post may be extremely hot. Direct contact with
these metal surfaces should be avoided in order to prevent
burns or clothing ignition.
Heater specifications can be found on the data label inside the cylinder cover.
Storage of an appliance indoors with the
cylinder attached is only permitted if the size
of the cylinder complies with AS/NZS 1596;
otherwise cylinders must be stored outdoors in
a well ventilated area.

REFLECTOR ASSEMBLY
1. Position the 4 segments of the reflector to overlap together.
2. Secure using 8 screws and dome nuts as illustrated.
STEP A
1. Place the square part of the reflector over the 4 assembled segments.
2. Secure using 8 screws and dome nuts as illustrated.
STEP B

HEATER ASSEMBLY & PARTS LIST
Tools Required:
Phillips head screwdriver
2 adjustable spanners
Note: Remove all transit protection
material.
Step 1.
Secure the base to the cylinder cover
body with nine M6 x 15 mm long screws
with washers and nuts, ensuring the base
detent is at the front left corner. Secure
the wheels with three M6 x 15mm long
screws with washers and nuts.
Step 2.
Secure the post onto the post frame with
four M6 x 15mm long screws with washers
and nuts.
Step 3.
Slide the decorative post cover down the
post onto the cylinder cover body.
Step 4.
Fit the door with the spring hinge pin at
the top.
Step 5.
From inside the cylinder cover feed the
hose up through the post and temporarily
secure the end with tape to the post top.
Step 6.
Securely attach the hose connection
adapter supplied to the burner head gas
pipe.
Step 7.
Securely attach the hose to the burner
head. Temporarily attach the gas cylinder
and check the connection for leaks using
a soap solution. Clip the cylinder retention
strap into position either side of the door.
Step 8.
Secure the burner head assembly to the
post with four M5 x 8mm long screws.
Step 9.
Secure the reflector to the burner
assembly with four M6 x 8mm long screws
and washers.

PATIO HEATER - For Outdoor Use Only
Minimum Clearance from Combustible Surfaces*:
*Combustible materials are considered to be wood, compressed paper, plant fibres, plastic or other materials that are capable
of being ignited and burned.

TEST FIRING HEATER
Test fire heater, following the lighting instructions on heater post. Leak test all gas connections with soapy water. Soap
bubbles indicate gas leakage. DO NOT use a match to test for gas leaks.
WARNING: White smoke may appear around the radiant head during the first minute of the initial firing.
TROUBLE SHOOTING
Problem Possible Causes
Pilot won’t light • Air in gas line
• Low gas pressure
• Gas line turned ‘OFF’
• Blockage in gas line
• Ignitor did not spark
-
check battery
• Pilot blocked by cobweb or insect
Pilot won’t stay lit • Suspect thermocouple
• Corrosion of thermocouple contact
• Suspect valve
• Wind exceeding 16 kph
Main burner won’t light • No gas
• Low gas pressure
• Blockage in orifice
• Manual valve not in ‘LIGHT’ position
Note: If the appliance cannot be adjusted to perform correctly it should not be used until serviced or repaired.
Warning: Improper installation, adjustment, alteration, service or maintenance can cause injury or property damage.
Any modifications or adjustments made to product without prior authority from the manufacturer will void any warranty claims.
Read the installation, operating and maintenance instructions thoroughly before installing or servicing this equipment.
LIGHTING INSTRUCTIONS
Warning: White smoke may appear around the radiant head during the first minutes of the initial firing.
Step 1.
Ensure that the control knob is off. Slowly open the gas cylinder valve.
Step 2.
Press and turn the control knob to ‘LIGHT’ position, keep control knob
in pressed position and press electronic ignitor button until pilot lights.
Step 3.
Check for pilot flame through pilot lighting hole. If pilot does not light
turn control knob to ‘OFF’ position and try again from the start.
Several attempts may be necessary.
Step 4.
With the pilot alight keep control knob depressed for 15 seconds then
turn the control knob to ‘LOW’.
Step 5.
For maximum heat turn control knob to ‘HIGH’.
Step 6.
To turn heater off, turn control knob to ‘OFF’.
NOTE: Allow one minute to purge air through to pilot after connection to a new cylinder.

Gasmate®is a registered trademark of: Sitro Group Australia Pty Ltd www.sitro.com.au
AberGas Ltd - Hamilton, N.Z www.abergas.co.nz
SAFE APPLIANCE LOCATIONS
This appliance shall only be used in an above ground open-air situation with natural ventilation, without
stagnant areas, where gas leakage and products of combustion are rapidly dispersed by wind and natural
convection.
Any enclosure in which the appliance is used shall comply with one of the following:
An enclosure with walls on all sides, but at least one permanent opening at ground level and
no overhead cover (see Example 1).
Within a partial enclosure that includes an overhead cover and no more than two
walls (see Example 2 & 3).
Within a partial enclosure that includes an overhead cover and more than two walls,
the following will apply:
at least 25% of the total wall area is completely open, and
at least 30% of the remaining wall area is open and unrestricted (see Example 4 & 5).
In the case of balconies, at least 20% of the total wall area shall be and remain open and unrestricted.
The following gures are diagrammatical representations of outdoor areas. Rectangular areas have been used in these
gures - the same principles apply to any other shaped area.
Table of contents
Other Gasmate Patio Heater manuals

Gasmate
Gasmate STELLAR BLACK PH7056 User manual

Gasmate
Gasmate GM120-001 User manual

Gasmate
Gasmate STELLAR BLACK PH7056 User manual

Gasmate
Gasmate PH2063 Manual

Gasmate
Gasmate NG1P45 Manual

Gasmate
Gasmate EH305 User manual

Gasmate
Gasmate GM135-009 Manual

Gasmate
Gasmate Blaze Manual

Gasmate
Gasmate PH2160 User manual

Gasmate
Gasmate GM124-003 Manual