Gewa DP 240 G User manual

OWNERS MANUAL
GEWA Digital Piano DP 240 G
Bedienungsanleitung | Owners manual | Mode d’emploi | Manual de instrucciones
www.gewapiano.com
Please read this user manual carefully before operating the
instrument and take note of the safety information!
Please keep the user manual for reference purposes.

Manufacturer:
GEWA music GmbH
Werkstraße 1
08626 Adorf
GERMANY
www.gewamusic.com
Version 1.0
Last update 01.09.2016

3
CONTENTS
1 SAFETY INFORMATION ................................................................................................................. 5
1.1 General Information................................................................................................................ 5
1.2 How to use/play the Piano...................................................................................................... 6
1.3 Improper Use ........................................................................................................................ 6
1.4 Safety Precautions ................................................................................................................. 7
1.5 CE label ................................................................................................................................. 8
1.6 Recycling .............................................................................................................................. 8
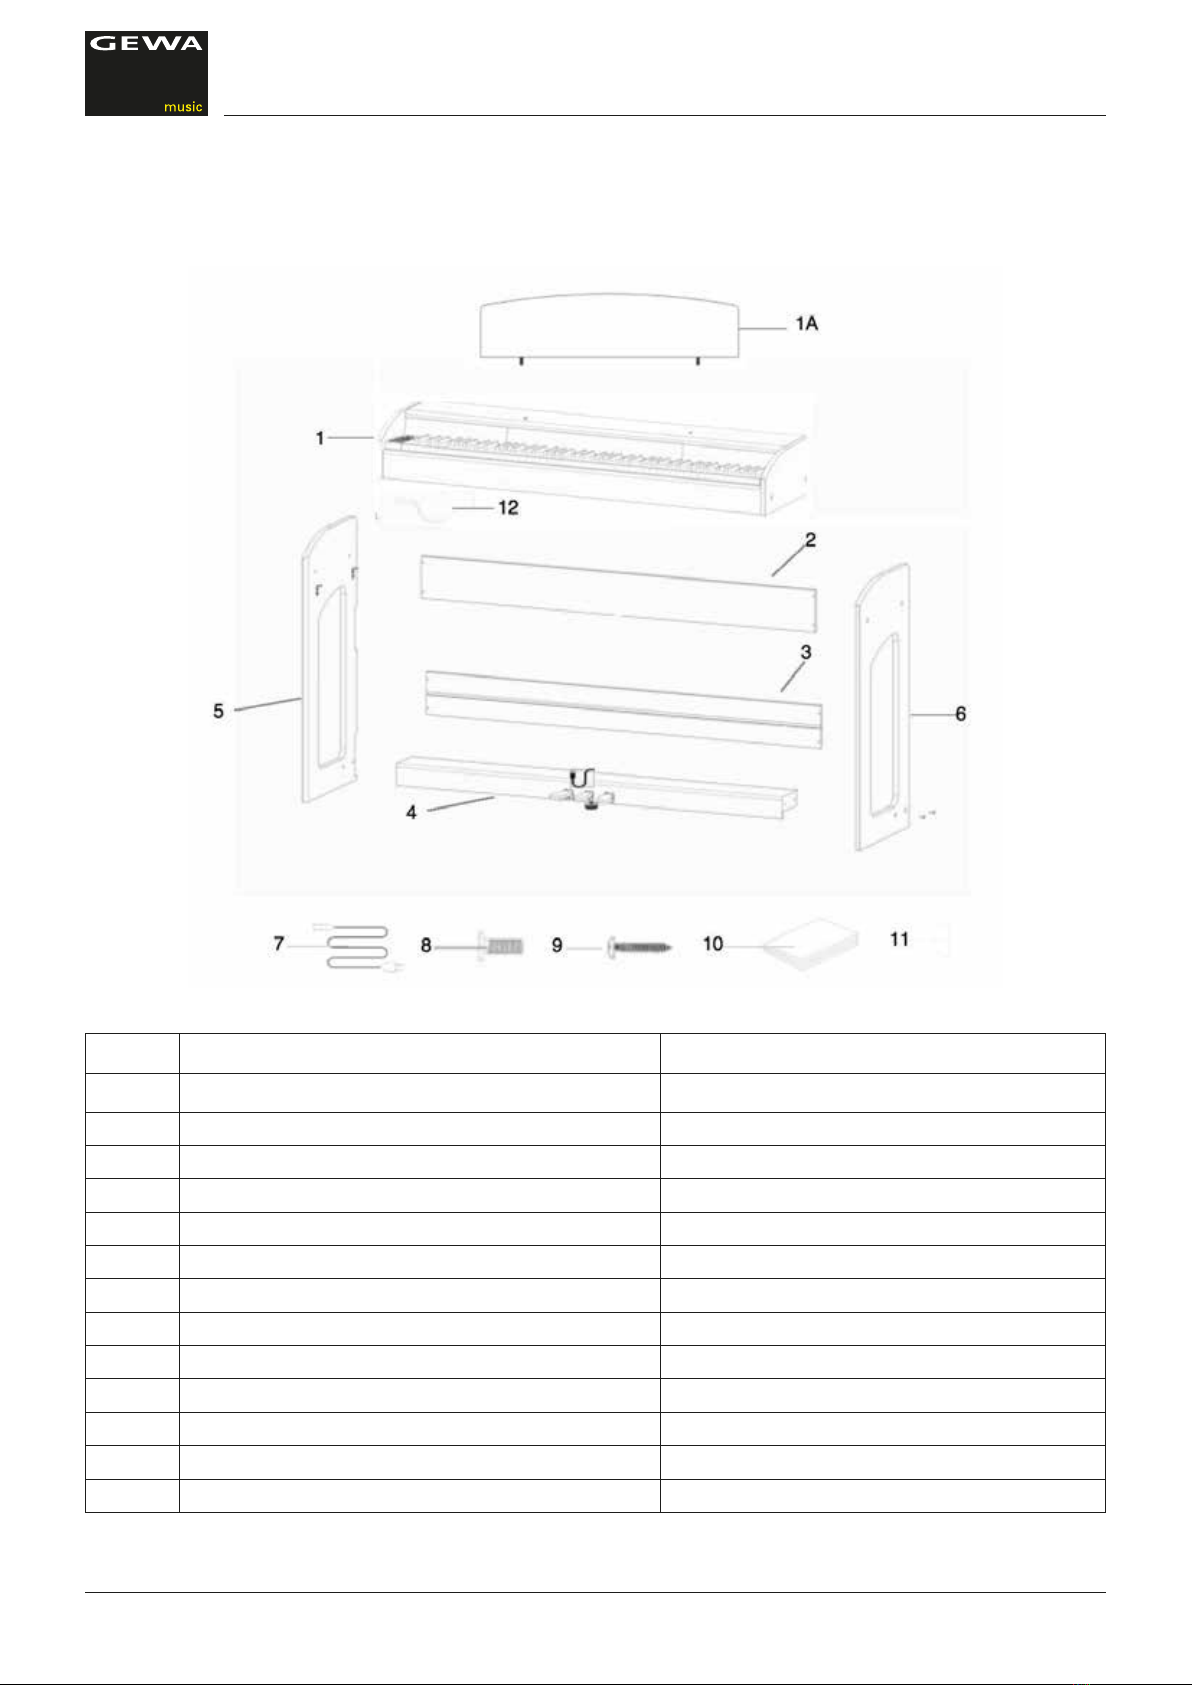
2 PARTS SUPPLIED WITH THE PIANO............................................................................................ 9
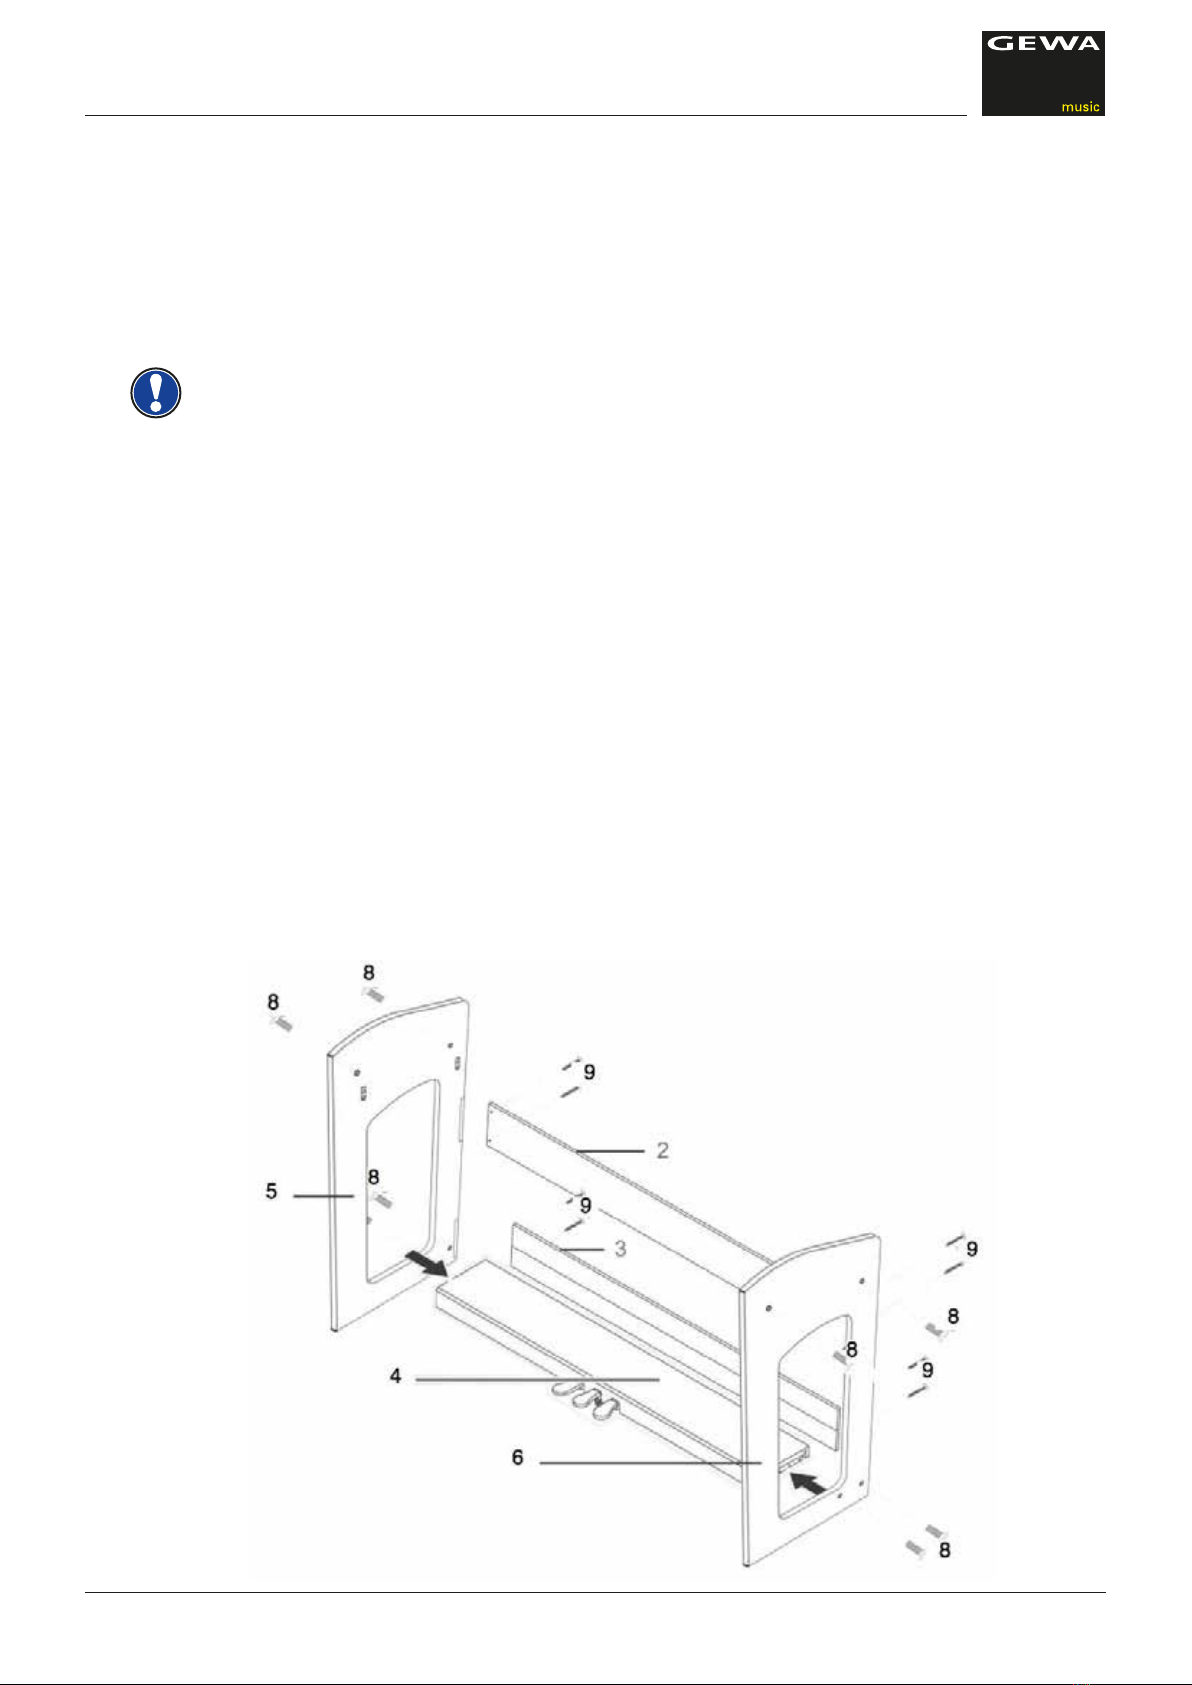
3 ASSEMBLY INSTRUCTIONS ....................................................................................................... 10
4 GETTING STARTED...................................................................................................................... 12
4.1 Piano Controls ..................................................................................................................... 12
4.2 Function Keys and Pedals .................................................................................................. 13
4.3 Connector Panel .................................................................................................................. 15
5 OPERATION ................................................................................................................................. 17
5.1 Switching on ........................................................................................................................ 18
5.2 DEMO function .................................................................................................................... 18
5.3 Sound selection ................................................................................................................... 18
5.3.1 Split Keyboard Mode ................................................................................................. 19
5.4 Reverb snd Chorus ............................................................................................................. 18
5.4.1 Reverb ........................................................................................................................ 18
5.4.2 Chorus and other DSP Effects ................................................................................... 19
5.5 Metronome .......................................................................................................................... 19
5.5.1 Switching the Metronome on/off ................................................................................. 19
5.5.2 Changing the Metronome Tempo .............................................................................. 20
5.5.3 Time Signature Change ............................................................................................. 20
5.5.4 Setting the Metronome Volume .................................................................................. 20
6 FUNCTION MENU ........................................................................................................................ 20
6.1 Settings Menu ..................................................................................................................... 21
6.2 Transpose ........................................................................................................................... 21
6.3 Fine-tune ............................................................................................................................. 22
6.4 Keyboard Dynamics Sensitivity ........................................................................................... 22
6.5 Balance Settings ................................................................................................................. 22
6.6 Brilliance Settings ................................................................................................................ 23
6.7 MIDI TX channel .................................................................................................................. 23
6.8 Local on/off Switch .............................................................................................................. 23
6.9 Program Change Function ................................................................................................... 23
6.10 Piano Mode ......................................................................................................................... 23
6.11 Changing Temperaments ................................................................................................... 24
6.11.1 Changing the Temperament Reference Tone ......................................................... 24
6.12 Setting the String Resonance .............................................................................................. 24
6.13 Setting the Damper Resonance .......................................................................................... 24
7 RECORD AND PLAYBACK FUNCTION ...................................................................................... 25
7.1 DeningtheRecordingMode ............................................................................................. 25
7.2 How to record Songs .......................................................................................................... 25
7.3 Playing back Recordings .................................................................................................... 25
7.4 Deleting Recordings ........................................................................................................... 25

4
CONTENTS
8 CONNECTING ACCESSORIES ................................................................................................... 26
8.1 Connecting Headphones .................................................................................................... 26
8.2 Connecting a Playback Device ........................................................................................... 26
8.3 ConnectinganexternalAmplier........................................................................................ 26
8.4 Connecting a PC ................................................................................................................. 26
9 ADDITIONAL INFORMATION ...................................................................................................... 27
9.1 Glossary .............................................................................................................................. 27
9.2 Warranty .............................................................................................................................. 28
10 TROUBLESHOOTING .................................................................................................................. 29
11 TECHNICAL INFORMATION ........................................................................................................ 30

5
Level of Risk Symbol Bedeutung Denition
Serious Injuries WARNING
Failure to observe the following
safety instructions can result in
serious injury or death.
Electrical Hazard WARNING
Failure to observe the following
safety instructions can result
in serious injury or death by
electrical hazards.
Minor Injuries and
device damage CAUTION
Failure to observe the following
safety instructions can result
in minot injuries and/or device
damage
Notes NOTE Helps to avoid the injuries and
damaging of the piano
Hints HINT Hints for optimized handling of
your GEWA digital piano
SAFETY INFORMATION
EXPLANATION OF SYMBOLS
Dear Customer,
Thank you for purchasing our GEWA DP 240 digital piano!
With the GEWA DP 240 you have selected a top quality digital digital piano, giving you a
highly impressive sound and playing experience with a huge extra set of additional and
easy-to-use sounds and functions.
Your safety is very important to us! So please read the safety information carefully and
take good note of the given information.
We suggest you to keep this user manual at a safe and known place, and to pass
it on to a new owner or user of your DP 240.
1SAFETY INFORMATION
The manufacturer cannot be held liable for injury to persons or damage to property
resulting from incorrect use of the device!
Only use your digital piano in accordance with the instructions given here!
1.1 SYMBOLS USED IN THE MANUAL
The following symbols are used to signal risks and to give advise:
NOTE

6
1.2 HOW TO USE/PLAY YOUR GEWA DIGITAL PIANO IN THE RIGHT WAY
Please keep your digital piano in a dry environment.
• Audio accessories for audio playback (connected to the pianos in- or output) or for
data communication can be connected. Accessories must match the relevant technical
specications(pleasethereforeseechapter11,technicaldata).
•Only and always use GEWA certied power adapters, and make sure that they are
properly attached and connected. The power supply used must also meet the country
voltagespecications(checkplateontheadapter).
•Thedigitalpianoisonlytobeusedasoriginallydelivered.Anymodicationstothepiano
are not allowed and result in a complete loss of warranty.
• The digital piano must be set up on safe weight-bearing, stable and even ground or
platform able to support the weight (please therefore see chapter 11, technical data).
1.3 IMPROPER USE
• Exposing the digital piano to an open air or moist/rainy environment
• Setting up the piano in damp rooms
• Using power supplies not authorized by GEWA music, or connecting the piano to an
electricaloutletinspiteofmismatchinglocalvoltagespecications
• Playing the piano close to electrical or electronic devices, such as stereo systems, TV
sets, radios or mobile phones. These devices can cause interferences and seriously
effect and decrease the sound quality of your GEWA digital piano.
• Using extensively long audio leads can likewise interfere with the sound quality.
• Transport and setup up in conjunction with strong vibrations and shocks, dust and heat
exposure(e.g.invehiclesordirectsunshineorboth),shouldalsodenitelybeavoided.
The manufacturer cannot be held liable in case of damages in the following cases:
• Non-compliance with the safety instructions
• Improper handling
• Connecting incompatible in/output devices etc. or other 3rd party interface devices.
NOTE
SAFETY INFORMATION
CORRECT USE

7
SAFETY INFORMATION
SAFETY PRECAUTIONS
1.4 SAFETY PRECAUTIONS
Always follow the safety precautions given here. Non-compliance with the safety
precautions may have serious consequences:
• Serious injury or even lethal accidents
• Electric Hazard
• Short circuits
• Damage
• Fire
Further and other risks are possible, therefore this list does not claim to be complete.
WARNING Electric hazard
• Even low electric currents can lead to serious injuries and even death!
• Never open the digital piano.
• Never use damaged power supplies/cables.
•Installpowersupplies/cablesrmlytoavoidtheriskofdamage.
•Never placecontainments lledwithwater orliquids (vases,glassesetc.) onor near
the piano.
• Never insert water or liquids into the digital piano or the keyboard.
• Never clean the digital piano with a wet cloth.
• Never plug in or unplug the piano with wethands and never pull on the cable as it may
be damaged.
• If liquids or water accidentally get into the digital piano, unplug it immediately. In all of
the above cases have the digital piano checked by your authorized GEWA customer
service.
WARNING In case of unexpected and unusual behavior of the piano
• Switch the digital piano off or unplug it immediately if:
- there is a sudden loss of sound while the piano is in use,
- the digital piano emits an unusual smell or smoke.
• It is essential to have the digital piano checked by your GEWA customer service.
WARNING Fire prevention
•Openamessuchasfromcandlesoroillampscantipoverandcauseare.
•Neverbringopenreonorneartothedigitalpiano!

8
SAFETY INFORMATION
CE MARK
CAUTION Damaging the digital piano
• Mismatching electrical voltages can damage the digital piano. Operate the digital piano
only within the correct voltage range (marked on the corresponding specs plate).
• Only use the power supply and power cable supplied with the device.
• Never place the power cable near to heat sources such as radiators or radiant heaters.
• Do not sharply bend the cable, or damage it otherwise (!risk of cable break!).
• Position the power cable in a way to avoid tripping or anything heavy rolling over it.
• Do not place any objects on the power cable.
• Check the power supply regularly and remove any visible dust or dirt on the device.
CAUTION Thunderstorms can also damage your GEWA digital piano
• Thunderstorms can produce electrical surges able to damage your digital piano
• During thunderstorms, or if you will not use your digital piano for a while, we suggest you
to unplug your digital piano completely form the electrical system.
1.5 CE LABEL
Your GEWA digital piano complies with the requirements of the EU directives:
2004/108/EC on the approximation of the laws of the Member States relating
to electromagnetic compatibility and repealing Directive 89/336/EEC.
Compliance with the above directives is conrmed by the CE label on the device.
The declaration of conformity can be viewed at the following address:
GEWA music GmbH
Werkstraße 1
08626 Adorf
GERMANY
1.6 RECYCLING
In case your digital piano needs to be disposed, take it to your local community waste
management service location (e.g. disposal companies, recycling centers).
The displayed symbol requires that devices labeled with this symbol must be disposed
separately from household waste. Under the Electrical and Electronic Equipment Act,
owners of devices marked with this symbol are required by federal law to deposit waste
electrical and electronic equipment in a separate waste collection.
Please help us with your contribution to protect the environment by not depositing your old
electric equipment with the general household waste.

9
ITEMS SUPPLIED
Pos. Description Pcs
1 Console with keyboard 1
1A Rollable Keyboard Cover 1
2 Rear panel 1
3 Pedalboard bracing 1
4 Pedal board with connector cable 1
5 Left side panel 1
6 Right side panel 1
7 Power supply and cable 1
8 Recessed head screw M6 9
9 Recessed head wood screw 8
10 Manual 1
11 Plastic screw covers 17
12 Headset rest 1
2PARTS SUPPLIED WITH THE PIANO
Check the content of the package for completeness before starting with the assembly.

10
ASSEMBLY INSTRUCTIONS
NOTE
3ASSEMBLY INSTRUCTIONS
In this section we will show you how to easily set up your GEWA digital piano.
For the assembly you need:
• size 2 Phillips screwdriver
• second assisting person
Do not rmly tighten the recessed head screws until all parts of your digital piano are
aligned. Make sure you assemble your digital piano on level ground.
Now lets start assembling your GEWA digital piano:
1. Release and unfold the wound up pedal cable (without illustration).
2. By using the recessed head screws M6 (10), connect the side panels (6 and 7)
with the pedal board (4).
3. Apply the bracing of the pedal board (3) to the backside of the pedal board so that it
snaps into the notch. Then screw it on using 4 recessed head screws.
4. Now screw on the bracing on to the back rear panel (2) with 4 recessed head screws.
5.Inserttheconsolefromaboveandushmountitwiththefrontedge.Theconsolemust
lieatonthescrewed-onbracketsforstabilityreasons.Thenscrewontheconsole(1)
with 4 recessed head screws. You can now screw on the headphone rest on the left
front bottom side of the digital piano.
6. Level your digital piano and tighten all recessed head screws (6).
7. Place the plastic covers on all side panel boreholes (6 and 7).

11
MONTAGEANLEITUNG
8. Nowtakeyourdigitalpianotoitsnalpositionintheroomandunscrewthesupport
underneaththepedalboarduntilitreachestheoor
9. Plug in the pedal board cable in the right way (it should slide on easily without the
use of force) to the socket on the bottom side of the console (1) and plug the power
supply (8) into the power socket on the rear of the piano (without image).
11. Please set up the music rest as shown below
THIS IS HOW TO OPEN THE KEYBOARD LID
Please make sure to always use both hands to open or close the lid.
To open the lid please follow below drawing. In the opposite way the lid can then be
closed again
Pedal cable
Pedal connector
CAUTION

12
ASSEMBLY INSTRUCTIONS / GETTING TO KNOW YOUR INSTRUMENT
CONTROLS / CONSOLE
FOR KEYBOARD STAND USE
It is also possible to use a keyboard stand in stead of the console. In this case place the
keyboard stand on level ground and position it centrally. If possible the speakers on the
bottom of the piano should not be touched by the stand. For the connection with a standard
sustain pedal you can use the 6,3mm jack socket on the rear panel.
NOTE
4GETTING STARTED
Now let‘s have a look on to the controls of your GEWA digital piano
4.1 THE CONTROLS OF YOUR DIGITAL PIANO
Your GEWA digital piano has the following controls:
Console
View A
Indicator LED Keyboard
Pedals
View A Speakers

13
P 1
GETTING STARTED
FUNCTION KEYS AND PEDALS
4.2 FUNCTION KEYS AND PEDALS
View A 1 Display
provides settings information.
2 Cursor keys
Navigate through the functions and edit settings.
3 Volume
Set the volume.
4 Voice (only function access)
Select the various sounds of your digital piano
(see Page 17).
5 Metronome (only function access)
Switches the metronome on or off (Page 19).
6 DEMO (only function access)
Press the Voice- and Metronome buttons simultaneously,
to enter the DEMO songs menu (Page 17).
7 Reverb (only function access)
Change and edit the reverb room simulation parameters
(Page 18).
8 Chorus (only function access)
Add DSP (Digital Sound Processing) effects to the sound
(Page 19).
9 Function (only function access)
Activate the Function-Menu to edit settings (Page 20).
10 REC
Start the recording (Page 25).
11 Play/Stop
Start/Stop the playback of the recorded pieces (Page 25).
12 Song Select
Push the REC- and Play/Stop-Keys simultaneously, to
select a recorded song (Page 25).

14
GETTING TO KNOW YOUR INSTRUMENT
THE CONTROL KEYS AND PEDALS
View B Una corda pedal (left)
The una corda pedal (soft pedal) simulates moving the
pianos key mechanics closer to the stringboard, resulting
in a more quiet and softer sound.
Sostenuto pedal (center)
The sostenuto pedal function is similar to the damper
pedal function. When depressed while playing a key or a
number of keys, this key or the keys is/are sustained until
the pedal is released again. Unlike the damper pedal It
sustains only those notes that are being held down when
the pedal is depressed, allowing future notes played to be
unaffected.
Damper/sustain pedal (right)
The damper/sustain pedal simulates the removal of the
dampers from the strings like on an acoustic piano.
Sounds that are played after pressing the damper/sustain
pedal sound considerably longer. Includes also half-
pedaling techniques.

15
GETTING TO KNOW YOUR INSTRUMENT
CONNECTORS
4.3 CONNECTORS (REAR SIDE OF THE CONSOLE)
View A 2 headphone outputs (6.3 mm jack)
Connect your headphones here.
View B Pedal cord jack
Connect the pedal cord here.
View C 1 MIDI-connector Connect MIDI devices here to utilize the MIDI functions of
your digital piano.
2 USB-B connector Connect your digital piano to your PC with this interface.
3 LINE IN Connect an output device (e.g. MP3 player) to your digital
piano here. The signal is looped through your digital piano
for a combined output with the sounds being played.
This can be used e.g. for Playback accompaniment in
rehearsals.
THE CONSOLE - REAR SIDE CONNECTORS (C)
3 6 4 1 2 5
Speakers

16
GETTING TO KNOW YOUR INSTRUMENT
CONNECTORS
View C 4 LINE OUT R/L Connect these outputs with a receiving audio device (e.g.
amplierorrecordingdevice)toe.g.recordyourplaying
on an audio recording/playback device.
5 Mains Power Supply Connect your digital piano with the supplied power
adapter.
6 SUSTAIN 6.3 jack socket for the connection of any standard sustain
pedal OR the supplied pedal.
The LINE IN and LINE OUT connectors are dened as separate stereo channels L(left)
and R(right). Use appropriate wiring to output or input stereo audio signals. (3.5 mm stereo
jack)
NOTE

17
OPERATION
SWITCHING ON
5USING/PLAYING YOUR GEWA DIGITAL PIANO
All edited settings will be reseted to the factory settings when you switch off your piano and
back on again, except for balance, brilliance and volume control settings.
5.1 SWITCHING ON
Set the volume control to the middle position before switching the piano on.
1. Press the On-/Off switch on the left side underneath the console of your digital piano.
2. The LEDs of the Reverb- and the Voice-keys are illuminated. The front of the digital
piano indicator LED lights up.
3. Your GEWA digital piano is now ready to play.
5.2 DEMO FUNCTION
The DEMO function provides an overview of the various sounds of your digital GEWA
digita piano.
This is how to activate the DEMO song function:
1. Press the Voice- and Metronome-keys simultaneously. This will display the number of
the active DEMO-song.
2. Press the upper and lower cursor keys, to choose from the different DEMO-songs.
3. Press the Play/Stop-key, to start or stop the playback of a DEMO song. You can play
along to a DEMO-song on your digital piano.
4. Press the Voice-key to end the DEMO-mode.
5.3 SOUND SELECTION
Your digital piano features 20 exclusive sounds:
NOTE
TIP
Press the Voice-key and then press the left or right cursor key, to switch to the different
sounds. The momentarily chosen sound is shown in the display.
Sounds 1 - 10 Sounds 11 - 20
Display Sound Display Sound
P1 Piano 1 Cho Choir
P2 Piano 2 Sy1 Synth Strings 1
P3 Piano 3 Sy2 Synth Strings 2
P4 Piano 4 OG1 Organ 1
HAr Harpsichord OG2 Organ 2
EP1 E-Piano 1 OG3 Organ 3
EP2 E-Piano 2 Git Guitar
EP3 E-Piano 3 CL Clavinet
EP4 E-Piano 4 Vib Vibraphone
Str Orch. Strings Acc Akkordion

18
SWITCHING ON
REVERB AND CHORUS
5.3.1 SOUND COMBINATIONS
You can set your digital piano to a mode so that two different sounds can be played
simultaneously during your performance.
This is how you can combine two sounds :
1. Choose a sound (as already described).
2. Hold the voice-key depressed for approx. 2 seconds. The LED of the voice-key will start
blinking. The display will indicate the sound.
3. Navigate with the upper or lower cursor to an additional sound sound of your choice.
4. You will now hear both sounds simultaneously.
5. The volume ratio of the two sounds can be set in the keys or keyboard balance-settings
(see page 22).
6. Press the Voice-key to end the dual mode and hit either the left or right cursor button until
„off“ is shown in the display
5.4 REVERB AND CHORUS
Your digital piano has the possibility to mix in various special effects to the sounds with the
reverb or chorus feature
• Some sounds already feature a factory preset reverb or chorus effect making the sound
more lively and realistic.
• You can deactivate or edit the effects as described.
• The edited effect settings remain active until the digital piano is switched off.
When the instrument is switched back on, all factory settings are set back to their factory
default values .
5.4.1 REVERB
The reverb (or hall-) effect simulates the sound in various room environments.
Your digital piano comes with the following reverb effects:
Display reading Description
R01 Sounds like in a medium size living room
R02 Simulates a slightly larger room
StG Stage / Club simulation
HA1 Concert hall
HA2 Cathedral type experience
Press the reverb and the effect on/off button. The reverb effect is active when the led light
of the reverb button lights up. If the reverb function has been activated, the current effect
setting will be shown in the display. You can then choose an effect with the left or right
cursor button. With the upper or lower cursor buttons the effect room size can be edited.
Changes become effective immediately.
NOTE

19
SWITCHING ON
METRONOME
5.4.2 CHORUS AND OTHER EFFECTS
The chorus-function contains the following effects:
Press the Chorus button, to switch the effect on or off. If the chorus effect is active, the LED
on the chorus-key lights up. Once you have activated the chorus function, you can choose
an effect with the left and right Cursor buttons and set the intensity with the upper and
lower cursor buttons. Changes of the effect and edits within an effect become effective
immediately.
5.5 METRONOME
Your digital piano has abuilt in metronome
The metronome features 7 different beats (1/4, 2/4, 3/4, 4/4, 5/4, 3/8 and 6/8), the volume
can be adjusted and set from 32 to 250 bpm (beats per minute).
5.5.1 SWITCHING METRONOME ON/OFF
1. Press the metronome button, the metronome button LED lights up.
The metronome is now activated.
2. By again depressing the metronome button the LED light will go off.
The Metronome is now deactivated.
Display reading Name Description
CH1 Chorus1 Adds an ensemble effect to the sound
CH2 Chorus2 Like (1), but more intense
FLG Flanger Similar to a chorus effect with a slight pitch
modulation
PH1 Phaser1 Similar to a chorus effect with a slight frequency
phase modulation
PH2 Phaser2 Like (PH1), but more intense
TR1 Tremolo1 Periodical sound volume modulation
TR2 Tremolo2 Like (TR1), but more intense
rot Rotary Simulates a rotary speaker cabinet.
Fits well with Organ sounds

20
SWITCHING ON
FUNCTION MENU
5.5.2 CHANGING METRONOME SPEED
1. Switch on the metronome.
2. Press the upper or lower cursor keys to increase or decrease the speed in steps of
10 or push the left or right cursor key, to increase or reduce the speed in single steps.
The selected beat and/or speed shows in the display.
5.5.3 BEAT TYPE CHANGES
1. Hold the metronome button depressed. The beat will be displayed.
2. Press the right or left cursor button to choose a beat.
3. Release the metronome button. The selected beat is now ready to play.
5.5.4 SETTING METRONOME VOLUME
1. Hold the metronome button depressed. The beat will be displayed.
2. Press the upper or lower cursor buttons to set the volume of the metronome.
3. Release the metronome button. The selected metronome volume will now be displayed.
6FUNCTION MENU
All the edited settings are reset to factory settings when the digital piano is switched off
and back on again. In the function menu you can change numerous settings. To enter the
function menu, press the Reverb and Chorus button simultaneously.
Navigation within the Function menu:
1. Push the Reverb and Chorus button simultaneously. In the display the abbreviation of
the relevant setting will blink alternating with the momentary setting.
2. Press the left or right cursor button to change from setting to setting.
3. Press the upper or lower cursor button to change the settings properties. Changes of
the properties become effective immediately.
4. Press the Reverb key to leave the menu.
NOTE
Table of contents
Other Gewa Musical Instrument manuals