Gewa DP345 User manual


Manufacturer:
GEWA music GmbH
Oelsnitzer Str. 58
08626 Adorf
GERMANY
www.gewamusic.com
Version 1.0
Last Update: 21.12.2021

1. SAFETY INFORMATION.................................................................................................................... 5
1.1 Key........................................................................................................................................... 5
1.2 Intended use............................................................................................................................ 6
1.3 Improper use - Examples......................................................................................................... 6
1.4 Precautions.............................................................................................................................. 7
1.6 Disposal ................................................................................................................................... 8
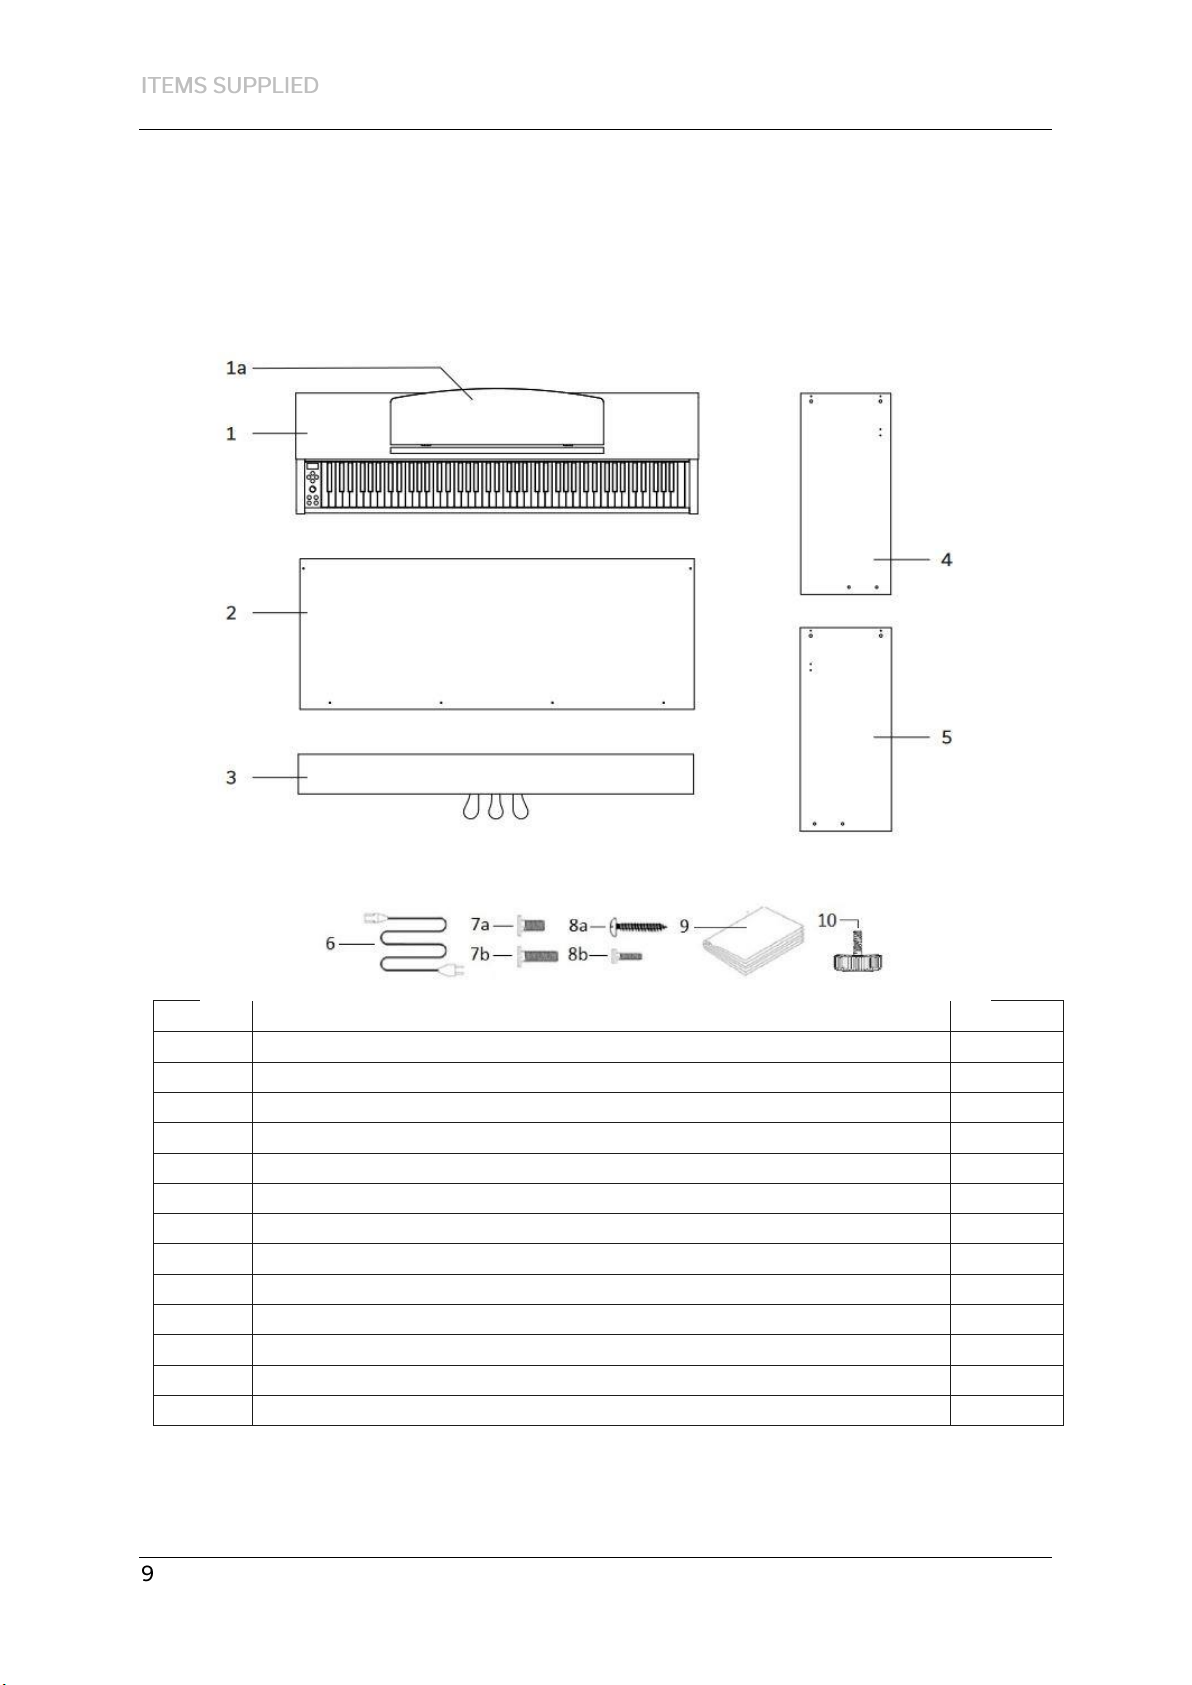
2. PARTS SUPPLIED WITH THE PIANO ................................................................................................. 9
3. ASSEMBLY INSTRUCTIONS DP345 ................................................................................................. 10
4. FIRST STEPS.................................................................................................................................... 12
4.1 The control elements of your digital piano .......................................................................... 12
4.2 Control buttons and pedals................................................................................................... 13
4.3 Keyboard / Connections / Underside.................................................................................... 15
5. CONTROLS ..................................................................................................................................... 17
5.1 Switching on .......................................................................................................................... 17
5.2 Sound selection ..................................................................................................................... 17
5.3 Favorites................................................................................................................................ 18
5.4 Metronome ........................................................................................................................... 18
5.4.1 Switching the metronome on/off.................................................................................. 18
5.4.2 Adjusting the metronome speed................................................................................... 18
5.4.3 Adjusting the Time Signature ....................................................................................... 18
5.5 Recorder Menu...................................................................................................................... 19
5.5.1 Internal recorder ........................................................................................................... 19
5.5.2 USB Recording ............................................................................................................... 19
5.6 Player..................................................................................................................................... 19
5.7 Piano information.................................................................................................................. 20
6. BLUETOOTH................................................................................................................................... 20
6.1 Bluetooth MIDI...................................................................................................................... 20
6.2 Bluetooth Audio .................................................................................................................... 20
7. OPERATION VIA APP...................................................................................................................... 21
7.2 Connect the App to the piano ............................................................................................... 21
7.3 Favorites................................................................................................................................ 21
7.4 Sound selection ..................................................................................................................... 22
7.4.1 Combinations................................................................................................................. 22
7.4.2 Combination-Editor....................................................................................................... 23

7.5 Player-Menu.......................................................................................................................... 23
7.5.1 Lesson-Player................................................................................................................. 23
7.5.2 Demo player .................................................................................................................. 24
7.5.3 Song Player.................................................................................................................... 24
7.5.4 Recorder ........................................................................................................................ 24
7.6 Metronome ........................................................................................................................... 24
7.7 Virtual piano technician ........................................................................................................ 24
7.7.1 Single Key Calibration.................................................................................................... 25
7.7.2 Ambient Noises ............................................................................................................. 25
7.7.3 Mechanics...................................................................................................................... 26
7.7.4 Touch............................................................................................................................. 26
7.7.5 Tuning............................................................................................................................ 26
7.8 General Piano Settings .......................................................................................................... 27
7.8.1 Piano Information.......................................................................................................... 27
7.8.2 Language........................................................................................................................ 28
7.8.3 MIDI Settings ................................................................................................................. 28
7.8.4 Volume settings............................................................................................................. 28
7.8.5 Bluetooth-Settings......................................................................................................... 29
7.8.6 Lesson-Library................................................................................................................ 29
7.8.7 Piano-Settings................................................................................................................ 29
8. USEFUL INFORMATION.................................................................................................................. 30
8.1 Index...................................................................................................................................... 30
8.2 Warranty................................................................................................................................ 31
9. TROUBLESHOOTING AND REPAIR ................................................................................................. 31
10. TECHNICAL DATA....................................................................................................................... 32

Dear Customer,
Thank you for choosing a digital piano from GEWA music!
You have chosen a high-quality digital piano that will give you an impressive
sound experience and lots of fun.
Additional functions extend the capabilities of your digital piano far beyond
piano playing.
Your safety is very important to us!
Please read the safety information carefully and pay close attention to it.
Retain this manual and hand it over to the respective user.
1. SAFETY INFORMATION
The manufacturer is not liable for personal injury or property damage
resulting from improper use of the device!
Only use your digital piano as directed!
1.1 KEY
The following symbols are used in this operating manual to identify hazards
and notes.
Level of danger
Symbol
Importance
Definition
Severe injury
WARNING
Severe to fatal injuries if
disregarded
Severe injury through
electric shock
WARNING
Additional symbol for danger of
electric shock
Slight injury and property
damage.
CAUTION
Slight injury and / or property
damage can occur if the safety
instructoins are disregarded.
Note
NOTE
Crucial information
concerning the handling
of the device.
Tip
TIP
Application tips

1.2 INTENDED USE
The digital piano is intended for use in dry rooms.
Devices for audio playback (as input or output) or for data
communication can be connected. However, the respective
technical specifications must be complied with (see the section
“Technical data“)
The electrical connection may only be made to correctly installed
power supplies, fulfilling the respective regulations. The mains
voltage on the identification plate must correspond to the mains
voltage of the country of use.
The digital piano is only to be used in the original delivery condition
described below. Conversions of any kind are not permitted and
cause the immediate loss of the warranty claim.
The digital piano must be placed on securely fastened and weight-
suitable, stable and level floors or platforms.
1.3 IMPROPER USE - EXAMPLES
Use outdoors or in rain
Use in damp rooms
Connection to incorrect supply voltage or improperly installed
electrical power supplies.
Use in close proximity to electrical or electronic equipment such as
stereos, televisions, radios or mobile phones.
These devices may cause interference and affect the sound quality.
Electrical leads that are too long can also affect sound quality.
Transport and installation in places or vehicles with strong
vibration, dust and strong heat e.g. direct sunlight.
The manufacturer accepts no liability for damage for the following reasons:
Disregard of the safety instructions
Improper handling
Use with devices that are not compatible with the technical data
listed below

1.4 PRECAUTIONS
Please follow the precautions listed here. Disrecord of precautionary
measures can have serious consequences:
Severe injury or even fatal accidents
Electric shock
Short circuit
Damage
Fire
Other threats are conceivable; this is not an exhaustive list.
Fatal electric shocks
Even low electrical currents can lead to serious injuries and death.
Never open the digital piano’s casing.
Never use damaged power cables.
Lay the power cable in such a way that it cannot be damaged.
Never place containers (vases, glasses, etc.) filled with water or
fluids on the piano.
Never pour water or liquids on to the digital piano or keyboard.
Never clean the digital piano with a wet cloth.
Never plug in or pull out the mains plug with wet hands. Never pull
on the cable; it can cause damage.
If liquid accidentally gets into the digital piano, immediately unplug
the power. Then have your digital piano checked by your GEWA
service representative.
Unusual circumstances
Turn off the digital piano or unplug the power cable if:
oThere is a sudden loss of sound while using the digital piano
oThe digital piano generates an unusual smell or smoke
Be sure to have the digital piano checked by your GEWA service
representative
Protection against fire
Open flames such as candles or tealights can tip over and cause a
fire
Never place objects with open flames on the digital piano!

Damage to the digital piano
Inappropriate electrical voltages can damage the digital piano.
Only operate the digital piano in the permissive voltage range (as
indicated on the respective identification plate)
Only use the supplied power cable.
Never place the power cable near to sources of heat, such as
radiators or freestanding heaters.
Do not blend or kink the power cable, or damage it in any other
way.
Lay the power cable so that nobody can step on it, trip on it or roll
over it.
Do not place objects on the power cable.
Regularly check the power cable and remove any dust or dirt that
may be present.
Damage to the digital piano through thunderstorms
Thunderstorms can generate electrical surges that can damage
electrical equipment.
In the event of a thunderstorm or long periods of non-use (such as
travel), unplug the appliance from the mains.
CE-MARK
This device complies with EU directive requirements: Directive 2014/53/EU
EN55020:2007+A11:2011
EN55024:2010
EN55032:2012
EN61000-3-2:2014
EN61000-3-3:2013
EN301489-17:V2.2.1
EN301489-17:V3.2.0
EN62479:2010
EN300328:V2.1.1
The conformity with the regulations listed above is confirmed by the CE sign
on the device. The declaration of conformity can be viewed at the following
address:
GEWA music GmbH, Oelsnitzer Str. 58, 08626 Adorf, GERMANY
1.6 DISPOSAL
To dispose of the old device, please take it to your local waste management
authority (e.g. disposal company or recycling centre).
The adjacent symbol indicates that the device must be disposed of
separately from household waste. In accordance with the Electrical and
Electronic Equipment Act, owners of old appliances are legally required to
dispose of old electrical and electronic appliances at a separate and
designated waste disposal point
Please help in contributing to protect the environment by not disposing of
the old device in household waste.
CAUTION
CAUTION

2. PARTS SUPPLIED WITH THE PIANO
Check the content of the package for completeness before starting with the
assembly.
Pos.
Description
Pcs.
1
Keyboard
1
1a
Music Desk
1
2
Rear panel
1
3
Pedal board
1
4
Left side panel
1
5
Right side panels
1
6
Power cable
1
7a
Phillips screw M6 x 16
4
7b
Phillips screw M6 x 35
4
8a
Phillips wood screw 3,5 x 18
4
8b
Phillips srew M4 x 10 with washer and spring washer
2
9
Quick Start Guide
1
10
Adjustment screw
1

3. ASSEMBLY INSTRUCTIONS DP345
This section tells you how to correctly set up your digital piano. For
assembly you will need:
A size 2 phillips screwdriver
Another person
Do not tighten the Philips screws until all parts of your digital piano have
been pre-assembled and aligned.
How to assemble your digital piano:
1. Unfold the pedal cable (not shown) and screw the adjustment screw
(10) into the pedal board (3).
2. Connect the side panels (4 and 5) with the pedal board using the Philips
screw (7b).
3. Attach the rear panel (2) with the 4 Phillips wood screws (8a) to the
pedal board. Then connect it to the side panels by using the Philips
screws (8b).
4. Then you can place the keyboard on the top. Ensure that it is fitted to
the metal angle of the side panels. 4 Phillips screws (7a) must be
screwed into the keyboard from below.
5. Then align your digital piano and tighten all of the screws.
6. Place you piano at the desired location and make sure that the
adjustment screw (10) touches the floor as shown below.

7. Insert the pedal cable true to side into the pedal cable socket on the
underside of the keyboard (1). It should slide easily into the socket.
Then plug the power cable (6) into the power socket on the back of the
piano (not shown).
8. Set up the music des as shown below.
OPENING THE KEYBOARD LID
Please always use both hands to open the keyboard lid.
Open the keyboard cover as shown in the diagram. Proceed in reverse
order to close it.

USE WITH A KEYBOARD STAND
It is also possible to use a keyboard stand instead of the supplied rack. In
this case place the keyboard stand on level ground and position the piano
centrally on top. If possible, the speakers on the bottom of the piano should
not be covered or partly touched by the stand. For the connection with a
standard sustain pedal you can use the 6.3mm jack socked labeled ‘sustain’
on the rear panel.
4. FIRST STEPS
In this section, we familiarize you with the controls on your digital piano.
4.1 THE CONTROL ELEMENTS OF YOUR DIGITAL PIANO
Your GEWA digital piano has the following controls:
NOTE
Speakers
User Panel
View A
Indicator LED
Keyboard

4.2 CONTROL BUTTONS AND PEDALS
Diagram A
1 Display
Shows information about the chosen settings.
2 Cursor Buttons
Navigate through the functions and adjust settings here.
3 Volume
Adjusts the volume.
4 Voice
Choose from your digital piano’s different sounds.
5 Metronome
Switch the metronome on or off here
6 Record
Opens the recorder menu.
7 Player
Open the player menu.

Diagram B
Sustain Pedal (right side)
The Sustain- or Damper Pedal on an
acoustic grand piano lifts up all the
dampers that sit on the strings. Thereby all
played notes continue to sustain after the
keys are released.
Furthermore, all the other strings can
freely resonate, so their frequencies
contribute to a richer sound.
All this is simulated by the pedal of your
GEWA piano. It is also possible to play with
half pedal, which means the simulated
dampers are only lifted slightly, so that the
sustaining notes are decaying faster than
with the pedal fully depressed.
Sostenuto Pedal (middle position)
The Sostenuto Pedal resembles the Sustain
Pedal. The only difference is that only those
notes are sustaining whose keys were being
depressed at the moment of actuating the
pedal. All the other notes are dampened as
usual.
Piano Pedal (left side)
When the Piano- or Una Corda pedal is being
operated, the GEWA Piano simulates shifting
the keyboard action slightly to the right. The
altered striking line of the imaginary piano
hammers results in a differently colored tone
and a slightly softer volume.

4.3 KEYBOARD / CONNECTIONS / UNDERSIDE
General View
A1
Power On/Off
Turn your digital piano on and off.
A2
USB IN/OUT
Connect a USB stick or other
USB device here if required.
A3
Headphone sockets
Connect one or two sets of headphones
here.
B
Pedal cable socket
Connect the pedal cable here.
A
B
Speaker
Speaker

KEYBOARD / CONNECTIONS REAR PANEL
Diagram C
C1
LINE IN
This port is for external sound source playback (e.g. MP3
players) through the speaker system via a 3.5 mm jack socket.
C2
SUSTAIN
You can connect a standard sustain pedal to this 6.3mm jack
socket, if you want to use your digital piano with an external
stand.
C3
LINE OUT L/R
This connection is split into the stereo channels L(eft) and
R(ight). Using 6.3mm jack cables, you can connect these
outputs to a receiver, e.g. an amplifier of a recorder.
C4
MIDI IN/OUT
Connect MIDI devices here.
C5
USB-B Connection
Connect your digital piano with your PC via this connection.
C6
Power Supply
Connect your digital piano to the power supply here, using the
power cable.

5. CONTROLS
All settings you change are automatically saved. Exceptions to this
are settings on the volume control.
5.1 SWITCHING ON
Set the volume control to the middle position before switching on.
1. Press the on/off switch on the bottom side of your digital piano.
2. The LEDs of the cursor data and the sound select button light up.
In addition, the indicator LED on the front of your digital piano
lights up.
3. Your digital piano is ready for operation.
5.2 SOUND SELECTION
Your GEWA digital piano has 15 sounds of different categories.
Category
Sound
Piano
Piano 1
Piano
Piano 2
Piano
Piano 3
Piano
Piano 4
E-Piano
E-Piano 1
E-Piano
E-Piano 2
E-Piano
E-Piano 3
E-Piano
E-Piano 4
Strings and Choirs
Strings
Strings and Choirs
Choir
Strings and Choirs
Synt Str
Strings and Choirs
Synt Pad
Organ
Organ 1
Organ
Organ 2
Organ
Organ 3
Others
Guitar
Others
Clavi
Others
Vibra
Others
Accord
Others
Harpsichord
NOTE

Press the voice selection key to enter the sound selection menu. By
using the left or right cursor keys you can navigate through the
different sounds. Use the cursor keys up and down to navigate
through the sound categories. The currently selected sound is shown
in the display.
5.3 FAVORITES
Your GEWA digital piano also has a category called “Favorites”. This
contains 6 presets that you can define completely freely.
To do this, use the GEWA Keys Piano Control app (see p. 22). The app
is available for Android and iOS.
5.4 METRONOME
Your digital piano has a built-in metronome that helps you find and
keep the right beat while playing.
The metronome has 7 time signatures (1/4, 2/4, 3/4, 4/4, 5/4, 3/8
and 6/8) and is adjustable between 32 and 250 beats per minute
(Bpm).
5.4.1 SWITCHING THE METRONOME ON/OFF
1. Press the Metronome Key. The corresponding LED will now start
blinking at the specified speed.
2. Press the metronome button again to start the metronome.
3. To stop the metronome, press the metronome button again.
5.4.2 ADJUSTING THE METRONOME SPEED
1. Switch on the Metronome
2. Use the cursor keys to adjust the speed of the metronome. Use
the Left/Right keys to select the corresponding digit. Use the
Up/Down cursor keys to increase or decrease this by one digit.
5.4.3 ADJUSTING THE TIME SIGNATURE
1. To change the time signature, proceed as described in 5.4.2.
Press the cursor key until you have selected the time signature.
2. Use the cursor keys up/down to switch between different time
signatures..
NOTE
Android
iOS

5.5 RECORDER MENU
Your GEWA digital piano has MIDI and USB-WAV recording
capabilities.
5.5.1 INTERNAL RECORDER
To use the internal recorder, proceed as follows:
1. Press the Recorder button to switch to recording mode.
2. The piano is now ready for recording. You can record the left and
right hand separately. Use the cursor left/right keys to select the
hand to be recorded.
3. Recording starts automatically as soon as you play the first note.
You can see if the recording is currently running by the animation
of the recording icon.
4. To stop the recording, press the player icon. Here you can also
listen to your performance.
5.5.2 USB RECORDING
To record audio files to a USB stick, proceed as follows:
1. Connect a USB stick to the bottom side of the console.
2. Press the Recorder button to switch to the recording mode. Press
the Recorder button again to get into the USB recording mode.
3. Press the Player button again to start recording.
4. Press the player button again to stop recording. The piano
automatically saves a file with the name “GEWA_S01.wav” onto
your USB stick.
5.6 PLAYER
You can use the player to play back your recordings. Proceed as
follows:
1. Press the Player soft button to open the player menu
2. Use the down cursor keys to select the song to be played
3. Press the player button to start and pause the player.
To play audio files from your USB flash drive, enter the Player menu
and press the Up cursor key to search for audio files on your USB
flash drive.
To play, proceed as described above.

5.7 PIANO INFORMATION
For service purposes, it may be important to be able to access the
most important information about your digital piano.
To do so, proceed as follows:
Press the Sound Select and Record buttons simultaneously.
A “Piano Information” window should now open.
6. BLUETOOTH
Your digital piano has Bluetooth audio and MIDI functionalities.
6.1 BLUETOOTH MIDI
The Bluetooth MIDI function allows you to connect your GEWA digital
piano to various learning apps or DAWs (Digital Audio Workstations,
e.g. Logic Pro or Studio One).
The Bluetooth MIDI interface is always active and you can connect
your digital piano at any time.
In the search of your mobile device, the MIDI interface is displayed
as: GEWA Mid.
Follow the instructions of your MIDI software to connect the piano.
6.2 BLUETOOTH AUDIO
In addition to the Bluetooth MIDI interface, your GEWA digital piano
also has a Bluetooth audio function.
To activate Bluetooth Audio, please proceed as follows:
1. Press the sound select and metronome buttons simultaneously.
2. Activate the Bluetooth Audio function with the cursor up button.
3. To put the piano into pairing mode, press the Right cursor
button. Now the piano is in pairing mode and waiting for external
devices to connect.
4. After successful pairing, the message: „Pairing OK!” will appear.
5. You can now play audio files from the device to your piano
through the Bluetooth audio interface.
Other manuals for DP345
1
Table of contents
Other Gewa Musical Instrument manuals