Gigaset 5015 User manual

Gi
gase
t
5015
/
EU
ger-eng-cre-s
l
ov
/
A30350
-
M208
-
D801
-
7
-
Z419
/
5015
.
f
m
/
14
.
04
.
2011
1
D
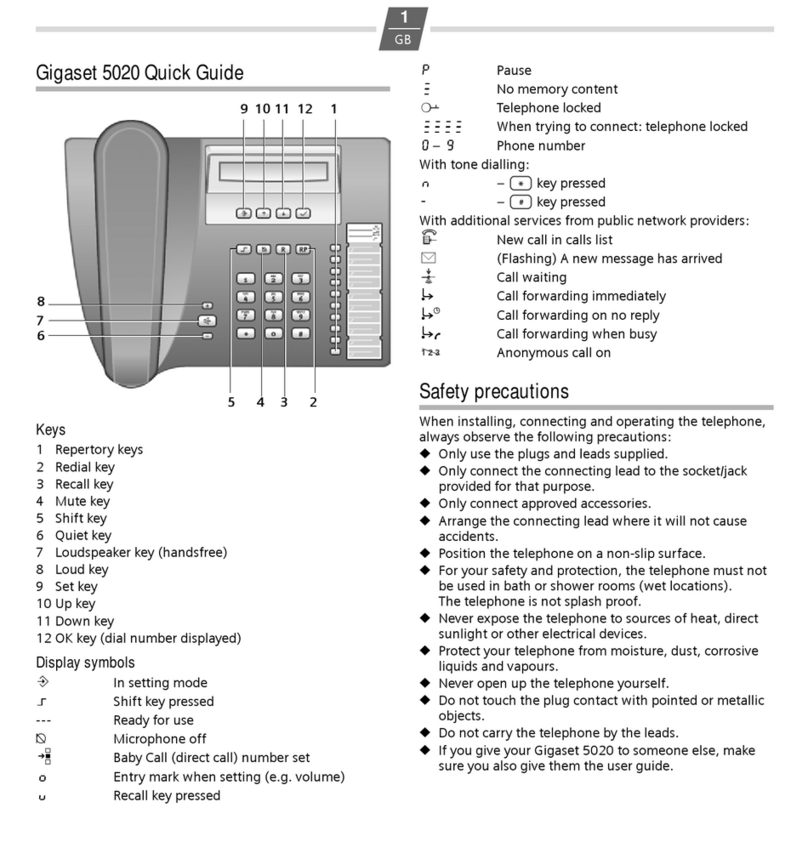
Kurzübersicht Gigaset 5015
Tasten
1 Zielwahl-Tasten
2 Wahlwiederholtaste
3Rückfragetaste
4 Stummschalte-Taste (Mute)
5Shift-Taste
6Leise-Taste
7 Lautsprecher-Taste (Freisprechen)
8Laut-Taste
9Speichern-Taste
10 Sperr-Taste
11 Rücksetzen-Taste (Gesprächsdauer)
12 Pause-Taste
Displaysymbole
Pim Speichermodus
‡Shift-Taste gedrückt
--- Betriebsbereit
yMikro aus
oEingabemarke beim Einstellen (z.B. Lautst.)
u
Rückfragetaste gedrückt
P
Pause
z
kein Speicherinhalt
---- PIN-Eingabe
zzzz
Telefon gesperrt
0
–
9
Rufnummer
Bei Tonwahlverfahren:
n
– Taste *gedrückt
-
– Taste #gedrückt
Bei Zusatzdiensten öffentlicher Netzbetreiber:
ëAnklopfen ein
™Anrufweiterleitung sofort
˜Anrufweiterleitung bei Nichtmelden
—Anrufweiterleitung bei Besetzt
Sicherheitshinweise
Beachten Sie beim Aufstellen, Anschließen und Bedienen
des Telefons unbedingt die folgenden Hinweise:
◆Nur die mitgelieferten Stecker und Schnüre verwenden!
◆Schließen Sie die Anschluss-Schnur nur an der dafür vor-
gesehenen Dose/Buchse an.
◆Schließen Sie nur zugelassenes Zubehör an.
◆Verlegen Sie die Anschluss-Schnur unfallsicher!
◆Stellen Sie das Gerät auf eine rutschfeste Unterlage!
◆Zu Ihrer Sicherheit und Ihrem Schutz darf das Telefon
nicht im Bad oder in Duschräumen (Feuchträumen) ver-
wendet werden. Das Telefon ist nicht spritzwasserfest.
◆Setzen Sie das Telefon nie Wärmequellen, direkter Son-
neneinstrahlung oder anderen elektrischen Geräten aus.
◆Schützen Sie Ihr Telefon vor Nässe, Staub, aggressiven
Flüssigkeiten und Dämpfen.
◆Öffnen Sie das Telefon niemals selbst!
◆Berühren Sie die Steck-Kontakte nicht mit spitzen und
metallischen Gegenständen!
◆Tragen Sie das Telefon nicht an den Schnüren!
◆Geben Sie Ihr Gigaset 5015 nur mit Bedienungsanlei-
tung an Dritte weiter.
Alle Elektro- und Elektronikgeräte sind getrennt vom all-
gemeinen Hausmüll über dafür staatlich vorgesehene Ste-
llen zu entsorgen
Wenn dieses Symbol eines durchgestrichenen Abfallei-
mers auf einem Produkt angebracht ist, unterliegt dieses
Produkt der europäischen Richtlinie 2002/96/EC.
Die sachgemäße Entsorgung und getrennte Sammlung von Alt-
geräten dienen der Vorbeugung von potenziellen Umwelt- und
Gesundheitsschäden. Sie sind eine Voraussetzung für die Wieder-
verwendung und das Recycling gebrauchter Elektro- und Elektronik-
geräte.
Ausführlichere Informationen zur Entsorgung Ihrer Altgeräte erhal-
ten Sie bei Ihrer Kommune oder Ihrem Müllentsorgungsdienst.
1
23
45
6
7
8
1211109

Gi
gase
t
5015
/
EU
ger-eng-cre-s
l
ov
/
A30350
-
M208
-
D801
-
7
-
Z419
/
5015
.
f
m
/
14
.
04
.
2011
2
D
Telefon in Betrieb nehmen
Empfehlung zum Aufstellen des Telefons
◆Das Telefon keiner Sonnenbestrahlung oder sonstigen
Wärmequellen aussetzen.
◆Betrieb bei Temperaturen zwischen +5°C bis +40°C.
◆Zwischen dem Telefon und Funkgeräten, z.B. Funktele-
fonen, Funk-Personenrufeinrichtungen oder TV-Geräten
einen Abstand von mindestens einem Meter einhalten.
Das Telefongespräch könnte sonst beeinträchtigt wer-
den.
◆Aufstellen des Telefons nicht in staubreichen Räumen,
da dies die Lebensdauer des Telefons beeinträchtigt.
◆Zur Reinigung nur mit einem feuchten Tuch oder Anti-
statiktuch abwischen, niemals ein trockenes Tuch
(Gefahr der elektrostatischen Aufladung und Entladung)
oder scharfes Reinigungsmittel verwenden!
◆Möbellacke und Polituren können bei Kontakt mit Gerä-
teteilen (z.B. Gerätefüße) angegriffen werden.
Anschließen
Das kurze Ende des gewendelten Hörerkabels in die vorge-
sehene Buchse im Hörer und das lange Ende in die mit a
gekennzeichnete Buchse an der Geräteunterseite stecken.
Das Telefonkabel in die Wanddose und mit dem anderen
Ende in die mit Ygekennzeichnete Buchse an der Geräte-
unterseite einstecken. Damit ist Ihr Telefon betriebsbereit.
Telefonieren
Rufnummer wählen
co Hörer abheben, Rufnummer wählen.
Ziffern nach der 20. Stelle werden im Display von rechts nach
links geschoben. Mit <lassen sich beim Wählen ab der
2. Stelle Pausen einfügen.
Wahlwiederholung (eine der 5 letzten Rufnummern)
Die zuletzt gewählten 5 unterschiedlichen Rufnummern (je
max. 32 Stellen) werden automatisch gespeichert.
cHörer abheben (oder Lautsprecher-Taste L
solange drücken, bis Wählton hörbar).
;...;Wahlwiederholtaste so oft drücken, bis die
gesuchte Rufnummer mit der Platznummer
(1...5 links) erscheint.
oPlatznummer (1...5) eingeben.
Die entsprechende Rufnummer wird erneut gewählt.
Mit Zielwahltasten wählen
cHörer abheben (oder Lautsprecher-Taste L
drücken, bis Wählton hörbar). (Ggf. =drü-
cken für Zielwahltaste in der 2. Ebene).
:Zielwahltaste drücken.
Rufnummern speichern
Verschiedene Einstellungen des Telefons müssen mit der
Speichern-Taste ?abgeschlossen werden, damit sie dau-
erhaft verfügbar sind.
Um (z.B. nach einer falschen Eingabe) ohne Speichern
abzubrechen, legen Sie den Hörer auf, anstatt abschlie-
ßend ?zu drücken. Die ursprüngliche Einstellung bleibt
dann erhalten.
Speichern mit Notizbuchfunktion
Sie können Rufnummern auch mit der Notizbuchfunktion,
d.h. während eines Gesprächs speichern.
Zielwahlnummern speichern
Sie können auf den beiden Ebenen der Zielwahltasten ins-
gesamt bis zu 20 Rufnummern (oder auch Funktionen,
s. S. 5) speichern.
c? Hörer abheben, Speichern-Taste drücken. (Für
2. Speicherebene zusätzlich =drücken.)
:Zielwahltaste drücken, unter der die Zielwahl-
nummer abgespeichert werden soll.

Gi
gase
t
5015
/
EU
ger-eng-cre-s
l
ov
/
A30350
-
M208
-
D801
-
7
-
Z419
/
5015
.
f
m
/
14
.
04
.
2011
3
D
Eine bereits gespeicherte Rufnummer wird im
Display angezeigt. Ist der Speicher für diese
Zielwahltaste leer, erscheint im Display
z
o Zu speichernde Rufnummer eingeben (max.
32 Stellen).
oder ...
Speichern aus der Wahlwiederholliste:
;...;Wahlwiederhol-Taste so oft drücken, bis die
gewünschte Rufnummer im Display angezeigt
wird.
?a Speichern-Taste drücken. Hörer auflegen.
Durch Drücken von <können Pausen gespeichert werden
(nicht an 1. Stelle).
Nach der 20. Ziffer werden evtl. nachfolgende Ziffern im
Display von rechts nach links geschoben.
Alle Zielwahlnummern löschen
c?1251
Hörer abheben, Funktion einleiten.
?a Speichern-Taste drücken. Hörer auflegen.
Telefon einstellen
Tonruflautstärke einstellen
Der Tonruf lässt sich in 7 Lautstärkenstufen einstellen
(Lieferzustand: Stufe 7, lauteste Stufe) oder ganz abschal-
ten.
◆Einstellen im Ruhezustand des Telefons:
c?5 Hörer abheben, Funktion einleiten.
H...IMit Laut-/Leise-Taste Lautstärke einstellen.
?a Speichern-Taste drücken. Hörer auflegen.
◆Einstellen, während das Telefon läutet:
Vor Abheben des Hörers H...Idrücken.
Der zuletzt eingestellte Wert wird gespeichert.
Frequenz des Tonrufs einstellen
Die Frequenz (Geschwindigkeit) des Tonrufes ist in 3 Stufen
einstellbar (Lieferzustand: Stufe 3).
c?6 Hörer abheben, Funktion einleiten.
1...3Eine der Tasten 1...3 drücken:
1: niedrigste Frequenz; 3: höchste Frequenz.
?a Speichern-Taste drücken. Hörer auflegen.
Tonrufmelodie einstellen
Für den Tonruf lassen sich 10 verschiedene Melodien ein-
stellen (Lieferzustand: Melodie 0).
c?7 Hörer abheben, Funktion einleiten.
0...9Eine der Tasten 0 ... 9 drücken.
?a Speichern-Taste drücken. Hörer auflegen.
Hörerlautstärke einstellen
Die Hörerlautstärke lässt sich in 3 Stufen einstellen und spei-
chern (Lieferzustand: Stufe 1).
c?9 Hörer abheben, Funktion einleiten.
H...IMit Laut-/Leise-Taste Lautstärke einstellen.
?a Speichern-Taste drücken. Hörer auflegen.
Stummschaltung (Mute)
Sie können den Hörer und das Mikrofon des Telefons aus-
schalten, Ihr Gesprächspartner hört Sie dann nicht mehr.
JIm Gespräch: Stummschaltetaste drücken.
Einschalten: Taste erneut drücken.
Lautsprecher einstellen
Während des Freisprechens können Sie die Lautstärke in 7
Stufen einstellen und speichern (Lieferzustand: 7).
H...IMit Laut-/Leise-Taste Lautstärke einstellen.
Lauthören ein-/ausschalten
Im Raum anwesende Personen können über den eingebau-
ten Lautsprecher ein Telefongespräch mithören.
LWährend des Gesprächs:
Lautsprecher-Taste drücken.
Lauthören ausschalten: Taste nochmals
drücken.
Bei eingeschaltetem Lautsprecher und abgenommenem
Hörer ist Lauthören eingeschaltet. Das Freisprechmikrofon
ist abgeschaltet.
Bei eingeschaltetem Lautsprecher und aufgelegtem Hörer
ist Freisprechen über das Freisprechmikrofon eingeschaltet
Freisprechen ein-/ausschalten
Mit diesem Telefon können Sie auch bei aufliegendem
Hörer telefonieren. Der optimale Sprechabstand zum Mikro-
fon beträgt ca. 50 cm.
◆Einschalten während des Gesprächs über den Hörer:
L+ aBei gedrückter Lautsprechertaste Hörer aufle-
gen.

Gi
gase
t
5015
/
EU
ger-eng-cre-s
l
ov
/
A30350
-
M208
-
D801
-
7
-
Z419
/
5015
.
f
m
/
14
.
04
.
2011
4
D
◆Einschalten vor Rufnummernwahl
LVor dem Wählen: Lautsprechertaste solange
drücken, bis Wählton hörbar.
Freisprechen ausschalten
cWährend des Gesprächs den Hörer abheben.
Stummschaltemelodie aus-/einschalten
Sie können die Stummschaltemelodie für die Stummschal-
tung ein- und ausschalten (Lieferzustand: ein).
c?19#
Hörer abheben, Funktion einleiten.
0/10: ausschalten; 1: einschalten.
?a Speichern-Taste drücken. Hörer auflegen.
Baby Call (Direktwahl)
Ist eine Rufnummer für den Baby Call eingestellt, wird diese
bei gesperrtem Telefon nach Drücken einer beliebigen
Taste (ausgenommen ?, M, L,Hund I) auto-
matisch gewählt.
Für die Wahl anderer Rufnummern ist das Telefon gesperrt,
ankommende Anrufe lassen sich jedoch entgegennehmen.
c?M8
Hörer abheben, Funktion einleiten.
oPIN eingeben (Lieferzustand: 0000).
Einschalten
oDirektrufnummer eingeben (max. 32 Ziffern;
kein <für Wahlpause!).
oder ...
Löschen
;Wahlwiederhol-Taste drücken.
?a Speichern-Taste drücken. Hörer auflegen.
Telefon sperren/entsperren
Bei gesperrtem Telefon ist nur noch die Wahl der Direktruf-
nummer möglich.
c?M Hörer abheben, Funktion einleiten.
0
/
10: entsperren; 1: sperren.
oPIN eingeben.
?a Speichertaste drücken, dann Hörer auflegen.
Bei gesperrtem Telefon sehen Sie im Display
zzzz.
Telefonsperre vorübergehend aufheben (für ein Gespräch)
cMo Hörer abheben, Sperr-Taste drücken, PIN ein-
geben.
oRufnummer wählen.
Nach Auflegen des Hörers ist die Tastensperre wieder aktiv.
Zielwahlnummern gegen Änderungen sperren/
entsperren
c?M6
Hörer abheben, Funktion einleiten.
(Ggf. =drücken, um Zielwahltaste in der 2.
Ebene zu sperren/entsperren.)
oPIN eingeben (Lieferzustand: 0000).
0
/ 10: Zielwahltasten nicht gesperrt
1: Zielwahltasten gesperrt.
?a Speichern-Taste drücken. Hörer auflegen.
PIN ändern
c?M9
Hörer abheben, Funktion einleiten.
oAktuelle PIN eingeben (Lieferzustand: 0000).
oNeue PIN eingeben (vier Ziffern).
oNeue PIN zur Bestätigung nochmals eingeben.
?a Speichern-Taste drücken. Hörer auflegen.
Gesprächsdaueranzeige
Das Telefon kann die ungefähre Gesprächsdauer im Display
anzeigen (max. 99 Min. 59 sec.). Ist die Gesprächsdaueran-
zeige eingeschaltet, wird die Zeitanzeige 12 Sekunden nach
Wahl der letzten Ziffer gestartet.
Zähler zurücksetzen
Ab der Wahl der ersten Ziffer oder zu einem beliebigen Zeit-
punkt während des Gesprächs:
NRücksetzen-Taste drücken.
Die Zählung beginnt wieder bei 0 Min. 0 Sek.
Aus- /Einschalten
Im Lieferzustand ist die Gesprächsdaueranzeige eingeschal-
tet.
c?18#
Hörer abheben, Funktion einleiten.
0/10: ausschalten; 1: einschalten.
?a Speichern-Taste drücken. Hörer auflegen.

Gi
gase
t
5015
/
EU
ger-eng-cre-s
l
ov
/
A30350
-
M208
-
D801
-
7
-
Z419
/
5015
.
f
m
/
14
.
04
.
2011
5
D
Pausezeit einstellen
Falls benötigt, können Sie die Pausezeit der Taste <
(Pausefunktion ab 2. Eingabeposition) auf 1, 3 oder 6
Sekunden verändern (Lieferzustand: 3 Sekunden).
c?102
Hörer abheben, Funktion einleiten.
0...20: 1 sec.; 1: 3 sec.; 2: 6 sec..
?a Speichern-Taste drücken. Hörer auflegen.
Wahlverfahren umstellen
c?# Hörer abheben, Funktion einleiten.
1/21: Tonwahlverfahren
2: Impulswahlverfahren ohne Flashfunktion.
?a Speichern-Taste drücken. Hörer auflegen.
Wahlverfahren während einer Verbindung umschalten
Ist das Telefon auf Impulswahlverfahren gestellt und Sie
wollen Funktionen nutzen, die Tonwahlverfahren erfordern
(z.B. Fernabfrage eines Anrufbeantworters), können Sie
während der Verbindung das Wahlverfahren umschalten.
*Bei bestehender Verbindung: Stern-Taste drü-
cken.
oZiffern für Fernsteuerung/Datentransfer einge-
ben.
Durch Auflegen des Hörers wird auf das ursprüngliche Wahl-
verfahren zurückgeschaltet.
Betrieb an privaten Telefonanlagen
Amtskennzahlen eingeben/löschen
Betreiben Sie Ihr Telefon an einer privaten Telefonanlage, so
müssen Sie u.U. eine oder mehrere Amtskennzahlen (AKZ)
speichern. Mit der AKZ wird automatisch eine Wahlpause
gesetzt. Sie können max. 3 AKZ speichern.
c?0 Hörer abheben, Funktion einleiten.
Ist an einer Speicherstelle keine AKZ einge-
stellt , erscheint im Display
z
.
Sind mehrere AKZ gespeichert, werden diese
nebeneinander angezeigt; die aktuell zur Bear-
beitung mögliche AKZ blinkt.
Mit ;wechseln Sie ggf. zwischen den ange-
zeigten AKZs, um sie wie folgt zu bearbeiten:
Löschen einer AKZ:
?a Speichern-Taste drücken. Hörer auflegen.
Eingeben einer AKZ:
oEin- bis dreistellige AKZ eingeben.
Weitere AKZ eingeben:
;oWahlwiederhol-Taste drücken, nächste AKZ
eingeben.
?a Speichern-Taste drücken. Hörer auflegen.
Rückfragetaste (an privaten Telefonanlagen)
Während eines Amtsgesprächs können Sie eine Rückfrage
halten oder ein Gespräch weiterleiten. Dazu drücken Sie die
Rückfragetaste >. Die weitere Bedienung ist von Ihrer
Telefonanlage abhängig. Im Lieferzustand ist die Rückfrage-
tastenfunktion auf eine Flashzeit (Unterbrechungszeit) von
90 ms zur Nutzung neuer Leistungsmerkmale an öffentli-
chen Telefonsystemen voreingestellt. Bei Anschluss an pri-
vaten Telefonanlagen kann es erforderlich sein, die Flash-
zeit zu ändern (z.B. 600 ms). Beachten Sie hierzu auch die
Bedienungsanleitung Ihrer Telefonanlage.
Flashzeit der Rückfragetaste einstellen
c?195
Hörer abheben, Funktion einleiten.
0...4Gewünschte Flash-Kennziffer eingeben:
0: 90 ms (Lieferzustand); 1:120ms;
2: 270 ms; 3:375ms; 4:600ms.
?a Speichern-Taste drücken. Hörer auflegen.
Funktionen für Zusatzdienste öffentlicher
Telefonsysteme nutzen
Wollen Sie Dienste nutzen, die mit der Rückfragetaste aus-
zulösen sind, vergewissern Sie sich zuvor, ob die richtige
Flashzeit für die Taste eingestellt ist.
Rückfragetaste (an öffentlichen Telefonsystemen)
An öffentlichen Telefonsystemen wird diese Taste zur Nut-
zung bestimmter Zusatzdienste benötigt.
Landesabhängig ist vor der Nutzung der Rückfragetaste die
passende Flashzeit einzustellen:
◆Belgien, Niederlande, Schweiz: 120 ms (Kennziffer 1)
◆Frankreich, Luxemburg, Portugal, Deutschland, Grie-
chenland: 270 ms (Kennziffer 2)
◆übrige europäische Länder: 90 ms (Kennziffer 0).
Zielwahltasten als „Funktionstasten“nutzen
Verschiedene Dienste/Funktionen öffentlicher Telefonsys-
teme – ggf. auf Bestellung/Beauftragung – lassen sich über
festgelegte Tastenkombinationen anwählen, die Sie bei
Ihrem Netzbetreiber erfahren.

Gi
gase
t
5015
/
EU
ger-eng-cre-s
l
ov
/
A30350
-
M208
-
D801
-
7
-
Z419
/
5015
.
f
m
/
14
.
04
.
2011
6
D
Die notwendigen Tastenkombinationen können Sie wie nor-
male Rufnummern auf Zielwahltasten speichern und
ebenso „wählen“ und den Dienst auch wieder abschalten.
Hinweis:
Wenn Sie die Symbolanzeige aktivieren und Funktionsauf-
rufe auf der 2. Ebene der Zielwahltasten speichern, kön-
nen Sie das Ein- und Ausschalten verschiedener Dienste per
„Funktionstaste“ mit der Anzeige bzw. dem Ausblenden
bestimmter Symbole am Display koppeln.
Beachten Sie daher beim Belegen der Zielwahltasten auf
der 2. Ebene, dass das Ein- und Ausschalten der
Displaysymbole ™, ˜, —und ëan ganz bestimmte Tas-
ten in der 2. Ebene gekoppelt ist – unabhängig von darauf
gespeicherten Rufnummern bzw. Funktionsaufrufen!
Symbolanzeige für Zusatzdienste deaktivieren/aktivieren
Je nach Bedarf lässt sich die Anzeige der Symbole aktivieren
oder deaktivieren. Im Lieferzustand ist die Anzeige deakti-
viert.
c?145
Hörer abheben, Funktion einleiten.
0/10: deaktivieren; 1: aktivieren.
?a Speichern-Taste drücken. Hörer auflegen.
Empfohlene Zuordnung von Symbolen zu Tasten
Wenn Sie bei aktivierter Symbolanzeige =und anschlie-
ßend eine der folgenden Zielwahltasten drücken, wird im
Display das jeweils zugeordnete Displaysymbol ein- bzw.
ausgeschaltet (Tastennummerierung von oben nach
unten):
Beispiel: Anrufweiterleitung
Nachfolgend finden Sie ein Beispiel zur Nutzung von Ziel-
wahltasten als „Funktionstasten“. Ist die Symbolanzeige
aktiviert, so wird im Beispiel „Anrufweiterleitung“ beim Ein-
schalten des Dienstes das dafür vorgesehene Symbol im Dis-
play angezeigt bzw. ausgeblendet, wenn der Dienst ausge-
schaltet wird.
Die Tastenfolge zum Einschalten der Funktion „Anrufweiter-
leitung sofort“ bei Ihrem Netzbetreiber besteht z.B. aus drei
Teilen:
Sie haben nun folgende Möglichkeiten:
◆Sie wählen die komplette Tastenfolge jedes Mal über die
Tastatur.
◆Sie speichern die Tastenfolge auf Zielwahltasten als
gesamte Funktion zusammen mit der Rufnummer
eines festen Weiterleitungsziels
oder
nur den Funktionsaufruf und das Funktionsende. Sie
halten sich dabei die Möglichkeit offen, ein fallweise ver-
änderbares Weiterleitungsziel festzulegen.
Anrufweiterleitung auf Funktionstaste speichern
c?= Hörer abheben, Funktion einleiten.
:Zielwahltaste drücken, die für die Symbolan-
zeige „™ein“ vorgesehen ist (s. S. 6).
Eine bereits gespeicherte Rufnummer wird im
Display angezeigt. Ist der Speicher für diese
Zielwahltaste leer, erscheint im Display
z.
*21*
Funktionsaufruf für „Anrufweiterleitung
sofort“ eingeben.
(a) Rufnummer des Weiterleitungsziels fest-
legen
oRufnummer des Weiterleitungungsziels einge-
ben.
#Raute-Taste drücken, um Funktionsende zu
markieren.
?a Speichern-Taste drücken. Hörer auflegen.
oder ...
=+ Belegung Anzeige
:1 Anrufweiterleitung sofort aus ™
:2 ein
:3 Anrufweiterleitung bei
Nichtmelden
aus ˜
:4 ein
:5 Anrufweiterleitung bei Besetzt aus —
:6 ein
:7 Anklopfen aus ë
:8 ein
Funktionsaufruf Weiterleitungsziel Funktionsende
*21* Rufnummer #

Gi
gase
t
5015
/
EU
ger-eng-cre-s
l
ov
/
A30350
-
M208
-
D801
-
7
-
Z419
/
5015
.
f
m
/
14
.
04
.
2011
7
D
(b) Veränderbare Weiterleitung reservieren
=Shift-Taste drücken.
Diese Taste bewirkt, dass beim späteren Ein-
schalten der „Anrufweiterleitung sofort“ die
Schreibmarke zur Eingabe der Rufnummer des
Weiterleitungungsziels blinkt.
#Raute-Taste drücken, um Funktionsende zu
markieren.
?a Speichern-Taste drücken. Hörer auflegen.
Anrufweiterleitung mit Funktionstaste einschalten
c=Hörer abheben, Shift-Taste drücken.
:Zielwahltaste für die Symbolanzeige „™ein“
drücken. Im Display wird ™angezeigt.
(a) Rufnummer der des Weiterleitungsziels
festgelegt
Sie hören ggf. eine Ansage, dass der Dienst
eingeschaltet ist.
aHörer auflegen.
Ankommende Anrufe werden ab jetzt ans Wei-
terleitungsziel weitergeschaltet, Ihr Telefon
läutet nicht.
(b) Veränderbares Weiterleitungsziel
o;Rufnummer des Umleitziels eingeben,
Wahlwiederholtaste drücken, um das Ende der
eingegebenen Rufnummer zu markieren.
Sie hören ggf. eine Ansage, dass der Dienst
eingeschaltet ist.
aHörer auflegen.
Ankommende Anrufe werden ab jetzt ans Wei-
terleitungsziel weitergeschaltet, Ihr Telefon
läutet nicht.
„Anrufweiterleitung ausschalten“ auf Funktionstaste
speichern
Die Anrufweiterleitung, wie sie im vorausgehenden Beispiel
dargestellt ist, schalten Sie bei Ihrem Netzbetreiber z.B. mit
der Tastenfolge #21#wieder aus.
Auch diese Tastenfolge können Sie auf einer eigens dafür
vorgesehenen Zielwahltaste speichern. Ist die Symbolan-
zeige aktiviert, und wird der Dienst wie beschrieben einge-
schaltet, so erlischt das Symbol ™im Display nach dem Aus-
schalten des Dienstes.
c?= Hörer abheben, Funktion einleiten.
:Zielwahltaste drücken, die für die Symbolan-
zeige „™aus“ vorgesehen ist (s. S. 6).
#21#
Funktionsaufruf für „Anrufweiterleitung
sofort“ eingeben.
?a Speichern-Taste drücken. Hörer auflegen.
Anrufweiterleitung mit Funktionstaste ausschalten
c= Hörer abheben, Shift-Taste drücken.
: a Zielwahltaste für die Symbolanzeige „™aus“
drücken. Hörer auflegen.
Das Symbol ™erlischt. Sie hören ggf. eine Ansage, dass der
Dienst ausgeschaltet ist.
Anhang
Pflege
Zur Reinigung nur mit einem feuchten Tuch oder einem
Antistatiktuch abwischen, niemals ein trockenes Tuch
(Gefahr der elektrostatischen Aufladung und Entladung)
oder scharfes Reinigungsmittel verwenden!
Wenn Ihr Telefon nicht einwandfrei arbeitet
Kein Signalton: Die Tonruflautstärke könnte auf 0 einge-
stellt sein.
Hörer abnehmen, kein Wählton: Ist die Anschluss-Schnur
am Telefon und an der Telefonanschlussdose richtig
gesteckt?
Wählton hörbar, Telefon wählt nicht: Der Anschluss ist in
Ordnung. Ist das Wahlverfahren richtig eingestellt (s. S. 5)?
Nur bei Telefonanlagen: Keine oder falsche Verbindung
bei Wahl aus Speicher (z.B. Wahlwiederholung, Kurz-
wahl): Amtskennzahl programmieren.
Gesprächspartner hört Sie nicht: Stummschaltetaste
gedrückt? Taste noch einmal drücken. Stecker von Höreran-
schlusskabel richtig gesteckt?
Rückfragetaste funktioniert nicht: Geeignete Flashzeit
einstellen.
Einlegeschilder
Unbeschriftete Einlegeschilder für die Zielwahl-Tasten fin-
den Sie im Internet unter www.gigaset.com/cordedphones.
Ansprechpartner
Falls beim Betrieb am angeschlossenen Kommunikations-
system mit analogem Netzzugang Probleme auftreten soll-
ten, wenden Sie sich bitte an Ihren zuständigen Netzbetrei-
ber bzw. an Ihren Fachhändler.

Gi
gase
t
5015
/
EU
ger-eng-cre-s
l
ov
/
A30350
-
M208
-
D801
-
7
-
Z419
/
5015
.
f
m
/
14
.
04
.
2011
8
D
Zulassung
Dieses Gerät ist für den analogen Telefonanschluss im deut-
schen und luxemburgischen Netz vorgesehen.
Länderspezifische Besonderheiten sind berücksichtigt.
Hiermit erklärt die Gigaset Communications GmbH, dass
dieses Gerät den grundlegenden Anforderungen und ande-
ren relevanten Bestimmungen der Richtlinie 1999/5/EC ent-
spricht.
Eine Kopie der Konformitätserklärung nach 1999/5/EC fin-
den Sie über folgende Internetadresse:
www.gigaset.com/docs
Garantie-Urkunde
Dem Verbraucher (Kunden) wird unbeschadet seiner Män-
gelansprüche gegenüber dem Verkäufer eine Haltbarkeits-
garantie zu den nachstehenden Bedingungen eingeräumt:
Neugeräte und deren Komponenten, die aufgrund von Fab-
rikations- und/oder Materialfehlern innerhalb von
24Monaten ab Kauf einen Defekt aufweisen, werden von
Gigaset Communications nach eigener Wahl gegen ein dem
Stand der Technik entsprechendes Gerät kostenlos ausge-
tauscht oder repariert. Für Verschleißteile (z. B. Akkus, Tas-
taturen, Gehäuse) gilt diese Haltbarkeitsgarantie für sechs
Monate ab Kauf.
Diese Garantie gilt nicht, soweit der Defekt der Geräte auf
unsachgemäßer Behandlung und/oder Nichtbeachtung der
Handbücher beruht.
Diese Garantie erstreckt sich nicht auf vom Vertragshändler
oder vom Kunden selbst erbrachte Leistungen (z.B. Installa-
tion, Konfiguration, Softwaredownloads). Handbücher und
ggf. auf einem separaten Datenträger mitgelieferte Soft-
ware sind ebenfalls von der Garantie ausgeschlossen.
Als Garantienachweis gilt der Kaufbeleg, mit Kaufdatum.
Garantieansprüche sind innerhalb von zwei Monaten nach
Kenntnis des Garantiefalles geltend zu machen.
Ersetzte Geräte bzw. deren Komponenten, die im Rahmen
des Austauschs an Gigaset Communications zurückgeliefert
werden, gehen in das Eigentum von Gigaset Communicati-
ons über.
Diese Garantie gilt für in der Europäischen Union erwor-
bene Neugeräte. Garantiegeberin ist die Gigaset Communi-
cations GmbH, Frankenstr. 2a, D-46395 Bocholt.
Weiter gehende oder andere Ansprüche aus dieser Herstel-
lergarantie sind ausgeschlossen. Gigaset Communications
haftet nicht für Betriebsunterbrechung, entgangenen
Gewinn und den Verlust von Daten, zusätzlicher vom Kun-
den aufgespielter Software oder sonstiger Informationen.
Die Sicherung derselben obliegt dem Kunden. Der Haf-
tungsausschluss gilt nicht, soweit zwingend gehaftet wird,
z.B. nach dem Produkthaftungsgesetz, in Fällen des Vorsat-
zes, der groben Fahrlässigkeit, wegen der Verletzung des
Lebens, des Körpers oder der Gesundheit oder wegen der
Verletzung wesentlicher Vertragspflichten. Der Schadenser-
satzanspruch für die Verletzung wesentlicher Vertrags-
pflichten ist jedoch auf den vertragstypischen, vorherseh-
baren Schaden begrenzt, soweit nicht Vorsatz oder grobe
Fahrlässigkeit vorliegt oder wegen der Verletzung des
Lebens, des Körpers oder der Gesundheit oder nach dem
Produkthaftungsgesetz gehaftet wird.
Durch eine erbrachte Garantieleistung verlängert sich der
Garantiezeitraum nicht.
Soweit kein Garantiefall vorliegt, behält sich Gigaset Com-
munications vor, dem Kunden den Austausch oder die Repa-
ratur in Rechnung zu stellen. Gigaset Communications wird
den Kunden hierüber vorab informieren.
Eine Änderung der Beweislastregeln zum Nachteil des Kun-
den ist mit den vorstehenden Regelungen nicht verbunden.
Zur Einlösung dieser Garantie wenden Sie sich bitte an Giga-
set Communications. Die Rufnummer entnehmen Sie bitte
der Bedienungsanleitung.

Gi
gase
t
5015
/
EU
ger-eng-cre-s
l
ov
/
A30350
-
M208
-
D801
-
7
-
Z419
/
5015
.
f
m
/
14
.
04
.
2011
1
EN
Gigaset 5015 Quick Guide
Keys
1 Repertory keys
2 Last number redial key
3 Recall key
4Mutekey
5Shiftkey
6Quietkey
7 Loudspeaker key (handsfree)
8Loudkey
9Setkey
10 Lock key
11 Reset key (call duration)
12 Pause key
Display symbols
PIn setting mode
‡Shift key pressed
--- Ready for use
yMicrophone off
oEntry mark when setting (e.g. volume)
u
Recall key pressed
P
Pause
z
No memory content
---- PIN entry
zzzz
Telephone locked
0
–
9
Phone number
With tone dialling:
n
– *key pressed
-
– #key pressed
With additional services from public network providers:
ëCall waiting
™Call forwarding immediately
˜Call forwarding on no reply
—Call forwarding when busy
Safety precautions
When installing, connecting and operating the telephone,
always observe the following precautions:
◆Only use the plugs and leads supplied.
◆Only connect the connecting lead to the socket/jack
provided for that purpose.
◆Only connect approved accessories.
◆Arrange the connecting lead where it will not cause
accidents.
◆Position the telephone on a non-slip surface.
◆For your safety and protection, the telephone must not
be used in bath or shower rooms (wet locations).
The telephone is not splash proof.
◆Never expose the telephone to sources of heat, direct
sunlight or other electrical devices.
◆Protect your telephone from moisture, dust, corrosive
liquids and vapours.
◆Never open up the telephone yourself.
◆Do not touch the plug contact with pointed or metallic
objects.
◆Do not carry the telephone by the leads.
◆If you give your Gigaset 5015 to someone else, make
sure you also give them the user guide.
All electrical and electronic products should be disposed
of separately from the municipal waste stream via desig-
nated collection facilities appointed by the government or
the local authorities.
This crossed-out wheeled bin symbol on the product
means the product is covered by the European Directive 2002/96/EC.
The correct disposal and separate collection of your old appliance
will help prevent potential negative consequences for the environ-
ment and human health. It is a precondition for reuse and recycling
of used electrical and electronic equipment.
For more detailed information about disposal of your old appliance,
please contact your local council refuse centre or the original
supplier of the product.
1
23
45
6
7
8
1211109

Gi
gase
t
5015
/
EU
ger-eng-cre-s
l
ov
/
A30350
-
M208
-
D801
-
7
-
Z419
/
5015
.
f
m
/
14
.
04
.
2011
2
EN
Preparing the telephone for use
Recommended installation of telephone
◆Do not expose the telephone to direct sunlight or other
sources of heat.
◆Operate at temperatures between +5°C and +40°C.
◆Maintain a distance of at least one metre between the
telephone and radio equipment, e.g. wireless
telephones, wireless pagers or TV sets. Otherwise,
telephone communication could be impaired.
◆Do not install the telephone in dusty areas as this can
shorten the service life of the telephone.
◆To clean, wipe with a moist or antistatic cloth only, never
with a dry cloth (risk of electrostatic charging and
discharge) or harsh cleaning agent.
◆Furniture lacquer and polish can be damaged by contact
with parts of the unit (e.g. device feet).
Connecting
Insert the short end of the coiled handset cord in the socket
provided in the handset and the long end in the socket
marked with an aon the underside of the device. Plug the
phone cord into the outlet on the wall and the other end
into the socket marked with a Yon the underside of the
device. Then your telephone is ready to use.
Making calls
Dialling a number
co Lift handset, dial number.
Any digits after the 20th digit are moved from right to left in
the display. The Pause key <can be used to insert pauses
when dialling, starting from the 2nd digit.
Last number redial (one of the last 5 call numbers)
The last 5 different call numbers dialed are automatically
saved (max. 32 digits each).
cLift handset (or press the Loudspeaker key L
until the dialling tone is audible).
;...;Press the Redial key repeatedly until the
required call number appears with the place
number (1...5 on the left).
oEnter the place number (1...5).
The relevant call number is redialed.
Dialling using the repertory keys
cLift handset (or press the Loudspeaker key L
until the dialling tone is audible). (If necessary,
press =for a 2nd level repertory key).
:Press repertory key.

Gi
gase
t
5015
/
EU
ger-eng-cre-s
l
ov
/
A30350
-
M208
-
D801
-
7
-
Z419
/
5015
.
f
m
/
14
.
04
.
2011
3
EN
Saving numbers
Different telephone settings must be completed with the
Set key ?so that they are available permanently.
In order to cancel without saving, e. g. after an incorrect
entry, replace the handset instead of pressing ?at the
end. The original setting is then retained.
Saving with notebook function
You can also save phone numbers during a conversation
with the notebook function.
Saving repertory numbers
You can save up to 20 phone numbers (or even functions,
see page 6) on both levels of the repertory keys.
c? Lift handset, press the Set key. (For 2nd mem-
ory level, also press =.)
:Press the repertory key under which you want
to save the repertory number.
A number that has already been saved is
shown in the display. If the memory for this
repertory key is empty,
z
appears in the display
o Enter the number to be saved (up to 32 digits).
or ...
Saving from the redial list:
;...;Press the Redial key repeatedly until the
desired phone number is displayed on the
screen.
?a Press the Set key. Replace handset.
Pressing <allows you to save pauses (not at the 1st digit).
After the 20th digit, any following digits are moved from
right to left in the display.
Delete all repertory numbers
c?1251
Lift handset, initiate function.
?a Press the Set key. Replace handset.
Adjusting the telephone
Adjusting the ringer volume
The volume of the ringer can be set to one of 7 levels and
can also be deactivated completely (default setting: level 7,
highest level) or deactivated completely. When the ringer is
deactivated an incoming call is notified in the display only.
◆To adjust when the telephone is idle:
c?5 Lift handset, initiate function.
H...IAdjust the volume with the Loud/Quiet key.
?a Press the Set key. Replace handset.
◆To adjust while the telephone is ringing:
Press H...Ibefore lifting the handset.
The last value set is saved.
Setting the ringer frequency
The frequency (speed) of the ringer can be set to one of
three levels (default setting: level 3).
c?6 Lift handset, initiate function.
1...3Press one of the keys 1...3:
1: highest frequency; 3: lowest frequency.
?a Press the Set key. Replace handset.
Setting the ringtone
Ten different ringtones can be set for the ringer (default
setting: ringtone 0).
c?7 Lift handset, initiate function.
0...9Press one of the keys 0 ... 9
?a Press the Set key. Replace handset.
Setting the handset volume
The volume on the handset can be set to one of 3 levels and
saved (default setting: level 1).
c?9 Lift handset, initiate function.
H...IAdjust the volume with the Loud/Quiet key.
?a Press the Set key. Replace handset.
Mute
You can deactivate the telephone's handset and
microphone. Then the other party can no longer hear you.
JDuring a call: Press the Mute key
Activate: Press the key again.

Gi
gase
t
5015
/
EU
ger-eng-cre-s
l
ov
/
A30350
-
M208
-
D801
-
7
-
Z419
/
5015
.
f
m
/
14
.
04
.
2011
4
EN
Adjusting the loudspeaker
While in handsfree mode, you can set the volume to one of
7 levels and save it (default setting: 7).
H...IAdjust the volume with the Loud/Quiet key.
Activating/deactivating open listening
The built-in loudspeaker means anyone in the room can lis-
ten-in on a call.
LDuring a call:
press the Loudspeaker key.
To deactivate open listening: press the key
again.
When the loudspeaker is activated and the handset is
lifted,open listening is activated. The handsfree micro-
phone is switched off.
When the loudspeaker is activated and the handset is
replaced, handsfree talking via the handsfree microphone
is activated.
Activating/deactivating handsfree mode
With this telephone you can also make calls without lifting
the handset. The optimum distance for speaking into the
microphone is around 50 cm.
◆Activating via the handset during a call:
L+ aReplace the handset while pressing the Loud-
speaker key.
◆Activating before dialling a phone number
LBefore you dial: press and hold the Loud-
speaker key until the dialling tone is audible.
Deactivating handsfree mode:
cLift the handset during a call.
Activating/deactivating the mute melody
You can activate and deactivate the mute melody for the
mute (default setting: on).
c?19#
Lift handset, initiate function.
0/10: deactivate; 1: activate.
?a Press the Set key. Replace handset.
Baby call (direct call) number setting
If a phone number is set for the Baby Call function, it is
dialled automatically when the telephone is locked after
you lift the handset (or press the Loudspeaker key) and
press any key (except ?, M, L, Hand I). The
telephone does not allow other phone numbers to be
dialled, but incoming calls can be received.
c?M8
Lift handset, initiate function.
oEnter the PIN (default setting: 0000).
Activating
oEnter direct call number (max. 32 digits; not
<for pause function!).
or ...
Deleting
;Press the Last number redial key.
?a Press the Set key. Replace handset.
Locking/unlocking the telephone
Only the Baby call number can be dialed when the tele-
phone is locked.
c?M Lift handset, then start the function.
1or 20: unlock; 1: lock
oEnter the PIN (default setting: 0000).
?a Press the Set key. Replace handset.
If the telephone is locked, the display shows
zzzz
.
Temporarily deactivating the telephone lock (for one call)
cMo Lift the handset, press the lock key, enter the
PIN (default setting: 0000).
oDial a call number.
The telephone lock is active again when the handset is
replaced.
Locking/unlocking repertory numbers so they cannot
be changed
c?M6
Lift handset, initiate function.
(If necessary, press =in order to lock/unlock
the repertory key on the 2nd level.)
oEnter the PIN (default setting: 0000).
0
/ 10: Repertory keys not locked
1: Repertory keys locked.
?a Press the Set key. Replace the handset.

Gi
gase
t
5015
/
EU
ger-eng-cre-s
l
ov
/
A30350
-
M208
-
D801
-
7
-
Z419
/
5015
.
f
m
/
14
.
04
.
2011
5
EN
Changing the PIN
c?M9
Lift handset, initiate function.
oEnter the current PIN (default setting: 0000).
oEnter a new PIN (four digits).
oEnter the new PIN again to confirm.
?a Press the Set key. Replace the handset.
Call duration display
The telephone can display the approximate call duration in
the display (up to 99 min. 59 sec.). If the call duration dis-
play is activated, the time display begins 12 seconds after
the last digit is dialled.
Resetting the counter
After dialling the first digit or at any point during a call:
NPress the Reset key.
The counter goes back to 0 min. 0 sec.
Deactivating/activating
The call duration display is activated by default.
c?18#
Lift handset, initiate function.
0/10: deactivate; 1: activate.
?a Press the Set key. Replace handset.
Setting the pause time
If necessary, the pause time of the Pause key <(pause
function from second input position) can be changed to 1,
3 or 6 seconds (default setting: 3 seconds).
c?102
Lift handset, initiate function.
0...20: 1 sec.; 1: 3 sec.; 2: 6 sec..
?a Press the Set key. Replace handset.
Changing the dialling mode
c?# Lift handset, initiate function.
1/21: Tone dialling.
2: Pulse dialling without flash function.
?a Press the Set key. Replace handset.
Changing dialling modes during a call
If your telephone is set to pulse dialling and you want to use
functions that require tone dialling (e.g. remote access to
an answering machine), you can change the dialling mode
during a call.
*With an open connection: press the star key.
oEnter digits for remote control/data transfer.
The telephone is reset to the original dialling mode by hang-
ing up the handset.
Operation on a PABX
Enter/delete an external line prefixe
If you are using your telephone on a PABX, you may have to
save one or more external line prefixes. A dialling pause is
set automatically with the external line prefixe. You can save
up to three external line prefixes.
c?0 Lift handset, initiate function.
If no external line prefixe has been set in a
location,
z
appears in the display.
If several external line prefixes are saved, these
are displayed next to one another; the current
external line prefixe to be edited flashes.
If necessary, use the ;key to toggle
between the external line prefixes displayed,
to edit them as follows:
To delete an external line prefix:
?a Press the Set key. Replace handset.
To enter an external line prefixe:
oEnter a one- to three-digit code.
Enter additional external line prefixes:
;oPress the Last number redial key, enter next
external line prefixe.
?a Press the Set key. Replace handset.
Recall key (on a PABX)
During an external call, you can make a recall or divert the
call. To do this, press the Recall key >. The subsequent
procedure depends on your PABX. By default, the Recall key
is preset to a flash time (interruption time) of 90 ms for use
of new features on public telephone systems. With a
connection to a PABX, it may be necessary to change the
flash time (e.g. 600 ms). To do this, please refer to the
operating instructions for your PABX.

Gi
gase
t
5015
/
EU
ger-eng-cre-s
l
ov
/
A30350
-
M208
-
D801
-
7
-
Z419
/
5015
.
f
m
/
14
.
04
.
2011
6
EN
Setting the flash time for the Recall key
c?195
Lift handset, initiate function.
0...4Enter desired flash code:
0: 90 ms (default setting); 1: 120 ms;
2: 270 ms; 3: 375 ms; 4: 600 ms.
?a Press the Set key. Replace handset.
Using functions for additional services of
public telephone systems
If you want to use services that are to be triggered with the
Recall key, make sure beforehand that the correct flash time
is set for the key.
Recall key (in public telephone systems)
In public telephone systems, this key is required to use
certain additional services.
The appropriate flashtime for the specific country must be
set before using the Recall key can be used:
◆Belgium, Netherlands, Switzerland: 120 ms
(access code 1)
◆France, Luxemburg, Portugal, Germany, Greece: 270 ms
(access code 2)
◆other European countries: 90 ms (access code 0).
Using the repertory keys as "function keys"
Different public telephone services/functions – possibly by
order/request – can be selected via predetermined key com-
binations which you can obtain from your network provider.
You can save the necessary key combinations like normal
phone numbers on repertory keys and similarly "select" and
also deactivate the service again.
Note:
If you activate the symbol display and save the function calls
on the 2nd level of the repertory keys, you can link the
activation and deactivation of different services for each
"function key" with the display or hiding of certain symbols
on the display.
Therefore, when setting the repertory keys on the 2nd
level, bear in mind that activating and deactivating the dis-
play symbols ™, ˜, —and ëis linked to very specific
keys in the 2nd level – regardless of the phone numbers or
function calls stored on it!
Deactivating/activating the symbol display for additional
services
Displaying the symbols can be activated or deactivated as
needed. In the default setting, the display is deactivated.
c?145
Lift handset, initiate function.
0/10: deactivate; 1: activate.
?a Press the Set key. Replace handset.
Recommended assignment of symbols to keys
When the symbol display =is activated and you then
press one of the following repertory keys, the display sym-
bol assigned to each is activated or deactivated respectively
(key numbering from top to bottom):
Example: Call forwarding
In the following, you will see an example of repertory keys
used as "function keys". If the symbol display is activated, in
the "call forwarding" example when the service is activated,
the symbol provided for it is displayed, or hidden when the
service is deactivated.
The key sequence for activating the function "call forward-
ing immediately" from your network provider consists of
e.g. three parts:
You now have the following options:
◆You can dial the entire key sequence each time on the
keypad.
◆You can save the key sequence on repertory keys as an
entire function together with the phone number of a
set forwarded call destination
=+Assignment Display
icon
:1 Call forwarding immediately off ™
:2on
:3 Call forwarding on no reply off ˜
:4on
:5 Call forwarding when busy off —
:6on
:7 Call waiting off ë
:8on
Select function Forwarded call destination End of
function
*21* Phone number of the
forwarded call destination #

Gi
gase
t
5015
/
EU
ger-eng-cre-s
l
ov
/
A30350
-
M208
-
D801
-
7
-
Z419
/
5015
.
f
m
/
14
.
04
.
2011
7
EN
or
only the select function and the function end. With
this, you still have the option to set a forwarded call
destination that may change on a case-by-case basis.
Saving call forwarding on a function key
c?= Lift handset, initiate function.
:Press the repertory key that is designated for
the symbol display "
™
on" (see page 6).
A number already saved is shown in the
display. If the memory for this repertory key is
empty,
z
appears in the display.
*21*
Enter the select function for "Immediate call
forwarding".
(a) Set the phone number for the
call forwarding
oEnter the phone number of the forwarded call
destination.
#Press the hash key to mark the function end.
?a Press the Set key. Replace handset.
or ...
(b) Reserve changeable call forwarding
=Press the Shift key.
When "Call forwarding immediately" is acti-
vated later, this key makes the cursor for enter-
ing the phone number of the forwarded call
destination flash.
#Press the hash key to mark the function end.
?a Press the Set key. Replace handset.
Activating call forwarding with a function key
c=Lift handset, press Shift key.
:Press the repertory key for the symbol display
"
™
on".
™
appears in the display.
(a) Phone number for call forwarding set
You may hear an announcement that the
service is activated.
aReplace the handset.
From now on, incoming calls will be forwarded
to the forwarded call destination. Your tele-
phone will not ring.
(b) Changeable call forwarding
o;Enter the phone number of the forwarded call
destination, press the Last number redial key
to mark the end of the phone number entered.
You may hear an announcement that the
service is activated.
aReplace the handset.
Incoming calls will be forwarded from now on to the for-
warded call destination. Your telephone will not ring.
Saving "Deactivate call forwarding" on a function key
The call forwarding, as described in the previous example,
can be deactivated again with your network provider e.g.
with key sequence #21#.
You can save this key sequence on a dedicated repertory key
as well. If the symbol display is activated and the service is
activated as described, the ™symbol in the display disap-
pears after the service is deactivated.
c?= Lift handset, initiate function.
:Press the repertory key that is designated for
symbol display "™off" (see page 6).
#21#
Enter the select function for "Immediate call
forwarding".
?a Press the Set key. Replace handset.
Deactivating call forwarding with a function key
c= Lift handset, press the Shift key.
:a Press the repertory key for symbol display
"™off". Replace handset.
The ™symbol disappears. You may hear an announcement
that the service is deactivated.
Appendix
Care
To clean, wipe with a moist or antistatic cloth only, never
with a dry cloth (risk of electrostatic charging and
discharge) or harsh cleaning agent.
If your telephone is not working perfectly
No signal tone: The tone volume might be set to 0.
Lift handset, no dialling tone: Is the connecting lead
correctly plugged into the telephone and the telephone
socket?

Gi
gase
t
5015
/
EU
ger-eng-cre-s
l
ov
/
A30350
-
M208
-
D801
-
7
-
Z419
/
5015
.
f
m
/
14
.
04
.
2011
8
EN
Dialling tone audible but telephone will not dial:
The connection is OK. Is the dialling mode set correctly
(see page 5)?
PABX only: No connection or incorrect connection when
dialling from memory (e.g. redial, speed dial):
Program external line prefixe.
The other party cannot hear you: Have you pressed the
Mute key? Press the key again. Is the plug from the handset
cord inserted correctly?
Recall key does not work: Set appropriate flash time.
Insert strips
Blank insert strips for the repertory keys can be found on the
Internet at www.gigaset.com/cordedphones.
Contacts
If you should encounter any problems when operating the
telephone connected to a communication system with
analogue network access, please contact the network
operator responsible or your dealer.
Authorisation
This device is intended for analogue phone lines in the UK
and on the Irish network.
Country-specific requirements have been taken into consid-
eration.
We, Gigaset Communications GmbH, declare that this
device meets the essential requirements and other relevant
regulations laid down in Directive 1999/5/EC.
A copy of the 1999/5/EC Declaration of Conformity is availa-
ble at this Internet address:
www.gigaset.com/docs
Guarantee Certificate
United Kingdom
Without prejudice to any claim the user (customer) may
have in relation to the dealer or retailer, the customer shall
be granted a manufacturer's Guarantee under the condi-
tions set out below:
◆In the case of new devices and their components exhib-
iting defects resulting from manufacturing and/or mate-
rial faults within 24 months of purchase, Gigaset Com-
munications shall, at its own option and free of charge,
either replace the device with another device reflecting
the current state of the art, or repair the said device. In
respect of parts subject to wear and tear (including but
not limited to, batteries, keypads, casing), this warranty
shall be valid for six months from the date of purchase.
◆This Guarantee shall be invalid if the device defect is
attributable to improper treatment and/or failure to com-
ply with information contained in the user guides.
◆This Guarantee shall not apply to or extend to services
performed by the authorised dealer or the customer
themselves (e. g. installation, configuration, software
downloads). User guides and any software supplied on a
separate data medium shall be excluded from the Guar-
antee.
◆The purchase receipt, together with the date of pur-
chase, shall be required as evidence for invoking the
Guarantee. Claims under the Guarantee must be submit-
ted within two months of the Guarantee default becom-
ing evident.
◆Ownership of devices or components replaced by and
returned to Gigaset Communications shall vest in
Gigaset Communications.
◆This Guarantee shall apply to new devices purchased in
the European Union. For Products sold in the United
Kingdom the Guarantee is issued by: Gigaset Communi-
cations UK Limited, Quatro House, Lyon Way, Camber-
ley, Surrey, GU16 7ER.
◆Any other claims resulting out of or in connection with
the device shall be excluded from this Guarantee. Noth-
ing in this Guarantee shall attempt to limit or exclude a
Customers Statutory Rights, nor the manufacturer's lia-
bility for death or personal injury resulting from its neg-
ligence.
◆The duration of the Guarantee shall not be extended by
services rendered under the terms of the Guarantee.
◆Insofar as no Guarantee default exists, Gigaset Commu-
nications reserves the right to charge the customer for
replacement or repair.

Gi
gase
t
5015
/
EU
ger-eng-cre-s
l
ov
/
A30350
-
M208
-
D801
-
7
-
Z419
/
5015
.
f
m
/
14
.
04
.
2011
9
EN
◆The above provisions does not imply a change in the bur-
den of proof to the detriment of the customer.
To invoke this Guarantee, please contact the Gigaset Com-
munications telephone service. The relevant number is to
be found in the accompanying user guide.
Guarantee Certificate
Ireland
Without prejudice to any claim the user (customer) may
have in relation to the dealer or retailer, the customer shall
be granted a manufacturer’s Guarantee under the condi-
tions set out below:
◆In the case of new devices and their components exhib-
iting defects resulting from manufacturing and/or mate-
rial faults within 24 months of purchase, Gigaset Com-
munications shall, at its own option and free of charge,
either replace the device with another device reflecting
the current state of the art, or repair the said device. In
respect of parts subject to wear and tear (including but
not limited to, batteries, keypads, casing), this warranty
shall be valid for six months from the date of purchase.
◆This Guarantee shall be invalid if the device defect is
attributable to improper care or use and/or failure to
comply with information contained in the user manuals.
In particular claims under the Guarantee cannot be
made if:
◆The device is opened (this is classed as third party inter-
vention)
◆Repairs or other work done by persons not authorised by
Gigaset Communications.
◆Components on the printed circuit board are manipu-
lated
◆The software is manipulated
◆Defects or damage caused by dropping, breaking, light-
ning or ingress of moisture. This also applies if defects or
damage was caused by mechanical, chemical, radio
interference or thermal factors (e.g.: microwave, sauna
etc.)
◆Devices fitted with accessories not authorised by Gigaset
Communications
◆This Guarantee shall not apply to or extend to services
performed by the authorised dealer or the customer
themselves (e.g. installation, configuration, software
downloads). User manuals and any software supplied on
a separate data medium shall be excluded from the
Guarantee.
◆The purchase receipt, together with the date of pur-
chase, shall be required as evidence for invoking the
Guarantee. Claims under the Guarantee must be submit-
ted within two months of the Guarantee default becom-
ing evident.
◆Ownership of devices or components replaced by and
returned to Gigaset Communications shall vest in
Gigaset Communications.
◆This Guarantee shall apply to new devices purchased in
the European Union. For Products sold in the Republic of
Ireland the Guarantee is issued by Gigaset Communica-
tions UK Limited, Quatro House, Lyon Way, Camberley,
Surrey, GU16 7ER.
◆Any other claims resulting out of or in connection with
the device shall be excluded from this Guarantee. Noth-
ing in this Guarantee shall attempt to limit or exclude a
Customers Statutory Rights, nor the manufacturer’s lia-
bility for death or personal injury resulting from its neg-
ligence.
◆The duration of the Guarantee shall not be extended by
services rendered under the terms of the Guarantee.
◆Insofar as no Guarantee default exists, Gigaset Commu-
nications reserves the right to charge the customer for
replacement or repair.
◆The above provisions does not imply a change in the bur-
den of proof to the detriment of the customer.
To invoke this Guarantee, please contact the Gigaset Com-
munications helpdesk on 1850 777 277. This number is
also to be found in the accompanying user guide.

Gi
gase
t
5015
/
EU
ger-eng-cre-s
l
ov
/
A30350
-
M208
-
D801
-
7
-
Z419
/
5015
.
f
m
/
14
.
04
.
2011
1
CZ
Stručný přehled Gigaset 5015
Tlačítka
1Tlačítka cílové volby
2Tlačítko opakování volby
3Tlačítko zpětného dotazu
4Tlačítko vypnutí zvuku (Mute)
5Tlačítko Shift
6Tlačítko snížení hlasitosti
7Tlačítko reproduktoru (hlasité telefonování)
8Tlačítko zvýšení hlasitosti
9Tlačítko uložení
10 Tlačítko blokování
11 Tlačítko vynulování (délka hovoru)
12 Tlačítko pauzy
Symboly na displeji
Pv paměťovém režimu
‡tlačítko Shift stisknuté
--- připravený k provozu
ymikrofon vypnutý
ozadávací značka při nastavování (např.
hlasitost)
u
tlačítko zpětného dotazu stisknuté
P
pauza
z
paměť neobsahuje žádná data
---- zadání PIN
zzzz
telefon zablokovaný
0
–
9
telefonní číslo
U tónové volby:
n
– tlačítko *stisknuté
-
– tlačítko #stisknuté
U doplňkových služeb veřejných provozovatelůsítí:
ëohlášení čekajícího volání zapnuté
™přepojení volání ihned
˜přepojení volání, pokud se účastník nehlásí
—přepojení volání, pokud má účastník obsazeno
Bezpečnostní pokyny
Při instalaci, zapojování a obsluze telefonu bezpodmínečně
dodržujte následující pokyny:
◆Používejte pouze zástrčky a kabely dodané s telefonem!
◆Přívodní kabel zapojte do zásuvky/zdířky k tomu určené.
◆Připojujte jen schválené příslušenství.
◆Přívodní kabel vždy veďte tak, aby nemohl způsobit úraz!
◆Telefon umístěte na neklouzavý podklad!
◆Pro vaši bezpečnost a ochranu nikdy nepoužívejte
telefon v koupelněani ve sprchách (ve vlhkých
prostorách). Telefon není chráněn proti stříkající vodě.
◆Telefon nikdy nevystavujte působení zdrojůtepla,
přímému slunečnímu záření, vlivu dalších elektrických
přístrojů.
◆Chraňte svůj telefon před vlhkem, prachem, agresivními
kapalinami a parami.
◆Telefon nikdy sami neotevírejte.
◆Kontaktůa konektorůse nikdy nedotýkejte špičatými
kovovými předměty!
◆Telefon nikdy nepřenášejte za kabely!
◆Svůj Gigaset 5015 předávejte třetím osobám vždy pouze
s návodem k použití.
Veškeré elektrické a elektronické výrobky musí být
likvidovány odděleněod komunálního odpadu
prostřednictvím určených sběrných míst stanovených
vládou nebo místními úřady.
Tento symbol škrtnuté popelnice na kolečkách znamená,
že se na produkt vztahuje evropská směrnice 2002/96/ES.
Správná likvidace a samostatný sběr starých přístrojůpomůže
prevenci před negativními důsledky na životní prostředí a lidské
zdraví. Je předpokladem opakovaného použití a recyklace použitého
elektrického a elektronického zařízení.
Podrobnější informace o likvidaci starých přístrojůsi prosím
vyžádejte od místního úřadu, podniku zabývajícího se likvidací
odpadůnebo v obchodě, kde jste produkt zakoupili.
1
23
45
6
7
8
1211109

Gi
gase
t
5015
/
EU
ger-eng-cre-s
l
ov
/
A30350
-
M208
-
D801
-
7
-
Z419
/
5015
.
f
m
/
14
.
04
.
2011
2
CZ
Příprava telefonu k provozu
Doporučení k instalaci telefonu
◆Telefon nevystavujte přímému slunečnímu záření ani
působení jiných zdrojůtepla.
◆Telefon je určen k provozu při teplotách mezi +5°C až
+40°C.
◆Mezi telefonem a rádiovými přístroji (například
radiotelefony, pagery) nebo televizními přístroji udržujte
vzdálenost nejménějeden metr. V opačném případěby
telefonní hovor mohl být nepříznivěovlivněn jejich
působením.
◆Telefon neinstalujte v prašných prostorách, protože
prach zkracuje životnost telefonu.
◆Přístroj čistěte setřením vlhkou látkou nebo antistatickou
utěrkou. Nikdy nepoužívejte suchou látku (nebezpečí
vzniku nebo vybití elektrostatického náboje) ani
agresivní čisticí prostředky.
◆Při kontaktu s částmi přístroje (např. podstavce přístroje)
mohou být poškozeny laky a politury nábytku.
Připojení
Krátký konec krouceného kabelu sluchátka zastrčte do
příslušné zdířky ve sluchátku a dlouhý konec do zdířky
označené symbolem ana spodní straněpřístroje.
Telefonní kabel zastrčte do nástěnné telefonní zásuvky
a druhý konec do zdířky označené symbolem Yna spodní
straněpřístroje. Tím je telefon připraven k provozu.
Telefonování
Volba telefonního čísla
co Zvedněte sluchátko, volte telefonní číslo.
Číslice za 20. pozicí se na displeji posouvají zprava doleva.
Tlačítkem <lze při volběod 2. pozice vkládat pauzy.
Opakování volby (jedno z 5 naposledy volených čísel)
Posledních 5 různých volených telefonních čísel (max.
32 míst) se automaticky ukládá.
cZvedněte sluchátko (nebo tlačítko
reproduktoru Ltiskněte tak dlouho, dokud
neuslyšíte oznamovací tón).
;...;Tlačítko opakování volby tiskněte opakovaně,
dokud se neobjeví hledané číslo s číslem
pozice (1...5 vlevo).
oZadejte číslo pozice (1...5), které je na displeji
uvedeno před telefonním číslem.
Odpovídající volené číslo se navolí znovu.
Volba tlačítky cílové volby
cZvedněte sluchátko (nebo tlačítko
reproduktoru Ltiskněte tak dlouho, dokud
neuslyšíte oznamovací tón). (Případně
stiskněte =pro tlačítko cílové volby ve 2.
úrovni).
:Stiskněte tlačítko cílové volby.
Telefonní číslo, uložení
Prováděná nastavení telefonu je nutné ukončit stisknutím
tlačítka uložení ?, aby nastavení zůstala trvale k dispozici.
Chcete-li (např. po chybném zadání) přerušit zadávání bez
uložení, zavěste sluchátko, tzn. netiskněte potvrzovací
tlačítko ?. Pak zůstane zachováno původní nastavení.
Uložení pomocí funkce poznámek
Telefonní čísla lze ukládat také prostřednictvím funkce
poznámek i v průběhu hovoru.

Gi
gase
t
5015
/
EU
ger-eng-cre-s
l
ov
/
A30350
-
M208
-
D801
-
7
-
Z419
/
5015
.
f
m
/
14
.
04
.
2011
3
CZ
Uložení čísel cílové volby
Na obou úrovních tlačítek cílové volby lze uložit celkem až
20 telefonních čísel (nebo také funkcí, viz str. 6).
c? Zvedněte sluchátko, stiskněte tlačítko uložení.
(Pro 2. úroveňpaměti stiskněte navíc =.)
:Stiskněte tlačítko cílové volby, pod které chcete
uložit číslo cílové volby.
Již uložené telefonní číslo se zobrazí na
displeji. Je-li paměť tohoto tlačítka cílové volby
prázdná, zobrazí se na displeji
z.
o Zadejte telefonní číslo (max. 32 míst), které
chcete uložit.
anebo ...
Uložení ze seznamu opakované volby:
;...;Tlačítko opakované volby tiskněte tolikrát,
dokud se na displeji neobjeví požadované
volené číslo.
?a Stiskněte tlačítko uložení. Zavěste sluchátko.
Stiskem <lze vložit pauzy (ne na 1. místě).
Po 20. číslici se případné následující číslice na displeji
posouvají zprava doleva.
Smazání všech čísel cílové volby
c?1251
Zvedněte sluchátko, vyvolejte funkci.
?a Stiskněte tlačítko uložení. Zavěste sluchátko.
Nastavení telefonu
Nastavení hlasitosti vyzvánění
Hlasitost vyzvánění lze nastavit v 7 stupních (tovární
nastavení: stupeň7, nejhlasitější stupeň) nebo jej lze zcela
vypnout.
◆Nastavení v klidovém stavu telefonu:
c?5 Zvedněte sluchátko, vyvolejte funkci.
H...ITlačítky zvýšení/snížení hlasitosti nastavte
hlasitost.
?a Stiskněte tlačítko uložení. Zavěste sluchátko.
◆Nastavení během vyzvánění telefonu:
Před zvednutím sluchátka stiskněte H...I.
Naposledy nastavená hodnota se uloží.
Nastavení frekvence vyzvánění
Frekvenci (rychlost) vyzvánění lze nastavit ve 3 stupních
(tovární nastavení: stupeň3).
c?6 Zvedněte sluchátko, vyvolejte funkci.
1...3Stiskněte jedno z tlačítek 1...3:
1: nejnižší frekvence; 3: nejvyšší frekvence.
?a Stiskněte tlačítko uložení. Zavěste sluchátko.
Nastavení melodie vyzvánění
Zvuk vyzvánění lze zvolit z 10 různých melodií (tovární
nastavení: melodie 0).
c?7 Zvedněte sluchátko, vyvolejte funkci.
0...9Stiskněte jedno z tlačítek 0 ... 9.
?a Stiskněte tlačítko uložení. Zavěste sluchátko.
Nastavení hlasitosti sluchátka
Hlasitost sluchátka lze nastavit a uložit ve 3 stupních
(tovární nastavení: stupeň1).
c?9 Zvedněte sluchátko, vyvolejte funkci.
H...ITlačítky zvýšení/snížení hlasitosti nastavte
hlasitost.
?a Stiskněte tlačítko uložení. Zavěste sluchátko.
Vypnutí zvuku (Mute)
Sluchátko a mikrofon telefonu můžete vypnout, váš partner
vás pak neslyší.
JBěhem hovoru: stiskněte tlačítko vypnutí
zvuku.
Zapnutí: znovu stiskněte tlačítko.
Nastavení reproduktoru
Během hlasitého telefonování lze nastavit a uložit hlasitost
v 7 stupních (tovární nastavení: 7).
H...ITlačítky zvýšení/snížení hlasitosti nastavte
hlasitost.
Zapnutí/vypnutí hlasitého poslechu
Osoby v místnosti mohou telefonní hovor vyslechnout díky
vestavěnému reproduktoru.
LBěhem hovoru:
Stiskněte tlačítko reproduktoru
Vypnutí hlasitého poslechu: opět stiskněte
tlačítko.
Při zapnutém reproduktoru a sejmutém sluchátku je
hlasitý poslech zapnutý. Mikrofon hlasitého telefonování
je vypnutý.
Other manuals for 5015
2
Table of contents
Languages:
Other Gigaset Telephone manuals

Gigaset
Gigaset C530 IP User manual

Gigaset
Gigaset E550 User manual

Gigaset
Gigaset E630 User manual

Gigaset
Gigaset DA210 User manual

Gigaset
Gigaset A590 User manual

Gigaset
Gigaset SL450 User manual

Gigaset
Gigaset A510H User manual

Gigaset
Gigaset SL400h User manual

Gigaset
Gigaset SL78H User manual

Gigaset
Gigaset SX353 isdn User manual

Gigaset
Gigaset T640 PRO User manual

Gigaset
Gigaset E560HX User manual

Gigaset
Gigaset AL110 User manual

Gigaset
Gigaset A160 User manual

Gigaset
Gigaset N510 User manual

Gigaset
Gigaset E630A GO User manual

Gigaset
Gigaset S400 professional User manual

Gigaset
Gigaset DA611 User manual

Gigaset
Gigaset C610H User manual

Gigaset
Gigaset DESK 200 User manual