Gigaset C810H User manual

2
Telephone at a glance
Gigaset C810H / CHN en/ A31008-M2357-Y101-1-7619 / overview.fm / 15.09.2011
Version 4, 16.09.2005
Telephone at a glance
1Display in idle status
2Battery charge status
(¢page 3)
3Display keys (¢page 11)
4End call key, On/Off key
End call, cancel function, go back one menu
level (press briefly), back to idle status (press
and hold), activate/deactivate handset (press
and hold in idle status)
5Hash key
Keypad lock on/off (press and hold in
idle status);
toggles between upper/lower case and digits
6Recall key
– Consultation call (flash)
– Insert a dialling pause (press and hold)
7Microphone
8Message key (¢page 24)
Access to calls and message lists;
Flashes: new message or new call
9Star key
Ringtone on/off (press and hold);
with an open connection: switch between dial
pulsing/tone dialling (press briefly);
Text input: Open table of special characters
10 Priority key (¢page 19)
Memory key for IP code (press and hold)
11 Key 1
Dial answering machine (press and hold)
if available on the base
12 Talk key
Flashes: incoming call;
Accept a call (press briefly);
13 Control key (¢page 11)
uinitiate an internal call;
vmute the microphone during a call;
topen audio settings;
sopen the directory;
14 Signal strength icon of the connection to the
base
15 Answering machine icon, if connected to a
base with answering machine
Answering machine switched on;
Flashes: Answering machine is recording a
message or is being operated by another inter-
nal party.
ÐÃ U
Menu
07:15
Redial
2011-10-14
INT 1
§§2§§
§§3§§
§§4§§
§§5§§
§§6§§
§13§
§12§
§§7§§
§§1§§
§§8§§
§§9§§
§11§
§14§
§15§
§10§

3
Telephone at a glance
Gigaset C810H / CHN en/ A31008-M2357-Y101-1-7619 / overview.fm / 15.09.2011
Version 4, 16.09.2005
Display symbols
The following symbols are displayed dependent on the settings and the operating status of
your telephone:
Signalling
Display in idle status
Keypad locked
Ringtone switched off
Signal strength
Number of new messages
u
Ãon the answering
machine (depending on
base)
u™in the list of missed calls
Answering machine activated
Handset in talk mode
Battery charging state
Name of the handset
Ðó˝Ã
æU
Menu
07:15
Redial
2011-10-14
INT 1
™
3
Ã
1
¼08:00
Current date
Current time
Alarm switched on and
wake-up time
External call Internal call Alarm clock
Ø«Ú ØåÚ Ø¼Ú
uReception signal between the base and handset:
good to poor: ÐiÑÒ
If the handset goes out of range a warning tone will be heard.
uBattery charge status:
–
=eVU(empty to full)
–=flashes red: batteries almost empty
–
eVU during charging, the symbol is outlined red
while the charging state changes periodically
uINT 1
Internal name of the handset (¢page 30)
If the answering machine on the base is activated, the Ãicon will
be displayed in the header
You can find additional information about your telephone at www.gigaset.com/gigasetc810.
Have fun using your new phone!
ÐÃU
Menu
07:15
Redial
2011-10-14
INT 1

4
Contents
Gigaset C810H / CHN en/ A31008-M2357-Y101-1-7619 / C810HIVZ.fm / 15.09.2011
Version 4, 16.09.2005
Contents
Telephone at a glance . . . . . . . . . . . . . . . . . . . . . . . . . . . . . . . . . . . . . . . . . . . . . . . . . . . . . .2
Display symbols . . . . . . . . . . . . . . . . . . . . . . . . . . . . . . . . . . . . . . . . . . . . . . . . . . . . . . . . . . . . . . . . . . . . . . . 3
Safety precautions . . . . . . . . . . . . . . . . . . . . . . . . . . . . . . . . . . . . . . . . . . . . . . . . . . . . . . . . 6
First steps . . . . . . . . . . . . . . . . . . . . . . . . . . . . . . . . . . . . . . . . . . . . . . . . . . . . . . . . . . . . . . . . 7
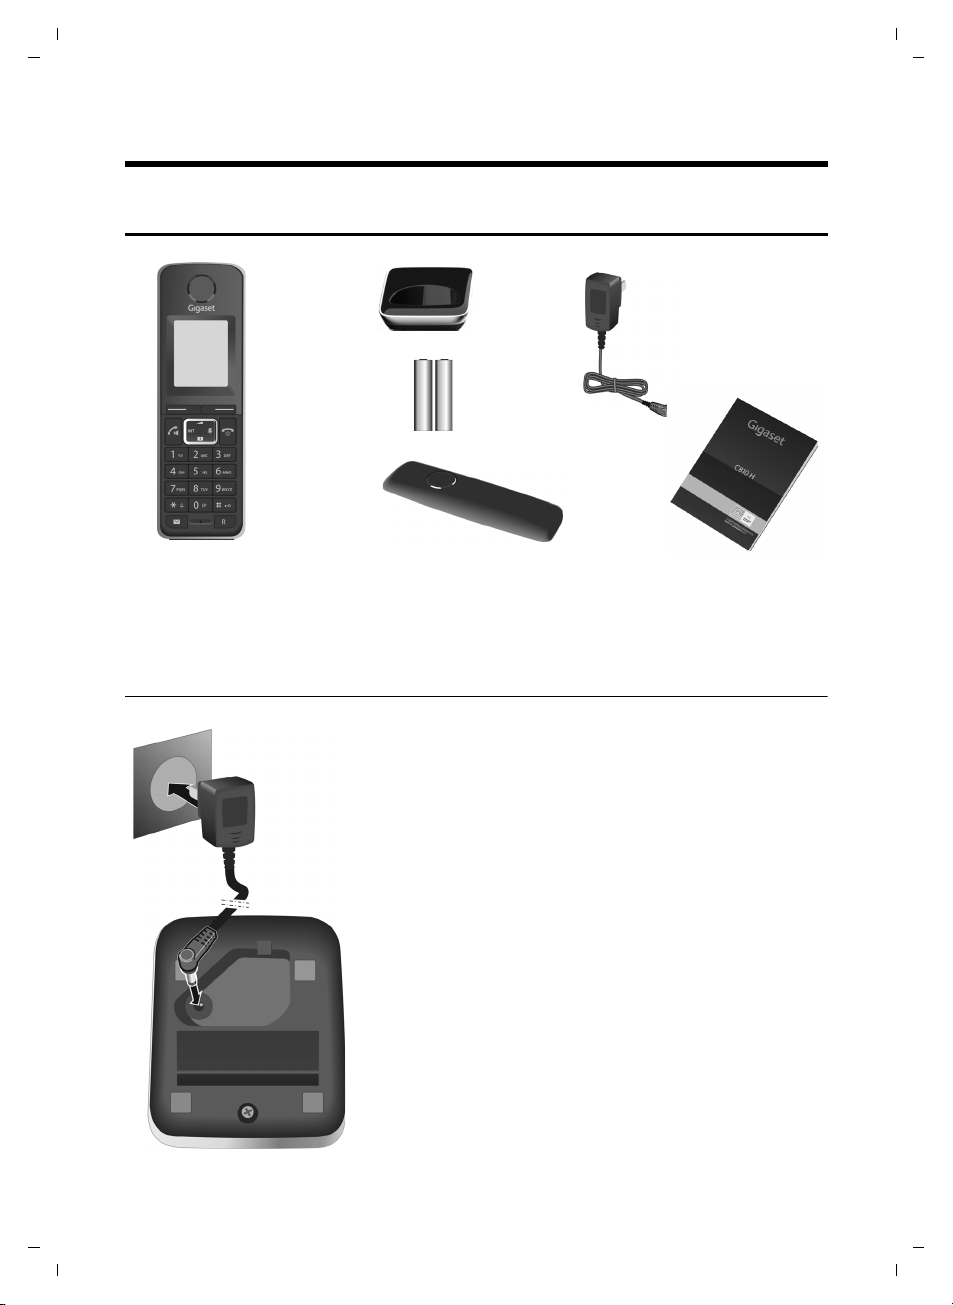
Checking the pack contents . . . . . . . . . . . . . . . . . . . . . . . . . . . . . . . . . . . . . . . . . . . . . . . . . . . . . . . . . . . . 7
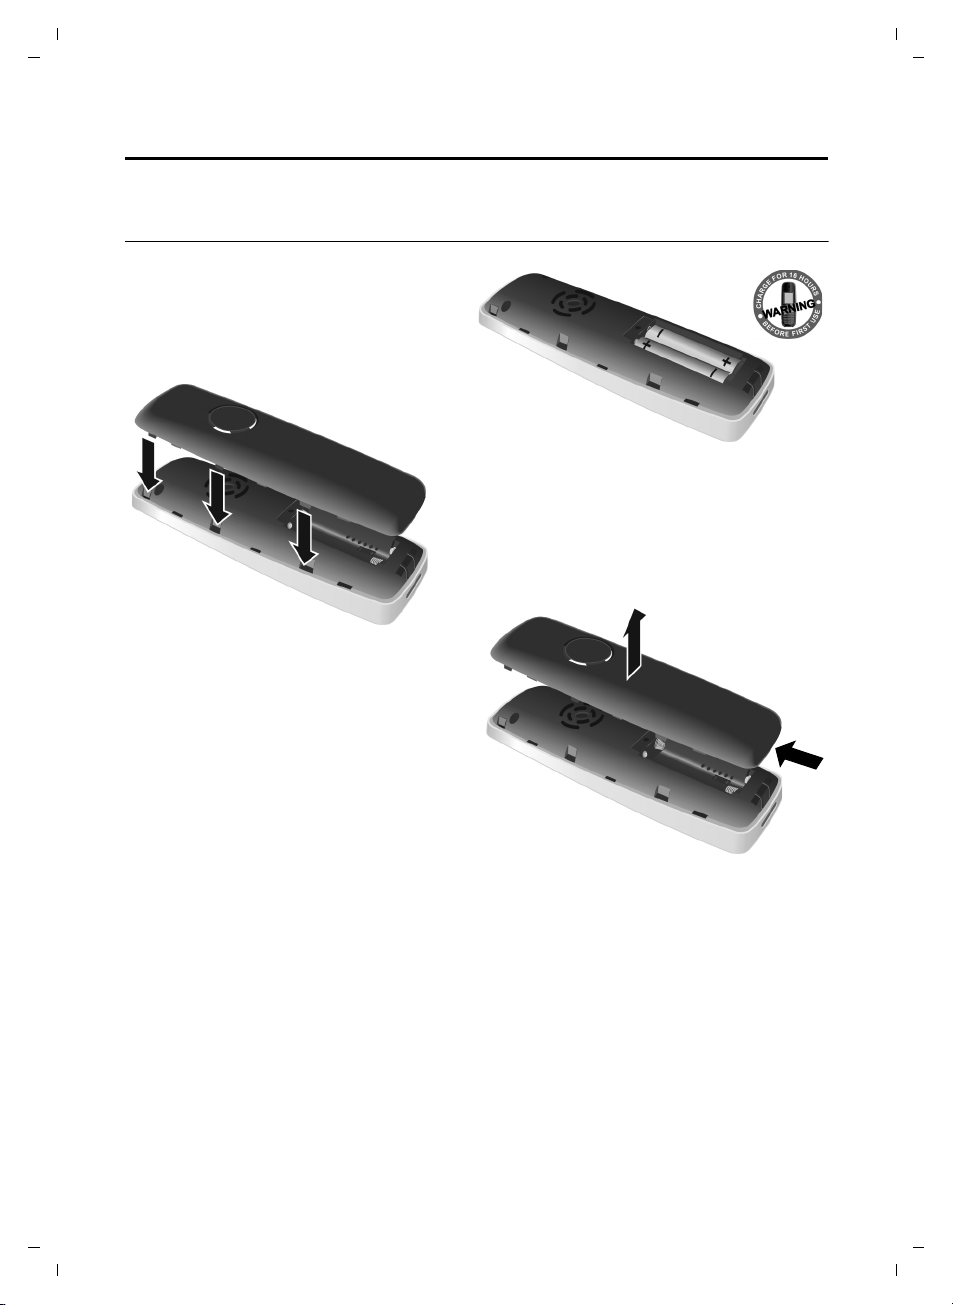
Setting up the handset for use . . . . . . . . . . . . . . . . . . . . . . . . . . . . . . . . . . . . . . . . . . . . . . . . . . . . . . . . . 8
Using the Gigaset C810H . . . . . . . . . . . . . . . . . . . . . . . . . . . . . . . . . . . . . . . . . . . . . . . . . 11
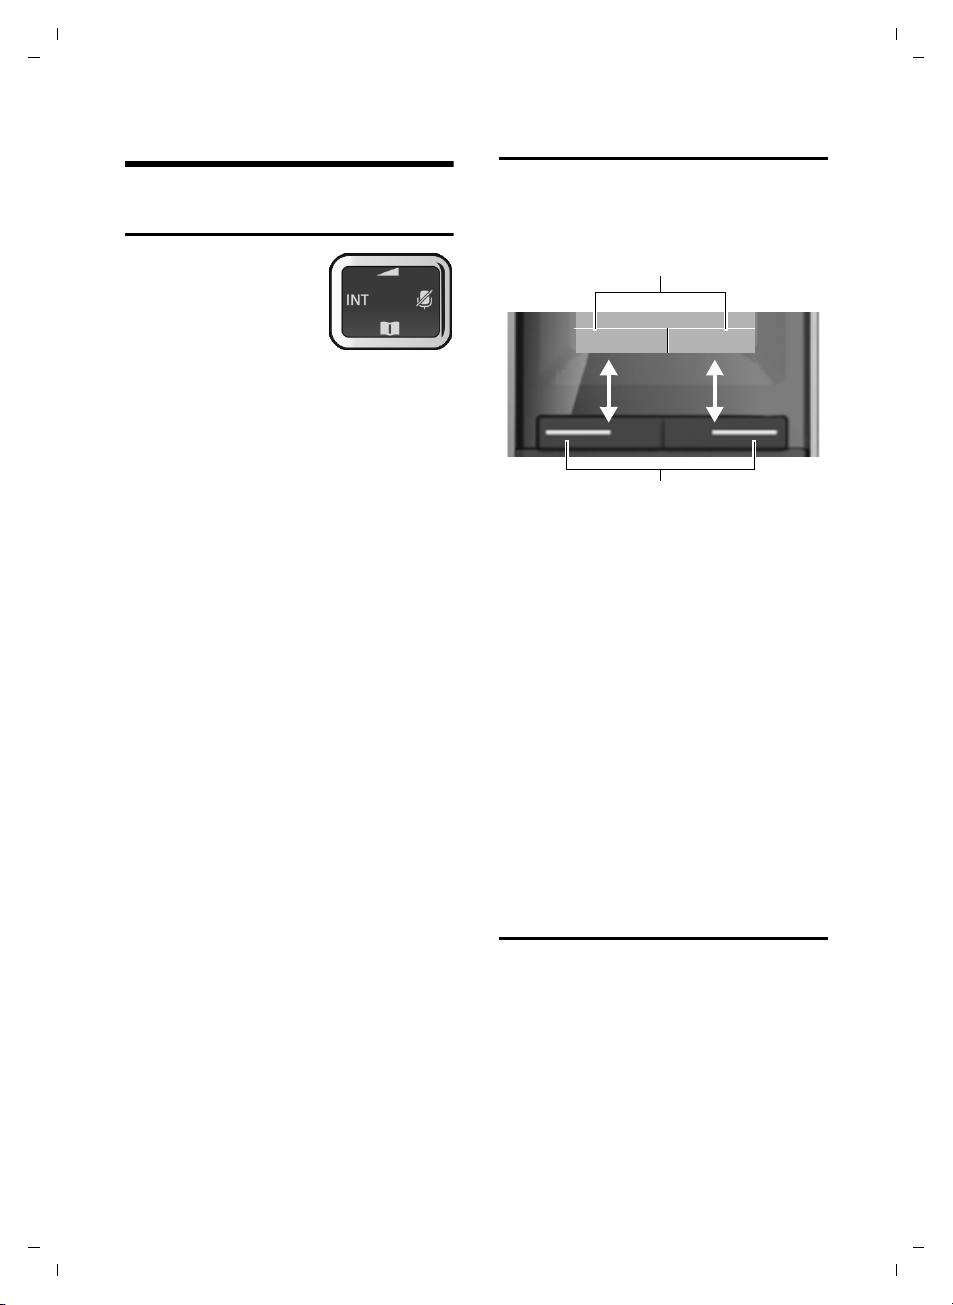
Control key . . . . . . . . . . . . . . . . . . . . . . . . . . . . . . . . . . . . . . . . . . . . . . . . . . . . . . . . . . . . . . . . . . . . . . . . . . . 11
Display keys . . . . . . . . . . . . . . . . . . . . . . . . . . . . . . . . . . . . . . . . . . . . . . . . . . . . . . . . . . . . . . . . . . . . . . . . . . 11
Keys on the keypad . . . . . . . . . . . . . . . . . . . . . . . . . . . . . . . . . . . . . . . . . . . . . . . . . . . . . . . . . . . . . . . . . . . 11
Correcting incorrect entries . . . . . . . . . . . . . . . . . . . . . . . . . . . . . . . . . . . . . . . . . . . . . . . . . . . . . . . . . . . 12
Activating/deactivating the keypad lock . . . . . . . . . . . . . . . . . . . . . . . . . . . . . . . . . . . . . . . . . . . . . . . 12
Activating/deactivating the handset . . . . . . . . . . . . . . . . . . . . . . . . . . . . . . . . . . . . . . . . . . . . . . . . . . . 12
Menu guidance . . . . . . . . . . . . . . . . . . . . . . . . . . . . . . . . . . . . . . . . . . . . . . . . . . . . . . . . . . . . . . . . . . . . . . . 12
Menu overview . . . . . . . . . . . . . . . . . . . . . . . . . . . . . . . . . . . . . . . . . . . . . . . . . . . . . . . . . . . . . . . . . . . . . . . 14
Registering handsets . . . . . . . . . . . . . . . . . . . . . . . . . . . . . . . . . . . . . . . . . . . . . . . . . . . . . . . . . . . . . . . . . . 16
De-registering handsets . . . . . . . . . . . . . . . . . . . . . . . . . . . . . . . . . . . . . . . . . . . . . . . . . . . . . . . . . . . . . . . 16
Locating a handset (paging) . . . . . . . . . . . . . . . . . . . . . . . . . . . . . . . . . . . . . . . . . . . . . . . . . . . . . . . . . . . 16
Making calls . . . . . . . . . . . . . . . . . . . . . . . . . . . . . . . . . . . . . . . . . . . . . . . . . . . . . . . . . . . . . 17
Making an external call . . . . . . . . . . . . . . . . . . . . . . . . . . . . . . . . . . . . . . . . . . . . . . . . . . . . . . . . . . . . . . . . 17
Quick dialling . . . . . . . . . . . . . . . . . . . . . . . . . . . . . . . . . . . . . . . . . . . . . . . . . . . . . . . . . . . . . . . . . . . . . . . . . 17
Ending a call . . . . . . . . . . . . . . . . . . . . . . . . . . . . . . . . . . . . . . . . . . . . . . . . . . . . . . . . . . . . . . . . . . . . . . . . . . 17
Accepting a call . . . . . . . . . . . . . . . . . . . . . . . . . . . . . . . . . . . . . . . . . . . . . . . . . . . . . . . . . . . . . . . . . . . . . . . 17
Calling Line Identification (CLI) . . . . . . . . . . . . . . . . . . . . . . . . . . . . . . . . . . . . . . . . . . . . . . . . . . . . . . . . 18
Speaker mode . . . . . . . . . . . . . . . . . . . . . . . . . . . . . . . . . . . . . . . . . . . . . . . . . . . . . . . . . . . . . . . . . . . . . . . . 18
Adjusting the earpiece/speaker volume during a call . . . . . . . . . . . . . . . . . . . . . . . . . . . . . . . . . . . 18
Switching to mute . . . . . . . . . . . . . . . . . . . . . . . . . . . . . . . . . . . . . . . . . . . . . . . . . . . . . . . . . . . . . . . . . . . . 18
Battery status control during a call . . . . . . . . . . . . . . . . . . . . . . . . . . . . . . . . . . . . . . . . . . . . . . . . . . . . . 19
IP dialling . . . . . . . . . . . . . . . . . . . . . . . . . . . . . . . . . . . . . . . . . . . . . . . . . . . . . . . . . . . . . . . . . . . . . . . . . . . . . 19
Making internal calls . . . . . . . . . . . . . . . . . . . . . . . . . . . . . . . . . . . . . . . . . . . . . . . . . . . . . 20
Transferring a call . . . . . . . . . . . . . . . . . . . . . . . . . . . . . . . . . . . . . . . . . . . . . . . . . . . . . . . . . . . . . . . . . . . . . 20
Internal consultation/conference calls . . . . . . . . . . . . . . . . . . . . . . . . . . . . . . . . . . . . . . . . . . . . . . . . . 20
Accepting/rejecting call waiting . . . . . . . . . . . . . . . . . . . . . . . . . . . . . . . . . . . . . . . . . . . . . . . . . . . . . . . 21
Barging in to an external call . . . . . . . . . . . . . . . . . . . . . . . . . . . . . . . . . . . . . . . . . . . . . . . . . . . . . . . . . . 21
Using the directory and lists . . . . . . . . . . . . . . . . . . . . . . . . . . . . . . . . . . . . . . . . . . . . . . 22
Directory . . . . . . . . . . . . . . . . . . . . . . . . . . . . . . . . . . . . . . . . . . . . . . . . . . . . . . . . . . . . . . . . . . . . . . . . . . . . . 22
Redial list . . . . . . . . . . . . . . . . . . . . . . . . . . . . . . . . . . . . . . . . . . . . . . . . . . . . . . . . . . . . . . . . . . . . . . . . . . . . . 23
Call lists . . . . . . . . . . . . . . . . . . . . . . . . . . . . . . . . . . . . . . . . . . . . . . . . . . . . . . . . . . . . . . . . . . . . . . . . . . . . . . 24

5
Contents
Gigaset C810H / CHN en/ A31008-M2357-Y101-1-7619 / C810HIVZ.fm / 15.09.2011
Version 4, 16.09.2005
Settings . . . . . . . . . . . . . . . . . . . . . . . . . . . . . . . . . . . . . . . . . . . . . . . . . . . . . . . . . . . . . . . . . 26
Changing the display language . . . . . . . . . . . . . . . . . . . . . . . . . . . . . . . . . . . . . . . . . . . . . . . . . . . . . . . 26
Quick access to numbers . . . . . . . . . . . . . . . . . . . . . . . . . . . . . . . . . . . . . . . . . . . . . . . . . . . . . . . . . . . . . . 26
Setting the date and time . . . . . . . . . . . . . . . . . . . . . . . . . . . . . . . . . . . . . . . . . . . . . . . . . . . . . . . . . . . . . 26
Setting the alarm clock . . . . . . . . . . . . . . . . . . . . . . . . . . . . . . . . . . . . . . . . . . . . . . . . . . . . . . . . . . . . . . . . 27
Audio settings . . . . . . . . . . . . . . . . . . . . . . . . . . . . . . . . . . . . . . . . . . . . . . . . . . . . . . . . . . . . . . . . . . . . . . . . 27
Setting the display . . . . . . . . . . . . . . . . . . . . . . . . . . . . . . . . . . . . . . . . . . . . . . . . . . . . . . . . . . . . . . . . . . . . 29
Activating/deactivating auto answer . . . . . . . . . . . . . . . . . . . . . . . . . . . . . . . . . . . . . . . . . . . . . . . . . . 29
Changing the name of the handset . . . . . . . . . . . . . . . . . . . . . . . . . . . . . . . . . . . . . . . . . . . . . . . . . . . . 30
Restoring the handset factory settings . . . . . . . . . . . . . . . . . . . . . . . . . . . . . . . . . . . . . . . . . . . . . . . . . 30
System settings . . . . . . . . . . . . . . . . . . . . . . . . . . . . . . . . . . . . . . . . . . . . . . . . . . . . . . . . . . . . . . . . . . . . . . . 30
Connecting the telephone to the PABX . . . . . . . . . . . . . . . . . . . . . . . . . . . . . . . . . . . . 32
Changing the dialling mode . . . . . . . . . . . . . . . . . . . . . . . . . . . . . . . . . . . . . . . . . . . . . . . . . . . . . . . . . . . 32
Setting recall . . . . . . . . . . . . . . . . . . . . . . . . . . . . . . . . . . . . . . . . . . . . . . . . . . . . . . . . . . . . . . . . . . . . . . . . . 32
Setting an automatic prefix . . . . . . . . . . . . . . . . . . . . . . . . . . . . . . . . . . . . . . . . . . . . . . . . . . . . . . . . . . . 32
Temporarily switching to tone dialling (DTMF) . . . . . . . . . . . . . . . . . . . . . . . . . . . . . . . . . . . . . . . . . 32
Operating the answering machine . . . . . . . . . . . . . . . . . . . . . . . . . . . . . . . . . . . . . . . . 33
Activating/deactivating the answering machine . . . . . . . . . . . . . . . . . . . . . . . . . . . . . . . . . . . 33
Playing back messages/memos . . . . . . . . . . . . . . . . . . . . . . . . . . . . . . . . . . . . . . . . . . . . . . . . . . . . . . . 33
Picking up a call from the answering machine . . . . . . . . . . . . . . . . . . . . . . . . . . . . . . . . . . . . . . . . . 34
Activating/deactivating call screening . . . . . . . . . . . . . . . . . . . . . . . . . . . . . . . . . . . . . . . . . . . . . . . . . 34
Recording an announcement . . . . . . . . . . . . . . . . . . . . . . . . . . . . . . . . . . . . . . . . . . . . . . . . . . . . . . . . . 34
Setting the answering machine mode . . . . . . . . . . . . . . . . . . . . . . . . . . . . . . . . . . . . . . . . . . . . . . . . . 35
Setting the recording parameters . . . . . . . . . . . . . . . . . . . . . . . . . . . . . . . . . . . . . . . . . . . . . . . . . . . . . 35
Customer Service & Assistance . . . . . . . . . . . . . . . . . . . . . . . . . . . . . . . . . . . . . . . . . . . 36
Questions and answers . . . . . . . . . . . . . . . . . . . . . . . . . . . . . . . . . . . . . . . . . . . . . . . . . . 36
Appendix . . . . . . . . . . . . . . . . . . . . . . . . . . . . . . . . . . . . . . . . . . . . . . . . . . . . . . . . . . . . . . . 37
Care . . . . . . . . . . . . . . . . . . . . . . . . . . . . . . . . . . . . . . . . . . . . . . . . . . . . . . . . . . . . . . . . . . . . . . . . . . . . . . . . . . 37
Contact with liquid . . . . . . . . . . . . . . . . . . . . . . . . . . . . . . . . . . . . . . . . . . . . . . . . . . . . . . . . . . . . . . . . . . . 37
Specifications . . . . . . . . . . . . . . . . . . . . . . . . . . . . . . . . . . . . . . . . . . . . . . . . . . . . . . . . . . . . . . . . . . . . . . . . . 37
General specifications . . . . . . . . . . . . . . . . . . . . . . . . . . . . . . . . . . . . . . . . . . . . . . . . . . . . . . . . . . . . . . . . . 38
Writing and editing text . . . . . . . . . . . . . . . . . . . . . . . . . . . . . . . . . . . . . . . . . . . . . . . . . . . . . . . . . . . . . . . 38
Index . . . . . . . . . . . . . . . . . . . . . . . . . . . . . . . . . . . . . . . . . . . . . . . . . . . . . . . . . . . . . . . . . . . 39

6
Safety precautions
Gigaset C810H / CHN en/ A31008-M2357-Y101-1-7619 / security.fm / 15.09.2011
Version 4, 16.09.2005
Safety precautions
Warning
Read the safety precautions and the user guide before use.
Explain their content and the potential hazards associated with using the telephone to your
children.
Only use the recommended, rechargeable batteries (¢page 37) as this could oth-
erwise result in significant health risks and personal injury.
The operation of medical appliances may be affected. Be aware of the technical con-
ditions in your particular environment, e.g. doctor's surgery.
Do not hold the rear of the handset to your ear when it is ringing or when speaker
mode is activated. Otherwise you risk serious and permanent damage to your hear-
ing.
Your Gigaset is compatible with the majority of digital hearing aids on the market.
However, perfect function with all hearing aids cannot be guaranteed.
The handset may cause an unpleasant humming or whistling noise in hearing aids
or cause them to overload. If you require assistance, please contact the hearing aid
supplier.
Do not install the charging cradle in bathrooms or shower rooms.
Do not use your phone in environments with a potential explosion hazard (e.g. paint
shops).
If you give your Gigaset to someone else, make sure you also give them the
user guide.
Please remove faulty bases from use or have them repaired by our Service depart-
ment, as they could interfere with other wireless services.
ƒ

7
First steps
Gigaset C810H / CHN en/ A31008-M2357-Y101-1-7619 / starting.fm / 15.09.2011
Version 4, 16.09.2005
First steps
Checking the pack contents
1. one Gigaset C810H handset
2. one charger for Gigaset C810H
3. two batteries
4. one battery cover
5. one mains adapter
6. one user guide C810H
1 2
3
4
5
6
Connecting the charging cradle
1
2¤Connect the mains adapter to the port on the underside
of the charger 1.
¤Plug the mains adapter into the plug socket 2.

8
First steps
Gigaset C810H / CHN en/ A31008-M2357-Y101-1-7619 / starting.fm / 15.09.2011
Version 4, 16.09.2005
Setting up the handset for use
The display is protected by a plastic film. Please remove the protective film!
Inserting the batteries and closing the battery cover
¤Insert the batteries the right way round.
The polarity is indicated in/on the battery
compartment.
¤First insert the battery cover at the top.
Then press the cover until it clicks into
place.
If you need to open the battery cover, for
instance to replace the batteries, place your
fingertip in the cavity at the lower side of the
cover and pull the battery cover upwards.

9
First steps
Gigaset C810H / CHN en/ A31008-M2357-Y101-1-7619 / starting.fm / 15.09.2011
Version 4, 16.09.2005
Your telephone is now ready to use!
Placing the handset in the charging cradle
¤Place the handset in the charging cradle with its display facing forward.
For registration of the handset to a base, see the user guide of your base and ¢page 16.
To charge the batteries, leave the handset in the charging cradle.
Please note
Only place the handset in the charging cradle that is intended for it.
Please note
uAfter the first battery charge and discharge you may replace your handset in the charg-
ing cradle after every call.
uAlways repeat the charging and discharging procedure if you remove the batteries from
the handset and reinsert them.
uThe batteries may warm up during charging. This is not dangerous.
uAfter a while, the charge capacity of the batteries will decrease for technical reasons.
¤Place the handset in the charging cradle for 10
hours.
¤Then remove the handset
from the charging cradle
and do not replace it until
the batteries are fully dis-
charged.
10 h
The correct charge level can only be displayed if the batteries are first fully
charged and discharged.
Initial charging and discharging of the batteries

10
First steps
Gigaset C810H / CHN en/ A31008-M2357-Y101-1-7619 / starting.fm / 15.09.2011
Version 4, 16.09.2005
What would you like to do next?
Now you have successfully started your Gigaset, you will probably want to adapt it to your per-
sonal requirements. Use the following guide to quickly locate the most important subjects.
If you are unfamiliar with menu-driven devices such as other Gigaset telephones you should
first read the sections entitled "Using the Gigaset C810H" on page 11.
If you have any questions about using your phone, please read the tips on
troubleshooting (¢page 36) or contact our Customer Care team (¢page 36).
Information on ... ... is located here.
Setting the ringtone and volume page 27
Setting the earpiece volume page 27
Recording a personal announcement for the
answering machine
page 34
Operating the telephone on a PABX page 32
Registering new Gigaset handsets to a base page 16
g
g
g
g
g

11
Using the Gigaset C810H
Gigaset C810H / CHN en/ A31008-M2357-Y101-1-7619 / HS_using.fm / 15.09.2011
Version 4, 16.09.2005
Using the Gigaset C810H
Control key
Below, the side of the con-
trol key that you must
press in the respective
operating situation is
marked in black
(top, bottom, right, left),
e.g. vfor "press right on the control key" or
tfor "press at the top of the control key".
The control key has a number of different
functions:
When the handset is in idle status
sOpen the directory.
vOpen the main menu.
uOpen the list of internal phones
(base and handsets).
tOpen the Audio Settings sub-
menu.
In the main menu
t, s, vor u
Navigate to the required func-
tion.
In submenus and lists
t/ sScroll up/down line by line.
In input fields
Use the control key to move the cursor up
t, down s, right vor left u. Press and
hold vor uto move the cursor word by
word.
During a call
sOpen the directory.
tAdjust the loudspeaker volume
for earpiece and speaker mode.
vActivates mute function.
Display keys
The functions of the display keys change
depending on the particular operating situ-
ation. Example:
Some important display keys:
§§Menu§§ Open the menu.
§§Options§§ Open a submenu for further
functions.
§§Ok§§ Confirm selection.
§§< C§§ Delete key: delete one charac-
ter/word at a time from right to
left.
§§Back§§ Go back one menu level or can-
cel operation.
§§Save§§ Store entry.
In the following description the instruction
“press the display key §XXX§“ means:
“press the display key below the display key
function labelled XXX“.
Keys on the keypad
c/ Q/ *etc.
Press the matching key on the
keypad.
~Enter digits or letters.
Display keys
MenuRedial
Display key functions

12
Using the Gigaset C810H
Gigaset C810H / CHN en/ A31008-M2357-Y101-1-7619 / HS_using.fm / 15.09.2011
Version 4, 16.09.2005
Correcting incorrect entries
You can correct incorrect characters in the
input fields by navigating to the incorrect
entry using the control key. You can then:
uDelete the character by briefly pressing
Ñor press and hold to delete the word
to the left of the cursor.
uInsert characters next to the cursor.
uOverwrite the highlighted (flashing)
character, e.g. when entering time and
date.
Activating/deactivating the
keypad lock
The keypad lock prevents any inadvertent
use of the phone.
#Press and hold the hash key in
idle status to activate or deacti-
vate the keypad lock. You will
hear the confirmation tone.
If the keypad lock is activated, the ˝sym-
bol is displayed and a warning tone will be
emitted when you press a key.
The keypad lock deactivates automatically
when you receive a call. It is reactivated
when the call is ended.
Activating/deactivating the
handset
aWith the phone in idle status,
press and hold the end call key
(confirmation tone) to switch off
the handset.
Press and hold the end call key
again to switch the handset on.
Menu guidance
Your telephone's functions are accessible
using a menu that has a number of levels.
The full menu tree is shown in the next sec-
tion, ¢page 14.
Main menu (first menu level)
¤When the handset is in idle status press
the Menu display key to open the main
menu.
The main menu func-
tions are shown in
the display with
icons. The icon for the
selected function is
marked in green and
the name of the asso-
ciated function
appears in the dis-
play's header.
To access a function, i.e. to open the corre-
sponding submenu (next menu level):
¤Use the control key qto select the
required function and press the display
key §Select§.
To return to the previous menu level or to
cancel the operation.
¤Briefly press the display key §Back§.
Please note
When the keypad lock is active, you can-
not call emergency numbers using the
handset. In this case use the corded
receiver at the base for emergency calls.
Please note
In these instructions, opening the main
menu is represented by pressing right on
the display key. However, if you prefer,
you can use the control key as described
above (¢page 11).
Date/Time
SelectBack
ÉÅ
Ç
ÄÌ
È

13
Using the Gigaset C810H
Gigaset C810H / CHN en/ A31008-M2357-Y101-1-7619 / HS_using.fm / 15.09.2011
Version 4, 16.09.2005
Submenus
The functions in the
submenus are dis-
played as lists (exam-
ple on the right).
To access a function:
¤Scroll to the func-
tion with the con-
trol key qand
press §Ok§.
¤Briefly press the
display key §Back§ or the end call key ato
return to the previous menu level/cancel
the operation.
Reverting to idle status
You can revert to idle status from anywhere
in the menu as follows:
¤Press and hold the end call key a.
Or:
¤Do not press any key: after 2 minutes the
display will automatically revert to idle
status.
Settings that have not been saved by select-
ing the display key §Ok§ or §Save§ will be lost.
An example of the display in idle status is
shown on page 3.
Illustration of menu operation in
the user guide
Menu operations are shown in the user
guide in abbreviated form.
Example:
The illustration:
§§Menu§§ ¢Ç¢Ringer Settings
¢Ringer Melody
means:
¤Press the §§Menu§§ display key to open the
menu.
¤Select the Çsymbol, press §Select§.
¤Use the control key qto select Ringer
Settings, press §Select§.
¤Use the control key qto select Ringer
Melody, press §Select§.
Handset Settings
OkBack
Language
Auto Answer
Register Handset
De-Register Handset
Rename Handset

14
Using the Gigaset C810H
Gigaset C810H / CHN en/ A31008-M2357-Y101-1-7619 / HS_using.fm / 15.09.2011
Version 4, 16.09.2005
Menu overview
To open the main menu press the §Menu§ display key.
ÈDate/Time Date/Time ¢page 26
Alarm Clock Activation ¢page 27
Alarm Time ¢page 27
Alarm Melody ¢page 27
Alarm Volume ¢page 27
ÇAudio Settings Call Volume ¢page 27
Ringer Settings Ringer Volume ¢page 28
Ringer Melody ¢page 28
Advisory Tones ¢page 28
ÉDisplay Screen Picture ¢page 29
Color Scheme ¢page 29
Brightness ¢page 29
Backlight ¢page 29
ÅHandset Settings Language ¢page 26
Auto Answer ¢page 29
Register Handset ¢page 16
De-Register Handset ¢page 16
Rename Handset ¢page 30
. . . Reset Handset ¢page 30

15
Using the Gigaset C810H
Gigaset C810H / CHN en/ A31008-M2357-Y101-1-7619 / HS_using.fm / 15.09.2011
Version 4, 16.09.2005
ÄSystem Settings Music On Hold ¢page 30
System PIN ¢page 30
Additional Features Dialing Mode
Recall
Barge In
Auto Prefix Activation
Prefix No.
Call List Type ¢page 25
Call Barring ¢page 30
ÌVoice Mail Play Messages ¢page 33
Answering machine ¢page 33
Call Screening ¢page 34
Announcements Rec. Announcement ¢page 34
Play Announcement ¢page 34
Del. Announcement ¢page 35
Message Length ¢page 35
Ring Delay ¢page 35

16
Using the Gigaset C810H
Gigaset C810H / CHN en/ A31008-M2357-Y101-1-7619 / HS_using.fm / 15.09.2011
Version 4, 16.09.2005
Registering handsets
Manual registration of the handset
on a base
If you want to register your handset to a
base, you must activate manual registration
of the handset on both the handset and the
base. Please refer to the user guide of your
base.
When the registration process has com-
pleted successfully, the handset returns to
idle status. The handset's internal number is
shown in the display e.g. INT 1. If not, repeat
the procedure.
On the handset
If the handset is not registered to a base the
display shows:
§Ok§ Press the display key to start the
registration.
~Enter the current system PIN
and press §Ok§.
A message indicates that a search for a base
that is ready for registration is being carried
out.
De-registering handsets
You can de-register any other registered
handset from any registered Gigaset C59H
handset.
§§Menu§§ ¢Å¢De-Register Handset
sSelect the internal subscriber
you wish to deregister and press
§Ok§.
~Enter the current system PIN
and press §Ok§.
§Ok§ Press the display key to confirm
the action.
Locating a handset (paging)
You can locate another handset using your
handset.
uBriefly press the INT key (control
key on the left).
qUse the control key to select the
handset to be called or select
Call All to locate the base and all
registered handsets.
§Select§ Press the display key to start
paging.
All called handsets and the base will ring
simultaneously (paging), even if the ring-
tones are deactivated.
Ending paging
§Back§ Press the display key to stop
paging.
Register Handset
OkRedial
Ð
Register Handset
Please note
In the case of an incoming external call
the paging is stopped.

17
Making calls
Gigaset C810H / CHN en/ A31008-M2357-Y101-1-7619 / HS_telefony.fm / 15.09.2011
Version 4, 16.09.2005
Making calls
If the back light is deactivated (¢page 29)
it is switched on by pressing any key. In this
case the pressed key has no other function.
Making an external call
External calls are calls using the public tele-
phone network.
~d Enter the number and press the
talk key.
Or:
d~ Press the talk key dand then
enter the number.
The number is limited to 32 digits.
You can cancel the dialling operation with
the end call key a.
An ongoing call is indi-
cated by:
You are shown the duration of the call while
the call is in progress.
If the line is in use by the base or another
handset, Line In Use is displayed.
Quick dialling
You can assign a number from the directory
to each of the digit keys
2to O,
¢page 26.
When the handset is in idle status:
¤Press and hold the digit key.
The number is dialled immediately.
Or:
¤Briefly press the digit key:
Press the display key with number/name
(abbreviated if necessary) to dial the
number.
Ending a call
aPress the end call key.
The end of the call is indi-
cated by:
Accepting a call
The handset indicates an incoming call in
three ways: by ringing, by a display on the
screen and by the flashing talk key c.
You can accept the call by:
¤Pressing the talk key c.
Or:
¤Pressing the §Accept§ display key.
If the handset is in the charging cradle and
the Auto Answer function is activated
(¢page 29), the handset automatically
answers the call when you remove it from
the charging cradle.
To deactivate the ringtone, press the §Silence§
display key. You can accept the call as long as
it is displayed on the screen.
Please note
Dialling with the directory (¢page 22),
call list (¢page 24) and redial list
(¢page 23) saves you repeatedly key-
ing in phone numbers
Please note
Specific numbers may not being allowed
to be dialled, because they are barred
(¢page 30).
æç
Please note
If no quick dial number has been stored
on the digit key, the directory opens,
allowing you to assign a number,
¢page 22.
æç

18
Making calls
Gigaset C810H / CHN en/ A31008-M2357-Y101-1-7619 / HS_telefony.fm / 15.09.2011
Version 4, 16.09.2005
Calling Line Identification
(CLI)
Calling Line Identification is a telephony
service that transmits caller identification
information (number and name). When you
receive a call, the caller's number and/or
name is displayed on the screen according
to the following rules:
Number/name is transmitted and
stored in the directory
Number/name is transmitted but not
stored in the directory
If the number is transmitted it is displayed. If
the name is transmitted, it replaces the
number.
If the name exceeds 16 characters, only the
first 16 characters are displayed. If the
number exceeds 24 digits, only the first 24
digits are displayed.
Number/name is not transmitted
External Incoming Call is displayed.
Speaker mode
In speaker mode, instead of holding the
handset to your ear you can put it down, for
example on the table in front of you. This
allows other people to participate in the call.
Activating/deactivating speaker
mode
Activating while dialling
~d Enter the number and press the
speaker key.
¤You should inform your caller before you
use the speaker function so that they
know someone else is listening.
Switching between earpiece and
speaker mode
dPress the speaker key.
During a call and when listening to an
answering machine, activate or deactivate
speaker mode.
If you wish to place the handset in the base/
charging cradle during a call:
¤Press and hold the speaker key dwhile
placing the handset in the base.
Adjusting the earpiece/
speaker volume during a call
To adjust the earpiece or speaker volume
during a call:
qUse the control key to adjust the
volume (five levels).
Switching to mute
You can deactivate the microphone in your
handset during an external call.
hPress the mute key to mute the
handset.
Or:
§Mute§ Press the display key.
The display shows Mute On.
Press the key again to reactivate
the microphone.
The caller’s
number and the
name according
to the directory
entry are dis-
played.
ÐU
SilenceAccept
Ø«Ú
Peter Smith
01234567890
Please note
If the telephone is muted, no keys except
the mute key hand the end call key a
will work.

19
Making calls
Gigaset C810H / CHN en/ A31008-M2357-Y101-1-7619 / HS_telefony.fm / 15.09.2011
Version 4, 16.09.2005
Battery status control during
a call
The battery charging state is shown on the
display symbol bar (¢page 3).
If during a call the battery status falls below
a level that could impair the quality of the
connection, the handset will beep at a 60-
second interval and Low Battery is dis-
played. If possible, the caller ID and the rep-
ertory dialling memory are saved before the
handset loses power. If the handset loses
power the call is transferred to the base in
speaker mode.
IP dialling
You can use IP dialling to economically make
international calls.
Precondition: You own an IP dial service
card of your provider and the IP code is
stored in the phone.
In idle mode:
~Enter the IDD number.
QPress and hold the IP key.
dPress the talk key.
Or:
§Call§ Press the display key.
Your telephone will automatically pick the
line and add the IP code stored in the phone
as a prefix to the IDD phone number.
In talk mode:
dPress the talk key.
QPress and hold the IP key.
The service provider is called.
You will hear an announcement
of your service provider.
~Enter the IDD number.
If no IP number is stored in the directory an
error message is output.
You can also dial the IP number for numbers
from the directory, call list, or redial list and
dial the IP code directly.
The prefix function (¢page 32) is disabled
when using IP dialling.
Storing IP numbers
To use IP dialling via the
Qkey the IP code
must be stored in the phone. The IP code
consists of the IP dial number, card number
and PIN. You can also assign a name. The size
of IP code is 32 digits and 12 characters.
Viewing the IP number
QPress and hold the IP key.
If an IP number is stored, it is displayed. If no
number is stored you can now enter one.
Storing an IP number
To store an IP number:
QPress and hold the IP key.
~Enter the IP number.
The IP number must be entered in the fol-
lowing format:
IP code Slanguage
SIP card number
#SPIN #
Example: 17901P1P31108888#P9888#
IP code: e.g. 17910 = China Unicom
Language: or 2or 3
e.g. 1 = Mandarin
Pause: Press and hold the Skey.
Editing an IP number
QPress and hold the IP key.
§Option§ Press the display key.
qSelect Edit Entry and press §Ok§.
~Change the name and press Ok.
~Change the number and press
§Save§.
Use the Ñdisplay key to erase a character
to the left of the cursor.
Deleting an IP number
QPress and hold the IP key.
§Option§ Press the display key.
qSelect Delete Entry and press
§Ok§.

20
Making internal calls
Gigaset C810H / CHN en/ A31008-M2357-Y101-1-7619 / HS_telefony.fm / 15.09.2011
Version 4, 16.09.2005
Making internal calls
Internal calls between the base and the
handset or to other handsets registered on
the same base are free.
An internal call is indi-
cated on the display via
the following symbol:
The name of the calling
station (base or handset)
is also shown.
Calling the base or a specific handset
uInitiate internal call.
sSelect a handset or Base.
cPress the talk key or the §Select§
display key.
Calling all
uInitiate internal call.
Call All Select menu option and
cPress the talk key.
All handsets and the base are called.
Ending a call
aPress the end call key.
Transferring a call
You can transfer an external call to the base
or another handset (connect).
During an external call:
uOpen the list of handsets.
The external participant hears
hold music if activated
(¢page 30).
sSelect the base, a handset or
Call All and press §Ok§.
When the internal participant answers:
¤If necessary, announce the external call.
aPress the end call key or the §End§
display key.
The external call is transferred to the base or
the other handset.
If the internal participant does not answer or
the line is busy, press the display key §Back§ to
return to the external call.
Internal consultation/
conference calls
When you are conducting an external call,
you can call an internal participant at the
same time for consultation or hold a confer-
ence call between all 3 participants.
You are conducting an external call:
uOpen the list of handsets.
The external participant hears
hold music if activated
(¢page 30).
sSelect the base or a handset and
press §Ok§.
You are connected to the inter-
nal participant.
Either:
§End§ Press the display key.
You are reconnected with the
external participant.
Or:
§Conf.§ Press the display key.
All 3 participants are connected
with each other.
Ending a conference call
aPress the end call key.
If an internal participant ends the call, the
other remains connected to the external
participant.
Please note
When selecting Call All the connection
will be established to the first answering
participant. All the others cannot partici-
pate.
ØåÚ
Base
Please note
Conferences are only possible between
one external and two internal partici-
pants.

21
Making internal calls
Gigaset C810H / CHN en/ A31008-M2357-Y101-1-7619 / HS_telefony.fm / 15.09.2011
Version 4, 16.09.2005
Accepting/rejecting call
waiting
If you receive an external call during an
internal call, you will hear the call waiting
tone (short tone). The caller's number or
name will appear in the display if Calling
Line Identification is enabled.
Ending an internal call, accepting an
external call
§Accept§ Press the display key.
The internal call is ended. You are connected
to the external caller.
Rejecting the external call
§Silence§ Press the display key.
The call waiting tone is turned off. You
remain connected with the internal partici-
pant. The ringtone can still be heard on
other registered handsets.
The caller is forwarded to the answering
machine if available and activated.
Barging in to an external call
Precondition: The Barge In function must
be activated.
You are conducting an external call. An inter-
nal participant can listen in on this call and
take part in the conversation. All participants
are made aware of the "bargin in" by a signal
tone.
Enabling/disabling barge in
§§Menu§§ ¢Ä¢Additional Features
¢Barge In
qSelect On or Off and press §§Ok§§
(Ø= selected).
Internal barge in
The line is engaged with an external call.
Your screen will display information to that
effect. You want to listen in to the external
call.
dPress the talk key.
You can listen in to the call. All participants
hear a signal tone. During this time, this
handset displays the Conference message
and it is not possible to dial another number
from this handset.
Ending barge in
aPress the end key.
All participants hear a signal tone.
If the first internal participant ends the call,
the one who has "barged in" remains con-
nected to the external participant.
Table of contents
Other Gigaset Telephone manuals

Gigaset
Gigaset SL400h User manual

Gigaset
Gigaset DA210 User manual

Gigaset
Gigaset euroset 3010 User manual

Gigaset
Gigaset SL450 User manual

Gigaset
Gigaset family HX User manual

Gigaset
Gigaset C610 User manual

Gigaset
Gigaset E370 User manual

Gigaset
Gigaset E630 A User manual

Gigaset
Gigaset DA611 User manual

Gigaset
Gigaset E630 User manual

Gigaset
Gigaset M270T User manual

Gigaset
Gigaset E290A User manual

Gigaset
Gigaset E290 User manual

Gigaset
Gigaset E550 User manual

Gigaset
Gigaset DE700 IP PRO User manual

Gigaset
Gigaset Gigaset DA610 User manual

Gigaset
Gigaset ION User manual

Gigaset
Gigaset Gigaset 5005 User manual

Gigaset
Gigaset DA310 User manual

Gigaset
Gigaset A120 User manual