manuals.online logo
Brands
  1. Home
  2. •
  3. Brands
  4. •
  5. Gilman Creek
  6. •
  7. Indoor Furnishing
  8. •
  9. Gilman Creek 1489606 User guide

Gilman Creek 1489606 User guide

ITM. / ART. 1489606
Assembly and Care Instructions
Instructions de montage et d'entretien
Instrucciones de ensamble y cuidado
Thank you for your purchase! If you encounter a problem,
PLEASE DO NOT RETURN THIS ITEM.
Contact us at [email protected] or (888)509-5381
Merci pour votre achat! Si vous rencontrez un problème,
VEUILLEZ NE PAS RETOURNER CET ARTICLE.
Contactez-nous à [email protected] ou (888)509-5381
¡Gracias por la compra! Si encuentra un problema,
POR FAVOR NO DEVUELVA ESTE ARTÍCULO.
Contáctenos en [email protected] o (888)509-5381
Teléfono no válido en México.
305 W High Ave. Ste. 1006 High Point, NC 27260
www.gilmancreek.com
CAUTION:
PLEASE READ ALL INSTRUCTIONS CAREFULLY BEFORE STARTING
ASSEMBLY PROCESS. IT IS RECOMMENDED TO USE TWO PEOPLE
WHEN ASSEMBLING AND REMOVING THE INSIDE BACKS OR THE
BASE OF THE FURNITURE.
ATTENTION :
BIEN LIRE TOUTES LES INSTRUCTIONS AVANT DE MONTER LE
PRODUIT. IL EST RECOMMANDÉ D'UTILISER DEUX PERSONNES
LORS DU MONTAGE ET DU RETRAIT DE L'INTÉRIEUR DU DOS OU
DE LA BASE DU MEUBLE.
PRECAUCIÓN:
LEA TODAS LAS INSTRUCCIONES CUIDADOSAMENTE ANTES
DE COMENZAR EL PROCESO DE MONTAR. SE RECOMIENDA
UTILIZAR DOS PERSONAS AL MONTAR Y QUITAR LOS RESPALDOS
INTERIORES O LA BASE DEL MUEBLE.
Leather Power Reclining Sectional
Canapé inclinable électrique en cuir
Sofá seccional reclinable de piel con sistema eléctrico
·2 people recommended for handling and assembly.
·2 personnes recommandées pour la manutention et le montage.
·2 personas recomendadas para manipulación y montaje.
IMPORTANT, RETAIN FOR FUTURE REFERENCE : READ CAREFULLY
IMPORTANT, À CONSERVER POUR DE FUTURS BESOINS DE RÉFÉRENCE : À LIRE SOIGNEUSEMENT
IMPORTANTE: CONSERVE PARA FUTURA REFERENCIA. LEA CUIDADOSAMENTE
·Do not sit on back rest.
·Ne vous asseyez pas sur le dossier.
·No se siente en el respaldo.
·Do not sit on arm rest.
·Ne vous asseyez pas sur l'accoudoir.
·No se siente en el reposabrazos.
WARNING
AVERTISSEMENT
ADVERTENCIA
2 MADE IN CHINA / FABRIQUÉ EN CHINE / HECHO EN CHINA
1 MADE IN CHINA / FABRIQUÉ EN CHINE / HECHO EN CHINA
1MADE IN CHINA / FABRIQUÉ EN CHINE /
HECHO EN CHINA
1MADE IN CHINA / FABRIQUÉ EN CHINE /
HECHO EN CHINA
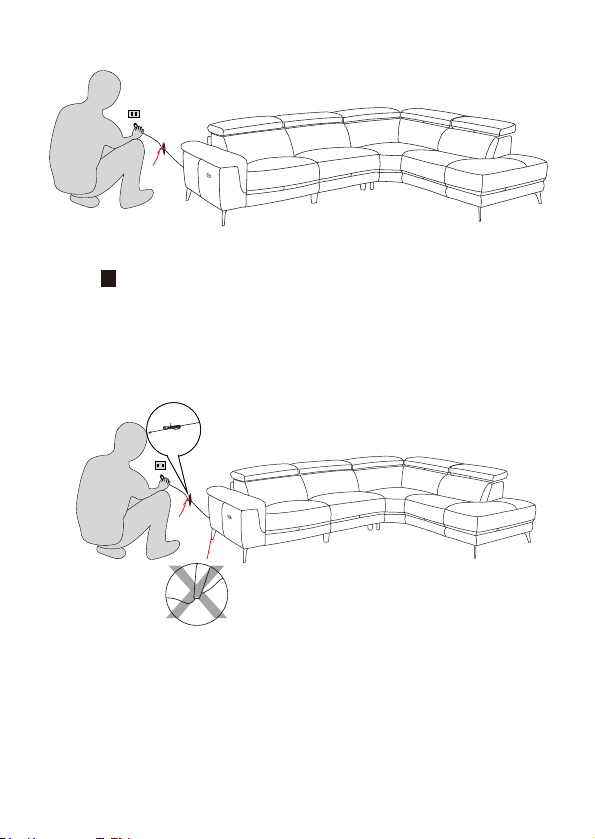
·Before using reclining furniture, check if the mechanism is restrained by a plastic strap. If so,
use scissors to remove.
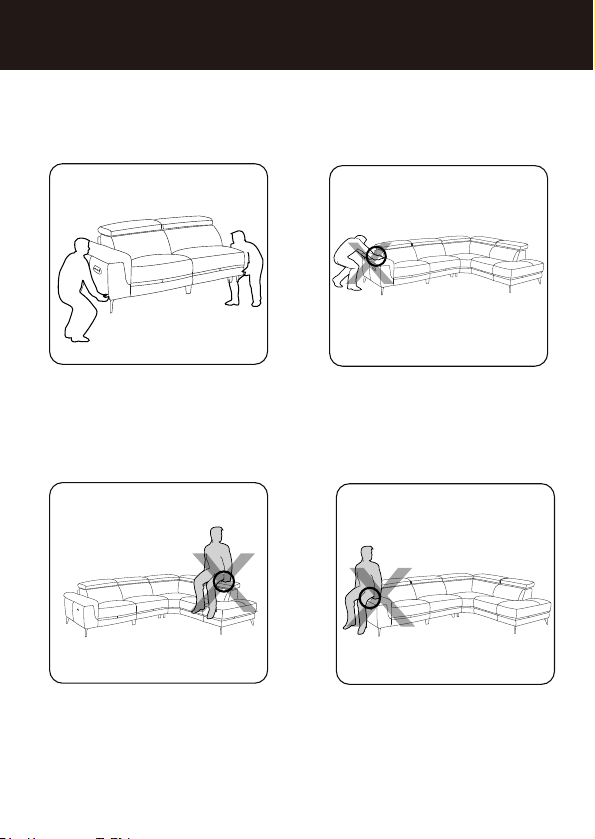
·Do not allow children to play with the mechanism.
·Only engage mechanism when the user is seated correctly.
·If squeaks are heard when reclining, lightly apply a store bought spray-on lubricant to all
hinges, joints and springs.
·Do not use power reclining furniture in the presence of flammable or explosive gases.
·Do not use in an overly humid environment.
·During the installation, the power supply must be disconnected. The power supply should
be connected only after the installation is complete.
·Avant d'utiliser un meuble inclinable, vérifier si le mécanisme est retenu par une attache
de plastique. Si c'est le cas, utiliser des ciseaux pour l'enlever.
·Ne pas laisser les enfants jouer avec le mécanisme.
·N'enclencher le mécanisme qu'une fois l'utilisateur bien assis.
·
Si le mécanisme grince pendant l'utilisation, lubrifier légèrement les charnières, les joints
et les ressorts avec un lubrifiant en aérosol ordinaire.
·Ne pas utiliser de meubles inclinables électriques en présence de gaz inflammables ou explosifs.
·
·
Ne pas utiliser dans un milieu trop humide.
Pendant l'installation, le cordon d'alimentation doit être débranché. Il ne doit être
branché qu'une fois l'installation terminée.
·Antes de utilizar los muebles reclinables, se debe revisar si el mecanismo está restringido por
algún plástico. De ser así, favor de utilizar tijeras para quitar.
·No permita que niños jueguen con el mecanismo.
·Solo utilice el mecanismo cuando el usuario esté sentado correctamente.
·Si se escuchan chirridos al reclinarse, aplique ligeramente un lubricante en aerosol a todas las
bisagras, juntas y resortes.
·No utilice muebles reclinables eléctricos en la presencia de gases inflamables o explosivos.
·No utilizar en un ambiente con demasiada humedad.
·Durante la instalación, la fuente de alimentación debe estar desconectada. La fuente de
alimentación solamente se debe conectar una vez que haya sido concluida la instalación.
WARNING
AVERTISSEMENT
ADVERTENCIA
4 MADE IN CHINA / FABRIQUÉ EN CHINE / HECHO EN CHINA
2 MADE IN CHINA / FABRIQUÉ EN CHINE / HECHO EN CHINA
x 3
x 2
c
a
b
x 2
Hardware List / Liste du matériel / Lista de hardware
3 MADE IN CHINA / FABRIQUÉ EN CHINE / HECHO EN CHINA
x 4
x 4
f
d
e
x 1
Left arm sofa
Canapé bras gauche
Sofá brazo izquierdo
Plastic legs
Pieds en plastique
Patas de plástico
Metal legs
1
Pieds en métal
1
Patas de metal
1
Metal legs
2
Pieds en métal
2
Patas de metal
2
Screw 1
Vis 1
Tornillo 1
Screw 2
Vis 2
Tornillo 2
Allen wrench
Clé allen
Llave allen
x 3
Allen wrench
Clé allen
Llave allen
Metal legs 1
Pieds en métal 1
Patas de metal 1
Screw 1
Tornillo 1
c
b
x 3
Hardware List / Liste du matériel / Lista de hardware
4 MADE IN CHINA / FABRIQUÉ EN CHINE / HECHO EN CHINA
x 6
x 6
f
d
e
x 1
Metal legs 2
Pieds en métal 2
Patas de metal 2
Screw 2
Vis 2
Tornillo 2
Chaise lounge
Méridienne
Sofá de tela
Vis 1
Tip back the sofa and remove hardware pack.
Inclinez le canapé et retirez le pack de matériel.
Incline el sofá y retire el paquete de herrajes.
1
Assembly
Assemblage
Ensamblado
5 MADE IN CHINA / FABRIQUÉ EN CHINE / HECHO EN CHINA
Install legs:
Attach all screws to the legs before fully tightening, using wrench and screwdriver fully
tighten in clockwise direction.
Installer les pieds:
Fixez toutes les vis aux pieds avant de serrer complètement, à l'aide d'une clé et d'un
tournevis, serrez complètement dans le sens des aiguilles d'une montre.
Instale patas:
Coloque todos los tornillos en las patas antes de apretarlos por completo, utilizando
una llave y un destornillador, apriete completamente en el sentido de las agujas del
reloj.
Left arm sofa
Canapé bras gauche
Sofá brazo izquierdo
a b
c
SCREWDRIVER'S NOT INCLUDED IN
HARDWARE PACKAGE.
LE TOURNEVIS N'EST PAS INCLUS DANS
L'EMBALLAGE DE MATÉRIEL.
EL DESTORNILLADOR NO ESTÁ INCLUIDO
EN EL PAQUETE DE HARDWARE.
HARDWARE PACKAGE
PACK MATÉRIEL
PAQUETE DE HARDWARE
de
f
ed
e
Tip back the sofa and remove hardware pack.
Inclinez le canapé et retirez le pack de matériel.
Incline el sofá y retire el paquete de herrajes.
2
6 MADE IN CHINA / FABRIQUÉ EN CHINE / HECHO EN CHINA
c
d
e
f
b
Chaise lounge
Méridienne
Sofá de tela
Install legs:
Attach all screws to the legs before fully tightening, using wrench and screwdriver
fully tighten in clockwise direction.
Installer les pieds:
Fixez toutes les vis aux pieds avant de serrer complètement, à l'aide d'une clé et
d'un tournevis, serrez complètement dans le sens des aiguilles d'une montre.
Instale patas:
Coloque todos los tornillos en las patas antes de apretarlos por completo,
utilizando una llave y un destornillador, apriete completamente en el sentido de
las agujas del reloj.
SCREWDRIVER'S NOT INCLUDED IN
HARDWARE PACKAGE.
LE TOURNEVIS N'EST PAS INCLUS DANS
L'EMBALLAGE DE MATÉRIEL.
EL DESTORNILLADOR NO ESTÁ INCLUIDO
EN EL PAQUETE DE HARDWARE.
HARDWARE PACKAGE
PACK MATÉRIEL
PAQUETE DE HARDWARE
d
e
7 MADE IN CHINA / FABRIQUÉ EN CHINE / HECHO EN CHINA
3
B
AC
D
C
A
Left arm headrest
Appui-tête du bras gauche
Reposacabezas del brazo
izquierdo
Right arm headrest
Appui-tête du bras droit
Reposacabezas del
brazo derecho
Put A into B, C into D.
Insérer A dans B, et C dans D.
Ponga A en B, C en D.
Please repeat above assembly instructions for chaise.
S'il vous plaît répéter les instructions d'assemblage ci-dessus pour la méridienne.
Por favor, repita las instrucciones de montaje anteriores para el sofá de tela.
Left arm sofa
Canapé bras gauche
Sofá brazo izquierdo
Chaise lounge
Méridienne
Sofá de tela
B.D
EF
Chaise lounge
Méridienne
Sofá de tela
3a. Align left arm sofa and chaise lounge and lift chaise lounge.
3b. Connect chaise lounge and left arm sofa with brackets E and F .
3a. Alignez le canapé bras gauche et la méridienne et soulevez la méridienne.
3b. Connectez la méridienne et le canapé bras gauche avec les supports E et F.
3a. Alinea el sofá brazo izquierdo y el sofá de tela y levante el sofá de tela.
3b. Conecte el sofá de tela y el sofá brazo izquierdo con los soportes E y F.
4
Left arm sofa
Canapé bras gauche
Sofá brazo izquierdo
8 MADE IN CHINA / FABRIQUÉ EN CHINE / HECHO EN CHINA
9 MADE IN CHINA / FABRIQUÉ EN CHINE / HECHO EN CHINA
·Any excess wiring should extend out from beneath the chair and be bundled and
secured with a plastic tie to secure. To avoid damage to the cord, do not store excess
length under the chair.
·Tout câblage en excès doit sortir du dessous de la chaise et être groupé et fixé avec
une attache en plastique pour le fixer. Pour éviter d'endommager le cordon, ne stockez
pas l'excès de longueur sous la chaise.
·Cualquier exceso de cableado debe extenderse desde debajo de la silla y ser atada
y asegurada con una brida de plástico para asegurarla. Para evitar dañar el cable, no
almacene un exceso de longitud debajo de la silla.
Insert plug into power outlet or surge protected power strip.
Brancher sur une prise de courant ou une barre multiprise avec
parasurtenseur.
Introduzca el enchufe en la toma de corriente o un tomacorriente
supresor de picos eléctricos.
5
Reminder:
Don't throw away plastic tie, keep it.
Rappel :
Ne jetez pas la cravate en plastique, gardez-la.
Recordatorio:
No tire la corbata de plástico, guárdela.
Disassembly
Démontage
Desmontaje
Disconnect the plug.
Débranchez la prise.
Desconecte el enchufe.
10 MADE IN CHINA / FABRIQUÉ EN CHINE / HECHO EN CHINA
12
Lift chaise lounge to take apart left arm sofa and
chaise lounge.
Soulevez la chaise longue pour démonter le canapé
bras gauche et la chaise longue.
Levante el diván para desmontar el sofá brazo
izquierdo y el diván.
Chaise lounge
Méridienne
Sofá de tela
Left arm sofa
Canapé bras gauche
Sofá brazo izquierdo
Remove legs:
Using wrench and screwdriver, remove all screws from the legs in counterclockwise
direction.
Retirez les pieds :
À l'aide d'une clé et d'un tournevis, retirez toutes les vis des pieds dans le sens
inverse des aiguilles d'une montre.
Quite las patas:
Utilice una llave y un destornillador para quitar todos los tornillos de las patas en
dirección contraria a las agujas del reloj.
a
c
d e
f
b
c
f
e
d
e d e d
b
11 MADE IN CHINA / FABRIQUÉ EN CHINE / HECHO EN CHINA
Distributed by:
Costco Wholesale Corporation
P.O. Box 34535
Seattle, WA 98124-1535
USA
1-800-774-2678
www.costco.com
Costco Wholesale Canada Ltd.*
415 W. Hunt Club Road
Ottawa, Ontario
K2E 1C5, Canada
1-800-463-3783
www.costco.ca
*faisant affaire au Québec sous
le nom les Entrepôts Costco
Importado por:
Importadora Primex S.A. de C.V.
Blvd. Magnocentro No. 4
San Fernando La Herradura
Huixquilucan, Estado de México
C.P. 52765
RFC: IPR-930907-S70
(55)-5246-5500
www.costco.com.mx
Seat cushion open
Coussin de siège ouvert
Abrir el cojin del asiento
Seat cushion close
Fermer coussin de siège
Cerrar el cojin de asiento
Location of USB port
Emplacement du port USB
Ubicación del puerto USB
64#
· Épousseter périodiquement pour prolonger la durée de vie du cuir.
· Pour le nettoyage général, utiliser un linge blanc doux, propre et humide.
·Nettoyer périodiquement les appuie-têtes et les accoudoirs avec un nettoyant doux pour les
meubles en cuir afin d'empêcher l'accumulation de graisses corporelles et capillaires pouvant
endommager le cuir avec le temps.
· Pour les taches plus tenaces, utiliser un nettoyant doux pour le cuir ou consulter un spécialiste
du cuir.
· El desempolvar periódicamente prolongará la vida de la piel.
· La limpieza en general se puede realizar con un paño blanco, limpio, suave, y húmedo.
·Se puede utilizar periódicamente un limpiador para muebles de piel sobre las cabeceras
y reposabrazos.Esto ayudará prevenir el acumulamiento de aceites de piel o cabellera
que con el paso del tiempo pueden llegar a dañar la piel.
·Para manchas más difíciles, puede utilizar un limpiador suave para piel o puede
consultarlo con un técnico de piel profesional.
·Periodic dusting will prolong the life of the leather.
General cleaning can be done with a damp, clean, soft white cloth.
Periodically, a mild leather home furnishings cleaner can be used on the headrests and armrests.
This will help prevent buildup of body and hair oils which can harm the leather over time.
For more stubborn stains, a mild leather cleaner can be used or consult a professional leather
technician.
·
·
·
1MADE IN CHINA / FABRIQUÉ EN CHINE / HECHO EN CHINA
12 MADE IN CHINA / FABRIQUÉ EN CHINE / HECHO EN CHINA
CARE & MAINTENANCE OF LEATHER
ENTRETIEN ETNETTOYAGE DU CUIR
CUIDADO Y MANTENIMIENTO DE CUERO
AUSTRALIA: Our goods come with guarantees that cannot be excluded under the
Australian Consumer Law. You are entitled to a replacement or refund for a major failure
and for compensation for any other reasonably foreseeable loss or damage. You are
also entitled to have the goods repaired or replaced if the goods fail to be of
acceptable quality and the failure does not amount to a major failure.
AUSTRALIE : Nos articles sont offerts avec des garanties qui ne peuvent connaître
d'exclusions au regard de la loi australienne sur la protection des consommateurs. Vous
avez droit au remplacement ou au remboursement en cas de défaillance majeure de
votre article ainsi qu'à une compensation en cas de perte ou de dommage prévisible.
Vous avez aussi droit à la réparation ou au remplacement de l'article s'il n'est pas d'une
qualité acceptable et que la défaillance n'est pas majeure.
AUSTRALIA: Nuestros productos cuentan con garantías que no se pueden excluir bajo
las Leyes del Consumidor de Australia. Usted tiene derecho a un cambio o devolución
en caso de un fallo importante y a una compensación por cualquier otra pérdida o
daño razonablemente previsible. También tiene derecho a la reparación o reemplazo
de los bienes, si éstos no cumplen con una calidad aceptable y el fallo no constituye un
fallo importante.
·1-year warranty on leather against splitting, peeling, and / or tearing.
·1-year warranty on internal and external frame structure.
·1-year warranty on cushioning material, seat springs and mechanism.
·Garantie 1 an sur le cuir contre le fractionnement, la desquamation et / ou la déchirure.
·Garantie 1 an sur la structure du châssis interne et externe.
·Garantie 1 an sur le matériel de rembourrage, les ressorts de siège et le mécanisme.
·Garantía de 1 año en el cuero contra la división, descamación, y / o lagrimeo.
·Garantía de 1 año en la estructura de la trama interna y externa.
·Garantía de 1 año en el material de relleno, muelles del asiento y el mecanismo.
13 MADE IN CHINA / FABRIQUÉ EN CHINE / HECHO EN CHINA
PRODUCT WARRANTY
GARANTIE DU PRODUIT
GARANTÍA PARA EL PRODUCTO
Gilman Creek L型電動沙發
14 MADE IN CHINA / FABRIQUÉ EN CHINE / HECHO EN CHINA
產品編號:1489606
·搬運和組裝推薦 2 人。
重要,保留以備將來參考:仔細閱讀
·不要坐在靠背上。 ·不要坐在扶手上。
警 告
2 MADE IN CHINA / FABRIQUÉ EN CHINE / HECHO EN CHINA
15 MADE IN CHINA / FABRIQUÉ EN CHINE / HECHO EN CHINA
1MADE IN CHINA / FABRIQUÉ EN CHINE /
HECHO EN CHINA
1MADE IN CHINA / FABRIQUÉ EN CHINE /
HECHO EN CHINA
4 MADE IN CHINA / FABRIQUÉ EN CHINE / HECHO EN CHINA
16 MADE IN CHINA / FABRIQUÉ EN CHINE / HECHO EN CHINA
MADE IN CHINA / FABRIQUÉ EN CHINE / HECHO EN CHINA
產品編號:1489606
皮革護理:
真皮:如果您選擇的是真皮家具,
請注意天然皮質的特征,它不可能有兩
張一模一樣的皮。儘管我們在選皮的時
候盡力挑選,我們不可能遮蓋掉皮質天
然的印記。這些是真皮產品最真實最生
動的證明。
光照:
為避免褪色,請勿將沙發直接放在
陽光直射的地方,或及時關上窗簾或不
要將沙發放置在窗戶邊。
日常清理:
即使是輕微的灰塵也會讓沙發顏色
顯得暗沉而失去光澤感。因此需經常對
沙發進行吸塵或者用軟刷進行清掃。請
勿用帶纖維或帶金屬的刷子進行清潔。
日常的表層灰塵用棉布直接擦拭,
如遇到污點,請先用濕布擦拭乾淨後再
用乾的棉布擦乾。定期的清潔和用合適
的品牌皮革保養劑可以延長家具的使用
壽命。
除非特別註明一般情況下不建議濕
洗。這可能會導致產品失去本色,當填充
物被浸濕後,最後會導致染色或造成內部
結構的破壞。小面積的染色可以直接用合
適的清潔劑去除,在家具中的“舒適便失
去了現代的設計感”再普通的外觀都是經
過測試改良的。這個包括對沙發的靠背坐
墊扶手的填充,以維持沙發的形狀和平
衡。
濕度調節:
如果您的家具是擺放在特別乾燥的地
方,比如正對著散熱器,所以你可能會希
望可以對沙發皮進行濕度調節。濕度調節
一年進行一次,請不要在沙發上使用噴霧
拋光劑或其他化學產品,同時應避免洗革
皂或其他有腐蝕性的清潔劑。
濕洗:
17 MADE IN CHINA / FABRIQUÉ EN CHINE / HECHO EN CHINA
注意事項:
沙發放置在平整的地面上,腳底部
最好墊放襯墊,防止移動損傷地板。
沙發擺放應距離牆面5-10cm,防止
沙發輿牆面擠壓,摩擦,發生損壞。
使用前應用乾淨軟布擦淨沙發表面
的灰塵,并保持清潔。
新沙發送至您家中,請經常保持室
內良好的通風條件,這有助於沙發本身
氣味的快速散發。若不立即使用,請拆
開包裝,放置乾燥通風環境,防止發
霉。
應避免在沙發座面上跳動,以免局
部受壓後變形影響使用。
應避免帶有銳角或者刀具類器具接
觸表面,防止劃傷皮面。
請管制好您的寵物,以防寵物抓咬
沙發引起損傷。
避免腐蝕性化學液漬或劣質去清潔
劑接觸表面,從而造成皮面褪色,老
化,開裂等損壞。
使用時請不要坐在沙發的靠背或者
扶手上。強力的擠壓會損壞框架。
搬動沙發時請不要抓住軟墊,軟扶
手,軟靠背用勁,會拉破縫合處,或因
推拉沙發而劃傷您的地板。應托沙發底
架,平抬輕放,謹防碰撞。
為助於保持沙發的色彩,防止皮質
變硬,龜裂,請將您的沙發放置在距暖
氣或者其他熱源(冷氣源)至少40cm以
外的地方并避免陽光的直接照射,以免
造成局部褪色或泛色等現象。
產品編號:1489606
如果有發現零星線頭,不可用手拉
扯,請用剪刀將之修平。
請不要將報紙放在沙發上,報紙上
的油印會染在沙發面套上把沙發弄髒清
洗不掉。
沙發在使用中長久性,美觀性與
否,除產品本身的優劣外,還需要用戶
精心的保養,每個細節都值得關注。
A.沙發避免暴曬、雨淋、敲擊、碰
撞和帶腐蝕性的化學劑放在一起。
B. 沙發應擺放在相對濕度
30%-80%的環境下,以免沙發受潮變形腐
爛。
C. 清潔方法:用清水擦洗後,通風
陰涼環境中自然晾乾或使用專用吸塵器
清潔沙發表面,禁止在水中浸泡和在陽
光下暴曬。
D. 安全性:安全無毒。
E.環保性:使用對人和環境無害的環
保材料。
在躺沙發時,不要雙臂壓在靠背之
上,以免受壓後影響靠背外觀。
x 3
x 2
內 六 角 扳 手
c
a
b
x 2
硬 件 清 單
18 MADE IN CHINA / FABRIQUÉ EN CHINE / HECHO EN CHINA
x 4
x 4
f
d
e
x 1
左臂沙發
金屬腿 1
金屬腿 2
螺 絲 1
螺 絲 2
塑料腿
x 3
內 六 角 扳 手
金屬腿 1
螺 絲 1
c
b
x 3
硬 件 清 單
19 MADE IN CHINA / FABRIQUÉ EN CHINE / HECHO EN CHINA
x 6
x 6
f
d
e
x 1
金屬腿 2
螺 絲 2
躺 椅

Other Gilman Creek Indoor Furnishing manuals

Gilman Creek 1695623 User guide

Gilman Creek

Gilman Creek 1695623 User guide

Gilman Creek 1644978 User guide

Gilman Creek

Gilman Creek 1644978 User guide

Gilman Creek 336765 User manual

Gilman Creek

Gilman Creek 336765 User manual

Gilman Creek 1695448 User manual

Gilman Creek

Gilman Creek 1695448 User manual

Gilman Creek 1646048 User guide

Gilman Creek

Gilman Creek 1646048 User guide

Gilman Creek 1363152 User manual

Gilman Creek

Gilman Creek 1363152 User manual

Gilman Creek Rachel 341960 User manual

Gilman Creek

Gilman Creek Rachel 341960 User manual

Gilman Creek 1656670 User guide

Gilman Creek

Gilman Creek 1656670 User guide

Gilman Creek 1653377 User guide

Gilman Creek

Gilman Creek 1653377 User guide

Gilman Creek 135618 User guide

Gilman Creek

Gilman Creek 135618 User guide

Gilman Creek 385322 User manual

Gilman Creek

Gilman Creek 385322 User manual

Gilman Creek 661219 User guide

Gilman Creek

Gilman Creek 661219 User guide

Gilman Creek 1681431 User manual

Gilman Creek

Gilman Creek 1681431 User manual

Gilman Creek 1570194 User guide

Gilman Creek

Gilman Creek 1570194 User guide

Popular Indoor Furnishing manuals by other brands

L.L.Bean HOME Mission Cabinet Small quick start guide

L.L.Bean

L.L.Bean HOME Mission Cabinet Small quick start guide

Walker Edison BU48RAD3D Assembly instructions

Walker Edison

Walker Edison BU48RAD3D Assembly instructions

Walker Edison BTMP Assembly instructions

Walker Edison

Walker Edison BTMP Assembly instructions

Forte SWXK311 Assembling instructions

Forte

Forte SWXK311 Assembling instructions

Lorell LLR48847 Assembly instructions

Lorell

Lorell LLR48847 Assembly instructions

Inspire HANAH 199-622Q Assembly instructions

Inspire

Inspire HANAH 199-622Q Assembly instructions

BLACK RED WHITE LOFT B156-KOM3S/90 Assembly instructions

BLACK RED WHITE

BLACK RED WHITE LOFT B156-KOM3S/90 Assembly instructions

Enwork Landing installation instructions

Enwork

Enwork Landing installation instructions

WASHTOWER WSCS146 quick start guide

WASHTOWER

WASHTOWER WSCS146 quick start guide

Heart of House Westbury 404/2208 Assembly instructions

Heart of House

Heart of House Westbury 404/2208 Assembly instructions

Balkene Home Kingsmen 63365 instructions

Balkene Home

Balkene Home Kingsmen 63365 instructions

Walmart BH15-092-099-20 Assembly instruction

Walmart

Walmart BH15-092-099-20 Assembly instruction

Oxford Garden ISLAY Assembly instructions

Oxford Garden

Oxford Garden ISLAY Assembly instructions

Ronbow E025023 Installation and care guide

Ronbow

Ronbow E025023 Installation and care guide

Better Homes and Gardens Espresso Finish Instruction booklet

Better Homes and Gardens

Better Homes and Gardens Espresso Finish Instruction booklet

Ostermann e-Desk 1+2 Design and operating instructions

Ostermann

Ostermann e-Desk 1+2 Design and operating instructions

ROOMS TO GO E180D-30 Assembly instruction

ROOMS TO GO

ROOMS TO GO E180D-30 Assembly instruction

Argos Oslo Oak Table 603/3071 Assembly instructions

Argos

Argos Oslo Oak Table 603/3071 Assembly instructions

manuals.online logo
manuals.online logoBrands
  • About & Mission
  • Contact us
  • Privacy Policy
  • Terms and Conditions

Copyright 2025 Manuals.Online. All Rights Reserved.