Godex HD830i User manual

HD830i BARCODE PRINTER
USER MANUAL
: HD830i
: Rev.A
: 2017.03
: 920-016611-00
User Manual
Version
Issue Date
P/N

1 Ba rc o d e Printe r 1
1- 1 Pa c ka g e Co nta ins ........................................................................................................................................ 1
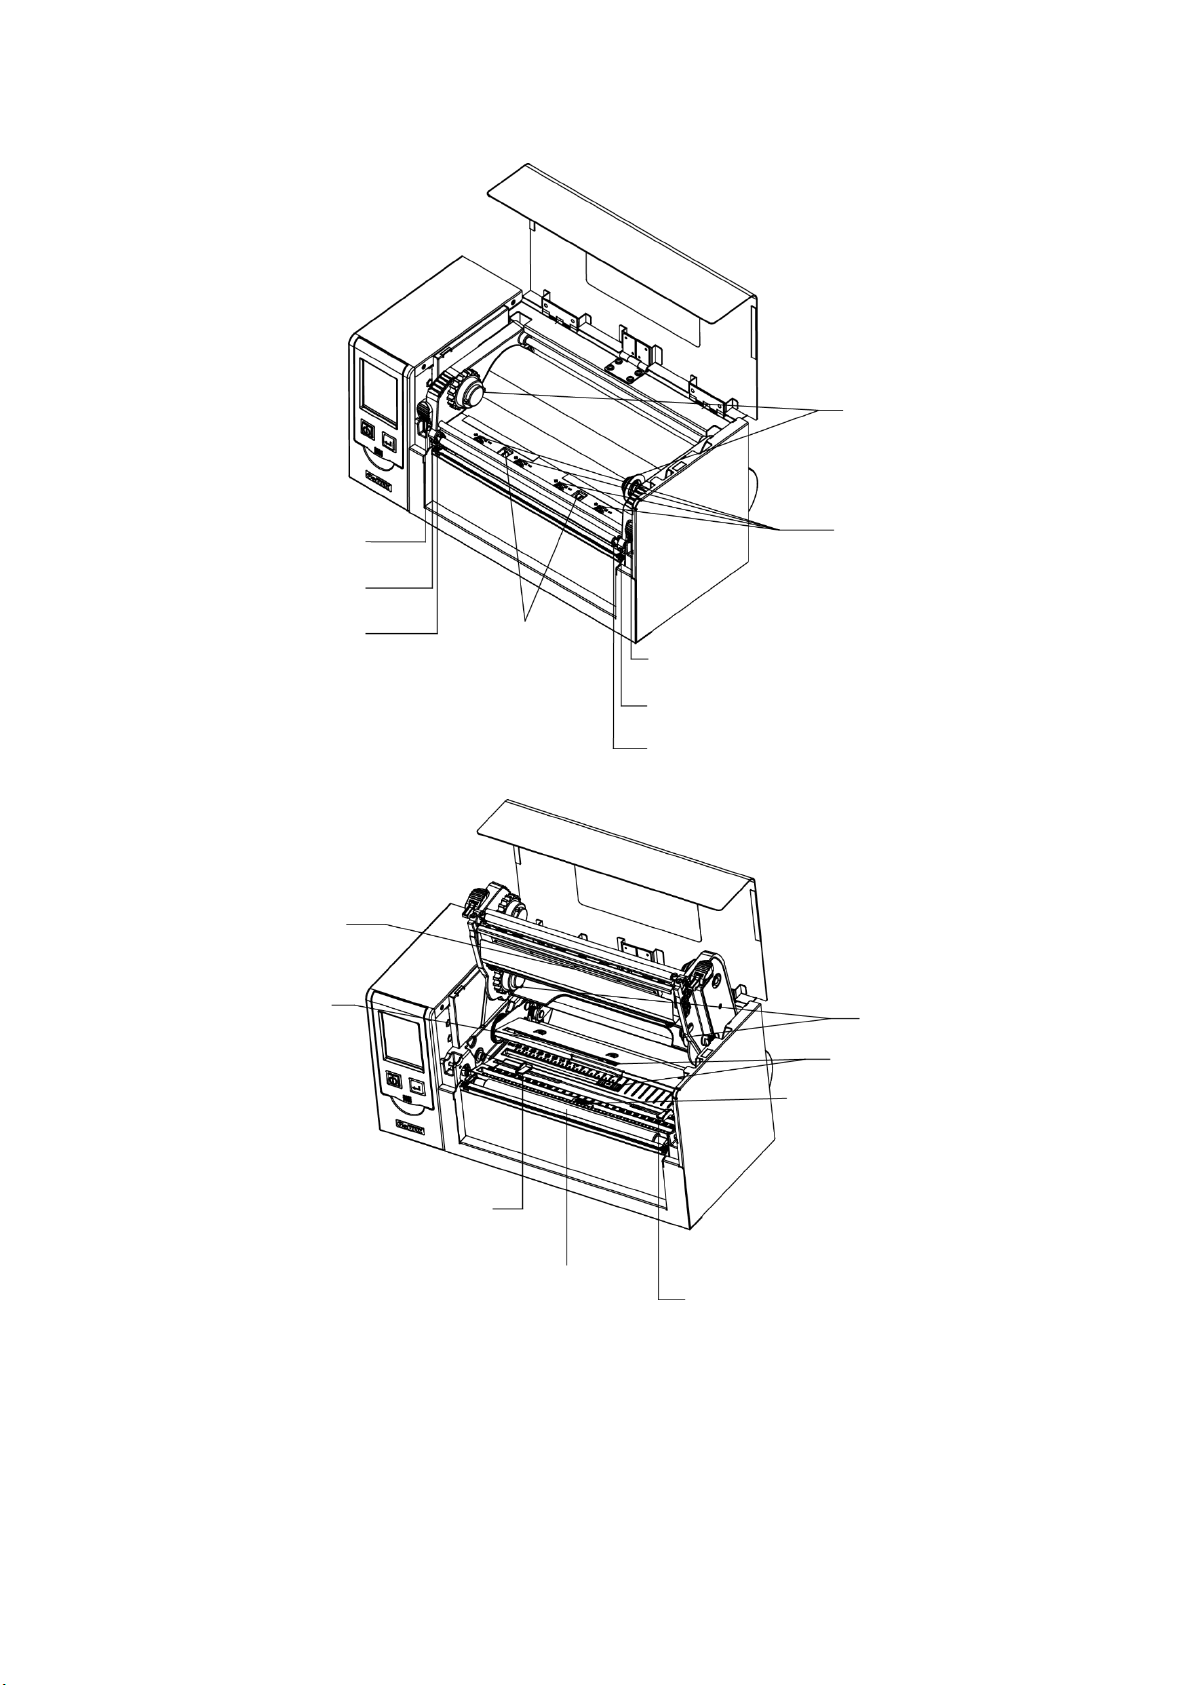
1- 2 Ba rc o d e Printe r Intro duc tio n ....................................................................................................................... 2
2 Ba rc o d e Printe rInsta lla tio n .................................................................................................................................. 4
2- 1 Me d ia Insta lla tio n.......................................................................................................................................... 4
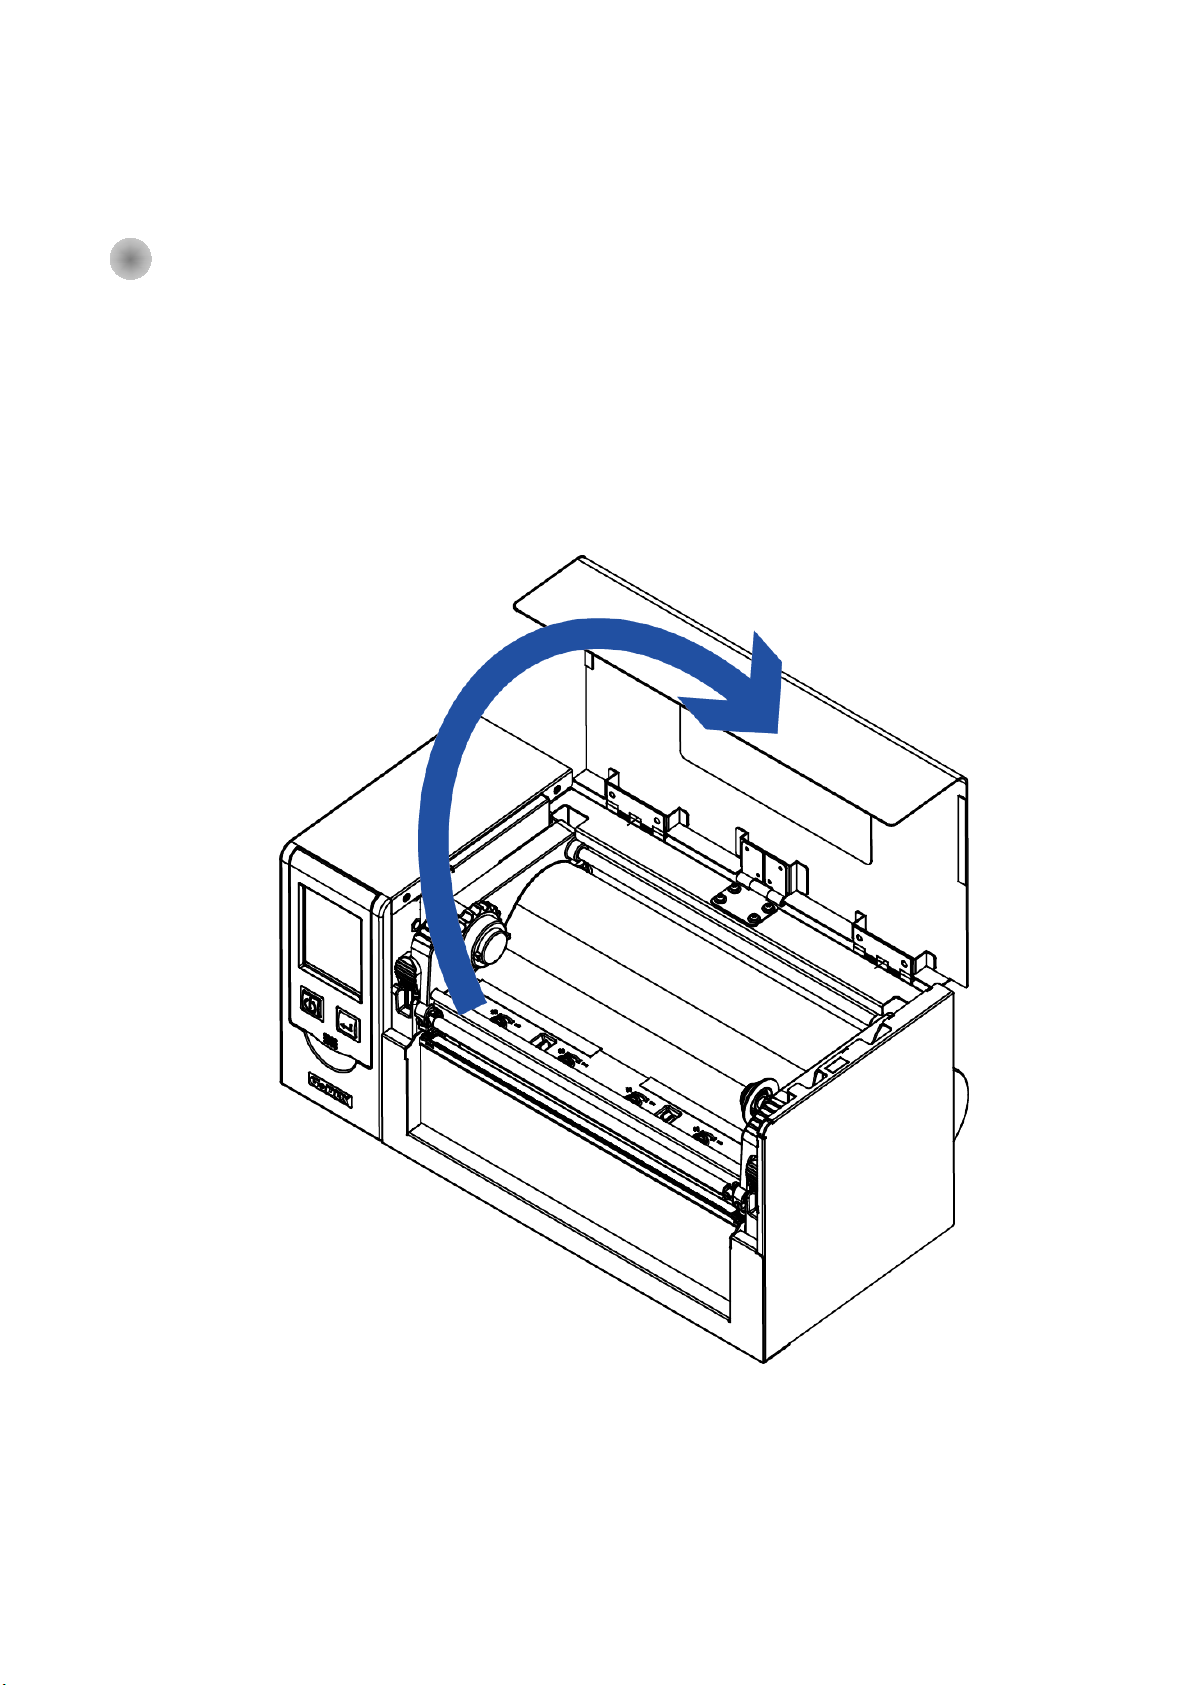
2- 2Printing Me c ha nism O pe ning ...................................................................................................................... 5
2- 3Rib b o n Insta lla tio n.......................................................................................................................................... 6
(4 inc h Rib b o n ) .................................................................................................................................................... 6
(8 inc h Rib b o n ) .................................................................................................................................................... 7
2- 4 La b e l Insta lla tio n ........................................................................................................................................... 9
2- 5 C o nne c tio n with PC .................................................................................................................................... 12
2- 4 Drive r a nd G o la b e l Insta lla tio n................................................................................................................. 13
2- 10 Wiza rd C D O the r C ho ic e Insta lla tio n.................................................................................................. 16
3 Ba rc o d e Printe r O p e ra tio n................................................................................................................................ 19
3- 1 Ba rc o de Printe r O pe ra tio n Inte rfa c e ....................................................................................................... 19
3- 3 LA N Se tting O p e ra tio n Instruc tio n ............................................................................................................ 25
Ma in Ma nu .......................................................................................................................................................... 25
3- 5 Erro r Me ssa g e .............................................................................................................................................. 32
4 Insta lling the Ne tSe tting so ftwa re ................................................................................................................ 37
4- 2 The Inte rfa c e o f Ne tSe tting ..................................................................................................................... 39
5 Ba rc o d e Printe r Op tio ns .................................................................................................................................... 46
5- 1 Pre -ste p fo r O p tio ns Insta lla tio n .............................................................................................................. 46
5- 2 C utte r Insta lla tio n ........................................................................................................................................ 47
6 Ma inte na nc e a nd Ad justme nt......................................................................................................................... 51
6- 1 Print He a d Re pla c e m e nt............................................................................................................................ 52
6- 2 Print Line A djustm e nt .................................................................................................................................. 53
6- 4 Print He a d C le a ning .................................................................................................................................... 55
6- 5 Print He a d Pre ssure Adjustm e nt ............................................................................................................... 55
6- 6 Rib b o n Wrinkle A djustm e nt....................................................................................................................... 57
6- 7 C utte r Erro r Tro ub le Sho o ting .................................................................................................................... 57
6- 8 Tro ub le Sho o ting .......................................................................................................................................... 59
Appe ndix - Printe r Sp e c ific a tio n ..................................................................................................................... 60
Appe ndix - C o m m unic a tio n Po rt Sp e c ific a tio n........................................................................................... 61
Appe ndix – Wi-Fi Se tting…………………………………………………………………………………………….59
Appe ndix – Blue to oth Se tting …..………………………………………………………………………………….66
Appe ndix – FILE MANIPULATIO N WHEN USING USB STIC K…………………………………………………….78


FC C C O MPLIANC E STATEMENT
FO R AMERIC AN USERS
Fe d e ra l C o mmunic a tio n C o mmissio n Inte rfe re nc e Sta te me nt
This e q uip me nt ha s b e e n te ste d a nd fo und to c o mp ly with the limits fo r a C la ss B d ig ita l d e vic e , p ursua nt to
Pa rt 15 o f the FC C Rule s. The se limits a re d e sig ne d to p ro vid e re a so na b le p ro te c tio n a g a inst ha rmful
inte rfe re nc e in a re sid e ntia l insta lla tio n. This e q uip me nt g e ne ra te s, use s a nd c a n ra d ia te ra d io fre q ue nc y
e ne rg y a nd , if no t insta lle d a nd use d in a c c o rd a nc e with the instruc tio ns, ma y c a use ha rmful inte rfe re nc e
to ra d io c o m munic a tio ns. Ho we ve r, the re is no g ua ra nte e tha t inte rfe re nc e will no t o c c ur in a p a rtic ula r
insta lla tio n. If this e q uip me nt d o e s c a use ha rmful inte rfe re nc e to ra d io o r te le visio n re c e p tio n, whic h c a n b e
d e te rmine d b y turning the e q uip me nt o ff a nd o n, the use r is e nc o ura g e d to try to c o rre c t the inte rfe re nc e
b y o ne o f the fo llo wing me a sure s:
● Reorient or relocate the receiving antenna.
● Increase the separation between the equipment and receiver.
● Connect the e q uip me nt into a n o utle t o n a c irc uit d iffe re nt fro m tha t to whic h the re c e ive r is c o nne c te d .
● Consult the dealer or an experienced radio/TV technician for help.
This d e vic e c o mp lie s with Pa rt 15 o f the FC C Rule s. O p e ra tio n is sub je c t to the fo llo wing two c o nd itio ns:
(1) This d e vic e ma y no t c a use ha rmful inte rfe re nc e , a nd (2) this de vic e must a c c e p t a ny inte rfe re nc e re c e ive d,
inc luding inte rfe re nc e tha t ma y c a use und e sire d o p e ra tio n.
FC C C a utio n: Any c ha ng e s o r mo d ific a tio ns no t e xp re ssly a p p ro ve d b y the p a rty
re sp o nsib le fo r c o mp lia nc e c o uld vo id the use r’ s a utho rity to o p e ra te this e q uip me nt.
TO WHIC H THIS DEC LARATIO N RELATES
IS IN C O NFO RMITY WITH THE FO LLO WING STANDARDS
FC C C FR Title 47 Pa rt 15 Sub p a rt B:2015 C la ss B,C ISPR 22:2008 ANSI C 63.4: 2014 IC ES-003 Issue 6:2016, C la ss B
IEC 60950-1:2005(Se c o nd Ed itio n)+Am1:2009+Am2:2013
EN55024:2010+A1:2015
EN55032:2012+AC :2013,C la ss B
EN61000-3-2:2014
EN61000-3-3:2013
AS/ NZS C ISPR 22:2009+A1:2010

SAFETY INSTRUCTIONS Please read the following instructions carefully.
Keep the equipment away from humidity.
Before you connect the equipment to the power outlet, please check the
voltage of the power source.
Make sure the printer is off before plugging the power connector into
the power jack.
It is recommended that you connect the printer to a surge protector to
prevent possible transient overvoltage damage.
Be careful not to get liquid on the equipment to avoid electrical shock.
For safety and warranty reasons, ONLY qualified service personnel
should open the equipment.
Do not repair or adjust energized equipment under any circumstances.
CAUTION
Danger of explosion if battery is incorrectly replaced. Replace only with the equivalent
type recommended by the manufacturer.
Dispose of used batteries according to the manufacturer’s instructions.
Only use with designated power supply adapter model.
Changes or modifications not expressly approved by the party responsible for
compliance could void the user's authority to operate the equipment.
Specifications are subject to change without Note

1
1 Ba rc o d e Printe r
1- 1 Pa c ka g e Co nta ins
Ple a se c he c k tha t a ll o f the fo llo wing ite m s a re inc lud e d with yo ur printe r.
(Pa c ka g e c o nte nt a nd Lo g o style m a y va ry pe r re g io n。)
Ba rc o d e Printe r
HD830i
Me d ia Sa mp le USB c a b le Q uic k Sta rt G uid e
Rib b o n Po w e r Co rd C D
(EU)
1.5 inc h/ 3 inc h Ad a p to r
Rib b o n Sha ft
La b e l Ro ll Ho ld e r Me d ia Ho ld e r Ba se Me d ia Sha ft
Power Cord
(US)
Label Roll Stopper

2
1- 2 Ba rc o d e Printe r Intro duc tio n
Fro nt Vie w
Re a r Vie w
(Inte rfa c e mig ht d iffe re d p e r O p tio na l inte rfa c e )
Paper Path
Calibration Key
USB 2.0
Power Plug
Power Switch
Top Cover
Front Panel
Touch Screen
Power Key
Feed Key
RS-232
BT/WiFi (Optional)
USB HOST
Parallel (Optional)
Ethernet
Media Damper

3
O p e n To p C o ve r
Ribbon Rewind
TPH Pressure Adjust knob
Movable Media Sensor
TPH Module
TPH Module
Hook Print Frame Hook (Right)
Print Line Adjust Knob (Right)
Ribbon Tension Adjust Knob (Right)
Print Frame Hook (Left)
Print Line Adjust Knob. (Left)
Ribbon Tension Adjust Knob. (Left)
Movable See Through Sensor
Ribbon Supply
Platen
Roller
Label Width Adjust Holder
(Left)
Paper
Damper
Label Width Adjust Holder
(Right)

4
2 Ba rc o de Printe rInsta lla tio n
2- 1 Me d ia Insta lla tio n
Lift up the to p c o ve r

5
2- 2 Printing Me c ha nism O p e ning
Push the Print fra me ho o k o n the sid e to he a d up the p rint fra me .
Lift up the
print frame
Print Frame Hook
(Right)
Print Frame
Hook (Left)
Push
Push

6
2- 3 Rib b o n Insta lla tio n
(4 inc h Rib b o n )
Plug a ne w rib b o n ro ll into the rib b o n Sha ft
Insta ll the e mp ty rib b o n c o re into rib b o n sha ft
Stic k the rib b o n with the Rib b o n Re wind units a nd ro lling 2~3 c yc le s.
New ribbon roll
Ribbon Shaft
Ribbon Supply
Ribbon Rewind
Ribbon shaft Empty Ribbon Core
Follow the direction
Rolling 2~3 cycles

7
(8 inc h Rib b o n )
Insta ll the e mp ty rib b o n c o re into rib b o n sha ft
Stic k the rib b o n with the Rib b o n Re wind units a nd ro lling 2~3 c yc le s
Ribbon Supply
Ribbon Rewind
Follow the direction
Ribbon shaft New ribbon roll
Ribbon shaft Empty Ribbon Core
Rolling 2~3 cycles

8
Insta ll the Rib b o n into the Ba rc o de Printe r
Fo llo w the b e lo w d ra wing to insta ll the rib b o n in p o sitio n.
Rolling to flat surface.
Put the Ribbon Rewind Assy into
position

9
2- 4 La b e l Insta lla tio n
La b e l Ro ll A ss’y
Put the la b e l ro ll into me d ia sp ind le a nd the n insta ll the la b e l ro ll sto p p e r o n the b o th sid e to ma ke the
me d ia ro lle r in p o sitio n.
La b e l Ho lde r Sta nd
Fo llo w the Arro w ma rk a nd No . to
a sse m b le the sta nd .
La b e l ro ll
sto p p e r
Me d ia Sp ind le
La b e l Ro ll
Fo llo w the d ire c tio n to se c ure the c o re a da p to r
Fo llo w the Arro w ma rk a nd No . to
a sse m b le the sta nd .

10
La b e l Insta lla tio n
Ste p 1. Fo llo w ing the a rro w ma rk a nd No . to p ut the la b e l ro ll ho ld e r into p o sitio n.
Ste p 2. Fo llo w ing the b e lo w a rro w ma rk a nd d ire c tio n to p ut the la b e l ro ll into p o sitio n.
Ste p 3. Put the la b e l ro ll into la b e l ro ll sta nd .
Hook
Position Pin

11
Ste p 4. Put the la b e l p a ss thro ug h the la b e l g uid e a nd the n a d just the suita b le la b e l wid th
a c c o rd ing to .
See Through Sensor
Reflective Sensor
Label Guide (Left)
Label Guide (Right)
Outside Label
Roll Installation
Fanfold paper
Installation
Inside Label Roll
Installation

12
2- 5 C o nne c tio n with PC
1. Ma ke sure the Ba rc o d e Printe r p o we r is in o ff sta tus.
2. Put the p o we r c o rd o ne sid e o n the p o we r p lug , o ne sid e o n the p o we r a d a p to r.
3. Co nne c t the tra nsmissio n c a b le in b e twe e n PC a nd p rinte r (The c a b le mig ht b e d iffe re d a c c o rd ing
to o p tio n se le c te d ) .
4. Afte r the m e d ia (rib b o n )insta lla tio n, the n p o we r o n the p rinte r, wa it the sta tus turne d to re a d y.
HD830i Ba rc o d e Printe r
(The inte rfa c e mig ht b e d iffe re d up o n
the o p tio ns b e e n se le c te d )
B1
Power
cord
B2
Power cord
B2
Power Socket
A2
USB port
A1
USB port
B1
Power
A1
USB port
A2
USB port

13
2- 4 Drive r a nd G ola b e l Insta lla tio n
Ste p .01 Inse rt the Sup e r Wiza rd C D in the C D/ DVD d rive o f the ho st c o mp ute r a nd the
insta lla tio n p ro g ra m sho uld p o p up a uto ma tic a lly. Yo u w ill se e the We lc o me sc re e n
first. O n the We lc o m e sc re e n, c ho o se “ STANDARD INSTALLATIO N” .
Ste p .02 The w iza rd will the n a sk yo u to ma ke sure yo ur USB a nd p o we r c a b le s a re c o nne c te d
a nd tha t the p o we r is turne d o n. The n c lic k “ NEXT”.
Ste p .03 The ne xt sc re e n yo u w ill se e is, “ Insta ll the G o La b e l So ftw a re a nd Wind o w s d rive r” . C lic k
“ NEXT” to c o ntinue .
NO TE
* If the Sup e r Wiza rd p ro g ra m d id no t run a uto ma tic a lly, yo u c a n e ithe r turn o n the “ Auto -run” se tting
fo r yo ur CD/ DVD d rive r o r d o ub le -c lic k the ic o n o f CD/ DVD d rive r to run the p ro g ra m ma nua lly.

14
Ste p .04 As the p rinte r d rive r a nd G o La b e l a re insta lling , a sc re e n will d isp la y a p ro g re ss b a r.
While d o wnlo a d ing c o mp le te d yo u w ill se e Insta lla tio n c o mp le te d . Clic k “ NEXT” to
c o ntinue .
Ste p .05 Yo u c a n a lso p rint a te st la b e l. If d o n’ t p rint a te st la b e l, the sc re e n d isp la y a s ste p 6.
No te
* If yo u ne e d m o re re so urc e s, to o ls o r re fe re nc e d o c ume nts, yo u c a n a lso find the m o n Sup e r Wiza rd
C D. Just c lic k “ O the r C ho ic e s” o n the We lc o me Sc re e n to a c c e ss the file s.

15
Ste p .06 O nc e the insta lla tio n is c o mp le te , yo u c a n sta rt to ma ke a nd p rint la b e ls with G o La b e l
o r thro ug h the p rinte r d rive r.
Other manuals for HD830i
1
Table of contents
Other Godex Printer manuals

Godex
Godex GE300 User manual

Godex
Godex EZ-2200 User manual

Godex
Godex EZ-2000 PLUS User manual

Godex
Godex EZ-4TKP User manual

Godex
Godex EZ-2P User manual

Godex
Godex RT860i User manual

Godex
Godex MX20 User manual

Godex
Godex EZ-1000 Plus Operating and maintenance manual

Godex
Godex RT200i User manual

Godex
Godex EZ-2 User manual

Godex
Godex EZPi-1200 User manual

Godex
Godex EZPi-1200 User manual

Godex
Godex MX20 User manual

Godex
Godex BP2250i User manual

Godex
Godex C-680 FlatJet Manual

Godex
Godex EZ-1105P series User manual

Godex
Godex EZ-4206 User manual

Godex
Godex EZ-2P User manual

Godex
Godex EZ-DT-2 User manual

Godex
Godex CI-4040 User manual