GPI OGM-DPS Series Instructions for use

Owner’s Operation Manual
Operation Manual - Gpi’s OGM-DPS Series
Preset Module
Oval Gear Flow
Meter
Preset Module
Oval Gear Flow
Meter
Please read and retain this instruction manual to assist you in the operation and maintenance of this product.
This manual contains connection and operating instructions for the OGM-DPS model
Models with a Liquid Crystal Display have an additional LCD instruction manual supplied. If you need further
assistance, contact your local representative or distributor for advice.
This Flow Meter has incorporated the oval rotor principal into its design. This is proven to be a reliable and highly
accurate method of measuring flow. Exceptional repeatability and high accuracy over a wide range of fluid viscosities
and flow rates are features of the oval rotor design.
With a low pressure drop and high pressure rating oval rotor flow meters are suitable for both gravity and (in-line) pump
applications.
Regulation Use
The oval gear meter is a precise positive displacement flow meter incorporating a pair of oval geared rotors.
These meters are capable of measuring the flow of a broad range of clean liquids.
Aluminum meters are suitable for fuels, fuel oils, & lubricating liquids. It is important to ensure that the
medium to be measured is compatible with the materials used in the instrument.
The flow meter is available as a measurement transducer with pulse output or with other forms of
evaluation electronics. Details of how to operate the electronics are included in a separate instruction
manual.
These flow meters OGM-DPS can be installed within hazardous areas when ordered with optional
Exd approval, or by using the reed switch pulse output in Intrinsically Safe loops or installing Intrinsically
Safe certified Instruments.
Any use of the oval gear flow meter model: OGM-DPS which exceeds the manufacturer’s specification,
may invalidate its warranty. Therefore, any resulting damage is not the responsibility of the manufacturer.
The user assumes all risk for such usage.

Owner’s Operation Manual
What is OGM-DPS ?
OGM-DPS is an electronic system , integrated with wide range of pump system for refilling station, for con-
trolling fluid dispensers.
The system provides
To set the desire dispenser volume or value.
Able to record first 100 dispensed record in memory
For User, User-friendly dispensing operation.
Economic Control Module to reduce over dispense volume
Operating Instruction
1) Press L/P to select L = Liter , P = Price
2) Key-in the Volume or Value ( Press CLEAR for change the clear the digit)
3) Press START to start the pump for dispensing the fluid
4) Operation will be STOP, when the dispense reach the desired value on the
LCD screen
For Non Preset Dispensing
1) Press START, Pump will operate and Press STOP to end the Operation
2) Round-Up Function, During the operation
A. press 7 for Liter Rounding up
B. Press 0 for Price Rounding Up
Operating Principle of Digital preset module
OGM-DPS Digital preset module is the main power supply for the pump system. The computer board of the
module will receive the pulses from the Oval Gear Rotor to calculate the volume flow through the meter.
OGM-DPS computer board will calculate to show Price and Liter on the LCD Screen.
When reach the preset value or volume, OGM-DPS will stop the pump.
Operation Principle –OGM
Oval gear flow meters are categorized as positive displacement flow technology. When liquid flows through
this type of positive displacement flow meter, two oval geared rotors measure a constant volume per rota-
tion within a precisely machined measuring chamber. With each rotation, a constant volume of liquid is
measured. The rotation of the oval gears is sensed via magnets embedded within the rotors. These mag-
nets transmit a high resolution pulse output. The output signal can be process externally via a remote dis-
play controller or PLC or via a variety of output/display options available as accessories attached to the flow
meters.
The positive displacement flow technology allows for precise flow measurement of most clean liquids re-
gardless of the media conductivity. Other liquid properties also have a minimal effect on the performance of
this type of meter. Flow profile conditioning is not required as with alternative flow technology options mak-
ing oval gear installations simple to install in tight spaces and at an economical price.

Calibration & Price Setting
Field Calibration /By Dispensing
CALIBRATION by dispensing calibrates the flow meter by dispensing fuel or fluid into a GRADUATED
Container of know capacity.
This is the quickest and easiest way of calibrating the flow meter and requires no calculations
Calibration by dispensing can be suspended and restarted at will, and is considered complete when the fuel
level can be seen in the container’s graduated section.
Calibration Instruction
Liter
1) Press STOP, then press L/P for 5 seconds with the L sign on the left screen till the
Right Conner of LCD screen Blank
2) Key-in Passcode: 78787878 then press L/P to log in the Calibration Mode
3) LCD screen will show U –XXXX, Key in the Value to calibrate the flow volume
(** The higher value is to reduce the flow count ; The lower value is to
increase the flow count)
4) Press STOP to end the Calibration.
To Set Price value
1) Press STOP, then press L/P for 5 seconds with the Psign on the left screen till the
Right Conner of LCD screen Blank
2) Key-in Passcode: 11223344 then press L/P to log in the Calibration Mode
3) LCD screen will show B-X.XX, Press CLEAR then Key in the value as the PRICE.
4) Press STOP to end the Calibration
WARNNING
To calibrate the flow meter properly, you should use an accurately graduated container
with a capacity of no less then 10 liters
In particular, you should :
Remove all air from the pump, hoses, tube and flow meter by pumping until the flow
is full and regular.
Stop the flow by switching off the nozzle but not the pump.
Do not reduce flow when nearing the container’s graduated section.
The correct procedure is to start and stop dispensing at the constant rate until reaching
the desired limit, if possible with no interruptions.
WARNNING
A single dispensing is enough to calibrate the flow meter properly
After calibrating the flow meter, always check the result to make sure the instrument’s
accuracy has is within acceptable limits.
Owner’s Operation Manual

System & Memory
To view Accumulative counter
To view Round up Accumulator.
1) Press CLEAR for 5 seconds, LCD screen will be Shown PC (Price
Counter)
2) Press L/P to switch between PC (Price Counter) and LC ( Liter Counter)
3) Press STOP to end.
To view Accumulator with decimal 0.01+/- .
1) Press “ ·“ for 5 seconds, LCD screen will be Shown PC (Price
Counter)
2) Press L/P to switch between PC (Price Counter) and LC ( Liter Counter)
3) Press STOP to end.
To view last 100 Transaction Memory
1) Press STOP for 5 seconds, LCD screen will shown the last transaction record
2) Press 3/˄ to scroll up and 1/˅ to scroll down for screech record
3) Press STOP to end.
Model Number OGM-DPS-25 OGM-DPS-40 OGM-DPS-50
Inlet Size 25mm 40mm 50mm
Flowrate 20-120 lpm 25-250 lpm 30-300 lpm
One-time Count 9 digits
Accumulated Count 11 digits
Max.Working Pressure 3.4 Mpa 1.8 Mpa 1.8Mpa
Application Media kerosene, diesel, gasoline, Heavy Oil
Accuracy /Repeatability 0.5% ≤ 0.17% 0.5% ≤ 0.17% 0.5% ≤ 0.17%
Carton Dimension 81.5x38.5x17.5 cm 82.5x43x17.5 cm 44x24x24 cm
G.W/N.W 20.5kgs/17.5kgs 36.5kgs/31.5kgs 16.5kgs/14.5kgs
Owner’s Operation Manual
Technical detail
Power Supply 12v DC, 24v DC, 220v AC
Body Material Aluminum
Oval Gear Rotor Aluminum
O-ring Viton (Standard) -15°C minimum
Rotor Shaft Aluminum (Standard)
Bearing Type No Bearing

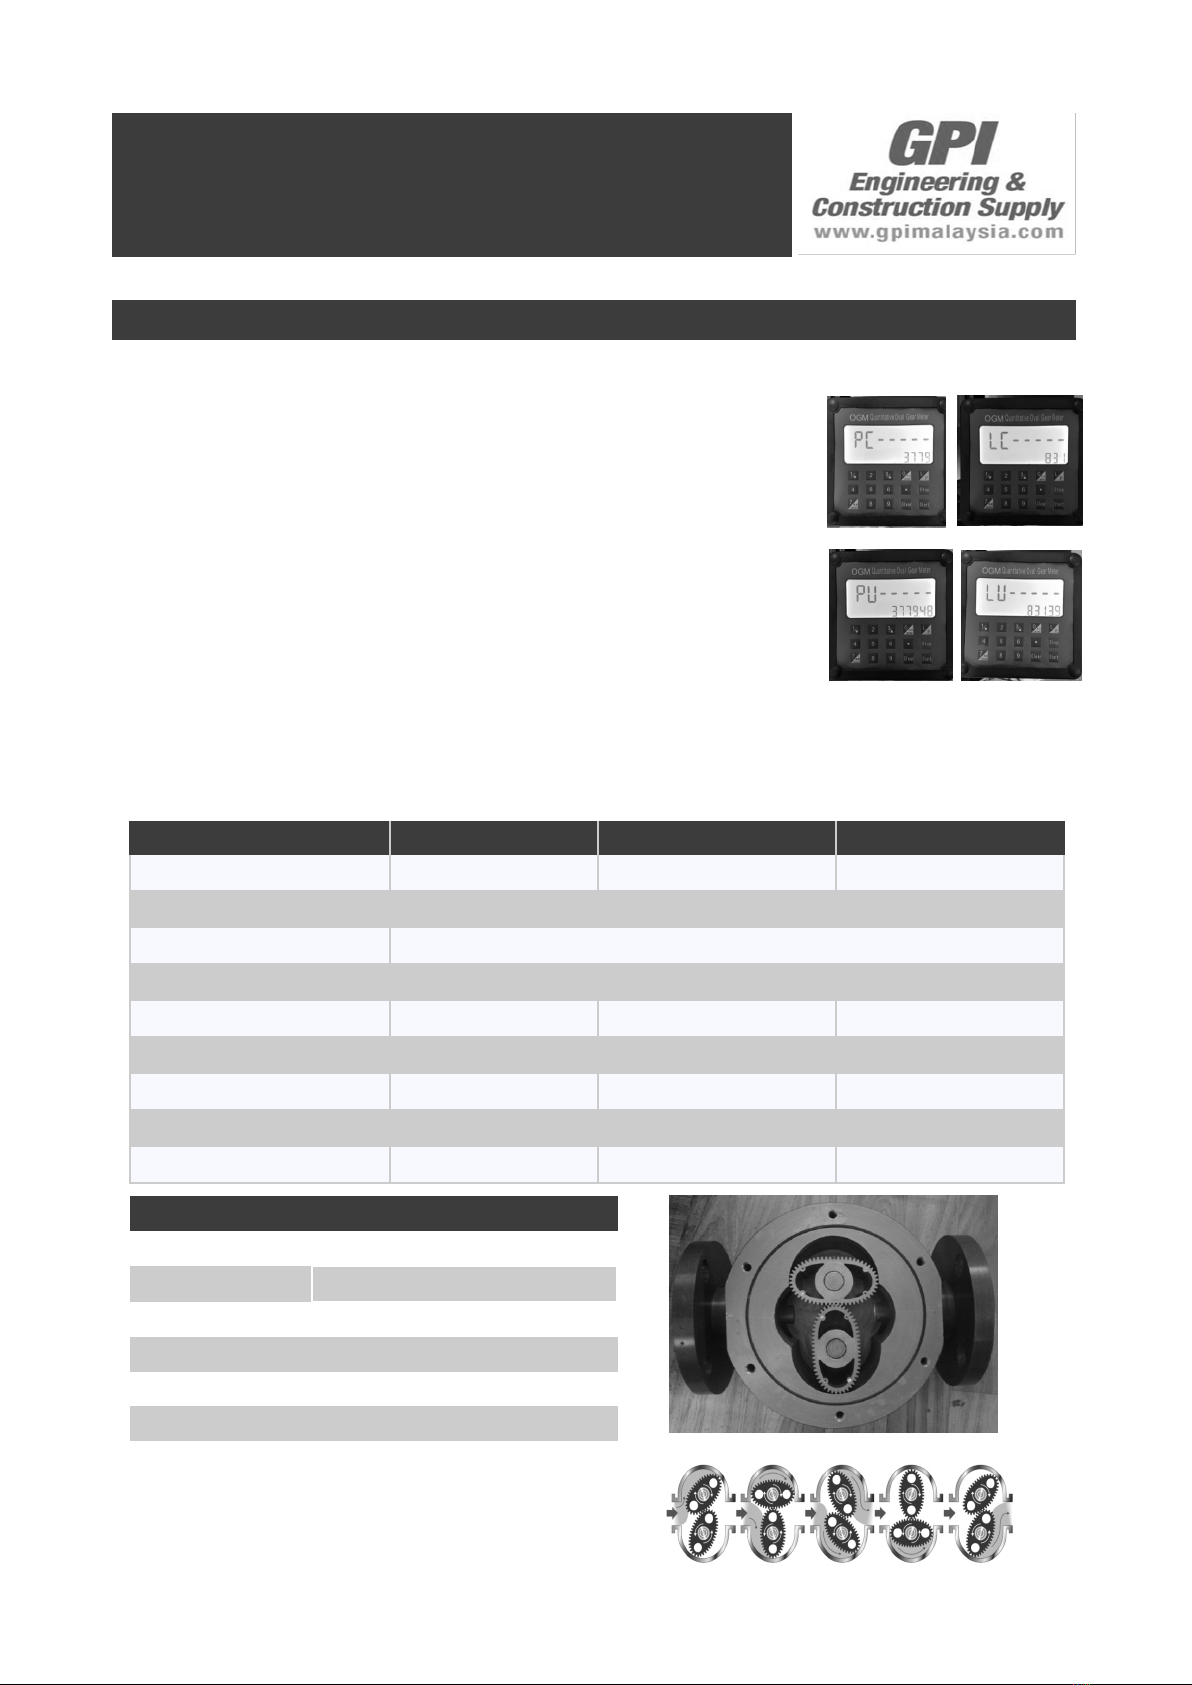
Oval gear flow meters have two clearly distinct portions: one of which is mechanical, wetted areas with the
oval gears surrounded by a housing, and the other is the electrical area, which includes the pulse output
board.
Details of some key troubleshooting steps will now be provided. Please also refer to the instructions on
troubleshooting errors contained on the following page.
Step 1 - Check application, installation and set-up. Carefully read the section on mechanical installation to
ensure full knowledge of all relevant installation and application factors which may affect the operation of
the counter. These include pulsation, trapped air or selecting the wrong counter, including incorrect flow
rate, temperature or pressure, or material incompatibility. Refer to the section on electrical installation to
ensure correct cabling.
Step 2 - Check for blockages. For new and modified systems in particular, the most frequent cause of error
or sub-optimal counter operation is internal system or counter blockages due to foreign particles, such as
beads of condensate, sealing tape residues or mixtures of deposits, rust, etc.
Step 3 - Guarantee flow rate. Flow stopping or a flow rate declining below the usual limit may be attribut-
able to a blocked screen, flow meter rotors which are stuck or damaged, a defective pump, closed valves or
an insufficient liquid level in the storage tank.
Step 4 - The oval gears in the counter must revolve. This rotation is audible: try holding a screwdriver blade
against the counter housing and push the handle right against your earlobe. Test the counter as required
with flow switched on and off, to ensure you are familiar with the audible sound of rotation.
Step 5 - Ensure that pulses are generated when liquids flow. Here, a multimeter is often not fast enough to
capture the pulse sequence of the reed switch or the Hall Effect sensor. However, an oscilloscope will allow
you to observe the output pulse sequence. When testing the reed switch pulse, a pull-up resistor must be
installed between the single connection of the reed switch and the supply voltage, while the other connec-
tion must be connected to the reference potential of the measurement device (oscilloscope)
Step 6 - Confirm device operation. Check the functions by simulating a pulse input. A reed switch pulse
input can be simulated by a swift and pulse-driven short-circuiting of the input terminals
Troubleshooting
Owner’s Operation Manual
Caution when operate.
DO NOT modify or alter the meter.
DO NOT leave the meter unattended while dispensing.
Check the meter daily. Worn or damaged parts should be repaired or replaced immediately.
DO NOT exceed the maximum working pressure level of the lowest rates system component.
Use only extensions and nozzles that are compatible with this meter.
Use only fluids and solvents that are compatible with the equipment. Notice the warnings for fluids and
solvents.
Tighten all fluid connections before operating the meter.
Comply with all local, state, and federal fire, electrical and safety regulations.
Use of the product in a manner other than specified in this manual may result in bodily injury or im-
paired operation or damage to the meter.

Installation Guide
Owner’s Operation Manual
Orientation When installing the flow meter, orientation must be considered.
The rotor shafts must be in a horizontal plane. To verify that the rotor shafts are in a horizontal plane, elec-
tronic cover or optional digital display will be facing in a horizontal direction. For modification in the field, the
electronic cover or digital display can be rotated in any 90 degree position. This accommodates access to
the electrical entry and allows the electronic display orientation to best suit the installation.
Flow Conditioning and Location
It is highly recommended to INSTALL a filter immediately before (prior to) the meter. Filters are available
and sold separately.
Recommended Filter:
OGM-DPS-25: < 75 µm particle size (200 mesh)
OGM-DPS-40: < 150 µm particle size (100 mesh)
OGM-DPS-50: < 350 µm particle size (45 mesh)
Flow conditioning: Flow conditions is not required since the DON flow meter does not require any straight
pipe runs before or after the flow meter.
Location: The recommended installation would be before of any flow control and/or shut off valves, this in-
stallation prevents complete emptying of the meter. This minimizes the risk of leakage and/or air entrap-
ment which could result in damage to the flow meter or inaccurate initial readings.
A by-pass installation is recommended for process or safety critical meters. Isolation valves enable the me-
ter to be isolated from the system and serviced as needed. System purging is also possible with a by-pass
arrangement. Accommodate all meter ratings and locate the meter on the discharge side of the process
pump.
For outdoor applications, be sure all electrical entries are sealed properly via the proper glands, mounting,
sealing or containment. For humid environments, mount the instrument appropriately as to avoid condensa-
tion build up. Generally these installations have the conduit connection pointing downward as to drain any
condensate away from the electronics.
Liquid State: Liquid within the flow meter must not freeze. If heat tracing is necessary, please be sure to
adhere to the temperature limits of the flow meter. Ensure the liquid does not flash, do not exceed the max
DP of the flow meter.
Hydraulic shock: Surge dampeners or pressure relief valves must be installed if hydraulic shock or pressure
spikes are present. Highly pulsating flow can also damage the DON flow meter. Diaphragm pumps and
specific application profiles can cause high frequency pulsating flow. Proper pulsating dampers are highly
recommend

Thank you very much for choosing a Gpi Engineering & Construction Supply, Product!
For future reference, please complete the owner’s record below: Model: _______________ Purchase Date:
_______________ Save the receipt, warranty and these instructions. It is important that you read the entire
manual to become familiar with this product before you begin using it. This machine is designed for certain
applications only. Gpi Engineering & Construction Supply, cannot be responsible for issues arising from
modification. We strongly recommend this machine is not modified and/or used for any application other
than that for which it was designed. If you have any questions relative to a particular application, DO NOT
use the machine until you have first contacted Northern Tool + Equipment to determine if it can or should
be performed on the product.
Warranty
Owner’s Operation Manual
This manual suits for next models
3
Table of contents
Other GPI Measuring Instrument manuals