manuals.online logo
Brands
  1. Home
  2. •
  3. Brands
  4. •
  5. Grandview
  6. •
  7. Accessories
  8. •
  9. Grandview Large Stage Series User manual

Grandview Large Stage Series User manual

Large Stage MBII Installation Manual
Model:LS-MBxxxII(xGxx)
Reminders
Thank you for purchasing Grandview products. Please read the instructions carefully before
installation and use, and collect it after reading for future use;
This product must be installed by a qualified professional after the feasibility assessment of
the environment, electricity, structure, etc.;
Do not disassemble or replace the original spare parts at will: If there is any fault, please
contact the after-sales service department.
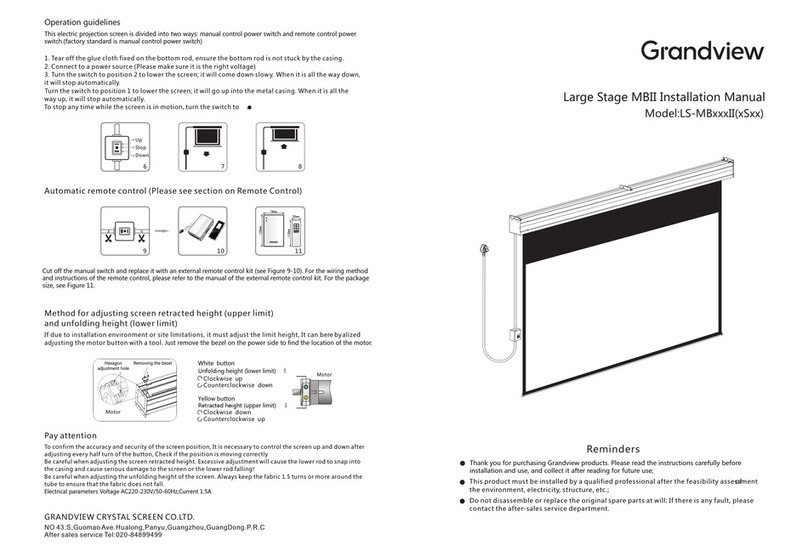
Method for adjusting screen retracted height (upper limit)
and unfolding height (lower limit)
9 10 11
7 86
Up
Stop
Down
If due to installation environment or site limitations, it must adjust the limit height, It can bere b y alized
adjusting the motor button with a tool. The button is located in the 12 round hole next to the power cord
outlet.
Yellow button
Retracted height(upper limit)
Clockwise down
Counterclockwise up
Motor
Green button
Unfolding height (lower limit)
Clockwise down
Counterclockwise up
Limit
adjustment
hole
Power
cord outlet
Pay attention
To confirm the accuracy and security of the screen position, It is necessary to control the screen up and down after
adjusting ever y half turn of the button, Check if the position is moving cor.rectly
Be careful when adjusting the screen retracted height. Excessive adjustment will cause the lower rod to snap into
the casing and cause serious damage to the screen or the lower rod falling!
Be careful when adjusting the unfolding height of the screen. Always keep the fabric 1.5 turns or more around the
tube to ensure that the fabric does not fall.
Electrical parameters: Voltage Ac220 ~ 2 30V 50 /60Hz , Current 0.27A , Power 60w
Operation guidelines
1. Tear off the glue cloth fixed on the bottom rod, ensure the bottom rod is not stuck by the casing.
2. Connect to a power source (Please make sure it is the right voltage)
3. Turn the switch to position 2 to lower the screen; it will come down slow y W h e .n it is all the way down,
it will stop automatically.
Turn the switch to position 1 to lower the screen; it will go up into the metal casing. When it is all the
way up, it will stop automatically.
To stop any time while the screen is in motion, turn the switch to .
Automatic remote control (Please see section on Remote Control)
GRANDVIEW CRYSTAL SCREEN CO.LTD.
NO 43.S,Guomao Ave.Hualong,Panyu,Guangzhou,GuangDong.P.R.C
After sales service Tel:020-84899499
This electric projection screen is divided into two ways: manual control power switch and remote control power
switch.(factory standard is manual control power switch)
Cut off the manual switch and replace it with an external remote control kit (see Figure 9-10). For the wiring method
and instructions of the remote control, please refer to the manual of the external remote control kit. For the package
size, see Figure 11.
94
Screen structure
Left hanging plate Middle Hanging plate Right Hanging plate
Casing
Casing centerline
Fabric centerline
Fabric
Lower
rod unit: mm
Accessories
Shackle (3)
Motorized adjust tool (3)Warranty Card (1)
Instruction manual (1)
Motor
exchange
port
Installation method and precautions
Note that due to structural reasons, the position of the fabric is not at the center of the screen. It's offset
on the right by about 94mm; This should be considered when determining the location of the mounting
holes; It is also recommended to keep a distance of 1 meter on the side of the screen power cord for future
maintenance.
Suspension installation
Measure the horizontal spacing of the hanging plate and the length of the product to determine the
installation position of the screen, and install three stable hooks on the solid concrete ceiling. Recommended
hook type is adjustable.
Concrete
ceiling
remain distance
on the left
>1000mm
Suspension
distance (P)
Hook
Hook the hook on the shackle of the left、middle and right hanging plate ,adjust the length of the hook to
the screen level, and complete the suspension installation
Hook
Load-
bearing Load-
bearing
Anti-
dropping
Screw rod installation
Note: The default factory setting of this product is suspension installation. If the customer needs screw rod
installation, the installation method of the hanging plate can be converted!
Converting the hanging plate method: Remove the M10 screws and 8 nuts on the left and right hanging plate,
take out the hanging plate and turnover to the corresponding end caps and fasten with screw.
Turnover
Screw rod installation
Measure the spacing of the four oblong holes on the left and right hanging plate respectively. Install the
M12 screw rod directly above the corresponding hole to connect the left and right hanging plate, Install an
adjustable hook at the top of the screen to connect the middle hanging plate
Recessed installation (see photo to the right)
Load-
bearing Load-
bearing
Anti-
dropping

This manual suits for next models

1

Other Grandview Accessories manuals

Grandview Large Stage Series User manual

Grandview

Grandview Large Stage Series User manual

Grandview FA-MR series User manual

Grandview

Grandview FA-MR series User manual

Grandview CN Series User manual

Grandview

Grandview CN Series User manual

Grandview GRIPRC92H User manual

Grandview

Grandview GRIPRC92H User manual

Grandview FA-MIxx II User manual

Grandview

Grandview FA-MIxx II User manual

Grandview CNV Series User manual

Grandview

Grandview CNV Series User manual

Grandview CR-Mxx User manual

Grandview

Grandview CR-Mxx User manual

Grandview FA-MIxx II User manual

Grandview

Grandview FA-MIxx II User manual

Grandview CN-MRxx User manual

Grandview

Grandview CN-MRxx User manual

Grandview FANCY Series User manual

Grandview

Grandview FANCY Series User manual

Grandview CB-MRC User manual

Grandview

Grandview CB-MRC User manual

Grandview CB-MI Series User manual

Grandview

Grandview CB-MI Series User manual

Grandview LF-MixxFII User manual

Grandview

Grandview LF-MixxFII User manual

Popular Accessories manuals by other brands

Panasonic MA3S133 (MA133) Specifications

Panasonic

Panasonic MA3S133 (MA133) Specifications

innovatt CPB502 user manual

innovatt

innovatt CPB502 user manual

Tascam US-600 owner's manual

Tascam

Tascam US-600 owner's manual

PCB Piezotronics 351B41 Installation and operating manual

PCB Piezotronics

PCB Piezotronics 351B41 Installation and operating manual

Honeywell RCWL200A Specifications

Honeywell

Honeywell RCWL200A Specifications

Pepperl+Fuchs PHA Series manual

Pepperl+Fuchs

Pepperl+Fuchs PHA Series manual

Wenglor OTII802C0103 operating instructions

Wenglor

Wenglor OTII802C0103 operating instructions

IntelliSense DUAL TEC DT-900 Series Supplemental information

IntelliSense

IntelliSense DUAL TEC DT-900 Series Supplemental information

netvox R718DA2 user manual

netvox

netvox R718DA2 user manual

ARAG ATLAS 100 Installation, use and maintenance

ARAG

ARAG ATLAS 100 Installation, use and maintenance

Galeo ANTARES manual

Galeo

Galeo ANTARES manual

Serene House Serene Pod Archi instruction manual

Serene House

Serene House Serene Pod Archi instruction manual

3M PELTOR TEP-200 EU User instructions

3M

3M PELTOR TEP-200 EU User instructions

Huawei RRU3201 installation guide

Huawei

Huawei RRU3201 installation guide

Clearaudio Clarify user manual

Clearaudio

Clearaudio Clarify user manual

FireSales Smoky Multi Socket user manual

FireSales

FireSales Smoky Multi Socket user manual

Emos 838W quick start guide

Emos

Emos 838W quick start guide

Novar RTS-UVC installation instructions

Novar

Novar RTS-UVC installation instructions

manuals.online logo
manuals.online logoBrands
  • About & Mission
  • Contact us
  • Privacy Policy
  • Terms and Conditions

Copyright 2025 Manuals.Online. All Rights Reserved.