Grozone Control CO2D User manual

USER GUIDE
CO2D
Dual Zone CO2Controller
www.grozonecontrol.com

TABLE OF CONTENTS
WARNING & CAUTIONS...........................................................1
GENERAL DESCRIPTION............................................................2
SPECIFICATIONS….…...…………………………………………………….……..3
INSTALLATION GUIDE…...…………………………………………...…......4-5
OPERATION GUIDE……....…………………………………………...…......5-6
TROUBLESHOOTING……..……………………...……………...….….…….7-8
WARRANT & CUSTOMER SERVICE ……………………….… ….…..9-10

WARNING & CAUTIONS
CAUTION:
SULPHUR VAPORIZATION CAN DAMAGE YOUR CONTROLLER!
In order to protect and ensure a long life to your CO
2
controller, it is very
important TO DISCONNECT AND COVER THE CONTROLLER (placing a
plastic bag around the unit) WHILE USING SULPHUR VAPORIZERS IN
YOUR GROW ROOM.
Grozone is able to detect CO
2
sniffers that have been contaminated by sulphur
and we reserve the right not to repair these defect units under warranty. How-
ever, we are able to repair your unit at a reasonable cost in a timely manner.
1

CO2D GENERAL DESCRIPTION
CO2D : 0-5000 ppm Dual Zone CO
2
Controller
(with 24-hour Logger)
•
Controls the CO
2
levels in two separate rooms simultaneously.
•
24-Hour data logger tracks the minimum, maximum and average
•
CO
2
values, for each hour of operation.
•
Special operating mode to operate two zones with only one CO
2
generator.
•
Remote sensors include 25-ft cables.
2

CO2D SPECIFICATIONS
•
Output 120V/5A.
•
Input 120V/50-60Hz.
•
CO
2
sensor: 0-5000PPM.
•
Day and night detection with photocell.
•
Digital display.
•
ETL Listed per CSA/UL Standards.
3

INSTALLATION GUIDE
Step 1
Connecting the equipment
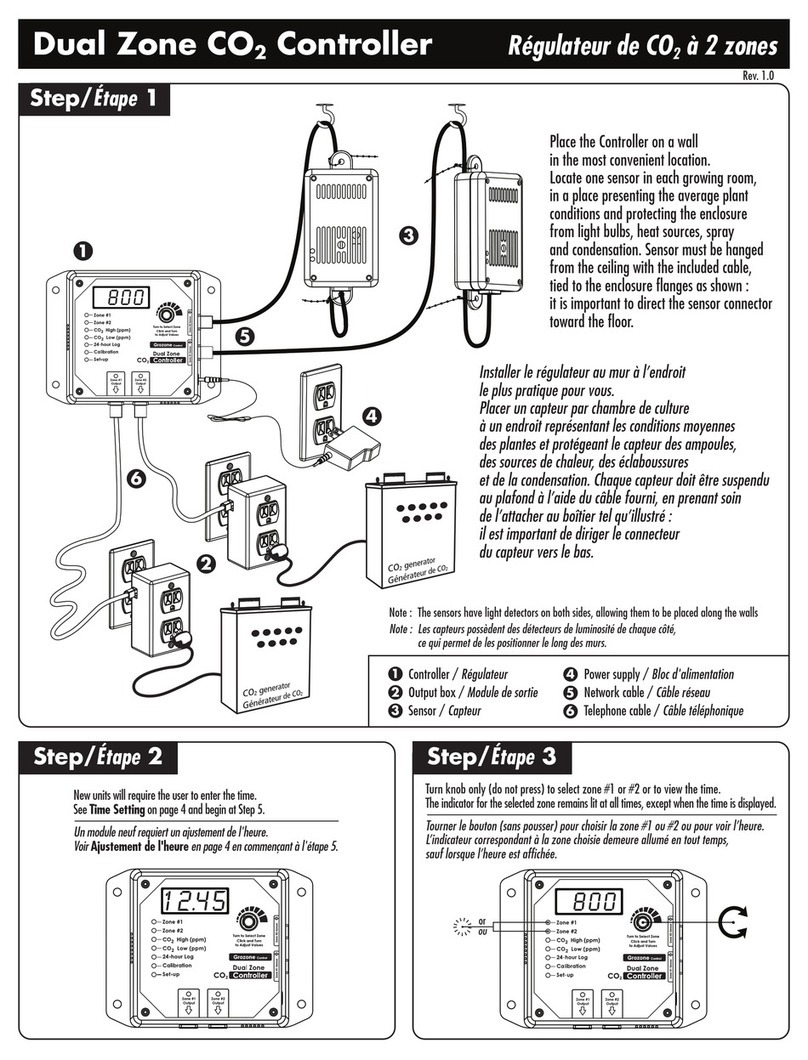
Place the Controller on a wall in the most convenient location. Locate one sensor
in each growing room, in a place presenting the average plant conditions and
protecting the enclosure from light bulbs, heat sources, spray and condensation.
Sensor must be hanged from the ceiling with the included cable, tied to the
enclosure flanges as shown : it is important to direct the sensor connector toward
the floor.
Note : The sensors have light detectors on both sides, allowing them to be placed
along the wall.
Controller
Output box
Sensor
Power Supply
Network cable
Telephone cable
4

INSTALLATION GUIDE
5
Step 2
Time setting
New units will require the user to enter
the time.
See Time Setting on page 6 and begin
at Step 5
Step 3
Zone selection
Turn knob only (do not press)
to select zone #1 or #2 or to view the
time. The indicator for the selected
zone remains lit at all times, except
when the time is displayed.
Step 4
Setting high value
Click knob and turn to set high ppm
value of selected zone. This is the
maximum CO2level the generator will
allow. In fact, the generator will usually
stop before reaching this level in order
to avoid overshoots.

OPERATION GUIDE
6
Step 6
24-H Log
Click knob and turn to set low ppm
value of selected zone. This is the
minimum CO2level the generator
will allow. In fact, the generator will
usually turn on before reaching this
level in order to avoid undershoots.
Click knob and turn to select log
time among last 24 hours;
controller displays the min.,
average and max. Ppm readings
observed during this selected
hour, for each zone separately.
Note : Example for zone # 2
Step 5
Setting low value

OPERATION GUIDE
7
Step 7
Setting operating mode
Sensor calibration and hour setting
WARNING Sensor calibration is not required for a new unit (factory calibrated).
Verify CO2sensor precision by exposing your unit to outdoor air every 6 months
(correct value stands between 350 and 450 ppm). To calibrate your sensor, refer to Ap-
pendix 2. Hour can be set at all times; also refer to Appendix 2.
Click knob and turn to select your Control Mode for each zone
.
F11: CO2enrichment, day only
F12: CO2enrichment, night only
F13: CO2enrichment, day & night
F14: CO2exhausting, day only
F15: CO2exhausting, night only
F16: CO2exhausting, day & night
F17: CO2enrichment, day only
For set-up using two burners
For set-up using one burner (see Appendix 1)
Click knob to return to CO
2
display
PARAMETER STTING IS NOW COMPLETE, YOUR CONTROLLER IS READY TO USE

8
Appendix 1
Set-up Mode F17, using a damper with actuator
Plug the CO2 generator and fan into Output Box #1
and the flap switch into the Output Box #2.
Make sure the airflow is directed toward Room #1
when the flap switch is de-activated.
Actuator de-activated
To room 2
To room 1
Actuator activated
CO
2
generator
120VActuator
Fan
Controller
Output box
Sensor
Power Supply
Network cable
Telephone cable

9
Appendix 1
Set-up Mode F17, using ventilation fans and an ON-OFF
Switcher (Grozone OSW—sold separately)
Plug the CO2generator into the upper
outlet of Output Box #1.
Plug the ON-OFF switcher (OSW) into
the lower outlet of Output Box #1.
Plug the Room #1 Fan into the ON
output (OSW upper outlet) .
Plug the Room #2 Fan into the OFF
output (OSW lower outlet).
Finally, plug the OSW sense cord into
the Output Box #2.
CO
2
generator
Fan room #1
Fan room #2
Grozone
OSW
120V sense cord
Controller
Output box
Sensor
Power Supply
Network cable
Telephone cable

10
Appendix 2
Calibration of CO
2
sensor
Important Notice : This step is not required for a new unit (factory calibrated).
Verify CO2sensor precision by exposing your unit to outdoor air every 6 months
(correct value stands between 300 and 500 ppm).
If you need to calibrate the sensor, please follow these instructions. At any time be-
fore the last step, the calibration procedure can be cancelled, causing the controller to
return to normal operation.
WARNING : Each zone sensor
must be calibrated separately
IS CALIBRATION NEEDED? First select
zone #1 or #2, then expose the corresponding
remote sensor to outdoor air for a minimum
of 5 minutes, fresh air being used as a refer-
ence. If the value on screen is around 350 to
450 ppm, YOU DO NOT NEED TO
RECALIBRATE THE SENSOR OF THIS
ZONE.
CALIBRATION IS NEEDED : Click knob
repeatedly until “Set-Up & Cal” indicator
turns ON.
Press knob and keep it pressed for about 5
seconds, until light indicator begins to flash
and “CAL“ appears on screen.
1.
2.
3.
——
Set-up & Cal
——
Set-up & Cal
Let button go, “CO2CAL“ appears on
screen, click knob again, then 400 will
appear on screen to remind you that you need
to place the unit in fresh air before starting
the calibration. If your controller is not in
fresh air condition, just click knob to abort
calibration.
STARTING CALIBRATION : press knob
and keep it pressed for at least 5 seconds,
until “CAL” shows up on screen, then let
button go.
Automatic calibration will take a few
seconds to complete: “CAL GOOD“ will
appear on screen for 5 seconds, and controller
will return to normal operation automatically
4.
5.
6.

11
Appendix 2
Time setting
Result on screen Follow these instructions
View current time by turning knob fully
clockwise.
Click knob until « CALIBRATION »
indicator turns on.
Press knob for 5 seconds until CAL
appears on screen.
Let knob go, you now enter the time
setting mode.
Click knob to display current time
You must turn knob to set minutes before
going to step 6.
Click knob and turn to set hours. Click
knob to toggle between hours and minutes.
Press knob for 5 seconds until GOOD
appears on screen.
Let knob go to return to normal operation
.
1.
2.
3.
4.
5.
6
7.
8.
Calibration
Minutes are blinking
Hours are blinking
ALARM AND ERROR MEANINGS
Alarm/
Error # Description Displayed on screen
Error 1
CO
2
Sensor problem:
Turn power off and retry. If problem
persists, call you retailer.
« - - - - »
Error 3 Real Time Clock problem :Turn
power off and retry. If problem persists,
call your retailer.
« Er.3 »
Alternately with sensor
values.
Error 8
Memory corruption problem : all set-
tings have been reset to factory settings.
You may need to re-enter your settings.
If problem persists, all your retailer.
« Er.8 »
Alternately with sensor
values.

TROUBLESHOOTING
1– BEFORE STARTING
***** CAUTION : MAKE SURE TO READ AND FOLLOW THESE INSTRUCTIONS
BEFORE STARTING THE TEST.
•
PLUG both output boxes (Zone #1 Output and Zone #2 Output) to the main module using the
2 telephone cables (included)
•
PLUG both remote sensors (Zone #1 Sensor and Zone #2 Sensor) to the main module using
the 2 “Network – CAT5” cables (included, 25-ft each).
•
PLACE both remote sensors close to each other in order to read similar (or equal) CO
2
PPM
levels.
•
CONNECTA LOAD (lamp or fan…) into the CO
2
OUTPUT BOX of ZONE #1 (NOT in the
OUTPUT BOX of ZONE #2).
•
LIGHTING CONDITION: make sure to perform this test in a room with enough light for the
controller to detect a DAY condition. A dark location should be avoided.
2-TEST
STEP HANDLING AND TEST
DESCRIPTION EXPECTED RESULTS
1 Plug the external supply into any
120V outlet or power bar, and plug
the power supply connector on the
left side of the module.
VERY IMPORTANT NOTICE :
MAKE SURE TO USE A 12V – 1A
POWER SUPPLY.
The screen shows a 30-second countdown after a short
introduction displaying the name of the product and
the revision number. Wait until the countdown ends.
12
VERY IMPORTANT NOTICE
You MUST use a
12 Volts - 1 Amp.
Power supply.
A 500mA (or 0.5 Amp.) unit
will NOT supply enough power to
the Controller and Sensors.

TROUBLESHOOTING
2 Turn the KNOB CCW to see
the CO2 PPM level of Zone #1.
Turn the KNOB CW so see the
CO2 PPM level of Zone #2.
Zone #1 or Zone#2 light indicators turn on alternately,
according to the selected zone.
A « normal » CO
2
value should stand between 400 and
1000 PPM. It might be higher if your room is not
ventilated enough or many people are present or you are
blowing directly toward the module.
Both PPM values SHOULD NOT be separated by more
than 150 PPM. If the difference between sensor values
goes beyond 150 to 200 PPM, it is likely that one sensor
needs to be calibrated.
Make sure to select Zone #1 while ending this step.
Zone #2 will be tested later.
CO
2
CALIBRATION will be checked at step 10.
3 Click knob once.
Turn knob both ways, and set
value to 4500 ppm.
The CO
2
High (ppm) indicator lights up to indicate the
value on screen is the CO
2
high setpoint (the default value
is 1500 PPM). The value on screen goes up or down ac-
cording to the knob rotation direction. To complete this
step, set the value to 4500 PPM, getting ready for step 5.
4 Click knob FOUR TIMES The CO
2
Low (ppm) indicator, as well as the 24-hour
Log, Calibration and Setup & Cal indicators, will light
up in this order. Make sure to stop when Set-up & Cal
lights up.
5 Turn knob in both directions to
change the value on screen be-
tween F13 and F14 repeatedly
The ZONE #1 OUTPUT indicator will turn off when F14
is set, and will turn back on when F13 is set. The LAMP
(or LOAD) and the Zone #1 Output indicator always turn
ON and OFF at the same time.
This step works only if the CO
2
High (ppm) has been set
to 4500 PPM at step 3.
6 Turn the knob to set value to
F11 Click knob ONCE to exit The 5 last light indicators at (from CO
2
High (ppm)
to Set-up) must be off to view the CO
2
level in Zone #1.
F11 stands for « CO
2
enrichment – day only ». The ZONE
#1 OUTPUT indicator must be ON.
7 Place the Zone #1 sensor flat on
your desk and cover it up en-
tirely with a DARK FABRIC
(coat, sweather…).
WARNING: the sensor has two
daynight detectors, one on
EACH SIDE of the enclosure.
The Zone #1 Output indicator must be ON before you
hide the sensor, but will turn off after 6 to 8 seconds when
the night condition is detected.
8 Remove the fabric covering the
Zone #1 sensor and wait 6-8
seconds.
The Zone #1 OUTPUT indicator will turn ON when day
condition is detected.
13

The basic test for Zone #1 or Zone #2 is now complete. If you just ended Zone #1 test, please do
again STEP3 to STEP9 while replacing « Zone #1 » by « Zone #2 » in the text.
PLEASE WAIT UNTIL CO2 PPM LEVEL GOES DOWN BELOW 1500 PPM BEFORE
STARTING THE TEST ON ZONE #2.
The CO
2
SENSOR (SNIFFER) CALIBRATION instructions follow.
TROUBLESHOOTING
9 Blow softly on Zone #1 sensor You will see the CO
2
PPM level on screen going up
to a value up to 5000 PPM and above. If needed, blow
closer to the module or stronger : your breath contains
a lot of CO
2
.
The Zone #1 OUTPUT indicator must turn OFF and
the screen will show « OVER » and « 5000 »
alternately.
10 Check the CO
2
Controller calibration
to confirm whether calibration is
required or not.
IF REQUIRED, you will find the
calibration procedure on next page.
You must bring the sensor close to an open door or
window or simply outside. Wait 1-2 minutes to get a
stable value and AVOID breathing near the sensor.
The CO
2
PPM value on controller screen should
be between 350 and 450 PPM, sometimes up to 500
in urban surroundings. In this case, your module
DOES NOT NEED calibration.
Note : The CO
2
sensor (sniffer) is precise to +/- 75
PPM (industry standard) meaning that two or more
modules in the same room are likely to indicate differ-
ent ppm values, showing variation between them of
up to 150 ppm. THIS IS NORMAL and no action is
required. If the variation between readings is beyond
150-200 ppm, one of them is likely to require a cali-
bration. Be aware that a difference of 100 PPM has
insignificant effect on plants.
14

REMOTE SENSOR CALIBRATION
STEP
>>>>>IMPORTANT<<<<<
Expose your sensors to outdoor air for a minimum of 1-2 minutes, fresh air being used
as a reference. If the value on screen is around 350 to 450 PPM, YOU DO NOT NEED
TO RECALIBRATE YOUR UNIT.
1 Turn knob to select the first zone sensor you would like to calibrate ( Zone #1 or Zone
#2 indicator will be ON accordingly).
2 Click knob repeatedly until “Calibration” indicator turn ON, then controller screen
shows « CO2 ».
3 Press knob and keep it pressed for about 5 seconds, until « CAL» appears on screen.
4 Let button go, « CO2 » and « CAL » appear on screen alternately (blinking).
5 Click knob again, then « CAL » and « 400 » appear on screen alternately (blinking).
IMPORTANT : if the value shown IS NOT 400, turn the knob to set value to 400.
6 TO CALIBRATE : press knob and keep it pressed for at least 5 seconds, until « CAL »
shows up on screen (not blinking), then let button go.
IMPORTANT : if you “click” the knob instead of “pressing and maintaining the
knob pressed”, you will exit WHITOUT calibrating.
7 The automatic calibration takes just seconds. When completed, « CAL » et « GOOD »
appear on screen alternately (blinking) for 5 seconds, then the controller returns to
normal operation.
IMPORTANT : you MUST see « GOOD » on screen at the end of the calibration
process. If not, the calibration has FAILED. Then go back to step 1.
8 Turn knob to select the second zone sensor you would like to calibrate (Zone #1 or
Zone #2 indicator will be ON accordingly) and then do again STEP 2 to STEP 7.
15
Still having problem with your CO2D?
Please contact Grozone Control Technical Support at
8 -262-1800 or by email service@grozonecontrol.com

WARRANTY & CUSTOMER SERVICE
DO YOU HAVE A PROBLEM WITH YOUR HT2 ?
PLEASE READ THESE
INSTRUCTIONS CAREFULLYAND SAVE THEM FOR FUTURE REFERENCE
1. I think my CO2D is damaged, or it simply does not work as indicated in
the user guide, what should I do?
•
Please refer to the troubleshooting steps. Follow these instructions
carefully, step by step. The CO2D should work as described in the “Test”
column of the Complete Troubleshooting Guide.
Do you need assistance on executing the Troubleshooting steps?
1. Contact us at 1-855-262-1800
2. Send us an EMAIL at service@grozonecontrol.com or
3. VISIT our Technical Support Center at www.grozonecontrol.com/
techsupport.html
Technical Support is available Monday through Friday, from 8:00 AM to 8:00 PM,
Eastern Time.
16

1. I think my CO2D is damaged, or it simply does not work as indicated in
WARRANTY & CUSTOMER SERVICE
2. I’ve been through the troubleshooting steps, what do I do if I meet a
problem at any of these steps? Is my product covered by the WARRANT ?
•
The CO2D is covered by a 3-years warranty (*). We will replace any DAM-
AGED PRODUCT WITH A BRAND NEW PRODUCT.
•
Covered or not covered? We do not authorize the replacement of fully
working products nor altered (tampered) products. The Troubleshooting
steps will help you identify a damaged product. Do not hesitate to contact
us or contact your retailer to make sure the controller is not fully working or
damaged before returning it to the store.
•
My product is not fully working or damaged, I want a replacement unit:
in order to get a replacement product, you MUST return all modules and
applicable accessories to the retailer. To avoid being charged for the
accessories, be sure to include all pieces. Thanks for your cooperation.
•
Any Grozone Control product that is returned with obvious signs of user
neglect will not be covered by warranty. Grozone Control exercises the right
to make final decisions in these matters.
(*)The warranty period begins from the date of purchase at the retail level. The
retailer/consumer must keep their proof of sale/purchase. Otherwise, Grozone
Control will consider the manufacturing date to apply the warranty coverage.
IMPORTANT MESSAGE TO RETAILER
The retailer must call Grozone Control to get authorisation to replace
the defective product and a RMA number.
1-855-262-1800
17

Table of contents
Languages:
Other Grozone Control Controllers manuals
Grozone Control
Grozone Control Temp-3 User manual

Grozone Control
Grozone Control TV12 User manual

Grozone Control
Grozone Control TV2 User manual

Grozone Control
Grozone Control SCC1 User manual

Grozone Control
Grozone Control The Simple One CLIMATE CONTROLLER Assembly instructions

Grozone Control
Grozone Control Dual Zone CO2 Controller User manual

Grozone Control
Grozone Control SCO2 User manual
Grozone Control
Grozone Control SCO2 User manual

Grozone Control
Grozone Control HT2 User manual
Grozone Control
Grozone Control TV2 User manual