Gymstick WalkingPad TM-WPAD User manual

Model No. : TM-WPAD
Manufactured for:
Gymstick International Oy
Ratavartijankatu 11, 15170 Lahti, Finland

User Manual
To reduce the risk of personal injury, read and understand all the instructions before using this product.
Electric shock hazard, where the appliance is used without the earth connection.
Never leave the treadmill unattended. Unplug the unit from the power outlet when it is not in use.
This appliance is not intended for use by persons (including children) with reduced physical, sensory or mental capabilities, or
lack of experience and knowledge, unless they have been given supervision or instruction concerning use of the appliance by a
person responsible for their safety. Children should be supervised to ensure that they do not play with the appliance.
This equipment is for household and office use only. Do not use the equipment outdoors.
If you feel any chest pains, nausea, dizziness, or short of breath, you should stop exercising immediately and consult your phy-
sician before continuing.
WARNING
Content
1. Product and Accessories
2. Function schematic diagram
3. Guide for initial operation
4. Learn to use WalkingPad
5. Safety Notice
6. Maintenance and Service
7. Implied Warranty
8. Replacement and Disposal
02
03
07
09
13
16
17
18

Welcome to use 01 Product and Accessories
Thank you for choosing the WalkingPad Walking device, hereinafter referred to as a WalkingPad, which possess various
advantages including exquisite, foldable, innovative integral design. From now on, enjoy the quality life of walking at home.
Please carefully check whether the contents of the package are complete and intact. If there is any missing or damaged, please
contact the seller.
Performance &indicators
Expansion dimensions
Folding dimensions
Walking Area
Gross weight
Net weight
Maximum load
Applicable age
Applicable height
Minimum speed
Maximum speed
Power Input
Frequency
Sport mode
Main Product
Other accessoriesParts
Detailed parameters
1432 x 547 x 129 mm
56.5'' x 21.5'' x 5''
822 x 547 x 129 mm
32.5" x 21.5" x 5"
1200 x 415 mm
47" x 16.5"
31 kg / 68 lbs
28 kg / 62 Ibs
100 kg / 220 lbs
14 ~ 60 years old
Unlimited
0.5 km/hr 0.5 mi/hr
6 km/hr 3.75 mi/hr
746 W
50 / 60 Hz
Rated voltage 220 - 240 V ~
Standby mode/ Manual
mode/ Automatic mode
Remote Controller Lanyard Wrench Silicone OilPower Cable
User Manual
01 02

1. Product main body
02 Function schematic diagram
Walking Belt
Display Panel
Mode Indicator Light
Roller
Power Switch
Power Plug
Roller
Fold Hinge
03 04
Mode Switch

Standby Mode Manual Mode Automatic Mode
Fault Warning Light
2. lntroduction of the function of the indicator panel 3. Walkingpad remote control
02 Function schematic diagram
05 06
START/STOP
LANYARD
ACCELERATION
DECELERATION
BATTERY COVER
Display Time Display Speed Display Distance Display Steps
MODE SWITCH

03 Guide for initial operation
07 08
1. Choose flat ground to place the
WalkingPad. It is forbidden to
place it on thick and soft cushion.
Please note: Don't connect the
power before the WalkingPad
is fully unfolded.
4. Connect the power cord and
press the button to switch on.
2. Unfold the walkingpad slowly and
press it down to completely flat.
3. Check and adjust the walking belt
to make sure it's centered.
5. Search ''Walkingpad" App from
Apple Store or Google Play and
complete installation.
6. Open the App, follow the prompts
to set up the device.
10. If the belt deviates from the orbit
in use, please adjust properly.
SEE: 06 Maintenance and
service.
8. Complete Novice Guide to
unlock all Functions ( maximum
speed 6 km/hr ). Otherwise the
speed limit remains at 3 km/hr.
7. Enter novice guide. 9. Start to use the WalkingPad.
11. Short press: return to the previous mode.
Long press: switch to Standby mode.
Mode Switch

1. Mode instruction 2. Instructions of the standby
mode control
Standby Mode
3. Instructions of manual mode control (primary mode)
04 Learn to use WalkingPad
09 10
Standby Mode
Light of the Standby mode is on;
Motor and sensor stop responding.
Manual Mode
Light of the manual mode is on;
Control the speed through the remote
control or APP.
Automatic Mode
Light of the automatic mode is on;
Speed is automatically controlled by
intelligent algorithm.
It follows the speed of walking.
The motor and sensor stop responding
in this mode to prevent nonusers from
accidentally triggering the WalkingPad.
In this mode, the speed of the WalkingPad can be controlled by the remote
control. It is recommended that beginners use the manual mode first and
then use the automatic mode after being skilled in using the WalkingPad.
The manual mode is controlled by remote control by default, that is, the
START/STOP button of the remote control is used to start or stop the Walk-
ingPad, which can be modified in the client "Personalized".
Mode Switch
Short press: return to the previous mode.
Manual Mode
MODE SWITCH
Short press: switch to automatic mode.
Long press: switch to Standby mode.
ACCELERATION
Short press: increase speed by 0.5 km/h.
START/STOP
Short press: Start or Stop the WalkingPad.
DECELERATION
Short press: reduce speed by 0.5 km/h.
In the manual mode, set as
the intelligent start and stop,
the WalkingPad will start
automatically to the target
speed (default is 3 km/h )
while entering this area.

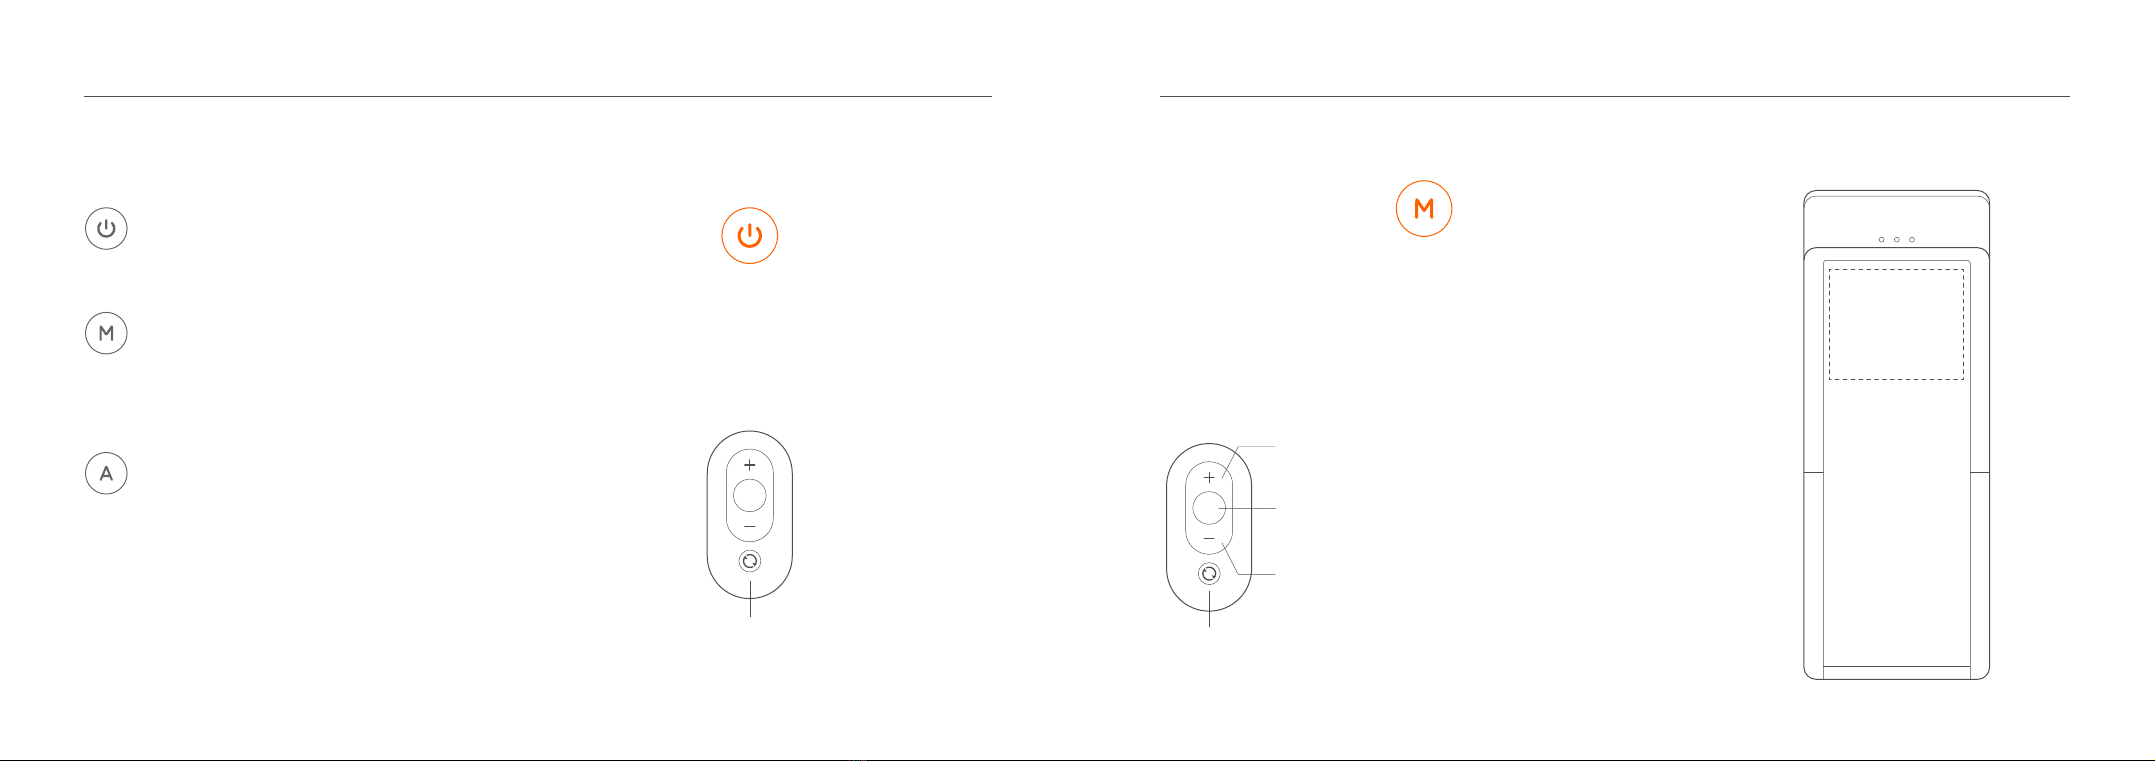
Short press: stop the WalkingPad.
Mode Switch
Short press: switch to manual mode.
Long press: switch to Standby mode.
5. Remote Controller Notice 6. Error Warning Light
11 12
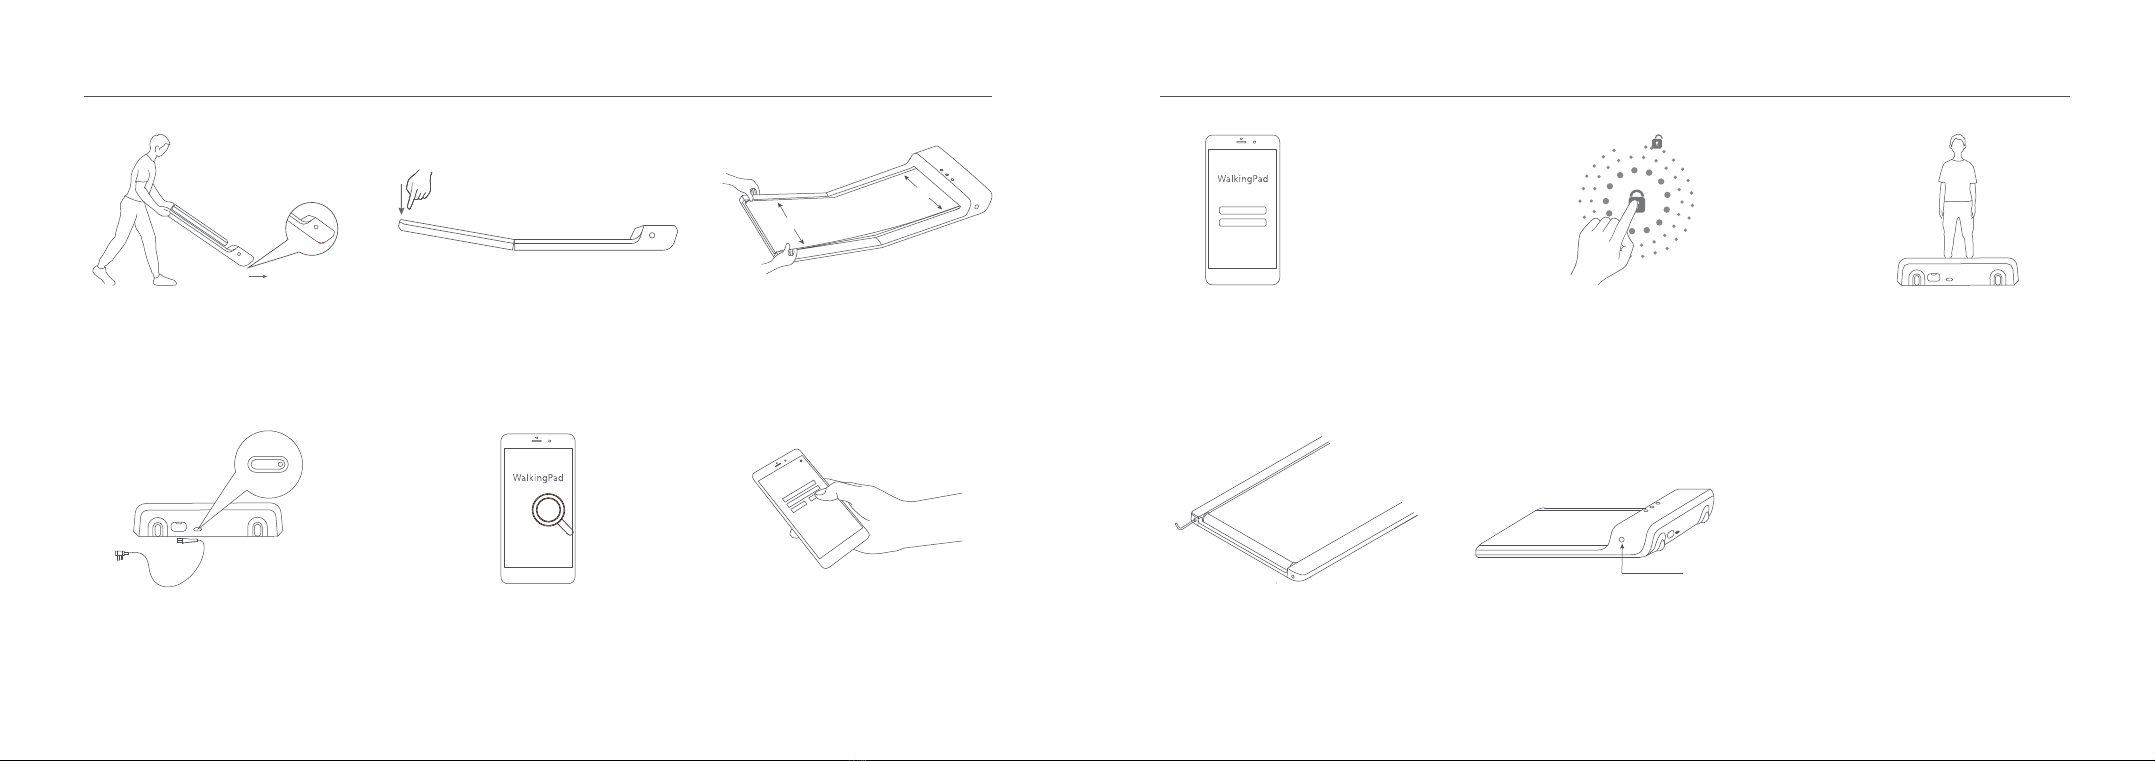
If the remote controller has no response or you
change a new one, the remote controller and
walking device need to re-establish communica-
tion.
Remote control pairing method:
Restart the WalkingPad, press and hold down the
mode switch button on the remote control immedi-
ately, hearing the sound of "Beep" indicates the
success of pairing. Note: During the operation, the
remote control should be close to the LED display
panel of WalkingPad.
Error Warning Light on the display panel is off when
Walkingpad works well. When error occurs, Error warn-
ing light turns on and shows its error code.
E01: Drive communication fault;
E02: Motor abnormalities;
E05: Overcurrent protection;
E06: Motor Protection;
E08: Sensor Fault;
E10: High temperature protection, automatic recovery
after the end of countdown;
E11: Overload protection, please add lubricating oil, and
resume automatically after countdown.
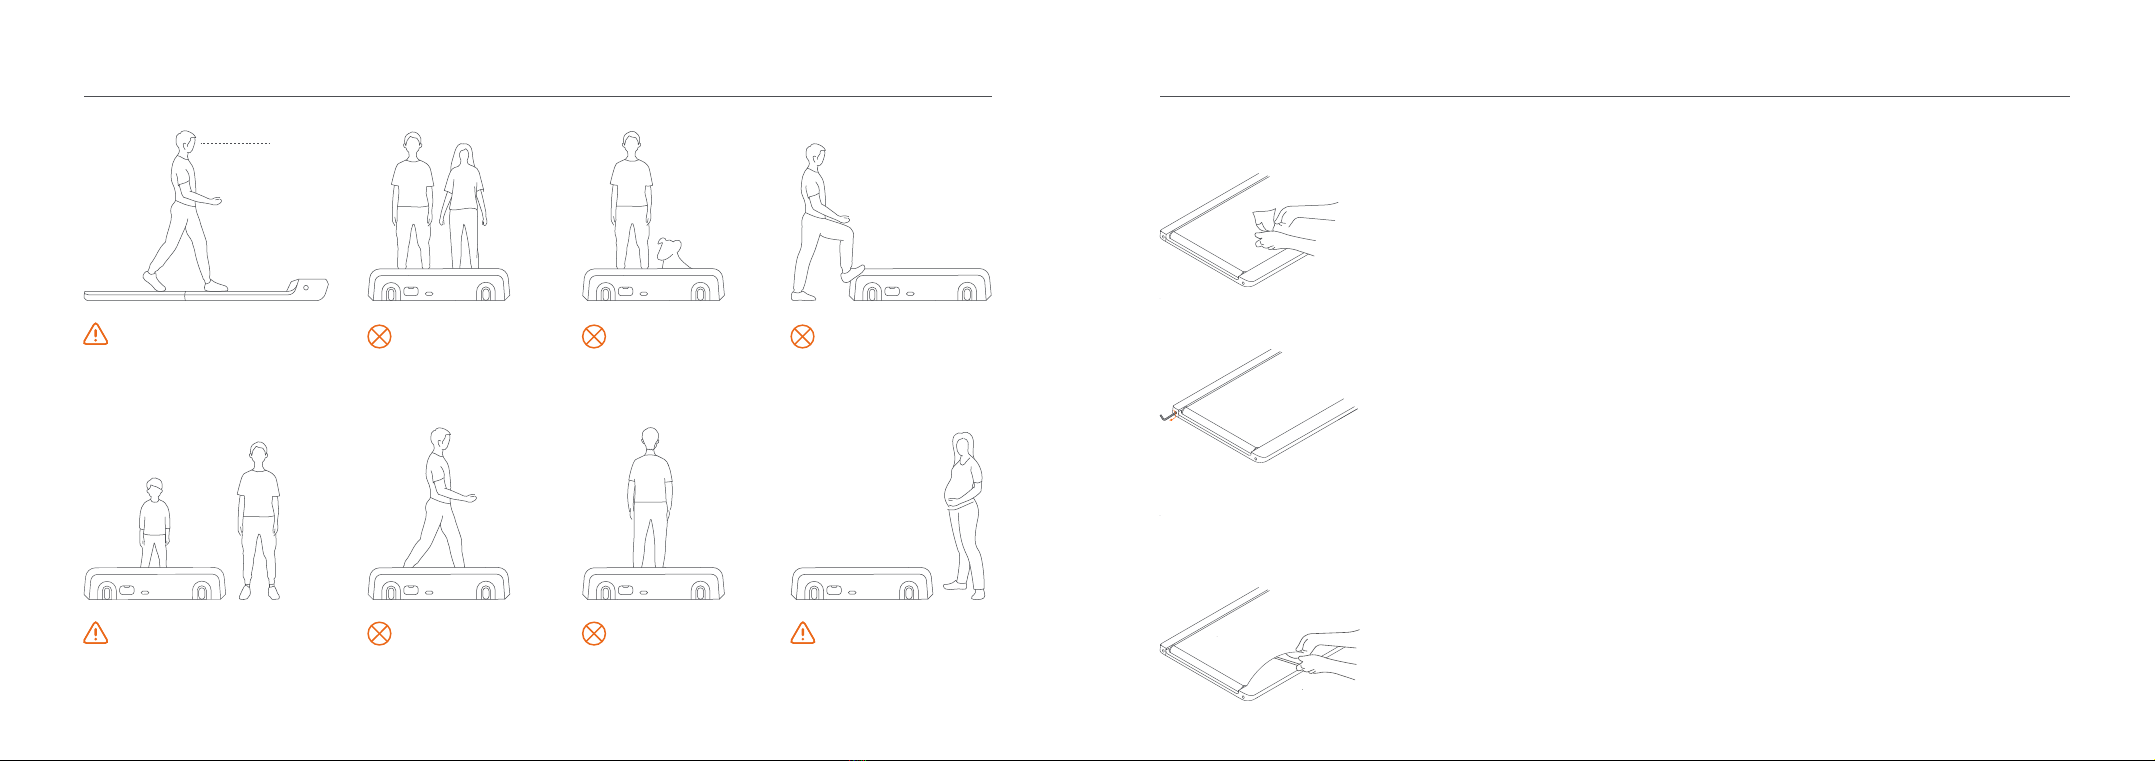
Automatic mode
4. Description of automatic mode control (advance mode)
04 Learn to use WalkingPad
This is a challenging and higher-class mode, User can walk
on the Walkingpad completely out of remote controller. We
only recommend those who have good sports skills or
walking-device experience to take the challenge.
Entering this area, the
WalkingPad will start or
accelerate under the
automatic mode.
Entering this area, the
WalkingPad will slow down
automatically under the
automatic mode.

05 Safety Notice
13 14
Please keep a rear distance of
1000 mm or more.
Please keep a distance of 500 mm
or more for both sides.
Please choose sport shoes. Please do not stand up on the
walking machine when it is
under auto calibration situation.
Anti-pinch.
Anti-involved, please do not
trample.
Please pull out the plug when you
are not using it.
Using on uneven ground is
prohibited.
It is strictly prohibited to walk
up and down the walking
machine when running.
Turn the power off before fold up
the WalkingPad.
Prohibition of vertical placement.
Prohibition of lateral placement.

1. Clean the walking machine - Turn off the machine and unplug the power cord.
- Add several drops of detergent on cotton rag or towel. Don't pour the detergent on the
belt directly, and don't use acid or corrosive cleaners.
- Wipe off dust and stains on the frame, front panel and belt. Do not wipe backside of the
belt.
- After using for a period, dust and stains may appear on the back part, that is normal
situation, and just clean them up.
- Press and hold both Mode Switch Button and Acceleration Button on the remote control
over 3 seconds.
- Front panel shows "CALI" and the speed is 4 km/hr ( 2.5 mi/hr ).
- If belt deviates to the left: Turn the left adjusting screw for a half-circle clockwise.
- If belt deviates to the right: Turn the right adjusting screw for a half-circle clockwise.
- If belt is slipping: Turn both left and right adjusting screw for a half-circle clockwise at
same time.
- Keep the machine running for 1-2 minutes and check whether it needs to readjust.
- Turn off the machine and unplug the power cord.
- Lift up the belt and apply silicone oil on the backside of the belt.
- Turn on the machine again
- Keep the machine running under 4 km/hr ( 2.5 mi/hr ) for 10-20 20 seconds.
- Only apply 5 ml ~ 10 ml lubricant oil each time, too much lubricant oil makes the belt
become slipping.
- Apply for silicone oil once every 3 months.
05 Safety Notice 06 Maintenance and Service
15 16
Children should be
supervised to ensure that
they do not play with the
Walkingpad.
Please do not use the
walking machine if you
are aged people or
pregnant women.
Please keep your sight
horizontal to avoid dizziness.
More than one person
on the Walkingpad is
prohibited.
Using machine with
pet is prohibited.
Walking sideways on
the machine is
prohibited.
Walking backwards on
the machine is
prohibited.
Trampling the machine
head is prohibited.
Horizon
2. Adjust the belt
3. Lubricate the Belt

08 Replacement and Disposal07 Implied Warranty
17 18
The battery contained in this appliance must be removed for or disposal.
When replacing the battery, use only original battery, available from our online parts shop.
The battery compartment is located on the underside of the appliance. Open the compartment by removing the
screw in the cover using a suitable screwdriver, and then press the lower end of the locking catch on the
connectors. In that way, both sides of the connection can be separated by pulling them apart.
When inserting a new battery, push together the two connectors and ensure that the catch locks over the stop.
Never dispose of old battery in domestic garbage, but only through the proper public collection points. This also
applies to the battery of defective appliances.
The importer of this machine assures that this device is manufactured with high quality materials.
The prerequisite for the implied warranty is the proper setup in accordance with the operating instructions. Improper use and /or
incorrect transportation can void the warranty.
The implied warranty is valid for 1 year, beginning from the date of purchase. For eventual defects please contact the dealer of
this product within the guarantee period.
The warranty applies to the following parts (as far as included in the scope of delivery): Frame, cable, electronic devices and
wheels.
The guarantee does not cover:
• Damage effected by outer force
• Intervention by unauthorized parties
• Incorrect handling of the product
• Non-compliance of the operating instructions
Wear parts and expendable parts are also not covered.
The device is only intended for home and office use. The warranty does not apply to commercial use of any kind.
Manufactured for:
Gymstick International Oy
Ratavartijankatu 11
15170 Lahti, FINLAND

08 Replacement and Disposal
Devices marked with this symbol must be disposed of separately from your household waste, as they contain
valuable materials which can be recycled. Proper disposal protects the environment and human health. Your
local authority or retailer can provide information on the matter.
19
Table of contents
Other Gymstick Treadmill manuals

Gymstick
Gymstick TITANIUM RUN 2.0 User manual

Gymstick
Gymstick GT7.0 User manual

Gymstick
Gymstick PRO10.0 User manual

Gymstick
Gymstick GT3.0 User manual

Gymstick
Gymstick RUN 3.0 User manual

Gymstick
Gymstick RUN 10.0 User manual

Gymstick
Gymstick PRO20.0 User manual

Gymstick
Gymstick PRO20.0 User manual

Gymstick
Gymstick GT1.0 User manual

Gymstick
Gymstick GT4.0 User manual