EnglishDeutsch
 logo
Brands
  1. Home
  2. •
  3. Brands
  4. •
  5. GYS
  6. •
  7. Batteries Charger
  8. •
  9. GYS 029200 User manual

GYS 029200 User manual

Other GYS Batteries Charger manuals

GYS BATIUM 25 User manual

GYS

GYS BATIUM 25 User manual

GYS GYSTECH 750 User manual

GYS

GYS GYSTECH 750 User manual

GYS GYSFLASH 20.12/24 PL User manual

GYS

GYS GYSFLASH 20.12/24 PL User manual

GYS GYSFLASH HERITAGE 6 A User manual

GYS

GYS GYSFLASH HERITAGE 6 A User manual

GYS Wattmatic 100 User manual

GYS

GYS Wattmatic 100 User manual

GYS GYSFLASH 6.12 User manual

GYS

GYS GYSFLASH 6.12 User manual

GYS GYSFLASH 10.36/48 PL User manual

GYS

GYS GYSFLASH 10.36/48 PL User manual

GYS NEOSTART 320 User manual

GYS

GYS NEOSTART 320 User manual

GYS GYSFLASH 8.12 User manual

GYS

GYS GYSFLASH 8.12 User manual

GYS GYSPack 650 User manual

GYS

GYS GYSPack 650 User manual

GYS ENERGY 123 User manual

GYS

GYS ENERGY 123 User manual

GYS CT 160 User manual

GYS

GYS CT 160 User manual

GYS GYSPACK 660 User manual

GYS

GYS GYSPACK 660 User manual

GYS BATIUM Series User manual

GYS

GYS BATIUM Series User manual

GYS CT 160 User manual

GYS

GYS CT 160 User manual

GYS GYSFLASH 4.12 User manual

GYS

GYS GYSFLASH 4.12 User manual

GYS ARTIC 800 User manual

GYS

GYS ARTIC 800 User manual

GYS GYSFLASH 8.48 PL-E User manual

GYS

GYS GYSFLASH 8.48 PL-E User manual

GYS GYSFLASH 1.12 User manual

GYS

GYS GYSFLASH 1.12 User manual

GYS GYSTECH 7000 User manual

GYS

GYS GYSTECH 7000 User manual

GYS TCB 60 User manual

GYS

GYS TCB 60 User manual

GYS GYSFLASH 50.24 HF User manual

GYS

GYS GYSFLASH 50.24 HF User manual

GYS GYSPack 610 User manual

GYS

GYS GYSPack 610 User manual

GYS INVERTER 40 HF User manual

GYS

GYS INVERTER 40 HF User manual

Popular Batteries Charger manuals by other brands

AA Portable Power Corp Universal Smart Charger user manual

AA Portable Power Corp

AA Portable Power Corp Universal Smart Charger user manual

Enelion Vertica manual

Enelion

Enelion Vertica manual

RCA CHU6 instruction manual

RCA

RCA CHU6 instruction manual

ANSMANN ALCT 6/24-10 manual

ANSMANN

ANSMANN ALCT 6/24-10 manual

Hitachi UC 18YRSL Safety instructions and instruction manual

Hitachi

Hitachi UC 18YRSL Safety instructions and instruction manual

Olympus B-20 LPC instructions

Olympus

Olympus B-20 LPC instructions

Exibel ZH1708143 operating instructions

Exibel

Exibel ZH1708143 operating instructions

Lenmar Mach 1 user manual

Lenmar

Lenmar Mach 1 user manual

CTEK MXS 5.0 manual

CTEK

CTEK MXS 5.0 manual

ABB HT842379 Operation manual

ABB

ABB HT842379 Operation manual

Nitecore Superb Charger SC4 user manual

Nitecore

Nitecore Superb Charger SC4 user manual

Renogy RBC2125DS-21W quick guide

Renogy

Renogy RBC2125DS-21W quick guide

Braun BWC02M User instructions

Braun

Braun BWC02M User instructions

CTEK MXS 3.6 manual

CTEK

CTEK MXS 3.6 manual

Black & Decker BDV090 Original instructions

Black & Decker

Black & Decker BDV090 Original instructions

Trinity DPD quick start guide

Trinity

Trinity DPD quick start guide

Hulkman Sigma 1 user guide

Hulkman

Hulkman Sigma 1 user guide

IKEA koppla manual

IKEA

IKEA koppla manual

https://manuals.online logo
https://manuals.online logoBrands
  • About & Mission
  • Contact us
  • Privacy Policy
  • Terms and Conditions

Copyright 2026 Manuals.Online. All Rights Reserved.

11
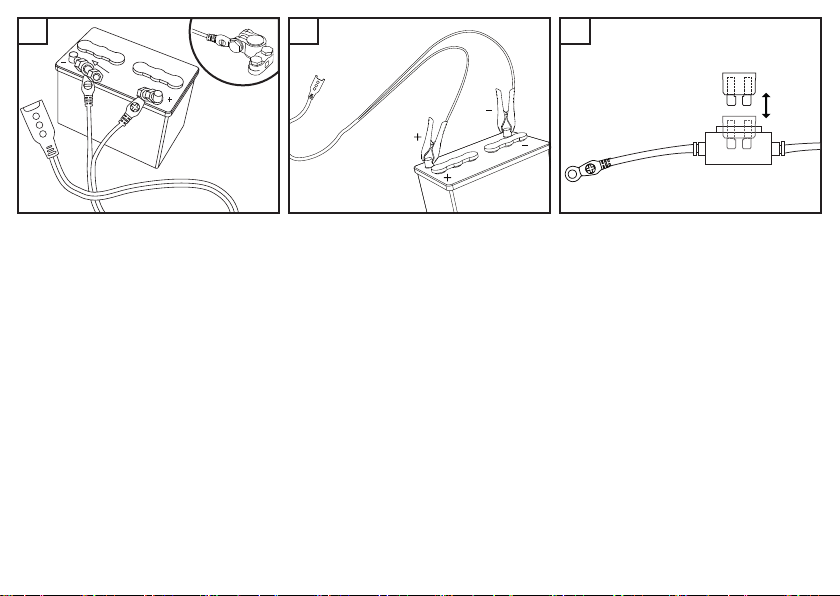
1- Fixer l’œillet rouge au + de la batterie.
2- Fixer l’œillet noir au - de la batterie.
(Vérier la présence du fusible 15A.)
1- Connect the red eyelet to the battery’s + terminal.
2- Cnnnetc the black eyelet to the battery’s - terminal.
(Check that the 15A fuse is in place)
1- Die rote Öse am Pluspol (+) der Batterie befestigen.
2- Die schwarze Öse am Minuspol (-) der Batterie
befestigen. (Überprüfen Sie die 15A-Sicherung.)
1 - Fijar el ojillo rojo al + de la batería.
2- Fijar el ojillo negro al - de la batería.
(Compruebe que haya un fusible de 15A)
1- Закрепите красное ушко на + АКБ.
2- Закрепите черное ушко на - АКБ.
(Проверьте присутствие плавкого предохранителя 15A.)
1- Bevestig de rood ring op de + van de accu.
2- Bevestig de zwarte ring op de - van de accu.
(Controleer de aanwezigheid van de 15A zekering).
1- Fissare l’occhiello rosso al + della batteria.
2- Fissare l’occhiello nero al - della batteria.
(Vericare la presenza del fusibile 15A.)
1- Branchez la pince rouge au + de la batterie.
2- Branchez la pince noir au - de la batterie.
(Vérier la présence du fusible 15A.)
1- Connect the red clamp to the battery’s + terminal.
2- Connect the black clamp to the battery’s - terminal.
(Check that the 15A fuse is in place)
1- Die rote Polklemme am Pluspol (+) der Batterie befestigen.
2- Die schwarze Polklemme am Minuspol (-) der Batterie
befestigen. (Überprüfen Sie die 15A-Sicherung.)
1- Conecte la pinza roja al polo + de la batería.
2- Conecte la pinza negra al polo - de la batería.
(Compruebe que haya un fusible de 15A)
1 - Подсоедините красный зажим к + АКБ.
2 - Подсоедините черный зажим к - АКБ.
(Проверьте присутствие плавкого предохранителя 15A.)
1 - Sluit de rode klem aan op de + van de accu.
2 - Sluit de zwarte klem aan op de - van de accu.
(Controleer de aanwezigheid van de 15A zekering).
1- Collegare il morsetto rosso al + della batteria.
2- Collegare il morsetto nero al - della batteria.
(Vericare la presenza del fusibile 15A.)
2
Après l’étape 1, si aucune diode ne s’allume, vérier et
remplacer le fusible si nécessaire (15A).
After completing step 1, if no LED indicator switches on,
check and replace the FUSE (15A) if necessary.
Leuchtet keine LED in der Anzeige, prüfen Sie den Zustand
der Sicherung (15A).
Tras la etapa 1, si ningún diodo se enciende, compruebe y
reemplace el fusible si fuese necesario (15A).
После этапа 1, если ни один из диодов не зажегся,
то проверьте и, если надо, замените плавкий
предохранитель (15A).
Als na stap 1 geen enkel lampje gaat branden moet u de
zekering (15A) controleren, en indien nodig, vervangen.
Dopo la fase 1, se nessun diodo si accende, controllare e
sostituire il fusibile se necessario (15A).
5
1- Branchez le chargeur GYSFLASH.
2- Choisir le type de charge (voir notice GYSFLASH).
1- Connect the GYSFLASH charger.
2- Choose the charge mode
(see GYSFLASH instruction manual).
1- GYSFLASH-Ladegerät anschließen.
2- Modus auswählen
(siehe Betriebsanleitungen GYSFLASH).
1- Conecte el cargador GYSFLASH.
2- Seleccione el tipo de carga (ver manual GYSFLASH).
1- Подключите зарядное устройство GYSFLASH.
2- Выберите тип зарядки
(см. инструкцию к GYSFLASH).
1 - Sluit de GYSFLASH aan.
2 - Kies de laadmodus (zie gebruiksaanwijzing GYSFLASH).
1- Collegare il caricatore GYSFLASH.
2- Scegliere il tipo di carica (vedere foglio illustrativo
GYSFLASH).
CLICK !
4
1- Enlever le bouchon du connecteur.
2- Connecter l’indicateur de batterie.
1- Remove the connector’s cap.
2- Connect the battery indicator.
1- Schutzkappe entfernen.
2- Kabel anschließen.
1 - Retire el tapón del conector.
2- Conecte el indicador de batería.
1- Снимите крышку с коннектора.
2- Подсоедините индикатор АКБ.
1 - Verwijder de dop van de connector.
2 - Sluit de accu-indicator aan.
1- Rimuovere il tappo dal connettore.
2- Collegare l’indicatore di batteria.
3
1- Rouge : Charge nécessaire (<40%)
2- Jaune : Charge recommandée (40%<90%)
3- Verte : Charge non nécessaire (>90%)
1- Red : Charge is necessary (<40%)
2- Yellow : Charge is recommended (40%<90%)
3- Green : Charge is not necessary (>90%)
1- Rot : Ladung nötig (<40%)
2- Gelb : Ladung empfohlen (40%<90%)
3- Grün : Ladung nicht nötig (>90%)
1- Rojo : Carga necesaria (<40%)
2- Amarillo : Carga recomendada (40%<90%)
3- Verde : Carga no necesaria (>90%)
1- Красный: Требуется зарядка (<40%)
2- Желтый: Зарядка рекомендуется (40%<90%)
3- Зеленый: Зарядка не требуется (>90%)
1 - Rood : Laden noodzakelijk (<40%)
2 - Geel : Laden aanbevolen (40%<90%)
3 - Groen : Laden niet noodzakelijk (>90%)
1- Rosso : Carica necessaria (<40%)
2- Giallo : Carica consigliata (40%<90%)
3- Verde : Carica non richiesta (>90%)
3
2
1