Care and Cleaning
Troubleshooting
Warranty
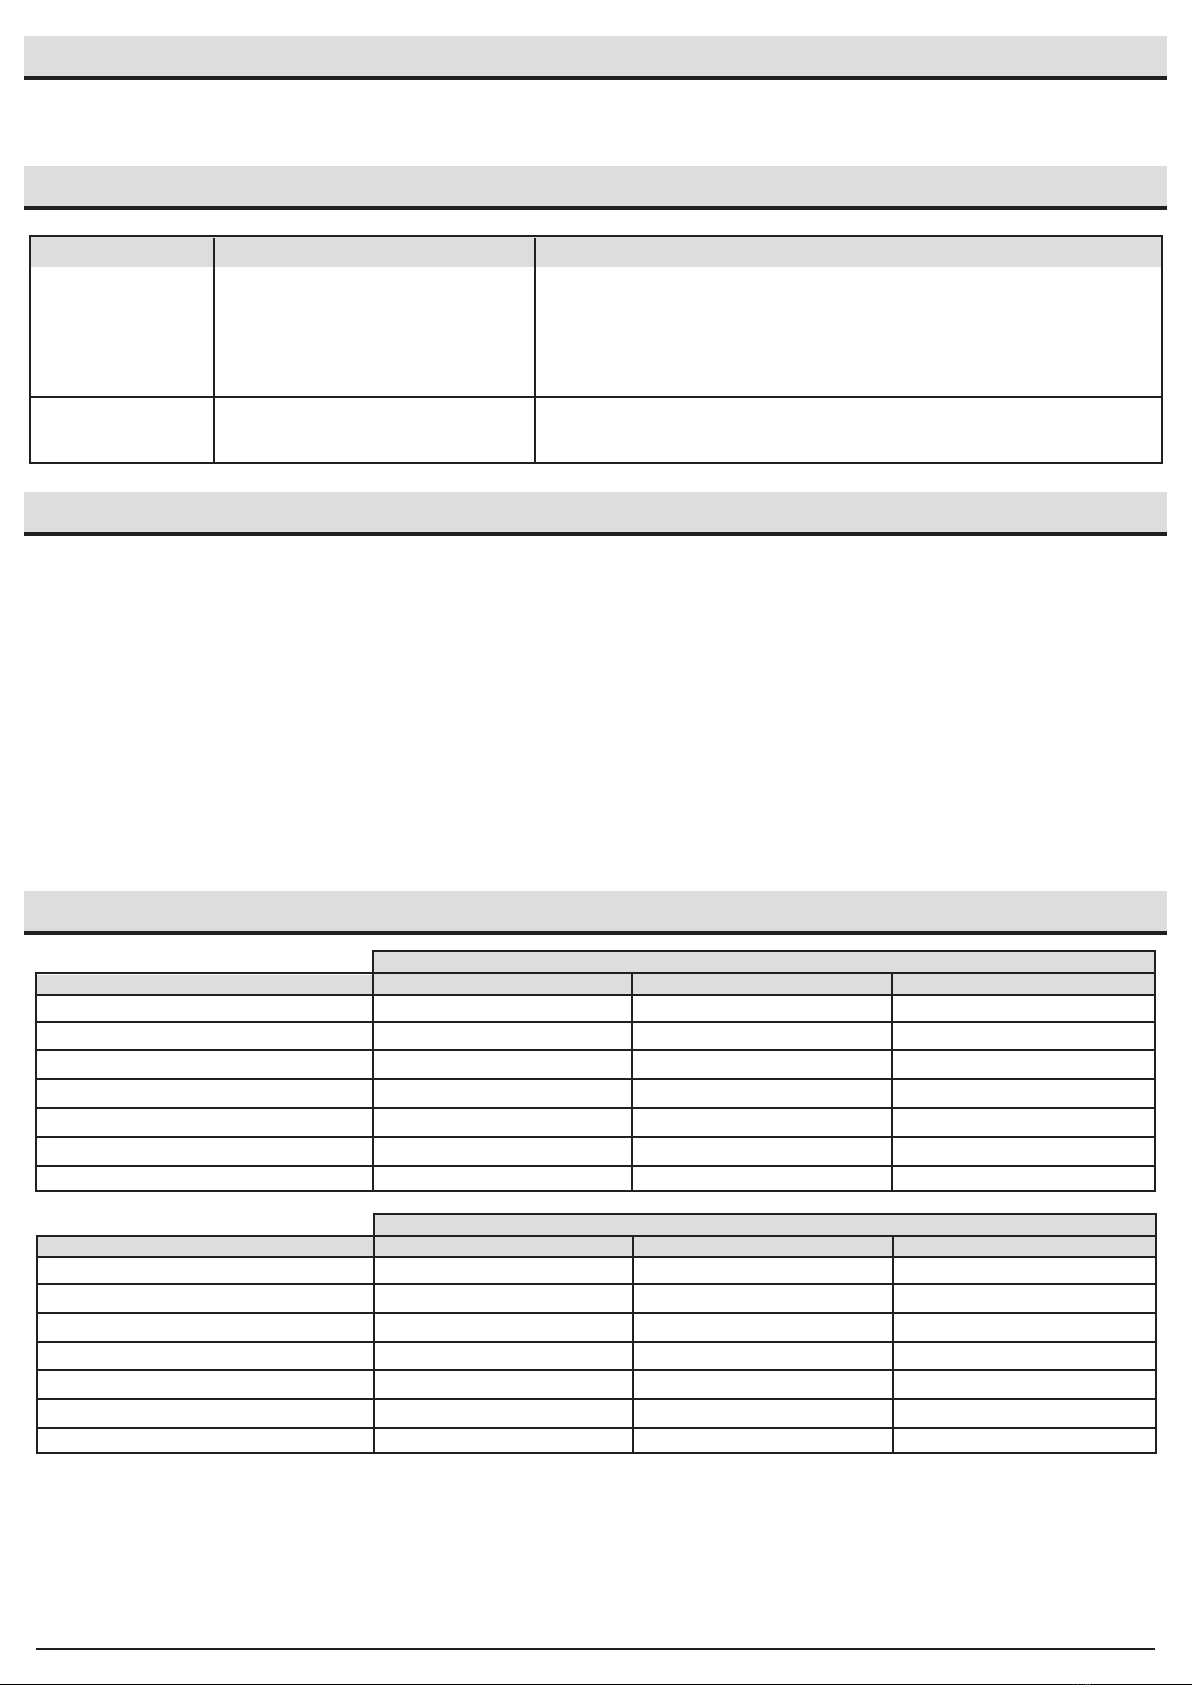
Cable Selection
□Clean the xture with a soft, dry cloth.
□Do not use any cleaners with chemicals, solvents or harsh abrasives.
The xture will not
light.
Only some lights
work.
• Thereisnopower.
• Thereisadisconnectionorbreakin
the wire.
• Thereisalightsourcenearthe
transformer.
• Therearetoomanyxtures
connected to the transformer.
•Theproblemiswiththexture’s
connector or LED.
• Checkthatthepowerison.
• Checkifthereisalooseconnectionatthetransformerscrewterminal.
• Makesurethephotocellisnotnearalightingsource.
• Removesomextures.
•Checktheconnectortomakesurethewirestabshavepiercedthelandscape
wire.
Problem Possible cause Solution
WHAT IS COVERED
The manufacturer warrants this lighting xture to be free from defects in materials and workmanship for a period of ve (5) years from the date of
purchase. This warranty applies only to the original consumer and only to products used in normal use and service. If this product is found to be
defective,themanufacturer’sonlyobligation,andyourexclusiveremedy,istherepairorreplacementoftheproductatthemanufacturer’sdiscretion,
provided that the product has not been damaged through misuse, abuse, accident, modications, alterations, neglect or mishandling.
WHAT IS NOT COVERED
This warranty shall not apply to any product that is found to have been improperly installed, set-up, or used in any way not in accordance with the
instructions supplied with the product. This warranty shall not apply to a failure of the product as a result of an accident, misuse, abuse, negligence,
alteration or faulty installation, or any other failure not relating to faulty material or workmanship. This warranty shall not apply to the nish on any
portion of the product, such as surface and/or weathering, as this is considered normal wear and tear.
The manufacturer does not warrant and specially disclaims any warranty, whether express or implied, of tness for a particular purpose, other than
the warranty contained herein. The manufacturer specically disclaims any liability and shall not be liable for any consequential or incidental loss or
damage, including but not limited to any labor / expense costs involved in the replacement or repair of said product.
Contact the Customer Service Team at 1-855-HD-HAMPTON or visit www.hamptonbay.com
Total Fixture Wattage
0-60 Watts
61-120 Watts
121-180 Watts
181-240 Watts
241-300 Watts
600W Transformer = (2X300) Watts
900W Transformer = (3X300) Watts
51-100 feet
Cable Length
101-150 feet
16 AWG 16 AWG 14 AWG
16 AWG 14 AWG 12 AWG
14 AWG 12 AWG NOT RECOMMENDED
14 AWG 12 AWG NOT RECOMMENDED
12 AWG NOT RECOMMENDED NOT RECOMMENDED
12 AWG NOT RECOMMENDED NOT RECOMMENDED
12 AWG NOT RECOMMENDED NOT RECOMMENDED
0-50 feet
12 VOLT TAP
Total Fixture Wattage
0-60 Watts
61-120 Watts
121-180 Watts
181-240 Watts
241-300 Watts
600W Transformer = (2X300) Watts
900W Transformer = (3X300) Watts
51-100 feet
Cable Length
101-150 feet
16 AWG* 16 AWG 16 AWG
16 AWG* 16 AWG 12 AWG
14 AWG* 14 AWG 12 AWG
14 AWG* 14 AWG 12 AWG
12 AWG* 12 AWG NOT RECOMMENDED
12 AWG* 12 AWG NOT RECOMMENDED
12 AWG* 12 AWG NOT RECOMMENDED
0-50 feet
15 VOLT TAP
This data is provided as a general guideline. Actual performance will depend on the installation layout, the xtures, and the
condition of the cable. NOTE: Most LED landscape lighting xtures can operate with full illumination from 9V down to as little as
6V. It is possible to have extended length runs with LED xtures that go beyond the specications shown in the guidelines above.
Additional landscape lighting cable can be purchased at your local Home Depot store.
* NOT RECOMMENDED FOR HALOGEN LANDSCAPE LIGHTS