Hanskamp MultiDos 035-000-000 Series User manual
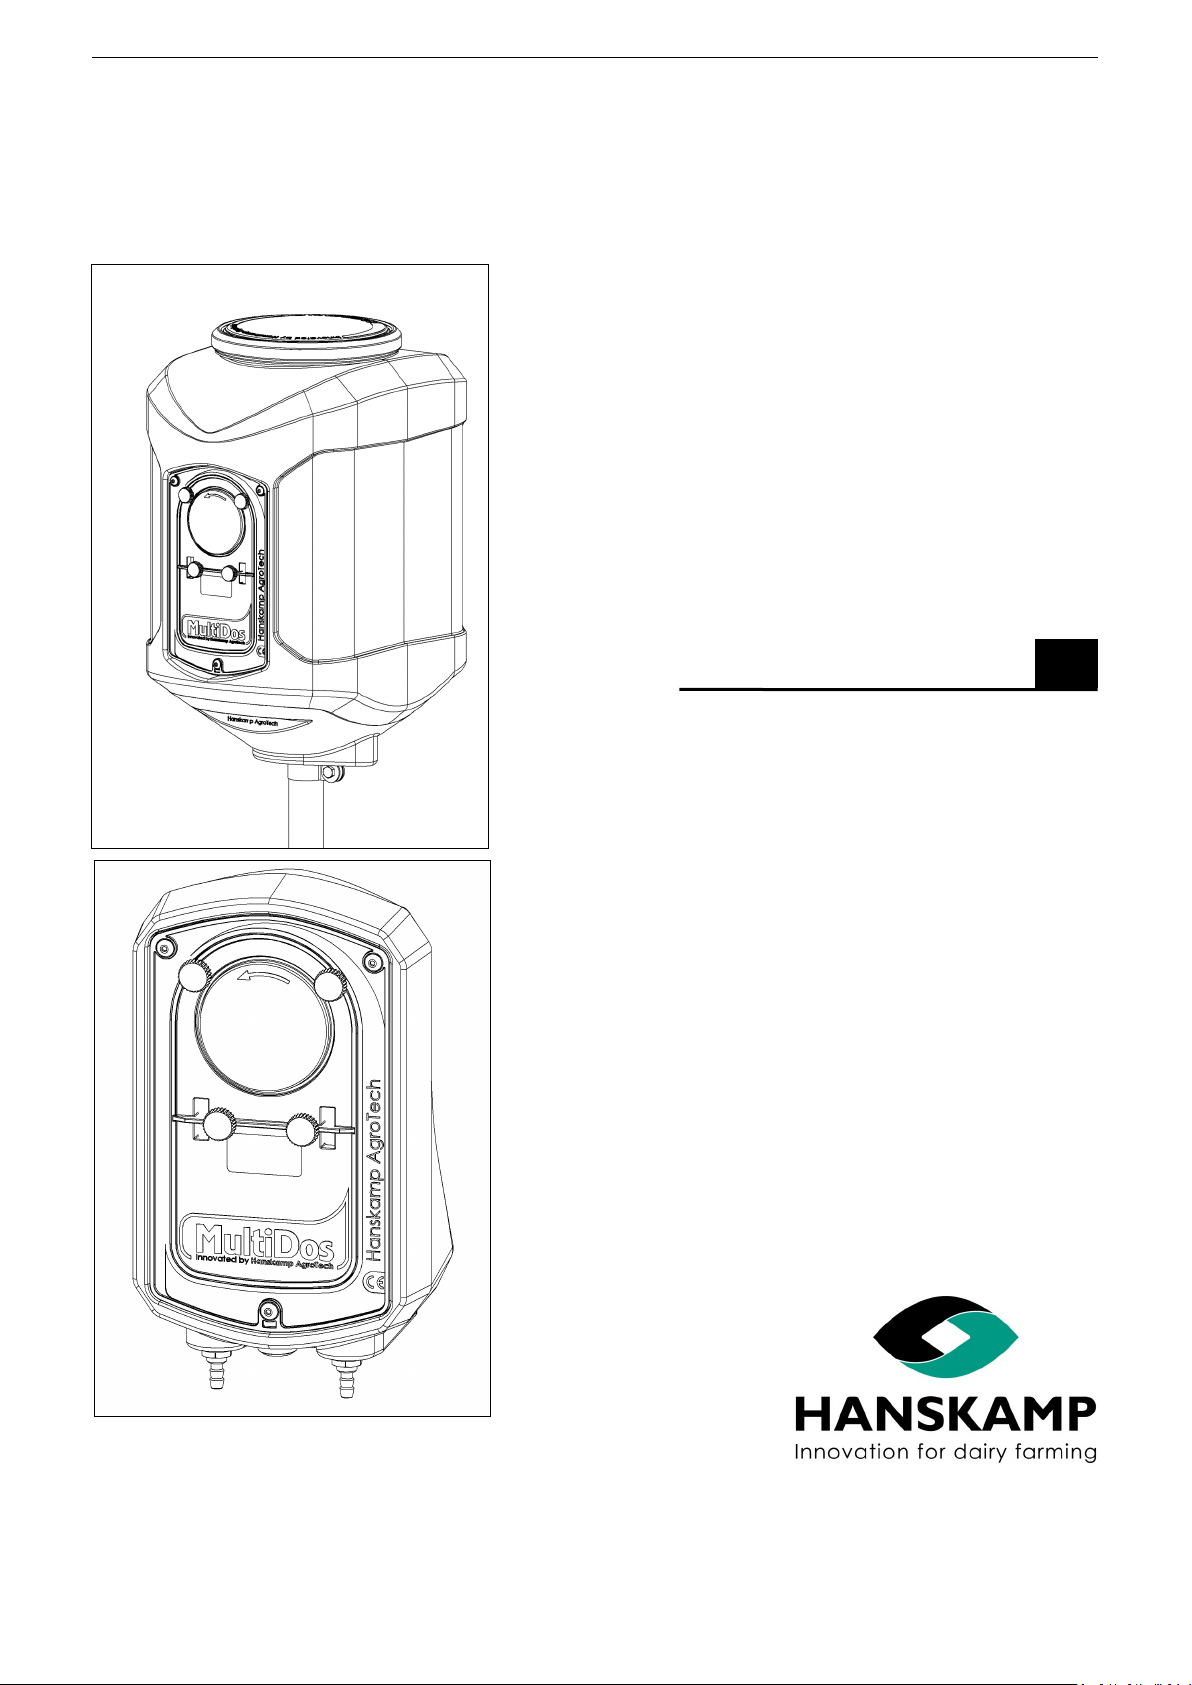
MultiDos 035-000-000
036-000-000
EN
Installaon and Operang Instrucons
Item number: 010-100-000
Date: December 2023
Version: 2.1 - Translaon of original instrucons for use
According to Annex 1 chapter 1.7.4 Machine guideline 2006/42/EC
Doenchem,
The Netherlands
www.hanskamp.com
Vloeistofdoseersysteem
Liquid dosing system
Flüssigkeitsdosiersystem
Système de dosage pour liquide
2 - 30
Hanskamp AgroTech BV (The Netherlands) www.hanskamp.com
MulDos
EN Dosing system - Dosiersystem - Système de dosage - Doseersysteem
Foreword
Contents of the installaon and operang instrucons
This manual contains the informaon necessary for the correct installaon and opera-
on of a Hanskamp MulDos. Study and understand this informaon thoroughly before
conguraon of the MulDos. Failure to do so could result in damage to equipment.
Please consult your milking equipment dealer if you do not understand the informaon
in this manual, or if you need addional informaon.
All informaon in this manual has been compiled with care. Hanskamp shall not be lia-
ble for errors or faults in this manual. The recommendaons are meant to serve as
guidelines. All instrucons, pictures and specicaons in this manual are based on the
latest informaon that was available at the me of publicaon. Your MulDos may com-
prise improvements, features or opons that are not covered in this manual.
Applicability
The table below shows the type numbers of the MulDos for which this manual is
applicable.
Model designaon
Contact number of milking technology dealer
We recommend that you enter the name, phone number and e-mail of your milking
technology dealer in the table below, so that you can always nd the right informaon
easily.
Name
Address
Phone number
E-mail
Model Type number
MulDos in Container (AC &DC) 035-001-000
035-002-000
036-001-000
036-002-000
Page 8 to 12
MulDos wall mount (AC&DC) 035-003-000
036-003-000
Page 13 to 17

3 - 30
Hanskamp AgroTech BV (The Netherlands) www.hanskamp.com
MulDos
EN Dosing system - Dosiersystem - Système de dosage - Doseersysteem
1. Introducon
MulDos by Hanskamp, a proven, sustainable technique enabling you to very easily
dose the right quanty of liquids per day and per cow. Smart, fast and aordable. Mul-
Dos doses liquid propylene glycol like gravy on top of the feed chunks. And cows love it!
The informaon in this manual is intended for dairy farmers and technicians.
• Dairy farmers can use the informaon to test and adjust the MulDos.
• Technicians can use the informaon to install and set up the MulDos.
4 - 30
Hanskamp AgroTech BV (The Netherlands) www.hanskamp.com
MulDos
EN Dosing system - Dosiersystem - Système de dosage - Doseersysteem
2. Safety
2.1 Introducon
The 'Safety Warning' symbol warns about important safety messages on your MulDos
and in the manual. Use cauon if you see this symbol; it means there is a risk of personal
injury or death. Follow the direcons of any safety messages.
Safety Alert Symbol
2.2 Warning Texts
Note the use of the warnings CAUTION and DANGER in the safety messages. The
following guidelines apply to these warnings:
Warning! Indicates a potenally hazardous situaon which could result in minor
personal injury or damage to equipment or the environment if the warning is
ignored.
Danger! Indicates a potenally hazardous situaon which could result in death or
serious injury if ignored.
2.3 Safety Instrucons
You are personally responsible for operang and maintaining your MulDos safely. You
must make sure that you and anyone else who operates the equipment, performs
maintenance on the MulDos or works in the vicinity of the MulDos, are familiar with
all the safety informaon in this manual.
Safety is in your hands. Proper safety measures protect you and the people around you.
Incorporate these measures into your safety programme. Make sure that everyone who
uses, carries out maintenance, or works in the vicinity of the MulDos is aware of these
safety measures. Do not risk injury or death by ignoring the safety precauons.
• MulDos owners must train users before the MulDos is used. This train-
ing must be repeated at least once a year.
• The user must read, understand and follow all the safety and operang
instrucons in the manual.
• Anybody who has not read and understood all the safety and operang
instrucons must not operate the MulDos.
• Do not make any modicaons to the equipment. Unauthorised modica-
ons may aect operaon, aect the service life of the equipment, and/or
result in personal injury.
• Only use original spare parts, and make sure that they are ed by
authorised technicians.

5 - 30
Hanskamp AgroTech BV (The Netherlands) www.hanskamp.com
MulDos
EN Dosing system - Dosiersystem - Système de dosage - Doseersysteem
2.3.1 General Safety
• Make sure that you have read and understood the manual and the safety
instrucons before connecng the power supply to operate or adjust the
MulDos, or turning it o for maintenance.
• Only trained persons may operate the MulDos.
• A rst-aid kit must be available near the MulDos. Store in a highly visible
place.
• A carbon dioxide or foam re exnguisher must be available near the Mul-
Dos. Store the re exnguisher in a highly visible place.
• Install all guards and safety devices before using the MulDos.
• Wear proper protecve clothing and equipment.
• Before cleaning the MulFill or performing maintenance on it, switch o
the power supply of the MulFill by removing the plug from the socket.
• Make sure that phone numbers of emergency medical care available in
your area are at hand.
• If you have any other quesons, please contact your milking technology
dealer.
• Review all safety-related topics with all users at least once a year.
2.3.2 Electrical safety
• Only an authorized electrician must install the electrical power supply for
the MulDos.
• Make sure the electrical grounding of the electrical system and all parts of
the MulDos meet the local rules and regulaons.
• Replace any damaged electrical lines, conduits, switches and components
immediately.
• Isolate the electrical power supply before you open the MulDos to work
on the electrical system.
2.3.3 Safety during installaon
• Make sure that you have read and understood the instrucons in this
manual.
• Check whether the MulDos has been installed correctly, as described in
the manual.
2.3.4 Safe operaon
• Make sure that you have read and understood the manual and the safety
instrucons before connecng the power supply to operate or adjust the
MulDos, or turning it o for maintenance.
• Only trained personnel may operate the MulDos.
• Before cleaning the MulDosor performing maintenance on it, switch o
the power supply of the MulDos by removing the plug from the socket.
• Install the lid and other safety devices before using the MulDos.
• Keep hands, feet, hair and clothing away from live parts.
• Keep all unauthorised persons, especially small children, away from the
MulDosat all mes.
• Before connecng the MulDos to the power supply, make sure that all
parts are properly ghtened and that all cables and mounngs are in good
condion.
• If you have any other quesons, please contact your milking technology
dealer.

6 - 30
Hanskamp AgroTech BV (The Netherlands) www.hanskamp.com
MulDos
EN Dosing system - Dosiersystem - Système de dosage - Doseersysteem
2.3.5 Maintenance Safety
• Make sure that you have read and understood the manual and the safety
instrucons before connecng the power supply to operate or adjust the
MulDos, or turning it o for maintenance.
• Only trained personnel may service and maintain the MulDos.
• Before cleaning the MulDos or performing maintenance on it, switch o
the power supply of the MulDos by removing the plug from the socket.
• Wear protecve clothing and safety goggles when you do work on the
pneumac system.
• Make sure all guards and safety devices are installed when you have
nished maintenance work.
2.3.6 Safety messages
This chapter lists the general safety messages. Specic safety messages,
where potenal hazards may arise if the procedures or instrucons are not
followed, are included in the appropriate secons of this manual.
7 - 30
Hanskamp AgroTech BV (The Netherlands) www.hanskamp.com
MulDos
EN Dosing system - Dosiersystem - Système de dosage - Doseersysteem
3. Installaon instrucon
General comment
The Hanskamp Mul-Dos-dosing system is a liquid dosing system. The MulDos
is suitable for uids with a low viscosity like Glycerine, Propyleen glycol, Tirsana
or Keto-protect which are based on water or oil. The MulDos is not suitable for
uids with a high viscosity. The MulDos can also as the PipeFeeder and other
Hanskamp dosators be linked to any general feed system.
This instrucon will help you to install the MulDos-system (gure 1).
Read this instrucon carefully and follow the safety instrucons. Examples of installa-
on can be found at www.hanskamp.com.
Order numbers and names of accessories can be found in the aachment.
Transport and storage
A complete MulDos system set consists out of a MulDos wall mount or a MulDos-
container with including 1 or 2 MulDos pumps. The container and/or wall mount will be
send in a box. These boxes can be put on each other on a pallet. The MulDos system
can also be send in a box.
Please note! Always use an appropriate vehicle (forkli truck, pallet fork, pump
truck, etc.) to move the pallet.
Please note! Parts may fall o the pallet when it is being unpacked.
Safety
The user and installer are solely responsible for the safe operaon and maintenance of
the MulDos-system. In case of changing the HanskampQualityTube of the pump (art. nr.
003-512-00*), always disconnect the electric system.
Important: do not remove the sckers!
Maintaining sckers
• Keep safety sckers clean and legible.
• Clean safety sckers with soap and water.
• Do not use solvents or abrasives that could damage safety sckers.
• Replace missing or illegible safety sckers.
• Safety sckers are available from Hanskamp. Always use the arcle numbers in correspondence.
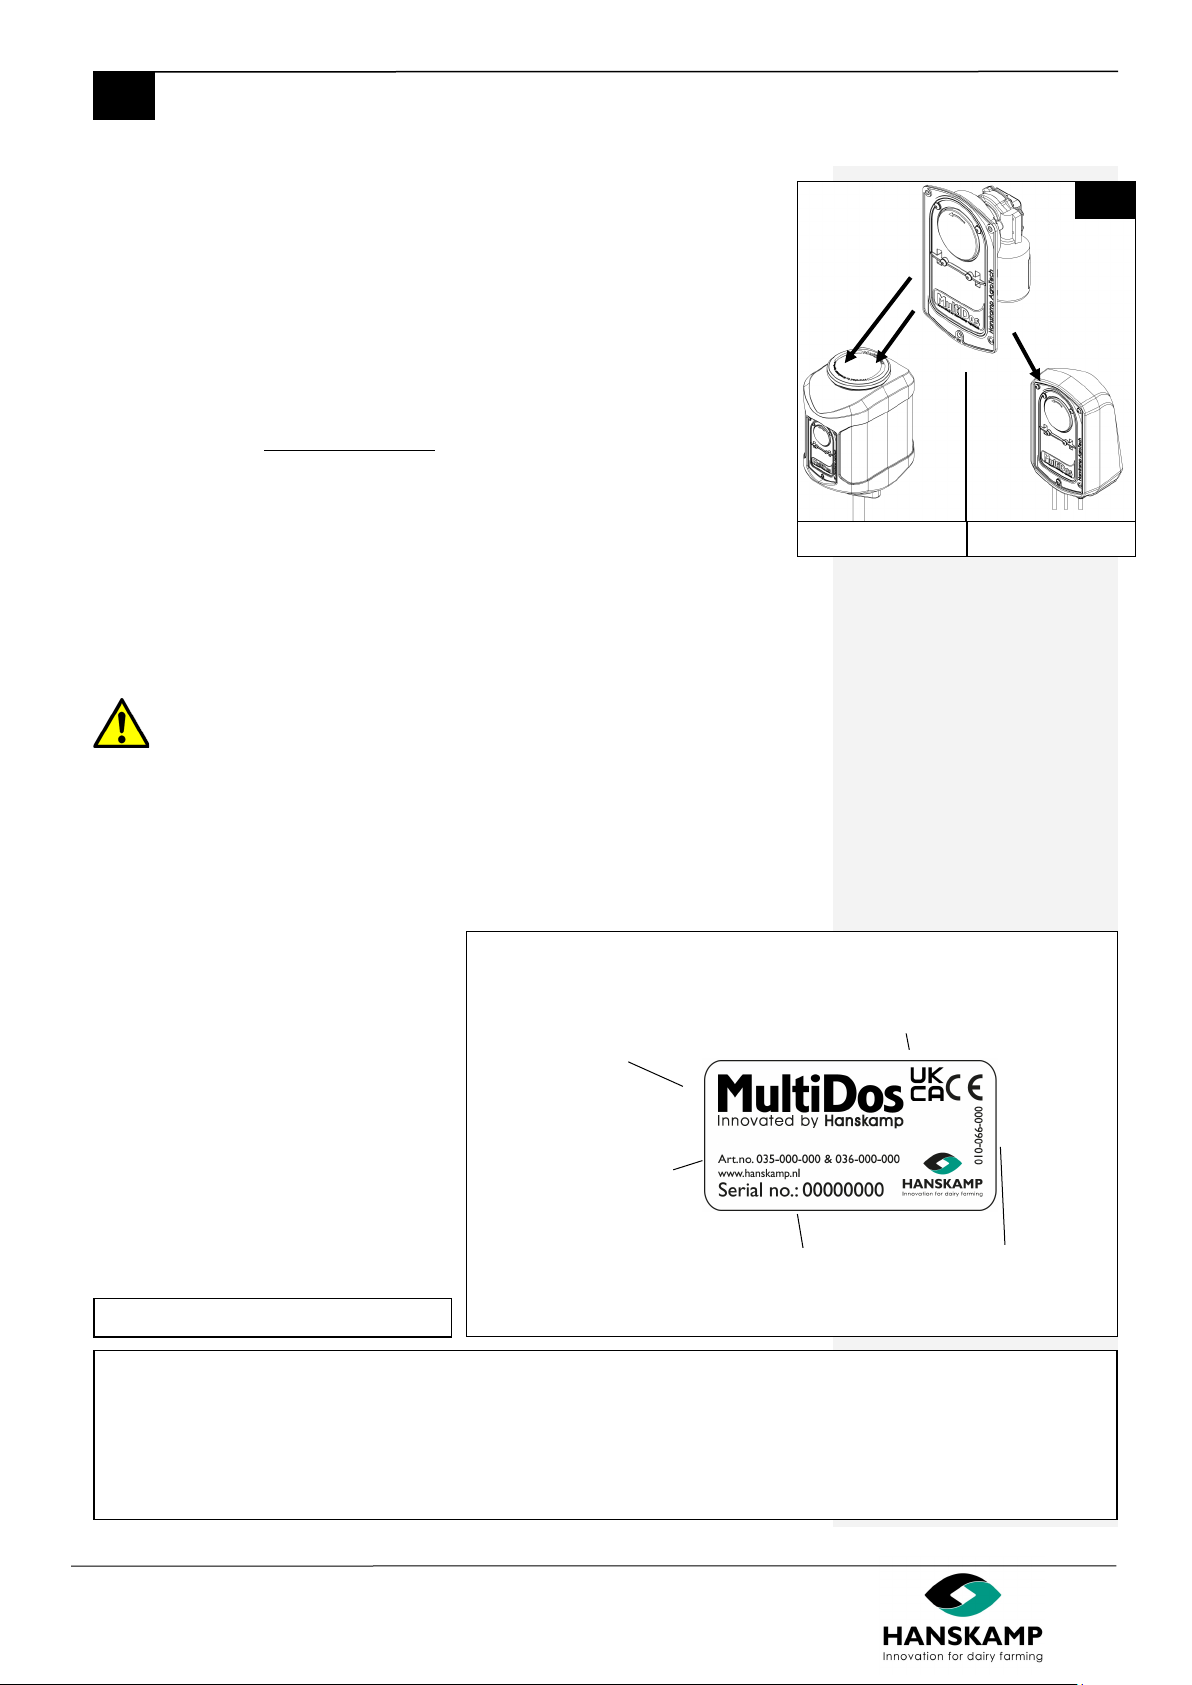
Type descripon, to be found on the pump housing
Serial number
Arcle number
CE/UKCA-marking
Art.nr. scker
1
1
Pag. 8 t/m 13 Pag. 14 t/m 17
Product name
8 - 30
Hanskamp AgroTech BV (The Netherlands) www.hanskamp.com
MulDos
EN Dosing system - Dosiersystem - Système de dosage - Doseersysteem
Assembly Container-version
Look for the assembly of the wall-bracket version at page 14.
This manual contains the informaon for the installaon of one pump unit. When you
have two pump units, use exactly the same informaon to mount the second pump at
the other side of the container.
1. Check that all the parts are present using the item list. The list of materials can
be found in the appendix (page 28).
Aenon! There are no connecon materials included to aach the pipe to
the feedstaon.
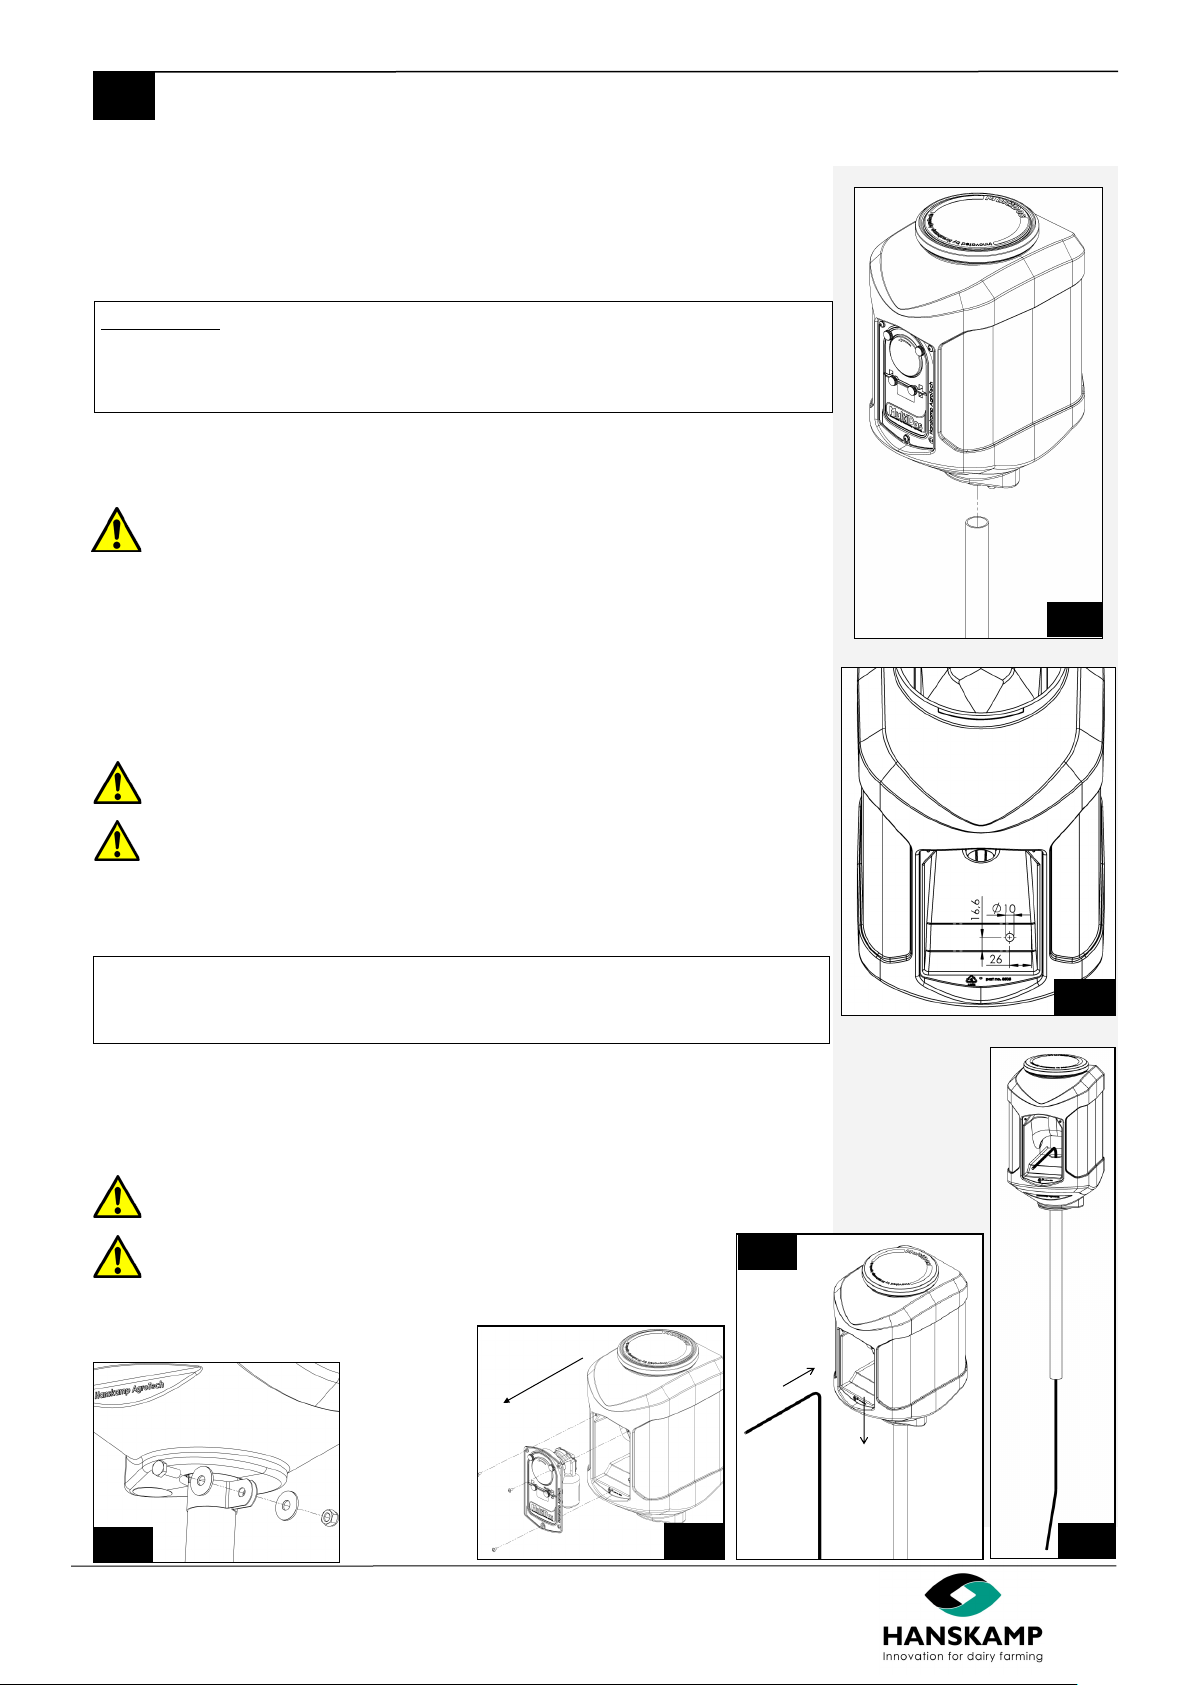
2. Aach the mounng pipe (art. no. 003-521-000) 1¼” (Ø 42,4) to a feed staon
or another feeding system.
3. Install the MulDos container over the pipe (g. 2).
4. Slide the container xer band (art. no. 003-538-000) over the stand pipe unl it
touches the container. Mount the container xer band so that the container
can’t rotate (g.4).
Aenon! During the assembly of the stand pipe, look for possible clip
danger.
Aenon! When the container runs easily on the tube, it should be xed.
When the container can make mulple rotaons it may impair the
operaon.
5. Unscrew the 3 Socket screw with ange (art. no. 003-510-000) at the outside of
the MulDos-pump and detach the pump. (g. 5).
6. Take the PVC hose and cut this to size. This part becomes the pressure hose to
the sprayer.
7. Place the pressure hose (art.nr.001-006-005) into the hole of the container and
through the pipe (g. 6A and 6B.) This hose goes to the sprinkler.
Aenon! Watch out for minor injuries by sharp objects during the installa-
on of the hose trough the stand pipe.
Aenon! Make sure that the PVC hose keeps its shape during the
mounng of it. Don’t pull the e-wraps too hard, this can pinch the
hose.
8. For nozzle assembly see page 22.
1x pumphose Ø11.5 (HanskampQualityTube) (art. no. 003-512-000)
1x sucon hose = 20 cenmetre (PVC hose Ø10x7) (art. no. 003-575-000)
1x pressure hose = 5 meter (PVC hose Ø10x7)(art. no. 001-006-005)
3
6B
2
6A
With 2 pumps:
Also drill a hole Ø13 on the other side of the container (diag. 3). Aerwards aach the
extra supplied feed-through coupling (art. no. 003-572-000) in the hole and secure this
with a coupling nut (art. no. 001-886-000).
5
4

9 - 30
Hanskamp AgroTech BV (The Netherlands) www.hanskamp.com
MulDos
EN Dosing system - Dosiersystem - Système de dosage - Doseersysteem
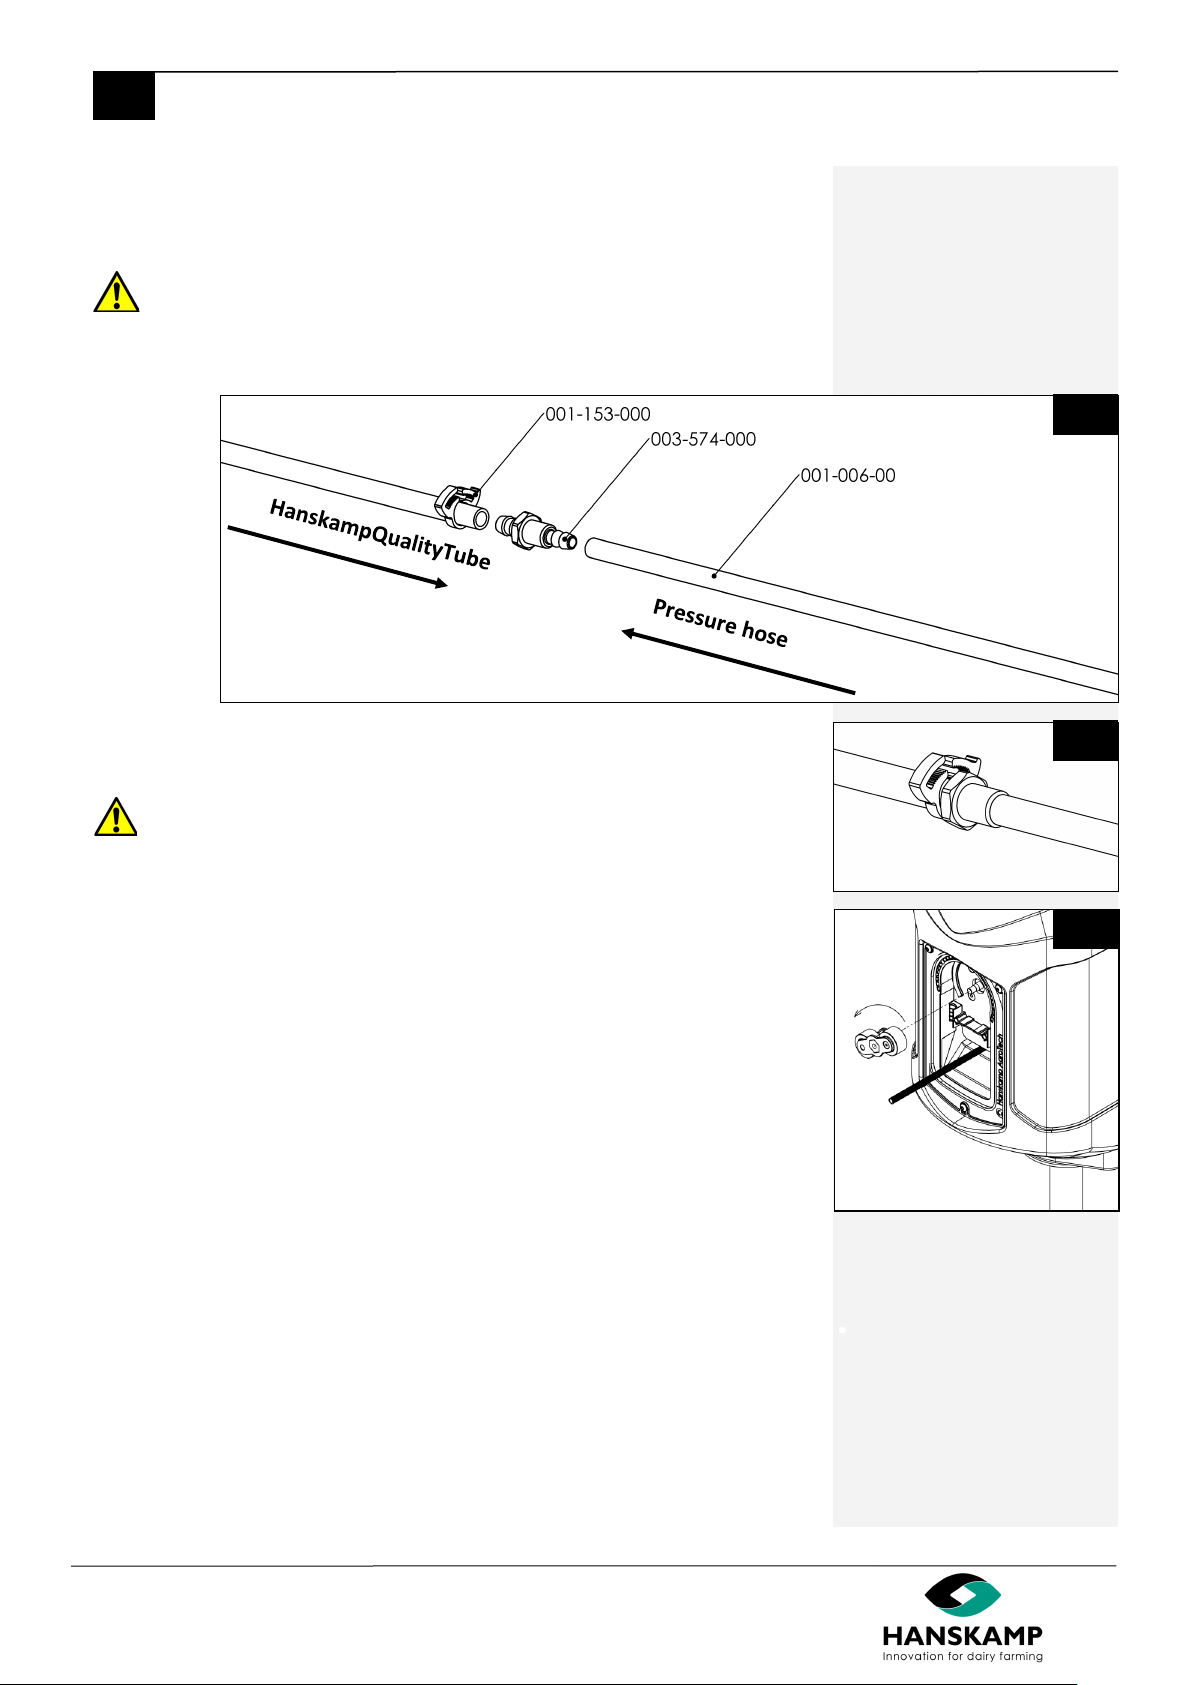
9. Take the already present pressure hose and pull this through the rear wall of
the pump housing to the front.
10. Aach the feed-through coupling (art. no. 003-572-000) in the container and on
the pressure hose as indicated in diag.7.
11. Aerwards mount the sucon hose (art. no. 003-575-000) on the feed-through
coupling as indicated in diagram 8.
12. Take the pump, remove the knurling bolts (art. no. 003-509-001) and take the
transparent cover of the pump housing (art. no. 003-502-000) (diag. 9)
13. Push the end of the electrical cable from the motor into the hole of the
container which also contains the pressure hose (g. 8).
14. Move the pump into the container, make sure the cable and the pressure hose
are not pinched.
15. Install the pump with the corresponding screws (art. no. 003-510-000) evenly
by hand.
Take care! HanskampQualityTube is not suitable for acids. A hose set suitable
for acids is available from Hanskamp.
7
10 11
8
9
003-575-000
10 - 30
Hanskamp AgroTech BV (The Netherlands) www.hanskamp.com
MulDos
EN Dosing system - Dosiersystem - Système de dosage - Doseersysteem
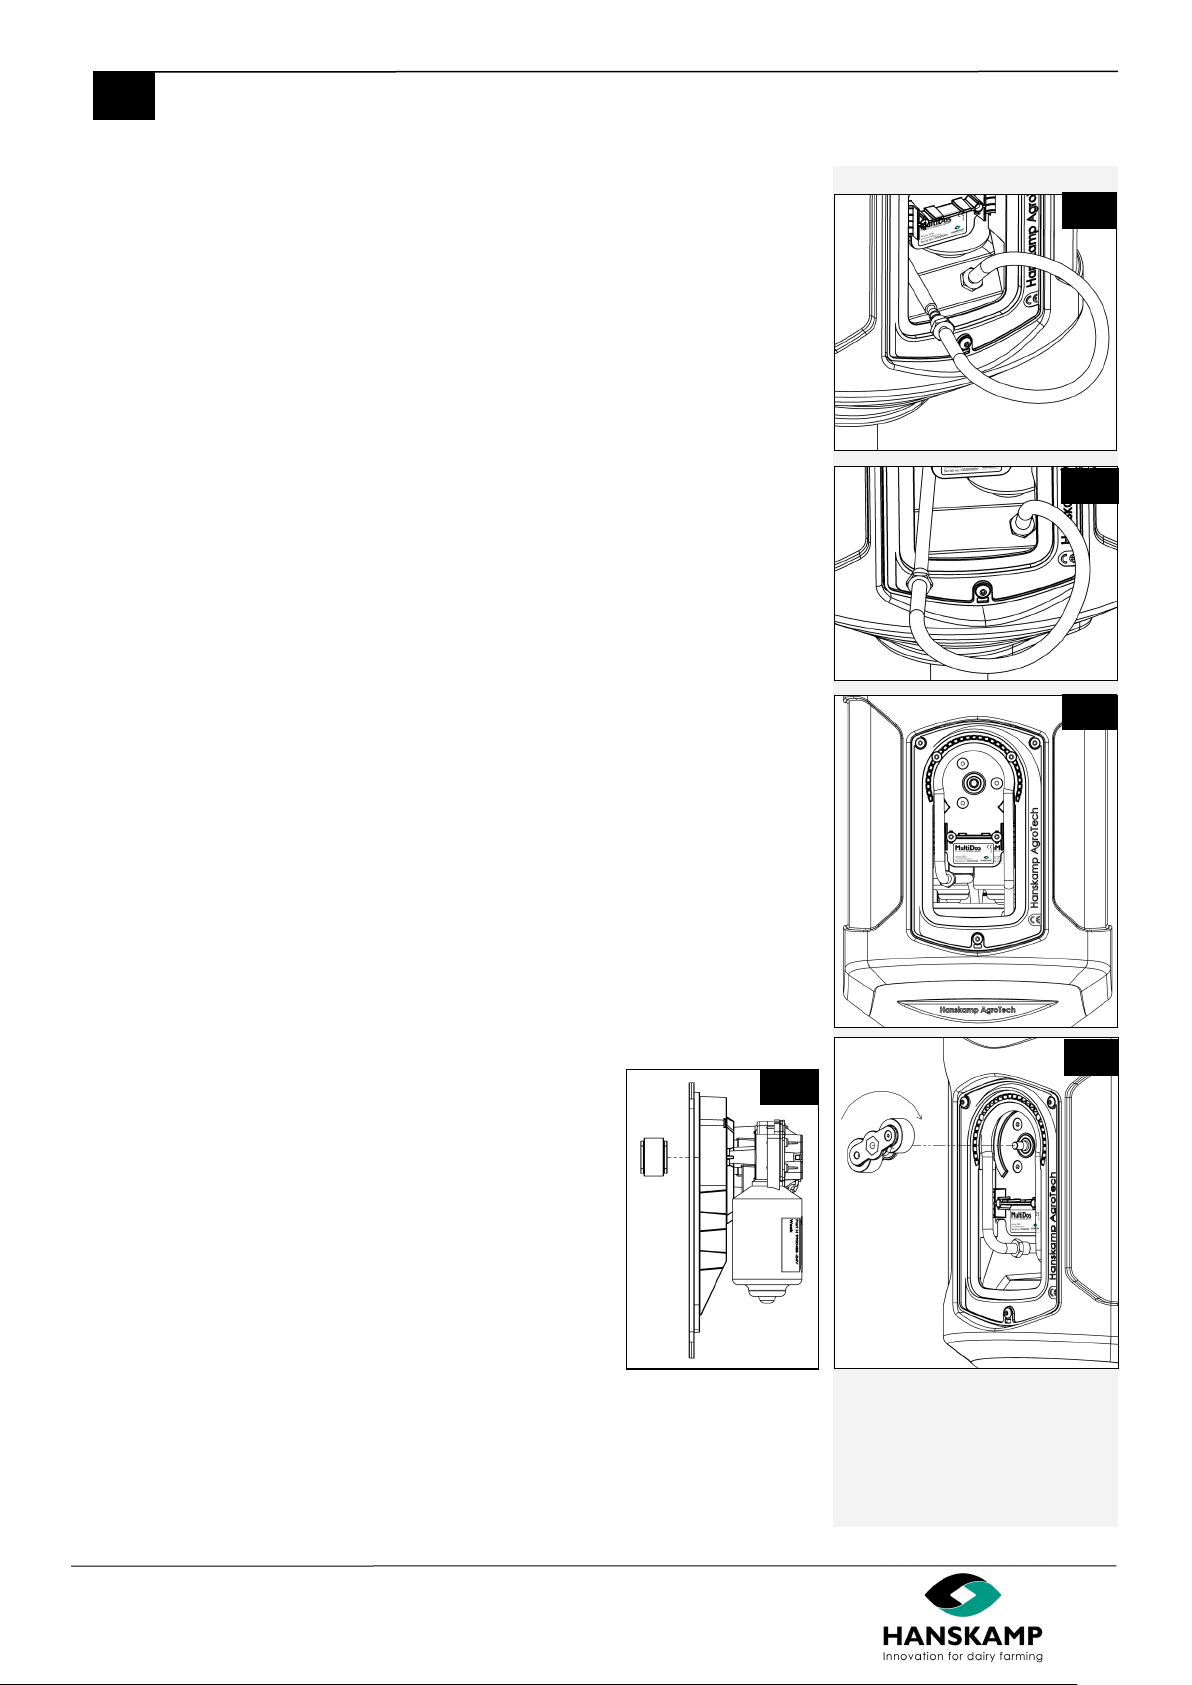
16. Take the pressure hose, HanskampQualityTube (which is located in the pump)
and 1 feed-through coupling (art. no. 003-572-000). Mount this according to
diagram 10 and 11.
Aenon! When assembling of the hose clamps there is a small chance of
clamp danger.
Aenon! Cut the hose o straight. When the hose is cut crooked, may impair
the operaon.
17. Turn the rotor of the pump loose by hand (counter-clockwise), and remove it
(g. 12).
Aenon! By loosening of the rotor by hand, minor injuries can occur.
12
10
11
5
11 - 30
Hanskamp AgroTech BV (The Netherlands) www.hanskamp.com
MulDos
EN Dosing system - Dosiersystem - Système de dosage - Doseersysteem
18. Bend the HanskampQualityTube around and slide this over the feed-through
coupling that scks out of the pump housing (g.16).
19. Bend the HanskampQualityTube as much as possible in the shape of
the casing. Press this to the pressure hose as far back as possible in the
stand pipe (g. 18).
20. Take the Rotor and turn this with the side of the conical recess on the sha of
the pump motor. With the last turn press the HanskampQualityTube into the
recess of the pump housing. The hose is now wedged in-between the rollers
and the pump housing. Tighten the rotor by hand on the motor sha (g. 19
and 20).
16
17
18
19
20

12 - 30
Hanskamp AgroTech BV (The Netherlands) www.hanskamp.com
MulDos
EN Dosing system - Dosiersystem - Système de dosage - Doseersysteem
Note! The tube must be placed as perfect as possible in the curve of the pump
(g. 21).
21. Take the transparent cover (art. no. 003-502-000) with the associated four
knurling bolts (art. no. 003-509-001). Posion the cover so that it is right for the
recess in the pump. Tighten the screws evenly unl the lid is ght. Note: solid
xed! (g. 22).
22. Connect the motor of the MulDos to the control board of the feeding staon.
First, make the control board voltage free, before connecng the motorcable.
Aenon! When connecng the motor to the control board, it is possible that
light electric shocks can occur.
23. Always mount the cover, so that dirt and dust can’t fall into the container.
24. With one pump unit: mount a stainless steel blind plate on the other side of the
container. Fasten the blind plate with the including socket screws (g.24)
(art. no. 003-545-000).
Maintenance
Check the MulDos on faults and wearing on a daily basis. Do this by means of a test
on the output of de tubes and electric cables. Check periodical the quanty and cali-
brate if necessary. When the HanskampQualityTube is worn by intensive use (leaking),
replace it according described steps. A repair kit is available by Hanskamp. Also check
the rollers and bearings for wear. Also these parts are available as a repair kit by Han-
skamp.
Aenon! Replace the HanskampQualityTube every year, or aer pumping
1000L of uid.
Calibraon
For calibraon: operate the motor manually ll the liquid emerges from the nozzle.
Aenon! During the rst rotaons you will not see anything happen, this is
because the rotor gets fastened to the axel of the motor.
The MulDos is calibrated by allowing the feeding computer to emit a pulse ten mes.
Then you measure the amount of dispended liquid, divide this by 10 and enter this
value into the feeding computer. Repeat this procedure every month and also aer
changing the liquid. This is one of the possibilies for calibraon. When the manual
of your feeding computer describes another method of calibrang, you need to
apply that way of calibrang the MulDos.
21
22
23
24
3545

13 - 30
Hanskamp AgroTech BV (The Netherlands) www.hanskamp.com
MulDos
EN Dosing system - Dosiersystem - Système de dosage - Doseersysteem
Assembly Wallmounng-version
1. Check if all the parts are present using the item list. The list of materials can be
found in the appendix.
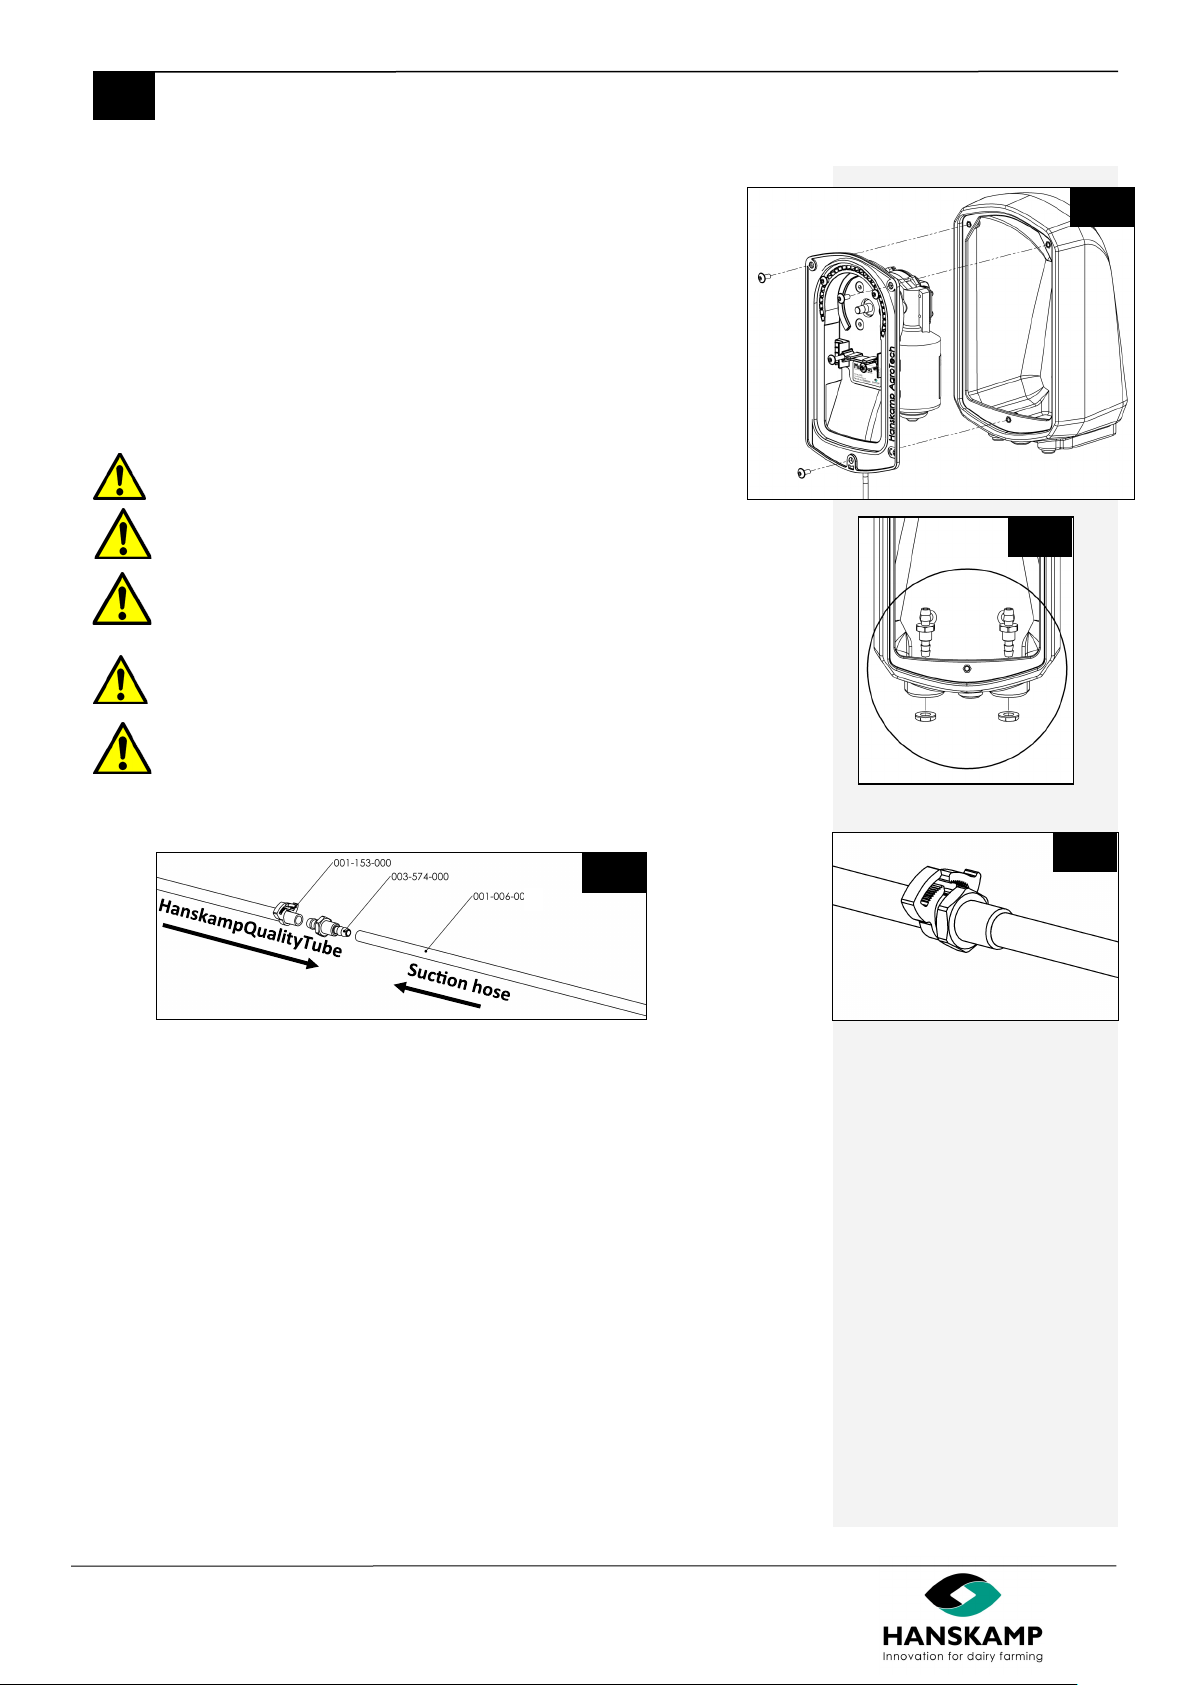
2. Unscrew the 3 Countersunk Hexagon socket screw (art. no. 003-510-000) at the
outside of the MulDos-pump and detach the pump.
Aenon! Place the housing up to a maximum of 2 meters from the boom of
the storage tank.
The MulDos can be mounted on two dierent ways.
3a. Aach to a wall:
Drill holes in the back of the MulDos, as indicated in gure 28. Then secure the
wall mounng. (Mounng material is not included.)
3b. Installed on a surface:
Drill holes in the underside of the MulDos. The place of the holes is
free to choose, minimum distance between the tubes and the place is
displayed in gure 27. Then secure the mounng material. (Mounng
material is not included.)
25
26
28
27
Distance between the tube and
the plate: ± 8mm
14 - 30
Hanskamp AgroTech BV (The Netherlands) www.hanskamp.com
MulDos
EN Dosing system - Dosiersystem - Système de dosage - Doseersysteem
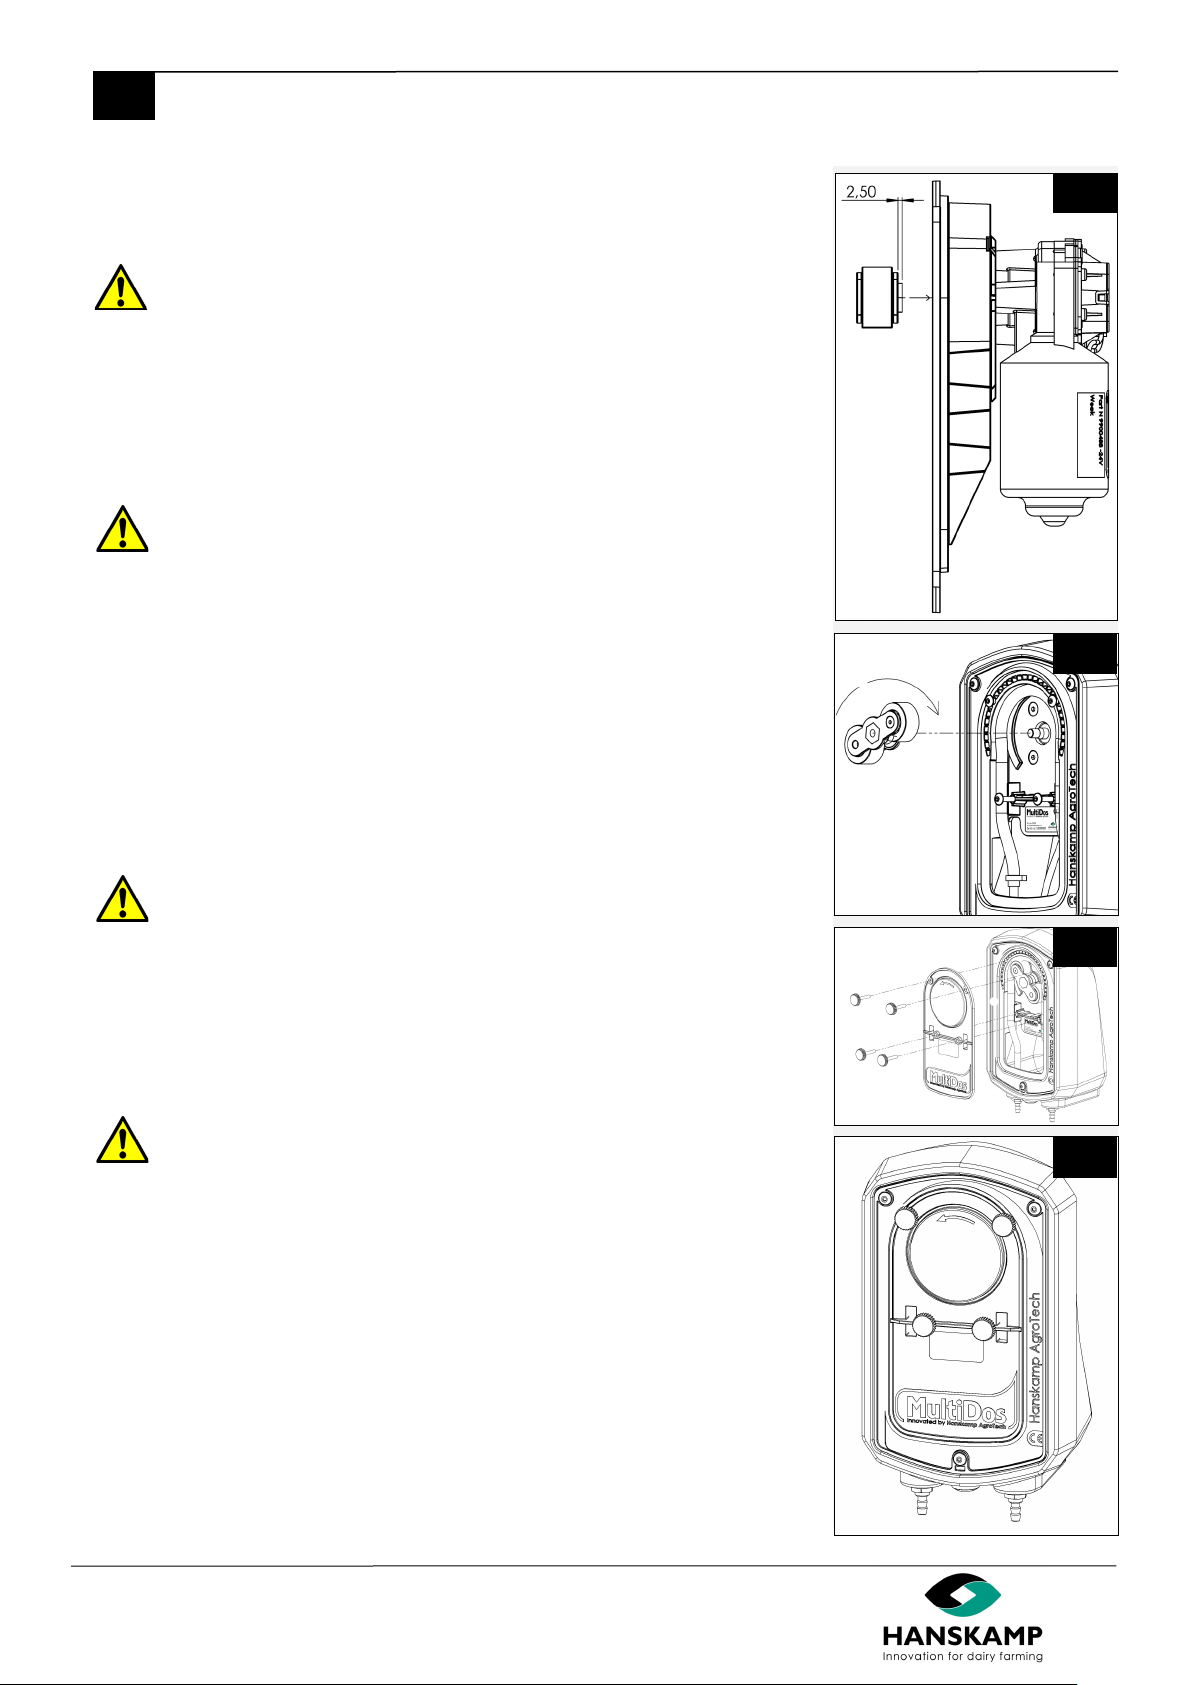
4. Unscrew the casing of the pump housing.
5. Make a hole in the middle grommet with a small at screwdriver. Press
the cable of the motor through that hole. This cable gets aached to the
relevant control unit. For a correct installaon, consult the installaon
instrucon of the relevant control unit. Do this when the mounng of
the MulDos is completed.
6. Mount the feed-through coupling (art. no. 003-574-000) in the 2 outer
most holes of the wall aachment and secure these with a union nut
(art.no. 001-886-000) as indicated in gure 30.
7. Steadily screw the pump housing with the accompanying screws (art.
no. 003-510-000) hand-ght on the wall aachment (g. 29).
8. Loosen the rotor of the pump by turning an-clockwise and remove it.
Aenon! By loosening of the rotor by hand, minor injuries can occur.
Aenon! Hanskamp only guarantees a correct operaon when the sucon
hose is 2 meters or shorter. Use the 5 meter hose as a pressure hose.
Aenon! HanskampQualityTube is not suitable for acids. A suitable hose kit for
acids can be ordered from Hanskamp upon request.
Aenon! Cut the hose o straight. When the hose is cut o skewed, it
may impair the operaon.
Aenon! Make sure that the end of the sucon hose is placed at the boom of
the container, otherwise the pump cannot pump all the liquid.
29
32
30
31
5

15 - 30
Hanskamp AgroTech BV (The Netherlands) www.hanskamp.com
MulDos
EN Dosing system - Dosiersystem - Système de dosage - Doseersysteem
9. Take the right side of the HanskampQualityTube, and slide this on the feed-
through coupling (art. no. 003-572-000) (g. 31).
10. Bend the HanskampQualityTube round and slide this over the le feed-through
coupling.
11. Now slide the sucon hose on the right feed-through coupling.
12. Repeat this with the pressure hose on the le-hand side.
13. Take the HanskampQualityTube, bend this as much as possible in the shape of the
pump housing (g. 35).
Take care! Always cut the hose square. If the hose is cut obliquely this can ad-
versely aect the operaon.
33
35
34
Motorcable to
the control unit
Pressure hose
Sucon hose
16 - 30
Hanskamp AgroTech BV (The Netherlands) www.hanskamp.com
MulDos
EN Dosing system - Dosiersystem - Système de dosage - Doseersysteem
37
38
36
39
14. Take the rotor to turn it on the side of the recess (protruding side) in the sha of
the pump motor. With the last ghtening turn, press the HanskampQualityTube
into the recess of the pump. The tube is now clamped between the rollers and the
pump casing. Turn the rotor by hand on the motor sha (g. 36 and 37).
Note! The tube must be placed as perfect as possible in the curve of the pump
(g. 37).
15. Take the transparent cover (art. no. 003-502-000) with the associated four knurl-
ing bolts (art. no. 003-509-001). Posion the cover so that it is right for the recess
in the pump. Tighten the screws evenly unl the lid is ght. Note: solid xed! (g.
38 and 39).
16. Connect the motor of the MulDos to the control board of the feeding staon.
First, make the control board voltage free, before connecng the motorcable.
Aenon! During the connecng of the motor to the control board, light
electric shocks can exist.
Maintenance
Check the MulDos on faults and wearing on a daily basis. Do this by means of a test on
the output of de tubes and electric cables. Check periodical the quanty and calibrate if
necessary. When the HanskampQualityTube is worn by intensive use (leaking), replace it
according described steps. A repair kit is available by Hanskamp. Also check the rollers
and bearings for wear. Also these parts are available as a repair kit by Hanskamp.
We recommend to disconnect the rotor when the system is temporarily decommissioned.
Replace the HanskampQualityTube every year, or aer pumping 1000L of uid.
Calibraon
For calibraon: operate the motor manually ll the liquid emerges from the nozzle.
Aenon! During the rst rotaons you will not see anything happen, this is be-
cause the rotor gets fastened to the axel of the motor.
The MulDos is calibrated by allowing the feeding computer to emit a pulse ten mes.
Then you measure the amount of dispended liquid, divide this by 10 and enter this value
into the feeding computer. Repeat this procedure every month and also aer changing
the liquid. This is one of the possibilies for calibraon. When the manual of your feeding
computer describes another method of calibrang, you need to apply that way of cali-
brang the MulDos.
The pump hose works opmally when it has been broken in for
a week. Therefore, calibrate again aer a week.

17 - 30
Hanskamp AgroTech BV (The Netherlands) www.hanskamp.com
MulDos
EN Dosing system - Dosiersystem - Système de dosage - Doseersysteem
Installaon instrucon Feeding Computer
Nedap: (001-669-000 motor SolidState5)
Enter these references in the computer:
- Dosage volume: 30 (Equals 3 cc dosage volume of MulDos.)
- Interval/dispensing speed:5 sec/0.6kg/min.
Congure the minimum and maximum feed quanty per interval, set in the same rao as
feed type 1 and 2. Thereto don’t enter the same numbers, but enter as a rao of concen-
trates/ liquid addive.
Conguring a liquid addive is done in the same way as conguring concentrates. Only,
the dosing weight is a tenth (1/10) part of the programmed weight.
Example: Programmed feed 3: 0.10 kg is the same as 10 cc liquid addive.
Programmed feed 3: 1.00 kg is the same as 100 cc liquid addive.
Feeding Computer:
Gascoigne Meloe (011-038-000 motor 24V AC 10RPM Time-controlled)
GM 3000
1. Enter liquid addive as an extra feedstu in the GM3000.
2. Enter its name, ‘MulDos’ in the processor.
3. Enter dosage at 1.6 g/sec.
4. Enter minimum running me at 2 sec.
5. Calibraon value 60 sec.
6. Close-o me: not applicable.
7. If the process computer cannot work with 1/100 kg, mulply the calibraon values
and feed doses by 10. See explanaon aer point 4 ‘BouMac’.
Gascoigne Meloe (011-038-000 motor 24V AC 10RPM Time-controlled
ID 2000(+) and MR2000(+)
Key Data
Change the following seng:
06 [enter]: Concentrate ? Yes
07 [enter]: Scale factor 1
08 [enter]: Min. Dispense 3 gram
10 [enter]: Eang speed 10.9 g/sec.
Press the spacebar. The main menu appears again.
Type 16 [enter]: Quit, to exit the ID2000 user program. The ID/MR2000 tools-menu 1.13
appears.
REMARK: When the Scale factor has been changed all data from all ID2000 Main control-
lers have to be erased and cow data have to be re-entered again.
Feed staon Data
Change the following sengs:
09 [enter]: Auger? Yes
10 [enter]: Feed dispense 10.00 g/sec.
11 [enter]: Auger stop me 131 msec.
All other feedtype(s):
01 [enter]: Auger? Yes
Press the ‘Arrow Up’ key to select Feed staon 2.
Repeat Chapter 3 for all other Feed staons or type 7 [enter]: Entering per batch, to
change the sengs for a batch of selected feed staons.
Press the spacebar and type 16 [enter]: Quit.

18 - 30
Hanskamp AgroTech BV (The Netherlands) www.hanskamp.com
MulDos
EN Dosing system - Dosiersystem - Système de dosage - Doseersysteem
DeLaval ALPRO/DELPRO (Motor 011-095-000 AC 28RPM with feedback)
Menu 2:1 or Menu 2:6
In FP204
Menu 2 (F9)
Expected calibraon amount:
0.096 kg = ± 96 ml liquid addive aer calibraon (8 ml x 30 sec (12 revoluons))
Calibraon
See ‘DeLaval ALPRO/feeding system book’.
In FP204
Menu 4:1
See: DeLaval FP204 feed system user manual.
Boumac 115V AC (001-436-000 motor bald 10RPM)
1. Enter liquid addive as an extra feedtype in the processor.
2. Maximize the intake speed of this feedtype.
3. Calibrate according to calibraon test results.
4. If the process computer cannot work with 1/100 kg, mulply the calibraon values
and feed doses by 10.
Conguraon for propylene glycol is similar to conguring for concentrates. If the calibra-
on has been mulplied by factor 10, the conguraon should also be mulplied by factor
10.
Example: Feedtype 3 is congured by 1 kg to equal 100 ml.
19 - 30
Hanskamp AgroTech BV (The Netherlands) www.hanskamp.com
MulDos
EN Dosing system - Dosiersystem - Système de dosage - Doseersysteem
Warning! In case of maintenance make sure to always rst switch o the voltage
and ensure that the storage container is empty.
Disassembly
In case of disassembly all parts should be separated on material type and should be pro-
cessed in the right type of waste management system.
Warning! When disassembling the MulDos, there is a risk of clamping danger.
Also watch out for slight injuries on the hand, by grasping into the roller mecha-
nism.
In operaon
Warning! During the cleaning of the tubing (ush) and grasping into the roller
mechanism with your hands, small injuries can occur on your hand. With an un-
covered motor ( no cover mounted) watch out for light electric shocks.
Overview of included changes in this installaon-and operang instrucon
Warranty limitaons
Costs and expenses resulng from the following are excluded from the warranty:
- Using the equipment improperly, in violaon of the specicaons in the
installaon and operang instrucons;
- The consequences of any intervenon by mechanics other than mechanics
approved by Hanskamp for carrying out certain work;
- Incidents such as freezing, ice, re, ood, ooding or any other problems caused
by excessive water, and lightning;
- Defecve electrical system or earthing;
- Using compressed air that does not meet Hanskamp's quality standards;
- Damage to the electrical system caused by pests and the like.
The warranty does not apply to consequenal damages unrelated to the machine itself.
All systems have been tested, However, in the event of defects, Hanskamp AgroTech BV
cannot be held responsible for consequenal damage.
No. Release date Chapter(s) Notes
108/2014 First edion
1.1 10/2014 All Apply technical improvements
1.2 12/2014 Conguraon Conguraon for mulple feedcomputers
1.3 01/2015 Arcle structure Update + 36000No.
1.4 09/2015 All General inspecon
1.5 09/2015 Aachment 1 Use only 3518 spray nozzle
1.6 01/2016 General comment and mainte-
nance
1.7 05/2017 All Arcle structure changed
1.8 10/2017 All Art. no. 001-006-000 split up
1.9 08/2019 Mulple Images replaced
1.9 01/2023 Page 21 UKCA logo added
2.0 03/2023 Page 17 + 29 Motor 011-044-000 removed
2.1 11/2023 Page 16 + 17 Page 16 sentence recalibrate aer a week. Page 17 calibraon quanty
adjusted

20 - 30
Hanskamp AgroTech BV (The Netherlands) www.hanskamp.com
MulDos
EN Dosing system - Dosiersystem - Système de dosage - Doseersysteem
4. FAQ
Common problem Possible cause Soluon
The liquid runs from the pump
back in the stock barrel
Leaking tube, worn rollers, worn
bearings
Replace the tube, replace the rollers, replace the
bearing.
Liquid runs out of the nozzle
while the motor doesn’t run
False air between the pump and
the nozzle
Press the hose on the nozzle again, check/improve
the sealing between the coupling and nozzle again,
mount the nozzle 100% vercal.
The motor runs but it doesn’t
pump any liquid
The sucon tube is closed, rotor is
installed the wrong way.
Clean the sucon tube (possibly by blowing), install
the rotor in the right way.
Leaking feed-through coupling Hose too loose on the coupling Mount a hose clamp (art. no 001-153-000) on the
coupling/hose
Copyright and disclaimer
The informaon in this publicaon is for informaonal purposes only, and is not intended as a sales quote. The products oered may dier from the ima-
ges. Any brand or product references in this manual are for idencaon purposes only. The company and product names menoned in this manual are
trademarks. No part of this publicaon may be reproduced or made public without the prior wrien consent of Hanskamp AgroTech BV. Although this
publicaon has been compiled with the greatest care, Hanskamp AgroTech BV is not liable for any damage that may arise due to any errors or omissions it
might contain. The Dutch installaon and operang instrucons are the original installaon and operang instrucons. Translaons into other languages
are based on the Dutch installaon and operang instrucons as a source document. Hanskamp AgroTech BV accepts no liability for dierences between
the translaons. If there are any doubts about the content and accuracy of the translated installaon and operang instrucons, the Dutch installaon
and operang instrucons shall prevail.
Other manuals for MultiDos 035-000-000 Series
1
This manual suits for next models
7
Table of contents
Other Hanskamp Farm Equipment manuals

Hanskamp
Hanskamp L'port User manual

Hanskamp
Hanskamp PowerSpray User manual

Hanskamp
Hanskamp MultiFrame 007-501-000 User manual

Hanskamp
Hanskamp PipeFeeder HighSpeed User guide

Hanskamp
Hanskamp SpiderServer User manual

Hanskamp
Hanskamp PipeFeeder HighSpeed User guide

Hanskamp
Hanskamp Spider User manual

Hanskamp
Hanskamp FeedStation 42000 User guide

Hanskamp
Hanskamp MultiFrame User manual

Hanskamp
Hanskamp PipeFeeder User guide


