manuals.online logo
Brands
  1. Home
  2. •
  3. Brands
  4. •
  5. Harken
  6. •
  7. Marine Equipment
  8. •
  9. Harken 3386 User manual

Harken 3386 User manual

Sideplate beta
Deadend
post
Roller cage
assembly
Sheave with side balls
Sideplate alpha
Isolator
Screw
Heli-Coil®
threaded insert
INSTRUCTIONS
Loop Block
3214, 3230, 3245, 3255, 3386
N15W24983 Bluemound Road, Pewaukee, WI 53072-4974
Telephone: (262) 691-3320 •Fax: (262) 701-5780 •Web: www.harken.com •Email: [email protected]
Parts
You Must Supply
Part
No.
Sheave
Ø
Max working load
(MWL)
Breaking load
(BL) Max line Ø
that fits
through mouth
lb kg lb kg
3214, 3386 57 mm 2500 1134 5000 2268 5 mm
3230 75 mm 5000 2268 10000 4536 8 mm
3245 100 mm 7500 3402 15000 6804 11 mm
3255 125 mm 11000 4990 22000 9977 14 mm
1) Head
2) Sideplates
3) Sheave
4) Deadend post
5) Mouth
6) Hex key
7) Blue Loctite® adhesive
8) Head securing line
6
Loop and/or high-strength lashing line
When choosing a Harken Loup®soft-attach, be sure the Loup maximum
working load in basket configuration exceeds the maximum working load
of the block.
When choosing a lashing line, use a breaking load that is double the block's
breaking load to account for strength loss from:
1. Knots slipping or breaking at a much lower load than line breaking load.
Spectra®or Dyneema®-type lines require specialized knots.
2. Splices slipping or failing due to incorrect type or execution.
3. UV damage increasing with each passing year.
4. Chafing seriously reducing strength.
Go to www.harken.com/knots for additional information. If you are not
comfortable choosing line, work with a qualified rigger.
Note: See chart for maximum line diameter that will fit through mouth.
Specifications
WARNING! Knots weaken line considerably. Consult qualified rigger
or line manufacturer for advice on securing line. Use high-strength
loops or consult rigger for recommendations on lashing. Using the
wrong line, or securing the line improperly, can cause an accident.
WARNING! Strictly follow all instructions to avoid an accident, damage to your vessel,
personal injury, or death. See www.harken.com/manuals for additional safety information. = Incorrect. Avoid to prevent accidents.
Block Sheave Ø Screw Isolator Sideplate beta Roller cage assembly Sheave w/side balls Deadend post Heli-Coil Sideplate alpha Head securing line
3214 57 mm HFS796 MP-3020 AL-3701 HBB85 H-34389A AL-3238 MS-210 AL-3700 HCP1438
3230 75 mm HFS806 MP-3021 AL-3727 HBB86 H-34390A AL-3336 MS-221 AL-3726 HCP1419
3245 100 mm HFS1271 MP-3022 AL-3752 HBB87 H-34391A AL-3427 MS-251 AL-3751 HCP1419
3255 125 mm HFS1275 MP-3023 AL-3770 HBB88 H-34392B AL-3515 MS-259 AL-3769 HCP392
8
7
1
2
34
5
Loctite is a registered trademark of Henkel AG & Company KGaA.
LOUP is a registered trademark of Yale Cordage.
Spectra is a registered trademark of Honeywell International, Inc.
Dyneema is a registered trademark of DSM Dyneema.
Heli-Coil is a registered trademark of Emhart Teknologies Inc.,Worldwide
Terminating to Deadend Post
5. Open sideplates without
pulling line through block.
Terminating to deadend post lets you attach block to a closed bail such
as a padeye.
1. Remove screw.
2. Remove deadend post.
Remove plate on post side to
deadend to double. 6. Part legs of loop and
insert deadend post.
Make sure deadend
post is seated straight
in sideplate. Put
sideplates together.
7. Pull loops to seat ends
on deadend post.
Loop
Deadend post
Deadend post
WARNING! Webbing or smaller lashings can be damaged by
being pinched between post and sideplate. Damaged webbing
or lashings can part suddenly under load. Use only loops when
terminating at deadend post.
Tip: With shorter loops, place loop at the side of the head to allow more
room to insert the deadend post.
4. Pass loop ends through
mouth so loops extend
beyond block's sideplates
as shown.
3. Insert loop into block
mouth as shown.
Block Sheave Ø Screws Isolators* Sideplate beta Roller cage assemblies Sheaves w/side balls Deadend post* Helicoil®Center plate Head securing line
3386 57 mm (2) HFS796 (2) MP-3020 (2) AL-3701 (2) HBB85 (2) H-34389A AL-3238 (2) MS-210 AL-3700 HCP1438
* AL-3701 sideplates include isolators. AL-3700 center plate includes Helicoil threaded inserts.
Deadend post
3386 Double Block Parts
Double block uses all
components of single and a
center plate.
Center plate
3386
Sideplate beta Sideplate beta
Heli-Coil is a registered trademark of Emhart Teknologies Inc.,Worldwide
Mouth
9. Secure loop to head of
block with head securing
line using a Carrick bend.
For knot tying resources:
www.harken.com/knots.
Terminating Loop Outside Block or Using Lashing
1. Use hex key to
remove screw.
If terminating line outside block or lashing using multiple strands
of smaller-diameter line, remove the deadend post.
2. Remove deadend post.
Do not use post with
multiple lashing lines.
10. Further secure knot by
carefully melting line
ends with a hot knife.
3. Reassemble block. Use blue Loctite®
adhesive on screw.
5. Secure lashings or loop
to the head using a
securing line tied in a
Carrick bend. For
knot tying resources:
www.harken.com/knots
WARNING! If head-securing line comes loose, block can flip
and cause line to jam, resulting in loss of control. Inspect
head-securing line often and redo if necessary.
WARNING! Attaching line to block head will considerably weaken
block so it can easily break under load. Attach loop/lashing only
through mouth of sheave.
Do not attach
to head.
Mouth
4. Lash or run loop through mouth of block.
Loctite is a registered trademark of Henkel AG & Company KGaA.
8. Reassemble block using
blue Loctite®adhesive
on screw.
Loctite is a registered trademark
of Henkel AG & Company KGaA.
Harken equipment is designed for minimal maintenance, but some maintenance
is required to give the best service and to comply with the Harken limited warranty.
Cleaning: Flush blocks, loops and lashing lines thoroughly with fresh water.
Periodically, disassemble the blocks and clean with detergent and fresh water. When
assembling block, make sure screws and holes are dry. Use blue Loctite
adhesive to secure screw before assembling.
IMPORTANT! Exposure to some teak cleaners and other caustic solutions can
result in discoloration of part and is not covered under the Harken warranty.
Printed in USA. 5334 03-20
Warranty
Inspect Parts Every Time you Sail
1. Inspect block to make sure that screw is secure. If screw is loose, remove
it. Apply blue Loctite®adhesive and retighten.
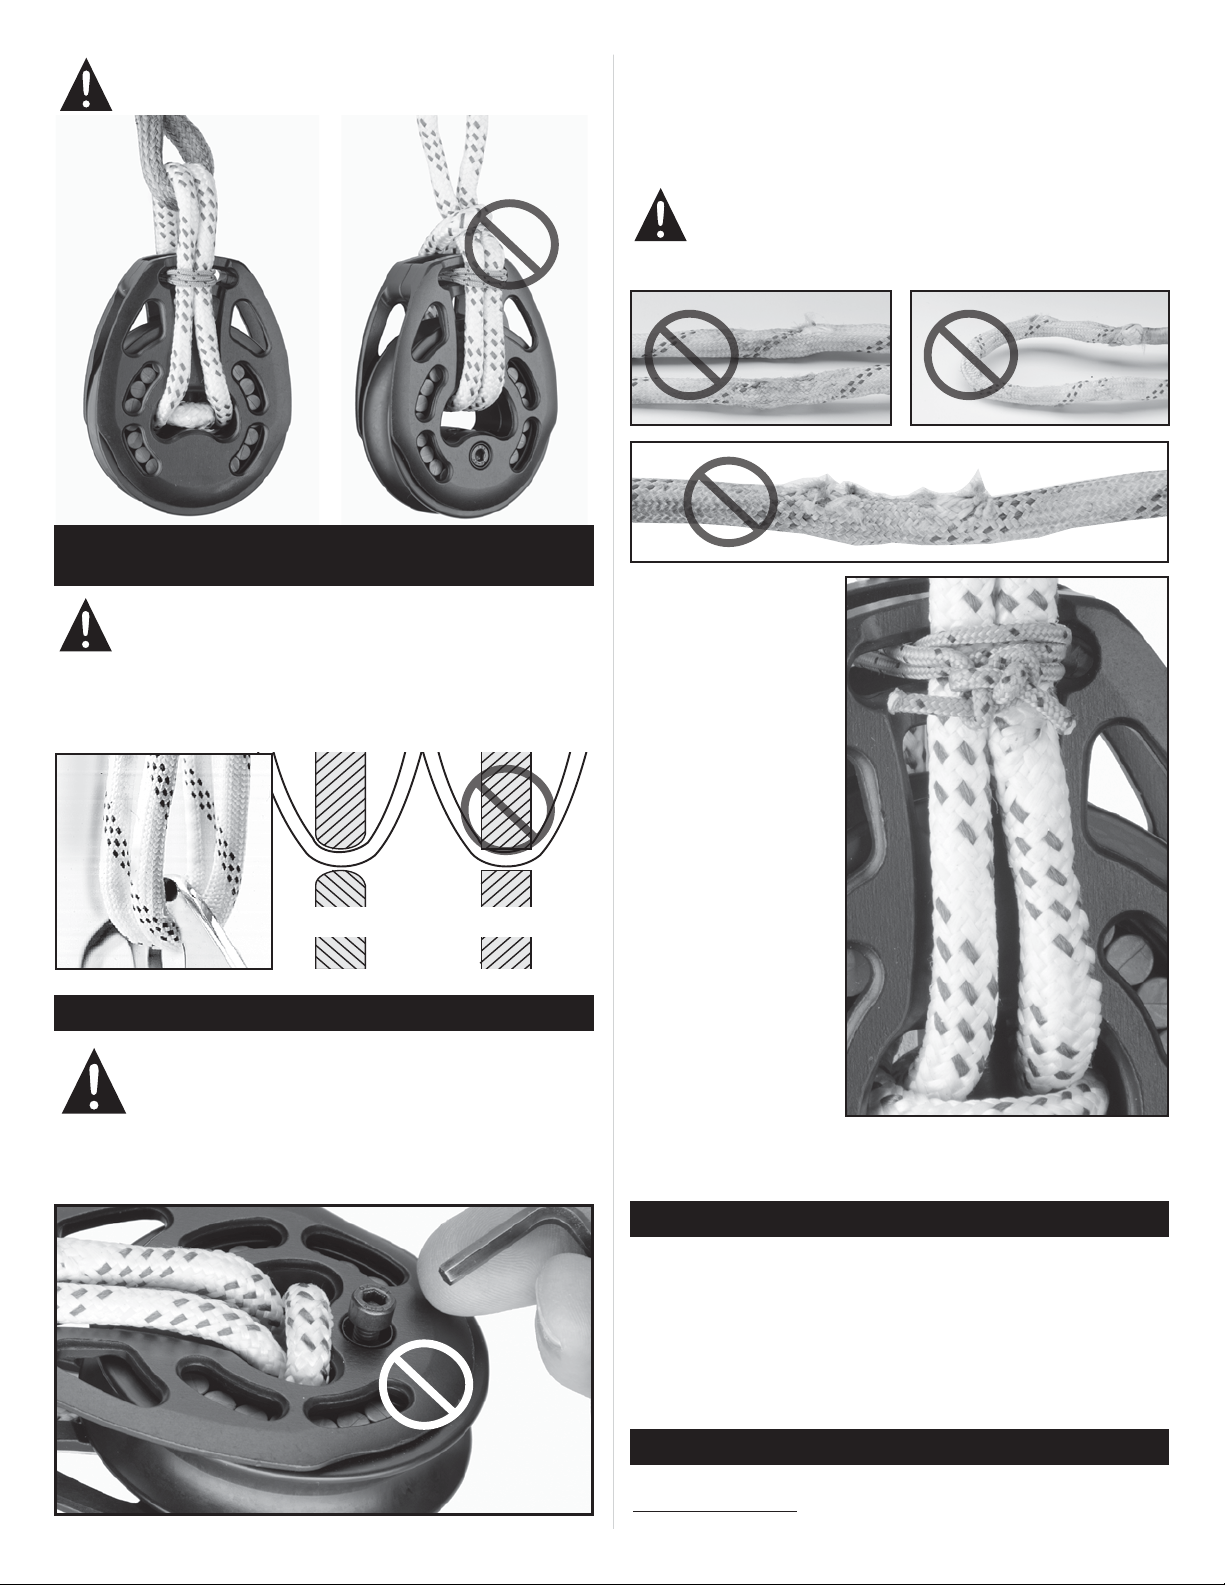
3. Inspect loops and lashings. Replace if there are signs of wear, or if the
colored tracer fades from UV damage. Pull loop out of mouth and inspect
loop/lashing carefully for any signs of wear, UV damage, fatigue, or
strand separation. Replace loop if it shows signs of UV damage or wear.
4. Inspect head securing
line to make sure knot
is holding tightly.
For additional safety, maintenance, and warranty information:
www.harken.com/manuals or the Harken catalog.
ALL INSTALLATIONS
Anchor Point Chafing or Cutting
Loops must be attached to round bails such as those found on padeyes
or pins. Sharp edges on many perforated toerails will cut loop, severely
weakening it. When loop is attached to a plate, it must be at least 25 mm
(1/4") thick and have rounded edges to keep loop from being damaged.
Sharp edges will
damage loop.
Round edges prevent
damage to loop.
WARNING! Failure to inspect block, loops, and lashing,
and correct any problems, may result in block breaking under load.
Inspect parts each time you sail. If blocks are under load during
long passages inspect them carefully while in use.
WARNING! Loops or lashings running over a sharp edge can cause
part to break under load. Attach to fitting with a rounded edge.
WARNING! Failure to replace damaged or weakened parts can
cause block to break under load. Replace all loops and lashings
every year or if there is any sign of wear, UV damage, fatigue,
or strand separation. If in doubt, replace. Consult chart to match
strength of loop/lashing to block and load.
Maintenance
WARNING! Using a loop in a “choker-style” weakens the
loop connection. Do not use choker-style connection.
Loctite is a registered trademark of Henkel AG & Company KGaA.
Choker

This manual suits for next models

4

Other Harken Marine Equipment manuals

Harken T2 Ratchamatic Block User manual

Harken

Harken T2 Ratchamatic Block User manual

Harken 1851 User manual

Harken

Harken 1851 User manual

Harken MKIV Unit 1 User manual

Harken

Harken MKIV Unit 1 User manual

Harken 1561 User manual

Harken

Harken 1561 User manual

Harken MKIV User manual

Harken

Harken MKIV User manual

Harken 3176 User manual

Harken

Harken 3176 User manual

Harken 1634 Assembly instructions

Harken

Harken 1634 Assembly instructions

Harken 3299 User manual

Harken

Harken 3299 User manual

Harken 1988 User manual

Harken

Harken 1988 User manual

Harken 2142 User manual

Harken

Harken 2142 User manual

Harken 9000 User manual

Harken

Harken 9000 User manual

Harken FlatWinder 250 Manual

Harken

Harken FlatWinder 250 Manual

Harken 1624 Assembly instructions

Harken

Harken 1624 Assembly instructions

Harken R27 Assembly instructions

Harken

Harken R27 Assembly instructions

Harken MKIII User manual

Harken

Harken MKIII User manual

Harken 391 Assembly instructions

Harken

Harken 391 Assembly instructions

Harken Carbo OneTouch User manual

Harken

Harken Carbo OneTouch User manual

Harken Cam-Matic 412 Assembly instructions

Harken

Harken Cam-Matic 412 Assembly instructions

Harken Black Magic Series User manual

Harken

Harken Black Magic Series User manual

Harken 8685 User manual

Harken

Harken 8685 User manual

Harken 1618 Midrange Assembly instructions

Harken

Harken 1618 Midrange Assembly instructions

Harken R32 User manual

Harken

Harken R32 User manual

Harken MKIV Unit 3 User manual

Harken

Harken MKIV Unit 3 User manual

Harken UNIT 2 MKIII User manual

Harken

Harken UNIT 2 MKIII User manual

Popular Marine Equipment manuals by other brands

Pittway SYSTEM SENSOR PA400 Series Installation and maintenance instructions

Pittway

Pittway SYSTEM SENSOR PA400 Series Installation and maintenance instructions

Global Fire Equipment VALKYRIE AS IP65 quick start guide

Global Fire Equipment

Global Fire Equipment VALKYRIE AS IP65 quick start guide

Garmin AIS installation instructions

Garmin

Garmin AIS installation instructions

TRIGA TR-B200S-LF-WH Installation and maintenance instructions

TRIGA

TRIGA TR-B200S-LF-WH Installation and maintenance instructions

E2S IS-A105N instruction manual

E2S

E2S IS-A105N instruction manual

Seawave ST60 Wireless Owner's handbook

Seawave

Seawave ST60 Wireless Owner's handbook

Boss marine MR1600S user manual

Boss marine

Boss marine MR1600S user manual

Jensen MCD5090 Installation and operation manual

Jensen

Jensen MCD5090 Installation and operation manual

Kongsberg Simrad EK80 Reference manual

Kongsberg

Kongsberg Simrad EK80 Reference manual

Standard Horizon VLH-3000 owner's manual

Standard Horizon

Standard Horizon VLH-3000 owner's manual

Raymarine St290 Owner's handbook

Raymarine

Raymarine St290 Owner's handbook

Raymarine C-Series Quick reference guide

Raymarine

Raymarine C-Series Quick reference guide

Furuno NAVpilot-300 Installation overview

Furuno

Furuno NAVpilot-300 Installation overview

Furuno LC-90MK2 Short guide

Furuno

Furuno LC-90MK2 Short guide

Skipper EML1100 user manual

Skipper

Skipper EML1100 user manual

Apollo 45681-300 installation guide

Apollo

Apollo 45681-300 installation guide

Deif AGC 150 Operator's manual

Deif

Deif AGC 150 Operator's manual

Magnadyne M6100CD Installation and operation manual

Magnadyne

Magnadyne M6100CD Installation and operation manual

manuals.online logo
manuals.online logoBrands
  • About & Mission
  • Contact us
  • Privacy Policy
  • Terms and Conditions

Copyright 2025 Manuals.Online. All Rights Reserved.