manuals.online logo
Brands
  1. Home
  2. •
  3. Brands
  4. •
  5. Hauppauge
  6. •
  7. TV Tuner
  8. •
  9. Hauppauge WinTV-soloHD User manual

Hauppauge WinTV-soloHD User manual

1
4
2
5
3
6
Click the RIGHT mouse button in the
live TV window to bring up the context
menu
Double click the LEFT mouse button to
bring the TV full screen. Double click
again to exit full screen
Settings menu
Program Information
Now/Next
TV recordings
folder
EPG Program
Guide
Record button
for manual
recording
Snapshot
Close Captions Audio
Volume and Mute
Program Pause
controls
• WinTV-soloHD or WinTV-dualHD DVB-T2/T/C receiver
• USB extension cable
• Portable TV antenna (on some models)
• Remote control
• WinTV v10 application for Windows (download with included Activation Code)
Installation of the WinTV-soloHD / WinTV-dualHD device
Locate a free USB 2.0/3.0 port (normally located at the side or back on the laptop
or desktop). Plug the WinTV-soloHD / WinTV-dualHD into the USB 2.0/3.0 port. The
USB extension cable can be used to position the WinTV-soloHD / WinTV-dualHD
away from your USB slot.
Note: we do not recommend connecting via a USB Hub.
WinTV-soloHD
WinTV-dualHD
Quick Installation Guide for Windows
click on Enter Activation code
and enter the activation code which
was printed on the WinTV v10
Download and Activation code
card. You do not need to enter the
dashes, and you can use upper or
lower case characters.
Step 4:
When the installation is complete,
you will find two new icons on your
Windows desktop: the WinTV
application icon and the WinTV
Advanced Options icon. The WinTV Advanced Options icon, when clicked, has
a number of useful WinTV v10 utilities such as to Empty EPG, Erase channel
database and others.
Double click on the
WinTV icon and the
WinTV application
will run. On the first
run of WinTV, it will
automatically go
through the TV source
selection and WinTV
will scan for channels.
Set the check mark
according to the
connected signal and
click Next.
Click Next to start the search.
Stations found are listed during the search.
When the search is complete, click Next to save the channels found.
Note: if you complete the channel scan and no channels are detected, you
can try the following: check your antenna connections, reposition your
antenna, add an antenna signal booster, or get a larger antenna. Information
on rescanning for TV channels can be found here:
www.hauppauge.com/rescan
Using the WinTV v10 application
Note: Please disable your antivirus software for the duration of the
software installation. We find that sometimes antivirus apps block the
temporary folders needed for the installation of WinTV
Note: An Internet connection is required for download and software
activation.
You will find the website and directions on the WinTV v10 Download and
Activation code card along with the Activation code for WinTV v10.
The WinTV v10 download can be found here:
www.hauppauge.com/wint10
Step 1:
Download the WinTV v10 installer by clicking the download button. The WinTV v10
Installer is normally saved in your
Download folder
Step 2:
Run wintv10setup from the Download
folder on your PC. Halfway through
the installation, a message will pop up
asking for you to enter the Activation
Code.
Step 3:
At the Activation required screen,
Installing the WinTV v10 application for Windows
Contents of the package
Note: the WinTV-soloHD / WinTV-dualHD will work with both USB 2.0 and
USB 3.0 ports.
Digital Terrestrial TV
The WinTV-soloHD / dualHD can receive DVB-T and DVB-T2 broadcasts from an
antenna.
Plug an antenna for DVB-T2 (FreeviewHD) or DVB-T (Freeview) TV reception into
the TV connector on WinTV-soloHD / WinTV-dualHD.
Note: When using FreeviewHD DVB-T2, it is recommended to connect
to a roof top aerial during the first time installation. This will provide
better signal quality then a portable antenna.
Cable TV
On a cable TV feed, the WinTV-soloHD / dualHD can receive digital TV and radio
programs (DVB-C).
Connect the TV output on the cable TV socket to the TV input on the WinTV stick,
using a high quality coax cable (not supplied).
Cable TV / Antenna
connector
Signal
indicator
USB 2.0/3.0
connector
IR
receiver
7
10
8
11
9
12
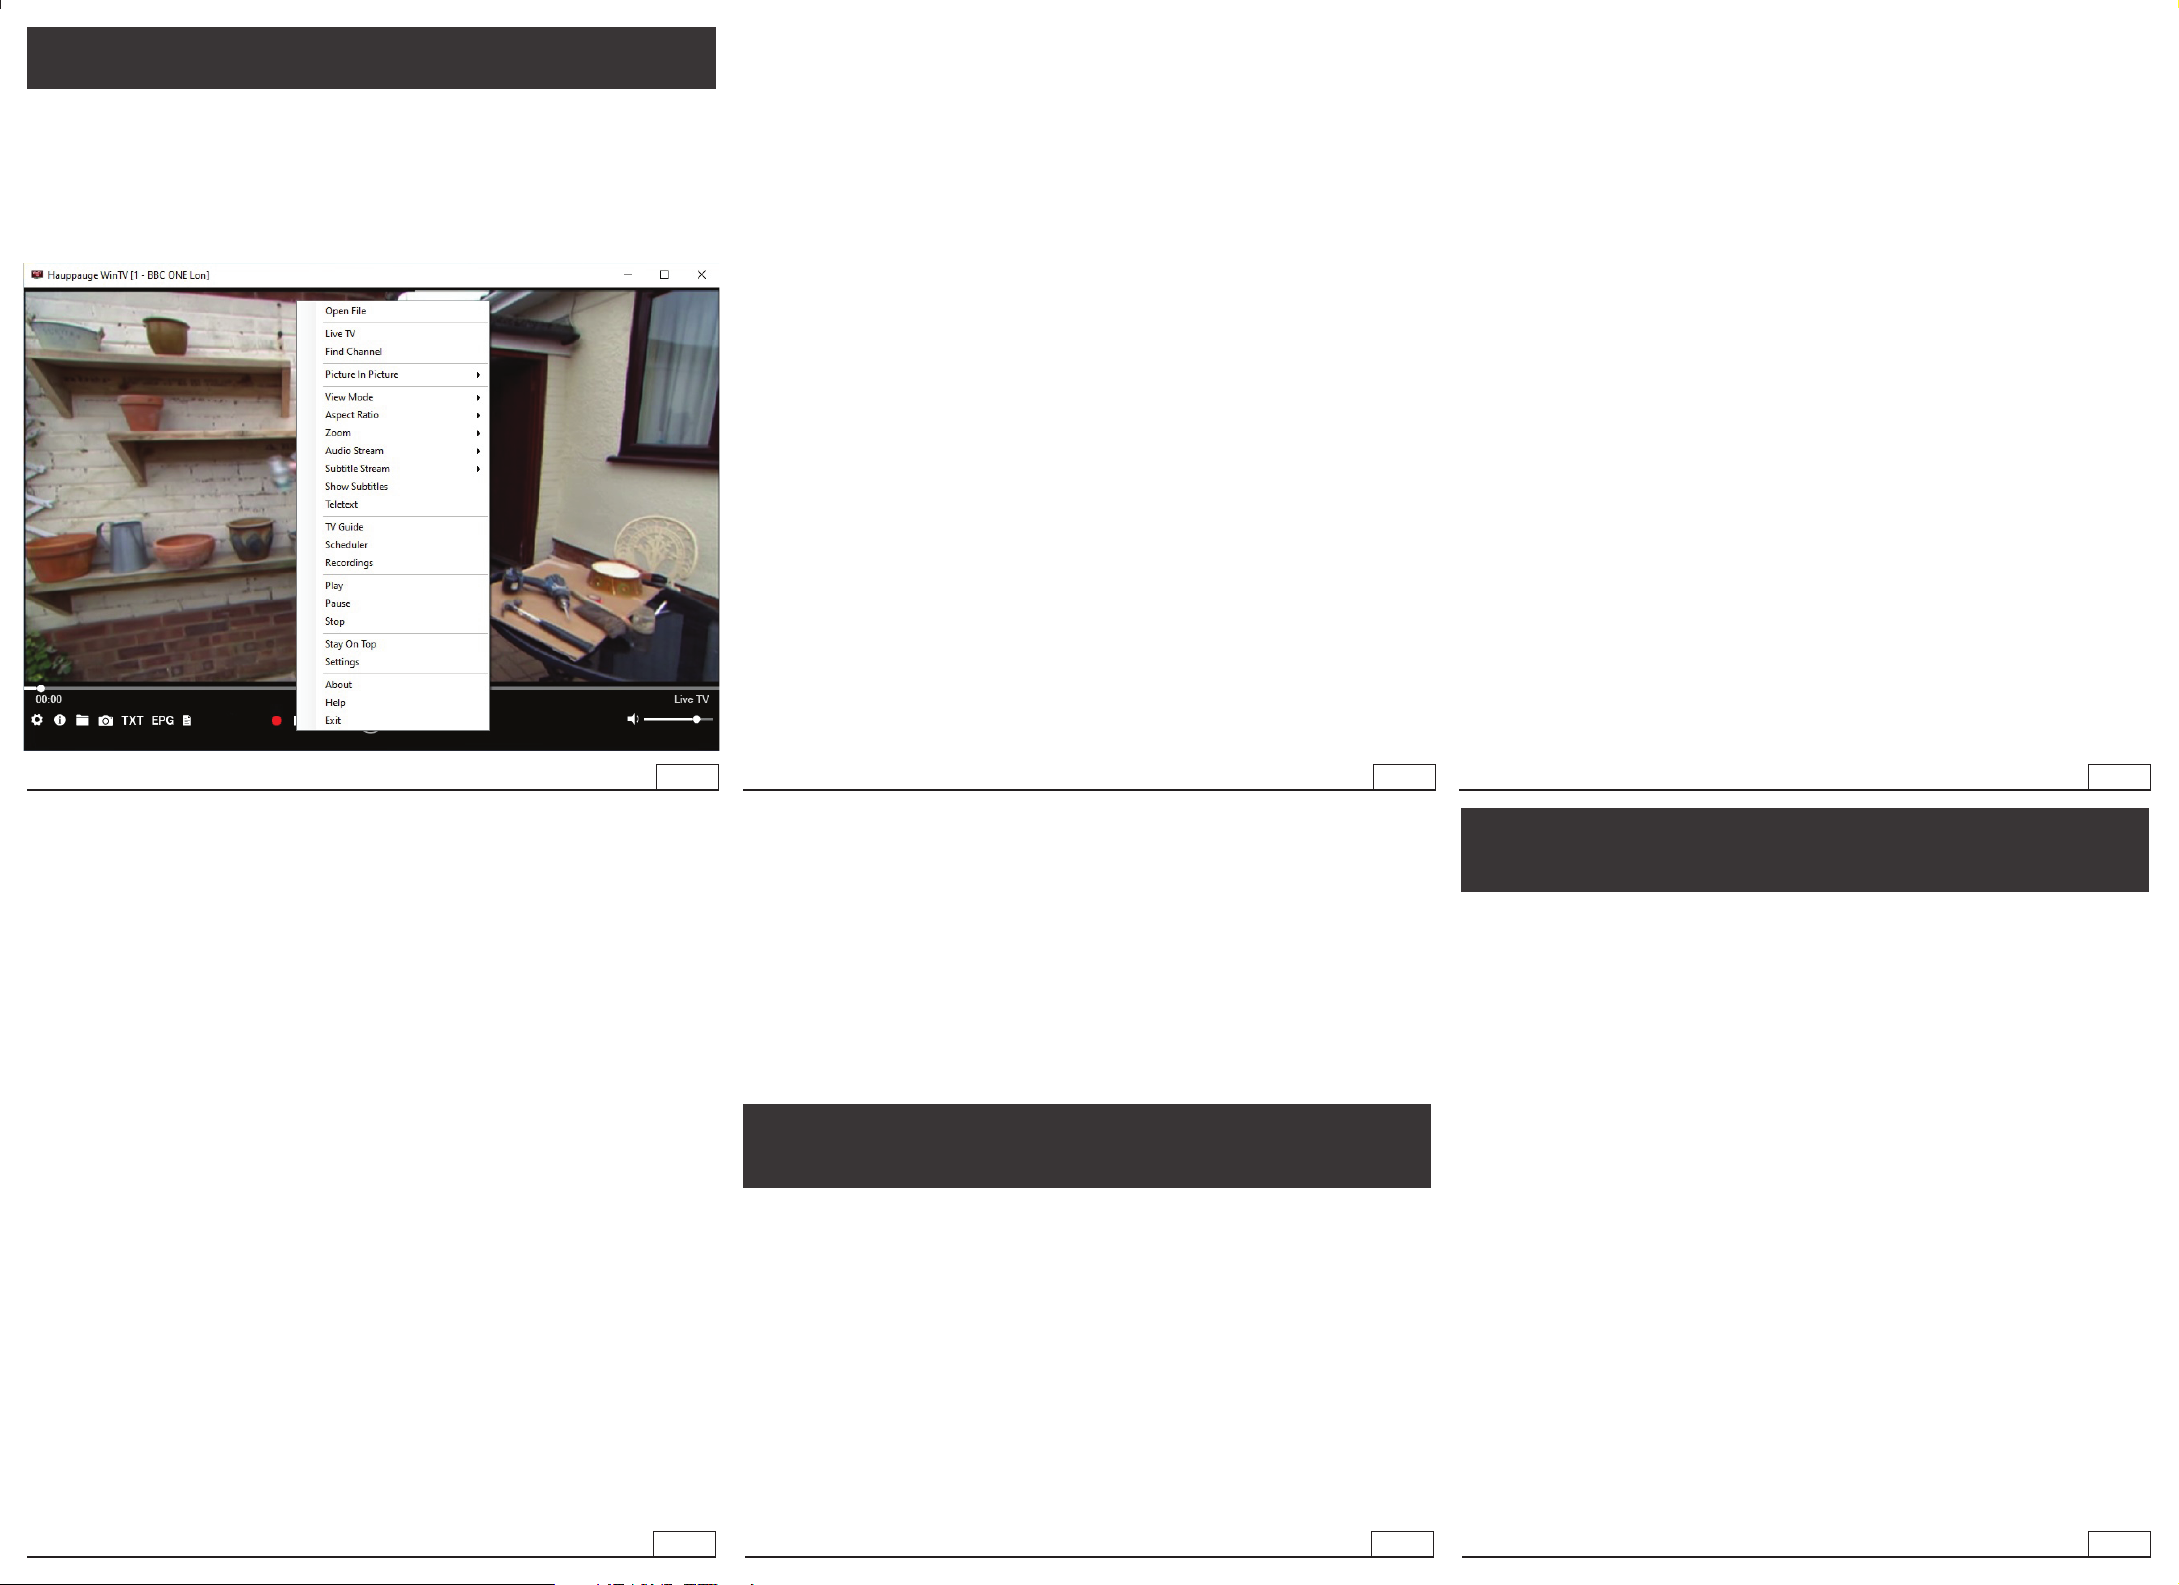
The Main WinTV Menu (context menu)
Right-click inside the TV window or click on the menu button on the WinTV
toolbar to display the Context Menu. The following options are available.
«Find Channel»
This brings up the Channel List. Click on a channel entry to select this channel for
watching. To filter the channel list, type in a channel name (or a part of the name). Click
on the Pin-Button to permanently show the channel list. The channel list will also be
displayed if you just enter any character (a - z) in live TV mode.
«Open file»
Open up a TV recording or other video file for playback in the WinTV window.
«Picture in Picture»
There are four ways to use the Dual Tuner function on WinTV-dualHD:
1. Recording up to two overlapping TV programs: you can schedule up to
two overlapping TV shows from the TV Guide or manually. Using the dual tuners is
automatic as long as you do not schedule more than two overlapping recordings.
2. Watch one live program while another program is being recorded:
you can watch one live program in WinTV v10 and continue watching, when a
scheduled recording takes place. The free tuner is used automatically for the
recording.
3. Watch with Picture-in-Picture: in Picture in Picture, click Two Tuner.
You will now see the WinTV window with a Picture-in-Picture window. to select a
channel, in Picture in Picture select Find Channel and choose your channel.
4. Watch two separate WinTV windows, each with their own TV channel:
in Picture in Picture, click Dual Window. You will now have two completely
separate windows, each with their own TV program.
«View Mode»
Normal, No Title and Fullscreen are available. In Normal view all control elements
and buttons are visible. In the No Title view only the TV image is shown. In the
The WinTV v10 Menu
Fullscreen view the TV image fills the whole screen. You can also switch between
these views by double clicking inside the TV window, or by pressing <Ctrl> W on
the keyboard.
«Audio Stream»
If the current TV broadcast offers more than one audio stream / language, you can
select the other stream / language here.
«Show Captions»
Select this option to display close captions. If close captions are available,
the On Screen Display message “Captions: On” is shown for a few seconds,
and close captions are displayed. If close captions are not available, the OSD
message does not appear. To turn off close captions, select “Show Captions”
again.
Note: captions are recorded when making a WinTV recording. When
playing back a .ts recording, captions can be displayed by selecting
Show Captions.
«Stay On Top»
If enabled, the WinTV application window will remain in view over any other
application windows, even if it is not selected. To turn on, select “Stay On Top”. To
turn off, select this option again.
«TV Guide»
Some DVB-T2 (FreeviewHD) digital TV channels transmit Electronic Program
Guide information (EPG). This information is collected and displayed in the TV
Guide window. Click a program title with your mouse to see more details about
the entry. To record a program, click on Record in the details view. The scheduled
recording is added to the Scheduler window. To rescan all frequencies for TV
Guide information, click on Update EPG.
«Scheduler» The Scheduler allows you to record a TV program at a certain date
and time on the specified channel. It lists all scheduled recordings added by the
TV Guide as well as any manual recordings that have been set. From here you can
Edit or Cancel (delete) existing schedule entries.
To schedule a new recording, click on the Add button. You will need to select the
channel, set the start time, duration etc. and confirm with a click on the Record
button.
Note: The WinTV application does not have to be running for a scheduled
recording to work, but your PC will need to be either turned on or in
Standby (not Hibernate). All scheduled recordings are performed in the
background by the task “WinTVRec.exe”. If a recording is started while you
are watching live TV, WinTV will display the TV program being recorded.
«Settings» Click the Settings button to open the WinTV Settings window.
«Settings» General: Select the language and the preferred Audio and subtitle
languages. You can also specify the video renderer to be used and the TV shape.
«Settings» Capture: Specify where the recordings, pause files and snapshots will
be stored.
«Settings» Devices: To rescan for TV channels, select the device you wish to
configure from the list and click on Tuner Setup.
«Settings» All Channels: You can enable or disable the listing of channels with
the select box in the first column. The Context menu allows you to select all
channels, to delete the selected channel(s), to watch the selected channel or to
display details about the channel.
«Settings» Favorites: Here you can define groups of your favorite channels.
«Settings» Advanced Options: From this menu you have options for:
Next Channel = Plus (+)
Previous Channel = Minus (-)
Last channel (the channel you were tuned
to previously): Alt P
Increase Volume = Page up
Decrease Volume = Page down
Show Channel List = Ctrl + L
Mute = Ctrl + M
Display Info = Ctrl + O
Stream Details = Ctrl + D
Teletext = Ctrl + T
Pause Video = Ctrl + Q
Play = Ctrl + P
Skip Ahead = Ctrl + F
Skip Back = Ctrl + R
Live (now) = Ctrl + C
Full Screen = Ctrl + W
Subtitles on / off = Ctrl + S
WinTV Settings = Ctrl + I
Start TV = Alt + T
Last Channel = Alt + P
Start Recording = Alt + R
Stop = Alt + S
Open File = Alt + F
Make Snapshot = Space Bar
Change Aspect Ratio = Ctrl +
Exit Full Screen = Esc
QI-WinTV10-solo-dual-V2.9-ENG
Troubleshooting
WinTV Shortcuts
Automatically starting TV when WinTV v10 opens
Disable the Now/Next channel information
Disable any On Screen Display graphics
Auto convert the standard .TS recordings to the .mpg format
«Settings» Decoders
The Decoders section allows you to test and use third party video/audio decoders.
(The use of third party decoders is an unsupported feature but can help in some
situations.)
How Can I Rerun the Channel Scan?
To scan for channels again, in the main WinTV window click on the gear icon
(lower left hand corner of WinTV), then select the “Devices” tab, click on the
WinTV-soloHD / WinTV-dualHD entry and click on “Tuner Setup”.
Click Next and Next to start the channel scan.
A video showing how to do the channel scan can be found here:
www.hauppauge.com/rescan

This manual suits for next models

1

Other Hauppauge TV Tuner manuals

Hauppauge WinTV-HVR-900 MCE-Kit User manual

Hauppauge

Hauppauge WinTV-HVR-900 MCE-Kit User manual

Hauppauge WinTV-HVR-955Q User manual

Hauppauge

Hauppauge WinTV-HVR-955Q User manual

Hauppauge WinTV-NOVA-T-USB2 MCE User manual

Hauppauge

Hauppauge WinTV-NOVA-T-USB2 MCE User manual

Hauppauge WinTV-NOVA-T-Stick User manual

Hauppauge

Hauppauge WinTV-NOVA-T-Stick User manual

Hauppauge WinTV-HD User manual

Hauppauge

Hauppauge WinTV-HD User manual

Hauppauge DEC 2000-t Installation and operating manual

Hauppauge

Hauppauge DEC 2000-t Installation and operating manual

Hauppauge Digital TV Tuner for Xbox One User manual

Hauppauge

Hauppauge Digital TV Tuner for Xbox One User manual

Hauppauge WinTV-HVR-1600 Kit User manual

Hauppauge

Hauppauge WinTV-HVR-1600 Kit User manual

Hauppauge WinTV-PVR-150 Kit Installation and operating manual

Hauppauge

Hauppauge WinTV-PVR-150 Kit Installation and operating manual

Hauppauge WinTV USB Installation and operating manual

Hauppauge

Hauppauge WinTV USB Installation and operating manual

Hauppauge WinTV-dualHD User manual

Hauppauge

Hauppauge WinTV-dualHD User manual

Hauppauge WinTV-HVR-950Q User manual

Hauppauge

Hauppauge WinTV-HVR-950Q User manual

Hauppauge WinTV-HVR-1950 User manual

Hauppauge

Hauppauge WinTV-HVR-1950 User manual

Hauppauge WinTV-HD User manual

Hauppauge

Hauppauge WinTV-HD User manual

Hauppauge IRRemoteBlaster User manual

Hauppauge

Hauppauge IRRemoteBlaster User manual

Hauppauge WinTV-D User manual

Hauppauge

Hauppauge WinTV-D User manual

Hauppauge WinTV-USB Installation and operating manual

Hauppauge

Hauppauge WinTV-USB Installation and operating manual

Hauppauge WinTV-PVR-150 Kit User manual

Hauppauge

Hauppauge WinTV-PVR-150 Kit User manual

Hauppauge WinTV-HVR-1250 MC-Kits User manual

Hauppauge

Hauppauge WinTV-HVR-1250 MC-Kits User manual

Hauppauge PCTV 461e User manual

Hauppauge

Hauppauge PCTV 461e User manual

Hauppauge WINTV-HVR-4000 CYBERLINK QI User manual

Hauppauge

Hauppauge WINTV-HVR-4000 CYBERLINK QI User manual

Hauppauge WINTV-NOVA-S QI User manual

Hauppauge

Hauppauge WINTV-NOVA-S QI User manual

Hauppauge WinTV-HVR-2250 User manual

Hauppauge

Hauppauge WinTV-HVR-2250 User manual

Hauppauge WinTV-NOVA-S-USB2 (DVB-S) User manual

Hauppauge

Hauppauge WinTV-NOVA-S-USB2 (DVB-S) User manual

Popular TV Tuner manuals by other brands

Evolveo Alpha HD user manual

Evolveo

Evolveo Alpha HD user manual

Contemporary Research 232-ATSC 4 product manual

Contemporary Research

Contemporary Research 232-ATSC 4 product manual

Roku Streaming Stick Plus quick start guide

Roku

Roku Streaming Stick Plus quick start guide

Audiovox WIDTV1 user guide

Audiovox

Audiovox WIDTV1 user guide

Elgato EyeTV Hybrid datasheet

Elgato

Elgato EyeTV Hybrid datasheet

Encore ENXTV-X3 -  2 - REV 2010 user manual

Encore

Encore ENXTV-X3 - 2 - REV 2010 user manual

Fujitsu LR 6611 Hardware guide

Fujitsu

Fujitsu LR 6611 Hardware guide

Roku 3500R user guide

Roku

Roku 3500R user guide

Pace RNG110 Specifications

Pace

Pace RNG110 Specifications

Asus My Cinema-U3100Mini ATSCQAM user manual

Asus

Asus My Cinema-U3100Mini ATSCQAM user manual

movistar HP4500-CL user manual

movistar

movistar HP4500-CL user manual

Encore ENXTV-X3 Specifications

Encore

Encore ENXTV-X3 Specifications

Kenwood KTC-V500P instruction manual

Kenwood

Kenwood KTC-V500P instruction manual

Conrad 1519708 operating instructions

Conrad

Conrad 1519708 operating instructions

Kaiser Baas KBA01015 install guide

Kaiser Baas

Kaiser Baas KBA01015 install guide

Dynamic Media SiriusXM BREW Setup and Install Guide

Dynamic Media

Dynamic Media SiriusXM BREW Setup and Install Guide

Teradek VidiUPRO instructions

Teradek

Teradek VidiUPRO instructions

Steren 208-900 user manual

Steren

Steren 208-900 user manual

manuals.online logo
manuals.online logoBrands
  • About & Mission
  • Contact us
  • Privacy Policy
  • Terms and Conditions

Copyright 2025 Manuals.Online. All Rights Reserved.