Hazet 4937-2/32 User manual

HAZET-WERK
HÖCHSTE TECHNOLOGIE IN DER WERKZEUGFERTIGUNG SEIT 1868
HIGHEST TECHNOLOGY IN TOOL MANUFACTURE SINCE 1868
4937-2/32_BAII
Betriebsanleitung
Silentlager-
Werkzeug-Satz
Operating instructions
Tool set for
silent blocks
Instrukcja obsługi
Zestawu narzędzi
do silentbloków
4937-2/32

Ursprungsprache deutsch – original language: German - Język źródłowy niemiecki
1Zu Ihrer Information
......................... 3 ................. 3
2Zu Ihrer Sicherheit ......................... 4 ................ 5
3Aufbau und Funktion ......................... 6 ................ 9
3.1 Technische Daten / Geräteelemente
3.2 Anwendung
3.3 Ausbau
3.4 Einbau
4Wartung und Pflege ......................... 10 ................ 10
5Aufbewahrung und Lagerung................ 10 ................ 10
6Entsorgung ........................10 ................ 10
1For your information
......................... 11 ................. 11
2For your safety ......................... 12 ................ 13
3Design and function ......................... 14 ................ 17
3.1 Technical data / tool components
3.2 Application
3.3 Removal
3.4 Installation
4Maintenance and care ......................... 18 ................ 18
5Storage ......................... 18 ................ 18
6Disposal ........................18 ................ 18
1Informacje dla użytkownika
.................. 19 ................. 19
2Bezpieczeństwo ......................... 20 ................ 21
3Budowa i sposób działania ................... 22 ................ 25
3.1 Dane techniczne / elementy urządzenia
3.2 Zastosowanie
3.3 Demontaż
3.4 Montaż
4Konserwacja i pielęgnacja.................... 26 ................ 26
5Przechowywanie i magazynowanie.......26 ................ 26
6Utylizacja ........................26 ................ 26

3
Getrennte Teile vor Herunterfallen sichern!
Werkzeuge dürfen nicht verkanten!
1. Allgemeine Informationen
• Bitte stellen Sie sicher, dass der Benutzer dieses
Werkzeugs die vorliegende Betriebsanleitung vor
der ersten Inbetriebnahme gründlich durchgelesen
und verstanden hat.
• Diese Betriebsanleitung enthält wichtige Hinweise,
die zum sicheren und störungsfreien Betrieb Ihres
HAZET Silentlager-Werkzeug-Satzes erforderlich
sind.
• Zum bestimmungsgemäßen Gebrauch des HAZET
Silentlager-Werkzeug-Satzes gehört die vollstän-
dige Beachtung aller Sicherheitshinweise und
Informationen in dieser Betriebsanleitung.
• Bewahren Sie deshalb diese Betriebsanleitung
immer bei Ihrem HAZET Silentlager-Werkzeug-Satz
auf.
• Dieses Werkzeug wurde für bestimmte Anwen-
dungen entwickelt. HAZET weist ausdrücklich
darauf hin, dass dieses Werkzeug nicht verändert
und/oder in einer Weise eingesetzt werden darf, die
nicht seinem vorgesehenen Verwendungszweck
entspricht.
• Für Verletzungen und Schäden, die aus unsachge-
mäßer und zweckentfremdeter Anwendung bzw.
Zuwiderhandlung gegen die Sicherheitsvorschriften
resultieren, übernimmt HAZET keine Haftung oder
Gewährleistung.
• Darüber hinaus sind die für den Einsatzbereich des
Gerätes geltenden Unfallverhütungsvorschriften
und allgemeinen Sicherheitsbestimmungen einzu-
halten.
2. Symbolerklärung
Achtung: Schenken Sie diesen Symbolen höchste
Aufmerksamkeit!
BETRIEBSANLEITUNG LESEN!
Der Betreiber ist verpflichtet die
Betriebsanleitung zu beachten und alle
Anwender des HAZET Silentlager-
Werkzeug-Satzes gemäß der Betriebs-
anleitung zu unterweisen.
HINWEIS!
Dieses Symbol kennzeichnet Hinweise,
die Ihnen die Handhabung erleichtern.
WARNUNG!
Dieses Symbol kennzeichnet wichtige
Beschreibungen, gefährliche Bedin-
gungen, Sicherheitsgefahren bzw.
Sicherheitshinweise.
ACHTUNG!
Dieses Symbol kennzeichnet Hinweise,
deren Nichtbeachtung Beschädigungen,
Fehlfunktionen und/oder den Ausfall des
Gerätes zur Folge haben.
ANWENDUNG NUR DURCH FACHLEUTE!
Dieses Werkzeug kann schwere Schäden
verursachen und ist daher nur durch
Fachleute anzuwenden.
1Zu Ihrer Information

4
Getrennte Teile vor Herunterfallen sichern!
Werkzeuge dürfen nicht verkanten!
1. Verantwortung des Betreibers
• Das Gerät ist zum Zeitpunkt seiner Entwicklung und
Fertigung nach geltenden, anerkannten Regeln der
Technik gebaut und gilt als betriebssicher. Es kön-
nen vom Gerät jedoch Gefahren ausgehen, wenn
es von nicht fachgerecht ausgebildetem Personal,
unsachgemäß oder nicht bestimmungsgemäß,
verwendet wird. Jede Person, die mit Arbeiten am
oder mit dem Gerät beauftragt ist, muss daher die
Betriebsanleitung vor Beginn der Arbeiten gelesen
und verstanden haben.
• Betriebsanleitung stets in unmittelbarer Nähe des
Gerätes aufbewahren.
• Veränderungen jeglicher Art sowie An- oder Um-
bauten am Gerät sind untersagt.
• Alle Sicherheits-, Warn- und Bedienungshinweise
am Gerät sind in stets gut lesbarem Zustand zu
halten. Beschädigte Schilder oder Aufkleber müs-
sen sofort erneuert werden.
• Angegebene Einstellwerte oder -bereiche sind
unbedingt einzuhalten.
• Diese Anweisung gibt lediglich Hinweise. Stel-
len Sie immer sicher, dass Sie die geeigneten
Serviceanweisungen des Fahrzeugherstellers oder
ein entsprechendes Handbuch besitzen, aus dem
Sie die korrekten Daten für die vorschriftsgemäße
Durchführung der Arbeit entnehmen können.
2. Bestimmungsgemäße
Verwendung
Die Betriebssicherheit ist nur bei be-
stimmungsgemäßer Verwendung ent-
sprechend der Angaben in der Betriebs-
anleitung gewährleistet.
Neben den Arbeitssicherheits-Hinweisen in dieser
Betriebsanleitung sind die für den Einsatzbereich
des Gerätes allgemein gültigen Sicherheits-, Unfall-
verhütungs- und Umweltschutz-Vorschriften zu
beachten und einzuhalten.
Die Benutzung und Wartung von Werkzeugen
muss immer entsprechend den lokalen staatlichen
Landes- oder Bundesbestimmungen erfolgen.
• Gerät nur in technisch einwandfreiem und betriebs-
sicherem Zustand betreiben.
• Sicherheitseinrichtungen immer frei erreichbar
vorhalten und regelmäßig prüfen.
• Die Funktion des HAZET Schlitzbuchsen-Silent-
lager-Werkzeuges ist das Ein- und Auspressen
von geschlitzten Silentlagern, z.B. an folgenden
Fahrzeugen:
MERCEDES-BENZ Actros 1, 2, 3
Bj. 2002 →– Stabilager
x70 mm: MAN TGA,TGS, TGX – Stoßdämpferla-
ger
x68 mm: MAN (Vorderfeder) ROR, SAF – Stoß-
dämpferlager
x66 mm: IVECO Eurostar – Fahrerhaus
x65 mm: MERCEDES-BENZ Actros 1 ∙ Atego 1
∙ Axor 1, 2, 3 ∙ Econic 1 – Stabilager
x63 mm: DAF
x60 mm: MAN TAG, TGS, TGX –
Blattfedernlagerung VA, HA ∙ MERCEDES-BENZ
Actros, Axor – Blattfedernauge ∙ IVECO Eurostar
– Blattfedernauge ∙ RENAULT Kerax, Magnum,
Premium – Blattfedernauge
x58 mm: MERCEDES-BENZ 3229 B, 652, 650 ∙
Volvo
x56 mm: IVECO Eurostar – Fahrerhaus
• Die weiteren Artikel, die Sie zum Betrieb dieses
Werkzeuges benötigen, entnehmen Sie bitte der
Tabelle auf Seite 6.
• Jede über die bestimmungsgemäße Verwendung
hinausgehende und/oder andersartige Verwendung
des Gerätes ist untersagt und gilt als nicht bestim-
mungsgemäß.
• Ansprüche jeglicher Art gegen den Hersteller und/
oder seine Bevollmächtigten wegen Schäden aus
nicht bestimmungsgemäßer Verwendung des
Gerätes sind ausgeschlossen.
• Für alle Schäden bei nicht bestimmungsgemäßer
Verwendung haftet allein der Betreiber.
2Zu Ihrer Sicherheit
5
Getrennte Teile vor Herunterfallen sichern!
Werkzeuge dürfen nicht verkanten!
3. Gefahren
die vom Gerät ausgehen
Vor jeder Benutzung ist der HAZET Silent-
lager-Werkzeug-Satz auf seine volle
Funktionsfähigkeit zu prüfen. Ist die Funk-
tionsfähigkeit nach dem Ergebnis dieser
Prüfung nicht gewährleistet oder werden Schäden
festgestellt, darf der HAZET Silentlager-Werkzeug-
Satz nicht verwendet werden. Ist die volle Funktions-
fähigkeit nicht gegeben und der HAZET Silentlager-
Werkzeug-Satz wird dennoch verwendet, besteht die
Gefahr von erheblichen Körper-, Gesundheits- und
Sachschäden.
• Volle Funktionsfähigkeit ist gegeben, wenn:
- das Gerät leichtgängig ist
- das Gerät keine Beschädigung aufweist.
• Die Einzelteile dürfen nur in der vorgesehenen
Zusammenstellung eingesetzt werden.
• Bei der Arbeit mit dem HAZET Silentlager-Werk-
zeug-Satz ist auf Schutzbrille und enganliegende
Arbeits-Schutzkleidung zu achten.
• Alle Service- oder Reparaturarbeiten immer durch
Fachpersonal ausführen lassen. Um die Betriebs-
sicherheit auf Dauer zu gewährleisten, dürfen nur
Originalersatzteile verwendet werden.
• Aus Sicherheitsgründen sind Veränderungen am
HAZET Silentlager-Werkzeug-Satz strengstens
untersagt. Die Vornahme von Veränderungen
am HAZET Silentlager-Werkzeug-Satz führt zum
sofortigen Haftungsausschluss.
• Achten Sie darauf, dass Sie getrennte Teile gegen
Herunterfallen sichern!
2Zu Ihrer Sicherheit

6
Getrennte Teile vor Herunterfallen sichern!
Werkzeuge dürfen nicht verkanten!
3Aufbau und Funktion
3.1 Technische Daten / Geräteelemente
Einzelteile 4937-2/32 Silentlager-Werkzeug-Satz
1Bezeichnung 7
14937-021
Aufnahme-Hülse lang, Ø 75 1
24937-022
Aufnahme-Hülse, kurz, Ø 75 1
34937-023
Aufnahme-Hülse lang, Ø 88 1
44937-024
Aufnahme-Hülse, kurz, Ø 88 1
54937-025
Aufnahme-Stufenplatte für Hydraulikzylinder - M27x2 1
64937-026
Spannblock 1
74937-027
Halbschalen-Sätze 1 (Ø 75 mm) - MERCEDES-BENZ 1
84937-028
Halbschalen-Sätze 2 (Ø 70 mm) - MAN 1
94937-029
Halbschalen-Sätze 3 (Ø 68 mm) - MAN Vorderfeder 1
04937-0210
Halbschalen-Sätze 4 (Ø 66 mm) - IVECO EUROSTAR 1
q4937-0211
Halbschalen-Sätze 5 (Ø 65 mm) - MERCEDES-BENZ ACTROS und ATEGO 1
w4937-0212
Halbschalen-Sätze 6 (Ø 63 mm) - DAF 1
e4937-0213
Halbschalen-Sätze 7 (Ø 60 mm) - MERCEDES-BENZ und IVECO EUROSTAR 1
r4937-0214
Halbschalen-Sätze 8 (Ø 58 mm) - MERCEDES-BENZ und VOLVO 1
t4937-0215
Halbschalen-Sätze 9 (Ø 56 mm) - IVECO EUROSTAR 1
z4937-0216
Druckstücke für Halbschalen-Sätze Ø 75 mm 1
u4937-0217
Druckstücke für Halbschalen-Sätze Ø 70 mm 1
i4937-0218
Druckstücke für Halbschalen-Sätze Ø 68 mm 1
o4937-0219
Druckstücke für Halbschalen-Sätze Ø 66 mm 1
p4937-0220
Druckstücke für Halbschalen-Sätze Ø 65 mm 1
a4937-0221
Druckstücke für Halbschalen-Sätze Ø 63 mm 1
s4937-0222
Druckstücke für Halbschalen-Sätze Ø 60 mm 1
d4937-0223
Druckstücke für Halbschalen-Sätze Ø 58 mm 1
f4937-0224
Druckstücke für Halbschalen-Sätze Ø 56 mm 1
g4937-0225
Distanzstück – U-Form 1
h4937-0226
Druckmutter M20 2
j4937-0227
U-Scheibe 2
k4937-0228
Spindel M20, L=520mm M20x1.5 1
l 4937-0229
Inbusschlüssel 6mm 1

7
Getrennte Teile vor Herunterfallen sichern!
Werkzeuge dürfen nicht verkanten!
3Aufbau und Funktion
4
1
3
2
56
7890q
w
ert
zuiop
asdf
g
h
j
k
l
3.2 Anwendung
• Diese Anweisung gibt lediglich Hinweise. Stellen
Sie immer sicher, dass Sie die geeigneten Service-
Anweisungen des Fahrzeugherstellers oder ein
entsprechendes Handbuch besitzen, aus dem
Sie die korrekten Daten für die vorschriftsgemäße
Durchführung der Arbeit entnehmen können.
• Die Silentlager und Werkzeuge dürfen vor und
während des Ein- und Ausziehens nicht verkantet
werden um Beschädigungen von Fahrzeugteilen
und Lagerteilen zu vermeiden.
• Beim Einziehen der Silentlager ausschließlich vom
Fahrzeughersteller freigegebene Gleitmittel
benutzen.
• Gegebenenfalls Anbauteile lösen bzw. ausbauen.
• Achten Sie darauf, dass Sie getrennte Teile
gegen Herunterfallen sichern!
• Die Spindel muss vor jeder Anwendung
ausreichend gefettet werden.
Hinweis: Markieren Sie die Einbaulage
des auszubauenden Schlitzbuchsen-
Silentlagers und übertagen diese auf das
neue Schlitzbuchsen-Silentlager.
8
Getrennte Teile vor Herunterfallen sichern!
Werkzeuge dürfen nicht verkanten!
3Aufbau und Funktion
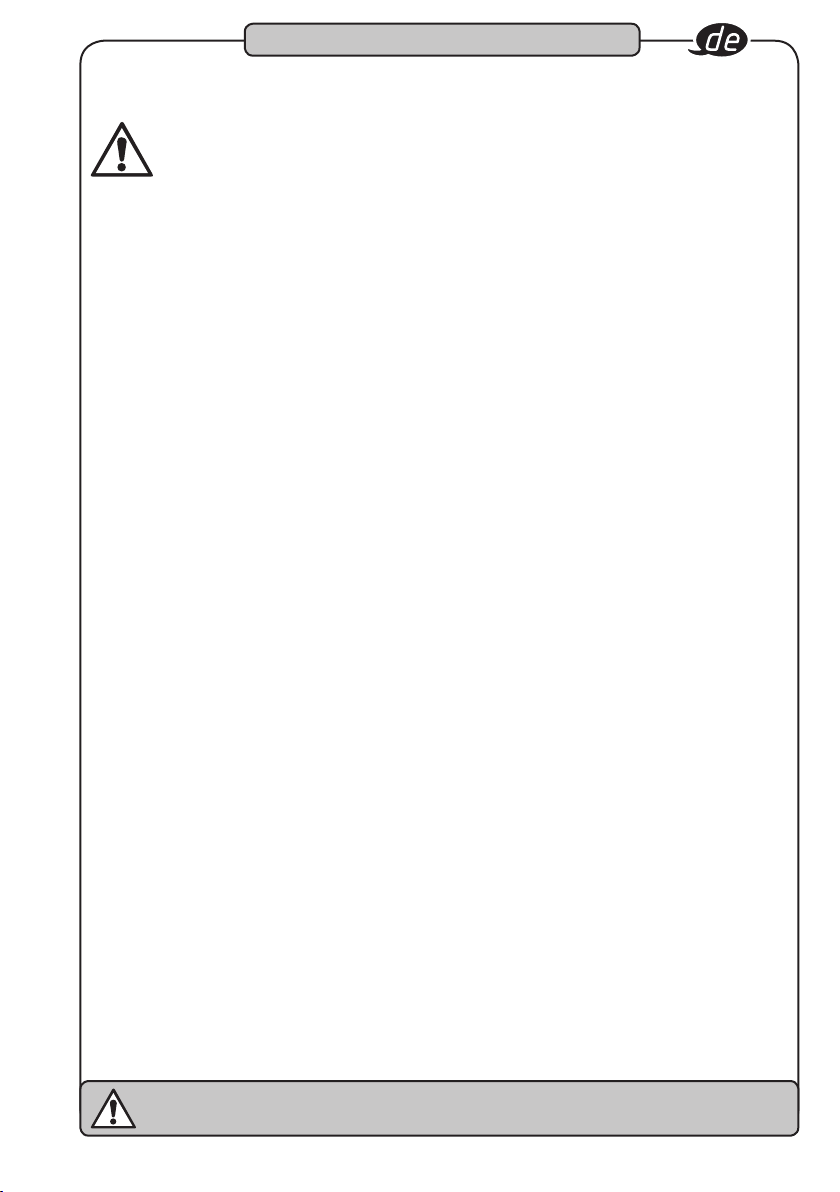
3.3 Anwendung Ausbau:
• Montieren Sie eine Druckmutter und eine Unterlegscheibe auf
die Gewindespindel.
• Wählen Sie ein geeignetes Druckstück passend zum
Außendurchmesser des Schlitzbuchsen-Silentlagers und führen
dieses mit der offenen Seite zum Schlitzbuchsen-Silentlager auf
die Spindel.
Achtung: Das Druckstück muss so ausgewählt werden,
dass dieses auf die Metallummantelung des Silentagers
drückt!
• Setzen Sie die diese Einheit in das Schlitzbuchsen-Silentlager
ein.
• Führen Sie von der gegenüberliegenden Seite eine passende
Aufnahmehülse mit Stufenplatte auf die Gewindespindel.
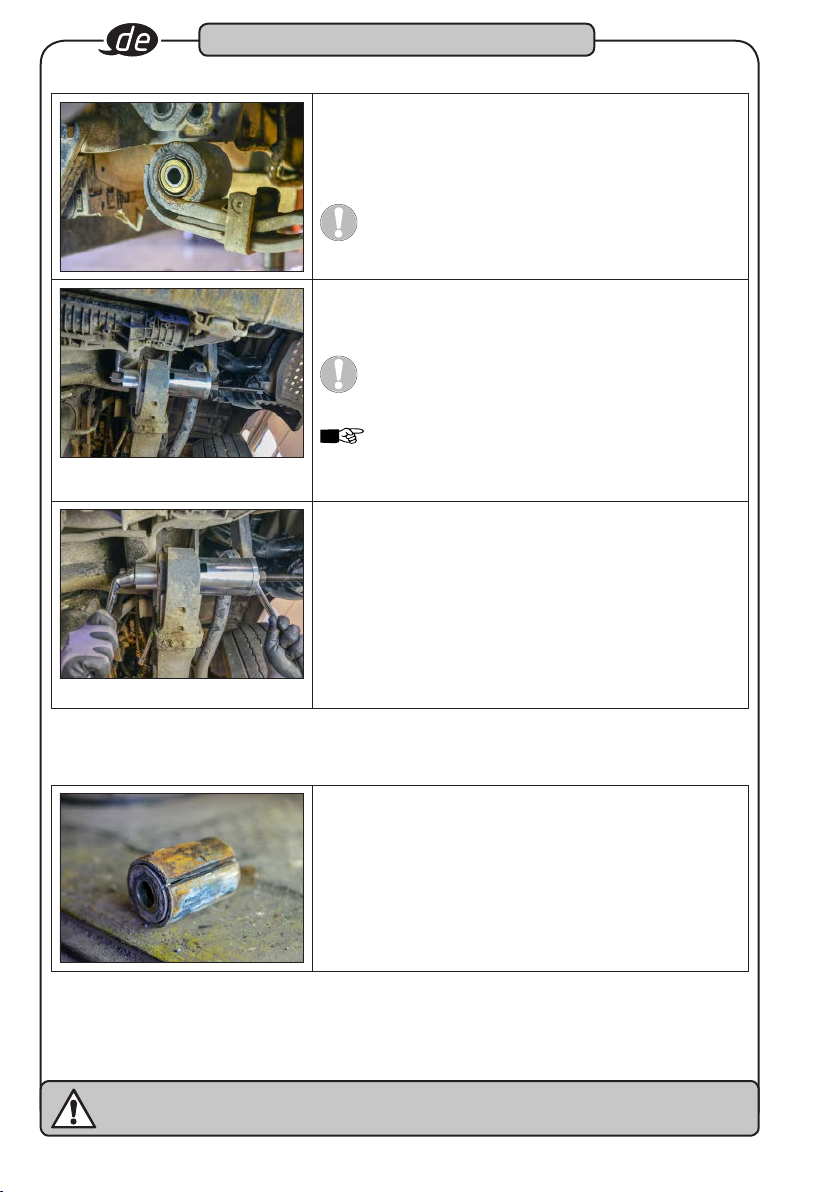
Achtung: Achten Sie darauf, dass Sie die Aufnahmehülse
so auswählen, dass das Schlitzbuchsen-Silentlager gut
aufgenommen werden kann und dass die Aufnahmehülse
genug Fläche hat um sich abzustützen!
Hinweis: Achten Sie darauf, dass Sie einen freien Blick
auf das Sichtfenster haben, um das Ausziehen zu über-
wachen!
• Schrauben Sie die Spindelmutter mit Unterlegscheibe bis zum
Reibschluss auf.
• Sind alle Werkzeuge optimal ausgerichtet, betätigen Sie die
Druckmutter, bei gleichzeitigem Gegenhalten der Spindelmutter,
bis das Schlitzbuchsen-Silentlager komplett ausgezogen ist.
• Lösen Sie die Werkzeuge und entnehmen das ausgebaute
Schlitzbuchsen-Silentlager aus der Aufnahmehülse.
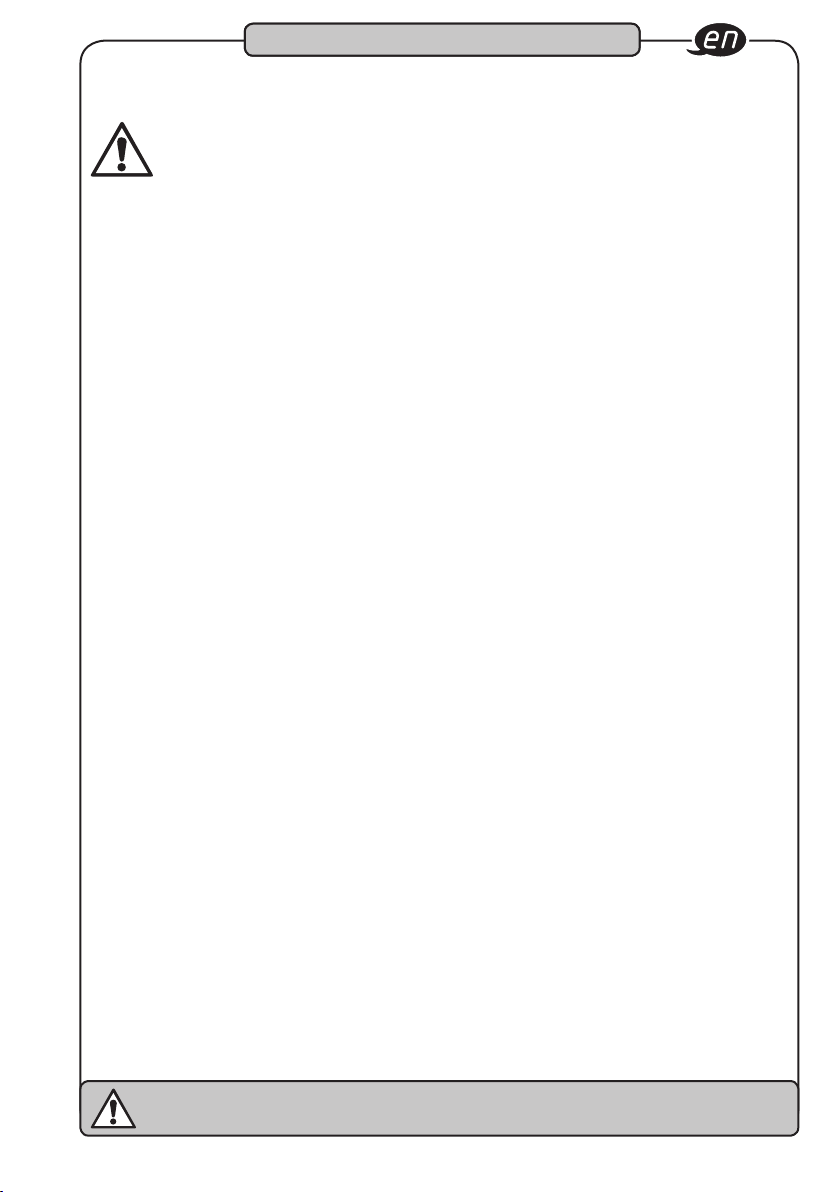
• Nach dem Ausbau die Betätigungswerkzeuge entfernen.
• Defektes Schlitzbuchsen-Silentlager

9
Getrennte Teile vor Herunterfallen sichern!
Werkzeuge dürfen nicht verkanten!
3Aufbau und Funktion
3.4 Anwendung 3.4.2 Einbau:
• Montieren Sie eine Druckmutter und Unterlegscheibe auf die
Gewindespindel.
• Wählen Sie eine kurze Aufnahmehülse und die entsprechende
Stufenplatte aus. Führen Sie diese mit der offenen Seite zum
Lager auf die Spindel.
Achtung: Die kurze Aufnahmehülse muss so ausgewählt
werden, dass genügend Fläche vorhanden ist, um sich
sicher abzustützen und das ein vorgesehener Überstand
des Lagers in die Aufnahmehülse passen kann!
Hinweis: Achten Sie darauf, dass Sie einen freien Blick
auf das Sichtfenster haben, um das Einziehen zu überwa-
chen!
• Setzen Sie diese Einheit in die Schlitzbuchsen-Silentlager
Aufnahme ein.
• Führen Sie von der gegenüberliegenden Seite den zuvor mon-
tierten Spannblock mit dem neuen Schlitzbuchsen-Silentlager
auf die Gewindespindel auf.
• Führen Sie anschließend das zu den Halbschalen entspre-
chende Druckstück mit der offenen Seite in Richtung Spann-
block auf die Spindel.
Achtung: Das Druckstück muss so ausgewählt werden,
dass dieses auf die Metallummantelung des Silentagers
drückt!
• Schrauben Sie die Spindelmutter mit Unterlegscheibe bis zum
Reibschluss auf.
• Sind alle Werkzeuge optimal ausgerichtet, betätigen Sie die
Druckmutter, bei gleichzeitigem Gegenhalten der Spindelmutter,
bis das Schlitzbuchsen-Silentlager komplett ausgezogen ist.
• Lösen Sie die Werkzeuge.
• Nach dem Einbau Betätigungswerkzeuge entfernen!
3.4 Anwendung 3.4.1 Vorspannen
Um das neue Schlitzbuchsen-Silentlager einzuziehen, ist es notwendig dieses in dem Spannblock
vorzuspannen.
• Wählen Sie geeignete Halbschalen und ein geeignetes Druckstück entsprechend zum neuen
Schlitzbuchsen-Silentlager aus.
• Legen Sie die Halbschalen in die Spannblockhälften ein und fixieren Sie diese mit den entsprechenden
Schrauben.
Hinweis: bei der Verwendung der Halbschalen Ø 56 / 58 / 60 / 63 mm muss die Halbschale
Ø 75 mm als Adapter verwendet werden. Hierzu legen Sie die Ø 75 mm Halbschalen in die
Spannblockhälften und verschrauben diese von außen mit den kurzen Schrauben. Danach
wird die passende kleinere Halbschale eingelegt und von außen mit den langen Schrauben
fixiert.
• Fetten Sie das neue Schlitzbuchsen-Silentlager und legen dieses in die Spannblockhälfte ein.
Hinweis: Achten Sie unbedingt darauf, dass Sie das neue Schlitzbuchsen-Silentlager mit dem
Schlitz leicht versetzt zu der Spannblockhälfte einlegen, damit es beim Vorspannen zu keinen
ungewollten Stauchungen im Lager kommen kann.
Hinweis: Achten Sie ebenfalls auf mittige Ausrichtung des neuen Lagers in den Spannblock-
hälften, damit Sie vorne und hinten einen gleichen Überstand haben.
• Setzen Sie die zweite Hälfte des Spannblockes auf und verschrauben beide Hälften gleichmäßig,
bis der Schlitz des Schlitzbuchsen-Silentlagers komplett geschlossen ist.

10
Getrennte Teile vor Herunterfallen sichern!
Werkzeuge dürfen nicht verkanten!
4 Wartung und Pflege
Aufbewahrung / Lagerung
Das Gerät ist unter folgenden Bedingungen zu lagern und aufzubewahren:
• Gerät nicht im Freien aufbewahren.
• Gerät trocken und staubfrei lagern.
• Gerät keinen Flüssigkeiten und aggressiven Substanzen aussetzen.
• Lagertemperatur -10 bis +45°C.
• Relative Luftfeuchtigkeit max. 60%.
5 Aufbewahrung / Lagerung
Entsorgung
• Zur Aussonderung, Gerät reinigen und unter Beachtung geltender Arbeits- und Umweltschutzvorschriften
zerlegen. Bestandteile der Wiederverwertung zuführen.
6 Entsorgung
Wartung und Pflege
• Gerät stets sauber halten.
• Keine entfettenden Mittel oder Wasser verwenden,
um Korrosion zu vermeiden.
• Überprüfung und Reparatur sind ausschließlich
durch Fachpersonal vorzunehmen.
Ihr Ansprechpartner für:
• Gewährleistung
• Wartung und Instandsetzung
Ersatzteile
• Nur Original-Ersatzteile des Herstellers verwenden.
• Bei allen Rückfragen und Ersatzteilbestellungen
unbedingt die Artikelnummer des Gerätes an-
geben.
• Falsche oder fehlerhafte Ersatzteile können zu
Beschädigungen, Fehlfunktionen oder Totalausfall
des Gerätes führen.
• Bei Verwendung nicht freigegebener Ersatzteile
verfallen sämtliche Garantie-, Service-, Schaden-
ersatz- und Haftpflichtansprüche gegen den
Hersteller oder seine Beauftragten, Händler und
Vertreter.

11
Please secure separate parts against falling off!
Tools must not tilt!
1For your Information
1. General information
• Please make sure that the user of this device care-
fully reads these operating instructions and fully
understands all information given before it is used.
• These operating instructions contains important
instructions that are required for safe and trouble-
free operation of your HAZET silent block tool set.
• Intended use of the HAZET tool set for silent blocks
includes complete compliance with all of the safety
precautions and information in these operating
instructions.
• For this reason, always keep these operating in-
structions with your HAZET silent block tool set.
• This tool has been designed exclusively for specific
applications. HAZET emphasizes that any modifica-
tion to the tool and/or use in a way that does not
correspond to its intended application is strictly
forbidden.
• HAZET will not be liable for any injuries to persons
or damage to property originating from improper
application, misuse of the tool or a disregard of the
safety instructions.
• Furthermore, the general safety regulations and
regulations for the prevention of accidents valid
for the application area of this device must be
observed and respected.
2. Explanation of symbols
Attention: Pay strict attention to these symbols!
READ THE OPERATING INSTRUCTIONS!
The owner is obligated to comply with
the operating instructions and instruct
all users of the HAZET silent block tool
set in accordance with the information
provided in the operating instructions.
NOTE!
This symbol indicates advice that is
helpful when using the tool.
WARNING!
This symbol indicates important specifi-
cations, dangerous conditions, safety risks
and safety advice.
CAUTION!
This symbol indicates advice which, if
disregarded, results in damage, malfunc-
tion and/or functional failure of the tool.
TO BE USED BY QUALIFIED PERSONNEL ONLY!
This tool may cause serious injury and
must therefore be used by qualified
personnel only.

12
Please secure separate parts against falling off!
Tools must not tilt!
1. Owner's liability
• The tool was developed and manufactured accor-
ding to the technical norms and standards valid
at the time and is considered to be operationally
reliable. Nevertheless, the tool may present a
danger when it is not used as intended or used in
an inappropriate way by non-qualified personnel.
Please make sure that any person using this device
or carrying out any maintenance work carefully
reads these operating instructions and fully under-
stands all the provided information before using the
device.
• Keep the operating instructions together with the
device at all times.
• Any modification of the tool is strictly forbidden.
• All security advices, warning and operation notices
on the tool have to be kept legible. Immediately
replace any damaged labels or stickers.
• All specified set values or ranges must be observed.
• These instructions are provided as a guide only.
Always make sure that you have a copy of the
appropriate vehicle manufacturer's service instruc-
tions, or another appropriate manual that provides
the correct information needed to correctly execute
the work.
2. Intended use
Operational reliability is only guaranteed
if the tool is used as intended in
accordance with the information in the
operating instructions.
In addition to the safety advice given in these ope-
rating instructions, the general safety regulations,
regulations for the prevention of accidents and regula-
tions for environmental protection valid for this tool's
application range must be observed and respected.
Always ensure tools are used, inspected and
maintained in compliance with the respective local,
state, national or federal regulations.
• The tool must only be used if it is in good working
condition.
• All safety equipment must always be within reach
and should be checked regularly.
• The HAZET slotted-cylinder silent block tools are
for inserting and removing slotted silent blocks,
e.g. on the following vehicles:
MERCEDES-BENZ Actros 1, 2, 3
model year 2002 →– Stabiliser bearings
x70 mm: MAN TGA, TGS, TGX – Shock absor-
ber bearings
x68 mm: MAN (front spring) ROR, SAF – Shock
absorber bearings
x66 mm: IVECO Eurostar – Cab
x65 mm: MERCEDES-BENZ Actros 1 ∙ Atego 1
∙ Axor 1, 2, 3 ∙ Econic 1 – Stabiliser bearings
x63 mm: DAF
x60 mm: MAN TAG, TGS, TGX –
Leaf spring bearing VA, HA ∙ MERCEDES-BENZ
Actros, Axor – Leaf spring lug ∙ IVECO Eurostar
– Leaf spring lug ∙ RENAULT Kerax, Magnum,
Premium – Leaf spring lug
x58 mm: MERCEDES-BENZ 3229 B, 652, 650 ∙
Volvo
x56 mm: IVECO Eurostar – Cab
• Please refer to the table on page 14 for further items
which you will require in order to operate this tool.
• Any deviation from the intended use and/or any
misapplication of the device is not allowed and will
be considered as improper use.
• Any claims against the manufacturer and/or its
authorised agents because of damage caused by
improper use of the tool are void.
• Any personal injury or material losses caused by
improper use of the tool are the sole responsibility
of the owner.
2For your safety
13
Please secure separate parts against falling off!
Tools must not tilt!
3. Dangers that may arise from
using the tool
Before use, check the HAZET silent block
tool set for full functionality. Do not use the
HAZET silent block tool set if its functional
efficiency cannot be ensured or if damage
is detected. If the HAZET silent block tool set is used,
when it is not in full working order, there is danger of
severe physical injury, health impairment and mate-
rial damage.
The device is fully functional when:
- The tool runs smoothly.
- The device does not show any signs of damage.
• The component parts must only be used in com-
bination and as intended.
• When working with the HAZET silent block tool
set, ensure that protective goggles and tight-fitting
protective work clothing are worn.
• Always have service or repair work performed by
qualified personnel. Only use original spare parts
so as to guarantee its long-term operational safety.
• For safety reasons, any modifications to the HAZET
silent block tool set are strictly prohibited. Making
changes to the HAZET silent block tool set results
in immediate exclusion of liability.
• Please ensure that separate parts are secured to
prevent them falling off!
2For your safety

14
Please secure separate parts against falling off!
Tools must not tilt!
3Design and function
3.1. Technical data / tool components
Components 4937-2/32 Tool set for silent blocks
1Designation 7
14937-021
Socket sleeve, long, Ø 75 1
24937-022
Socket sleeve, short, Ø 75 1
34937-023
Socket sleeve, long, Ø 88 1
44937-024
Socket sleeve, short, Ø 88 1
54937-025
Socket step plate for hydraulic cylinder - M27x2 1
64937-026
Clamping block 1
74937-027
Half shell sets 1 (Ø 75 mm) - MERCEDES-BENZ 1
84937-028
Half shell sets 2 (Ø 70 mm) - MAN 1
94937-029
Half shell sets 3 (Ø 68 mm) - MAN FRONT SPRING 1
04937-0210
Half shell sets 4 (Ø 66 mm) - IVECO EUROSTAR 1
q4937-0211
Half shell sets 5 (Ø 65 mm) - MERCEDES-BENZ ACTROS and ATEGO 1
w4937-0212
Half shell sets 6 (Ø 63 mm) - DAF 1
e4937-0213
Half shell sets 7 (Ø 60 mm) - MERCEDES-BENZ and IVECO EUROSTAR 1
r4937-0214
Half shell sets 8 (Ø 58 mm) - MERCEDES-BENZ and VOLVO 1
t4937-0215
Half shell sets 9 (Ø 56 mm) - IVECO EUROSTAR 1
z4937-0216
Thrust blocks for half shell sets Ø 75 mm 1
u4937-0217
Thrust blocks for half shell sets Ø 70 mm 1
i4937-0218
Thrust blocks for half shell sets Ø 68 mm 1
o4937-0219
Thrust blocks for half shell sets Ø 66 mm 1
p4937-0220
Thrust blocks for half shell sets Ø 65 mm 1
a4937-0221
Thrust blocks for half shell sets Ø 63 mm 1
s4937-0222
Thrust blocks for half shell sets Ø 60 mm 1
d4937-0223
Thrust blocks for half shell sets Ø 58 mm 1
f4937-0224
Thrust blocks for half shell sets Ø 56 mm 1
g4937-0225
Spacer – U-shaped 1
h4937-0226
Compression nut M20 2
j4937-0227
Washer 2
k4937-0228
Spindle M20, L=520mm M20x1.5 1
l 4937-0229
Allen key 6 mm 1

15
Please secure separate parts against falling off!
Tools must not tilt!
3Design and function
4
1
3
2
56
7890q
w
ert
zuiop
asdf
g
h
j
k
l
3.2. Use
• These instructions are provided as a guide only.
Always make sure that you have a copy of the
appropriate vehicle manufacturer's service instruc-
tions or another appropriate manual that provides
the correct information needed to correctly execute
the work.
• To avoid damage to vehicle parts and bearing
components, the silent block and tools must not
be tilted during insertion or extraction.
• When inserting the silent block, only use an anti-
friction agent approved by the vehicle manufacturer.
• If necessary, loosen or remove any attached parts.
• Please ensure that separate parts are secured to
prevent them falling off!
• The spindle must be adequately lubricated
before each application.
Note: Mark the installation point of the
slotted-cylinder silent block and transfer
this to the new slotted-cylinder silent
block.

16
Please secure separate parts against falling off!
Tools must not tilt!
3Design and function
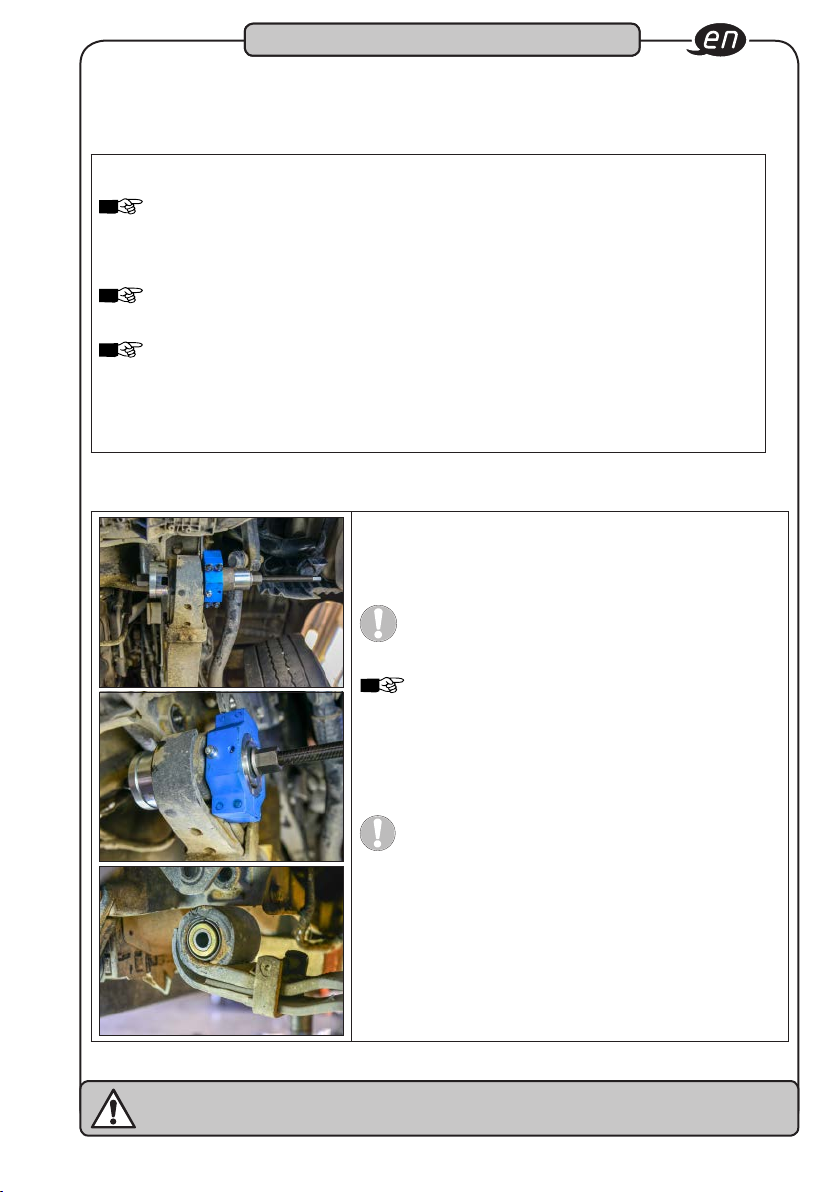
3.3 Application Removal:
• Install a compression nut and a washer onto the threaded
spindle.
• Select a thrust block suitable for the external diameter of the
slotted-cylinder silent block and guide this onto the spindle with
the open side facing the slotted-cylinder silent block.
Attention: The thrust block must be selected so that this
presses onto the metal sheath of the silent block.
• Insert this unit into the slotted-cylinder silent block.
• From the opposite side, guide a suitable socket sleeve with a
step plate onto the threaded spindle.
Attention: Ensure that you select the socket sleeve so
that the slotted-cylinder silent block is well received and
that the socket sleeve has enough surface to support
itself.
Note: Ensure that you have an unobstructed view of the
viewing window in order to monitor the extraction.
• Screw on the spindle nut with washer until a frictional connection
is made.
• If all tools are optimally aligned, operate the compression nut
while counterholding the spindle nut until the slotted-cylinder
silent block is completely exposed.
• Loosen tools and remove the dismounted slotted-cylinder silent
block from the socket sleeve.
• After removal, remove the operating tools.
• Defective slotted-cylinder silent block
17
Please secure separate parts against falling off!
Tools must not tilt!
3Design and function
3.4 Application 3.4.2 Installation:
• Install a compression nut and a washer onto the threaded
spindle.
• Select a short socket sleeve and the corresponding step plate.
Guide this onto the spindle with the open side towards the
bearing.
Attention: The short socket sleeve must be selected so
that sufficient space is available to support itself secure-
ly and that the projecting overhang of the bearing can fit
into the socket sleeve.
Note: Ensure that you have an unobstructed view of the
viewing window in order to monitor the insertion.
• Insert this unit into the slotted-cylinder silent block socket.
• From the opposite side, guide the previously assembled clam-
ping block with the new slotted-cylinder silent block onto the
threaded spindle.
• Then guide the thrust block that corresponds to the half shells
onto the spindle with the open side towards the clamping block.
Attention: The thrust block must be selected so that this
presses onto the metal sheath of the silent block.
• Screw on the spindle nut with washer until a frictional connection
is made.
• If all tools are optimally aligned, operate the compression nut
while counterholding the spindle nut until the slotted-cylinder
silent block is completely exposed.
• Loosen the tools.
• After installation, remove the operating tools.
3.4 Application 3.4.1 Pre-tightening
In order to insert the slotted-cylinder silent block, it is necessary to pre-tighten this in the clamping
block.
• Select half shells and a thrust block suitable for the new slotted-cylinder silent block.
• Insert the half shells into the clamping block halves and fix these with the appropriate screws.
Note: When using half shells Ø 56 / 58 / 60 / 63 mm, half shell Ø 75 mm must be used as an
adapter. To do this, lay the Ø 75 mm half shells in the clamping block halves and screw these
together from the outside with the short screws. After this, the suitable smaller half shell is
inserted and fixed from the outside with the long screws.
• Grease the new slotted-cylinder silent block and insert this in the clamping block half.
Note: Ensure that you insert the new slotted-cylinder silent block with the slot slightly offset
to the clamping block half, so that no undesired crushing of the bearing can occur during
pre-tightening.
Note: Also ensure the central alignment of the new bearing in the clamping block halves so
that an equal overhang is achieved at the front and the back.
• Fit the second half of the clamping block and screw both halves together evenly, until the slot of
the slotted-cylinder silent block is completely closed.
18
Please secure separate parts against falling off!
Tools must not tilt!
4 Maintenance and care
Storage
The tool must be stored according to the following conditions:
• Do not store the tool outdoors.
• Keep the tool in a dry and dust-free place.
• Do not expose the tool to liquids and/or aggressive substances.
• Storage temperature: -10 to +45 °C.
• Relative air humidity: max. 60%.
5Storage
Disposal
• For disposal, clean the device and disassemble it according to the regulations for work safety and envi-
ronmental protection. Please recycle components.
6 Disposal
Maintenance and care
• Always keep the tool clean.
• Do not use degreasing agents or water in order to
avoid corrosion.
• Inspection and repair may only be carried out by
qualified personnel.
Your contacts for:
• Warranty
• Maintenance and repair
Spare parts
• Only use the manufacturer’s original spare parts.
• For questions and spare parts orders, please
indicate the article number of the device.
• Unsuitable or defective spare parts may cause
damage, malfunction or total failure of the device.
• The use of non-approved spare parts will void all
warranty, service and liability claims as well as all
claims for compensation against the manufacturer
or its agents, distributors and sales representa-
tives.

19
Oddzielone części zabezpieczyć przed upadkiem!
Narzędzia nie mogą się przekrzywiać!
1Informacje dla użytkownika
1. Informacje ogólne
• Należy zapewnić, aby użytkownik tego narzędzia
dokładnie przeczytał i zrozumiał niniejszą instrukcję
obsługi przed pierwszym użyciem narzędzia.
• Niniejsza instrukcja obsługi zawiera ważne wska-
zówki konieczne do bezpiecznego i bezawaryjnego
użytkowania zestawu narzędzi do silentbloków
firmy HAZET.
• Elementem użytkowania zestawu narzędzi do
silentbloków firmy HAZET w sposób zgodny z
przeznaczeniem jest całkowite przestrzeganie
wszystkich wskazówek bezpieczeństwa oraz in-
formacji zawartych w niniejszej instrukcji obsługi.
• Dlatego niniejszą instrukcję obsługi należy prze-
chowywać zawsze razem z zestawem narzędzi do
silentbloków firmy HAZET.
• Niniejsze narzędzie zostało zaprojektowane do
określonych zastosowań. Firma HAZET wyraźnie
wskazuje na fakt, iż niniejsze narzędzie nie może
zostać w jakikolwiek sposób zmienione ani być
używane niezgodnie z przeznaczeniem.
• Za odniesione obrażenia lub szkody powstałe w
wyniku niewłaściwego i niezgodnego z przeznacze-
niem zastosowania lub w wyniku nieprzestrzegania
przepisów bezpieczeństwa firma HAZET nie ponosi
odpowiedzialności ani gwarancji.
• Ponadto w zakresie zastosowania narzędzia
konieczne jest przestrzeganie przepisów o za-
pobieganiu wypadkom oraz ogólnych warunków
bezpieczeństwa.
2. Objaśnienie symboli
Uwaga: Na te symbole należy zwracać szczególną
uwagę!
PRZECZYTAĆ INSTRUKCJĘ OBSŁUGI!
Użytkownik jest zobowiązany do
przestrzegania niniejszej instrukcji oraz
do instruowania wszystkich osób
korzystających z zestawu narzędzi do
silentbloków firmy HAZET zgodnie z
zapisami instrukcji.
WSKAZÓWKA!
Ten symbol oznacza wskazówki, które
ułatwiają obsługę urządzenia.
OSTRZEŻENIE!
Ten symbol oznacza ważne opisy,
niebezpieczne warunki, zagrożenia
bezpieczeństwa oraz wskazówki z zakresu
bezpieczeństwa.
UWAGA!
Ten symbol oznacza wskazówki, któr-
ych nieprzestrzeganie prowadzi do
uszkodzeń, niewłaściwego działania i/lub
awarii urządzenia.
UŻYTKOWANIE URZĄDZENIA TYLKO PRZEZ
WYKWALIFIKOWANY PERSONEL!
To narzędzie może spowodować
poważne szkody i dlatego może być
użytkowane tylko przez wykwalifikowany
personel.

20
Oddzielone części zabezpieczyć przed upadkiem!
Narzędzia nie mogą się przekrzywiać!
1. Odpowiedzialność użytkownika
• Urządzenie zostało zbudowane według uznanych
i obowiązujących w czasie jego projektowania
i produkcji zasad techniki i jest bezpieczne w
eksploatacji. Ryzyko wystąpienia zagrożenia ze
strony urządzenia istnieje wówczas, jeśli będzie ono
użytkowane przez niewykwalifikowany personel,
nieprawidłowo lub niezgodnie z jego przeznacze-
niem. Każda osoba, która będzie bezpośrednio
obsługiwać urządzenie albo tylko uczestniczyć
w jego obsłudze, musi przeczytać i zrozumieć
niniejszą instrukcję.
• Niniejszą instrukcję obsługi należy przechowywać
zawsze w bezpośrednim pobliżu urządzenia.
• Wszelkiego rodzaju zmiany albo jakakolwiek prze-
budowa lub rozbudowa urządzenia są zabronione.
• Wszystkie wskazówki bezpieczeństwa, ostrze-
gawcze i dotyczące obsługi, które znajdują się na
urządzeniu, należy stale utrzymywać w czytelnym
stanie. Uszkodzone tabliczki lub naklejki muszą
zostać natychmiast wymienione.
• Należy koniecznie przestrzegać podanych wartości
nastaw lub ich zakresów.
• Niniejsza instrukcja podaje jedynie wskazówki.
Zawsze należy się upewnić, że posiada się odpo-
wiednie instrukcje serwisowe producenta pojazdu
albo odpowiedni dla niego podręcznik, z których
można odczytać prawidłowe dane do przeprowa-
dzenia prac zgodnie z przepisami.
2. Użytkowanie
zgodne z przeznaczeniem
Bezpieczeństwo pracy jest gwarantowane
tylko przy użytkowaniu zgodnym z
przeznaczeniem, odpowiednio do danych
zawartych w instrukcji obsługi.
Ponadto w zakresie zastosowania narzędzia poza
wskazówkami z zakresu BHP konieczne jest prze-
strzeganie ogólnie obowiązujących przepisów bez-
pieczeństwa, przepisów o zapobieganiu wypadkom
oraz ochronie środowiska.
Narzędzia należy użytkować i konserwować zgod-
nie z lokalnymi przepisami krajowymi.
• Urządzenie użytkować tylko w sprawnym i zapew-
niającym bezpieczną pracę stanie technicznym.
• Przyrządy zapewniające bezpieczeństwo muszą
być zawsze swobodnie dostępne i regularnie
sprawdzane.
• Działanie narzędzia do silentbloków firmy HAZET
z gniazdem z rowkiem polega na wciskaniu i
wyciskaniu silentbloków z rowkiem, np. w nastę-
pujących pojazdach:
MERCEDES-BENZ Actros 1, 2, 3
rok prod. 2002 →— łożysko stabilizacyjne
x70mm: MAN TGA,TGS, TGX — łożysko amor-
tyzatora
x68mm: MAN (sprężyna przednia) ROR, SAF —
łożysko amortyzatora
x66mm: IVECO Eurostar — kabina
x65mm: MERCEDES-BENZ Actros 1 ∙ Atego 1
∙ Axor 1, 2, 3 ∙ Econic 1 — łożysko stabilizacyjne
x63mm: DAF
x60mm: MAN TAG, TGS, TGX –
łożysko sprężyny piórowej VA, HA ∙ MERCEDES-
-BENZ Actros, Axor — zaczep sprężyny piórowej
∙ IVECO Eurostar — zaczep sprężyny piórowej ∙
RENAULT Kerax, Magnum, Premium — zaczep
sprężyny piórowej
x58mm: MERCEDES-BENZ 3229 B, 652, 650 ∙
Volvo
x56mm: IVECO Eurostar — kabina
• Inne artykuły potrzebne do użytkowania narzędzia
można znaleźć w tabeli na stronie 22.
• Każde użytkowanie narzędzia wykraczające poza
zgodne z przeznaczeniem i/lub inne zastosowanie
jest zabronione i traktowane jako niezgodne z
przeznaczeniem.
• Wykluczone są wszelkiego rodzaju roszczenia w
stosunku do producenta i/lub jego pełnomocni-
ków z tytułu szkód wynikających z niezgodnego z
przeznaczeniem zastosowania urządzenia.
• Za wszelkie szkody wynikające z użytkowania
niezgodnego z przeznaczeniem odpowiedzialność
ponosi wyłącznie użytkownik.
2Bezpieczeństwo
Table of contents
Languages:
Other Hazet Power Tools manuals

Hazet
Hazet 9023 M-1 User manual

Hazet
Hazet 5108 KV User manual

Hazet
Hazet 2191/12 K User manual

Hazet
Hazet 4932-17 User manual

Hazet
Hazet 5121KV User manual

Hazet
Hazet 9041 G-1 Installation and operating instructions

Hazet
Hazet 7280-2sTAC User manual

Hazet
Hazet 9212SPC-1 User manual

Hazet
Hazet 6391 User manual

Hazet
Hazet System 5000 CT User manual


