manuals.online logo
Brands
  1. Home
  2. •
  3. Brands
  4. •
  5. HEIDENHAIN
  6. •
  7. Scanner
  8. •
  9. HEIDENHAIN LIC 4019 User manual

HEIDENHAIN LIC 4019 User manual

Other HEIDENHAIN Scanner manuals

HEIDENHAIN AK ECA 4410 User manual

HEIDENHAIN

HEIDENHAIN AK ECA 4410 User manual

HEIDENHAIN AK ERM 2280 User manual

HEIDENHAIN

HEIDENHAIN AK ERM 2280 User manual

HEIDENHAIN AK LIC 401 User manual

HEIDENHAIN

HEIDENHAIN AK LIC 401 User manual

HEIDENHAIN AK LIC 411 User manual

HEIDENHAIN

HEIDENHAIN AK LIC 411 User manual

HEIDENHAIN AK ERM 220 User manual

HEIDENHAIN

HEIDENHAIN AK ERM 220 User manual

HEIDENHAIN AK LIDA 49 M User manual

HEIDENHAIN

HEIDENHAIN AK LIDA 49 M User manual

HEIDENHAIN AK ECA 4410 User manual

HEIDENHAIN

HEIDENHAIN AK ECA 4410 User manual

HEIDENHAIN AK ERP 10 0 Series User manual

HEIDENHAIN

HEIDENHAIN AK ERP 10 0 Series User manual

HEIDENHAIN LIF 47R User manual

HEIDENHAIN

HEIDENHAIN LIF 47R User manual

HEIDENHAIN AK ECA 4410V User manual

HEIDENHAIN

HEIDENHAIN AK ECA 4410V User manual

HEIDENHAIN LIDA 400 Series User manual

HEIDENHAIN

HEIDENHAIN LIDA 400 Series User manual

HEIDENHAIN AK LIP 607 User manual

HEIDENHAIN

HEIDENHAIN AK LIP 607 User manual

HEIDENHAIN LIDA 400 Series User manual

HEIDENHAIN

HEIDENHAIN LIDA 400 Series User manual

HEIDENHAIN AK ERM 220 User manual

HEIDENHAIN

HEIDENHAIN AK ERM 220 User manual

Popular Scanner manuals by other brands

Radio Shack PRO-433 quick start guide

Radio Shack

Radio Shack PRO-433 quick start guide

Atid AT911N series user guide

Atid

Atid AT911N series user guide

Siemens RUGGEDCOM WiN5100 Faq

Siemens

Siemens RUGGEDCOM WiN5100 Faq

Canon CanoScan LiDE 20 Specifications

Canon

Canon CanoScan LiDE 20 Specifications

Epson 4180 - Perfection Photo Product support bulletin

Epson

Epson 4180 - Perfection Photo Product support bulletin

Radio Shack PRO-72 owner's manual

Radio Shack

Radio Shack PRO-72 owner's manual

Lanier 5622 Operator's guide

Lanier

Lanier 5622 Operator's guide

Faro Freestyle 2 user manual

Faro

Faro Freestyle 2 user manual

Kramer VS-16N user manual

Kramer

Kramer VS-16N user manual

Z/I Imaging PhotoScan 2001 instructions

Z/I Imaging

Z/I Imaging PhotoScan 2001 instructions

Renkforce DS100-5M operating instructions

Renkforce

Renkforce DS100-5M operating instructions

Canon imageFORMULA CR-120N user manual

Canon

Canon imageFORMULA CR-120N user manual

Fujitsu FI-4860C2 Specifications

Fujitsu

Fujitsu FI-4860C2 Specifications

HPc9861a 4400c Setup and support guide

HPc9861a

HPc9861a 4400c Setup and support guide

Kodak i5800 Scanner Brochure & specs

Kodak

Kodak i5800 Scanner Brochure & specs

Kodak i7300 user guide

Kodak

Kodak i7300 user guide

Revopoint POP user manual

Revopoint

Revopoint POP user manual

Fujitsu fi-4860C installation guide

Fujitsu

Fujitsu fi-4860C installation guide

manuals.online logo
manuals.online logoBrands
  • About & Mission
  • Contact us
  • Privacy Policy
  • Terms and Conditions

Copyright 2025 Manuals.Online. All Rights Reserved.

Montageanleitung
Mounting Instructions
Instructions de montage
Istruzioni di montaggio
Instrucciones de montaje
LIC 4019
5
/20
1
3
2
Seite
3 Warnhinweise
5 Reinigungshinweis
6 Lieferumfang
8 Hinweise zur Montage
10 Anbau des Maßbandes
13 Anbau des Abtastkopfes
15 Technische Kennwerte
16 Justage und Diagnose
Page
3 Warnings
5 Cleaning Instructions
6 Items Supplied
8 Mounting Procedure
10 Mounting the Scale Tape
13 Mounting the Scanning Head
15 Specifications
16 Adjustment and Diagnosis
Page
3 Recommandations
5 Instructions de nettoyage
6 Contenu de la fourniture
8 Procédure de montage
10 Montage du ruban
13 Montage de la tête captrice
15 Caractéristiques techniques
16 Réglage et diagnostic
Pagina
3 Avvertenze
5 Istruzioni per la pulizia
6 Standard di fornitura
8 Avvertenze per il montaggio
10 Montaggio del nastro
13 Montaggio della testina
15 Dati tecnici
16 Taratura e diagnosi
Página
3 Advertencias
5 Instrucciones de limpieza
6 Elementos suministrados
8 Indicaciones para el montaje
10 Montaje de la cinta
13 Montaje del cabezal
15 Datos técnicos
16 Ajuste y diagnóstico
Inhalt · Contents · Sommaire · Indice · Indice
3
Achtung: Die Montage und Inbetriebnahme ist von einer qualifizierten Fachkraft unter Beachtung der örtlichen
Sicherheitsvorschriften vorzunehmen.
Die Steckverbindung darf nur spannungsfrei verbunden oder gelöst werden.
Der Antrieb darf während der Montage nicht in Betrieb gesetzt werden.
Note: Mounting and commissioning is to be conducted by a qualified specialist under compliance with local safety regulations.
Do not engage or disengage any connections while under power.
The drive must not be put into operation during installation.
Attention: le montage et la mise en service doivent être assurés par un personnel qualifié dans le respect des consignes de sécurité
locales.
Le connecteur ne doit être branché ou débranché que hors tension.
L’entraînement ne doit pas être mis en route pendant le montage.
Attenzione: far eseguire montaggio e messa in servizio da un tecnico specializzato in impianti elettrici e meccanica di precisione in
ottemperanza alle disposizioni di sicurezza locali.
Collegare o staccare i collegamenti soltanto in assenza di tensione.
L'azionamento non deve essere messo in funzione durante il montaggio.
Atención: El montaje y la puesta en marcha deben ser realizados por un especialista cualificado, observando las prescripciones
locales de seguridad.
Conectar o desconectar el conector sólo en ausencia de tensión.
El accionamiento no debe estar en marcha durante el montaje.
Warnhinweise · Warnings · Recommandations · Avvertenze · Advertencias
4
Maße in mm
Dimensions in mm
Cotes en mm
Dimensioni in mm
Dimensiones en mm
Messgerät nicht fallen lassen
oder größeren Erschütterungen
aussetzen.
Do not drop the encoder. Do not
subject it to strong impact.
Ne pas laisser tomber le systèm
e
de mesure ou le soumettre à
d’importantes secousses.
Non sottoporre il sistema di
misura a cadute o urti.
No dejar caer el sistema de
medida ni exponerlo a grandes
vibraciones.
Warnhinweise · Warnings · Recommandations · Avvertenze · Advertencias
5
Bei verschmutztem Maßband
oder Abtastkopf Meßgerät mit
sauberem fusselfreiem Tuch und
destilliertem Spiritus oder Iso-
propylalkohol vorsichtig reinigen.
If the scale tape or scanning head
are contaminated, carefully clean
the encoder with a clean, lint-
free
cloth and distilled spirit or
isopropyl alcohol.
S
p
i
r
i
t
u
s
ID 325919-ZY
Si la tête captrice ou le ruban est
encrassé, nettoyer soigneuse-
ment le système de mesure avec
un chiffon propre non pelucheux
et de l'alcool ou de l'isopropanol.
Se necessario, pulire il sistema di
misura con un panno che non lasci
residui e con alcool o isopropilene.
Si la cinta de medida o el cabezal
del sistema de medida están
sucios, limpiar cuidadosamente
con un paño limpio, sin pelusa, y
con alcohol etílico o isopropílico.
Reinigungshinweis · Cleaning Instructions · Instructions de nettoyage · Istruzioni per la pulizia · Instrucciones de limpieza
6
Lieferumfang · Items Supplied · Contenu de la fourniture · Standard di fornitura · Elementos suministrados
Abstandsfolie
Spacer foil
Cale d'épaisseur
Pellicola distanziale
Lámina separadora
1 x 0.15 mm
1 x 0.75 mm
Abtastkopf LIC 401
Scanning head LIC 401
Tête captrice LIC 401
Testina LIC 401
Cabezal LIC 401
7
Maßband LIC 4009
LIC 4009 Scale tape
Ruban de mesure LIC 4009
Nastro graduato LIC 4009
Cinta de medida LIC 4009
8
Anbau so wählen, dass der maxi
-
male Verfahrweg innerhalb der
Messlänge ML des Meßgerätes
liegt.
= Beginn der Messlänge ML
Choose a mounting attitude such
that the maximum traverse range
is within the measuring length
ML of the scale tape.
= Begin. of meas. length ML
s
9
ML 46
9
Choisir l'implantation de manière
à ce que le déplacement max.
soit compris dans la longueur de
mesure ML du ruban de mesure.
= Début longueur utile ML
Montare in modo che la traslazione
massima sia inferiore alla corsa
utile ML del nastro.
= Inizio lunghezza di misura ML
Elegir el montaje de forma
que el máximo recorrido de
desplazamiento se encuentre
dentro de la máxima longitud útil
ML de la cinta.
= Comienzo longitud útil ML
Lackfreie Montagefläche
vorbereiten.
Prepare the mounting surface.
It must be free of paint.
> 13.5
ML + 29
Préparer une surface de manière
à ce qu'elle soit exempte de
peinture.
Preparare la superficie di
montaggio che deve essere priva
di vernice.
Preparar la superficie de montaje
que debe estar sin restos de
pintura.
Hinweise zur Montage · Mounting Procedure · Procédure de montage · Avvertenze per il montaggio · Indicaciones para el montaje
9
Meßgerät so anbauen, dass Tei
-
lung vor direkter Verschmutzung
geschützt ist. Eventuell beson-
dere Schutzvorrichtung vorsehen.
Mount the encoder so that the
graduation is protected from
direct contamination. If
necessary, fit a protective cover
over the scale.
Monter la règle de façon à être
protégée des projections directes
Prévoir si nécessaire un dispositif
de protection particulièr.
Installare il sistema di misura in
modo che non sia direttamente
esposto alla contaminazione.
Eventualmente prevedere carter
di protezione.
Montar el sistema de medida de
tal manera que la graduación
quede protegida ante fuentes
directas de contaminación. En
caso necesario, prever
dispositivos de protección
especiales.
Mindestabstand von Störquellen.
Minimum distance from sources
of interference.
M
> 200 mm
6 m
> 100 mm
Distance minimale avec les
sources de perturbation.
Distanza minima dalla fonte di
disturbo.
Distancia mínima respecto a las
fuentes de interferencias.
10
Anschlag
leiste anbringen, bzw.
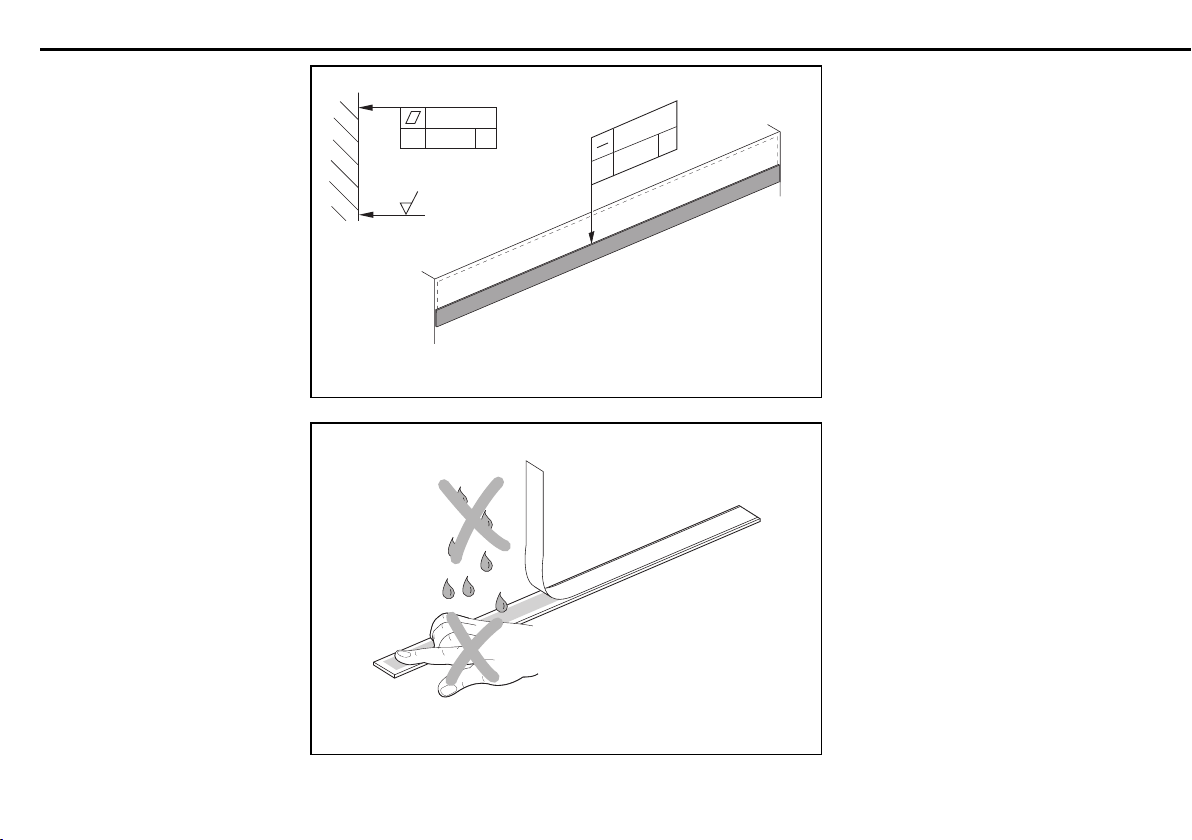
Absatz 0,3 mm vorsehen.
Auf Maschinenführung achten.
Attach aligning rail or provide
a 0.3-mm step. Pay attention to
machine guideway.
0.05/500
// 0.1 F
3.2
0.1/1000
// 0.2 F
Installer la barrette d'arrêt ou
prévoir un retrait de 0,3 mm de
hauteur. Attention au guidage de
la machine.
Fissare le spine di allineamento o
prevedere uno spessore di 0,3 mm.
Prestare attenzione alla guida della
macchina.
Colocar la barra-tope o prever un
escalón de 0,3 mm de alto.
Tener en cuenta la guía de la
máquina
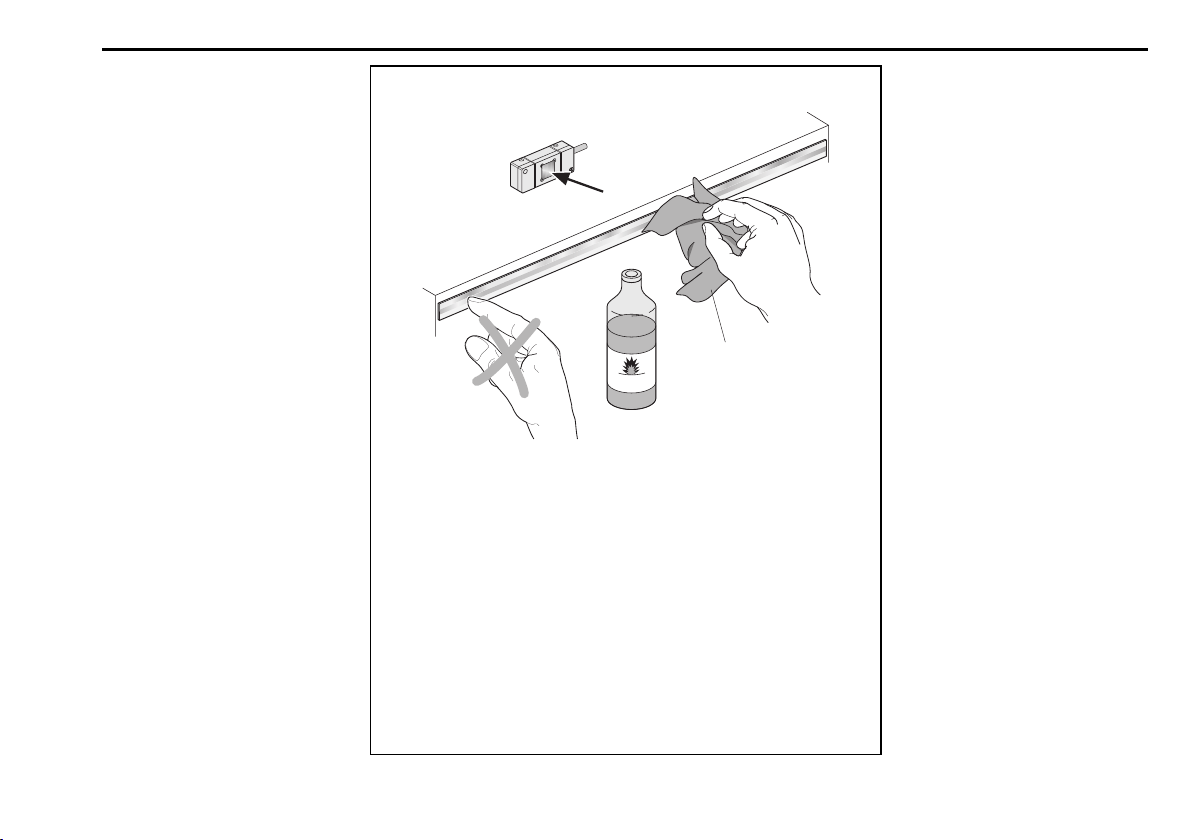
Schutzfolie des Montagefilms
PRECIMETentfernen. Auf das
Verfallsdatum auf der Verpackung
achten!
Montagefilm vor Verschmutzung
schützen!
Remove the protective foil from
the PRECIMET

mounting film.
Note the expiration date on the
package! Protect the mounting
film from contamination.
Retirer la pellicu
le de protection du
film de montage PRECIMET. Tenir
compte de la date d’expiration
indiquée sur l'emballage! Protéger le
film de montage contre les salissures!
Rimuovere la protezione dalla pellicola
di montaggio PRECIMET

. Attenzione
alla data di scadenza riportata sulla
confezione! Proteggere la pellicola di
montaggio dalle contaminazioni.
Retirar la cinta de protección de la
película adhesiva PRECIMET.
¡Comprobar la fecha de caducidad en
el embalaje! ¡Proteger la película
adhesiva de la suciedad!
Anbau des Maßbandes · Mounting the Scale Tape · Montage du ruban · Montaggio del nastro · Montaje de la cinta