HEKA Favorit-Olymp 128 User manual

Operating Manual for
HEKA Incubators
HEKA-Brutgeräte
Langer Schemm 290
D-33397 Rietberg
Tel.: +49 52 44 / 17 18
Fax: +49 52 44 / 1 01 59
E-Mail: info@heka-brutgeraete.de
HEKA-Favorit(-Olymp) 84
HEKA-Favorit(-Olymp) 126
HEKA-Favorit(-Olymp) 168
HEKA-Favorit(-Olymp) 216
HEKA-Favorit(-Olymp) 288
HEKA-Favorit(-Olymp) 432
HEKA-Favorit(-Olymp) 84+S
HEKA-Favorit(-Olymp) 126+S
HEKA-Favorit(-Olymp) 168+S
HEKA-Favorit(-Olymp) 90/S
HEKA-Favorit(-Olymp) 135/S
HEKA-Favorit(-Olymp) 180/S
HEKA-Favorit(-Olymp) 270/S
HEKA-Favorit(-Olymp) 360/S
HEKA-Falcon

2
Preface
The purpose of this manual is to familiarise the reader with the incubator
and provide instructions on use.
The operating manual contains important information for the safe,
economic, and correct operation of the incubator. Compliance with this
manual helps to avoid dangers, minimise repair costs and downtime, and
increase the reliability and service life of the machine.
The operating manual is suitable for adding environmental protection
regulations to the instructions on the basis of existing national accident
prevention regulations.
The operating manual must always be kept at the place of deployment of
the incubator. All individuals who are authorised to work with the
incubator must read and observe the operating manual. This includes
instructions in the following areas:
●Operation
●Troubleshooting
●Care and maintenance
●Transport
The operator must ensure that only authorised persons work with the
incubator. The operator must check the incubator for externally visible
damage and defects on a daily basis. Moreover, the operator must
promptly report any changes that impair the safety. This also includes
changes in the operating behaviour. The incubator may only be operated
if its condition is flawless.
As a matter of principle, safety equipment must not be removed or
disabled.
Should it be necessary to remove safety equipment during preparation,
repair, or maintenance, the safety equipment must be reinstalled
immediately upon completion of the maintenance or repair work.
The manufacturer does not assume any liability for damages resulting
from unauthorised modification of the incubator.
All safety information and warnings on the incubator must be observed.
In addition to the information in the operating manual, the generally
applicable safety and accident prevention regulations must also be
complied with.
3
Structure of the safety instructions
All safety instructions have a uniform structure:
Pictogram (indicates the type of danger)
Caution! (indicates the severity of the danger)
Information (describes the danger and how it can be avoided)
Pictogram
Signal word
Meaning
Consequences of non-
observance
Danger!
Imminent danger to persons
Very severe to fatal
injury
General
danger
Warning!
Potentially very dangerous
situation for persons
Very severe to fatal
injury
Dangerous
electric
voltage
Caution!
Potentially dangerous situation
for persons
Minor injury
Attention!
Potential damage to property
Damage to the device
Useful information or tip
Other notes in the operating manual
Caution!
Risk of injury due to hot surface!
Warning pointing to a risk of injury to the operator from hot
surfaces.
Please read and observe the operating manual.
Disconnect the power plug before opening the device.

4
General safety instructions!
Caution!
Non-observance of the following safety precautions can result in
bodily injury or damage to the incubator.
Apart from the notes listed below, please also observe the
general safety and accident prevention regulations.
Read the operating manual!
Do not start using the incubator until you have read the
associated operating manual.
●Do not operate the incubator on the ground. Keep a minimum
distance of 50 cm from the ground!
●Do not use the incubator outdoors.
●Do not place the incubator in direct sunlight (counts also for
storage and transport).
●Before connecting the incubator, compare the voltage of the power
supply with the voltage on the type plate.
●In accordance with the intended use, the incubator may only be
used to incubate eggs.
●Never operate the incubator if any part(s) are damaged, if it does
not function properly, or if you suspect damage.
●Defective power cables may only be replaced by the manufacturer,
its customer service, or a similarly qualified person.
●Maintenance work may only be performed by appropriately trained
personnel.
●Repair work and special maintenance work may only be performed
by authorised personnel (manufacturer's personnel) or
appropriately trained personnel.
●Work on the electrical equipment may only be performed by
qualified electricians and persons instructed in electrical
engineering (see DIN VDE 0105).
●Working on live parts and equipment is not permitted.
●Conversion or modification of the incubator is not permitted.

5
Table of contens
Preface .................................................................................... 2
Structure of the safety instructions.............................................. 3
General safety instructions.......................................................... 4
Table of contents ........................................................................ 5
1Description ........................................................................... 7
1.1 Technical specifications ..Fehler! Textmarke nicht definiert.
2Setup and connection........................................................... 8
2.1 Loading the incubator......Fehler! Textmarke nicht definiert.
3Operating the incubator...................................................... 10
3.1 Control elements / control panel ..........................................10
3.2 Switching on/off....................................................................10
3.3 Switching the light on ...........................................................10
4Programming and settings.................................................. 11
4.1 Temperature.........................................................................11
4.2 Humidity ...............................................................................12
4.3 Turning-Cycle.......................................................................12
4.4 Turning-Length.....................................................................12
4.5 Cool-Down-Cycle .................................................................12
4.6 Cool-Down-Length ...............................................................13
5Alarm.................................................................................. 13
6Tips for successful incubatoin............................................. 14
6.1 Incubation temperature ........................................................14
6.2 Humidity ...............................................................................14
6.3 Turning the eggs ..................................................................16
6.4Cooling the eggs ..................................................................17
6.5 Inserting the hatching eggs..................................................18
6.6 Putting the eggs into the hatching-trays...............................18
7. Shutting-down after incubation ........................................... 19
7Maintenance and care........................................................ 19
7.1 Incubation or hatching chamber...........................................19
7.2 Technical compartment........................................................20
7.3 Float-Valve...........................................................................20
7.4Replacing the power-cable...................................................21

6
8FAQs –frequent questions .................................................22
9Disposal..............................................................................23
10 CE- Declaration of conformity .............................................24
11 Appendix: Analysis of mistakes at incubation / bad hatching25
12 Appendix: Incubation periods..............................................26

7
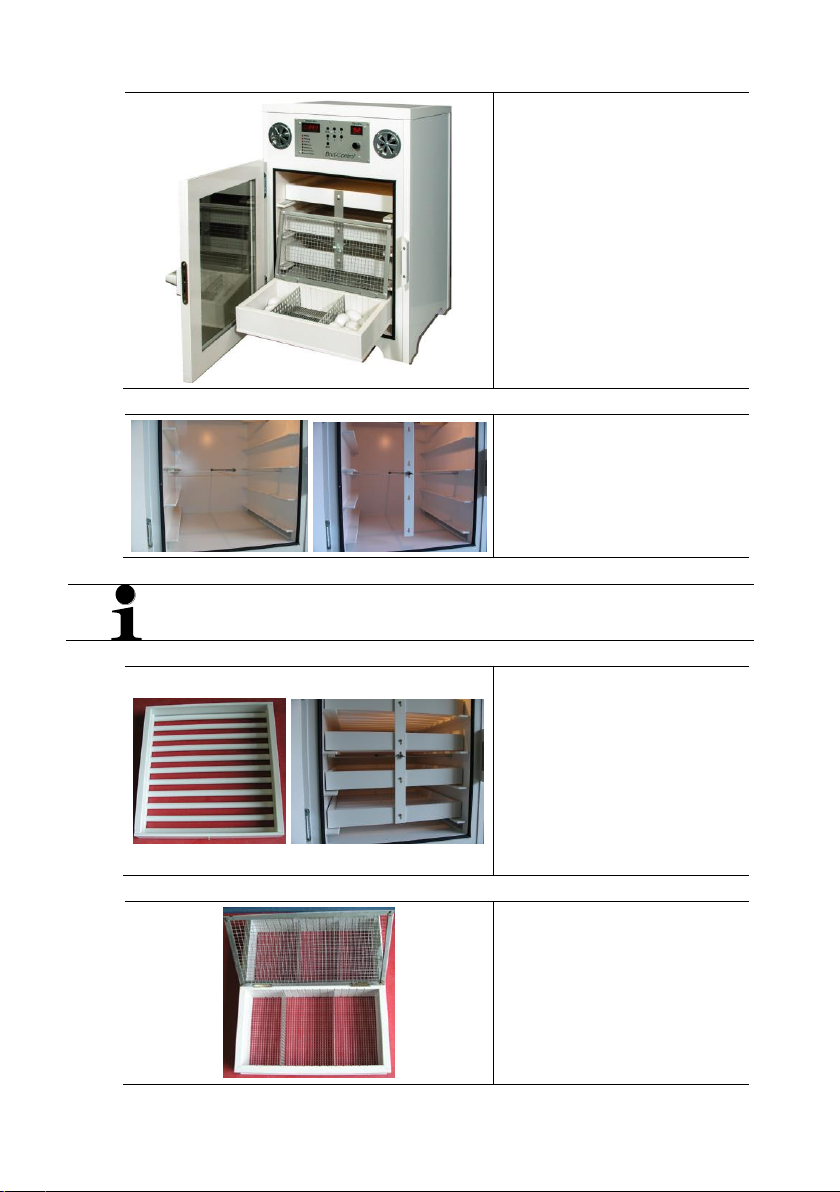
1 Description
HEKA-FAVORIT-OLYMP incubators are made of plastic and consist of a
two-compartment housing:
The upper part contains the technic (distribution, control, fan, heater, and
water supply), and the lower part the incubation or hatching chamber with
trays.
The HEKA-FAVORIT-OLYMP models are equipped with a
microprocessor control. The temperature, humidity, turning time, turning
interval, cooling time, cooling interval are displayed in large red
illuminated digits.
Serially the motorised incubators feature the following equipment:
automatic turning mechanism (not in hatchers), automatic humidity
control, double thermostat with alarm trigger, thermopane glazing.
1
2
3
Air-Vents
Control panel
Water-tank

8
2 Setup and connection
The incubator is ready to be connected.
The incubator must be set up as follows:
●Horizontal position
●Must not shake
●Door(s) must open easily
●Must not be set up outdoors and must be at least 50 cm above the
ground
●Must be protected from direct sunlight
●There must be at least 5 cm of free space above the device in order
to allow air circulation.
●The environment of the incubator should be well ventilated.
●The ventilation slots must not be covered.
A power supply (230 V / 50 Hz) must be available at the installation site.
The incubator must not be connected to an offgrid-inverter, which are
used in autonomous power-supply like solar-electricity-power-supply.
Serially, the incubator is equpped with water-canister and the matching
brass-float-valve for low-pressure. The water canister must be filled with
distillated water and placed in a position above the incubator (directly
onto the top of the incubator or –better –hanging above the incubator).
To enable the water to flow freely, make sure there are no air
bubbles in the connection hose.
If the incubator should be plugged directly to the (high-pressure-
) water-mains, it must be directly ordered for this purpose or the
brass-float-valve must be changed afterwards.
The ideal ambient temperate is 10°C - 20°C. However, smooth function
is also guaranteed at an ambient temperature of 5°C - 28°C (with air-
cooling up to 32°C –with water-cooling up to 40°C).
The humidity must be suitable for the intended purpose. Attention must
be paid to the indoor humidity in particular if it is necessary to achieve a
low humidity value in the device; the device can humidify but not reduce
the humidity. If you choose the correct installation site, humidity values
between 35-45% and 85-95% can be reached.
After setting up the device, check the incubation chamber and remove
any items such as the thermometer and other accessories that were
ordered and stored in the incubation chamber during transport.
After removing all foreign items from the incubation chamber, you can
connect the device to the mains.
9
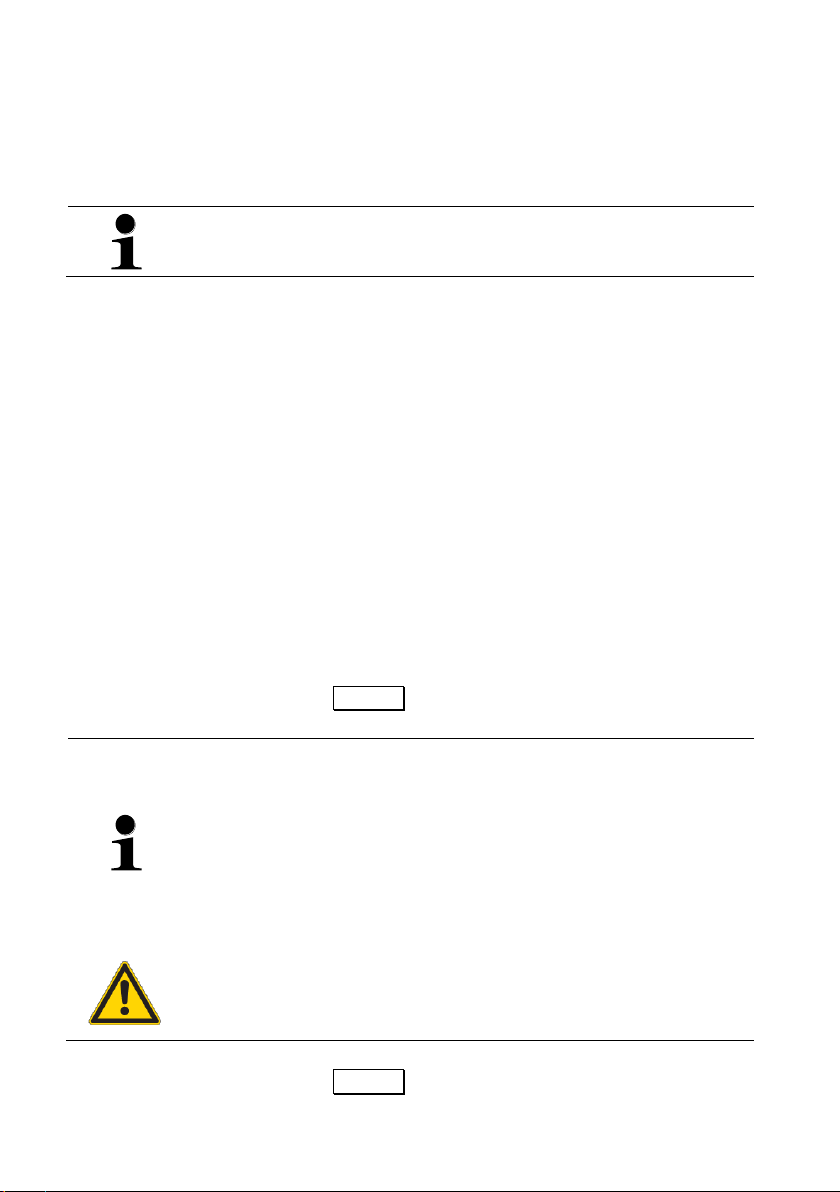
2.1 Installing the incubation trays
Example:
Incubation trays (top)
Hatching tray (bottom)
Unscrew the wing-nut and
take away the white
connector.
Never (!) unscrew the “normal” screw-nuts. These are fixed in
the right position to have right traverse path of the turning.
Insert the turning trays into
the incubator. Then put the
matching white connector
over the screws of the trays
and into the turning-rod.
Finally screw the wing-nut
onto the turning-rod to fix the
trays.
Hatching-trays are just put
into the incubator without
fixing it with the connector.
You must use the shorter
connector !

10
3 Operating the incubator
3.1 Control elements / control panel
1
2
3
4
5
6
0
Only dot: „ready“
otherwise: decimal-point
Display for values (°C und %)
and time (minutes or hours)
LED-indicators
Light on/off and in adjust-
mode: save
Select program and
set values
Display of the
current value
Power on/off
3.2 Switching on/off
Press the on/off-button
Ein/Aus
Power on/off
Check:
When "On", the actual temperature is
displayed in the display module. The
control status is displayed by the LED
indicators.
In the active state, the corresponding LED
flashes.
LED lit: the heater is not heating
LED flashing: the heater is heating
3.3 Switching the light on
Press S
The interior light is switched on.
The lamp automatically goes off after 1
minute.
The light phase is limited to 1 minute in order to prevent
excessive emission of heat to eggs close to the lamp.
For a shorter lighting period:
Press S
The lamp goes off immediately.

11
4 Programming and settings
As a general rule, you need to press the ↑- or ↓- button to select the
desired value for programming.
The current actual values appear in the right-hand digital display field
under temperature and humidity. The humidity display is marked by the
decimal point.
For the turning time, cooling time, turning, and cooling period, the stored
values are displayed.
In the basic mode, the display always shows the actual temperature.
Button F
The stored value is displayed.
Button ↑or ↓
Set the desired value.
Button S drücken
The new value is saved.
Check:
On the display, "SSS" appears for about 0.5
seconds.
The new value is saved permanently and will be retained even in the
event of a power failure.
4.1 Temperature
Press button F
The target temperature is displayed.
The target value is 36°C to 39°C
Press button ↑or ↓
Set new target value:
↑= higher temperature
↓= lower temperature
Press button S
The new value is stored permanently.
Check:
On the display, "SSS" appears for about 0.5
seconds.
Press button F
The stored value is checked.
Press button F
The control returns to the normal starting
position.

12
4.2 Humidity
Press button ↑or ↓
Until the"Humidity" LED is lit
Press button F
The stored target value is displayed.
Press button ↑or ↓
Sets new target value:
↑= higher humidity
↓= lower humidity
Press button S
The new value is stored permanently.
Check:
On the display, "SSS" appears for about 0.5
seconds.
Press button F
The stored value is checked.
Press button F
The control returns to the normal starting
position.
4.3 Turning-Cycle
The adjustment takes place as described under "Humidity".The values
are displayed in minutes. If the displayed value is 120, the eggs will be
turned every 2 hours.
4.4 Turning-Length
The adjustment takes place as described under "Humidity". The values
are displayed in minutes.
The turning duration of these devices is 30 minutes.
Example:turning time = 120; turning = 30
The incubator starts turning after 90 minutes
and completes turning after 30 minutes.
Turning is completed after 120 minutes.
4.5 Cool-Down-Cycle
The setting is as described previously for "Humidity".
The display is in hours.
Example:Cooling time = 12
The eggs are cooled 2x a day (every 12 hours).
Cooling time = 24
The eggs are cooled 1x a day (every 24 hours).
Caution!
The cooling period must be set.
Cooling does not occur if you do not set
a cool-down-length (value: 0; see below)
13
4.6 Cool-Down-Length
The adjustment takes place as described under "Humidity". The values
are displayed in minutes (adjustment range: 10 –120 minutes).
The cooling period is the time during which the heaters are turned off.
The cooling period of the incubator depends heavily on the ambient
temperature.
Normally, cooling is not performed at the hatching
stage.Therefore, the cooling period should be set to 0 minutes
during this time.
5 Alarm
HEKA incubators are serially equipped with double-thermostat and
alarm. If the device reaches an excess temperature of 0.5° C, due to a
malfunction, wrong handling (air-vents fully closed, door opened too long
without swithing-off the incubator) or external influences (insolation), it
automatically switches to alarm. The alarm is indicated visually and
audibly, that is, the display flashes at regular intervals and it also emits a
beep at regular intervals.
Emergency shut off is enabled and all heating systems are switched off.
The device cools down to the set target value and then continues to work
in the normal way.
The buzzer and the flashing display persist.
Stopping the alarm
Press the on/off-button Ein/Aus 2x: the alarm stops
An alarm can be caused, if the door is opened for too long;
because heat and humidity escapes and the temperature and
humidity sensors detect incorrect values.
The microprocessor now attempts to compensate for the low
values and this causes the heating systems to heat up
considerably. After closing the door, the extremely hot heating
elements take effect and this causes an excess temperature for
a few minutes so that an alarm is triggered.
Caution!
Switch off the incubator before opening the incubator doors in
order to prevent the alarm from being triggered as described
above.
Press the on/off-button Ein/Aus : the device is off.
14
6 Tips for successful incubatoin
6.1 Incubation temperature
Generally, we recommend a temperature of 37,8°C. For incubating
bantam, quails or pheasants (partly also ducks and geese) we
recommend 37,5-37,6°C - for raptors, parrots and parakeet a
temperature of 37,0-37,2°C. If different (poultry-)eggs are incubated
together, you should set a temperature of 37,7-37,8°C. Ostriches, rheas
and nandus are an exception with much less temperature.
6.2 Humidity
Apart from the temperature, the incubation humidity plays a significant
role for the incubation results. During incubation, every egg must lose
weight. The weight loss must amount to at least 15% of the fresh egg. A
weight loss of 17% is ideal. You can check this with a special accuracy
weighing machine –breeders of very valuable (and thus mostly sensitive,
difficult to incubate) animals weigh every single egg every day and adjust
the humidity according to the weight-loss to come to 100% hatching
success (the higher humidity, the less weight-loss; and vice versa).
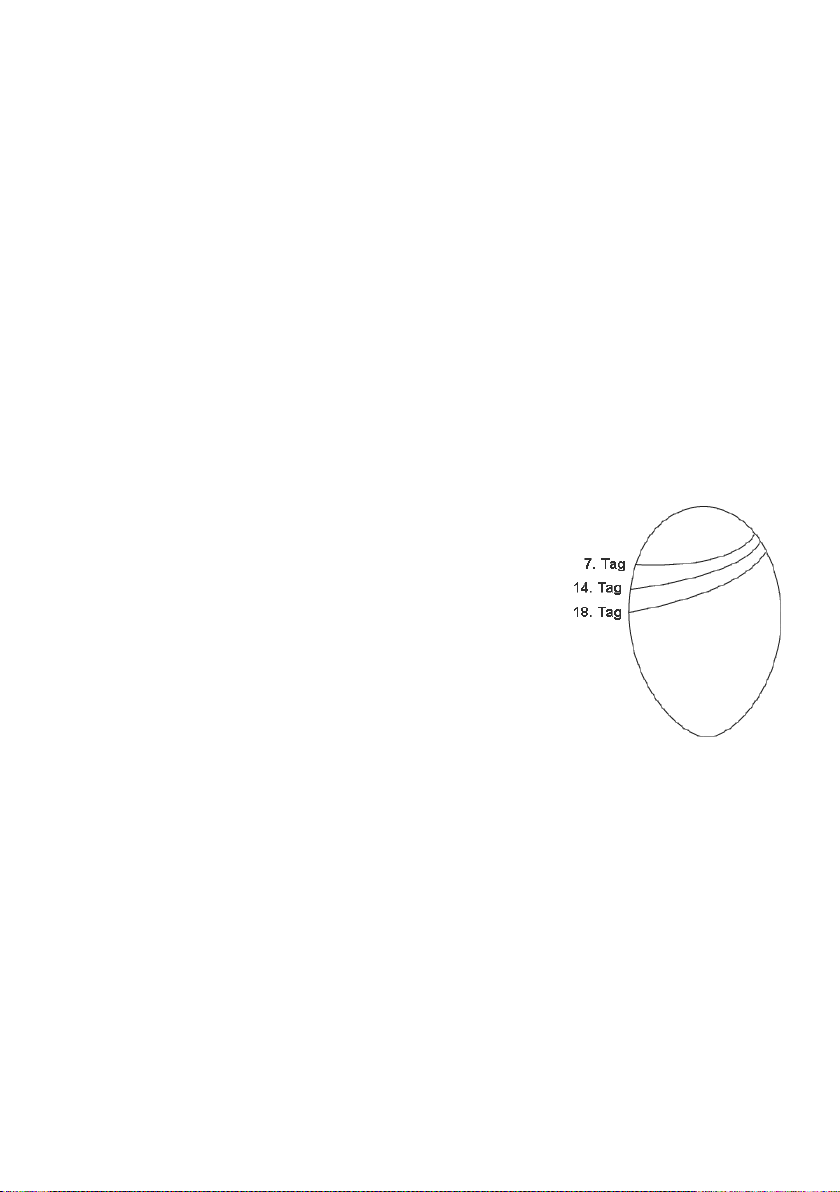
With the weight-loss comes along a steadily
growing air cell. This can be checked with a
candling-lamp to adjust the humidity (if neces-
sary; the less humidity, the bigger the air cell).
The air cell must be steadily growing over the
complete time of incubating –until shortly before
hatching it takes about one-third of the egg.
Fig.: Optimum size of the air cell in a
chicken-egg (incubation-length: 21 days)
Due to the different characteristics of the eggshell, a different humidity
is necessary for various kinds of fowl to come to the right weight-loss
and size of the air cell. For example, a chicken egg (at the same
humidity) loses weight much more slowly than a waterfowl egg.
The weight-loss even varies for chicken of different types, which means
that the eggs normally should be incubated at different humidity levels.
The weight loss is also determined by the size of the egg. In practice
incubating with different values of humidity mostly is not possible. Thus,
we recommend well-proven mean values, which experiantal lead to
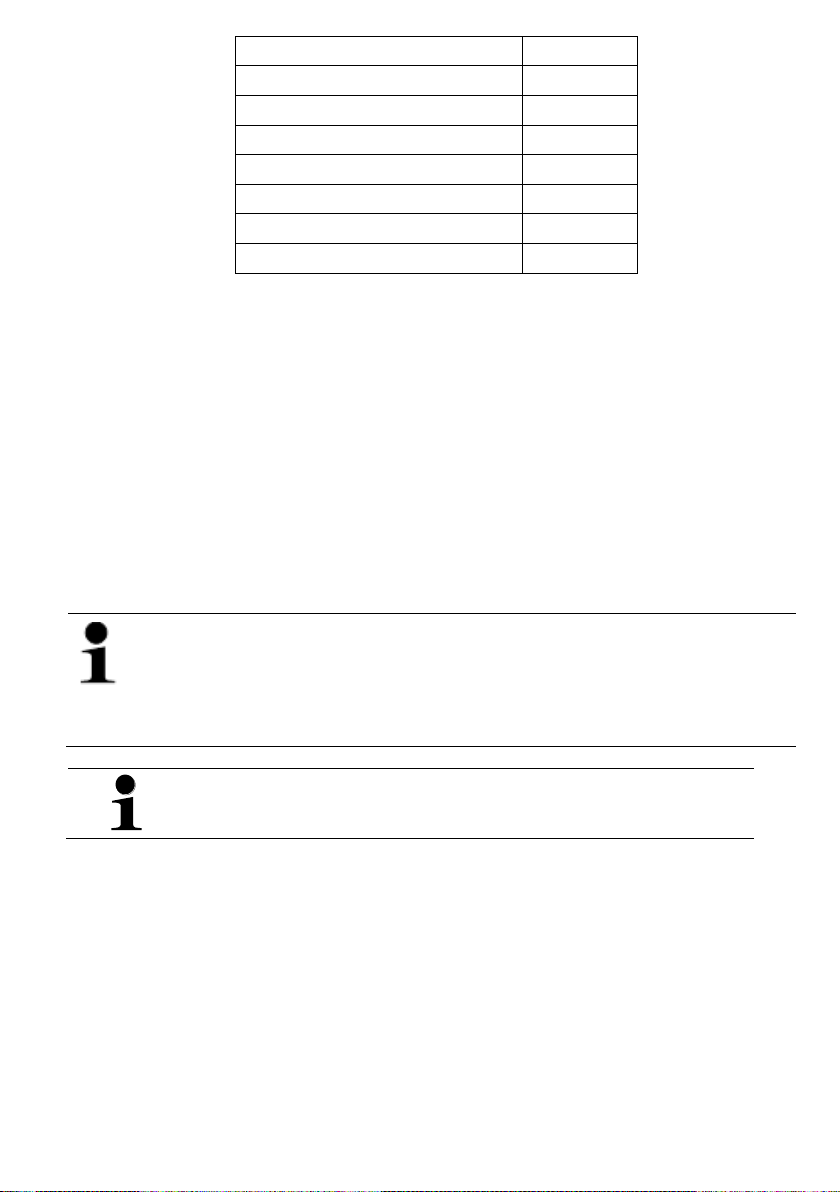
very good hatching-results:
15
Chicken and bantam eggs
53 %
Goose eggs
57 –58 %
Duck eggs
60 –63 %
Pheasant eggs
48 –53 %
Quail eggs
53 %
Ostrich eggs
19 –23 %
Emu eggs
40-45 %
Rhea eggs
53-58 %
But please note, that there are also considerably outliers because of
the characteristics of the eggshell (e.g. Marans: 40-45%) and/or the
climate of their natural habitat (e.g. Crested-partridge 65-70%; Muscovy
ducks 50-55%).
For parakeet and parrot eggs general recommendations are not
possible, because the required humidity varies extremely. The required
humidity depends on the location of their natural breeding areas (humid
tropics or dry savanna). For incubating species from very arid/dry
habitats normally you need a humidity as low as possible (viz.: no water
in the incubator/water basin; air-vent(s) fully open). Only in the hatching
stage the humidity is raised as normal.
In case of failing water-supply to the incubator (because of
missing water in the tank or stuck valve) you must set the
humidity to „0“, because otherwise the alarm will be activated.
When you take eggs out of the incubator for weighing or candling
and thus you switched on the light –don’t forget to switch it off
again.
Light should not be switched on (when door closed) longer than 5
minutes.
16
6.3 Turning the eggs
Expert opinions vary considerably concerning the turning interval.
The purpose of turning the eggs is to prevent the embryo from sticking to
the egg and dying. This objective already is reached by turning the eggs
three times within 24 hours. On the other hand, practical experience has
shown that continuous turning at intervals of 2 hours (setting: turning-
cycle 120, turning 30) has an extremely positive effect on the incubation
results.
Chicken eggs must be turned from the third day after insertion, and duck
and goose eggs from the fourth day.
In the last 3-4 (depending on the incubation period) of hatching, the
turning must be deactivated (setting: turning-cycle 120, turning-length 0).
Though this is not necessary, the hatching eggs can be turned
from the first day without being damaged.

17
6.4 Cooling the eggs
In this field, too, experts express different opinions.
However, it is undisputed that the eggs of wildfowl and waterfowl must be
cooled. The cooling strengthens the embryo in the egg. The cooling
period depends heavily on the ambient temperature.
As a general rule, wildfowl and waterfowl must be cooled once a day, at
least to an extent that the egg no longer feels warm and the temperature
display drops below 30°C.
Especially when incubating goose eggs, cooling is an important factor
that has a decisive effect on the hatching result.
We recommend cooling goose eggs once a day from the 11th to the 27th
incubation day (when incubation period is 30 days). The cooling-length
should be at least 30 minutes, though longer cooling phases are not
detrimental.
If the device stands in a temperate room, a cooling period of
about 60-90 minutes is necessary.
For a hen's eggs, cooling in HEKA-EURO-LUX incubators is not
absolutely necessary, but recommended.
The strengthening of the embryo results in a shorter hatching phase,
both for wildfowl and for waterfowl.
The cooling times are shorter for chicken eggs.
We recommend 20-30 minutes.
Generally, we consider one cooling cycle per day to be sufficient.
Airing by opening the door is not necessary in HEKA incubators. The
incubated eggs are supplied with an adequate amount of oxygen by the
fan(s) and the air-vent(s).
For good hatching results, it actually makes sense to keep the device
closed whenever possible and only to open it if you need to take some
action such as candling, weighing, reloading, etc.

18
6.5 Inserting the hatching eggs
After setting the correct humidity and temperature values, place the eggs
(horizontal or slightly vertical with air cell on top) on the incubation trays
in the incubator.
Attention!
Handle the hatching eggs with care. Especially hatching eggs
whose incubation process has started are very sensitive.
Please make sure that the eggs are not too old. (max. 10 - 14 days). If
you store the eggs more than 4-5 days: daily turn the eggs, don’t store
too dry, optimum temperature: 12-15°C.
6.6 Putting the eggs into the hatching-trays
3 days before the date of hatching the eggs should be put into the
hatching trays or into the hatcher; the eggs must not be turned
anymore. Switch off the turning. In the hatching stage all eggs need a
higher humidity than in the incubation stage. Humidity should be 20-
25% higher than before in the incubation stage (e.g. from 53% to 73-
78%). Raising of the humidity should be made in steps. First day 10%
more, next day again 10% more –and when the chicks begin to come
out of the eggs again some percentage more.
To come faster and/or to higher humidity at hatching, you can
take away the cover on the stainless-steel-basin with the water-
heating-element. Switch off the incubator, unplug from power-
mains and wait at least 5 minutes, before you then take away
the lid of the incubator.
Don’t raise the humidity to more than 90% - otherwise there’s risk
of chicks not drying and having water (condensed) on the bottom
of the incubator. When the pane of a double-glass door begins to
steam up, reduce the humidity a bit. Only for waterfowl and other
eggs, which already needed very high humidity in the stage of
incubating, it can be necessary or helpful to have such a high
humidity (of 80-90%), that the double-glass pane begins to steam
up. If you use simple hatching trays (without cover), place them
central, so that to the door and to the back you just have little
space left. Nevertheless, with very agile chicks it can happen,
that some hop over the edge of the hatching tray. To avoid risk of
drowning in the water basin, cover the water basin with mesh-
wire or net –or alternatively use our pedigree-hatching-trays with
cover and partitions.

19
7. Shutting-down after incubation
When you have had hatching in the incubator and plan to put in eggs
shortly, make at least a light maintenance and care according to chapter
9. Empty the water-reservoir (or disconnect it from the water-mains) and
also empty the stainless-steel water-basins (water-heating and floater)
inside the incubator –and set the humiditiy to “0”, so that the incubator
won’t activate the water-heating. Run the incubator without water until the
humidity has fallen to that value, which you need for the next incubation.
If you don’t plan to put in eggs shortly, make maintenance and care like
described in chapter 9. Switch-on again the incubator after maintenance
and care (without water in the water-basins and humidity set to “0”) and
run it until the humidity doesn’t fall anymore. Depending on the room,
weather conditions and season this will be 30-50%. Thus you avoid, that
high humidity (from last hatching or from cleaning) remain in the
incubator without possibility to really get it out while storage / until next
incubation.
Afterwards switch off and unplug the incubator.
7 Maintenance and care
7.1 Incubation or hatching chamber
We recommend cleaning the hatching device or incubator
thoroughly and disinfecting it after every major hatch.
Attention!
After disinfection, the incubator must be ventilated according to
the manufacturer's instructions. We recommend waiting a few
days before using the hatching device/incubator again.
The incubation chamber and the incubation trays must be cleaned and
disinfected regularly. To do this:
●Open the hatching device/incubator
●Remove the hatching/incubating trays
●Clean and disinfect the hatching/incubating chamber and the
hatching/incubating trays (with “Amo-Des” or “Euphagol”)
●Reinstall the hatching/incubating trays

20
7.2 Technical compartment
Disconnect the power plug before opening the cover.
Caution!
Dangerous voltage!
Before cleaning, disconnect the power plug to make sure no
voltage is present.
Caution!
Danger of injury from hot surface!
Before opening the lid, wait for approximately 10 minutes until
the heating elements have cooled off.
Regularly clean and disinfect the "technology compartment" under the lid:
●Unscrew the screws at each corner of the incubator cover (total of
four).
●Lift the lid, exerting slight pressure.
●Empty the stainless-stell water-basins
●Remove incubation dust, incubation dirt, and residue
●Disinfect the hatching device/incubator (with “Amo-Des” or
“Euphagol”)
●Close the lid.
●Re-tighten the screws.
7.3 Float-Valve
Due to knocks during transport, undesigned adustment at cleaning or impurity it
can happen, that the water supply does not work correctly. Open the lid of the
incubator according to the description and the safety warnings in chapter 9.2
(maintenance and care: technical compartment) and Follow these steps:
1. Check, if both stainless-steel water-basins are filled up to ~0,5-1cm
below the edge of the water-basins. If only the basin with the water-
heating is not filled sufficiently, the tube between the two basins is
blocked and must be cleaned. If both basins are not filled sufficiently,
go on with the next point:
2. Check, if the brass-float-valve is exactly vertical and does not stuck in
its table-track (at the basin). If the floater “jumped” out of its position or
got stuck, just correct its position. If the water-reservoir is on/over the
incubator, water directly will (slowly) run into the basin(s). Wait, until the
final filling-level is reached. If water seems to rise above the edge of the
basins, adjust the brass-float-valve to a slightly lower position (with the
wing-nut at the arm of the floater).
This manual suits for next models
14
Table of contents
Other HEKA Laboratory Equipment manuals


Popular Laboratory Equipment manuals by other brands

WPI
WPI PV850 instruction manual

Market Forge Industries
Market Forge Industries STM-EL Parts and service manual

Controls
Controls 58-C0181/DGT instruction manual

Scienceware
Scienceware Colony Counter instructions

Thermo IEC
Thermo IEC Medilite 6 Place Operation manual

Sakura
Sakura Tissue-Tek Film Quick reference guide


