Helmholz REX 300 User manual

Quick Start Guide REX 300
www.helmholz.de
Version
1en
from FW 3.7.0

Quick Start Guide REX 300
2
Contents
1. Introduction 3
2. Preparing the REX 300 unit 3
3. Access to the portal 4
4. Initialroutercongurationviatheportal 6
5. Routercongurationtransferoptions 8
6. Establishing a VPN connection to your REX 300 20
7. Tips and tricks 21
8. Remote maintenance of S7-MPI/PROFIBUS PLCs 23
9. Remote maintenance of Ethernet CPUs 24
10. Setting up VCOM LAN for serial communications 25
11. LED displays 26
12. Restoring the REX 300 router to its default settings 26
13.FirmwareupdateusingaUSBashdrive 26
14.AlternativecongurationwithoutmyREX24-V2portal 26
15. Technical data 27

Quick Start Guide REX 300
3
1. Introduction
REX 300 is an industrial router for global remote access to PLC, HMI, IP cameras, etc.
It is directly mounted on the mounting rail. This Quick Start Guide explains the basic
settingsinthemyREX24portalandshowshowtotransferthecongurationmade
there to the REX 300 unit.
Youwillndmoreinformationonpage26inchapter14"Alternativeconguration
withoutmyREX24portal"shouldyouwishtooperateyourrouterwithoutourVPN
portal.
Before getting started: Please use the most current version (as of v3.7.0) of the dial-up
software "shDIALUP" for commissioning. You can acquire it as a download at www.
helmholz.de.
The current rmware must be installed on all REX routers for successful connection with
the myREX24 V2 portal. Write down the serial number and MAC address of your REX
300 router before installing the router in your system. You will need the serial number in
order to congure the REX 300!
2. Preparing the REX 300 unit
2.1 REX 300 with modem
AstandardSIMcardofaproviderisnecessaryfortheGSMvariants.Thisservesthe
purposeofidenticationforthenetworkoperator.TheSIMcardmustbeinsertedin
accordance with the graph and click in.
Withthetetheredmodemvariant,thecorrespondingtelephonecableisconnected
to the TAE socket.
2.2 Antenna connection
Antennaswiththecorrespondingthreadedconnectionareavailableseparatelyas
accessories. Please ensure prior to installation that the antenna is positioned in such
awaythatitreceivesanadequateGSMsignal.Alsobesuretofollowtheinstructions
from the technical data sheets of the antenna manufacturer and do not install these
(due to the shielding effect) into metal housings (e.g. control cabinet).
2.3 REX 300 WAN
Connect the REX 300 router's WAN port to the network/router or DSL modem being
used to establish the Internet connection. To this purpose use a standard CAT-5
patch cable.

Quick Start Guide REX 300
4
2.4 Power supply and ports
The REX 300 must be supplied with 24 V DC at the wide range input 10 – 30 V
DC. Rigid copper wires with a max. diameter of 1.5 mm² can be clamped onto the
providedconnectorplug.
TheconnectiontothemachinerynetworktakesplaceviatheLANport.Commission-
ingwithaPCalsotakesplaceviatheLANport.A9-pinMPI/PROFIBUSconnectionis
availableforstandardPROFIBUSplugs(notforECOdevices).
The green ON LED lights up when the power supply is switched on. The boot pro-
cess starts following the internal system check (duration of approx. 25 sec.), which
is indicated by the blinking Rdy LED (for approx. 90 sec.). The REX 300 is then ready
for operation.
3. Access to the portal
REX300routerscanbefullyconguredusingthemyREX24portal.Asecureconnec-
tionwiththeportalisrequiredtothispurpose:
-For complete hardware project planning of a REX 300 router, the remote client
software shDIALUP must be used in order to establish a VPN connection.
-Alternatively,youcouldalsocreatethecongurationwithanHTTPS-secureddirect
callupfromyourbrowser.ThecallupisrealizedwiththefollowingURL:https://
v2.myREX24.net.
PleasealwaysuseyourmyREX24-V2portalaccessdatatologin.Youcanndfurther
information in the manual for the myREX24-V2 portal.
ThevariouswaystotransferthecongurationyouhavecreatedtotheREX300are
described in this Quick Start Guide.

Quick Start Guide REX 300 5
3.1 Registering
Ifyoudon'tyethaveamyREX24-V2portalaccount,youcanregisterunderwww.my-
REX24.net.Fillouttherequiredeldsthere.Afteryourdataischeckedbyourservice
team(Mon.-Fri.8a.m.to5p.m.CET),youwillreceivetwoseparatee-mailswiththe
access data. One e-mail contains the user name, the second the password.
ThesoftwarerequiredforestablishingtheconnectionwiththemyREX24-V2portal
(shDIALUP and shCHECK) can be found in the download area under www.helmholz.
de. There you can also download further documents with additional example appli-
cations at any time.
3.2 Log in to the myREX24 portal
Once you install and start the shDIALUP software, you can use your login data to log
intothemyREX24portal.Select"V2.myrex24.net"intheserverselectioneld.
Notes:
-Alternatively, the login page can also be reached under: https://v2.myrex24.net.
Any up-to-date browser can be used for this purpose. Chrome and Firefox have been
successfully tested.
-Your login name is composed of a user name preceding the @ character and the name
of your company. Example: admin@helmholz
-Following the initial login, you will be prompted to register a new, individual password
for your account.
-If necessary, you can also create and administer additional users after logging into the
myREX24-V2 portal.

Quick Start Guide REX 3006
4. Initialroutercongurationviatheportal
Thefundamentalcongurationpointsaredescribedinthefollowing.Theyare
necessary to realize a VPN connection with the myREX24 portal. A description of
the expanded functions can be found with the online help or in the manuals/white
papers.
Assoonasyouhavesuccessfullyloggedintotheportalforthersttime,youwill
bepromptedtoindividualizeyouraccessdataonce(usernames/passwords).Only
subsequenttothiscananewprojectbecreated.
4.1 Create new project
Navigation: Administration > Project
Click on the plus intheprojectoverviewandassignaprojectnameinthesubse-
quentwindow(allotherentries/informationcanbeprovidedlater).
4.2 Creatinganewdevice
Navigation: Administration > Project > Project (created project)
Click on the plus intheselectedprojectandthenon"Createnewdevice".
Only the selection of the type, the assignment of a name and the entry of the serial
numbersarenecessaryfortheinitial/minimalcongurationinthemenu"Device"
underthetab"Device".Thenamecanbefreelyselected,butonlythefollowing
numbersandletterswithoutspacesareallowed:0to9,AtoZ,atoz.
Notes:
-The name must start with a letter. Umlauts, special characters and spaces are general-
ly not permitted. Double designations are also not possible in the "Name" eld.
-The serial number always starts with the letter "R", followed by eight numbers (0-9).
Aftersavingyourinformation,youwillbeautomaticallyforwardedtothedevice
settings.

Quick Start Guide REX 300 7
4.3 CongureREX300(connectiondata)
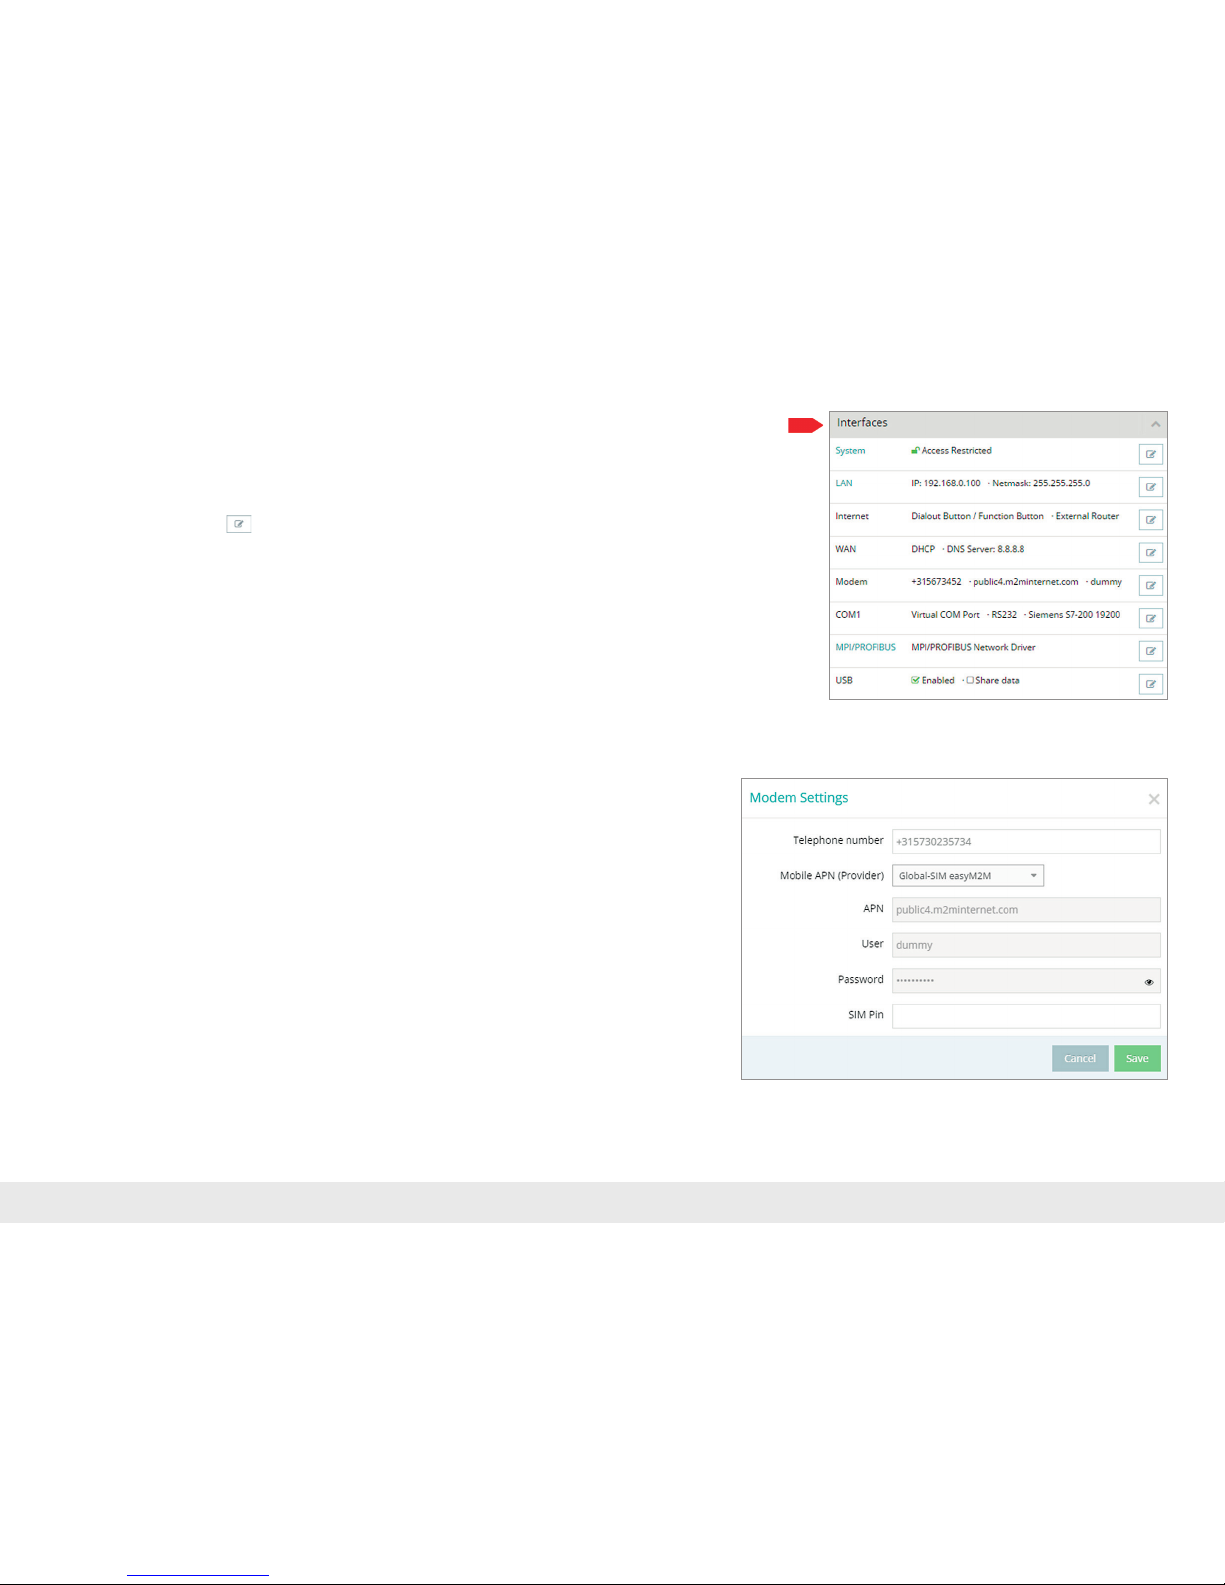
Onlythe"Interfaces"menuisrelevantfortheinitialconguration.
Navigation: Administration > Project > Project (selected project) > New Device (selected
device).
Click on the editing symbol inordertoprocessthesettingsoftherelevantsub-
menu.
Thefollowingmenusaresignicantfortheinitialconguration:
-LAN All REX 300 routers come with a LAN-side IP address of
192.168.0.100/24 as a default. Modify the IP address and the subnet
maskinkeepingwiththespecicationsfromthemachinerynetwork.
Note: It can happen that this IP address must be used as a standard gateway for addi-
tional TCP/IP components that are connected to the REX 300 for remote maintenance
purposes (see chapter 9 on page 24).
-Internet Fortheinitialcongurationitisadvisabletochoosetheaction"Always"
fortheselectioneld"Connecttotheserver".Onlywiththissetting
does the REX 300 automatically attempt to establish a connection with
the portal as soon as it is supplied with power.
-WAN EnterthedatafortheWANconnectionhere:DHCPorstaticIP.The
correspondingdataprovidesyouwiththeresponsiblenetworkadmin-
istrator.
-Modem IfyouhavethetelephonenumberoftheSIMcardavailable,youcan
enterthisintheappropriateeldsothatthemyREX24portalcan
control the REX 300 with SMS messages. The parameters for the APN
(AccessPointName)ofthecardproviderandthecorrectSIMPINentry
mustbeavailabletoyouandbestoredhere.
Note: If you enable DHCP, make sure that the DHCP server does not assign the WAN port
to an IP address that is already in use on the LAN side. IP addresses from two different
subnets must be assigned to every router's LAN and WAN ports.
Savethesettings.Theinitialcongurationisherewithcomplete.

Quick Start Guide REX 300
8
5. Routercongurationtransferoptions
ThecreateddevicecongurationcanbetransferredtotheactualREX300unitina
varietyofways.
1.TransfercongurationperUSBstick
YousavethecongurationlelocallyonyourPCandsubsequentlytransferitwitha
USB stick to the REX 300 (see page 9, chapter 5.1).
You can choose this procedure when the REX 300 router cannot be reached either
through the local network (LAN) or through the Internet during commissioning.
Prerequisite:thecongurationPChasaconnectionwiththeportal.
2.Automaticcongurationviaportal(FirstsetupintheREX300required)
Tothispurposeyouprovidethecongurationdatafordownloadingintheportal.
ThecongurationisautomaticallytransferredtotheREX300assoonastheREX300
connects with the portal (page 11, chapter 5.2)
Prerequisite/conditions:
-theREX300cancreateaconnectionwiththeportalviatheInternet
-YouhavepreconguredtheconnectiondataviathewebinterfaceoftheREX300
(First Setup Assistant).
-TheREX300canbeauthenticatedattheportalonthebasisofitsuniqueserial
number.
3.CongurationviaLAN
ThecongurationistransferredviaalocalLANconnectionofthecomputeronwhich
shDIALUP is running (see page 18, chapter 5.3).
You can select this procedure if the REX 300 router can be reached directly through
LAN.TheIPaddresssettingsofthenetworkadapterarenotrelevant.
Note: We recommend the "Conguration per LAN" variant for the initial conguration.

Quick Start Guide REX 300
9
5.1 TransfercongurationperUSBstick
UsetheUSB-basedcongurationmethodiftheREX300routercannotbereached
either through the local network (LAN) or through the Internet. You can utilize this
methodwithanyup-to-datebrowser.TheprerequisitesareanInternetconnection
with the portal and an FAT-formated USB stick.
Note: The conguration le must be stored in the root directory of your USB stick. In
addition, no valid rmware les may be found in the root directory when carrying out
this action. A disruption of the supply voltage during the transfer from the USB stick can
switch the router to an undened status.
3. Save the configuration file
1. Log in at myREX24 V2
2. Create/edit and download the
REX 300 configuration
4. Transfer the configuration

Quick Start Guide REX 30010
InthemyREX24portal,selectthe"DownloadtoPC"optioninthedevicesettings.
-DownloadthecongurationleprovidedbythemyREX24portaltoyourPCand
saveitonaFAT-formatedUSBstick.Theleisnamedmyrex24.mbnfortheinitial
commissioningoftheREX300.Allsubsequentcongurationlesgeneratedfor
theseroutersareautomaticallygeneratedasmyrex24.mbnx.Neverrenamethisle.
-Switch the REX 300 on and wait until the boot process is completed (Rdy & ON
LEDs are lit green continuously).
-Plug the USB stick into the appropriate USB terminal on the REX 300.
-Afterapprox.5seconds,theTxDandRxDLEDswillashred.TheREX300has
recognizedthecongurationle.
-PresstheDialOutbuttonforapprox.1seconduntiltheRxDLEDashesgreen.The
RxDLEDwillashgreenwhilethecongurationleisbeingtransferred(approx.
20 seconds).
-After an additional 10 seconds, the REX 300 will restart automatically and log in at
theportalwiththejustloadedconguration.TheUSBstickcannowbewith-
drawn.
Note: Once the con guration le has been successfully transferred, the le on the USB
stick will be renamed "XmyREX24.mbn(x)" by the REX 300, making it impossible to reuse
it a second time accidentally.
Youwillndtheprocedureforthermwareupdateinchapter13onpage26.

Quick Start Guide REX 300 11
5.2 Transferautomaticcongurationthroughtheportal
5.2.1 File the REX 300 confi guration in the portal
As soon as the REX 300 router has established an Internet connection with the por-
tal,theREX300isveriedforyouraccountonthebasisofitsuniqueserialnumber.
ThecongurationdataisthentransferredautomaticallytotheREX300.Thismethod
isalsoidealintheeventthatyouneedtocarryoutretroactivechangestothedevice
settings.
Prerequisite/conditions:
-theREX300congurationwascreatedintheportal.Theserialnumberhasbeen
correctly entered.
-theREX300waspreconguredviathewebinterfacewiththeconnectiondata
(First Start Assistant, see next chapter 5.2.2).
-the REX 300 has a connection to the Internet
Clickonthesymbolfortheselectionofthetypeoftransferandthenon"Preparefor
Synchronization".
Nofurthersettingsarerequiredforthebasicconguration.Intheeventthatakey
hasbeenleftforthecreationofthecongurationdata,thiskeymustbeprovided
here.Clickon"Synchronize".
4. Automatic synchronization
1. Log in via shDIALUP
2. Create REX 300 configuration
and prepare for
synchronization
3. Carry out First Start Assistent
in the REX 300

Quick Start Guide REX 30012
5.2.2 Calling up the "First Start Assistant" through the browser
You can also determine the Internet access of the REX 300 directly in the web inter-
faceoftherouterviathe"FirstStart"website.Thisisrelevantintheeventthatthe
REX300hasnotyetbeenconguredthroughoneoftheothercongurationpaths
(withthePCviaLANorviaUSBstick).
Inthedeliverycondition,theREX300hastheLANIPaddress192.168.0.100with
the subnet mask 255.255.255.0. In order to reach the REX 300 through your local
LAN connection, the network setting of your PC may need to be adjusted. To this
purpose, open the properties of your LAN connection and adjust the IPV4 address
andthesubnetofthecomputer(e.g.IP:192.168.0.99/SNM:255.255.255.0).
ThewebsitecanthenbereachedforsubsequentcongurationwiththeURL:
http://192.168.0.100.
Authenticateyourselfwiththeuser:helmholzandthepassword:router.
The First Start Assistant then opens. The Internet connection path of the REX 300
unitnowneedstobeconguredhereonceviatheportalserver(orasaclassic
router).The"Cloudserver"buttonnowneedstobeactivatedforthesubsequent
conguration.
Note: Make sure that there are no address space con icts with any other network
interfaces (do not assign the same IP address more than once) in order to be able to
communicate with the REX 300 unit properly.
Establish Internet connection with the internal UMTS modem:
If you are using a REX 300 UMTS model, only the login information for the mobile
communicationprovider(APN)andtheSIMcardIDnumber(SIMPIN)arerequired
for the modem.

Quick Start Guide REX 300
13
Create Internet connection with internal analog modem:
If you are using a REX 300 router with an internal analog modem, you will need
tostorethelogininformationofan"Internetbycallprovider"intheREX300.The
devicewillprovidesuggestedlogininformationforInternetaccessbydefault.It
is,however,recommendedthatyouenteraproviderofyourchoicehere,asusing
thedefaulttypeofconnectionwillentailadditionalfeesandtheavailabilityofthe
suggestedproviderisonlyguaranteedinGermany.
The default X3 AT command initializes the internal modem to not wait for a dial tone
(privatebranchexchangemode)whendialing.Inmostcases,thissettingdoesnot
need to be changed or supplemented.

Quick Start Guide REX 300
14
Establish Internet connection with WAN:
Tethered access to the Internet must be established through the “External Router”
on the system side. To this purpose, the WAN interface must be connected with the
customerserver/DSLmodem.
Ifyouselect"DHCP,"youdonothavetocongureanyWANsettings.
Note: Please make sure to either disable the MAC address ltering on the DSL modem
and/or external rewall, or to approve the REX 300 MAC address there.
ThevaluesforthestaticallysetWANinterfaceareestablishedbytheresponsible
network administrator.
Whereapplicable,settingsforaccessthroughproxyserverswillalsoneedtobe
storedintheWANconguration.Conrmwith"Next".

Quick Start Guide REX 300 15
Cloud server
Selectthefollowingsettingfromthelistofportalservers:"V2Europe".Thecode
forthesessionkeyisoptionalandisdenedduringsynchronization.Noentryis
requiredforinitialcommissioning.
Conrmwith"Next".
Complete
Thesettingsintheassistantarenowcomplete.Clickon"Apply".TheREX300saves
theentriesandyouarethenforwardedtothe"DeviceStatus"page(seechapter
5.2.4,page17).Theindividualconnectionstepsaredisplayedthereinformatively.
As soon as the REX 300 has successfully connected with the myREX24-V2 portal
throughtheInternet,itpicksupthecongurationstoredforitandactivatesit
automatically.
Automatic download of the confi guration
If the REX 300 is able to establish an Internet connection, the router will connect to
themyREX24portalandverifyitselfusingitsserialnumber.
The successful establishment of a connection is indicated on the REX 300 by a slowly
ashing"ConVPN"LED(seeLEDdescriptiononpage26,chapter11).
IfacongurationleisavailableonthemyREX24-V2portal,itwillbeautomatically
loaded onto the REX 300 and enabled.

Quick Start Guide REX 30016
5.2.3 Synchronization of the portal confi guration
As soon as the REX 300 has logged into your account in the myREX24-V2 portal,
youcantransferretroactivechangestotheREX300atanytimewith"Synchronize".
Where there is an existing portal connection, the REX 300 checks cyclically whether
thereisanewcongurationavailableforitsserialnumberandthenloadsitauto-
matically.When,forexample,youhaveeditedtheLANIPaddress,the "Device
congurationisnotuptodate"symbolappearsnexttotheOnlineLED.
Clickheretoinitiatethesynchronization.Alternatively,thecorrespondingmenucan
alsobeopenedviathesymbol .
Thesynchronizationfunctionmustalwaysbeconrmedthroughthefollowing
dialog.Inthismenuyoucandeneadditionalsecurityaspectsasrequired.
Whenyougenerateauniquekeyforthedownloadhere,thismustbeenteredinthe
"FirstStartAssistant"attheREX300websiteforpurposesofverication(seepage11,
chapter 5.2.1).

Quick Start Guide REX 300
17
5.2.4 REX 300 status and diagnostics page
The status page on the REX 300 router's web interface will show the router's
connectionstatusandactivecongurationdata.Tothispurpose,entertheLANIP
address of the REX 300 into the address bar of a browser. The TCP/IP address of your
network adapter must be located in the same IP subnet. Authenticate yourself with
thestandarduser:helmholzandthepassword:router.
ToviewmoreinformationoneachstepoftheREX300connection,clickonthe
Infoiconsinthestatuselds.
Intheeventofirregularitiesorinterruptionswhenestablishingtheconnection,the
diagnosticspagesupportsyouwithtroubleshooting.Intheeventofanerror,the
technicalsupportofHelmholzrequirestherespectiveresultfromtheindividualand
autonomous test functions.

Quick Start Guide REX 300
18
5.3 TransfercongurationviaalocalLANconnection
InordertotransferthecongurationfromaPCthroughalocalLANconnection,the
congurationPCmustallowfortwosimultaneousnetworkconnections:
1.ThePCmustbeactiveintheInternetwiththeshDIALUPsoftware
2.ThePCandtheREX300tobeconguredmustbeconnectedinthesamenetwork
viaLAN.
Inpracticaltermsthisispossibleasfollows:
-PC with two network adapters/Ethernet connections
-Notebook with WLAN and Ethernet connection
-PC or notebook with additional switch at the workspace
LAN
1. Log in via shDIALUP
3. Search for REX 300 in the LAN
4. Transfer the configuration
2. Create/edit and download the
REX 300 configuration
LAN

Quick Start Guide REX 300 19
Procedure:
-Connect the free LAN port of your PC (LAN adapter) to the REX 300 unit's LAN
port with a standard CAT-5 patch cable.
-Selecttheoption"SubmittoDevice"intheREX300devicesettingsinthemy-
REX24-V2 portal (shDIALUP) (see page 8, chapter 5).
The menu for the transfer function opens (the Windows2rewallappearsattherst
start; allow access to the corresponding network).
Selecttheappropriatenetworkadapterinthe"selectnetworkadapter"selection
menu.
Thesearchstartswithabroadcastwith"scan".WhentheREX300withtheappropri-
ateserialnumberisfound,thetransfercanbestartedwith"go>>".
Afterthecongurationhasbeensuccessfullytransferred,theREX300automatically
carriesoutarestartandusesthenewsettings.Inordertoleavethemenu,click
"CANCEL"

Quick Start Guide REX 30020
6. Establishing a VPN connection to your REX 300
Note: The following steps presume that the REX 300 has already been con gured and
that you have successfully logged into your account at myREX24 V2 with shDIALUP.
LoggedinREXroutersareshownidentiedwithagreencircleinthedashboard
view.Byclickingonthe button, you establish the connection between your
(remote) PC and the REX 300.
Thenumberofactiveconnectionsisshowninthemenubar.
TheactiveconnectionstatuswiththeREX300isrepresentedwithanorangeLED.
In order to end the connection of a remote access, please click the in the meantime
yellowandanimatedconnectionbuttonandthenconrmthedisconnectionofthe
remote connection.
Once a connection to the REX 300 has been established, all the IP packets that are
validfortheapplicableLANnetworkonthesystemsidewillbeforwarded.Further
parameters for the VPN-IP/IP subnet are also shown in the lower status bar for infor-
mational purposes.
Other manuals for REX 300
2
Table of contents
Other Helmholz Network Router manuals

Helmholz
Helmholz WALL IE User manual

Helmholz
Helmholz REX 100 User manual

Helmholz
Helmholz REX 300 User manual

Helmholz
Helmholz REX 100 WiFi User manual

Helmholz
Helmholz REX 100 WiFi User manual

Helmholz
Helmholz REX 200 User manual

Helmholz
Helmholz REX 200 User manual

Helmholz
Helmholz 700-877-WAN02 User manual

Helmholz
Helmholz REX 100 WAN User manual

Helmholz
Helmholz REX 100 3G User manual