manuals.online logo
Brands
  1. Home
  2. •
  3. Brands
  4. •
  5. Helvex
  6. •
  7. Plumbing Product
  8. •
  9. Helvex Triton ME-302 User manual

Helvex Triton ME-302 User manual

Mezcladora para Fregadero con Manerales
Mixer with HandlesSink
ME-302
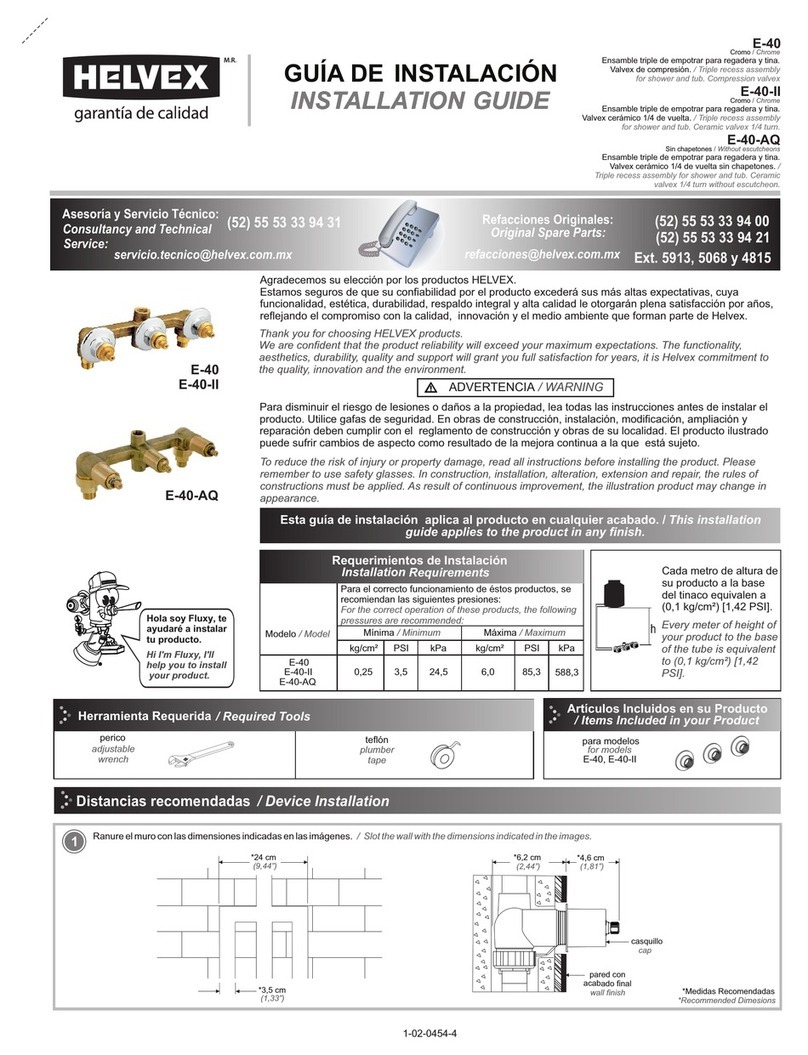
Requerimientos de
Instalación
Para el correcto funcionamiento de
este producto, la presión mínima
es de (0,25 kg/cm²) 3,55 PSI.
Relación
Altura Tinaco-Presión
2,5 m
3 m
4 m
PSI
Altura (h)
3,55
4,2
5,6
kg/cm²
0,25
0,3
0,4
Cada metro de altura de
su producto a la base
del tinaco equivalen a
(0,1 kg/cm²) [1,42 PSI].
Visite nuestra página
www.helvex.com.mx,
para visualizar los videos
de instalación.
Para disminuir el riesgo de lesiones o daños a la propiedad, lea todas las instrucciones antes de instalar el
producto. Utilice gafas de seguridad. En obras de construcción, instalación, modificación, ampliación y
reparación deben cumplir con el reglamento de construcción y obras de su localidad. El producto ilustrado
puede sufrir cambios de aspecto como resultado de la mejora continua a la que está sujeto.
Hola soy Fluxy, te
ayudaré a instalar
tu producto.
Instalación General
Agradecemos su elección por los productos HELVEX.
Estamos seguros de que su confiabilidad por el producto excederá sus más altas expectativas, cuya
funcionalidad, estética, durabilidad, respaldo integral y alta calidad le otorgarán plena satisfacción por años,
reflejando el compromiso con la calidad, innovación y el medio ambiente que forman parte de Helvex.
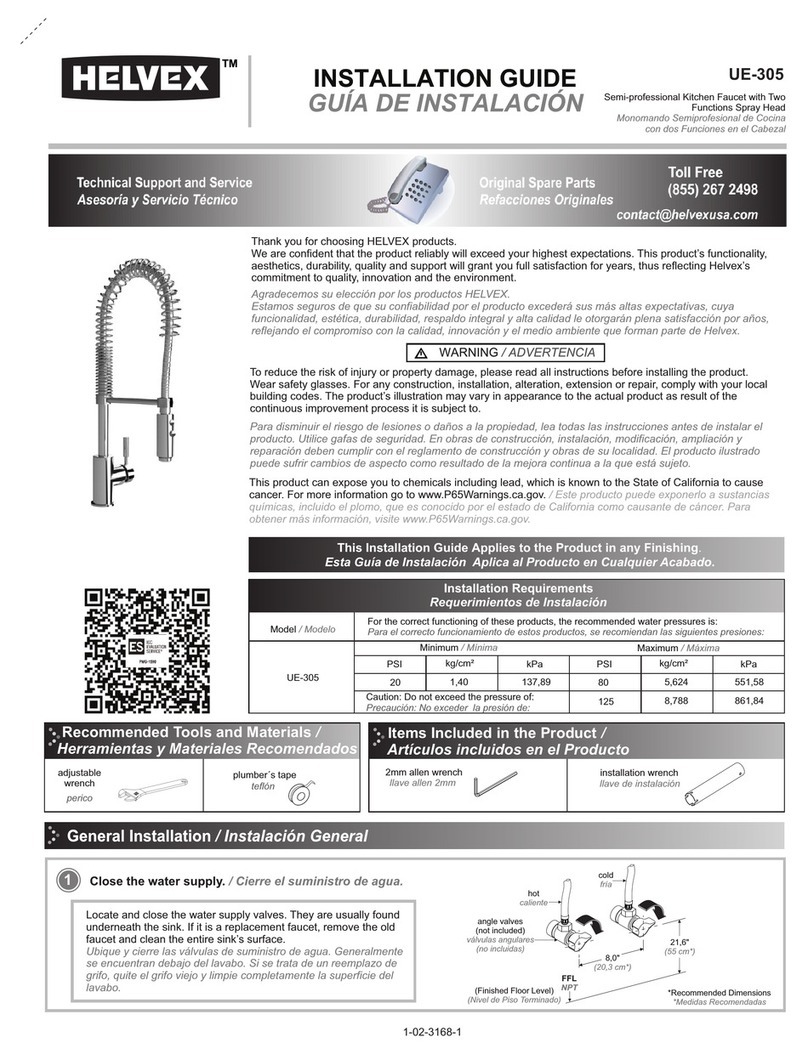
hot
cold
Caliente
Fría
*55 cm
(21,6”)
*20,3 cm
agle valves
n
vál as
vul
an
gulares
NPT
(8”)
*Recommended Actions
*Medidas Recomendadas
INSTALLATION GUIDE
GUÍA DE INSTALACIÓN
1-02-2492-2
[email protected]
Original Parts:
Advice and Service:
01(55)53339431
01800 909 2020 01 (55) 53 33 94 00
Refacciones Originales:
Asesoría y Servicio Técnico:
Ext. 5068 y 5815
(Nivel de Piso Terminado)
Thank you for choosing HELVEX products.
We are confident that the product reliability will exceed your highest expectations, whose functionality,
aesthetics, durability, high quality and comprehensive support grant him full satisfaction for years, reflecting
the commitment to quality, innovation and the environment as part Helvex.
To reduce the risk of injury or property damage, read all instructions before installing the product. Use safety
glasses. In construction, installation, alteration, extension and repair must comply with the rules of
construction an your local. The illustrated product may change in appearance as a result of continuous
improvement to which it is subject.
For the correct operation of this
product, the minimum pressure is
(0,25 kg/cm ²) 3,55 PSI.
Every meter of height of
your product to the base
of the water tank (0,1
kg/cm²) [1,42 psi]
equivals.
Visit our website
www.helvex.com.mx,
to view the
videos.
installation
Hi I'm Fluxy, I'll
help you to install
your product.
Installation Requirements Relation
Tub Height-Pressure
/ General Installation
ADVERTENCIA / WARNING
Este instructivo aplica al producto en cualquier acabado.
Height (h)
1Cierre el suministro de agua. / Closing off water supply.
Ubique y cierre las válvulas de suministro de agua.
Generalmente se encuentran debajo del lavabo. Si se trata de un
reemplazo de grifo, quite el grifo viejo y limpie completamente la
superficie del lavabo.
Locate and close the water supply valve.
Usually found under the sink. If it is a replacement faucet, remove
the old faucet and clean the entire surface of the sink.
Herramienta Requerida
perico desarmador de cruz llave de plomero
Herramienta Incluida en su Producto
/ Tools Included in your Product
aerator wrench
llave de aireador
screw driver plumber´s wrench
adjustable
wrench
/ Required Tools
Tritón
I se e la salid n e gade yn rt a elfre ro
ver f que ue col q e eli i q se o u
em aq e
p u ./In rt h u p t n t ese t eotuih
sink nd e that p a at.a ch ck l ce g ske
Inserte a rond a de f bra y enr sque l
l an i o a
tuerca para su etar la s ldajai.Insert t e
/ h
fi r washer and tighten he nut t hold
be t o
the ou put.
t
23
staaió liIn l c n Sa da /
4
2
I tala n F uctns l tio a e
Desenrosque la tuerca y retire el
empaque. / Unscrew the nut and remove
the packing.
aa ióu La r l
Inst l c n C erpotea
I ta a Si By
/ nsll tionde od
sta a ió u r La r lInl c n C e po tea/a la n i ya e
Inst l tioS de Bod Fuc t
i e a a a
Instalac ón d lsMnguers
/Installationof Hoses
t
nu
rondana
tuerca
wa he
srLim la su f
pie per icie.
lean he su face.
C t r
empaque
kipac ng
7
espárrago
output
unc erpo ce tral
central body
mangueras (incluidas)
ses i ude
ho ( ncl d)
6
p i e.A r et /
T h en
ig t.
empaque
acki gp n
tuerca
nut
ecutcheons
fib r
e
washer
Desenrosque el chapetón master
e inserte la rondana de fibra al
cuerpo lateral. Unscrew the
escutcheon master and insert the
fiber washer to the body side.
rondana
de fibra
chapetón
5
Coloque el cuerpo lateral con tuerca y rondana, considerando la altura necesaria para el correcto
funcionamiento de sus manerales, inserte la rondana y enrosque el chapetón, posteriormente
coloque el cuerpo maneral y enrosque el tornillo. / Place the side body with nut and washer,
considering the height needed for the proper functioning of their-handle, insert the washer and screw
the escutcheon, then place the body-handle and tighten the screw.
tnu
tuerca
rondana de hule
ua e
rbber w sh r
fibe was er
r h
4,8 cm
chapetón
rondana de fibra
handle
maneral
screw
tornillo
ehscutc eon
Enrosque el cuerpo cent al,a es árra o d la salidar l p g e ,
poste iormente enrosque l s ma guera incluidas) al cuerp
rans ( o
c ntral y a los cuerpos latera e .
el s / Scr w he central bo y, thee td
output stu , th n screw the hose include ) o the central ody
de ( dtb
and lateral bodies.
8
ín s e
l ea d
a m t ci
li en a ón
lines fedding
Abra el sumi stro de a y purgue l línea de a imentación.
ni gua a l/
Open the ater supply and pur the li feddi
w gue nes ng.
e
cali nte
hot
fría
o
c ld
4
rondana de
fibra
i r e
f be wash r
tuerca
nut
r ro
colo jo
red color azul
blue
/ Drain Installation
Opening the water supply.
10 Abra el suministro de agua.
Revise que no existan fugas
encima y debajo del lavabo.
Caliente
hot
Check for leaks up and
down the lavatory.
cold
Fría
Operación / Operation
a i e a a a
Instal c ón d lsMnguers
/Inst. of Hoses
9 Conecte las mangueras (no incluidas) a los cuerpos laterales y
posteriormente a la línea de alimentación. / Connecting hoses
(not included) to the lateral bodies and subsequently the supply
line.
mangueras
(no incluidas)
½-14-NPSM
válvula angular
( no incluida)
angle valve
(not nclud d)
i e
hoses
½-14-NPSM
(not included)
Instalación General / General Installation
1
2
11
La salida es giratoria./ The output is rotating. Para abrir , cer ar y r gu ar la temp ratu del a ua gire los
r e l e ra g
manera es inclu do )
l ( i s . / To o en close a d ad ust the wa er
p , n j t
t mperatur ,oer tan le (inc ded).
ee p aeh d s lu
Mantenimiento del Aireador
/ Maintenance Aerator
14
13
Desenrosque el aireador con la llave (incluida) y límpielo a
chorro de agua con un cepillo suave. / Remove the aerator with
wrench (included) and clean water jet with a soft brush.
aerator
llave para
aireador (incluida)
aireator wrench
(included)
aireador
Para purgar deje correr el agua caliente y fría durante al
menos 15 segundos cada una./ To purge flush hot and cold
water for at least 15 seconds each.
+ caliente
+ hot
+ cold
+ fría
3
4
01 55 53 33 94 00
Ext. 5804, 5805 y 5806 (0133) 36 19 01 13
Comunícate:
Participa en nuestros
cursos gratuitos
de capacitación.
(0181) 83 33 57 67
(0181) 83 33 61 78
In Guadalajara:
Contact:
Enter our free
training courses.
In Monterrey:
En la Ciudad de México:
In Mexico City:
En Monterrey:
En Guadalajara:
HELVEX, S. A. DE C.V. Calzada Coltongo 293, Col. Industrial Vallejo 02300 Del. Azcapotzalco, México, D.F. Tel. (55) 53-33-94-00.
Es muy importante seguir las siguientes instrucciones para conservar los
acabados de los
1. Utilice únicamente agua y un paño limpio.
2. No utilice fibras, polvos, abrasivos, ni productos químicos.
3. No utilice objetos punzo-cortantes para limpiar los acabados.
4. Se recomienda realizar la limpieza de su producto diariamente.
Nota: Vea nuestros tips en la pag. www.helvex.com.mx
productos HELVEX, con brillo y en perfecto estado:
It is very important to follow the instructions below to preserve HELVEX products
finishes, shiny and in perfect condition:
1. Use only water and a clean cloth.
2. Do not use fibers, powders, abrasives, or chemicals.
3. Do not use sharp objects to clean the finish.
4. It is recommended to clean your product daily.
Note: See our tips on: www.helvex.com.mx
Recomendaciones de Limpieza / Cleaning Recommendations
Mantenimiento / Maintenance
Posibles Causas y Soluciones/ Possible Causes and Solutions
Problema Causa Solución
La salida está floja. / The
output is loose.
La tuerca espárrago no está apretada./ The stud nut is
tight.
Apriete firmemente la tuerca espárrago (Pag. 2, paso 4). /
Tighten the stud nut (Page 2, step 4).
Hay fuga en las
conexiones. / There are
leaks in the connections.
Posiblemente no estén firmemente apretadas. / Possibly
not tight.
Apriete firmemente la conexión. (Pag. 3, paso 9) Instalación de
mangueras. / Tighten the connection. (Page 3, Step 9) Install
hoses.
Filtración en la parte
inferior. / Filtration at the
bottom.
El empaque de la salida no hace sello. / The gasket does
not seal out. Verifique la sujeción. / Check the attachment.
15 Enrosque nuevamente el aireador a la salida. / Screw
the aerator back on departure.
aerator
llave para
aireador
aireator wrench
aireador
16 Cierre el suministro de agua antes de comenzar, desenrosque el tornillo del
maneral, retire el maneral y desenrosque el valvex V. / Shut off water before
you start, unscrew the screw of the handle, remove the handle and unscrew
the Valvex V.
valvex V
valvex V
Mod.Sh-1012
empaque
gasket
maneral
handle
tornillo
crew
s
Cambio del Valvex
/ Change of Valvex

Other Helvex Plumbing Product manuals

Helvex AC10-8 User manual

Helvex

Helvex AC10-8 User manual

Helvex LAV MARCUS User manual

Helvex

Helvex LAV MARCUS User manual

Helvex PIU-101 User manual

Helvex

Helvex PIU-101 User manual

Helvex TH-058 User manual

Helvex

Helvex TH-058 User manual

Helvex 24-CH User manual

Helvex

Helvex 24-CH User manual

Helvex 1342-H User manual

Helvex

Helvex 1342-H User manual

Helvex ADARA E-312 User manual

Helvex

Helvex ADARA E-312 User manual

Helvex Explora HOT-106 User manual

Helvex

Helvex Explora HOT-106 User manual

Helvex 122 User manual

Helvex

Helvex 122 User manual

Helvex Bennu M-1007 User manual

Helvex

Helvex Bennu M-1007 User manual

Helvex 444 User manual

Helvex

Helvex 444 User manual

Helvex NUVA E-47 User manual

Helvex

Helvex NUVA E-47 User manual

Helvex SQUADRA E-711 User manual

Helvex

Helvex SQUADRA E-711 User manual

Helvex 24 User manual

Helvex

Helvex 24 User manual

Helvex U16105 User manual

Helvex

Helvex U16105 User manual

Helvex Century UE-928 User manual

Helvex

Helvex Century UE-928 User manual

Helvex 27 User manual

Helvex

Helvex 27 User manual

Helvex NUVA UTV-200 User manual

Helvex

Helvex NUVA UTV-200 User manual

Helvex 312-WC-4,8 User manual

Helvex

Helvex 312-WC-4,8 User manual

Helvex E-937 User manual

Helvex

Helvex E-937 User manual

Helvex ES-003 User manual

Helvex

Helvex ES-003 User manual

Helvex 110-WC-4.8 User manual

Helvex

Helvex 110-WC-4.8 User manual

Helvex Nuva TV-061-S User manual

Helvex

Helvex Nuva TV-061-S User manual

Helvex FB-185-19 User manual

Helvex

Helvex FB-185-19 User manual

Popular Plumbing Product manuals by other brands

Xylem Bell & Gossett Hoffman Speciality Series Engineering Data Manual

Xylem

Xylem Bell & Gossett Hoffman Speciality Series Engineering Data Manual

Kohler K-1997 Installation and care guide

Kohler

Kohler K-1997 Installation and care guide

Grohe 41735XX0 Specification sheet

Grohe

Grohe 41735XX0 Specification sheet

Spectrum Brands Pfister Arkitek R89-XLPM Quick installation guide

Spectrum Brands

Spectrum Brands Pfister Arkitek R89-XLPM Quick installation guide

IKEA SUNDSVIK manual

IKEA

IKEA SUNDSVIK manual

newform PARK 69785C instructions

newform

newform PARK 69785C instructions

KWC AQCT0050 2030007876 Installation and operating instructions

KWC

KWC AQCT0050 2030007876 Installation and operating instructions

American Standard 8413 installation instructions

American Standard

American Standard 8413 installation instructions

Pfister Iyla RT6-4TR Quick installation guide

Pfister

Pfister Iyla RT6-4TR Quick installation guide

Kessel Ultraflat 54 quick start guide

Kessel

Kessel Ultraflat 54 quick start guide

Toto Keane TB211DD Installation and owner's manual

Toto

Toto Keane TB211DD Installation and owner's manual

Graff G-4425-LM53 installation instructions

Graff

Graff G-4425-LM53 installation instructions

Luraco MAGNA JET user manual

Luraco

Luraco MAGNA JET user manual

Bradley S19-220DCRPT Installation

Bradley

Bradley S19-220DCRPT Installation

Spectrum Brands Pfister Verve LG6-1VRV Quick installation guide

Spectrum Brands

Spectrum Brands Pfister Verve LG6-1VRV Quick installation guide

Sterling Plumbing ACCLAIM 71090120 Specifications

Sterling Plumbing

Sterling Plumbing ACCLAIM 71090120 Specifications

KWC F3 ACSV2002 Installation and operating instructions

KWC

KWC F3 ACSV2002 Installation and operating instructions

Felton RW installation guide

Felton

Felton RW installation guide

manuals.online logo
manuals.online logoBrands
  • About & Mission
  • Contact us
  • Privacy Policy
  • Terms and Conditions

Copyright 2025 Manuals.Online. All Rights Reserved.