manuals.online logo
Brands
  1. Home
  2. •
  3. Brands
  4. •
  5. Helvex
  6. •
  7. Plumbing Product
  8. •
  9. Helvex UE-305 User manual

Helvex UE-305 User manual

1
UE-305
Semi-professional Kitchen Faucet with Two
Functions Spray Head
Monomando Semiprofesional de Cocina
con dos Funciones en el Cabezal
1,40
20 137,89
Model / Modelo
Minimum / Mínima Maximum / Máxima
kg/cm²
PSI kPa kg/cm²
PSI kPa
UE-305 5,624
80 551,58
Caution: Do not exceed the pressure of:
Precaución: No exceder la presión de: 8,788
125 861,84
2mm allen wrench
llave allen 2mm
adjustable
wrench
perico
teflón
plumber´s tape installation wrench
llave de instalación
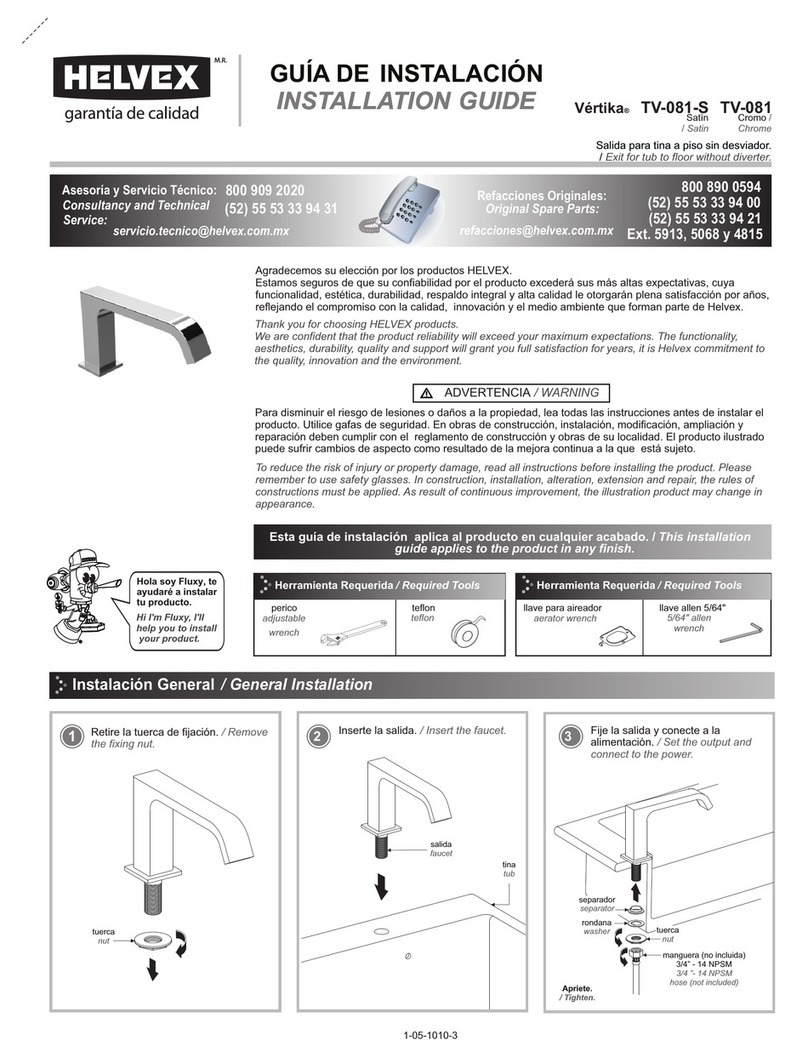
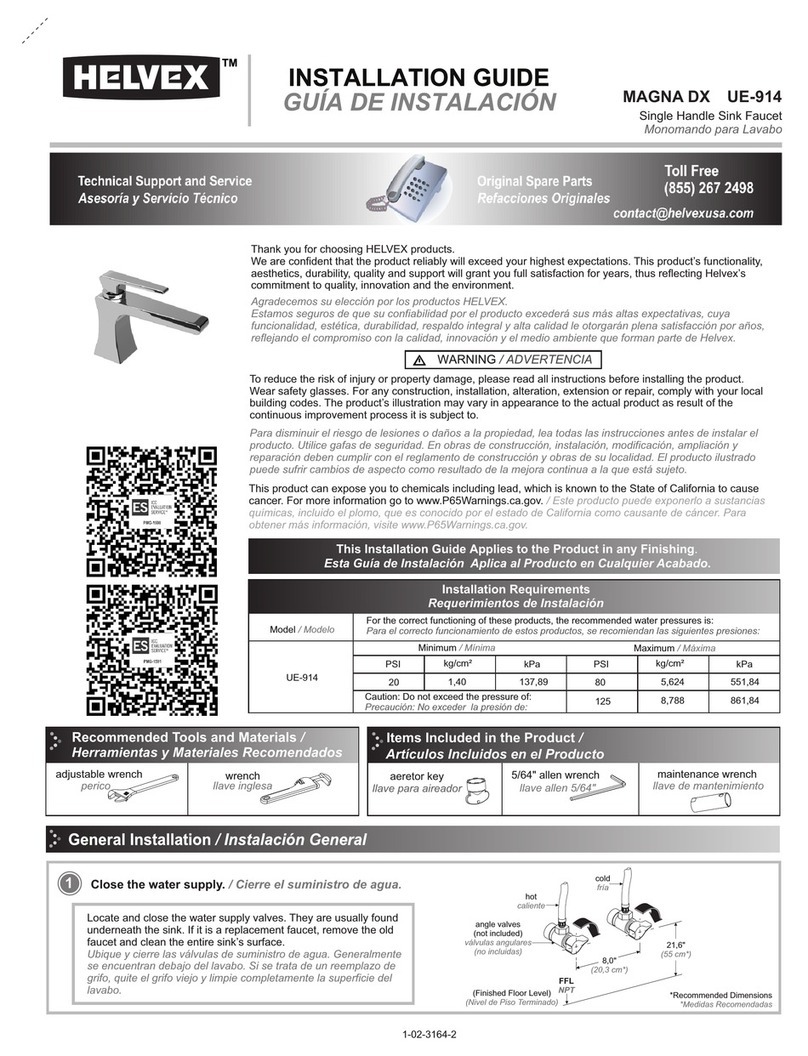
Close the water supply. / Cierre el suministro de agua.
1-02-3168-1
Locate and close the water supply valves. They are usually found
underneath the sink. If it is a replacement faucet, remove the old
faucet and clean the entire sink’s surface.
Ubique y cierre las válvulas de suministro de agua. Generalmente
se encuentran debajo del lavabo. Si se trata de un reemplazo de
grifo, quite el grifo viejo y limpie completamente la superficie del
lavabo.
cold
fría
hot
caliente
angle valves
(not included)
válvulas angulares
(no incluidas)
(Finished Floor Level)
(Nivel de Piso Terminado)
FFL
NPT
8,0"
(20,3 cm*)
21,6"
(55 cm*)
*Recommended Dimensions
*Medidas Recomendadas
Requerimientos de Instalación
Installation Requirements
This Installation Guide Applies to the Product in any Finishing.
Esta Guía de Instalación Aplica al Producto en Cualquier Acabado.
Items Included in the Product /
Recommended Tools and Materials /
Artículos incluidos en el Producto
Herramientas y Materiales Recomendados
This product can expose you to chemicals including lead, which is known to the State of California to cause
cancer. For more information go to www.P65Warnings.ca.gov. / Este producto puede exponerlo a sustancias
químicas, incluido el plomo, que es conocido por el estado de California como causante de cáncer. Para
obtener más información, visite www.P65Warnings.ca.gov.
Para disminuir el riesgo de lesiones o daños a la propiedad, lea todas las instrucciones antes de instalar el
producto. Utilice gafas de seguridad. En obras de construcción, instalación, modificación, ampliación y
reparación deben cumplir con el reglamento de construcción y obras de su localidad. El producto ilustrado
puede sufrir cambios de aspecto como resultado de la mejora continua a la que está sujeto.
To reduce the risk of injury or property damage, please read all instructions before installing the product.
Wear safety glasses. For any construction, installation, alteration, extension or repair, comply with your local
building codes. The product’s illustration may vary in appearance to the actual product as result of the
continuous improvement process it is subject to.
Agradecemos su elección por los productos HELVEX.
Estamos seguros de que su confiabilidad por el producto excederá sus más altas expectativas, cuya
funcionalidad, estética, durabilidad, respaldo integral y alta calidad le otorgarán plena satisfacción por años,
reflejando el compromiso con la calidad, innovación y el medio ambiente que forman parte de Helvex.
Thank you for choosing HELVEX products.
We are confident that the product reliably will exceed your highest expectations. This product’s functionality,
aesthetics, durability, quality and support will grant you full satisfaction for years, thus reflecting Helvex’s
commitment to quality, innovation and the environment.
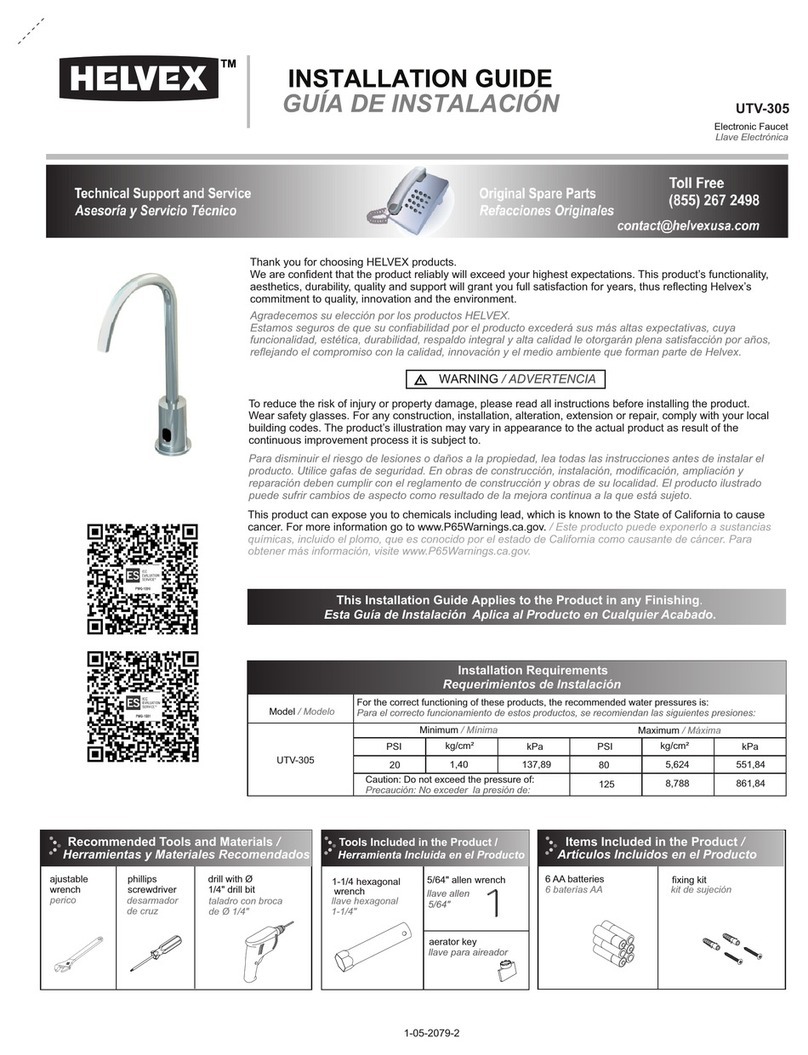
For the correct functioning of these products, the recommended water pressures is:
Para el correcto funcionamiento de estos productos, se recomiendan las siguientes presiones:
7
supply pipes
tubos de alimentación
Dimensions / Medidas
3
General Installation / Instalación General
4
Instalación de las Mangueras
Open the water supply and purge the
supply lines. / Abra el suministro de
agua y purgue la línea de alimentación.
5Insert the fixing plate and washer, screw
the nut (with the installation wrench
included) and the connectors (included).
/ Inserte la placa de fijación y la
rondana, atornille la tuerca (con la llave
de instalación incluida) y los conectores
(incluidos).
Hoses Installation /
6
Unscrew the nut to remove the washer. / Desenrosque la
tuerca para remover la rondana.
washer
rondana
nut
tuerca
gasket
empaque
fixing plate
placa de
sujeción
washer
rondana nut
tuerca
Open the water supply. / Abra el
suministro de agua.
supply lines
líneas de alimentación
connectors (included)
conectores (incluidos)
gasket
empaque
9
Operation / Operación
Check for leaks above and below the
sink. / Revise que no existan fugas
encima y debajo del lavabo.
caliente
hot
cold
fría
8
+ hot
+ caliente
open
abrir
+ cold
+ fría
hoses
(not included)
1/2"-14 NPSM x 1/2"-14 NPSM x 24"
mangueras
(no incluidas)
To open, tilt the lever. To adjust the
temperature, turn clockwise for hotter
and counterclockwise for colder. / Para
abrir, incline la palanca. Para regular la
temperatura, gire a la derecha para más
caliente y a la izquierda para más fría.
The recommended dimensions for installation are shown. / Se
muestran las medidas recomendadas para la instalación.
2
* 1,37"
Ø 3,5 cm
2,48"
6,3 cm
*Recommended Dimensions
*Medidas Recomendadas
sink
tarja
Insert the faucet into the sink and
check that the gasket is placed. /
Inserte la salida en el fregadero y
verifique que se coloque el empaque.
Screw the hoses (not included) to
the supply pipes and then to the
supply line. / Enrosque las
mangueras (no incluidas) a los
tubos de alimentación y
posteriormente a la línea de
alimentación.
supply lines
líneas de
alimentación
hot water
agua caliente
cold water
agua fría
2
3
Swipe your finger over the anti-scalant to remove the limescale.
/ Pase el dedo por encima de los anticalcáreos del cabezal
para eliminar el sarro.
Remove the aerator with a wrench (not included) and clean
with water and a soft brush. / Retire el aireador y límpie con
agua y un cepillo suave.
10 11 Remove the head from the support arm and turn right or left. /
Retire el cabezal del brazo soporte y gire a la derecha o
izquierda.
12 13
14
Remove the head from the support arm, select and press the
button to obtain the desired jet. / Retire el cabezal del brazo
soporte, seleccione y oprima el botón para obtener el chorro
deseado.
a) sprinkler button
a) botón regadera
b) aerator button
b) botón aireador
*When the water passage is
closed, the button returns to the
aerated jet. / *Al cerrar el paso
del agua, el botón regresa al
chorro aireado.
head
cabezal
Cartridge Replacement / Cambio del Cartucho
Unscrew the set screw from the handle with the allen wrench (included), remove the handle, unscrew the escutcheon and locknut, replace
the cartridge and reassemble. / Desenrosque el opresor del maneral con la llave incluida, retire el maneral, desenrosque el chapetón y la
tuerca de sujeción, cambie el cartucho y arme nuevamente.
escutcheon
chapetón
set screw
opresor
handle
maneral
locknut
tuerca de sujeción
cartridge
cartucho
a) sprinkler button
a) botón regadera
b) aerator button
b) botón aireador
Maintenance / Mantenimiento
gasket
empaque
aerator
aireador
gasket
empaque
body
barril
anti-scalant
anticalcáreos
Troubleshooting / Posibles Causas y Soluciones
There are leaks in the
connections. / Hay fuga
en las conexiones.
The faucet is loose.
/ La salida está floja The nut is not tightened. / La tuerca no está apretada. Tighten the nut firmly (page 2, step 5). / Apriete
firmemente la tuerca (pág. 2, paso 5).
Tighten the connections firmly (page 2, step 7) Hoses
installation. / Apriete firmemente la conexión (pág. 2, paso 7)
Instalación de las mangueras.
There is low water flow. /
Existe poco flujo de
agua.
Clogged aerator. / Aireador obstruido. Remove the aerator and clean it (page 3, step 12 and 13).
/ Retire el aireador y límpielo (pág. 3, paso 12 y 13).
Verify the pressure in the installation requirements (page 1).
/ Verifique la presión en los requerimientos de instalación
(pág. 1).
The operating pressure is not adequate. / La presión de
operación no es la adecuada.
Fully open the angle valves (page 2, step 8).
/ Abrir totalmente las válvulas angulares (pág. 2, paso 8).
Angle valves are not fully open. / Las válvulas
angulares no están totalmente abiertas..
Connections are possibly not firmly tightened. / Es
posible que las conexiones no estén firmemente
apretadas.
4
It is very important to follow the instructions below to preserve HELVEX products
finishings shiny and in perfect conditions:
1. Use only water and a clean cloth.
2. Do not use fibers, powders, abrasives, or chemicals.
3. Do not use sharp objects to clean the finishings.
4. It is recommended to clean your device daily.
Visit our website www.helvexusa.com
Es muy importante seguir las siguientes instrucciones para conservar los
acabados de los productos HELVEX, con brillo y en perfecto estado:
1. Utilice únicamente agua y un paño limpio.
2. No utilice fibras, polvos, abrasivos, ni productos químicos.
3. No utilice objetos punzo-cortantes para limpiar los acabados.
4. Se recomienda realizar la limpieza de su producto diariamente.
Visite nuestra página www.helvexusa.com
/ Recomendaciones de LimpiezaCleaning Recommendations
Toll free number / línea sin costo
(855) 267 2498
[email protected]

Other Helvex Plumbing Product manuals

Helvex EXPLORA E-705 User manual

Helvex

Helvex EXPLORA E-705 User manual

Helvex U16105 User manual

Helvex

Helvex U16105 User manual

Helvex ALFA UTV-297 User manual

Helvex

Helvex ALFA UTV-297 User manual

Helvex Kubica E-49 User manual

Helvex

Helvex Kubica E-49 User manual

Helvex Elegance 8124 User manual

Helvex

Helvex Elegance 8124 User manual

Helvex Ergo E-39 User manual

Helvex

Helvex Ergo E-39 User manual

Helvex TR-037 User manual

Helvex

Helvex TR-037 User manual

Helvex 313-38-4.8 User manual

Helvex

Helvex 313-38-4.8 User manual

Helvex KUBICA UTR-036 User manual

Helvex

Helvex KUBICA UTR-036 User manual

Helvex FORZA TV-304 User manual

Helvex

Helvex FORZA TV-304 User manual

Helvex MAXIMA E-713 User manual

Helvex

Helvex MAXIMA E-713 User manual

Helvex H3303-THD User manual

Helvex

Helvex H3303-THD User manual

Helvex Albatros HM-37 User manual

Helvex

Helvex Albatros HM-37 User manual

Helvex 110-WC-4.8 User manual

Helvex

Helvex 110-WC-4.8 User manual

Helvex LV FUTURA1 User manual

Helvex

Helvex LV FUTURA1 User manual

Helvex NUVA E-47 User manual

Helvex

Helvex NUVA E-47 User manual

Helvex Maxima E-712 User manual

Helvex

Helvex Maxima E-712 User manual

Helvex Liquida TV302-1.5 User manual

Helvex

Helvex Liquida TV302-1.5 User manual

Helvex MAGNA DX UE-914 User manual

Helvex

Helvex MAGNA DX UE-914 User manual

Helvex MEP-2004 User manual

Helvex

Helvex MEP-2004 User manual

Helvex 282-H User manual

Helvex

Helvex 282-H User manual

Helvex 122 User manual

Helvex

Helvex 122 User manual

Helvex TV-302 User manual

Helvex

Helvex TV-302 User manual

Helvex ARGOS UTV-296 User manual

Helvex

Helvex ARGOS UTV-296 User manual

Popular Plumbing Product manuals by other brands

Hans Grohe AXOR 26434180 Assembly instructions

Hans Grohe

Hans Grohe AXOR 26434180 Assembly instructions

American Standard Hampton 4770.702 SERIES repair parts

American Standard

American Standard Hampton 4770.702 SERIES repair parts

Reece MIZU Technical guide

Reece

Reece MIZU Technical guide

Hans Grohe AXOR Citterio Select 39860 Series Instructions for use/assembly instructions

Hans Grohe

Hans Grohe AXOR Citterio Select 39860 Series Instructions for use/assembly instructions

Elkay Ferrara LK7622 Specifications

Elkay

Elkay Ferrara LK7622 Specifications

Symmons ADACHS Operation & maintenance manual

Symmons

Symmons ADACHS Operation & maintenance manual

Sanela SLU 02BT Instructions for use

Sanela

Sanela SLU 02BT Instructions for use

Teal HYGIENIUS instruction sheet

Teal

Teal HYGIENIUS instruction sheet

BATHSELECT BS10101 installation instructions

BATHSELECT

BATHSELECT BS10101 installation instructions

Axor One 280 2jet 48499 Series Assembly instructions

Axor

Axor One 280 2jet 48499 Series Assembly instructions

Delta 3538 Series manual

Delta

Delta 3538 Series manual

Delta Pilar 980T-DST Series parts list

Delta

Delta Pilar 980T-DST Series parts list

Moen 10600 manual

Moen

Moen 10600 manual

Hans Grohe Accessories C 06091XX0 Specification sheet

Hans Grohe

Hans Grohe Accessories C 06091XX0 Specification sheet

Sterling Plumbing 71100116 Specification sheet

Sterling Plumbing

Sterling Plumbing 71100116 Specification sheet

Voda Plumbingware VDSR1 quick start guide

Voda Plumbingware

Voda Plumbingware VDSR1 quick start guide

Marco MIX 1000879FB instruction manual

Marco

Marco MIX 1000879FB instruction manual

Oras Medipro Series Installation and maintenance guide

Oras

Oras Medipro Series Installation and maintenance guide

manuals.online logo
manuals.online logoBrands
  • About & Mission
  • Contact us
  • Privacy Policy
  • Terms and Conditions

Copyright 2025 Manuals.Online. All Rights Reserved.