manuals.online logo
Brands
  1. Home
  2. •
  3. Brands
  4. •
  5. Helvex
  6. •
  7. Toilet
  8. •
  9. Helvex ATM User manual

Helvex ATM User manual

INSTALLATION GUIDE
GUÍA DE INSTALACIÓN
1-08-0877-1
Asiento Mecánico con Funciones Tipo
Bidet para Inodoro Elongando, Incluye
Antibacterial, Color Blanco. / Mechanical
Seat with Bidet Functions for Elongated
Toilet, Includes Antibacterial, White Color.
ATM
Hola soy Fluxy, te
ayudaré a instalar
tu producto.
Hi I'm Fluxy, I'll
help you to install
your product.
Especificaciones Técnicas / Technical Specifications
Para disminuir el riesgo de lesiones o daños a la propiedad, lea todas las instrucciones antes de instalar el
producto. Utilice gafas de seguridad. En obras de construcción, instalación, modificación, ampliación y
reparación deben cumplir con el reglamento de construcción y obras de su localidad. El producto ilustrado
puede sufrir cambios de aspecto como resultado de la mejora continua a la que está sujeto.
Agradecemos su elección por los productos HELVEX.
Estamos seguros de que su confiabilidad por el producto excederá sus más altas expectativas, cuya
funcionalidad, estética, durabilidad, respaldo integral y alta calidad le otorgarán plena satisfacción por años,
reflejando el compromiso con la calidad, innovación y el medio ambiente que forman parte de Helvex.
To reduce the risk of injury or property damage, read all instructions before installing the product. Please
remember to use safety glasses. In construction, installation, alteration, extension and repair, the rules of
constructions must be applied. As result of continuous improvement, the illustration product may change in
appearance.
ADVERTENCIA / WARNING
Esta guía de instalación aplica al producto en cualquier acabado. / This installation
guide applies to the product in any finish.
Thank you for choosing HELVEX products.
We are confident that the product reliability will exceed your maximum expectations. The functionality,
aesthetics, durability, quality and support will grant you full satisfaction for years, it is Helvex commitment to
the quality, innovation and the environment.
El aparato no debe utilizarse por personas
(incluyendo niños) con capacidades físicas
sensoriales o mentales reducidas, o carezcan
de experiencia o conocimiento, a menos que
reciban supervisión o capacitación.
Los niños deben supervisarse para que no
jueguen con el aparato.
The device should not be used by persons
(including children) with reduced physical
sensory or mental capabilities, or lack of
experience and knowledge, unless they
r e c e i v e s u p e r v i s i o n o r t r a i n i n g .
Children should be supervised to not play with
the appliance.
Installation
desarmador
plano
flat
screwdriver
Relación
Herramienta Requerida
Required Tools
guide applies to the product in any finish.
Accesorios Incluidos
Accessories Included
Caudal de Lavado Trasero /
Rear Wash Flow Rate 0.35 - 1.8 L/min / 0.09 - 0.47 gpm
Caudal de Lavado Femenino /
Lady Wash Flow Rate 0.35 - 1.8 L/min / 0.09 - 0.47 gpm
Suministro de Agua /
Water Supply Agua del Grifo / Tap Water
Presión de Trabajo /
Working pressure
Presión Mínima: 0,4 kg/cm² Presión Máxima 8,1 kg/cm² /
Minimum Pressure: 5,68 PSI Maximum Pressure 115,20 PSI
Precaución / Caution
No desmontar, reparar o remodelar el producto.
El suministro de agua debe ser agua del grifo en lugar de agua de lluvia o
agua gris. / Please do not disassemble, repair or remodel the product.
The water supply must be tap water rather than rain water, grey water or cycle
water.
[email protected]
Original Spare Parts:
Consultancy and Technical
(52) 55 53 33 94 31 (52) 55 53 33 94 00
Refacciones Originales:
Asesoría y Servicio Técnico:
Ext. 5913, 5068 y 4815
Service:
(52) 55 53 33 94 21
[email protected]
perico
adjustable
wrench
plantilla
template
Relación
Accesorios Incluidos Accessories Included/
tornillos
screw
tuercas tapón
plug nuts
armella
washer
tuercas de
plastico
plastic nuts
plato de
fijación
fixing plate
manguera
flexible
flexible hose
únion T
T shape
joint
Clasificación / Classification Descripción / Description
Componentes / Components
1. Manguera flexible (no incluida) / Flexible
hose (not included)
2. Union T / T shape joint
3. Válvula de ángulo / Angle valve
4. Manguera flexible / Flexible hose
5. Perilla / Knob
6. Boquilla de lavado femenino / Lady
wash nozzle
7. Boquilla de lavado trasero / Rear
wash nozzle
8. Borde del asiento / Seat rim
9. Tapa / Lid
10. Amortiguador / Buffer
10
9
8
7
6
5
4
3
2
1
2
1
2
23
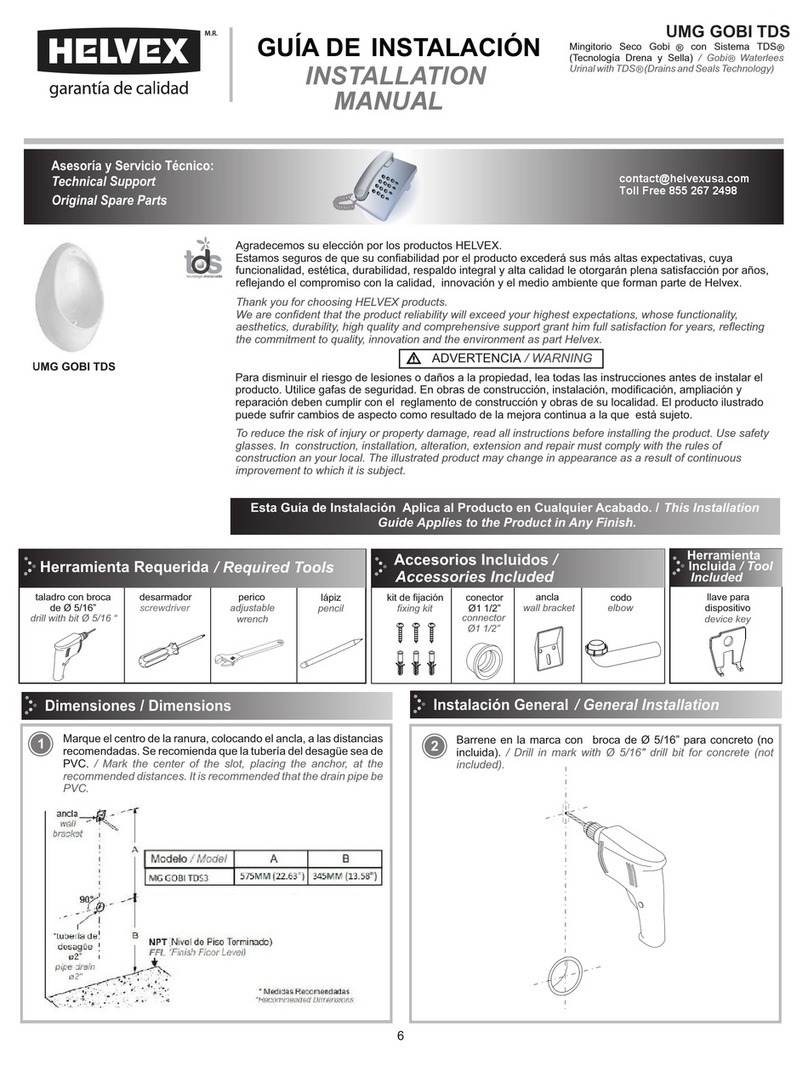
Instalación General / General Installation
2
456
Coloque la plantilla en los perfiles de
coincidencia de la taza entre el asiento del
bidet y la taza. / Place the template onto the
bowl matching profiles between bidet seat
and bowl.
Coloque la placa de fijación, las arandelas y
los tornillos en el recipiente en la abertura de
la plantilla. / Place the fixing plate, washers
and screws onto the bowl in the opening of
template.
Retire la plantilla e inserte el asiento del bidet
en la placa de fijación y empújelo hasta que
escuche un “click” / Remove the template and
insert the bidet seat onto the fixing plate and
push it to the end. it is fixed while you hear a
“click”.
2
789
Asegúrese de que el sello se mantenga en
la unión T y luego conectela a la válvula de
admisión / Make sure that flat seal kept in
the T shape joint and then connect it to the
inlet valve.
Conecte la manguera flexible (no incluida) a la
unión T y a la conexión de admisión de agua
del su tanque. / Connect the flexible hose (not
included) to the T-joint and the water inlet
connection of your tank.
Asegúrese de que el sello se mantenga en la
manguera flexible y luego conéctelo a la
unión T / Make sure that flat seal kept in the
flexible hose and then connect it to the T
shape joint.
Nota / Note:
1. Las tuercas de plástico no se muestran en el siguiente procedimiento. Las tuercas de plástico se usan
para la instalación inferior en lugar de las tuercas de tapón en el paso 2. / The plastic nuts are not shown in
below procedure. The plastic nuts are used for bottom installation instead of plug nuts in step 2.
2. El producto se puede conectar al suministro de agua caliente. Pero la temperatura del agua tibia debe
estar dentro de los 40°C. / The product can be connected to warm water supply. But the warm water
temperature must be within 40°C.
3. El límite de presión de suministro de agua es de 0.4 a 8.1 kg/cm². Si la presión del suministro de agua es
inferior a 0.71 kg/cm² (como el tanque de agua en la azotea), retire el regulador haciendo referencia a las
siguientes figuras. / The supply water pressure limit is from 5.68 a 115.2 PSI. If the water supply pressure is
lower than 10.0 PSI (such as the water tank on rooftop), please take out the regulator referring to below
figures.
regulador
regulator
Coloque las tuercas tapón en el orificio de
fijación del inodoro. / Put the plug nuts into the
fastening hole on bowl.
Instalación de ;mangueras / Hose Installation
2
Mantenimiento / Maintenance
10 Use un paño suave con detergente de cocina diluido para limpiar el
producto. Las siguientes cosas están prohibidas para la limpieza de
superficies: Detergente de cloruro de hidrógeno, diluyente de pintura,
benceno, papel abrasivo, crema para pulir, fragancia e insecticida, etc. /
Use a smooth sponge/cloth with diluted kitchen detergent to clean the
product. The following things are forbidden to use for surface cleaning:
Hydrogen chloride detergent, painting thinner, benzene, abrasive paper,
polishing agent, fragrance and insecticide, etc.
11 Para retirar el asiento mantenga la tapa cerrada. Presione el botón lateral
y tire del asiento del bidet a lo largo de la flecha que se muestra en la
figura / To remove the seat keep the lid closed. Push the button on side
and pull the bidet seat along the arrow shown in figure.
12 Saque la boquilla suavemente y use un paño suave o un cepillo de
dientes con detergente de cocina para limpiarla / Pull out the nozzle softly
and use cloth/sponge or toothbrush with kitchen detergent to clean it.
13 1. Saque la boquilla suavemente y sostenga el tubo. Retire la boquilla
a lo largo en la dirección de la flecha como en la figura A.
2. Sostenga el tubo e inserte la nueva boquilla a lo largo en la
dirección de la flecha como en la figura B / 1. Pull out the nozzle softly
and hold the tube. Remove the nozzle along the arrow direction as
figure A.
2. Hold the tube and insert the new nozzle along the arrow direction as
figure B.
Limpieza de la Boquilla / Nozzle Cleaning Reemplazar la Boquilla / Nozzle Replacement
14 1. Jale la vieja perilla a lo largo en la dirección de la flecha como en la
figura A. 2. Inserte la nueva perilla a lo largo en la dirección de la
flecha como en la figura B. / 1. Pull out the old knob along the arrow
direction as figure A. 2. Insert the new knob along the arrow direction
as figure B.
15 1. Gire la perilla para el modo lavado trasero / lavado de dama, retire el
regulador del tubo de entrada con la herramienta. 2. Inserte el nuevo
regulador en el tubo de entrada. Gire la perilla a la posición de no
funciona. / 1. Rotate the knob to be rear wash/lady wash, clip out the
regulator from the inlet tube with tool. 2. Insert the new regulator into the
inlet tube. Rotate the knob to non-working position.
Reemplazar la Perilla / Knob Replacement Reemplazar Regulador / Regulator Replacement
Nota: El regulador debe estar en la dirección correcta para que el agua pueda
atravesar. Note: The regulator must be in right direction which the water can get
throught.
Reemplazo de Regulador
Regulator Replacement
boquilla
nozzle
3
4
Es muy importante seguir las siguientes instrucciones para conservar los
acabados de los productos HELVEX, con brillo y en perfecto estado:
1. Utilice únicamente agua y un paño limpio.
2. No utilice fibras, polvos, abrasivos, ni productos químicos.
3. No utilice objetos punzo-cortantes para limpiar los acabados.
4. Se recomienda realizar la limpieza de su producto diariamente.
Visite nuestras páginas www.helvex.com.mx para México y www.helvex.com
para el mercado Internacional
It is very important to follow the instructions below to preserve HELVEX products
finishes, shiny and in perfect condition:
1. Use only water and a clean cloth.
2. Do not use fibers, powders, abrasives, or chemicals.
3. Do not use sharp objects to clean the finish.
4. It is recommended to clean your product daily.
Visit our pages www.helvex.com.mx for Mexico and www.helvex.com
for the International market.
Recomendaciones de Limpieza / Cleaning Recommendations
In Guadalajara:
Contact:
Enter our free
training courses.
In Monterrey:
En la Ciudad de México:
In Mexico City:
En Monterrey: En Guadalajara:
(52) 55 53 33 94 00
Ext. 5806, 5805 y 5804
33 36 19 01 13
Comunícate:
Participa en nuestros
cursos gratuitos
de capacitación.
81 83 33 57 67
81 83 33 61 78
HELVEX, S. A. DE C. V. Calzada Coltongo # 293, Col. Industrial Vallejo, Alcaldía Azcapotzalco, C. P. 02300, Ciudad de México.
Hecho en China
Posibles Causas y Soluciones / Troubleshooting
Problema / Problem Causas / Causes Solución / Solutions
El rociador de agua esta muy
bajo / The water spray too low
La apertura de la válvula no es suficiente / The valve opening is
not enough.
La presión del agua es inferior a 0.71 kg/cm² / The water
Pressure is lower than 10.0 PSI.
Gire la perilla a la posición máxima / Turn the knob to the max position.
Consulte el paso 2 para retirar el regulador de flujo. / Consult step 2 to
remove the flow regulator.
La válvula de cierre de agua está cerrada / The water shut-off
valve is turned off.
La boquilla está atascada / The nozzle is stuck
Abra la válvula de cierre de agua / Turn on the water shut-off valve.
Retire la boquilla y límpiela / Take off the nozzle and clean it.
El filtro en la manguera flexible está atascado / The filter screen
in flexible hose is stuck.
La presión del suministro de agua es demasiado bajo / The
water supply pressure is too low.
Limpie el filtro en la manguera flexible / Clean the filter screen in flexible
hose.
Aumente la presión externa de agua / Increase the external water
pressure.
No sale agua / No water
come out
El agua se escapa de la base
del bidet / Water leaks from the
bidet seat base part
La presión del suministro de agua es demasiado alta / The
water supply pressure is too high.
La presión máxima que puede soportar el producto es de 8.1 kg/cm² / The
maximum pressure that product can afford is 115.2 PSI.
Operación de Limpieza Trasera/Delantera / Rear/Front Cleaning Operation
17 Gire la perilla hacia atrás y el agua saldra por la boquilla para limpiar la parte frontal del cuerpo o hacia delante, para limpiar la parte posterior del
cuerpo. Regrese la perilla al centro para detener la limpieza. / Turn the knob back and the water will flow out of the nozzle to clean the front of the
body or forward, to clean the back of the body. Return the knob to the center to stop cleaning.
16
frontal
front
posterior
rear

Other Helvex Toilet manuals

Helvex WC DRAKAR User manual

Helvex

Helvex WC DRAKAR User manual

Helvex WC OP CAPRI User manual

Helvex

Helvex WC OP CAPRI User manual

Helvex WC-OPTION-AT2 User manual

Helvex

Helvex WC-OPTION-AT2 User manual

Helvex AT-5 User manual

Helvex

Helvex AT-5 User manual

Helvex WC MIURA 16 TCC User manual

Helvex

Helvex WC MIURA 16 TCC User manual

Helvex TZF NAO User manual

Helvex

Helvex TZF NAO User manual

Helvex WC AUSTRAL P User manual

Helvex

Helvex WC AUSTRAL P User manual

Helvex MG-MOJAVE User manual

Helvex

Helvex MG-MOJAVE User manual

Helvex TZF NAO PARED User manual

Helvex

Helvex TZF NAO PARED User manual

Helvex OP RIVOLI PLUS User manual

Helvex

Helvex OP RIVOLI PLUS User manual

Helvex MG Ferry User manual

Helvex

Helvex MG Ferry User manual

Helvex UMG GOBI TDS User manual

Helvex

Helvex UMG GOBI TDS User manual

Helvex OP CAPRI PLUS User manual

Helvex

Helvex OP CAPRI PLUS User manual

Helvex NAO W User manual

Helvex

Helvex NAO W User manual

Helvex WC OPTION User manual

Helvex

Helvex WC OPTION User manual

Helvex WC AUSTRAL L 2P User manual

Helvex

Helvex WC AUSTRAL L 2P User manual

Helvex WC 2.5 User manual

Helvex

Helvex WC 2.5 User manual

Helvex MG GOBI TDS User manual

Helvex

Helvex MG GOBI TDS User manual

Helvex WC MIURA16 User manual

Helvex

Helvex WC MIURA16 User manual

Helvex AT-4 User manual

Helvex

Helvex AT-4 User manual

Helvex AF-1 User manual

Helvex

Helvex AF-1 User manual

Helvex WC ULTRA 2P User manual

Helvex

Helvex WC ULTRA 2P User manual

Helvex WLU GOBI TDS User manual

Helvex

Helvex WLU GOBI TDS User manual

Helvex BOLMEN2 User manual

Helvex

Helvex BOLMEN2 User manual

Popular Toilet manuals by other brands

Kohler K-3575 Installation and care guide

Kohler

Kohler K-3575 Installation and care guide

Crosswater M-PRO US-PRO9005CW manual

Crosswater

Crosswater M-PRO US-PRO9005CW manual

Separett Tiny 1270 user manual

Separett

Separett Tiny 1270 user manual

Kohler novita K-BH90-N0 installation guide

Kohler

Kohler novita K-BH90-N0 installation guide

National Toilet Partitions HD-8122 installation manual

National Toilet Partitions

National Toilet Partitions HD-8122 installation manual

Swiss Madison SM-WT555 installation instructions

Swiss Madison

Swiss Madison SM-WT555 installation instructions

enware 6861 Series Installation and maintenance instructions

enware

enware 6861 Series Installation and maintenance instructions

noken NK CONCEPT 100130998 N312140106 installation instructions

noken

noken NK CONCEPT 100130998 N312140106 installation instructions

Separett Tiny 1270-01 installation manual

Separett

Separett Tiny 1270-01 installation manual

Scarabeo Moai 8604 manual

Scarabeo

Scarabeo Moai 8604 manual

STOREMIC SMBTC01 instruction manual

STOREMIC

STOREMIC SMBTC01 instruction manual

Uberhaus EL103-3 installation instructions

Uberhaus

Uberhaus EL103-3 installation instructions

Hornbach MANDARA 10475208 Assembly instructions

Hornbach

Hornbach MANDARA 10475208 Assembly instructions

Dometic CT 4110 installation manual

Dometic

Dometic CT 4110 installation manual

TRONE Aquatina III A3ETBCERN-12.WH installation manual

TRONE

TRONE Aquatina III A3ETBCERN-12.WH installation manual

nashi OVIAN PLUS instruction manual

nashi

nashi OVIAN PLUS instruction manual

Kohler Hyten K-25875 manual

Kohler

Kohler Hyten K-25875 manual

Jungborn DIO 59 Assembly instruction

Jungborn

Jungborn DIO 59 Assembly instruction

manuals.online logo
manuals.online logoBrands
  • About & Mission
  • Contact us
  • Privacy Policy
  • Terms and Conditions

Copyright 2025 Manuals.Online. All Rights Reserved.