Es muy importante seguir las siguientes instrucciones para conservar los
acabados de los productos HELVEX, con brillo y en perfecto estado:
1. Utilice únicamente agua y un paño limpio.
2. No utilice fibras, polvos, abrasivos, ni productos químicos.
3. No utilice objetos punzo-cortantes para limpiar los acabados.
4. Se recomienda realizar la limpieza de su producto diariamente.
Nota: Vea nuestros tips en la pag. www.helvex.com.mx
It is very important to follow the instructions below to preserve HELVEX products
finishes, shiny and in perfect condition:
1. Use only water and a clean cloth.
2. Do not use fibers, powders, abrasives, or chemicals.
3. Do not use sharp objects to clean the finish.
4. It is recommended to clean your product daily.
Note: See our tips on: www.helvex.com.mx
Recomendaciones de Limpieza / Cleaning Recommendations
Posibles Causas y Soluciones / Troubleshooting
In Guadalajara:
Contact:
Enter our free
training courses.
In Monterrey:
En la Ciudad de México:
In Mexico City:
En Monterrey:
En Guadalajara:
01 55 53 33 94 00
Ext. 5804, 5805 y 5806 (0133) 36 19 01 13
Comunícate:
Participa en nuestros
cursos gratuitos
de capacitación.
(0181) 83 33 57 67
(0181) 83 33 61 78
Realice la limpieza como acostumbra
con agua, jabón cloro, etc. / Perform
cleaning as usual with water, chlorine
soap, etc.
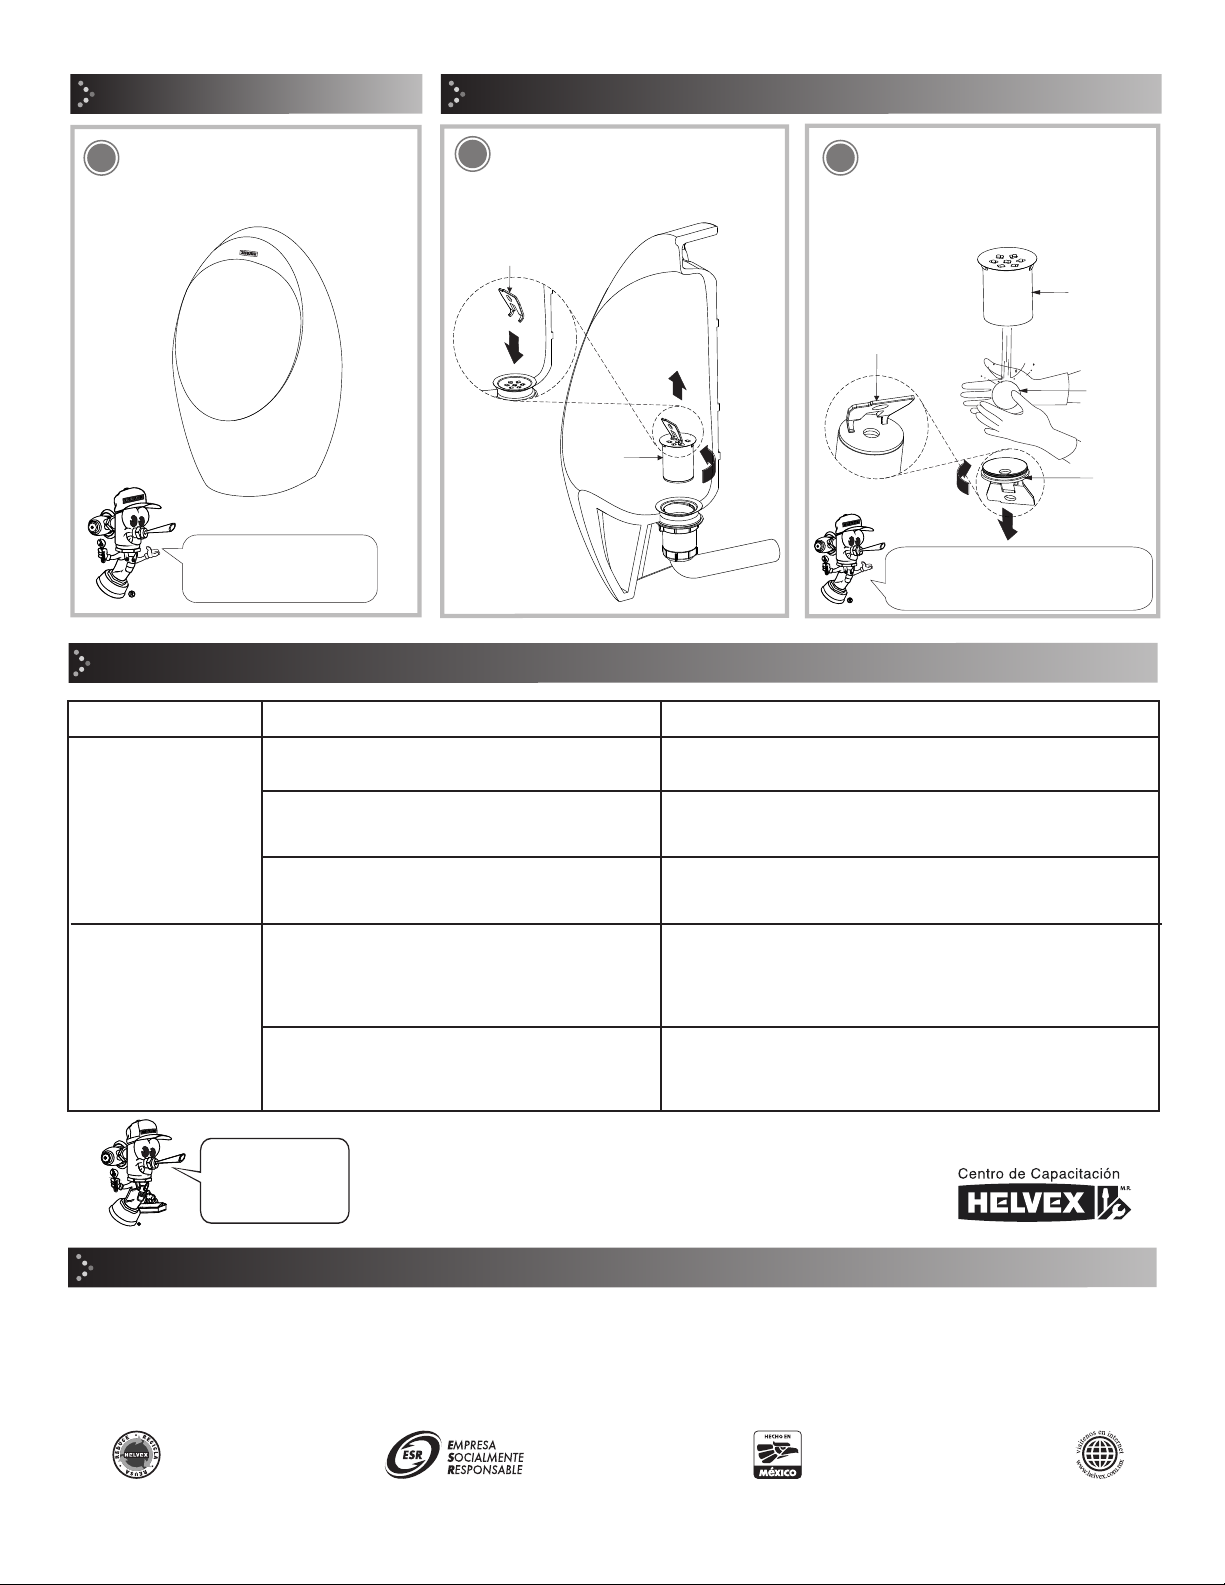
Limpieza / Cleaning
20 Desenrosque y retire el cartucho con la
ayuda de la llave para dispositivo. /
Unscrew and remove the cartridge with
the help of the device key.
21 Desenrosque y retire la base del
cartucho. Limpie todos los componentes
con agua y jabón, arme nuevamente. /
Unscrew and remove the base of the
cartridge. Clean all components with
soap and water, reassemble.
22
Utilice fibras suaves
para evitar rayar
la cerámica del mueble. / Use
soft fibers to avoid scratching
the furniture's ceramics.
cartucho
cartridge
llave para dispositivo
device key
cartucho
cartridge
esfera
sphere
base
base
HELVEX, S. A. DE C. V. Calzada Coltongo # 293, Col. Industrial Vallejo, Del. Azcapotzalco, C. P. 02300, Ciudad de México.
En caso de incrustaciones acumuladas,
utilice una fibra suave, evitando rallar la
superficie. / In case of accumulated
incrustations, use a soft fiber, avoiding
grating the surface.
llave para dispositivo
device key
Problema / Problem Solución / Solution
Causa / Cause
Mal olor. / Bad Smell.
Los líquidos se quedan
estancados.
/ Liquids get stuck.
La esfera del cartucho no está sellando. /
The cartridge sphere is not sealing.
No colocó el conector ó está mal instalado.
/ Did not fit the connector or is incorrectly installed.
No se encuentra la esfera dentro del cartucho. /
The sphere can not be found inside the cartridge.
Acumulación de sedimentos u objetos en el dispositivo
y/o en la tubería. / Accumulation of sediments or
objects in the device and / or in the pipeline.
La inclinación del codo no es la adecuada para el
desalojo del dispositivo. / The inclination of the elbow
is not suitable for eviction of the device..
Retire el cartucho y lave sus componentes (pag. 4, paso 21, 22). /
Remove the cartridge and wash its components (page 4, step 21, 22).
Coloque el conector (pag. 2, paso 5) ó verifique la correcta
instalación. / Insert the connector (page 2, step 5)
or check the correct installation.
Coloque la esfera dentro del cartucho (pag. 4, paso 21, 22 ).
/ Place the sphere into the cartridge (page 4, step 21, 22).
Retire el dispositivo, lave sus componentes y vierta sarricida para
destapar la tubería (pag. 4) o realice un mantenimiento mecánico
a la tubería. / Remove the device, wash its components and pour it
to remove the pipe (page 4) or perform mechanical maintenance
on the pipe.
Desinstale el mingitorio y presente nuevamente, (Ajuste de
Instalación pag. 3). / Uninstall the urinal and present again,
(Installation Adjustment page 3).
Mantenimiento / Maintenance
4